


快速操作手册
Quick guide
クイック・ガイド


目录
Table of Contents
目次
|
中文
EN
日本語
包装内容
按键功能
安装 TF 卡
电源
升级
运动臂带组装
蓝牙播放使用说明
注意事项
Package content
Key Denitions
Install the TF card
Power
Firmware update
Assembly of arm belt for sport
Bluetooth
Notes
内容物
各キーの名称と機能
TF カードを取り付けます
電源
ファームウェアのアップデート
スポーツ用アームベルトの取り付け
ブルートゥース
注意


快速操作手册
CH
主机
快速操作手册
Quick guide
クイック・ガイド
快速操作手册
运动臂带
快速操作手册
Quick guide
クイック・ガイド
保修说明
USB数据线(电源线)

CH
按键功能
(01)
(02)
(03)
(04)
(12)
(05)
(06)
(07)
(13)
(08)
(14)
(09)
(10)
(11)
(01)
线路输出 /SPDIF 光纤输出
(02)
耳机输出
(03)
平衡式耳机输出(2.5mm)
(04)
阻抗选择(高 / 低)
(05)
音量增大
(06)
音量减小
(07)
下一曲 / 快进
(08)
上一曲 / 快退
(09)
数字转盘
(10)
播放 / 暂停 / 确认(播放界面中长按可切换屏幕信息)
(11)
增益选择(高 / 低)
(12)
显示屏
(13)
Music/Fn
(14)
返回 / 设置
(15)
ATE/PMEQ 音效
(16)
锁屏 / 电源
提示:(13)(14)(15)三个按键 , 短按为“/”左侧功能,
长按为“/”右侧功能。
(15)
(16)

安装 TF 卡
1、装入 TF 卡(如图示一)
图示一
按壳体标识方向将 TF 卡插入卡槽,轻推至听到
卡座锁定声后松手,TF 卡安装完成。
2、取出 TF 卡(如图示二)
图示二
轻推 TF 卡至听到卡座声响后缓慢松手,TF 卡
弹出约 3mm,直接取卡即可。
CH
提示:
1)本机需要插入 TF 卡才可正常开机,机器本身无内存容量。
2)本机最大支持 2TB 的 TF 卡。
3)本机支持 FAT32/ exFAT 格式的 TF 卡,建议将 TF 卡插入本
机进行格式化后再正常使用。
4)请勿强行抽取 TF 卡,强行取卡可能造成 TF 卡座的损伤或
损坏。
5)运动臂带支架内可存放四张 TF 卡,请按照标识方向存放。

CH
电源
1、打开本机
播放器关闭时,长按 " 电源键 ",可启动本机。
播放器开启状态时 , 短按 " 电源键 " 可激活或者关闭液晶显示屏。
当液晶显示屏关闭时,只有 " 电源键 "、" 音量 +"、" 音量 -" 三
个按键功能可用。
建议长时间欣赏音乐时关闭液晶显示屏 ,以提高播放器续航能力。
2、关闭本机
1) 播放器为开启状态且屏幕点亮时,长按 " 电
源键 ",可关闭本机;
2) 播放器为开启状态但屏幕熄灭时,先短按 "
电源键 " 激活屏幕后,再长按 " 电源键 ",可关
闭本机。
3、充电
通过电源适配器将本机连接至 220V 电源,机器
开始自动充电。
本机通过 USB 3.0 端口对电池进行充电。
充电时播放功能:本机外接电源适配器,可为供电电路与充
电电路同时供电。因此您可以选择在充电时播放歌曲,不影响
电池充电 ( 充电时间与电源适配器输出功率相关 )。
提示:电源适配器需另行购买。

升级
1、请保持本机电量高于 20% 时进行升级。若
电量低于 20%,请您先补充电量,再进行系统
升级;
2、登陆乐图lotoo 官网www.lotoo.cn,进入
下载页面。下载最新固件,并将压缩包内的
“PAW5KMK2.COE”文件拷贝到本机 TF 卡根
目录下;
3、进入设置,点击【菜单 > 系统设置 > 系统升
级】。等待系统升级完成。正确的升级将执行
以下过程:
读取升级文件 . . . 校验成功,开始升级 ...
CH
升级中 . . .
关机
升级成功!
4、正确升级后,机器将自动关机。再次开机,
您可以在【菜单 > 系统设置 > 系统信息】中查
看最新的软件版本号。

CH
运动臂带组装
1、如下图所示,将臂带有大面积尼龙搭扣一面
朝外,从支架左侧穿入,然后从右侧穿出;
尼龙搭扣绒面 尼龙搭扣勾面
2、如下图所示,将臂带往右侧拉至尼龙搭扣绒
面完全露出支架右侧,将臂带整理入支架扣下;
支架
将臂带整理
入支架扣下
尼龙搭扣绒面
3、将整机底端斜插入支架底端,使支架下方的
两个卡钩卡入整机底端凹槽,将整机上端卡入
卡钩。
注意:播放器安装在支架上存放时会造成播放器损坏!当不使
用运动臂带功能时,请将播放器从臂带支架上取下。

蓝牙播放使用说明
1、长按 进入设置菜单,并打开【蓝牙设置】
选项,如图一;
SETUP
播放设置
系统设置
蓝牙设置
运动模式设置
Fn 键自定义
图一
2、进入【蓝牙开关】选项并选择【开】,如图二、三;
SETUP
蓝牙开关
蓝牙列表
96%
96%
SETUP
开
关
96%
CH
图二
图三
3、短按 返回上一层菜单,进入【蓝牙列表】,
如图四;
SETUP
蓝牙开关
蓝牙列表
96%
图四
4、打开蓝牙音箱或耳机的配对模式,在【蓝牙列表】
中选择【扫描新设备】,如图五、六;
BLUETOOTH
扫描新设备
图五
96%
正在扫描 . 20
停止
图六

CH
5、屏幕上会显示可连接的蓝牙设备,当发现设备后可
按确认键停止扫描,如图七;
正在扫描 . . 19
H300
停止
图七
6、选中蓝牙设备名称,按确认键进行配对并连接,
如图八、九;
BLUETOOTH 2/2
扫描新设备
H300 已配对
图八
7、当设备右侧显示“已连接”,说明连接成功,
如图十;
BLUETOOTH 2/2
扫描新设备
H300 已连接
96%
连接中 ..
取消
图九
96%
图十
8、连接成功后,即可通过蓝牙设备聆听音乐;
注意事项
1、产品安全
·请勿自行拆卸本机,否则可能会导致损坏或故障;
·请勿在雷电天气里使用本机,否则可能会造成损坏;
·请勿在尘土或烟雾较多的地区使用本机,否则可能会导致损坏
或故障;
·请勿摔打本机以及其附件产品,否则可能造成严重损坏或故障;
·请勿用化学溶剂或洗涤剂清洁本机,否则可能造成损坏;
·请勿将本机靠近强磁性的物质,否则可能会导致损坏或故障;
·请勿将重物放置于本机上,否则可能会导致损坏或故障;
·请勿在可能遭受水滴、水溅或湿气过重的环境中使用本机,否
则可能会造成电路损坏或燃烧;
·请勿在本机上放置诸如花瓶一类的装满液体的物品,否则可能
会造成电路损坏或燃烧。
2、电池安全
·请勿将本机置于火中,或加热本机,否则可能会造成电池爆炸;
·若电池有高温发热的现象,请立即停止使用,否则可能造成损
坏;
·只能用同样类型或等效类型的电池来更换,如果电池更换不当
会有爆炸危险。
3、听力安全
·当进行耳机和线路输出的插入和拔出动作前,
请先停止音乐播放,并将播放音量调至最小;
CH
EN
Quick guide
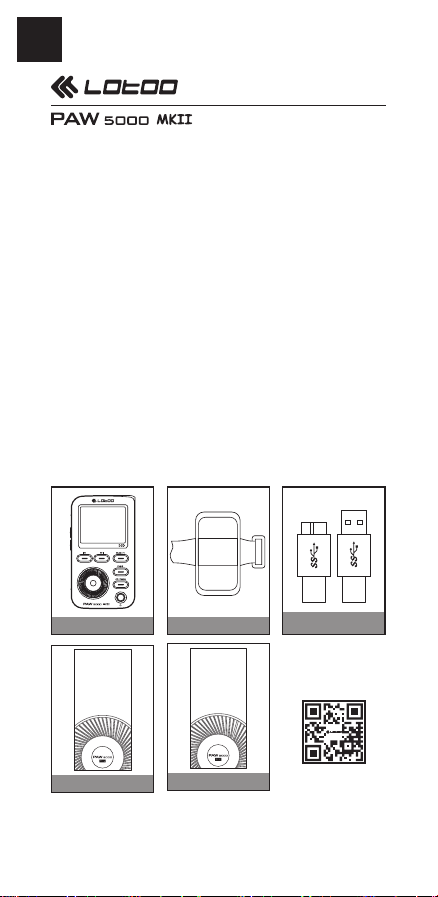
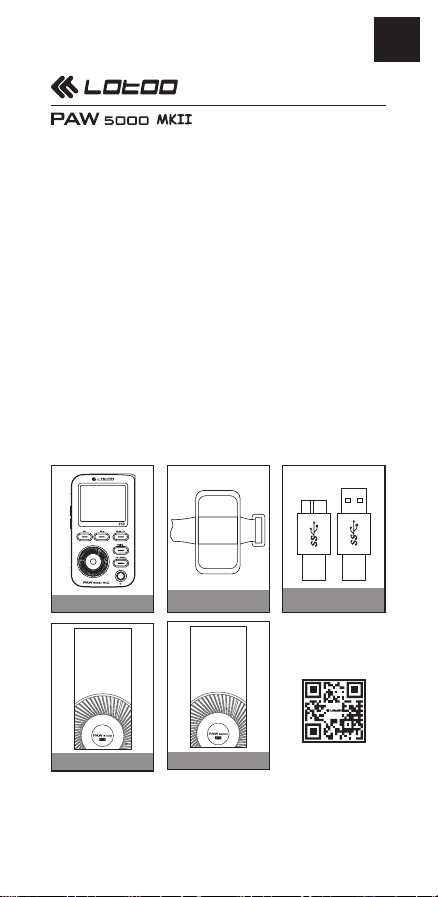
Package content
The package includes following accessories
(The quantity for each accessory is one).
Please carefully verify when purchasing. If
anything absent, please contact with the device
supplier timely.
Player Sport arm belt
快速操作手册
Quick guide
クイック・ガイド
Quick guide
Notes: Lotoo ocial website supply electronic version of the
User manual book and fast setup.
快速操作手册
Quick guide
クイック・ガイド
Warranty card
USB cable
(Power cable)
Please visit www.lotoo.cn and download.

Key functions
(01)
(02)
(03)
EN
(04)
(12)
(05)
(06)
(07)
(13)
(08)
(14)
(09)
(10)
(11)
(01)
Line output /SPDIF Optical ber output
(02)
Headphone output
(03)
Balance type headphone output ( 2.5mm )
(04)
damp ( high/low )
(05)
Volume up
(06)
Volume down
(07)
Next/Fast forward
(08)
Previous/Fast reverse
(09)
Jogdial
(10)
Play/ OK
(11)
Gain(high/low)
(12)
Liquid crystal display
(13)
Music/Fn(long press)
(14)
Return/Setup(Long press)
(15)
ATE/PMEQ music eects
(16)
Power/lock Screen
Notes: the buttons of (13) (14) (15), short press will show you
the left functions of buttons, long press will show you the right
functions of buttons.
(15)
(16)

EN
Install the TF card
1. Inserting the TF card(As shown in
gure1)
Insert the TF card into the slot according to the
shell logo direction, push to hear "beep" sound
and release. Then the TF Card is installed.
2. Pull out the TF card(As shown in
gure 2)
Figure 1
Figure 2
Gently push the TF card bottom to hear "Di"
sound, then slowly let go. You can see TF Card
pops up about 3mm. then you can directly take
the card.

Notes:
1) The device will turn on normally when the TF card is
inserted. The device if self hasn't memory capacity.
2) Theoretically, the device can support TF card with 2T
capacity maximum.
3) The device can support the TF card with FAT32/ exFAT
format. So we advise: When inserting the TF card, please
format it rst before use.
4) When inserting or pulling out the TF card, please be gentle,
otherwise it may cause damage to the TF card.
5) You can place four TF cards into the moving arm belt's
bracket. Please follow the direction of identication.
Power
1. Power on
When powered o, long press “POWER” to
turn on the device.
When powered on, short press “POWER” to activate or turn
o the screen. When the screen is turned o, you can only
operate the “POWER”, ”Volume+”, and ”Volume-” button.
Advice: when you play music long time, please turn o the
screen to improve this player's endurance performance.
EN
2. Power o
1) The player is turned on and the screen is

EN
lighted, long press “POWER”. And it will turn
o.
2) The player is turned on and the screen
is out, rstly press “POWER” to activate the
screen. Then long press “POWER”, you can
turn o the device.
3. Recharge
This device will recharge automatically when
connect to 220V power supply with the power
adapter. When the player is o, long press
<power > to turn on the device.
Playing while charging: The externally connected power
adapter can supply power to the device while charging the
Lithium battery. Therefore, you can choose to play music when
charging the Lithium battery, which has no inuence on the
charging performance.
Notes: you need buy the power adapter separately.
Firmware update
1. To update, please make sure that the battery
is higher than 15%. If not, please charge it
rst;
2. Please visit the Lotoo ocial website
www.lotoo.cn, enter the download page.

Download the latest rmware, and copy
the "PAW5KMK2.COE" le inside the
compressed package to the root of TF card;
3.
Enter the settings, click【Menu>System
settings>System update】. Then wait for the
completion of update The correct update will
perform the following process
:
EN
Read the update
file
Updating
Turn o
Check successfully,
start to update
Update successfully
4. After the correct update, the machine will
turn o automatically. turn it on again, you
can check the latest software version
number at【Menu>System settings >System
information】.

EN
Assembly of arm belt for
sport
1. As showing below, let the arm belt's large
area of Velcro side outwards, penetrating from
left side, penetrating from the right side;
Bracket
Nylon hasp loop side
Nylon hasp hook side
2. As showing below, pull out the arm belt (from
the right side) to the nylon hasp loop side and
show the bracket's right side. Then arrange the
arm belt below the bracket;
Below the bracket
Nylon hasp loop side

3. Please insert obliquely this device’s bottom
into the end of the bracket. And snap two card
hook below the bracket into the groove of
device’s bottom. Then snap the upper end of
this device into card hook.
Notes:
This device will be damaged if you place it at the bracket.
Please take the device o from the bracket when you don’t use
the sport arm belt.
Bluetooth
1. Long press to enter into SETUP
menu, then click【System settings>Bluetooth
settings】as shown in Figure 1;
SETUP
Play settings
System settings
Bluetooth settings
Sport mode settings
Fn key definition
Figure 1
96%
EN
2. Select【Bluetooth switch】, press【OK】
and set it to【ON】, as shown in Figure 2, 3;
SETUP
Bluetooth switch
List of bluetooth
Figure 2
96%
SETUP
On
Off
Figure 3
96%

EN
3. Short press to back to the previous
menu, enter into【List of bluetooth】, as
shown in Figure 4;
SETUP
Bluetooth switch
List of bluetooth
Figure 4
96%
4. Power on your Bluetooth headphone or
speaker, and activate the pairing mode. Select
【
scan for new device】on PAW 5000, as
shown in Figure 5, 6;
BLUETOOTH
Scan for new device
Figure 5
96%
Scanning... 20
Stop
Figure 6
5. When you see the name of your device,
press【OK】to stop the scanning, or wait till
the scanning nish after some seconds, as
shown in Figure 7;
Scanning... 19
H300
Stop
Figure 7

6. Select on the device name and press 【OK】
to connect, as shown in Figure 8, 9;
BLUETOOTH 2/2
Scan for new device
H300 Paired
Figure 8
96%
Connecting..
Cancel
Figure 9
7. When it shows ”connected” at the right of the
device. The connection is done, as shown in
Figure 10.
BLUETOOTH 2/2
Scan for new device
H300 Connected
Figure 10
96%
8. When the connection is completed, you can
enjoy your music with Bluetooth.
EN
Notes
1. Devices safety operations
• Please do not disassemble the device. Otherwise it may
cause damage for the device.
• Please do not use this device in the lightning weather.
Otherwise it may bring you some harms.
• Please do not use the device in heavy dust or smoke areas.
Otherwise it may cause damage or malfunction.

EN
• Please do not beat this device and its accessories. Otherwise
it may cause serious damage or malfunction.
• Please do not clean this device with Chemical solvent or
detergents. Otherwise it may cause damages.
• Please do not let this device close to strong magnetic
material. Otherwise it may cause serious damage or
malfunction.
• Please do not place heavy things on the device. Otherwise it
may cause damage or malfunction.
• Please use this device in excessive moisture environment.
Otherwise it may cause damage to the circuit.
2. Battery safety operations
• Please do not place the battery in re or heat the battery.
Otherwise the battery may explode.
• If there is a high temperature heating phenomenon on the
battery, please stop using it immediately.
• Risk of explosion if battery is replaced by an incorrect type.
• Dispose of used batteries according to the instructions.
Otherwise it may bring you damages.
3. Volume safety operations
• To prevent possible hearing damage. Do not listen at high
volume levels for long periods.
• Fully understand user manual before use.
• Ensure your player at low volume levels
or power o before.
クイック・ガイド
内容物
このパッケージには以下の付属品が入ってい
ます。ご購入時に確認いただき、もしも入っ
ていないものがございましたら、ご購入店に
ご連絡ください。
JP
プレーヤー本体
快速操作手册
Quick guide
クイック・ガイド
クイック・ガイド
スポーツ・アーム・
ベルト
快速操作手册
Quick guide
クイック・ガイド
保証書
USB ケーブル
注 : lotoo の公式ウェブサイト (lotoo.jp) に電子
版ユーザマニュアルと簡易セットアップ方法を掲載
しております。

JP
各ボタンの名称と機能
(01)
(02)
(03)
(04)
(12)
(05)
(06)
(07)
(13)
(08)
(14)
(09)
(10)
(11)
ライン出力/ SPDIF 光出力
(01)
ヘッドフォン出力
(02)
バランス・ヘッドフォン出力(2.5mm TRRS)
(03)
DAMP(ハイ/ロー)
(04)
ボリューム・アップ
(05)
ボリューム・ダウン
(06)
次曲/早送り
(07)
前曲/早戻し
(08)
ジョグダイアル
(09)
再生/ OK
(10)
ゲイン(ハイ/ロー)
(11)
液晶ディスプレイ
(12)
音楽/ファンクション(長押し)
(13)
戻る/設定(長押し)
(14)
ATE / PMEQ 音響効果(長押し)
(15)
電源/スクリーン・ロック
(16)
ヒント:(13),(14),(15) ボタンは 短押しで左側、長押し で右
側の機能になります
(15)
(16)

micro SD カードの挿入
1.micro SD カードを挿入(Figure1)
筐体に印刷されている向きで micro SD カード
を挿入します。押し込んで「カチッ」という
音が聞こえたら指を離します。
Figure 1
2.micro SD カードを取り(Figure2)
micro SD カードを静かに押して「カチッ」と
いう音が聞こえたらゆっくりと指を離します。
micro SD カードが 3mm ほど飛び出てくるので、
そのまま取り出してください。
JP
Figure 2
補足:
1.micro SD カードを挿入すると、プレーヤーの電源

JP
が自動的にオンになります。プレーヤー本体にメ
モリーは内蔵されていません。
2. 理論的には、このプレーヤーは最大 2 TB までの
micro SD カードをサポートしています。
3. このプレーヤーは FAT32/exFAT フォーマッの
micro SD カードをサポートしています。新しい
micro SD カードを挿入する時は、先にフォーマ
ットしてください。
4. micro SD カードを挿入したり抜いたりする時は、
丁寧に行ってください。乱暴に扱うとカードが破
損することがあります。
5. 移動用のアームベルトのブラケットに 4 枚まで
micro SD カードを収納することができます。
電源
1. 電源オン
プレーヤーの電源がオフの状態から電源をオ
ンにするには、「POWER」ボタンを長押しします。
電源がオンの時に画面表示をオン/オフにするには、
「POWER」ボタンを短押しします。画面表示がオフの
時には、「POWER」、「Volume +」、「Volume -」
ボタン以外は使うことができません。
補足:音楽を長時間再生する時には、画面表示をオ
フにすることでバッテリーの持ちを延ばすことがで
きます。

2. 電源オフ
1) 電源がオンでスクリーン表示もオンになっ
ている時に電源をオフにするには、「POWER」
ボタンを長押ししてください。
2) 電源がオンでスクリーン表示がオフにな
っている時に電源をオフにするには、まず
「POWER」ボタンを短押しして画面表示をオン
にし、その後に「POWER」ボタンを長押しして
ください。
3. 充電
このプレーヤーは USB ケーブルを電源アダプ
ターに接続すると自動的に充電します。プレ
ーヤーの電源がオフになっている時には、
「POWER」ボタンを長押しして電源をオンにし
てください。
JP
充電中に再生する:USB ケーブルが電源に接続されて
いれば、リチウム電池に充電しながら電力が供給さ
れます。つまり、充電しながら音楽を再生すること
ができます。これによって充電の速度に影響が出る
こともありません。
注:USB 電源アダプターはスマートフォン充電用のア
ダプターなど別売り製品をお使い下さい。

JP
ファームウェアのアップ
デート
1. ファームウェアをアップデートする際は、
まずバッテリー残量が 15%以上であることを
確認してください。15%未満の時は、先に充
電をしてください。
2. Lotoo の公式ホームページ中のダウンロー
ドページにアクセスして、最新のファームウ
ェアをダウンロードします。
「PAW5KMK2.COE」と いう名称の ファ イルをコ
ピーして、micro SD カードのルートにペース
トします。
3. 設定メニューに入って、「メニュー → シ
ステム設定 → システム ·アップデート」と
クリックします。アップデートが完了するま
で待ちます。正しい手順でアップデートする
と、次のようにアップデートが進みます。
アップデート ファイルを
読み込み中
アップデート中です
チェック完了、アップデ
ートを開始します
アップデートに
成功しました

終了
4. アップデートが順調に完了すると、自動的
に電源がオフになりますので、再び電源をオン
にしてください。最新のファームウェアのバー
ジョンは「メニュー → システム設定 →シス
テム情報」で確認できます。
スポーツ用アームベルト
の取り付け
1. 下図のように、アームベルトのベルト(マ
ジックテープ)側を外側にして、左から挿入
して右に通します。
ブラケット
JP
ベルトを通すプラス
チックのループ側
ベルクロの端に
留め具の付いた側
2. アームベルトを(右側から)引っぱって下

JP
図のような状態にし、アームベルトの両端を少
し斜めにしながら ブラケットのフックの下に
挿入します。
ブラケットの下に
ベルトを通すプラス
チックのループ側
3. アームベルトの両端の溝をフックでパチン
と留めます。
注意 : アームベルトを使用しない時は、予期せぬ損
傷を防ぐため、PAW5000MKII をベルトから取り外して
ください。
ブルートゥース
1. を長押しして設定メニューに入り、
ジョグダイヤルをまわして「ブルートゥース設
定」を選び、「OK」を押します。
SETUP
再生時の設定
システム設定
ブルートゥース設定
スポーツモード設定
Fn キーの割り当て
96%
Figure 1

2.「ブルートゥース・スイッチ」を選んで「OK」
を押し、「ON」にセットします。
SETUP
ブルートゥーススイッチ
ブルートゥース一覧
96%
SETUP
On
Off
96%
JP
Figure 2
Figure 3
3. を押して上位メニューに戻り、「ブ
ルートゥース一覧」に入ります。
SETUP
ブルートゥーススイッチ
ブルートゥース一覧
Figure 4
96%
4. ブルートゥース・ヘッドフォンまたはブル
ートゥース・スピーカーのスイッチを入れ、
ペアリング・モードにします。
PAW5000MKII で、「新しいデバイスをスキャン」
を選びます。
BLUETOOTH
新しいデバイスをスキャン
Figure 5
96%
スキャン中 ...
取り消し
Figure 6
20
5.5. ご使用のデバイス名が見つかったら、「OK」

JP
を押してスキャニングを停止するか、または
数秒後にスキャニングが終了するのを待ちま
す。
19
スキャン中 ...
H300
取り消し
Figure 7
6. デバイス名を選んで「OK」を押し、接続し
ます。
BLUETOOTH 2/2
新しいデバイスをスキャン
H300
Figure 8 Figure 9
ペアリング
96%
接続中..
Cancel
7. デバイスの右側に「接続」と表示されたら、
接続は完了です。
BLUETOOTH 2/2
新しいデバイスをスキャン
H300
96%
接続
Figure 10
8. を 3 回押して再生画面に戻ります。
9. これでブルートゥースで音楽を再生できま
す。

注意
1. 機器を安全にお取り扱いいただくために
この機器を分解しないでください。故障の原因に
•
なる恐れがあります。
この機器を悪天候下では使用しないでください。
•
事故の原因になる恐れがあります。
この機器を埃や煙の多い場所で使用しないでくだ
•
さい。故障の原因になる恐れがあります。
この機器とその周辺機器に衝撃を与えないでくだ
•
さい。重大な故障の原因になる恐れがあります。
この機器を化学溶剤や洗剤で清掃しないでくださ
•
い。故障の原因になる恐れがあります。
この機器を強力な磁気を発生する物に近づけない
•
でください。重大な故障の原因になる恐れがありま
す。
この機器の上に重い物を置かないでください。故
•
障の原因になる恐れがあります。
この機器を極度に湿度の高い環境で使うのは避け
•
てください。故障する原因になる恐れがあります。
JP
2. 充電池を安全にお使いいただくために
充電池を火の中に入れたり、加熱したりしないで
•
ください。爆発する可能性があります。
充電池が高温になる現象が見られた場合には、直
•
ちに使用を中止し、サポートへご連絡ください。事
故の原因になる恐れがあります。
輸入・発売元:有限会社トップウイング
製品についてのご質問・ご購入者様サポート:ENZO j-Fi LLC.
Lotoo コンタクトページ http://lotoo.jp/contact.html

FCC Statement
THIS DEVICE COMPLIES WITH PART 15 OF
THE FCC RULES. OPERATION IS SUBJECT
TO THE FOLLOWING TWO CONDITIONS: (1)
THIS DEVICE MAY NOT CAUSE HARMFUL
INTERFERENCE, AND (2) THIS DEVICE
MUST ACCEPT ANY INTERFERENCE
RECEIVED, INCLUDING INTERFERENCE
THAT MAY CAUSE UNDESIRED OPERATION.
NOTE: This equipment has been tested and found
to comply with the limits for a Class B digital device,
pursuant to part 15 of the FCC Rules. These limits
are designed to provide reasonable protection against
harmful interference in a residential installation. This
equipment generates, uses and can radiate radio
frequency energy and, if not installed and used in
accordance with the instructions, may cause harmful
interference to radio communications. However, there
is no guarantee that interference will not occur in a
particular installation. If this equipment does cause
harmful interference to radio or television reception,
which can be determined by turning the equipment
o and on, the user is encouraged to try to correct
the interference by one or more of the following
measures:
-Reorient or relocate the receiving antenna.
-Increase these paration between the e
quipment and receiver.

-Connect the equipment into an outlet on a
circuit dierent from that to which the receiver is
connected.
-Consult the dealer or an experienc ed radio /
TV technician for help.

名称:数字音频播放器
型号 : PAW 5000 MK II
输入电压和电流 : 5V , 1A
制造商 : 北京英夫美迪电子技术有限公司
使用环境 : 仅适用于在海拔 2000 米以下地区安全
使用,仅适用于非热带气候。
CMIIT ID:2015DP4402
Name: Digital Audio Player
Model: PAW 5000 MK II
Input voltage and current: 5V , 1A
Manufactory:
Beijing Infomedia Electronic Technology Co., Ltd.
Operation condition:
Altitude up to 2000m, Non tropical climate
CMIIT ID:2015DP4402
中国制造 /
Made in China
北京英夫美迪电子技术有限公司
Beijing Infomedia Electronic Technology Co.,Ltd.
北京市海淀区翠微路 2 号院中国印刷科学技术研究所 B 座四层
Floor 4, B Building, Printing Academy, No. 2 Cuiwei Road,
Haidian District,Beijing, China.
客服电话/
乐图官网 / Lotoo Website :
Customer Service Tel
:
+86 4006538168
www.lotoo.cn
 Loading...