

Losi LOSB0105BD User Manual
1/10-SCALE ELECTRIC SHORT COURSE TRUCK
LOSB0105 1/10 STRIKE Short Course Truck RTR
LOSB0105BD 1/10 STRIKE Short Course Truck Bind-N-Drive
CONNECT - REGISTER - WIN
Register your product online so we can notify you
about the latest option parts, product updates, tech
tips, service bulletins and more. Visit
WWW.LOSI.COM/REGISTER to stay connected.
For registering your Losi Product you will be automatically entered for a chance to win the Losi-Pick-Your
Prize Sweepstakes. The winner will be allowed to
select a total prize package of $1,000 (retail value)
based on his/her preference.
1
Not Responsible for errors. All prices
subject to change without notice.
Losi, a Division of Horizon Hobby, Inc.

Table of Contents
Introduction
Introduction................................................................................
Safety Precautions....................................................................
Battery/Charging.......................................................................
Supplied and Required Equipment.....................................
Technical Overview...............................................................
5-7
ESC Overview/Requirements................................................
Transmitter Battery Installation............................................
Vehicle Battery Installation...................................................
Quick Start..................................................................................
Losi DSM Radio System...................................................
12-13
Driving the 1/10 Strike SCT...................................................
Tuning, Adjusting and Maintaining.............................
15-18
Troubleshooting the 1/10 Strike SCT................................
Warranty Information......................................................
20-21
10
11
14
19
2
3
3
4
8
9
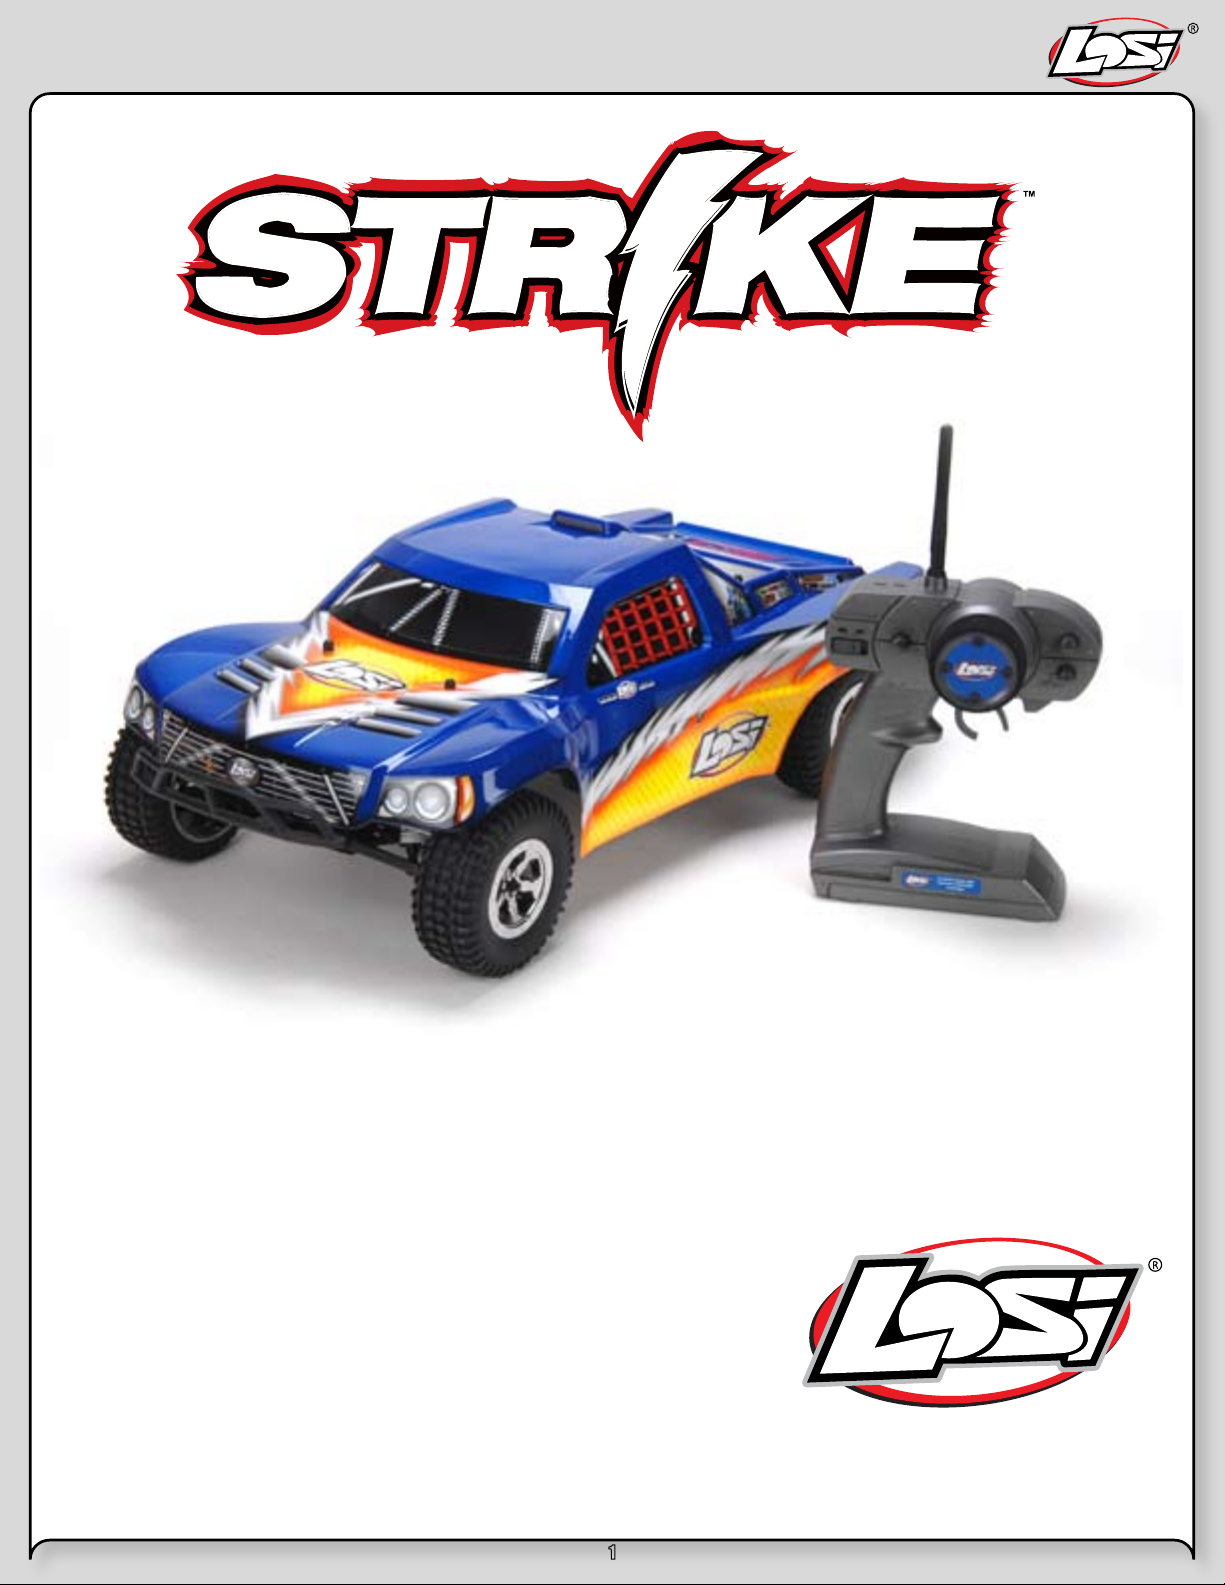
Thank you for purchasing the Losi® 1/10 Strike Short Course
Truck. We are confident you will be satisfied with the performance
of this durable and resilient vehicle.
Understanding that you are anxiously wanting to get your 1/10
Strike SCT ready for the open road, it will be to your long term
benefit to make the effort and read through the entire manual. In
the following pages you will find all the information you will need
to set up as well as operate your new 1/10 Strike SCT to its full
potential.
If you are an experienced RC hobbyist, or new to RC vehicles,
it will benefit you to read all enclosed information.
From everyone at Losi we would like to thank you again for
choosing the 1/10 Strike SCT. Our goal is helping people have fun
and enjoy using our products.
Register your Losi Product Online
Register your 1/10 Strike SCT now and be the first to find out
about the latest option parts, product updates and more. Log on
to www.LOSI.com and follow the product registration link to stay
connected.
Declarations of Conformity.................................................
RC Terminology........................................................................
Parts Listing........................................................................
Optional Parts Listing.....................................................
Exploded Views.................................................................
Notes and STRIKE Action Photos.................................
24-25
25-26
27-30
31-33
Stock Setup Sheet...................................................................
Blank Setup Sheet..................................................................
22
23
34
35
Losi/Horizon Support
If you have any questions concerning setup or operation of your
1/10 Strike SCT please call Horizon Customer Support at
1-877-504-0233.
Hours:
Monday thru Friday from 8:00 am CST to 5:00 pm CST
In the United Kingdom please call Horizon Hobby UK Customer
Support at +44 (0) 1279 641 097.
Getting Ready
Thoroughly read all the enclosed material, precautions and follow
instructions to avoid damaging your new RC vehicle. If you
choose to not follow these steps or instructions, it will be considered negligence.
If after review of this manual and prior to running your 1/10 Strike
SCT, you determine this RC vehicle is not what you want—DO
NOT proceed and DO NOT run the 1/10 Strike SCT. If the 1/10
Strike SCT has been run, your local hobby shop will not be able to
process a return or accept it for exchange.
Caution:
THIS PRODUCT IS SUITABLE FOR CHILDREN 14 YEARS OR
OVER. THIS PRODUCT IS NOT A TOY. This product is not
intended for use by children without direct adult supervision.
When driving the 1/10 Strike SCT it is important that you take
measures to avoid someone being hit by the vehicle. You may
cause serious injury to another person, or to personal property
should you make contact while running the 1/10 Strike SCT.
2

Safety Precautions
We hope you operate this RC model in a safe, reasonable and
cautious fashion in order to enjoy your vehicle. Should you operate
this vehicle without a cautious and reasonable approach it may
result in serious injury and/or property damage. Only you can
control and make certain that safety precautions and instructions
are followed.
General:
• The 1/10 Strike SCT is not a toy. This product is not
intended for use by children without direct adult supervision.
• This RC vehicle is not intended for use on public highways
or roads.
• Avoid an area that has many pedestrians or crowds of
people.
• Keep in mind that this vehicle is radio controlled and can
experience moments of radio loss or interference, so
provide for a margin of error at all times.
• Please be aware that the motor and batteries of this RC
vehicle will get HOT during each use. Be careful not to burn
yourself.
Electronic Speed Control (ESC):
• Read all safety precautions prior to each use.
• Never leave the vehicle/ESC unsupervised while it is
switched on, in use or connected to a power source. If there
is a short-circuit or product defect, it could result in fire.
• If there are exposed wires, do not use the ESC until you
have installed shrink-wrap or replaced the wire.
• Disconnect the battery from the ESC after use.
• The ESC is water-resistant, but should not be submerged or
exposed to long periods of moisture.
• Do not attempt to use more than a 2S LiPo battery or
more than a 7-cell NiMH battery; doing so will damage
the ESC and could result in fire.
• Always turn on the transmitter first then the ESC to prevent
an out-of-control vehicle.
• When setting your Electronic Speed Controller:
º Please disconnect motor or remove the pinion gear
during ESC setup or calibration functions.
º Keep loose clothing, hair, gloves and fingers away
from moving parts at all times.
º Rubber tires can cause severe injury if there is a
failure while running the vehicle while on a stand or
when being held. Ensure rubber tires are securely
mounted to the rims and if not, re-glue them and
check them often for security.
Batteries and Charging:
The 1/10 Strike SCT uses rechargeable batteries such as NiMH
or LiPo. These batteries require special handling to preserve
performance and last a long time. Read all instructions and
precautions that are provided with the batteries intended to be
used in the 1/10 Strike SCT.
• Read all instructions provided by the manufacturer of the
batteries.
• Responsible adult supervision is necessary while charging
batteries.
• Always check to ensure the polarity of battery connection is
correct.
• Never leave batteries unattended while charging.
• Never charge a battery while it is installed in the 1/10 Strike
SCT.
• Do not charge any battery that appears to have any
damage.
• If there are exposed wires do not charge or use the battery
until you have installed shrink-wrap or replaced the
complete wire.
When charging NiMH batteries, select a charger to meet your
requirements. Chargers can be of two primary types for their
source of power; a 100-240V wall charger, or one which requires
a 12V power supply. Follow the charger manufacturer’s instruc-
tions and precautions during each use.
3
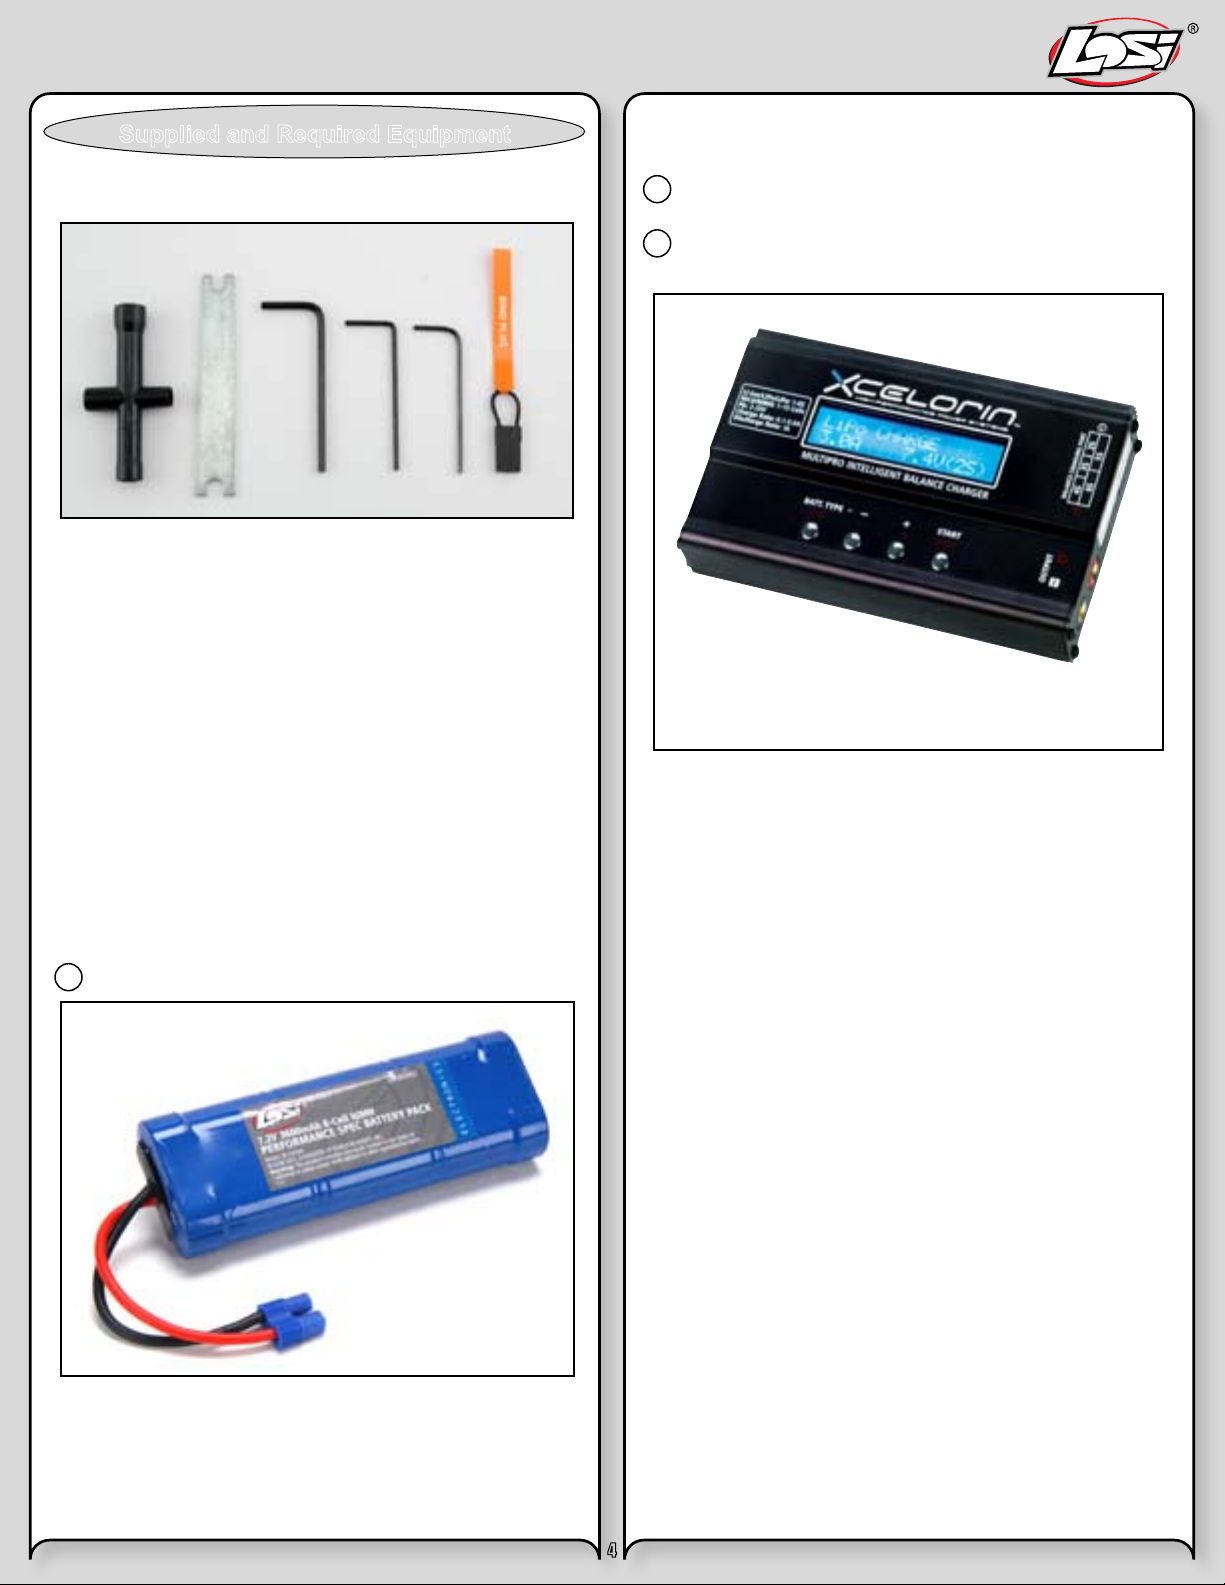
Supplied and Required Equipment
Supplied Tools:
2-Way wrench
Flat Turnbuckle Wrench
Three (3) Hex Wrenches (L shaped) 3/32, 5/64, and 1/16
Bind Plug
Recommended Accessories:
- Hobby grade knife
- CA glue (LOSA7880 or LOSA7881)
- Needle-nose pliers
- Side-cutting pliers
- Double-sided tape (LOSA4004)
- Safety Goggles
- Soldering iron
Required Equipment:
A Six (6) cell NiMH or 2S LiPo battery pack.
1
Four (4) AA batteries
2
3
NiMH battery charger with automatic “peak detection” or
LiPo-compatible charger recommended.
MultiPro™ Intelligent Balance Charger (LOSB9606)
AC Adapter (LOSB9604) required for AC operation
Using Your Charger:
If you do not yet have a charger, a peak detecting charger will
provide the performance required and take care of your expensive
batteries.
A popular choice for a charger would be a peak detection charger
that can be plugged into a household AC wall socket. The peak
detection portion of the charger monitors the battery charging and
will automatically shut off upon full charge.
Other peak detection chargers require a 12V power source to
charge your batteries. You would need to use or purchase a
hobby grade 12V power supply before charging.
Vehicle Battery
(6-Cell 7.2V “Stick Pack”)
LOSB9903
If you are going to be using a charger other than a peak detection
charger it is important to have your battery fully discharged prior
to recharging. Many of these have a timer that allows you to set
the amount of charge time. If the battery was not fully discharged
from prior use, you can potentially overcharge your battery pack.
If you are using a LiPo battery be sure to consult the
manufacturer’s suggestions for an appropriate LiPo-compatible
charger. Chargers designed for NiMH cells only should never be
used to charge your LiPo batteries and could result in serious
injury.
Do not charge any battery unattended, and monitor for heat build
up. If the battery pack is more than warm to the touch immediately
discontinue charging.
Read all safety precautions supplied by the charger manufacturer,
and also any from the battery manufacturer.
4
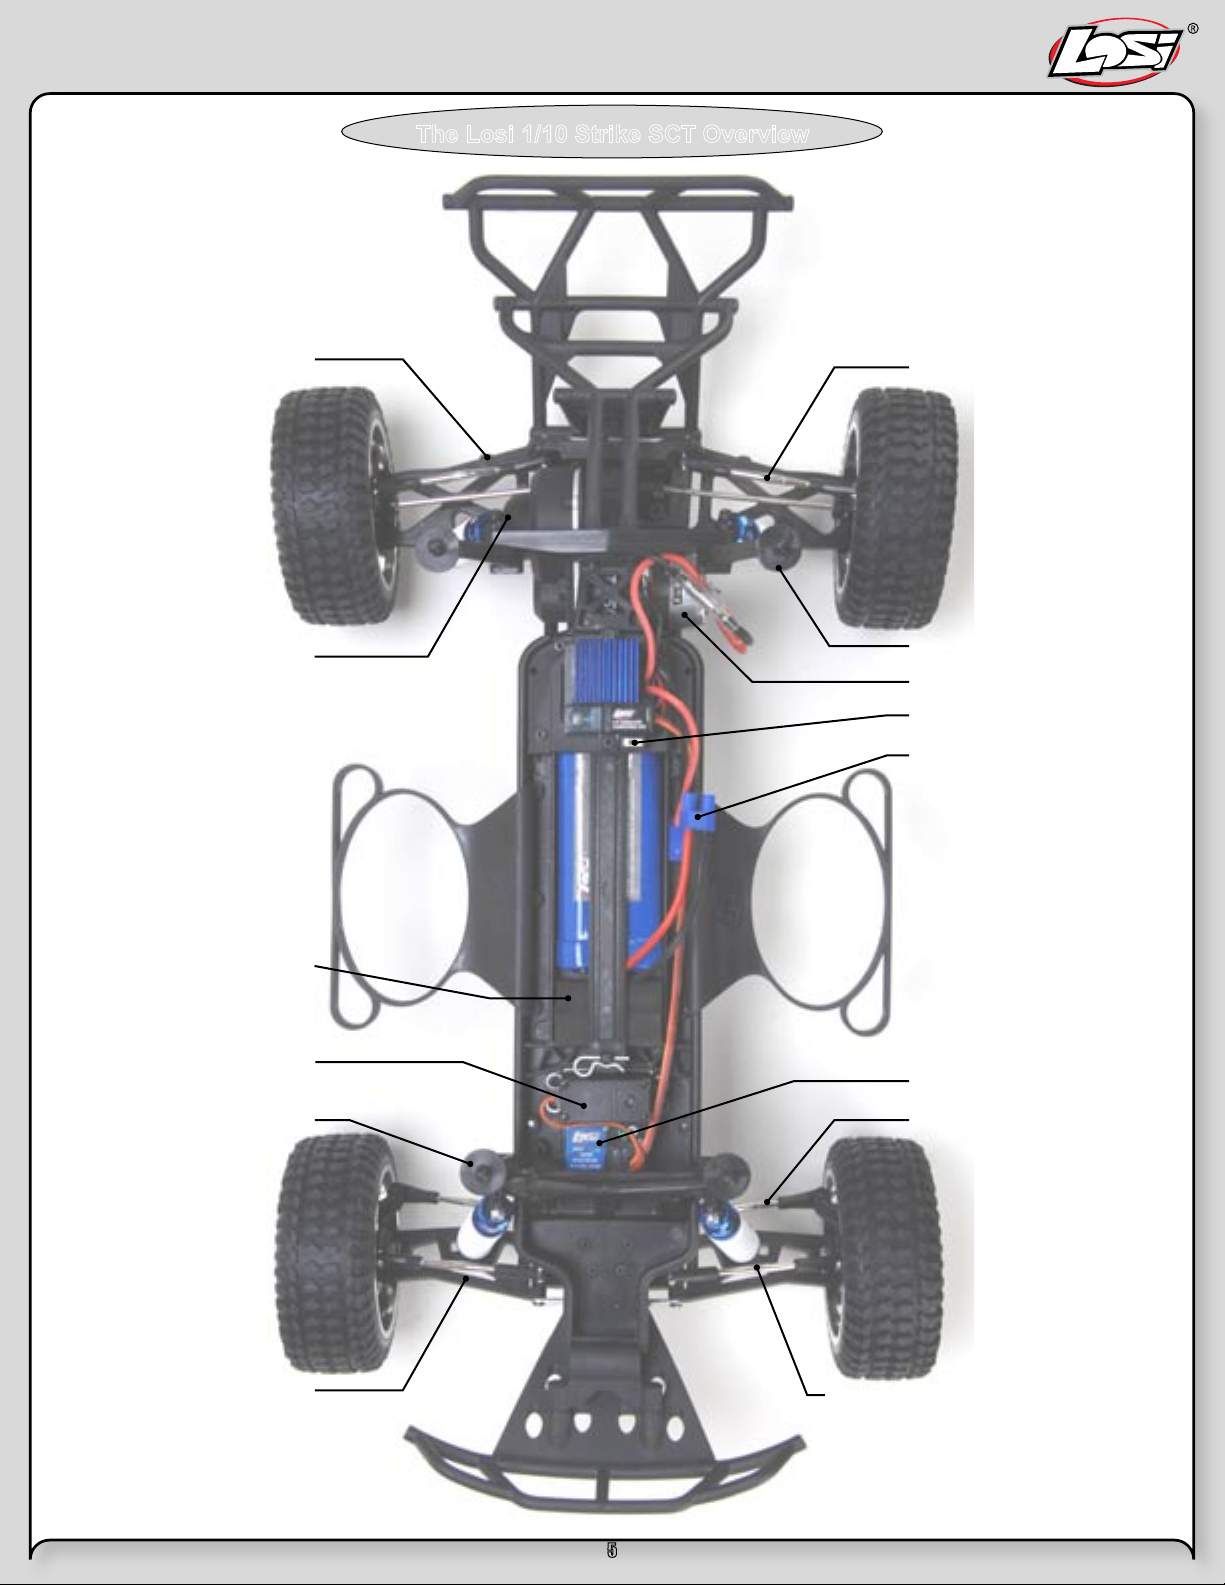
The Losi 1/10 Strike SCT Overview
Rear Suspension Arm
Slipper Clutch
Adjustment Access
Rear Tie Rod
Rear Body Mount
Motor
On/Off Switch
EC3 Battery Connector
Battery Positioning Blocks
Digital Servo
Front Suspension Arm
2.4GHz DSM Receiver
Front Tie RodFront Body Mount
Front Camber Link
5
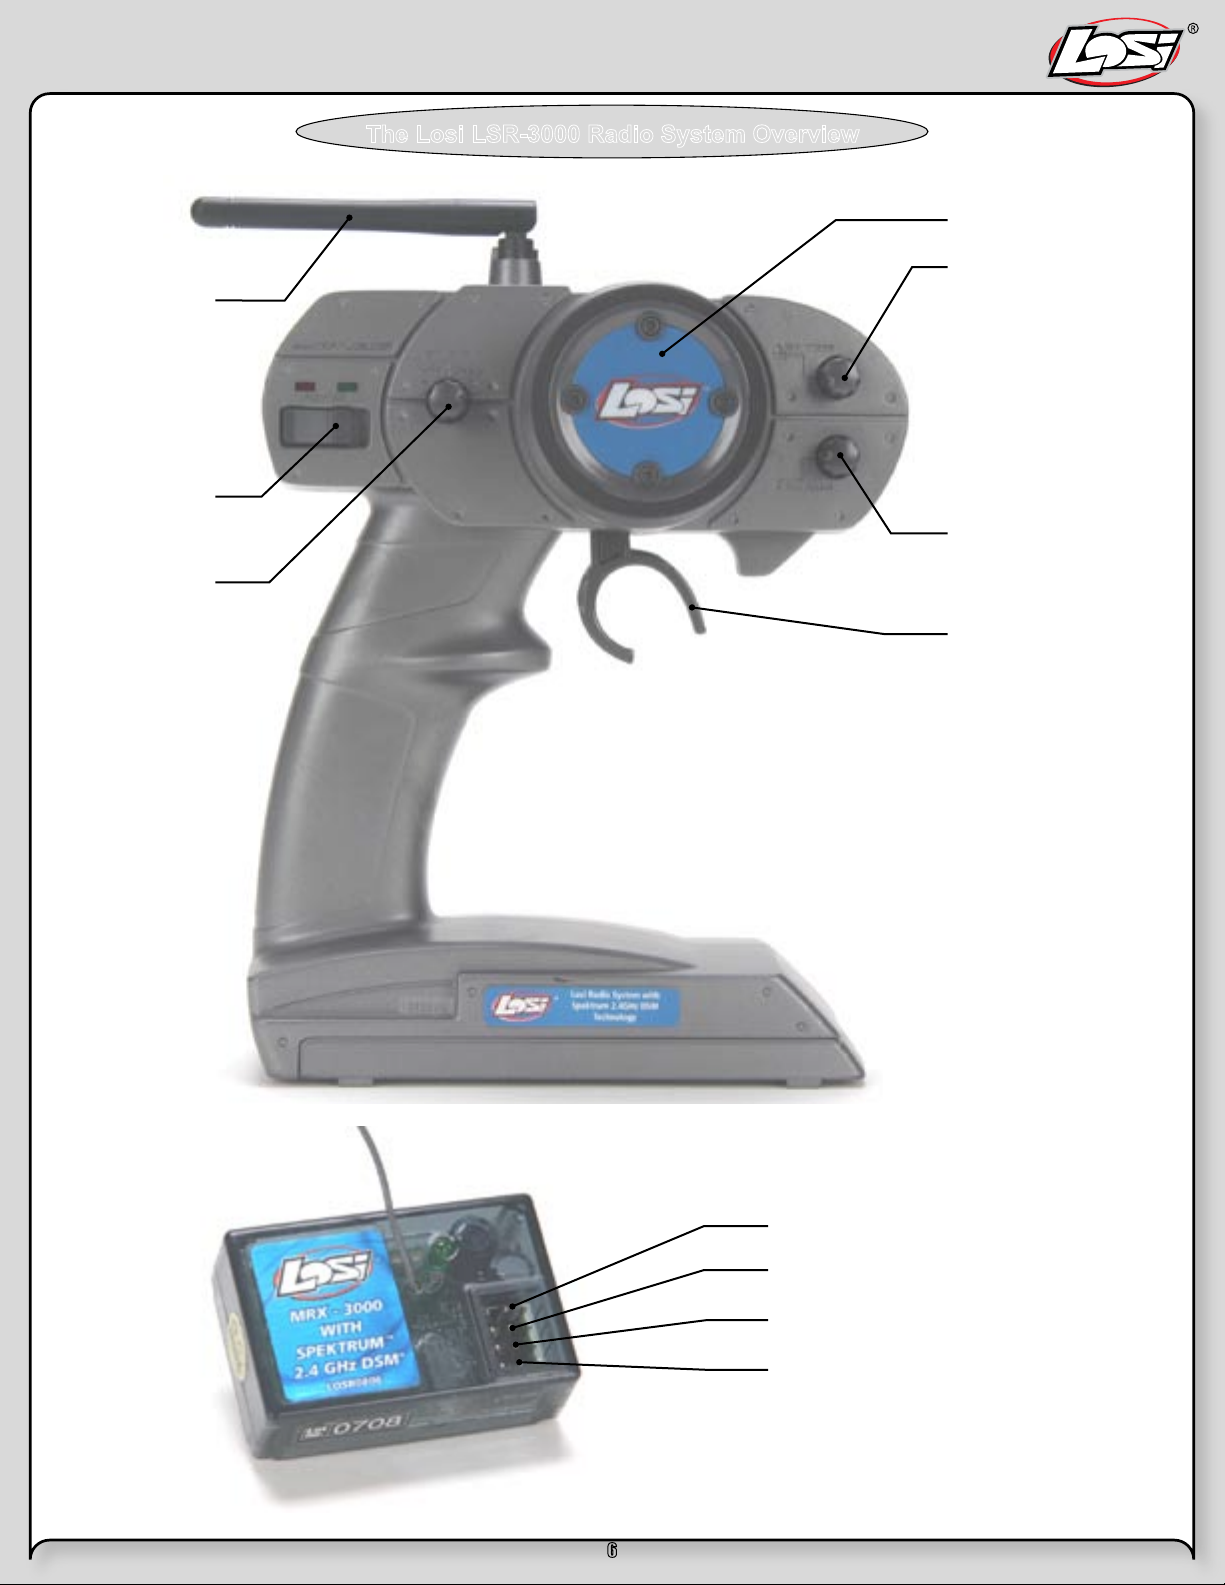
Antenna
Power On/Off
Switch
Dual Rate Steering
Adjustment
The Losi LSR-3000 Radio System Overview
Steering Wheel
Steering Trim (TH. Trim)
Throttle Trim (TH. Trim)
Throttle/Brake Trigger
Auxiliary Channel
Throttle Channel
Steering Channel
Binding Port
6
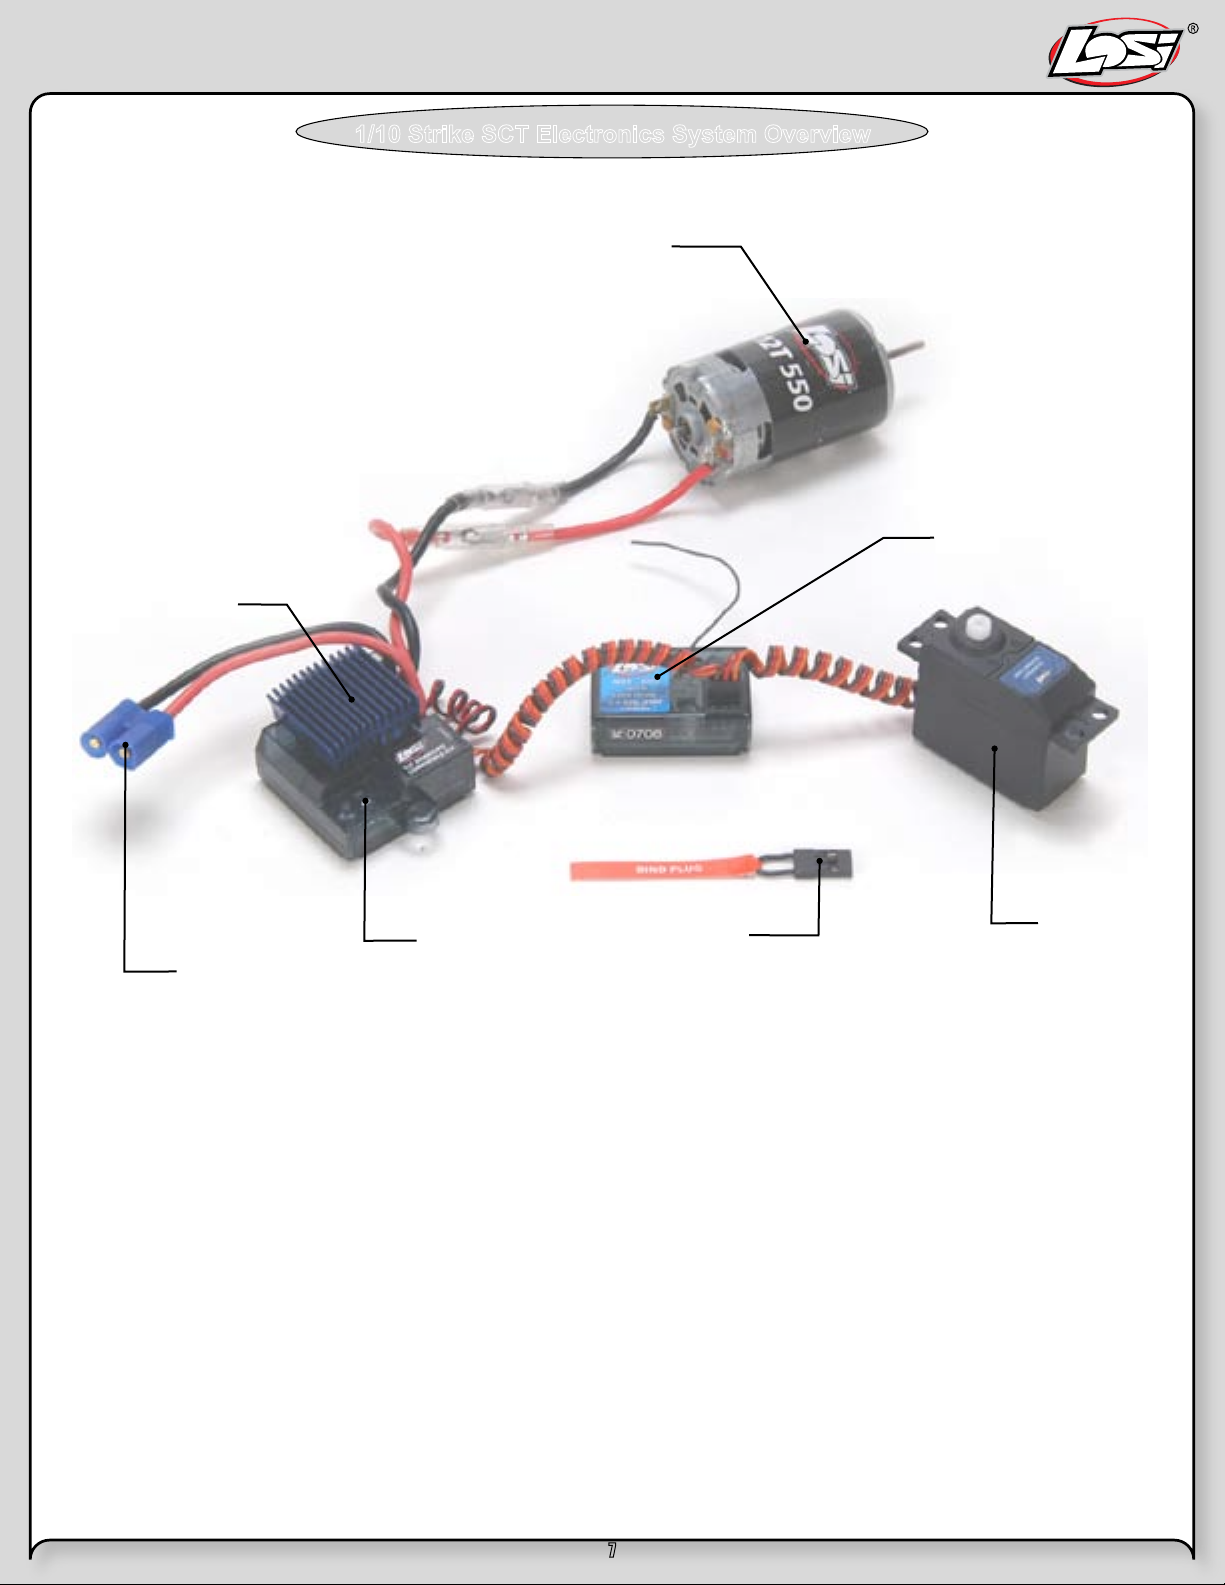
MSC 12L 12T ESC
1/10 Strike SCT Electronics System Overview
Motor
MRX-3000 DSM Receiver
Male EC3
Battery Connector
One-Touch
Setup Button
Bind Plug
Digital Servo
7

MSC-12L Fwd/Rev ESC
Features
• LiPo, NiMH/NiCd compatible
• 4 user selectable modes—Forward/reverse, Forward only
race, Practice mode with slow acceleration, and Crawler.
• High-power FET control with proportional forward and
reverse.
• High frequency design delivers smooth speed transition.
• Thermal Overload Protection prevents damage due to over
current conditions.
• Pre-wired with EC3 battery plug and bullet-style motor
connectors.
• Designed to operate with stock motors (12 turns or higher).
• Push-button programming with one touch setup.
• Water-Resistant
Specifications
Operation..............................Proportional forward, proportional
reverse with braking delay
Input Voltage ........................4-cell (4.8 volts) to 6-cell (7.2 volts)
DC NiMH/NiCd or 2S LiPo (7.4 volts)
Peak Current ........................1000A Forward and 350A Backwards
Continuous Current ..............250A Forward and 125A Backwards
Full-On Resistance ...............0.0014 Ohms Forward
0.0028 Ohms Backwards
Frequency ............................1kHz
BEC output ...........................5V DC, 1 amp max. at 7.2V
Overload Protection..............Thermal
Dimensions ..........................1.575 in x 1.575 in x 1.063 in
(40mm x 40mm x 27mm)
Weight ..................................1.87 oz (53 g)
Connecting the Battery
The MSC-12L comes pre-wired with an EC3 connector. Use
battery packs from 4-cell (4.8-volt) to 7-cell (8.4-volt) sub-C size
battery packs or with 2S LiPo packs (7.4-volt).
1. Be sure the on/off switch is in the “off” position.
2. Connect a fully charged battery pack to the speed control’s
battery connector.
Speed Control Programming
NOTE: While in the programming mode, no power is applied to
the motor.
Battery Selection: When the ESC is powered on, the LED will be
flashing for 2 seconds to indicate the Selected Battery Type.
During this time the user can press the key to toggle between
LiPo and NiMH/NiCd modes. After the key has been pressed
(battery type selected), the LED will flash for 2 more seconds.
A. Turn on ESC and push button once within 2 seconds, push
again to toggle between modes.
B. Red light indicates LiPo mode (with 6-volt cutoff)
C. Green light indicates NiMH/NiCd mode
One Touch Endpoint Setup
NOTE: Please be sure to set all throttle trim settings to neutral
before performing an endpoint setup.
A. Hold button and turn on ESC until the Red/Green light
comes on. Once on, release button.
B. Pull trigger to full throttle position until the green light goes
from flashing to solid. Once solid, your forward endpoint is
now set.
C. To set reverse endpoint, push the trigger into the full
reverse position until the flashing red light turns solid. At this
point your reverse/brake endpoint is now set.
D. Return trigger to neutral setting. The green light will now
be solid and you are ready to go!
Selecting Speed Controller Modes
To change modes on your MSC-12L hold the setup key for
over 5 seconds while in neutral. Once you find desired mode,
simply release the key and you are ready for action.
Forward/Reverse mode—Solid Green LED
Forward Only mode—Fast Flashing Green LED
Practice mode—Slow Flashing Green LED
Crawler mode*—Solid Green and Red LED
Adjusting the Transmitter
1. Set the “throttle reversing” switch to the NORMAL position.
2. Set the “throttle trim” to the CENTER position.
Troubleshooting Guide
Symptom Solution
Programming is not complete. Reprogram the ESC by following the programming instructions.
Speed control connected to receiver incorrectly.
Steering servo operates but the motor does not run
Steering and motor do not function
Full speed not attainable
Motor slows but will not stop
Reduced radio range/Interference
Motor defective. Test motor independently, repair or replace as needed.
Low batteries. Charge as needed.
Overload Protection enabled. Check motor and connections.
Receiver wired incorrectly. Check polarity and orientation of controlplugs.
Batteries discharged. Recharge or replace.
Transmitter adjusted improperly.
ESC programmed incorrectly. Reprogram.
Throttle trim may be set improperly.
ESC program does not match transmitter. Reprogram ESC.
Motor capacitors broken/missing. Repair or replace.
Motor noise. Move receiver further away from ESC, motor and wiring.
Transmitter batteries low. Replace batteries.
*NOTE: Crawler mode is for use in rock crawling vehicles only.
Do not use this mode with your 1/10 Strike SCT. Doing so
may damage the vehicle.
8
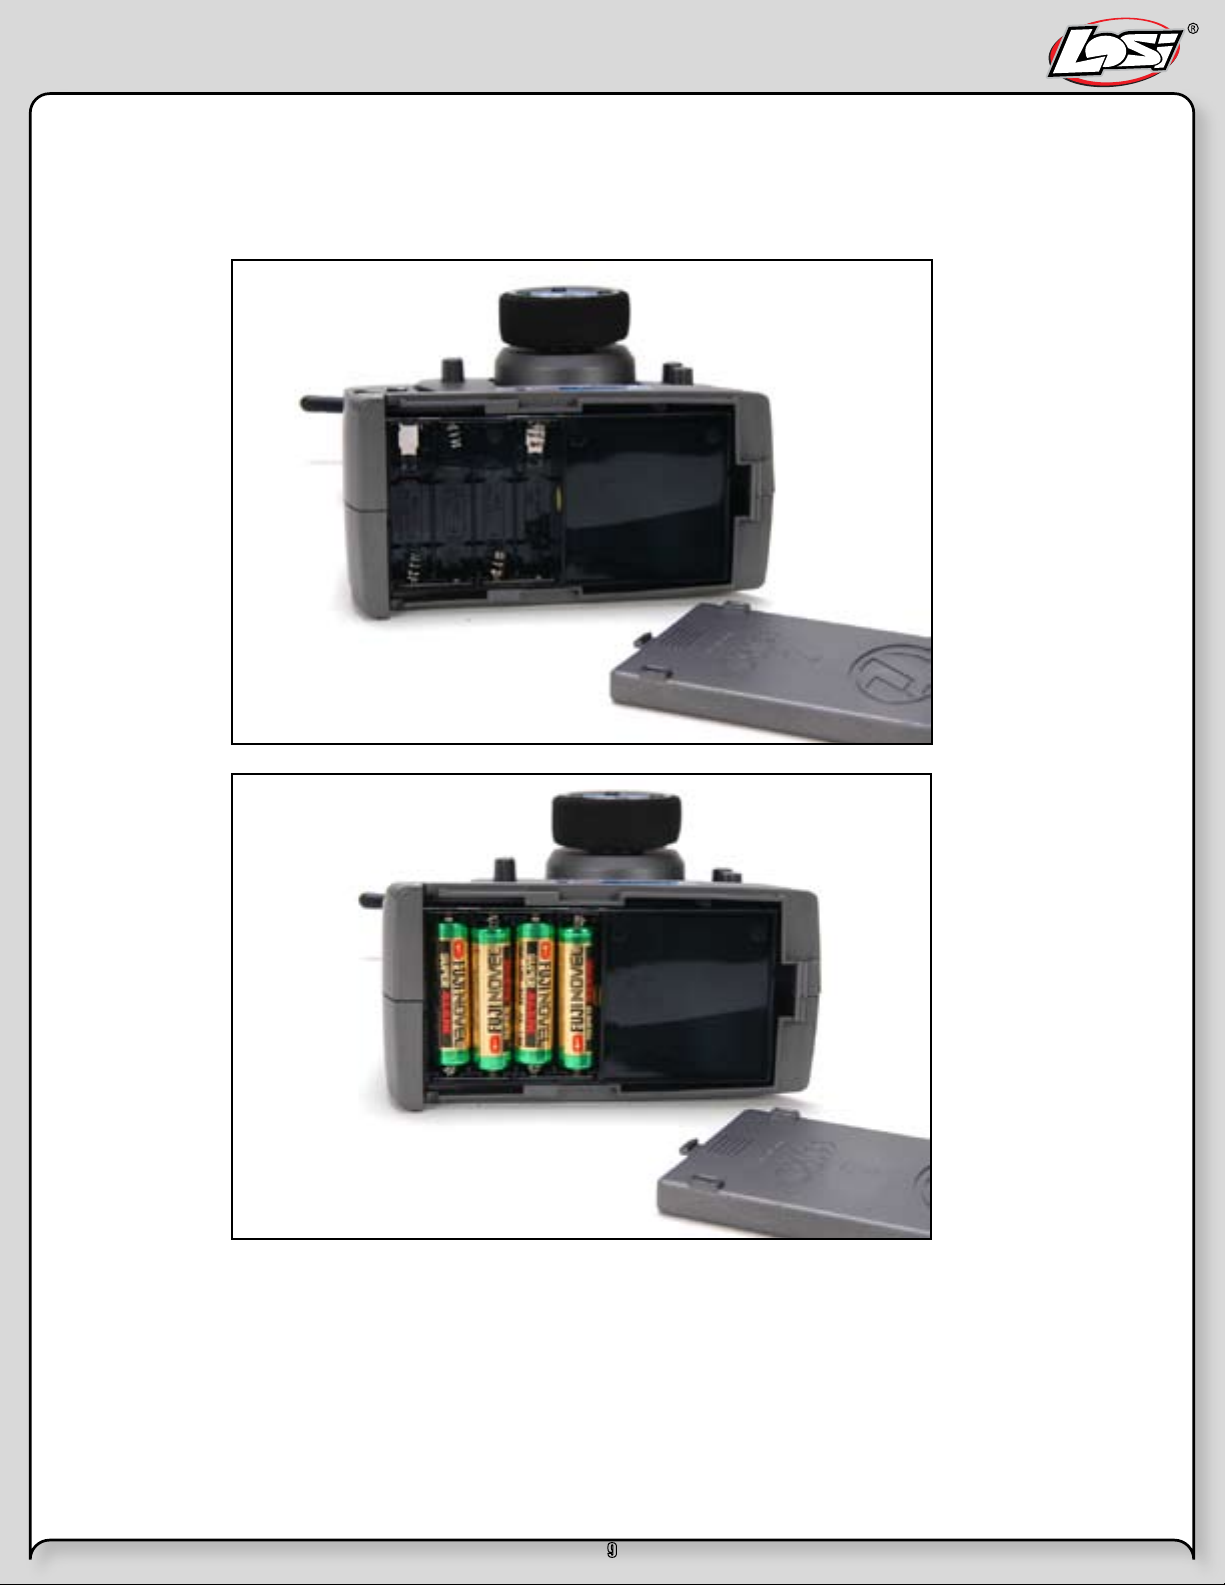
Installing Batteries:
Transmitter
Remove the battery cover from the bottom of the transmitter by sliding it away from the base of the handle.
Install the four (4) AA-size batteries into the base, noting polarity when inserting each battery.
Transmitter with batteries installed
Reinstall the battery cover by sliding it back on the handle base.
9
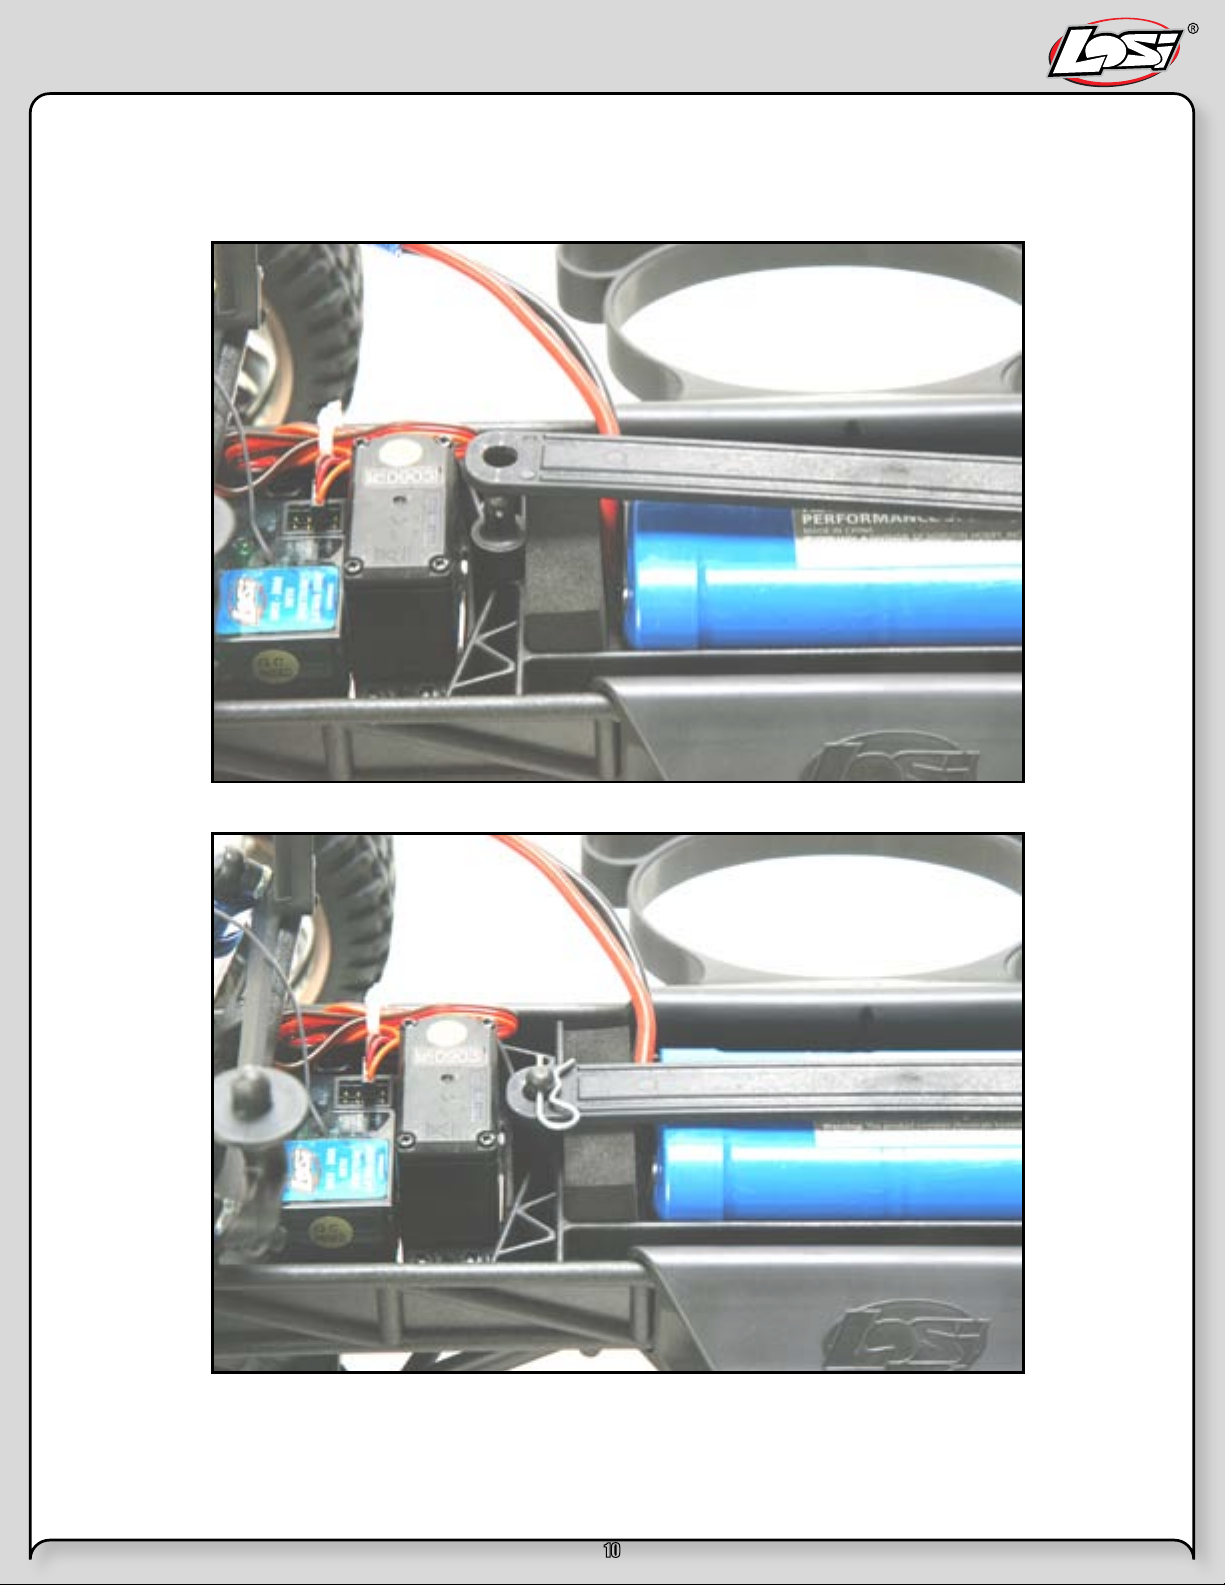
Battery Pack(s):
To install the battery pack remove the battery hold-down strap by removing the clip from the front mounting boss, and then,
while lifting the strap, pulling forward in one motion.
After you have inserted the fully-charged battery pack reinstall the battery hold-down strap.
Notice that the battery hold-down has a flat side while the other side has strengthening ribs; the rib side should be facing
down to the battery.
Insert on an angle into the rear support, and then down on the front pin and secure it with the previously removed clip.
10

Quick Start
Note: Please read the entire manual to gain a full understanding of the 1/10 Strike SCT vehicle,
fine-tuning the setup and performing maintenance.
1. Read the safety precautions found on page 3. This is important for your safety
and prevention of personal injury.
2. Charge the battery pack you have chosen (NOT INCLUDED). Refer to the
manufacturer’s supplied instructions for battery charging information.
3. Install the AA batteries into the Losi LSR-3000 transmitter (see page 9). Use
alkaline or rechargeable batteries only.
4. Install the battery pack (see previous page). The battery pack should be fully
charged before installation.
5. Turn on the transmitter and then the vehicle. It is a good practice to turn on the
transmitter before the vehicle and turn it off after the vehicle has been turned off.
6. Check steering (see page 12). Verify that the servo is functioning properly.
7. Driving the 1/10 Strike SCT (see page 14).
8. Performing maintenance of the 1/10 Strike SCT. Refer to Tuning, Adjusting and
Maintenance of the 1/10 Strike SCT on page 15.
11
 Loading...