

Page 1
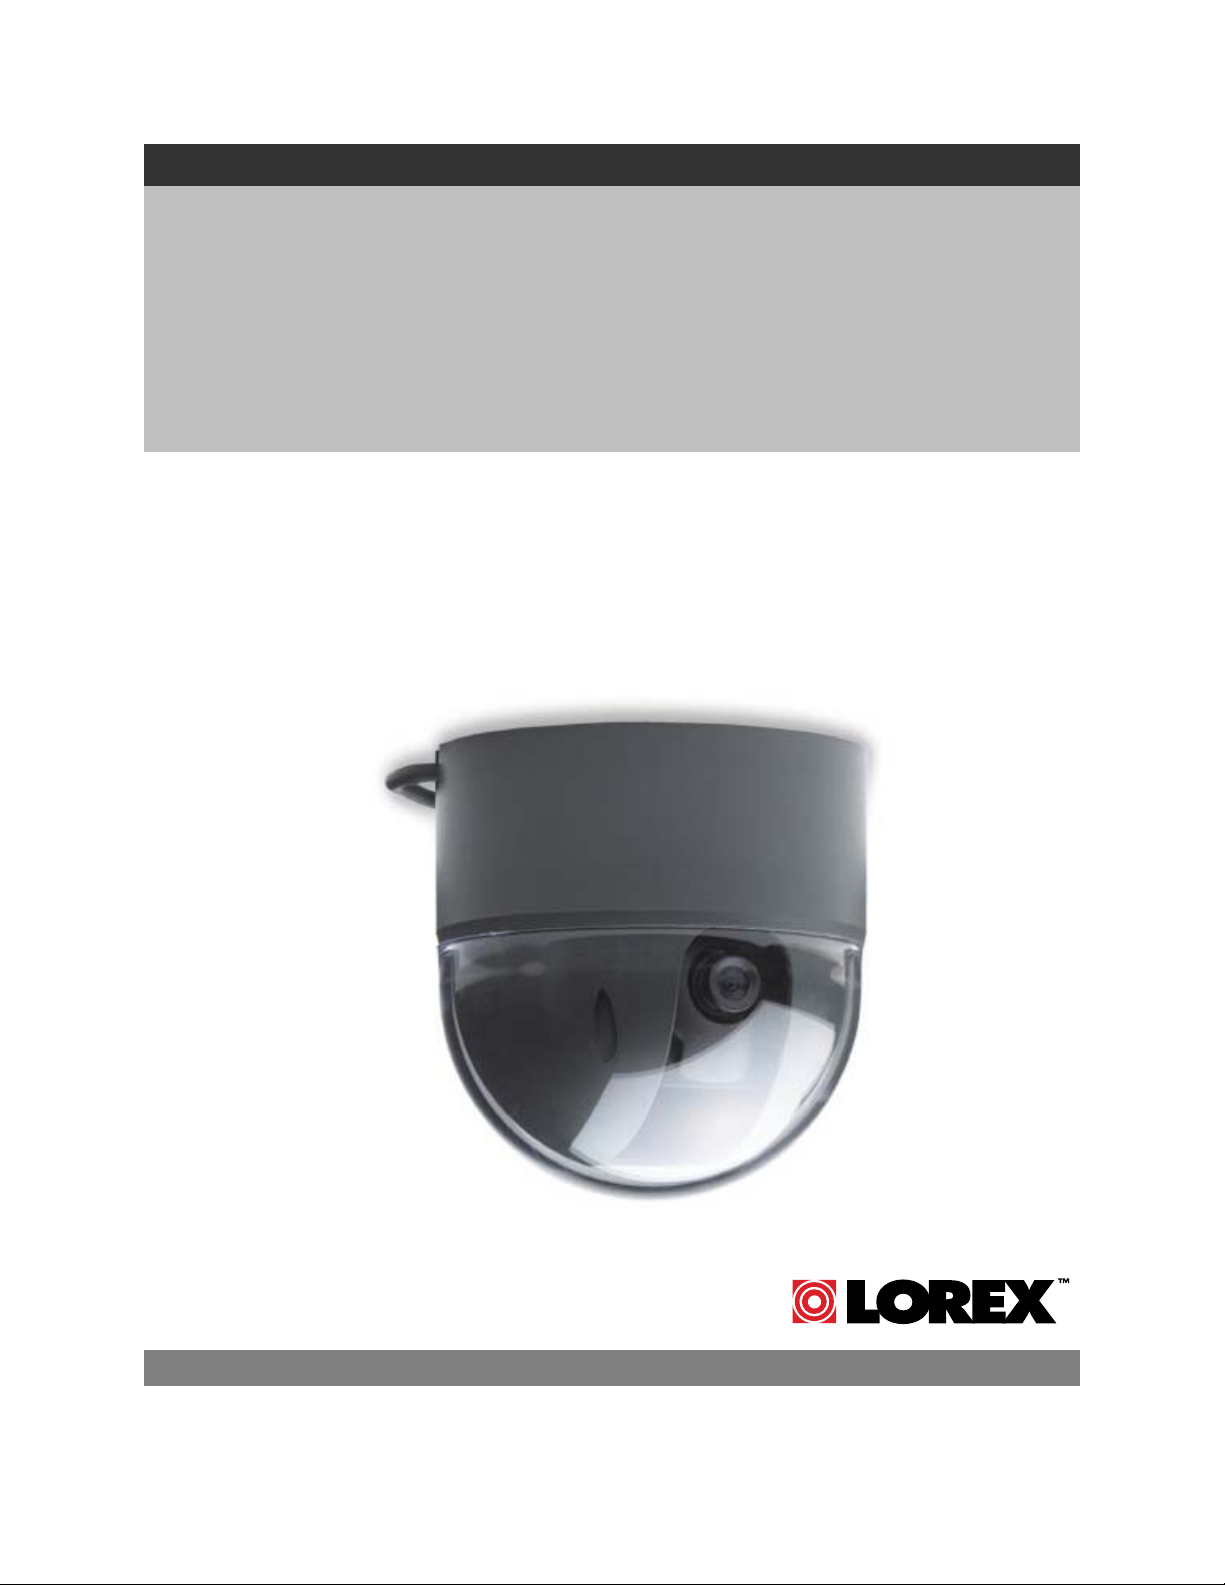
1/3” CCD COLOR PAN / TILT
DOME CAMERA
WITH 3x DIGITAL ZOOM
Instruction Manual
English Version1.0
MODEL:
SG7381
Copyright © 2007 Lorex Technology Inc.
www.lorexcctv.com
Page 2
Thank you for purchasing this Indoor, Mini Color Dome Camera, with Pan / Tilt control and 3x Digital
Zoom. Lorex is committed to providing our customers with a high quality, reliable security product.
This camera features a 1/3” Color CCD and Digital Signal Processing (DSP), allowing for excellent
picture quality under varying conditions.
This compact smoked acrylic dome blends with any décor, and provides discrete video surveillance.
The motorized controls have the ability to give you a viewing angle of 330° horizontal, and 90° vertical.
This dome camera can connect to any Lorex Color Observation System or DVR with a 6-pin DIN or
BNC / R
To learn more about the LCD / 8 Channel DVR Combo, and to learn about our complete range of
accessory products, please visit our website at:
S-485 Connection supporting the PELCO-D Protocol.
http://www.lorexcctv.com
CAUTION
RISK OF ELECTRIC SHOCK
DO NOT OPEN
CAUTION: TO REDUCE THE RICK OF ELECTRIC SHOCK
REFER SERVICING TO QUALIFIED SERVICE PERSONNEL.
WARNING: TO PREVENT FIRE OR SHOCK HAZARD, DO NOT
EXPOSE THIS UNIT TO RAIN OR MOISTURE.
CAUTION: TO PREVENT ELECTRIC SHOCK, MATCH WIDE BLADE
OF THE PLUG TO THE WIDE SLOT AND FULLY INSERT.
DO NOT REMOVE COVER (OR BACK).
NO USER SERVICABLE PARTS INSIDE.
The lightning flash with arrowhead symbol, within an
equilateral triangle, is intended to alert the user to the
presence of uninsulated “dangerous voltage” within the
products ‘ enclosure that may be of sufficient magnitude
to constitute a risk of electric shock
The exclamation point within an equilateral triangle is
intended to alert the user to the presence of important
operating and maintenance (servicing) instructions in the
literature accompanying the appliance.
Please visit us on the web for the most current Manuals, Quick Start Guides and Firmware.
Additional Language Manuals are also available at:
p://www.lorexcctv.com
htt
2
Page 3

General Precautions
General Precautions
1. All warnings and instructions of this manual should be followed
2. Remove the plug from the outlet before cleaning. Do not use liquid aerosol detergents. Use a water
dampened cloth for cleaning
3. Do not use this unit in humid or wet places
4. Keep enough space around the unit for ventilation. Slots and openings in the storage cabinet should
not be blocked
5. During lightning storms, or when the unit is not used for a long time, disconnect the power supply,
antenna, and cables to protect the unit from electrical surge
FCC CLASS B NOTICE
Note:
This equipment has been tested and found to comply with the limits for a Class B digital device,
pursuant to Part 15 of the FCC Rules. These limits are designed to provide reasonable protection
against harmful interference in a residential installation. This equipment generates, uses, and can
radiate radio frequency energy and, if not in-stalled and used in accordance with the instruction, may
cause harmful interference to radio communications.
However, there is no guarantee that interference will not occur in a particular installation. If this
equipment does cause harmful interference to radio or television reception (which can be determined
by turning the equipment on and off), the user is encouraged to try to correct the interference by one
or more of the following measures:
o Reorient or relocate the receiving antenna
o Increase the separation between the equipment and receiver
o Connect the equipment into an outlet on a circuit different from that to which the receiver
is connected
o Consult the dealer or an experienced radio or television technician for assistance
This equipment has been certified and found to comply with the limits regulated by FCC, EMC, and
LVD. Therefore, it is designated to provide reasonable protection against interference and will not
cause interference with other appliance usage.
However, it is imperative that the user follows this manuals guideline to avoid improper usage which
may result in damage to the unit, electrical shock and fire hazard injury
In order to improve the feature functions and quality of this product, the specifications are subject to
change without notice from time to time.
LOREX TECHNOLOGY INC.
http://www.lorexcctv.com
3
Page 4

Table of Contents
Table of Contents
Camera Features .................................................................................................. 4
Getting Started ...................................................................................................... 5
Camera Connections – DIN Cable........................................................................ 6
DIN – Port Pins..........................................................................................................................................6
Camera Connections – DIN to BNC / RS-485 Adaptor Cable .............................. 7
Observation System / DVR Connections .............................................................. 7
Observation System / DVR Connections (cont.) ................................................... 8
Connectivity Diagram ................................................................................................................................ 8
Changing the Camera Address Settings............................................................... 9
DIP Switch Address Chart ......................................................................................................................... 9
Calculating the DIP Switch Addresses .................................................................................................... 10
Technical Specifications...................................................................................... 11
Dimensions.............................................................................................................................................. 11
Camera Features
• High Resolution Color CCD camera
• 480 lines, 1.0 lux
• Indoor Pan/Tilt Dome System
• Supports PELCO-D Protocol
• Auto Pan -330°, Auto Tilt -90°
• 3x Digital Zoom
• Light Weight, Compact Size
• 6 pin DIN connection & BNC / RS-485 Adaptor
• Smoked housing provides unobtrusive appearance
4
Page 5

Getting Started
The system comes with the following components:
Getting Started
1 x MINI COLOR PAN / TILT
DOME CAMERA
1 x MOUNTING BRACKET
1 x 60’ DIN EXTENSION
CABLE
1 x DIN TO BNC / RS-485
ADAPTOR CABLE
1 x POWER ADAPTOR FOR
1 x HARDWARE MANUAL
DIN TO BNC ADAPTOR
CHECK YOUR PACKAGE TO CONFIRM THAT YOU HAVE RECEIVED THE COMPLETE
SYSTEM, INCLUDING ALL COMPONENTS SHOWN ABOVE.
5
Page 6

Camera Connections – DIN Cable
Camera Connections – DIN Cable
NOTE: Visit us on the web at http://www.lorexcctv.com for a full list of compatible Observation Systems.
Before installation make sure that:
• You have the proper lift equipment or ladder to reach the installation location.
• Electrical power is not connected to the dome camera and surveillance monitor during installation.
DIN Installation
NOTE: The camera will only work on CHANNEL 1 when using the DIN Cable connection.
1.) Conne
NOTE: Confirm that the arrows on the DIN Camera Cable and the
DIN Extension cable are pointed together when connecting the
cable. If the pins in the DIN Connector are bent, the Camera will
NOT function.
2.) Attach the adaptor plate on the ceiling using the 3screws
provided (M3X20 screw). The mounting bracket must be attached to a structural object, such as a ceiling
rafter which will support the weight of the camera.
3.) Twist the base of the dome camera on to the adaptor plate on the ceiling. Do not hold the clear plastic
bubble or swivel when you attach the dome to the adapter plate.
4.) Connect the other end of the 6
System (the System must include a Pelco-D Pan/Tilt Zoom feature).
5.) Turn on the Observation System.
ct the 60 ft Din cable (included with the dome camera) to the wired lead of the dome camera.
0 ft cable to the CH1 DIN Camera Input on the back of the Observation
Camera DIN Extension
Cable
Observation
System Ports
DIN – Port Pins
6
A. Video Input
B. Audio Out
C. NC (Not Connected)
D. B+ 12V ( Power )
E. Audio Input
F. Camera Audio AMP: B+ 12V ( Power )
G. Ground
Page 7

Camera Connections – DIN to BNC / RS-485 Adaptor Cable
Camera Connections – DIN to BNC / RS-485 Adaptor Cable
NOTE: The camera will work on a BNC channel when using the Adaptor Cable. Please refer to the
Observation System User manual for details on available channels for PTZ functionality.
1.) Conne
NOTE: Confirm that the arrows on the DIN Camera Cable and the
DIN Extension cable are pointed together when connecting the
cable. If the pins in the DIN Cable are bent, the Camera will NOT
function.
2.) Attach the adaptor plate on the ceiling, using the 3screws provided (M3X20 screw). The mounting
bracket must be attached to a structural object, such as a ceiling rafter which will support the weight of the
camera.
3.) Twist the base of the dome camera on to the adaptor plate on the ceiling. Do not hold the clear plastic
bubble or swivel when you attach the dome to the adapter plate.
4.) Connect the other end
5.) Connect the leads from the Adaptor cable to the inputs on the back of the Observation System (the
Observation System must include a Pelco-D Pan/Tilt Zoom feature).
5.) Turn on the Observation System or DVR.
ct the 60 ft Din cable (included with the dome camera) to the wired lead of the dome camera.
of the 60 ft cable to the BNC / RS-485 Adaptor Cable.
Connect to Power Adaptor
Connect to BNC Input
Connect to RS-485 Input
Observation System / DVR Connections
Connect to BNC Input.
Note: BNC Adaptors and/or RCA Cable may be needed for some systems
(as shown above).
Connect to RS-485
Connections:
White: + (positive)
Black: -
Connect to Power
Adaptor
(negative)
7
Page 8

Observation System / DVR Connections (cont.)
Observation System / DVR Connections (cont.)
Connecting to RS-485 (PTZ):
Connections:
White: RS-485 +
Black: RS-485 -
Note: Additional settings are required on the Observation System (to control the
PTZ). Please refer to the Observation System Hardware Manual for menu details
Connecting to BNC:
The BNC end of the cable may be connected directly
to the back of the Observation System or DVR. In
some cases, adaptors may be needed for
connection.
BNC to RCA Adaptor
RCA Cable
BNC to RCA Adaptor
Connectivity Diagram
Camera DIN Extension
Cable
8
Cable
Power AdaptorDIN to BNC / RS-485
Observation System / DVR
RS-485
(PTZ) Port
BNC Port
Page 9

Changing the Camera Address Settings
Changing the Camera Address Settings
NOTE: This is only applicable when using the BNC Adaptor cable. CH1 is the only available channel if
using the DIN Connection.
The DIP switches inside the camera can be changed to set a unique address for the Camera (set to 1 by
default). The address range is between 1~255:
• If using a single camera, the address does not need to be changed. Refer to the Hardware
Manual for the Observation System for camera channel placement and configuration.
• If using multiple cameras, each camera must be set to a unique address using the internal DIP
switches. The DIP switches shown below.
To access the DIP switches:
1. Remove the Dome Cover.
2. Use the chart below to set the desired address. Set the dip switches (ON is up; OFF is down)
using a paperclip or other pointed tool.
DIP Switch Address Chart
Default Configuration: Switch 1 is ON, and
all other switches are off. The address is ‘1’
9
Page 10

Changing the Camera Address Settings
DIP Switch Address Chart (cont…)
Calculating the DIP Switch Addresses
Each switch in the block has a specific associated value. When the switch is turned ON, the value is
added to the total.
Switch # 1 2 3 4 5 6 7 8 9 10 Address
Value 1 2 4 8 16 32 64 128 N/A N/A
Ex. 1 off ON off off ON off off off - - 18
Ex. 2 ON ON ON off off ON ON off - - 103
Ex. 3 ON off off ON ON off off ON - - 153
10
Page 11

Technical Specifications
Image Sensor
Effective Pixels
Scanning System
Scanning Frequency
Horizontal Resolution
Lens
Shutter Speed
S/N Ratio
Digital Zoom Ratio
Pan / Tilt Speed
Pan / tilt Travel
PTZ Protocol
Baud Rate Supported
Minimum Illumination
Video Output
Power Requirement
Operating Temperature
Operating Humidity
Dimensions
Weight
Housings
Connections
1/3” Interline Transfer Color CCD
768K (H) x 494K (V)
525 Lines, 2:1 Interlace
15.734 KHz (H) x 59.94Hz (V)
480 TV Lines
3.8 mm
1/60 ~ 1/100,000 sec.
More than 48dB
3x
Pan 50° /sec.
Tilt 40° /sec.
Pan maximum 330°
Tilt maximum 90°
Pelco-D
2400
1.0 lux (F1.2)
1.0V p-p ( 75 ohms )
• From monitor via cable (when using DIN only)
• From power adaptor (when using the DIN to BNC /
14 °F – 122°F
-10°C to 50°C
90% RH Max
4.21” (W) x 4.35” (H) x 4.21” (D)
107mm (W) x 110.5mm (H) x 107mm (D)
2.5 lbs
1.1 kg
Black – ABS Plastic
• 6 pin DIN -OR-
• BNC with RS-485 Adaptor and Power Adaptor
Technical Specifications
RS-485 Adaptor cable).
Dimensions
As our products are subject to continuous improvement, LOREX Technology Inc. and its subsidiaries
reserve the right to modify product design, specifications and prices, without notice and without
incurring any obligation. E&OE
11
 Loading...