

Page 1
QLR0440 SERIES
QUICK START GUIDE
4 PORT PCI CARD
DIGITAL VIDEO RECORDER
PACKAGE CONTENTS:
1 x 4 Port PCI Capture Card
1 x User’s Manuals
1 x Quick Start Guide
1 x Software CD
ENGLISH REVISION # R3
NOTE:
QLR0444 includes:
4 x Cameras
4 x 60ft extension cables
4 x Power adaptors
4 x 4 PIN to RCA Convertor cables (ACC425 - optional)
Page 2
STEP 1
For detailed setup information,
please refer to your User’s manual.
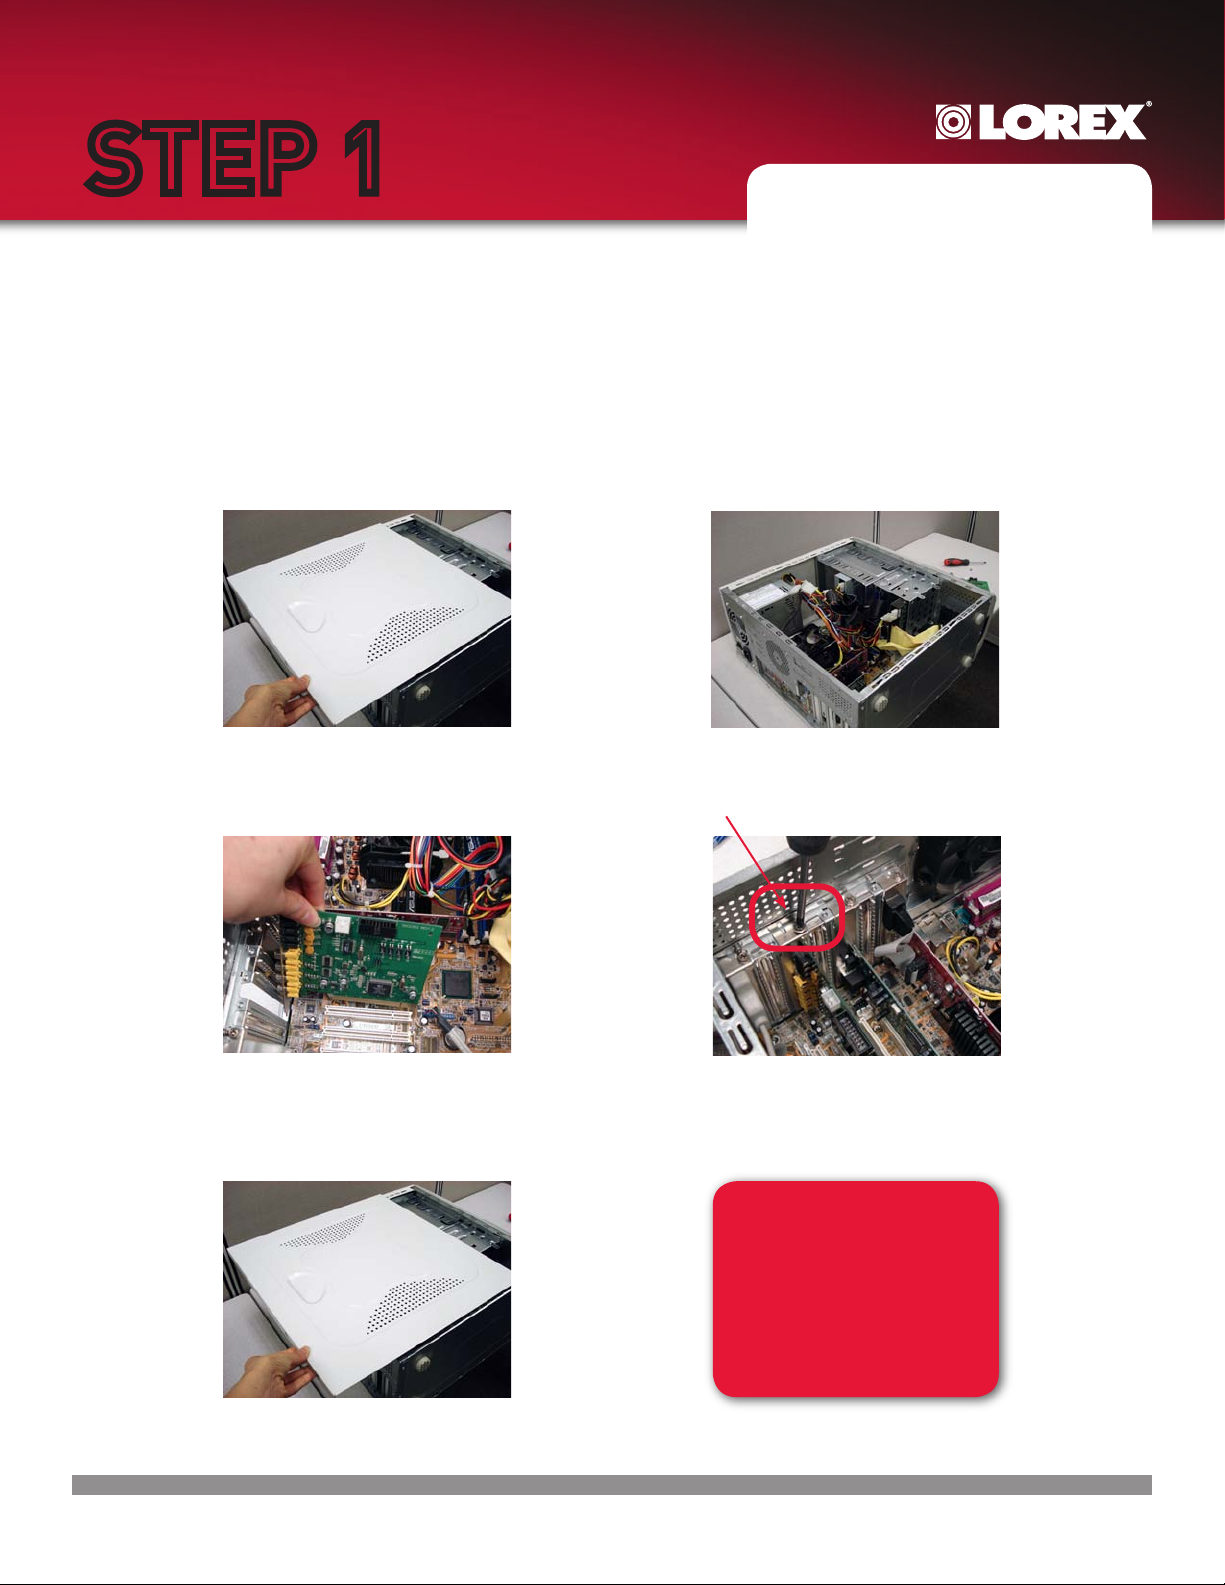
Hardware Installation
NOTE: Please turn off the computer’s power prior to installing the QLR Capture Card. If you are unfamiliar
with installing PC hardware, it is recommended to have a PC technician perform the installation.
1. Using a screw driver remove the
screws from the cover of your
computer.
3. Insert the PCI Capture card into an
available expansion slot.
2. The picture shown is of a computer
with its cover removed.
4. Secure the PCI Card by tightening the
screw with a screw driver.
5. Slide the computer cover back on
and secure it with screws using a
screw driver.
QLR0440 SERIES QSG_EN_R3
Congratulations!
You have completed Step 1
successfully. Your computer
can now support up to 4
cameras.
Page 1
Page 3

STEP 2
Before you install a camera, carefully plan where and
how you will position the camera, and where you will
route the cables.
Camera Installation
NOTE: The 4 Port PCI card has 4 Video inputs, allowing you to connect up to 4 cameras (the instructions
below apply to the cameras included with QLR0444). You may connect your own cameras, however please
make sure to use a proper power adaptor NOT EXCEEDING 12V DC for each camera.
1. Connect the female end of the
supplied 60’ extension cable to
the camera.
4. Connect the included 12V DC
power adaptor to the Power
end of the extension cable.
2. Confirm that the arrows on the
DIN Camera Cable and the DIN
Extension cable are pointed
together when connecting the
cable. If the pins in the DIN
Cable are bent, the Camera will
NOT function.
5. Connect the 12V DC Power
adaptor to a power outlet.
Note, you will be able to view
images from the cameras
after installing the software
and drivers, see step 3.
3. Connect the RCA Video end of the
supplied 60’ extension cable to one
of the video input at the back of your
computer. Follow the same steps to
connect the other cameras.
WARNING - For QLR0444, you are
required to use the included power
adaptor. Use of a non-regulated, nonconforming power adaptor can damage
the cameras and will void the warranty.
*
*NOTE: Depending on your
camera bundle you may have
an accessory 4 PIN to RCA
Convertor cable (ACC425).
QLR0440 SERIES QSG_EN_R3
Congratulations!
You have completed Step 2
successfully. Your cameras
are now connected to your
computer.
Page 2
Page 4

STEP 3
Driver Installation on Local
Computer (Server)
VistaPro4 software CD includes both Video
and Audio Drivers. It is recommended that
you install the Video Driver first and follow
the same steps to install the Audio driver.
1. Once you turn on your PC after
inserting the PCI Card, Microsoft
Windows™ will automatically
detect the newly installed
hardware and will prompt you to
install the drivers. Insert the
VistaPro4 Software CD and
proceed with the driver
installation. Simply follow
the screen prompts.
4. Select “Driver” and click “OK” to
proceed with the installation.
2. Choose “Install from a list of
specific location (Advanced)”
option and press the “Next”
button.
5. Once you see this warning screen,
press “Continue Anyway” to
proceed with the installation.
3. Select “Search for the best driver
in these locations” option. Select
“Include this location in the
Search” option. Select your CD
Rom drive (e.g., “D” or “E” drive)
and press the browse button to
locate the drivers from the
VistaPro4 software CD. Press
Next to proceed with the
installation.
6. Click the “Finish” button to
complete the installation.
NOTE: The PCI card does not support audio, nor do the cameras included
with QLR0444. You can use the sound card of your computer (depending
on your computer configuration) to capture and record audio.
QLR0440 SERIES QSG_EN_R3
Congratulations!
You have completed Step 3
successfully. Your computer
now has the VistaPro4 PCI
Card drivers installed.
Page 3
Page 5

STEP 4
It is recommended to connect the cameras
to your PC prior to installing the VistaPro4
software application
VistaPro4 Software Installation on Local Computer (Server)
1. Browse to your CD drive and
open the VistaPro4 software.
4. Click “Next” and proceed with
your installation.
2. Open to view the contents
from within the Install folder.
5. Enter the necessary information
and press the “Next” button. The
serial number can be found within
the sleeve of the VistaPro4 CD.
E.g.
3. Double click to execute the
Setup.exe file.
6. Choose “All Components” option
and press the “Next” button.
7. Wait for the software installation
to complete and click “Yes” to
register your product. This
ensures that the server application
launches at the start up of your
computer.
QLR0440 SERIES QSG_EN_R3
Tip: Please keep a copy of your serial
number in a safe location.
8. Open the VistaPro4 Server software
icon from your computer desktop. If
the cameras are connected, you will
see the live images.
Congratulations!
You have completed Step 4
successfully. Your computer
is now ready to view, record
and play back video using the
VistaPro4 software.
NOTE: Click “Unblock” when you see the Windows XP™ Security Alert.
Page 4
Page 6

STEP 5
Register for Lorex DDNS
Port Forward Your Router First before proceeding with the set-up. You must forward Ports: 2000, 2001, 2002, 2003
(TCP/IP). All routers are different. To port forward your router, please refer to your router’s user manual. A router
configuration guide featuring the most commonly used routers in the market is available on
www.lorexcctv.com/support in the Consumer’s Guide Section.
1. Retrieve System Information:
In order to register for Lorex
DDNS, you need to make a note of
your computer’s Physical ID (MAC
address). Click on “Start” (located
and the left side of your monitor
screen) then click on “Run” and
type “cmd”. Type “ipconfig /all”
and make a note of your
computer’s Physical Address
(e.g. 001D09C4D5C8).
4. Complete New Account
Information:
1
2
3
1. FOR PRODUCT LICENSE select
the QLR0440 Series option from
the drop down menu.
2. FOR PRODUCT CODE enter your
computer’s physical address
(recorded in Step 5, section 1).
3. FOR URL REQUEST enter a
unique URL name (e.g. tomsmith).
Note: URL name should not be
more than 15 characters.
2. DDNS (Dynamic Domain Name
Service) Set-up:
Open your web browser (Internet
Explorer by default) and enter
http://ddns.lorexddns.net in
the address bar.
3. Create Account:
From Lorex DDNS website, click
the CREATE ACCOUNT option.
http://www.lorexddns.net
5. Registration Email:
An automated REGISTRATION
CONFIRMATION EMAIL will be sent to your
email. Print and Save this confirmation. You will
need this information to access your System
remotely.
EXAMPLE:
DDNS Server: ddns.lorexddns.net (already added)
Domain Name: tomsmith
User ID: tomsmith1
Password: (your password)
Create Account
Congratulations!
You have completed
Step 5 successfully. Your
computer is now configured
to work with Lorex Free
DDNS Service.
QLR0440 SERIES QSG_EN_R3
Page 5
Page 7

STEP 6
Setup DDNS (on VistaPro4 Server Software)
1. Double click on the “VistaPro4 Server” icon
from your desktop to open the VistaPro4 Server
software and click on the “Setup” icon. You
will now be asked to enter the User Confirm “User
ID” (admin by default) and “Password” (master by
default). Press the “OK “ button.
3. From within the “DDNS Setup” screen, enter the
information sent to you via the “Registration
Confirmation Email”.
2. In the “Setup” screen and from
under the “System” tab ensure
that there is a check mark to
“Enable auto register to IP server”
and click on the DDNS button to
enter the DDNS information you
received in the Registration email.
tomsmith
tomsmith1
******
SUCCESS
5
QLR0440 SERIES QSG_EN_R3
1. DDNS Server: ddns.lorexddns.net (already added)
2. Domain Name: Enter the DOMAIN NAME sent to
you in the REGISTRATION CONFIRMATION EMAIL
(i.e.tomsmith).
1
3. Enter the USER ID sent to you in the
2
REGISTRATION CONFIRMATION EMAIL
(i.e. tomsmith1).
4. Enter your PASSWORD (from the DDNS
3
Registration Email sent to you).
5. Click the OK button.
4
Press the OK button again to exit the “Setup” menu.
6
Within the VistaPro4 Server window, click the
Power button to turn off the server and wait for 10
seconds. You will now be asked to enter the User
Confirm “User ID” (“admin” by default) and
“Password” (“master” by default). Press the “OK “
button.
6. Repeat steps 1 - 3 to enter to “DDNS Setup”
menu. If your settings are entered correctly, you
will see Status: “SUCCESS”.
Page 6
Page 8
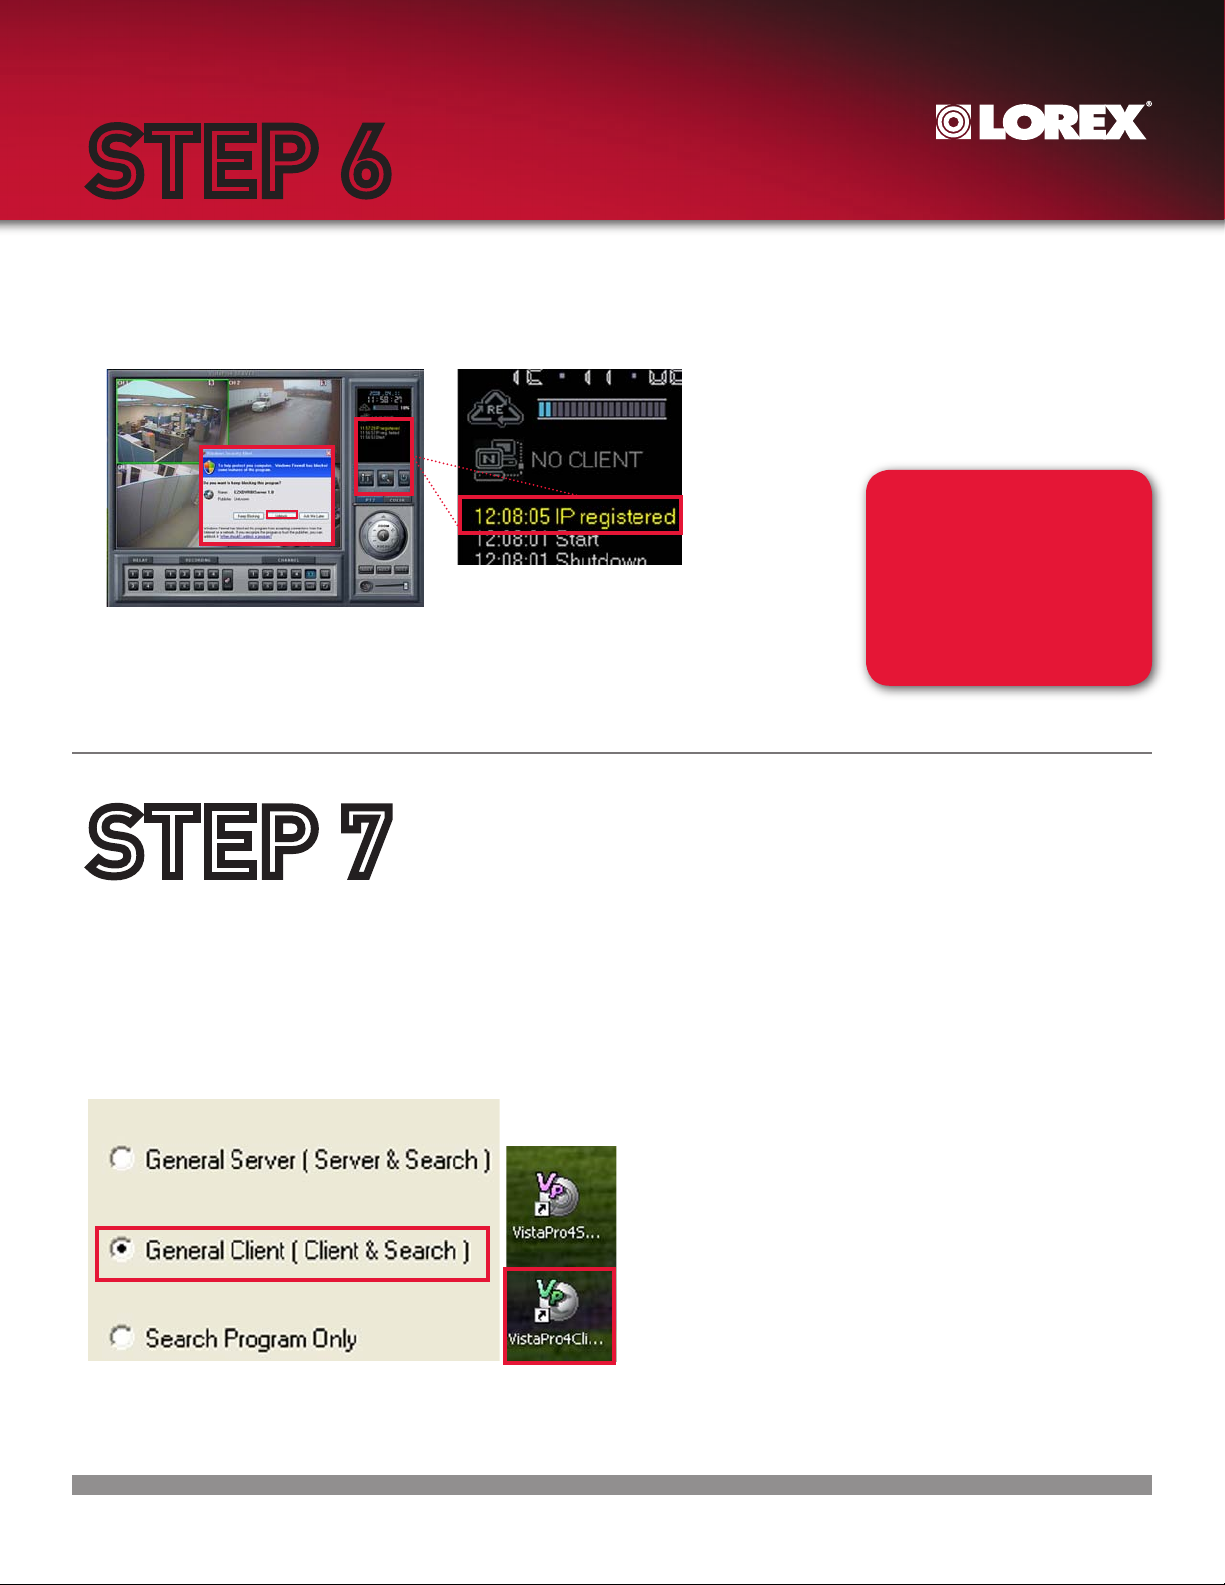
STEP 6
4. Double click the VistaPro4 Server icon from your desktop to open it.
You will see the live images if the cameras are connected. You
will also see “IP registered” if your settings are right. If you
see “IP failed”, please recheck your settings.
(continued)
NOTE: Click “Unblock”
when you see the
Windows XP™ Security
Alert.
Congratulations!
You have completed Step 6
successfully. Your computer
is now ready to view, record
and play back video remotely
using Lorex DDNS.
STEP 7
Software Installation on Remote Computer (Client)
Follow the installation screens as per Step 4 (section 1 - 5) to install the Client software. Once you
see the “Select Component” screen, choose “General Client (Client & Search) option and press the
“NEXT” button. After the installation is complete, you will see VistaPro4 Client and Search icons on
your desktop. Click on the VistaPro4 Client software icon to open the Client software .
QLR0440 SERIES QSG_EN_R3
Page 7
Page 9
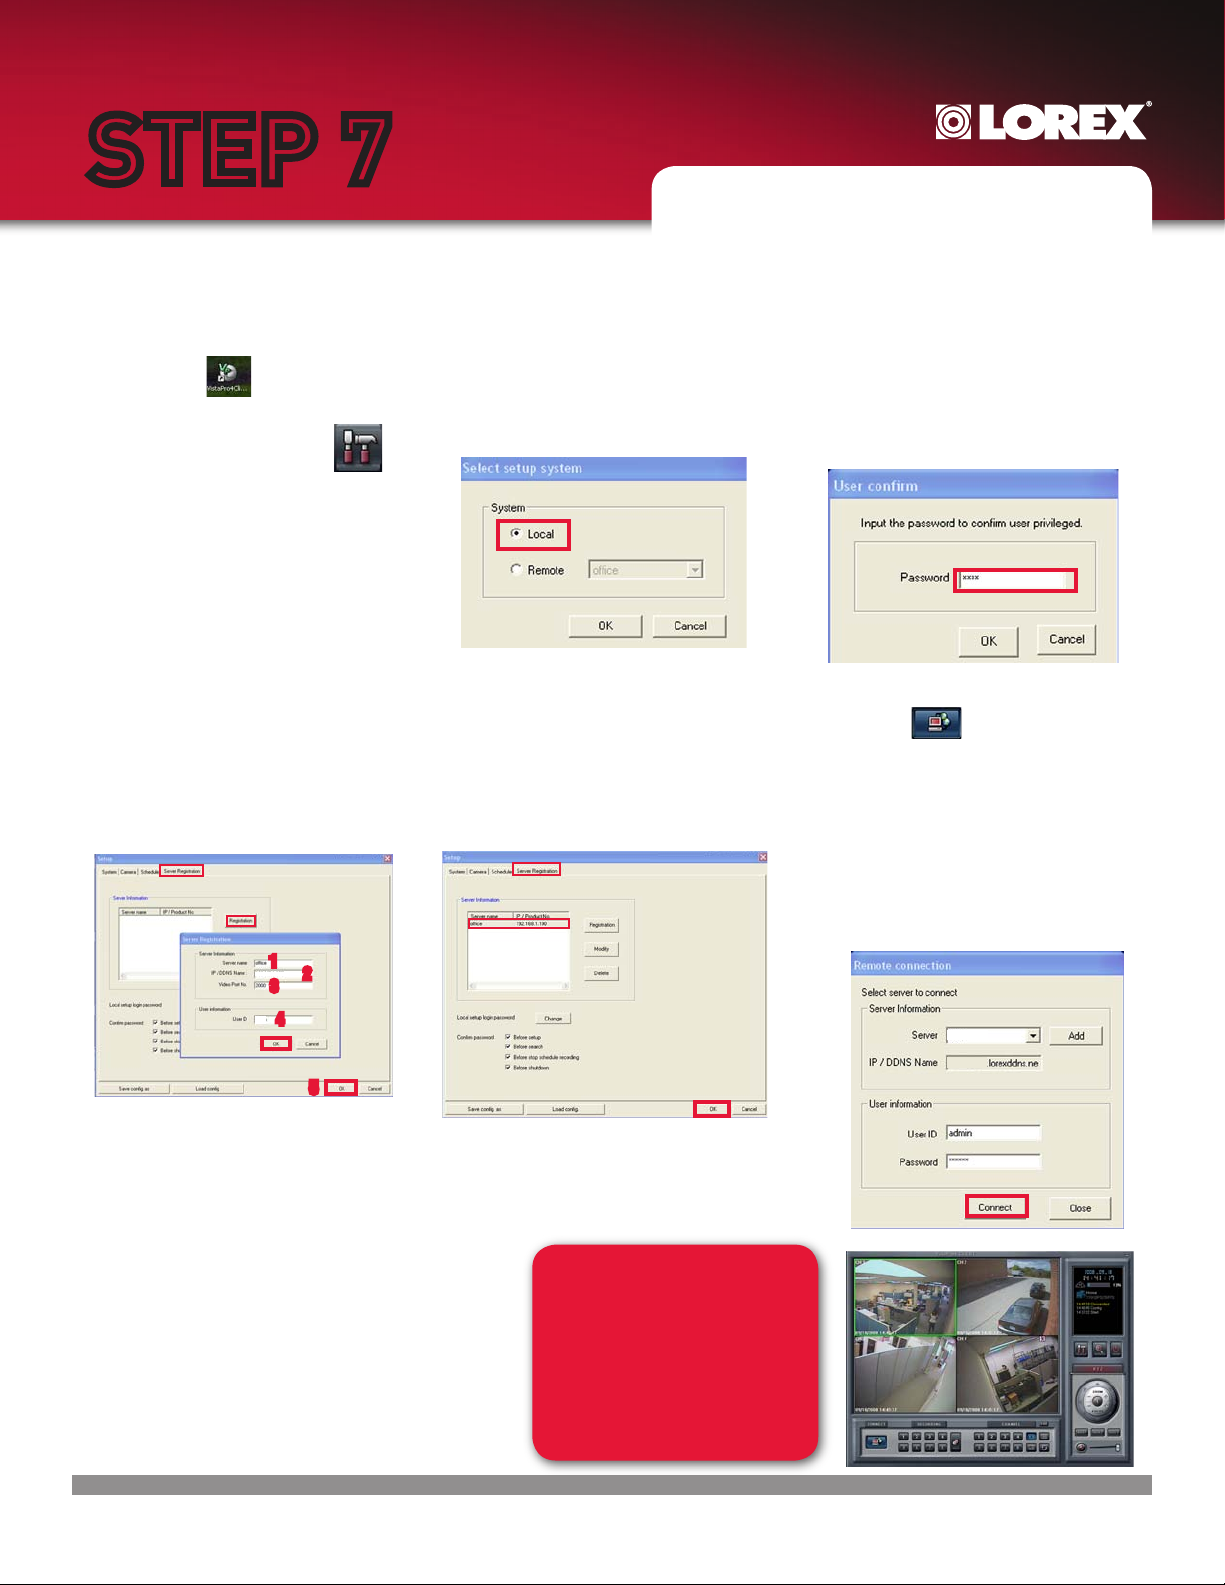
STEP 7
(continued)
NOTE: Please make sure that VistaPro4
Server Software is running while configuring
the VistaPro4 Client Software.
Enable DDNS (on VistaPro4 Client Software)
1. Double click on the VistaPro4
Client icon from your
desktop to open the Client
software and click on the
“Setup” icon.
4. From within the “Setup” screen,
click on the “Server Registration”
tab and within “Server
Information”, click on the
Registration button to complete
the Server Registration.
2. On the “Select Setup System”
screen and from under “System”
you will see “Local” selected by
default. Press the “Ok” button.
5. On the “Setup” screen and within
the “Server Registration” tab, select
the server name you created (e.g.
office) and press the “OK” button.
3. Once you press the “OK” button, you
will be prompted to enter “User
Confirm” password. Type “1111”
(default password) and press the
“OK” button.
6. On the VistaPro4 software screen,
press the
On the “Remote Connection”
screen, choose the Server name
you created (e.g. Office). IP/DDNS
name will already be filled out.
The default User ID is “admin”
and Password is “master”. Press the
“Connect” button to connect to the
remote live site.
“Connect” button.
1
tomsmith
2
3
admin
4
5
1. Server Name: Type any name
(e.g. Office)
2. IP/DDNS Name: Enter the
DOMAIN NAME sent to you in the
REGISTRATION CONFIRMATION
EMAIL (i.e.tomsmith)
3. Video port by default is 2000.
4. USER ID (by default is admin).
5. Click the OK button.
QLR0440 SERIES QSG_EN_R3
Office
tomsmith
Congratulations!
You have completed Step 8
successfully. Your computer
is now ready to view, record
and play back video remotely
using Lorex DDNS.
Page 8
Page 10
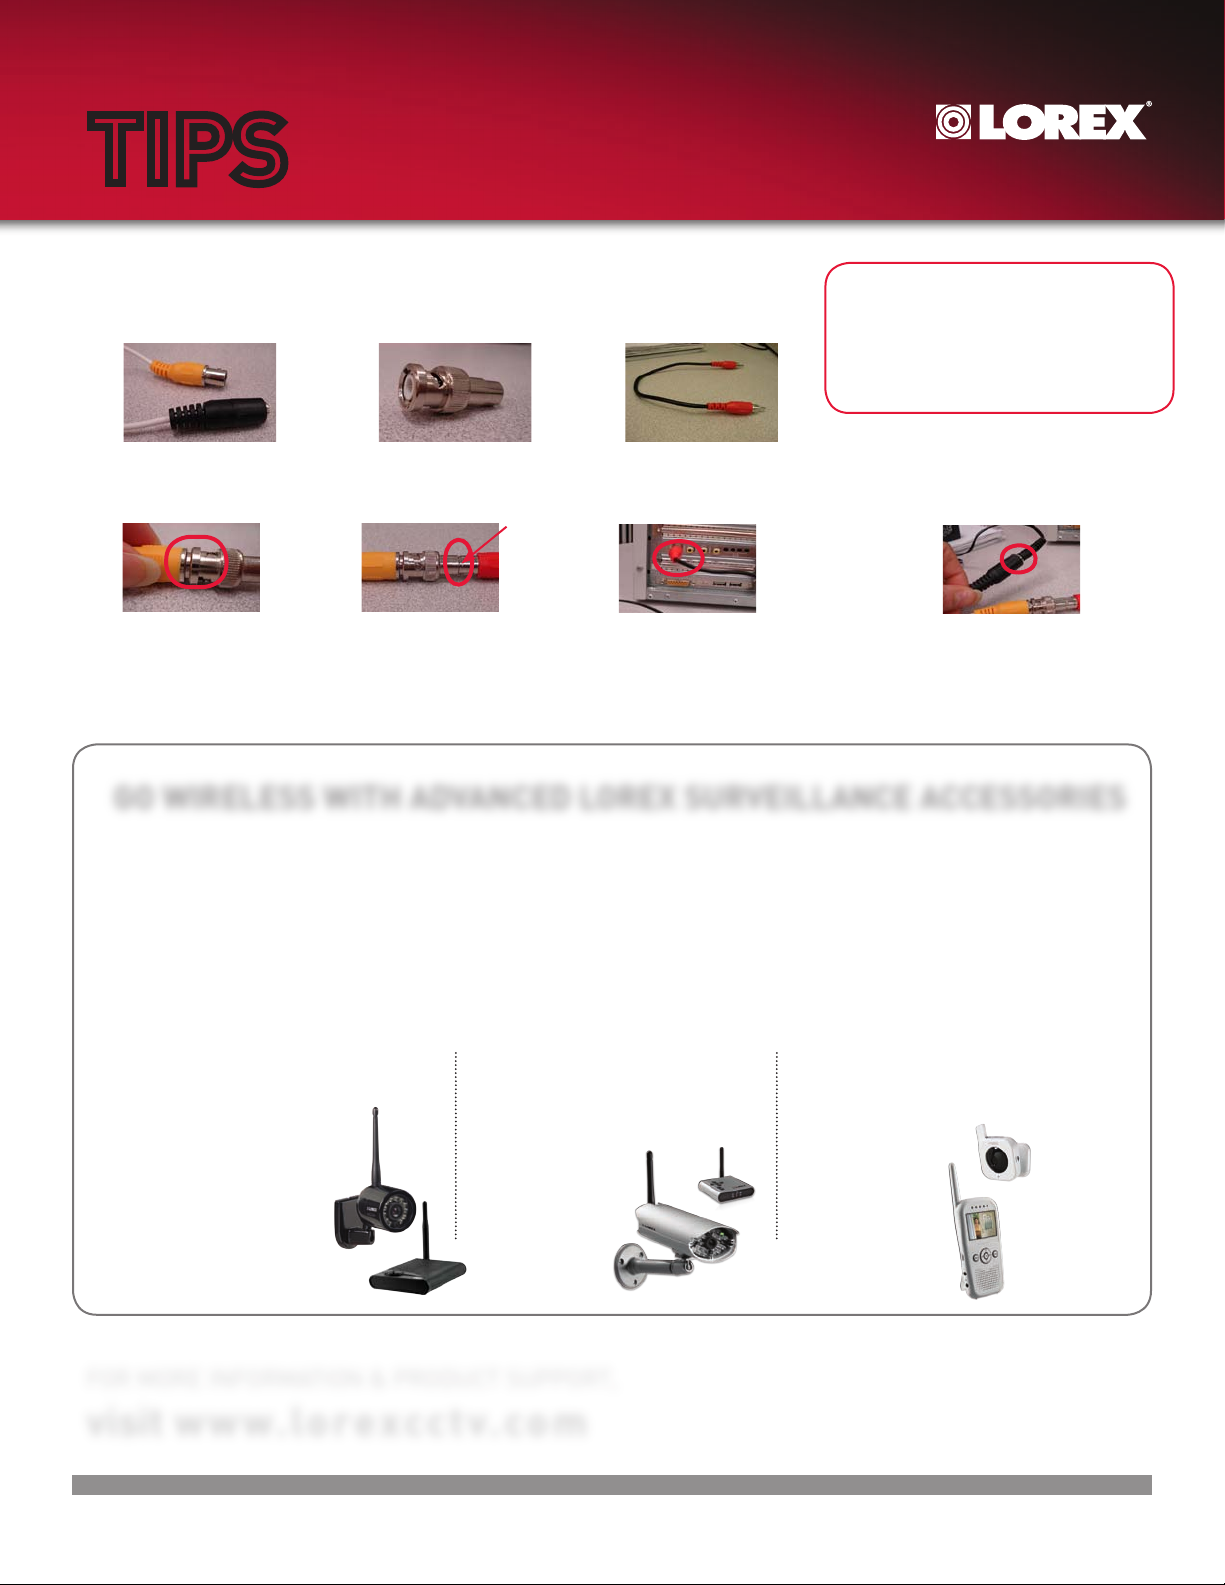
TIPS
How to Connect BNC Cameras (not included)
BNC Male to RCA Female
Connector Kit (Model BNC-4PK)
You can order the connector kit
from our website at
www.lorexcctv.com
Camera with BNC Connector
BNC Male to RCA Female Connector
RCA Male to Male cable
BNC Cameras require BNC Male to Female connector & RCA Male to Male cable to connect to the VistaPro4 PCI Card.
1. Connect BNC female
end of the camera to
the BNC Male end of
the connector.
2. Connect the RCA Cable.
3. Connect the other end of
the RCA Male cable to the
video port of the PCI Card
(already inserted to your
computer).
4. Connect your Camera Power
adaptor to the Power end of
the Camera Cable.
GO WIRELESS WITH ADVANCED LOREX SURVEILLANCE ACCESSORIES
CONNECT in minutes
Choose from products that allow
you to view from your TV, PC/
Laptop, Mobile Phone or even just
a simple web browser. The choice
is yours.
SEE anywhere
Whether you are at home, at
the office, out shopping or on
holiday, you no longer have
to wonder what’s happening.
Simply watch it live as it
happens.
HEAR everything
Keep track of sounds and voices
with the built-in microphones
that lets you hear everything you
need to hear.
PROTECT what matters
Easy, secure local and /or remote
access helps you see, hear and
protect your business, home, or
cabin - and anything else that
matters to you.
Enhanced Wireless Surveillance
LW1010/LW1020 SERIES
• Wi-fi-friendly, no
interference from
common household
applicances
• Automatic channel
switching
• View remotely
through a mobile
phone or web
(select models)
Ultra Digital Wireless Surveillance
LW2100 / LW2100R SERIES
• Private, interference
free, superior image
clarity
• 40ft IR night vision
for no/low light
viewing
• Digital Pan/Tilt/
Zoom feature
FOR MORE INFORMATION & PRODUCT SUPPORT,
visit www.lorexcctv. com
QLR0440 SERIES QSG_EN_R3
Ultra Digital Wireless Monitoring
LW2002 SERIES
• Private, interference
free, superior
image clarity
• Portable 2.4” color
LCD receiver with
Lithium rechargeable
battery
• Convenient receiver
docking cradle
Page 9
 Loading...