

Page 1
SWEET PEEK MINI
VIDEO BABY MONITOR
USER’S GUIDE
Version 1.0
ENGLISH
FRANÇAIS
ESPAÑOL
www.lorexbaby.com
Page 2

Safety Precautions
• Adult assembly is required. Keep small parts away
from children when assembling.
• This product is not a toy. Do not allow children or
infants to play with it.
• This video monitor is not a substitute for responsible
adult supervision.
• Test the video monitor before use. Become familiar with
its functions.
• Keep the cords out of reach from children and infants.
• Never use extension cords with power adapters.
• Only use the chargers and power adapters provided.
Do not use other chargers or power adapters as this
may damage the device and battery pack.
• Only insert batteries/battery pack of the same type.
• Insert batteries with the correct polarity.
• Do not mix new and used batteries.
• Do not mix alkaline, standard, and rechargeable
batteries.
• Remove exhausted batteries from the product.
• Keep all batteries away from children and infants.
• Dispose or recycle batteries in accordance with local
laws, which may vary by location.
• Do not cover the video monitor with a towel or blanket.
• Do not use the video monitor near water.
• Do not install the video monitor near a heat source.
• Do not touch the plug contacts with sharp or metal
objects.
• Keep this user’s guide for future reference.
To Avoid Injury to
Children & Infants:
• MAKE SURE to keep the camera and all power
cords are least 3ft / 1m away from cribs and out of
reach of your child.
• Use the included cable clips to help keep power
cords away from your child.
3ft / 1m
Page 3

ENGLISH
Table of Contents:
Product Includes ..............................2
Monitor Overview ...........................2
Camera Overview ...........................3
Getting Started ...............................4
Optional - Wall Mounting the Camera ....... 7
Using Your Baby Monitor ................8
Using the Menu ....................................... 8
Talking to Your Baby ................................ 9
Adjusting Volume .................................... 9
Adjusting Screen Brightness ...................... 9
Turning on the Night-Light ....................... 10
Changing Channels ............................... 10
Enabling VOX Mode (Voice Trigger) ........ 12
Video Off Mode (Audio Only Mode) ....... 13
Pairing Additional Cameras ..........14
Disabling Channels ............................... 16
Technical Specifications .................17
Camera ............................................... 17
Monitor ................................................ 17
Troubleshooting ............................18
Need Help? ...................................18
1
Page 4

Product Includes
Camera
Screws & Anchors
x1
Monitor
x1*
x2*
x2*
Power Adapter
x1*
Power Adapter
Cable Clips
x1
Battery
x2*
x1
*Contents may vary by model
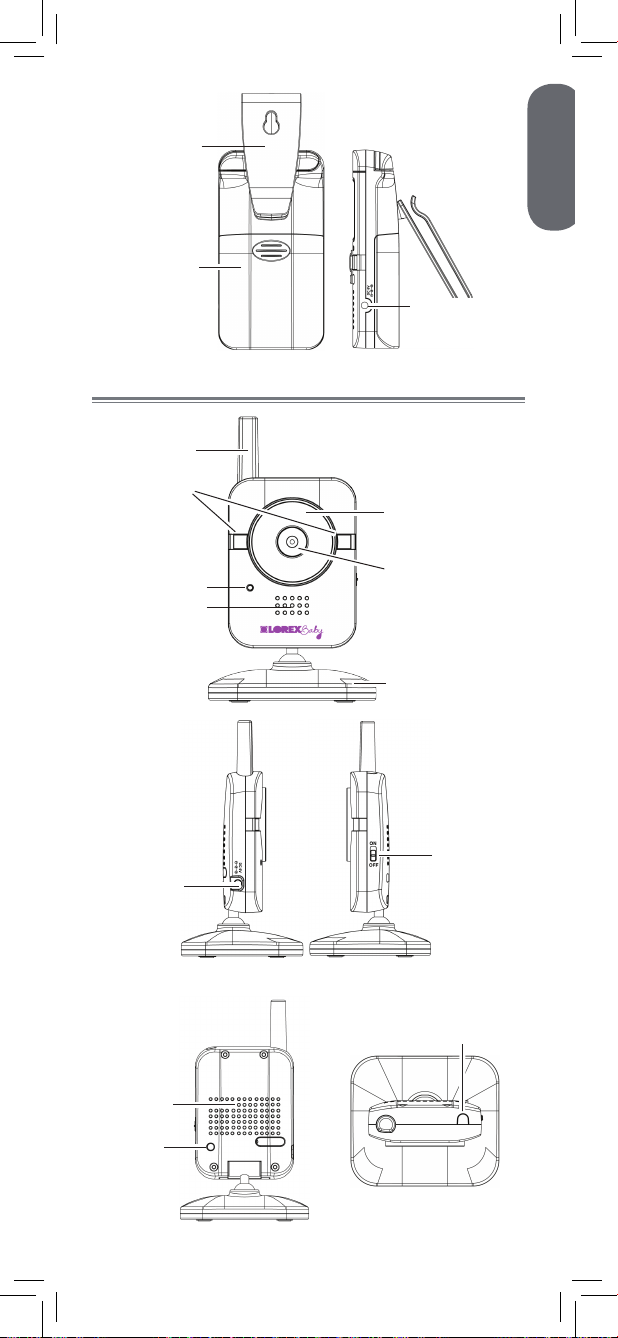
Monitor Overview
Antenna
Sound LEDs
Display
Power LED
Power on/off
Video on/off + VOX
ESC / night light
Speaker
Talk
Link LED
Volume up/down
Menu
2
Page 5
ENGLISH
Belt clip
stand
Battery
compartment
Camera Overview
Antenna
Night-light
Power port
Nighttime LED’s
Power LED
Microphone
Power port
Speaker
Pairing
button
Lens
Mounting stand
On/off
switch
Light sensor
3
Page 6
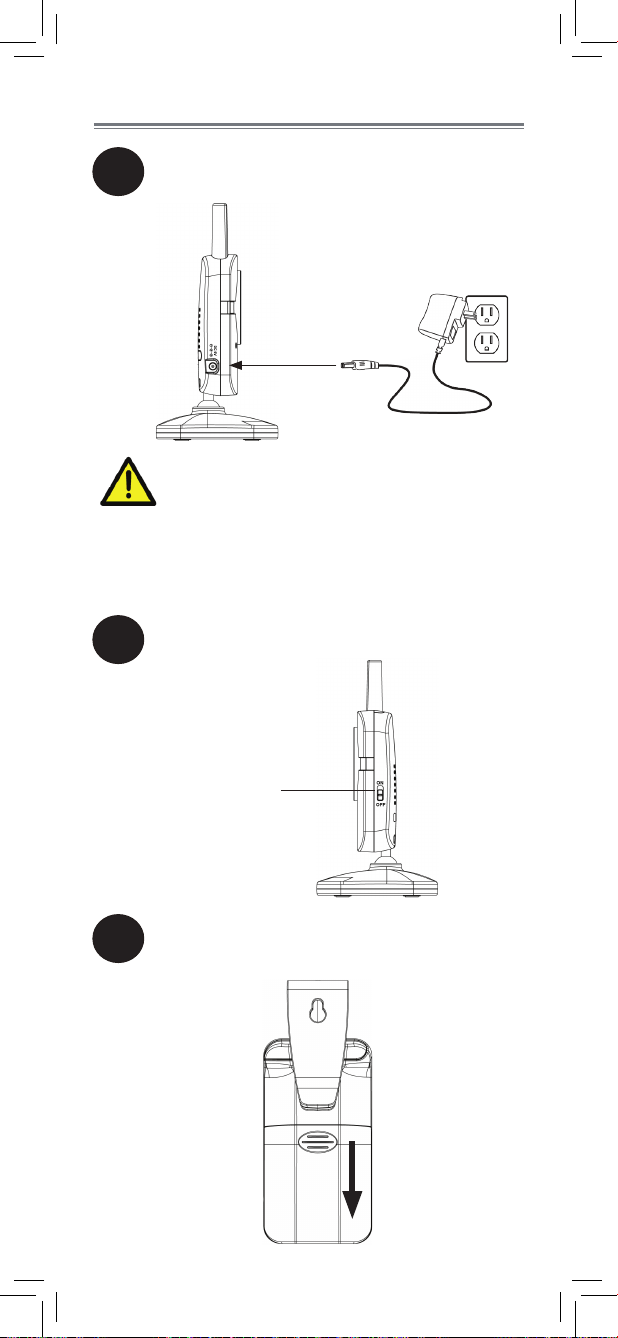
Getting Started
Connect the power adapter to the
1
camera.
Make sure all power cables are at
least 3ft / 1m away from the crib and
out of reach of your child.
Use the included cable clips to help
keep power cords away from your
child.
Slide the power switch to ON.
2
Power switch
Press down on the battery compartment
3
door and slide it off the monitor.
4
Page 7
ENGLISH
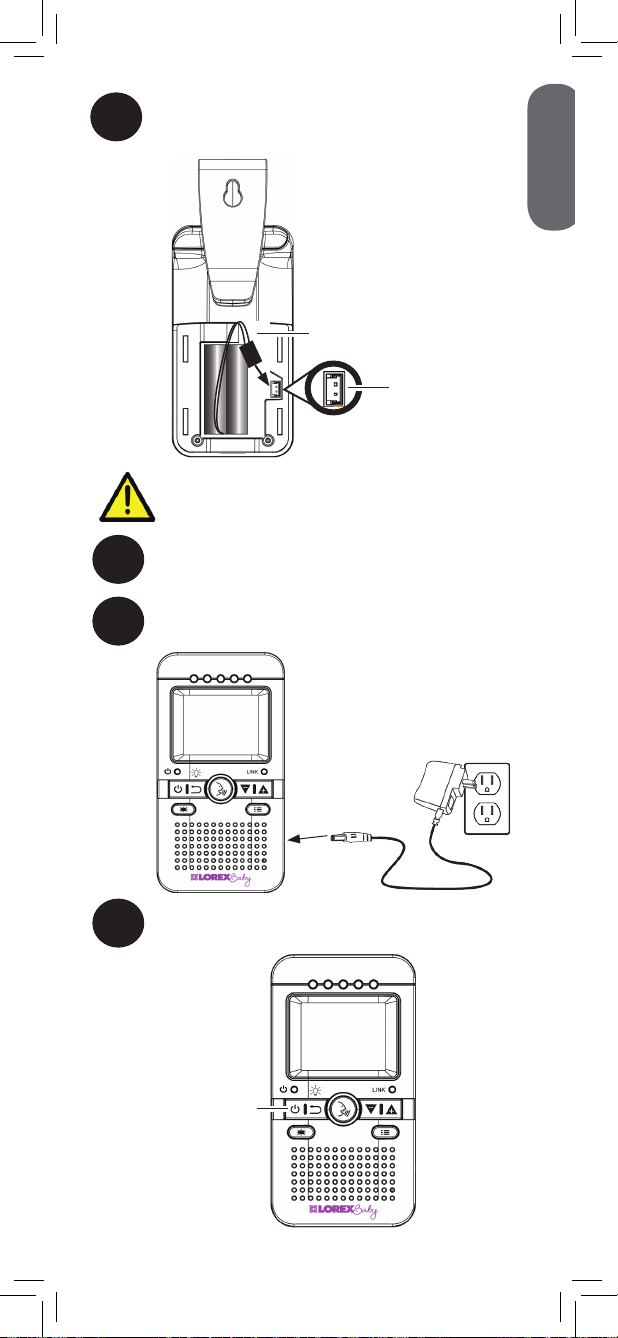
Connect the battery cable to the monitor.
4
Battery cable
Battery
terminals
The battery cable only connects one
way. Do not force the battery cable.
Replace the battery compartment door.
5
Connect the power adapter to the monitor.
6
Press and hold the power button to turn on
7
the monitor.
Power button
5
Page 8

Tips
•It is recommended to charge the battery for
3 hours before use.
•For overnight monitoring, it is recommended to
connect the power adapter. When fully charged,
the monitor will stay on up to 5 hours in normal
mode or X+ hours on Video OFF mode
(see page 13).
•For better reception, flip up the antenna on the
monitor.
Pull up to extend
antenna
6
Page 9

ENGLISH
Optional - Wall Mounting the Camera
Before permanently mounting the camera:
•Determine where you will get the best view of
your baby.
•Ensure the power cable is long enough to power
the camera.
Make sure all power cables are at
least 3ft / 1m away from the crib
and out of reach of your child.
Use the included cable clips to help
keep power cords away from your
child.
Cable Clips
Drill 2 holes in the wall with centers exactly
1
48mm apart.
Tap anchors into holes with a hammer. Insert
2
screws 2/3 of the way.
Align the mounting points with the screws
3
and push the camera down.
48mm
48mm
Mounting points
7
Page 10

Using Your Baby Monitor
The monitor shows the following icons during use:
Icon Meaning
Signal strength
Selected
channel
Battery full*
Battery low
Camera out of
range or off
*When battery is charging, icon will fill up.
Icon Meaning
Talk activated
Sequence
mode activated
Night-light
activated
Night vision
activated
VOX mode
activated
Using the Menu
1
Press to open menu
2
Press up/down to
select sub-menus and
options
Press to open submenus and confirm
menu options
3
Press to go back/exit menu.
8
Page 11

ENGLISH
Talking to Your Baby
Press and hold to talk to
the selected camera
Adjusting Volume
Press to adjust the volume
Adjusting Screen Brightness
1
Press to open menu.
Then, press again
to select Brightness
sub-menu
9
Page 12

2
Press to adjust brightness
Press to confirm brightness
Press to exit menu.
3
Turning on the Night-Light
Press and hold until
appears on the screen
to turn on the night-light
for the currently selected
camera
Press and hold until
goes away to turn off the
night light
Changing Channels
1
10
Press to open the menu
Page 13

ENGLISH
2
Press up/down to select
Press to confirm
3
1
2
3
4
Press up/down to select
the channel you would like
to view
OR
Select to select
Sequence mode. During
Sequence mode the
monitor will automatically
switch channels every 6
seconds
4
Press to confirm channel
To connect additional cameras to
the monitor, see “Pairing Additional
Cameras” on page 14.
11
Page 14

Enabling VOX Mode (Voice Trigger)
In VOX mode, the monitor’s screen and speaker
will turn off after a minute unless sound is
detected at the selected sensitivity level. This
conserves battery power, and alerts you only
when needed.
To activate VOX mode:
1
Press and hold until
is shown
While VOX is activated, the monitor’s screen and
speaker will turn off after a minute unless sound is
detected above the preset sensitivity level. Press any
button to turn the screen back on. When VOX is on, a
VOX icon is shown on the screen.
VOX mode will not work while Sequence
mode is activated.
To deactivate VOX mode:
Press and hold until the icon
1
goes away.
12
Page 15

Video Off Mode (Audio Only
ENGLISH
Mode)
1
Press to turn the screen off
and monitor sound only.
The monitor will play sound
from the selected channel
only.
Notes
•If Sequence mode is enabled, the monitor will
play sound from the channel that is currently
selected.
•VOX mode will override Video Off mode.
See “Enabling VOX Mode (Voice Trigger)” on
page 12 for details.
Press any button to turn the screen back
2
on.
13
Page 16

Pairing Additional Cameras
The camera(s) included have already
been paired with the monitor. If you have
purchased additional add-on cameras (model#
BB1811AC1), OR if your monitor and camera
are not paired up, follow the steps below.
To pair a camera to your monitor:
Place the camera and monitor next to each
1
other. Make sure the camera and monitor
are turned on.
2
Press to open the menu
3
Press to select
Press to open pairing
sub-menu
14
Page 17

4
ENGLISH
Press to select the
channel you would like
to pair the camera to
Press to begin
pairing.
The LINK LED will
start flashing
If a camera is already connected
to this channel, the new camera
will replace the existing camera.
Press the PAIR button on the back of the
5
camera.
1
2
3
4
PAIR button
Images from the camera are immediately
shown on the monitor once the camera is
successfully paired.
5
Press twice to exit menu.
Notes
•Immediately move the camera away from the
monitor to avoid speaker feedback.
•The monitor can connect up to 4 cameras.
15
Page 18

Disabling Channels
You can disable empty channels so they do not
appear on the monitor when changing channels
manually or using Sequence Mode. You only
need to do this if you have moved a camera to a
different channel using the pairing function.
To disable channels:
1
Press to open the menu
2
Press to select
Press to open the delete
channel sub-menu
Press to select the channel you
3
would like to delete and press to
confirm.
If a camera is paired to a channel, a *
will appear next to the channel number.
4
Press twice to exit menu.
16
Page 19

Technical Specifications
ENGLISH
Camera
Frequency 2.4GHz
Maximum Range Up to 450ft / 138m outdoors*
Up to 150ft / 46m indoors*
Image Sensor 1/5” Color CMOS
Lens 3.0mm F2.5
IR LED 6 pcs
Power Adapter 6.0V DC 800mA
Weight 0.3lbs / 0.1kg
Monitor
Frequency 2.4GHz
Display 1.8” TFT Color LCD
Power Adapter 6.0V DC 800mA
Battery Li-ion Rechargeable Battery 3.6V DC
750mAh
Battery Life Up to 5 hours in normal mode
Up to X+ hours in Video Off
Weight 0.4lbs / 0.2kg
*Based on unobstructed line of sight. Actual range will vary
based on surroundings.
5.1in
130mm
4.6in
117mm
3.1in
80mm
2.4in
61mm
2.7in
69mm
2.7in
68mm
17
Page 20

Troubleshooting
Problem Solution
No video displayed
on the monitor
Monitor screen keeps
turning off
The camera is not
detected; “Out of
Range” is shown on
the monitor
Feedback / squealing
noise coming from the
monitor
• Press and hold the
button to power on the
monitor.
• Monitor is out of batteries.
Plug in the monitor power
adapter.
• Video Off or VOX mode is
on. Press any button to turn
the screen back on.
• VOX mode is on. See
“Enabling VOX Mode (Voice
Trigger)” on page 12 for
details on disabling VOX
mode.
• The monitor battery is low.
Plug in the monitor power
adapter
• Wrong channel selected.
To change the channel, see
“Changing Channels” on
page 10.
• Make sure the camera is
powered on.
• The camera and monitor
may be out of range. Extend
the antennas on the monitor
or move the monitor and
camera closer together.
• For optimal performance,
avoid placing the
monitor and camera near
televisions, computers,
cordless/mobile phones, or
other electrical equipment.
• You may need to pair the
camera and the monitor
again. See “Pairing
Additional Cameras” on
page 14 for details.
• Your camera and monitor
may be too close to each
other. Move them further
apart.
• Press to lower the
monitor volume.
Need Help?
Product Support is available 24/7 including product
information, user guides, quick start guides, and FAQ’s
at www.lorexbaby.com/support
18
Page 21

CLEANING
Clean the monitor and camera with a slightly damp cloth or an anti-static cloth.
Never use cleaning agents or abrasive solvents.
• Do not clean any part of the product with cleaners with thinners or other
solvents and chemicals. This may cause permanent damage to the product,
which is not covered by the Warranty. When necessary, clean it with a damp
cloth.
• Keep your camera and monitor away from hot, humid areas or strong sunlight,
and do not get it wet.
• Every effort has been made to ensure high standards of reliability for your
baby monitor. However, if something does go wrong, please do not try to
repair it yourself. Contact Customer Service for assistance.
DISPOSAL OF THE DEVICE
At the end of the product life cycle, you should not dispose
of this product with normal household waste, but take the
product to a collection point for the recycling of electrical
and electronic equipment. The symbol on the product, user’s
guide, and/or box indicates this.
Some of the product materials can be re-used if you take
them to a recycling point. By reusing some parts or raw
materials from used products you make an important
contribution to the protection of the environment.
Please contact your local authorities in case you need more information on the
collection points in your area. Dispose of the battery pack in an environmentallyfriendly manner according to your local regulations.
NOTICES
WARNING: Any changes or modifications not expressly approved by the grantee
of this device could void the user’s authority to operate the device.
ENGLISH
FCC NOTICE
This equipment has been certified and found to comply with the limits regulated by
the FCC part 15, subpart C. Operation is subject to the following two conditions:
(1) this device may not cause harmful interference, and (2) this device must
accept any interference received, including interference that may cause undesired
operation. This equipment has been tested and found to comply with the limits
for a Class B digital device, pursuant to Part 15 of the FCC rules. These limits
are designed to provide reasonable protection against harmful interference in
a residential installation. This equipment generates, uses and can radiate radio
frequency energy and, if not installed and used in accordance with the instructions,
may cause harmful interference to radio communications.
However, there is no guarantee that interference will not occur in a particular
installation. If this equipment does cause harmful interference to radio or television
reception (which can be determined by turning the equipment on and off), the user
is encouraged to try to correct the interference by one or more of the following
measures:
•Reorientorrelocatethereceivingantenna
•Increasetheseparationbetweentheequipmentandreceiver
•Connecttheequipmentintoanoutletonacircuitdifferentfromthattowhichthe
receiver is connected
•Consultthedealeroranexperiencedradioortelevisiontechnicianforassistance
CAUTION: To maintain compliance with the FCC(IC)’s RF exposure guidelines, place
the camera at least 20cm (7.87in) from nearby persons.
The video monitor has been tested and meets the FCC(IC) RF exposure guidelines
when used with the belt clip supplied with or designated for this product. Use of
other accessories may not ensure compliance with FCC(IC) RF exposure guidelianes.
19
Page 22

CANADA/IC NOTICE
This device complies with Industry Canada licence-exempt RSS standard(s).
Operation is subject to the following two conditions: (1) this device may not
cause interference, and (2) this device must accept any interference, including
interference that may cause undesired operation of the device.
Le présent appareil est conforme aux CNR d'Industrie Canada applicables
aux appareils radio exempts de licence.
L'exploitation est autorisée aux deux conditions suivantes:
(1) l'appareil ne doit pas produire de brouillage, et
(2) l'utilisateur de l'appareil doit accepter tout brouillage radioélectrique subi,
même si le brouillage est susceptible d'en compromettre le fonctionnement.
Under Industry Canada regulations, this radio transmitter may only operate
using an antenna of a type and maximum (or lesser) gain approved for the
transmitter by Industry Canada. To reduce potential radio interference to other
users, the antenna type and its gain should be so chosen that the equivalent
isotropically radiated power (e.i.r.p.) is not more than that necessary for
successful communication.
Conformément à la réglementation d'Industrie Canada, le présent émetteur
radio peut fonctionner avec une antenne d'un type et d'un gain maximal
(ou inférieur) approuvé pour l'émetteur par Industrie Canada.
Dans le but de réduire les risques de brouillage radioélectrique à l'intention
des autres utilisateurs,il faut choisir le type d'antenne et son gain de sorte
que la puissance isotrope rayonnée équivalente (p.i.r.e.) ne dépasse pas
l'intensité nécessaire à l'établissement d'une communication satisfaisante.
USER’S GUIDE
SWEET PEEK MINI
www.lorexbaby.com
Copyright © Lorex Technology Inc. 2013
 Loading...