

Page 1
Lorex
Baby Camera
User Manual
Ver. 1.0
Page 2
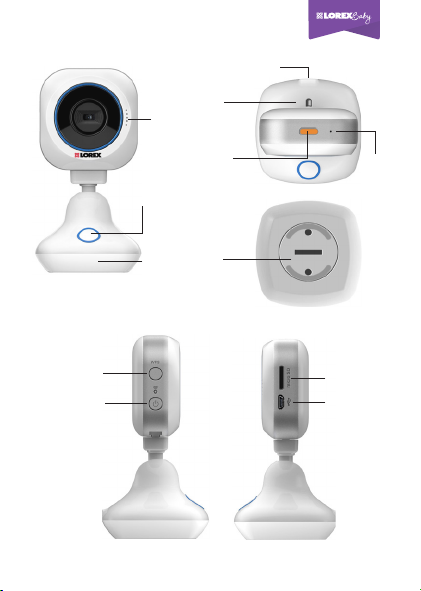
Overview
Micro USB Power Port
Temperature
Sensor
Speaker
LED
Indicator
Night Light
Button
Night
Light
Wall
Mount
Mic
WPS
Button
Power /Mode
Button
microSD
Card Slot
Micro
USB Port
| 1English
Page 3

Power On
Getting Started
Please connect the camera with the provided power adapter.
Press Power button
ashing and then change to orange in a few seconds. That means
the camera is ready.
for 1 second, you'll see the red light
Before you start, you need:
1. Please download [LOREX WONDER]
from Google Play or Apple Store on your
mobile before camera setup.
2. Before connecting your camera to
internet, please make sure you have
a WiFi AP and a mobile connected
to internet.
2 | English
LOREX WONDER
WiFi AP
Mobile
Page 4
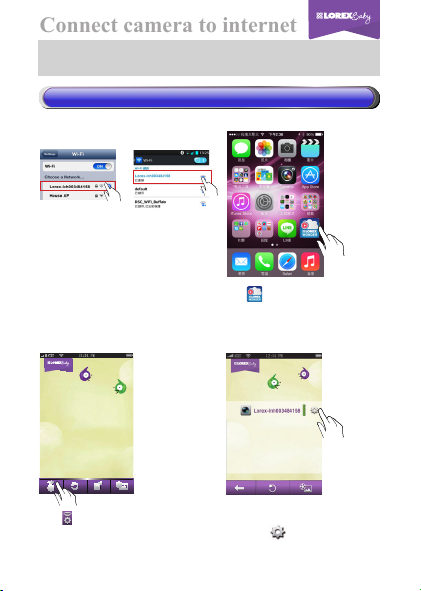
Now you need to do two things. First, setup a WiFi AP for your
Connect camera to internet
camera. Second, add the camera to your mobile.
1) Setup a WiFi AP for your camera
1) Setup a WiFi AP for your camera
Step 1. Step 2.
(iOS) (Android)
Turn on Wi-Fi on your mobile and
select camera (Lorex-XXXXX)
as the AP. This will enable a
connection between your mobile
and camera.
Step 3. Step 4.
Tap to run LOREX
WONDER APP.
LOREX WONDER
Tap in main page.
Choose the camera
and tap .
| 3English
Page 5
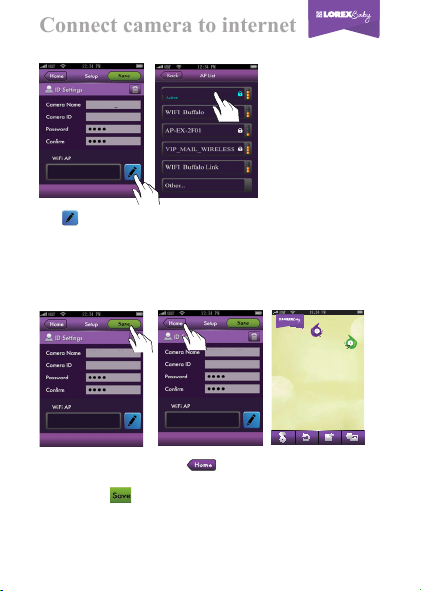
Step 5.
Connect camera to internet
Lorex-lnh003484158
lnh003484158
House AP
Tap to select the WiFi AP for camera
to connect internet.
Step 6.
Lorex-lnh003484158
lnh003484158
House AP
Password is strongly
reconmended.
And then tap .
4 | English
Lorex-lnh003484158
lnh003484158
House AP
Tap to go back to main page.
Camera LED will ash and turn to
steady green.
Page 6

Connect camera to internet
2) Add the camera to your mobile
2) Add the camera to your mobile
Step 7. Step 8.
(iOS)
(Android)
Press (iOS) or
(Android) to go to your
mobile settings.
Step 9. Step 10.
Run LOREX WONDER APP.
Tap to add the camera to
your mobile.
or
You need to switch the AP or 3G/4G
for internet connection.
Tap to scan your camera ID or
you can key-in camera ID manually.
(for Android: you will be guided to install
barcode scanner app if it's not on your mobile.)
| 5English
Page 7

Step 11.
Connect camera to internet
lnh003484158
Step 12.
lch003484158
lnh003484158
Tap and then shoot a picture
for easy camera identication.
3) Start Live View
3) Start Live View
Step 13.
You will see your camera
in main page. Now tap
you camera name.
6 | English
Tap , then tap .
Your camera is added.
Step 14.
You should be able to
live view from your
camera now.
Page 8

Audio & Video features
Tap to take a photo
to your mobile storage.
Tap to record a video to
your mobile storage.
and tap
again to stop.
Tap and start talking,
your baby will hear your voice
from camera. And tap
again to stop.
Tap to mute the sound
from the camera.
| 7English
Page 9

Tap for audio only
Audio & Video features
Lullaby & Controls
monitoring.
Control night light in 3 levels
8 | English
Video recorded on mobile
Photo taken on mobile
Select a lullaby
to play
Play
Stop
Random
Recursive
Night light
Video record on camera
when any alert goes off
Page 10

Alert Notication
Camera provides 3 kinds of alert settings to monitor your baby.
1. Audio Detection
2. Motion Detection
3. Temperature Alert
An alert email and mobile message will be sent to you if any of
alert settings go off.
Step 1. Step 2.
In main page, tap and
go to setup page for [Alert
Notication] setting.
Setup alert settings and enter
e-mail address then tap .
| 9English
Page 11

Getting Help
Q1: Do I need to go from step 1 to step 14 all over again if there's
another mobile'd like to get connected as well?
A1: If you've completed the internet connection of camera with the
1st mobile, you could just start from step 7 for the other mobile(s).
Q2: If I'm outdoors and have no internet access, how do I make
the camera work?
A2: If you're outdoors and AP is not available, there's a simple way
for you to see the camera.
Step 1. Step 2.
(iOS) (Android)
Press the Mode button
for
1 second, LED will turn to
steady orange
Step 3. Step 4.
10 | English
.
LOREX WONDER
Tap to run LOREX
WONDER APP.
Turn on Wi-Fi on your mobile
and select camera (LorexXXXXXX) as the AP.
In main page, tap
camera name directly.
then tap
Page 12

Getting Help
Q3: How to power off your camera?
LED & Beep
A3: You can press Power button for 3 seconds to turn it off
(with 3 beep sound).
Q4: What can I do when camera is no response?
A4: You can press Power button for 10 sec to reset camera back
to power off state. To turn on camera again, you need to press
Power button twice.
Q5: How to use WPS button?
A5: You can use WPS button to connect camera to internet.
Step 1. Step 2.
WPS
Press the WPS button on AP.
You can go to page 5, step 7 to step 14 to start live view.
Condition LED Beep
Power on Steady red for 20 seconds N/A
Power off No indication
Connect to
internet
Fail connect
to internet
Low battery No indication
Firmware
upgrade
Connecting: Flash green
Connected : Steady green
Flash red for 10 seconds then turn to orange
Flash between green and orange back and
forth, and turn to steady green when completed
Press WPS button on camera, LED
will ash and turn to steady green
when connected.
3
times
N/A
N/A
3
times
N/A
| 11English
Page 13

FCC Regulations:
§ 15.19 (a)(3)
This device complies with part 15 of the FCC Rules. Operation is
subject to the following two conditions: (1) This device may not cause
harmful interference, and (2) this device must accept any interference
received, including interference that may cause undesired operation.
§ 15.21
Changes or modifications not expressly approved by the party
responsible for compliance could void the user‘s authority to operate
the equipment.
§ 15.105 (b)
This equipment has been tested and found to comply with the limits
for a Class B digital device, pursuant to part 15 of the FCC Rules.
These limits are designed to provide reasonable protection against
harmful interference in a residential installation. This equipment
generates, uses and can radiate radio frequency energy and, if not
installed and used in accordance with the instructions, may cause
harmful interference to radio communications. However, there is no
guarantee that interference will not occur in a particular installation. If
this equipment does cause harmful interference to radio or television
reception, which can be determined by turning the equipment off and
on, the user is encouraged to try to correct the interference by one or
more of the following measures:
—Reorient or relocate the receiving antenna.
—Increase the separation between the equipment and receiver.
—Connect the equipment into an outlet on a circuit different from
that to which the receiver is connected.
—Consult the dealer or an experienced radio/TV technician for help.
FCC RF Exposure Information (SAR)
This device is designed and manufactured not to exceed the emission
limits for exposure to radio frequency (RF) energy set by the Federal
Communications Commission of the U.S. Government. The exposure
standard for wireless devices employs a unit of measurement known
12 | English
Page 14

as the Specific Absorption Rate (SAR). The SAR limit adopted by
the FCC is 1.6W/kg for an uncontrolled environment. Tests for SAR
are conducted using standard operating positions accepted by the
FCC with the device transmitting at its highest certied power level
in all tested frequency bands. The FCC has granted an Equipment
Authorization for this device with all reported SAR levels evaluated as
in compliance with the FCC RF exposure guidelines.
Although the SAR is determined at the highest certied power level,
the actual SAR level of the device while operating can be well below
the maximum value. This is because the device is designed to operate
at multiple power levels so as to use only the poser required to reach
the network. In general, the closer you are to a wireless base station
antenna, the lower the power output.
IC Regulations:
RSS-Gen 7.1.3
This device complies with Industry Canada license-exempt RSS
standard(s). Operation is subject to the following two conditions:
(1) this device may not cause interference, and
(2) this device must accept any interference, including interference
that may cause undesired operation of the device.
Le présent appareil est conforme aux CNR d'Industrie Canada
applicables aux appareils radio exempts de licence. L'exploitation est
autorisée aux deux conditions suivantes:
(1) l'appareil ne doit pas produire de brouillage, et
(2) l'utilisateur de l'appareil doit accepter tout brouillage
radioélectrique subi, même si le brouillage est susceptible d'en
compromettre le fonctionnement."
CAN ICES-3(B)/NMB-3(B)
IC RF Exposure Statement (SAR)
This device is tested in accordance with the measurement
requirement and procedure specied in IEEE 1528 and IEC 62209.
This device complies with SAR for general population/uncontrolled
RF exposure limits in IC RSS-102.
| 13English
Page 15

All trademarks belong to their respective owners. No claim
is made to the exclusive right to use the trademarks listed,
other than the trademarks owned by Lorex Technology Inc.
We reserve the right to change models, congurations or
specications without notice or liability. Product may not
be exactly as shown. Images are simulated.
Distributed by/Distribué par/Distribuido por
LOREX CORPORATION
901 Elkridge Landing Road, Suite 100, Linthicum,
Maryland 21090
Technical Support and Customer Service:1-905-940-5355
© 2013 Lorex Technology, Inc.
Made in China / Fabriqué en Chine / Hecho en China
14 | English
 Loading...