

Page 1
MODELS:
LW2100 Series
Copyright © 2008 Lorex Technology Inc.
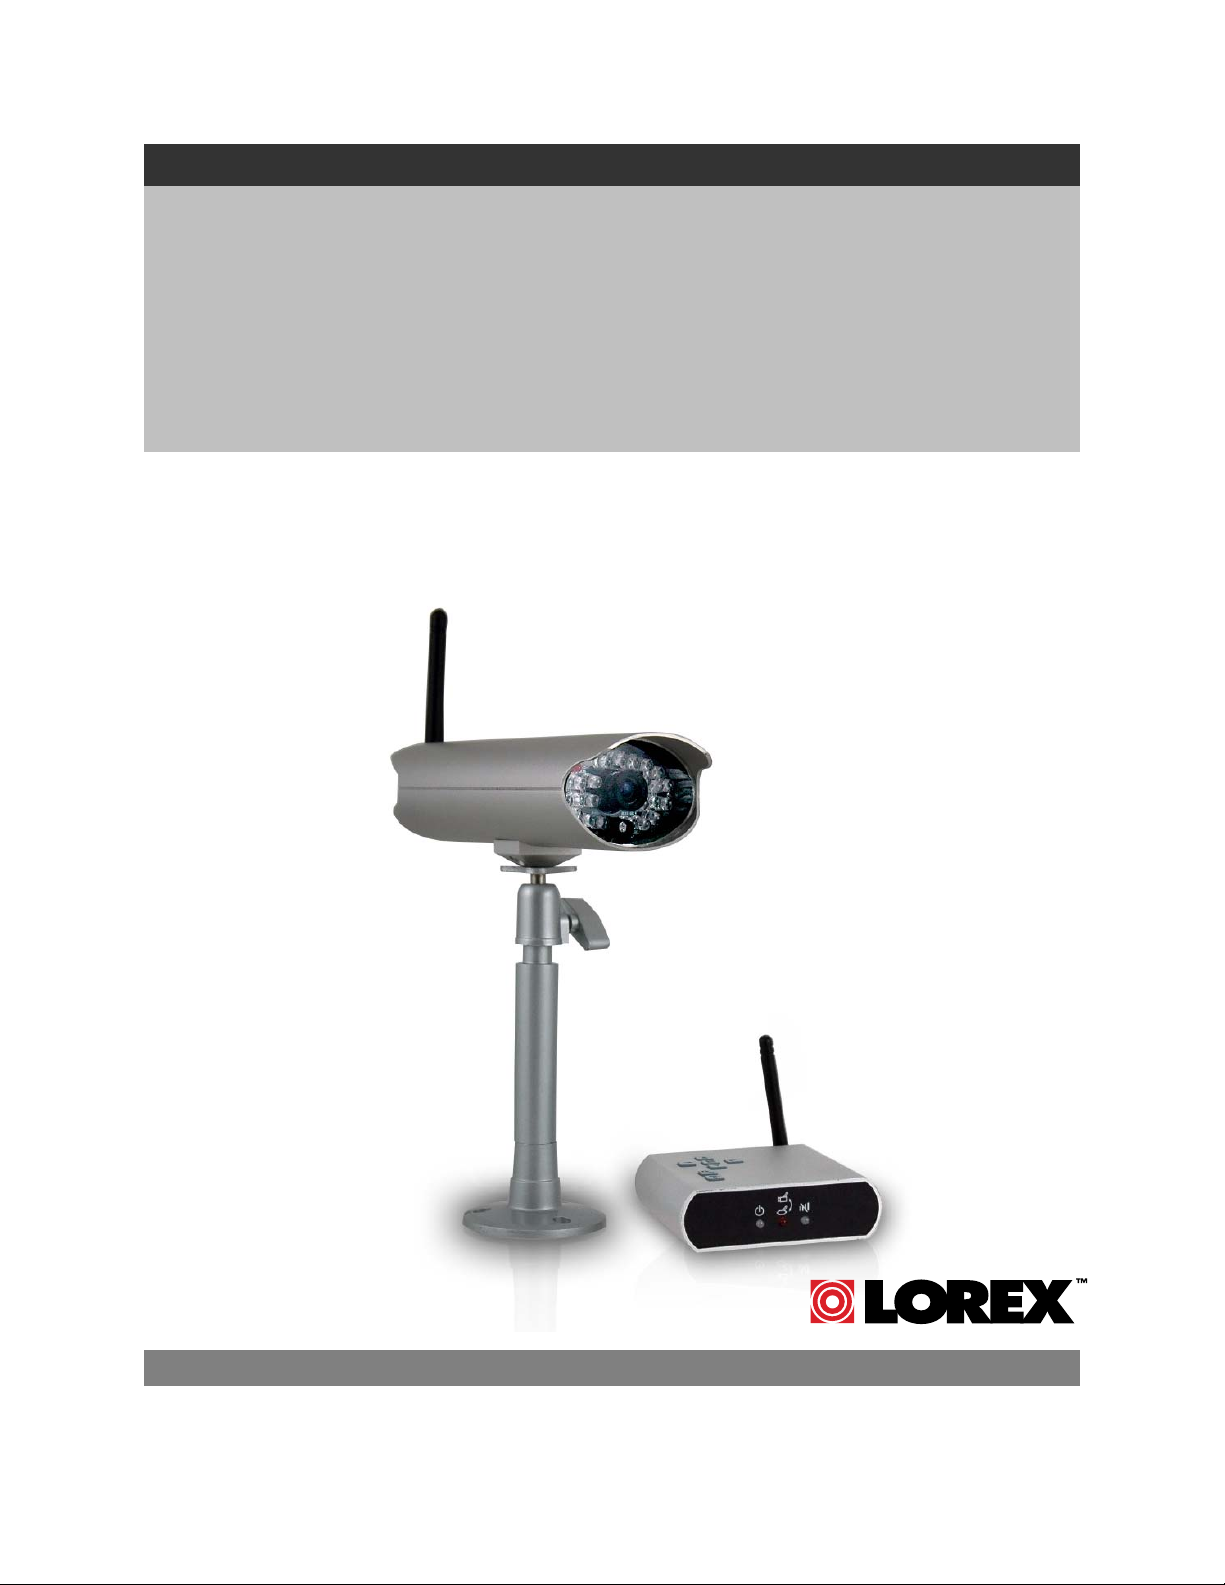
COLOR DIGITAL WIRELESS
SURVEILLANCE SYSTEM
& INDOOR/OUTDOOR COLOR
CAMERA(S) WITH AUDIO
Instruction Manual
English Version 1.1
www.lorexcctv.com
Page 2
p
Thank you for purchasing the LW2100 SERIES COLOR DIGITAL WIRELESS
SURVEILLANCE SYSTEM. Lorex is committed to providing our customers with a high
quality, reliable security product.
http://www.lorexcctv.com
This product broadcasts over public airways. Digital Wireless is a secure signal, however video and
audio signals may be intercepted without your consent.
Wireless Disclaimer:
CAUTION
RISK OF ELECTRIC SHOCK
DO NOT OPEN
CAUTION: TO REDUCE THE RICK OF ELECTRIC SHOCK
REFER SERVICING TO QUALIFIED SERVICE PERSONNEL.
WARNING: TO PREVENT FIRE OR SHOCK HAZARD, DO NOT
EXPOSE THIS UNIT TO RAIN OR MOISTURE.
CAUTION: TO PREVENT ELECTRIC SHOCK, MATCH WIDE BLADE
OF THE PLUG TO THE WIDE SLOT AND FULLY INSERT.
DO NOT REMOVE COVER (OR BACK).
NO USER SERVICABLE PARTS INSIDE.
The lightning flash with arrowhead symbol, within an
equilateral triangle, is intended to alert the user to the
presence of uninsulated “dangerous voltage” within the
products ‘ enclosure that may be of sufficient magnitude
to constitute a risk of electric shock
The exclamation point within an equilateral triangle is
intended to alert the user to the presence of important
operating and maintenance (servicing) instructions in the
literature accompanying the appliance.
Please visit us on the web for the most current Manuals, Quick Start Guides and Firmware.
Additional Language Manuals are also available at:
://www.lorexcctv.com
htt
2
Page 3
p
Important Safeguards
Important Safeguards
In addition to the careful attention devoted to quality standards in the manufacture process of your video
product, safety is a major factor in the design of every instrument. However, safety is your responsibility
too. This sheet lists important information that will help to assure your enjoyment and proper use of the
video product and accessory equipment. Please read them carefully before operating and using your
video product.
Installation
ENG
1. Read and Follow Instructions - All the
safety and operating instructions should be
read before the video product is operated.
Follow all operating instructions.
2. Retain Instructions - The safety and
operating instructions should be retained for
future reference.
3. Heed Warnings - Comply with all warnings
on the video product and in the operating
instructions.
4. Polarization - Do not defeat the safety
purpose of the polarized or grounding-type
plug.
o A polarized plug has two blades with
one wider than the other.
o A grounding type plug has two
blades and a third grounding prong.
o The wide blade or the third prong is
provided for your safety.
o If the provided plug does not fit into
your outlet, consult an electrician for
lacement of the obsolete outlet
re
5. Power Sources - This video product should
be operated only from the type of power
source indicated on the marking label. If you
are not sure of the type of power supply to
your location, consult your video dealer or
local power company. For video products
intended to operate from battery power, or
other sources, refer to the operating
instructions.
6. Overloading - Do not overload wall outlets of
extension cords as this can result in the risk
of fire or electric shock. Overloaded AC
outlets, extension cords, frayed power cords,
damaged or cracked wire insulation, and
broken plugs are dangerous. They may result
in a shock or fire hazard. Periodically examine
the cord, and if its appearance indicates
damage or deteriorated insulation, have it
replaced by your service technician.
7. Power-Cord Protection - Power supply
cords should be routed so that they are not
likely to be walked on or pinched by items
placed upon or against them, paying
particular attention to cords at plugs,
convenience receptacles, and the point where
they exit from the video product.
8. Ventilation - Slots and openings in the case
are provided for ventilation to ensure reliable
operation of the video product and to protect
it from overheating. These openings must not
be blocked or covered. The openings should
never be blocked by placing the video
equipment on a bed, sofa, rug, or other
similar surface. This video product should
never be placed near or over a radiator or
heat register. This video product should not
be placed in a built-in installation such as a
bookcase or rack unless proper ventilation is
provided or the video product manufacturer’s
instructions have been followed.
9. Attachments - Do not use attachments
unless recommended by the video product
manufacturer as they may cause a hazard.
10. Water and Moisture - Do not use this video
product near water. For example, near a bath
tub, wash bowl, kitchen sink or laundry tub, in
a wet basement, near a swimming pool and
the like.
Caution: Maintain electrical safety. Power line
operated equipment or accessories
connected to this unit should bear the UL
listing mark of CSA certification mark on the
accessory itself and should not be modified
so as to defeat the safety features. This will
help avoid any potential hazard from electrical
shock or fire. If in doubt, contact qualified
service personnel.
11. Accessories - Do not place this video
equipment on an unstable cart, stand, tripod,
or table.
The video equipment may fall,
causing serious damage to the
video product. Use this video
product only with a cart, stand,
tripod, bracket, or table
recommended by the
manufacturer or sold with the
video product.
Any mounting of the product should follow
the manufacturer’s instructions and use a
mounting accessory recommended by the
manufacturer.
3
Page 4

Important Safeguards
Service
13. Servicing - Do not attempt to service this
video equipment yourself as opening or
removing covers may expose you to
dangerous voltage or other hazards. Refer all
servicing to qualified service personnel.
14. Conditions Requiring Service - Unplug this
video product from the wall outlet and refer
servicing to qualified service personnel under
the following conditions.
A. When the power supply cord or plug is
damaged.
B. If liquid has been spilled or objects have
fallen into the video product.
C. If the video product has been exposed to
rain or water.
D. If the video product does not operate
normally by following the operating
instructions. Adjust only those controls
that are covered by the operating
instructions. Improper adjustment of
other controls may result in damage and
will often require extensive work by a
qualified technician to restore the video
product to its normal operation.
E. If the video product has been dropped or
the cabinet has been damaged.
F. When the video product exhibits a
distinct change in performance. This
indicates a need for service.
15. Replacement Parts - When replacement
parts are required, have the service
technician verify that the replacements used
have the same safety characteristics as the
original parts. Use of replacements specified
by the video product manufacturer can
prevent fire, electric shock or other hazards.
16. Safety Check - Upon completion of any
service or repairs to this video product, ask
the service technician to perform safety
checks recommended by the manufacturer to
determine that the video product is in safe
operating condition.
17. Wall or Ceiling Mounting - The cameras
provided with this system should be mounted
to a wall or ceiling only as instructed in this
guide, using the provided mounting brackets.
18. Heat - The product should be situated away
from heat sources such as radiators, heat
registers, stoves, or other products (including
amplifiers) that produce heat.
Use
19. Cleaning - Unplug the video product from the
wall outlet before cleaning. Do not use liquid
cleaners or aerosol cleaners. Use a damp
cloth for cleaning.
20. Product and Cart Combination - Video and
cart combination should be moved with care.
Quick stops, excessive force, and uneven
surfaces may cause the video product and
car combination to overturn
21. Object and Liquid Entry - Never push
objects for any kind into this video product
through openings as they may touch
dangerous voltage points or “short-out” parts
that could result in a fire or electric shock.
Never spill liquid of any kind on the video
product
22. Lightning - For added protection for this
video product during a lightning storm, or
when it is left unattended and unused for long
periods of time, unplug it from the wall outlet
and disconnect the antenna or cable system.
This will prevent damage to the video product
due to lightning and power line surges. The
manufacturer’s instructions and use a
mounting accessory recommended by the
manufacturer.
4
Page 5

General Precautions
General Precautions
1. All warnings and instructions of this manual should be followed
2. Remove the plug from the outlet before cleaning. Do not use liquid aerosol detergents. Use a water
dampened cloth for cleaning
3. Do not use this unit in humid or wet places
4. Keep enough space around the unit for ventilation. Slots and openings in the storage cabinet should
not be blocked
5. During lightning storms, or when the unit is not used for a long time, disconnect the power supply,
antenna, and cables to protect the unit from electrical surge
FCC CLASS B NOTICE
Note:
This equipment has been tested and found to comply with the limits for a Class B digital device,
pursuant to Part 15 of the FCC Rules. These limits are designed to provide reasonable protection
against harmful interference in a residential installation. This equipment generates, uses, and can
radiate radio frequency energy and, if not in-stalled and used in accordance with the instruction, may
cause harmful interference to radio communications.
However, there is no guarantee that interference will not occur in a particular installation. If this
equipment does cause harmful interference to radio or television reception (which can be determined
by turning the equipment on and off), the user is encouraged to try to correct the interference by one
or more of the following measures:
o Reorient or relocate the receiving antenna
o Increase the separation between the equipment and receiver
o Connect the equipment into an outlet on a circuit different from that to which the receiver
is connected
o Consult the dealer or an experienced radio or television technician for assistance
ENG
This equipment has been certified and found to comply with the limits regulated by FCC, EMC, and
LVD. Therefore, it is designated to provide reasonable protection against interference and will not
cause interference with other appliance usage.
However, it is imperative that the user follows this manual' guidelines to avoid improper usage which
may result in damage to the unit, electrical shock and fire hazard injury
In order to improve the feature functions and quality of this product, the specifications are subject to
change without notice from time to time.
LOREX TECHNOLOGY INC.
http://www.lorexcctv.com
5
Page 6

Features
–
Features
Frequency Hopping Spread Spectrum
High Transmission Power
Encrypted Technology
Interference Fee
Superior Image and Sound Quality
Latest Ultra Digital Wireless Technology Provides Excellent Image Quality and Clarity
Up to 450ft Wireless Transmission Range**
Weather Resistant Metal Camera is Great for Indoor/Outdoor Surveillance ***
Listen in with Exceptional Sound Clarity
Safety Warning Feature Notifies You When out of Range
The Digital Wireless signal transmission type used by the Lorex LW2100 series is also known as FHSS
Frequency Hopping Spread Spectrum. This type of signal is highly resistant to deliberate jamming as it
generates a channel hopping sequence using an algorithm generated by the receiver system.
The 2.4GHz (2.400-2.483Ghz) band is being divided into sections or paths of 2MHz per section, and each
second the transmission signal hops hundreds of times in a specified sequence within this frequency range.
The overall bandwidth required for frequency hopping is much wider then 2MHz however because
transmission occurs only on a small section of this bandwidth at any given time, the signal being transmitted
does not suffer from greatly reduced signal degradation and also avoids blocked paths other devices who
act as sources of competing signals.
* Maximum open space transmission range. The actual range is dependent upon building materials and other
obstructions in path of wireless signal.
**IR illumination range of 23 ft. / 7m under ideal conditions. Objects at or beyond this range may be partially or
completely obscured, depending on the camera application.
*** LW1010 requires the Optional 2
nd
Camera
Table of Contents
Features ........................................................................................................................................................ 6
Getting Started ..............................................................................................................................................7
Wireless Receiver .........................................................................................................................................7
Wireless Receiver Buttons ............................................................................................................................8
Wireless Receiver Installation .......................................................................................................................9
Camera Installation ....................................................................................................................................... 9
Connecting Camera Power .....................................................................................................................10
Wireless Connection LED Indicator ............................................................................................................11
Viewing Mode.............................................................................................................................................. 12
Advanced Menu Mode ................................................................................................................................ 13
Camera Pairing ...........................................................................................................................................14
Troubleshooting ..........................................................................................................................................15
Appendix #1 - Receiver Specifications .......................................................................................................16
Appendix #2 - Camera Specifications......................................................................................................... 16
Appendix #3 - Digital Wireless Technology ……………………………………………………………………. 18
6
Page 7

Getting Started
The System comes with the following components:
ENG
Getting Started
1 x WIRELESS RECEIVER
1 x POWER ADAPTOR
(FOR RECEIVER)
1 x WIRELESS CAMERA(S)*
1 x POWER ADAPTOR(S) (FOR
CAMERA) *
1 x RECEIVER ANTENNA
1 x CAMERA ANTENNA(S) *
1 x RCA VIDEO CABLE
1 x CAMERA BATTERY
PACK(S) *
CHECK YOUR PACKAGE TO CONFIRM THAT YOU HAVE RECEIVED THE COMPLETE
CAMERA SYSTEM, INCLUDING ALL COMPONENTS SHOWN ABOVE.
* 1 of each provided with each Camera. Please see your System Package for the number of
cameras included with your System.
7
Page 8

Wireless Receiver
Wireless Receiver
1. Power LED – Indicates the Power state of the
Receiver.
2. Pairing LED – Flashes when the system is
attempting to pair with a Camera (See the Menu for
details on Pairing a Camera Channel).
3. Signal LED – Flashes to indicate the signal quality
4. Receiver Antenna – Connect the Antenna to the
Receiver to receive wireless signals from the
camera(s).
5. USB Port – Currently not in use in this product.
6. AV OUT – Connect the provided AV Cable to the
Receiver. Connect the Audio and Video ends of the
cable to a TV, VCR or other viewing device.
7. DC 9V INPUT – Connection port for the 9V Power
Adaptor (provided with this system). Connect the
Power Adaptor to a power source.
NOTE: It is recommended that the receiver be
connected to a power surge bar to protect the
equipment from damage.
1 2 3
5 6 7
1
4
Wireless Receiver Buttons
1. ▲▼◄► Buttons – Press the Up, Down, Left or
Right buttons to navigate in Menu Mode. Use these
buttons to change the image in ZOOM Mode (QVGA
Mode Only).
2. MENU Mode Button – Press the M to enter or exit
Menu Mode.
3. ZOOM Button – Press the ZOOM Button to Zoom
In (QVGA) or Zoom Out.
4. CAM Button – Press the CAM Button to switch to a
different Camera on the Receiver.
8
1
2
3
4
Page 9

Wireless Receiver Installation
Wireless Receiver Installation
1. Connect the Antenna to the receiver.
2. Connect the AV Cable to the back of the receiver. Connect the other end of the Cable to the
Video IN (Yellow) and Audio IN (White) ports on the TV, VCR or other viewing monitor.
3. Plug the Receiver power cable into the 9V POWER input. Plug the power cable into a wall outlet
or surge protector.
4. Place the receiver in a place that will have clear reception to your camera(s).
Camera Installation
Before you install the camera, carefully plan where and how it will be positioned, and where you will route
the cable that connects the camera to the power adaptor or battery adaptor.
ENG
Installation Warnings:
• Aim the Cameras to best optimize the viewing area: Select a location for the camera that provides
a clear view of the area you want to monitor, which is free from dust, and is not in line-of-sight to
a strong light source or direct sunlight.
• Avoid installing the cameras where there are thick walls, obstructions, or interference (i.e.
transformers, microwave ovens or other electrical equipment) between the Cameras and the
Receiver.
• Select a location for the camera that has an ambient temperature between 14°F~113°F
(-10°C~45°C)
• Before starting permanent installation, have another person hold the camera for you while you
verify its performance by observing the image on a monitor.
Night Vision
This camera includes IR LEDs, which provide the camera with the ability to view images in low light
conditions. It is important to use the provided power adaptor (and not the 9V DC Battery Adaptor) when
using the camera for prolonged periods in low light conditions, as the LEDs will drain the battery more
quickly than regular daytime use.
9
Page 10

Installing the Camera:
1. Carefully unpack the Camera.
2. Mount the stand to the wall:
• Mark the position of the screw holes
on the wall.
• Drill holes and insert the drywall
plugs as needed.
• Firmly attach the stand to the wall
using the provided screws.
3. Attach the Antenna to the Camera prior to
mounting.
3. Place the camera in the desired mounting
position. Tighten the thumbscrews to secure
the camera to the Stand. Adjust the angle of
the camera until the desired view is set.
Connecting Camera Power
The Camera can be powered either by using the provided Power Adaptor, or using the included Battery
Pack (with 4 x AA Batteries).
NOTE: Wireless cameras require a power source
(either an electrical outlet or battery power) to
operate. If you plan to permanently mount the
camera in a location, it is recommended to use the
included Camera Power adaptor to prevent
interruptions in the image, as the battery adaptor
is intended as a temporary power solution.
POWER ADAPTOR:
Connect the Power Adaptor to the Camera. Make
sure the power adaptor is placed into a grounded
outlet or surge bar to protect the camera from
power fluctuations.
Power Adaptor:
Connect the Power
Adaptor to the Female
Barrel Power
termination on the
camera.
10
Page 11

BATTERY PACK:
1. Slide the cover off the Battery Pack.
2. Insert 4 x AA Batteries (not included) into the
Battery Pack. Make sure to correctly line up the
Positive (+) and Negative (-) terminals of the
batteries.
Slide the Battery Pack cover back on.
3. Connect the Battery Pack to the Camera. To
turn the Camera ON of OFF, simply connect the
BatteryPack.
NOTE: It is recommended to remove the battery
pack from the camera when not in use.
ENG
Wireless Connection LED Indicator
Battery: Connect
the Camera
Battery Adaptor
cable to the
Female Barrel
Power termination
on the camera.
Connect a battery
to the cable.
Wireless Connection LED Indicator
When the Receiver and Camera are connected:
• The Camera will have IR LEDs indicating that there is a connection
• The Wireless receiver Wiresless Indicator LED will be lit
CAMERA RECEIVER
11
Page 12

Viewing Mode
Viewing Mode
1. SIGNAL INDICATOR – The
signal indicator shows the strength
of the signal being received from the
camera.
The number of bars in the Signal
Indicator shows the strength of the
signal – One or No Bars indicates
the signal is poor, and 4 bars
indicate a very strong signal.
Signal Indicators:
Signal Strength Indicator Data Rate VGA Frames QVGA Frames
Perfect
Good
Fair
Low
No Signal
2. CHANNEL INDICATOR – Displays the current channel
number. Press the CAM Button on the Receiver to switch
between available cameras
NOTE: To automatically switch between channels, configure
the Auto Scan settings in Menu Mode.
3. ZOOM INDICATOR – Press the ZOOM Button on the
Receiver to go into ZOOM IN Mode (QVGA Mode ONLY).
1 2 3 4
ZOOM
1062~1280 Kbps 5~10 FPS 15~30 FPS
725~1062 Kbps 3~5 FPS 12~20 FPS
543~725 Kbps 2~4 FPS 8~15 FPS
250~543 Kbps 0~1 FPS 0~4 FPS
Under 250Kbps 0 FPS 0 FPS
12
Page 13

While in ZOOM MODE, you can Pan and Tilt the
Camera image using the Arrow keys on the receiver.
4. STATUS INDICATOR – The Status indicator
message “No Connection” will appear when a
camera cannot be found.
NOTE: There may be temporary signal losses for
less than 1 second, due to the handshake
process between the Camera and Receiver
(when switching between channels).
ENG
Advanced Menu Mode
Advanced Menu Mode
Press the MENU Button on the Receiver to enter MENU Mode. Use the ▲▼◄► Buttons to navigate UP,
Down, Left or Right in the menu.
1. AUDIO VOLUME – Use the Left and Right arrows to change the
Audio Volume from 0 (off) to 20 (high).
2. SCAN TIME – Sets the Auto Sequence to OFF (you must press
the CAM Button on the receiver to see other channels), or 5
Second, 10 Second or 15 Second Auto scanning.
NOTE: Before turning on the Auto Sequence, make sure all
cameras are paired to the System.
Use the ▲▼◄► arrows to navigate to each camera. Turn each camera to ON or OFF for Auto Detection.
13
Page 14
Camera Pairing
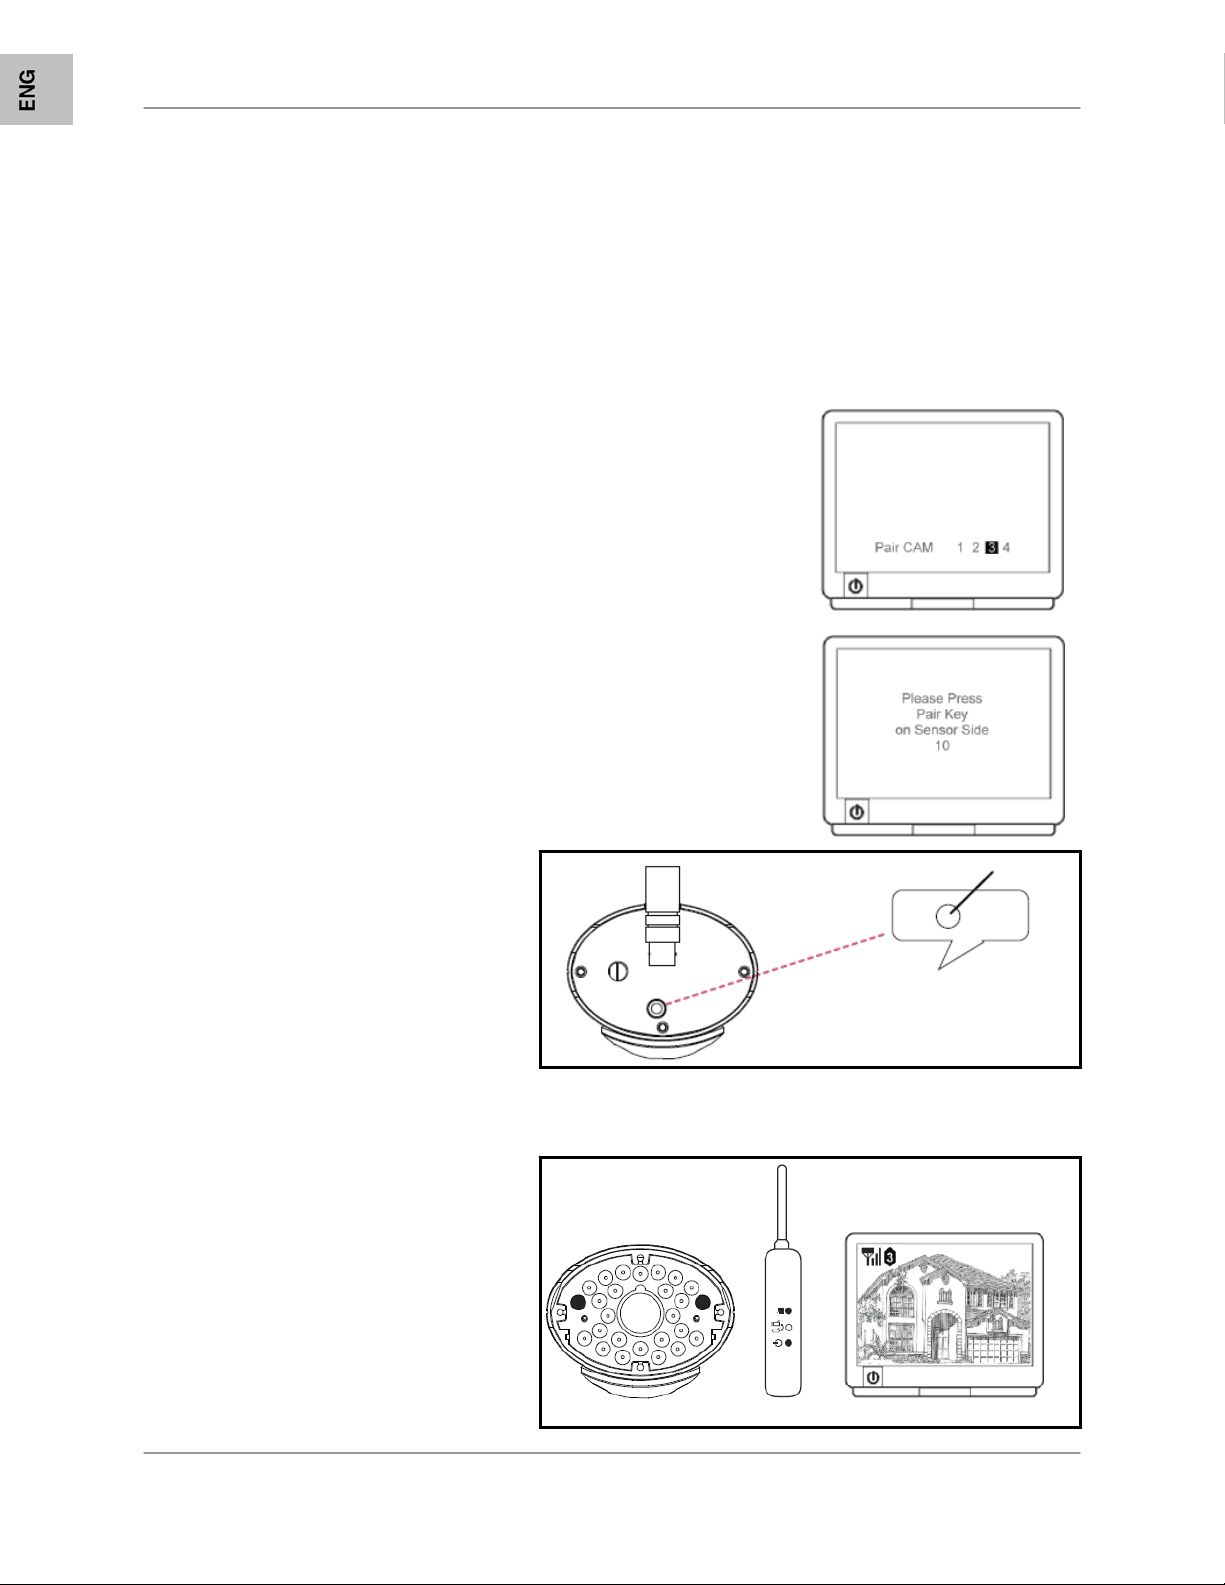
Camera Pairing
The System comes with camera(s) that have already been paired. The Pairing Function assigns each
Camera to a different channel on the Wireless Receiver (up to 4 Cameras), and is necessary for
configuring additional cameras.
NOTE: It is highly recommended to pair the Cameras to the Receiver before permanently mounting the
Cameras.
1. Power on the Camera by connecting the Power Adaptor or Battery Pack. The transmit lights on the
front of the Camera should be ON.
2. Navigate to the PAIR CAM Menu option, by pressing the MENU
Button on the Receiver, and using the ▲▼◄► keys to navigate. Select
the desired Pairing channel.
3. The screen will display the following message:
Please Press Pair Key on Sensor Side
The number indicates the countdown of time left for the pairing process.
4. Press the Pairing Button on the back of
the Camera.
Once the Pairing has been successfully completed:
• The Camera Transmit indicator
LEDs will be illuminated
• The Receiver Status Indicator
LED will be illuminated
• The Camera Information (channel,
transmission strength, etc.) will
appear onscreen.
14
Page 15

Troubleshooting
Troubleshooting
If you have problems with your System, there is often a quick and simple solution. Please try the
following:
Problem Solution
There is no picture from a
Camera.
There is Interference with
the Camera Picture.
There are problems with
the Audio.
• Check all connections to the Camera. Make sure
the adaptor is plugged in.
• Make sure that the Cameras and Receiver are
both ON.
• Make sure that the camera is in range of the
Receiver.
• If using the battery adaptor, try replacing the
Batteries
• Make sure that each camera is within range, and
that there are no large obstructions or interference
• Try repositioning the camera, receiver or both to
improve the reception.
• Ensure that the volume on the TV is ON
• Make sure that the sound is occurring within
range of the Camera Microphone
• If the unit emits a loud screeching noise
(feedback), move the camera or receiver farther
apart.
ENG
15
Page 16

Appendix #1 - Receiver Specifications
Appendix #1 - Receiver Specifications
Receiver
Receiving Frequency Range 2.400GHz~2.485GHz
RX Sensitivity -82dBm
Demodulation GFSK
Data Rate 2Mbps
Display Size/Type VGA (640x240) or QVGA (320x240)
A/V Output 3.5mm Stereo Jack. Video: 640x480 or 320x240.
Power Requirement 5.0Vdc +/-10%
Power Consumption 250mA Max
Operating Temp Range 14°F ~ 104°F
Operating Humidity 10% ~ 80% RH
-10° ~ 40° C
Appendix #2 - Camera Specifications
Camera(s)
Transmit Frequency Range 2.400GHz~2.485GHz
TX Power 13.5dBm
Data Rate 2Mbps
Modulation GFSK
TX Range 328 ft. / 100m Line in Sight
Image Sensor Type 1/4" VGA CMOS Image Sensor
Effective Pixel H: 640, V: 480
Image Processing Motion JPEG
Image Resolution H: 640, V: 480 @ 5~7fps, H: 320, V: 240 @ 20fps
Lens 3.6mm F 2.0
Viewing Angle H: 54° / V: 37°
AGC On
AES ERS (Electric Rolling Shutter)
Power Requirement 5.0Vdc +/-10%.
Power Consumption 450mA Max with IR LED, 345mA Max without IR LED.
Operating Temp Range 14°F ~ 104°F
-10° ~ 40° C
Environment Rating IP44
Built-in IR LED 23 Units of IR LED (850nm Type) for Night Vision
Built-in Auto IR Turn On/Off CdS Drive Auto IR LED turn On/Off Circuit
Weatherproofing Housing IP44 Rated Metal Bullet Housing with Metal Mounting
Stand.
16
Page 17

Appendix #3 – Digital Wireless Technology
Appendix #3 – Digital Wireless Technology
The Digital Wireless signal transmission type used by the Lorex LW2100 series is also known as FHSS –
Frequency Hopping Spread Spectrum. This type of signal is highly resistant to deliberate jamming as it
generates a channel hopping sequence using an algorithm generated by the receiver system.
The 2.4GHz (2.400-2.483Ghz) band is being divided into sections or paths of 2MHz per section, and each
second the transmission signal hops hundreds of times in a specified sequence within this frequency
range. The overall bandwidth required for frequency hopping is much wider then 2MHz however because
transmission occurs only on a small section of this bandwidth at any given time, the signal being
transmitted does not suffer from greatly reduced signal degradation and also avoids blocked paths other
devices who act as sources of competing signals. The strength of the signal being transmitted is set to be
from 13.5-16dBm, which is much higher then the analog transmission signal allowed by authorities
around the Globe (see next 2 slides for a comparison).
When an image is captured by the camera it is instantly converted from an analog to digital signal and
packaged into small packets. With each successful transmission via the 2Mhz paths discussed above, the
packets of information containing images are delivered to the receiver and decoded into analog
information. The information can then be displayed on devices that are connected to the wireless receiver
(RX).
A device pairing process is required to synchronize the transmitter (TX, Camera) and the receiver (RX).
This allows the transmitter and receiver to be on the same frequency and use the same algorithm for
frequency hopping. This ensures that only the paired transmitter and receiver can maintain
communication signal by hopping to the same frequency paths at the exact same time. As a result, the
chance that other devices within the same frequency range are on the same frequency, at the same time
and in the same order is extremely unlikely. Note that the pairing process is already done at the factory
for products that ship within the same packaging. Only when add-on devices are purchased is a pairing
process required.
17
ENG
 Loading...