

Page 1

www.lorexbaby.com
ENGLISH
FRANÇAIS
ESPAÑOL
SWEET PEEP MAX
VIDEO BABY MONITOR
Version 1.0
USER’S GUIDE
Page 2
DC 6V
Safety Precautions
• Adult assembly is required. Keep small parts away
from children when assembling.
• This product is not a toy. Do not allow children or
infants to play with it.
• This video monitor is not a substitute for responsible
adult supervision.
• Test the video monitor before use. Become familiar with
its functions.
• Keep the cords out of reach from children and infants.
• Never use extension cords with power adapters.
• Only use the chargers and power adapters provided.
Do not use other chargers or power adapters as this
may damage the device and battery pack.
• Only insert batteries/battery pack of the same type.
• Insert batteries with the correct polarity.
• Do not mix new and used batteries.
• Do not mix alkaline, standard, and rechargeable
batteries.
• Remove exhausted batteries from the product.
• Keep all batteries away from children and infants.
• Dispose or recycle batteries in accordance with local
laws, which may vary by location.
• If you do not plan to use the unit for a prolonged
period of time, remove the battery or ensure you
charge it at least once every 6 months.
• Do not cover the video monitor with a towel or blanket.
• Do not use the video monitor near water.
• Do not install the video monitor near a heat source.
• Do not touch the plug contacts with sharp or metal
objects.
• Keep this user’s guide for future reference.
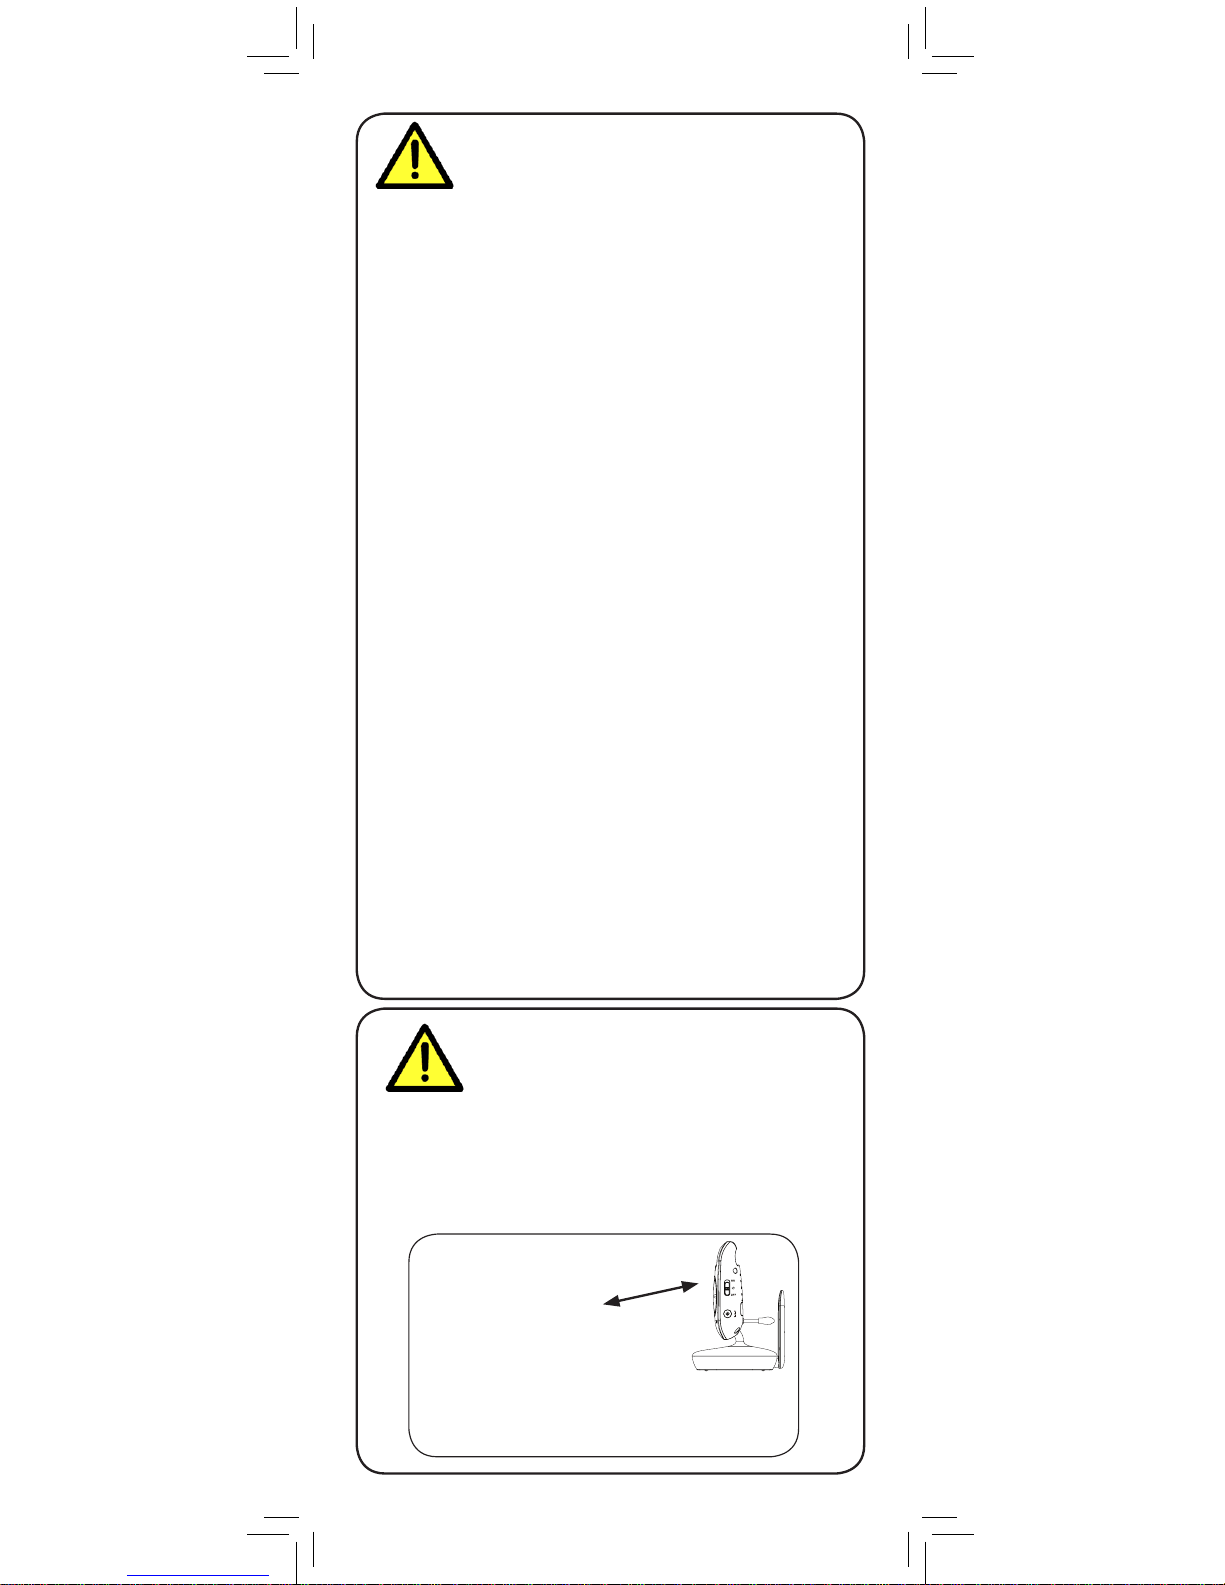
To Avoid Injury to
Children & Infants:
• MAKE SURE to keep the camera and all power
cords are least 3ft / 1m away from cribs and out of
reach of your child.
• Use the included cable clips to help keep power
cords away from your child.
3ft / 1m
Page 3

Product Includes ..............................2
Monitor Overview ...........................3
Camera Overview ...........................4
Getting Started ...............................5
Optional - Camera Batteries .....................7
Optional - Wall Mounting the Camera ....... 8
Using Your Baby Monitor ................9
Using the Menus .....................................9
Talking to Your Baby .............................. 10
Changing Channels ...............................10
Using Scan Mode (multiple cameras only) ...... 10
Adjusting Volume .................................. 12
Adjusting Screen Brightness ....................12
Using Digital Zoom................................13
Turning on the Night-Light ....................... 14
Playing Lullabies ...................................14
Temperature Alerts ................................. 15
Selecting Fahrenheit or Celsius ................16
Enabling VOX Mode (Voice Trigger) ........ 17
Video Off Mode (Audio Only Mode) ....... 18
Pairing Additional Cameras ..........19
Technical Specifications .................21
Camera ...............................................21
Monitor ................................................21
Troubleshooting ............................22
Need Help? ...................................22
ENGLISH
1
Table of Contents:
Page 4
2
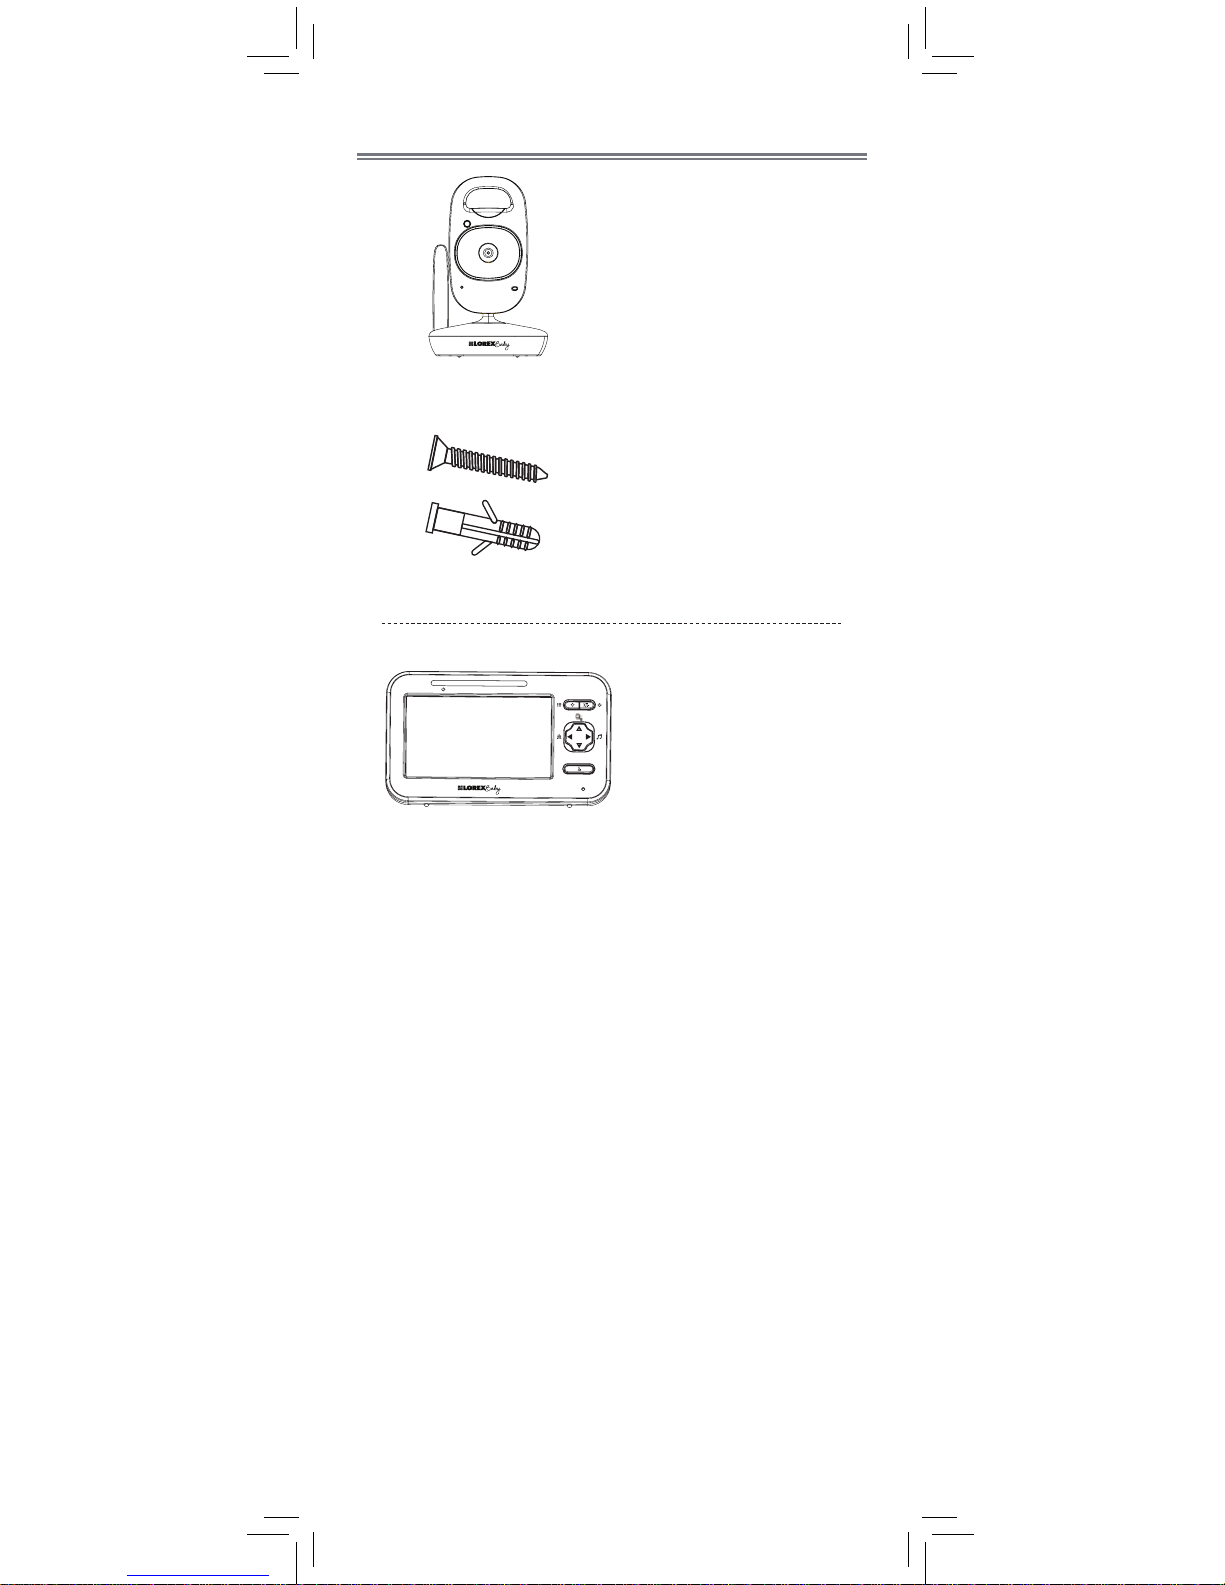
Product Includes
x1*
x1
Camera
Monitor
Power Adapter
x2*
x2*
*Contents may vary by model
x1*
Screws & Anchors
Power Adapter
x1
Cable Clips
x2*
LINK
Battery
x1
Page 5
ENGLISH
3
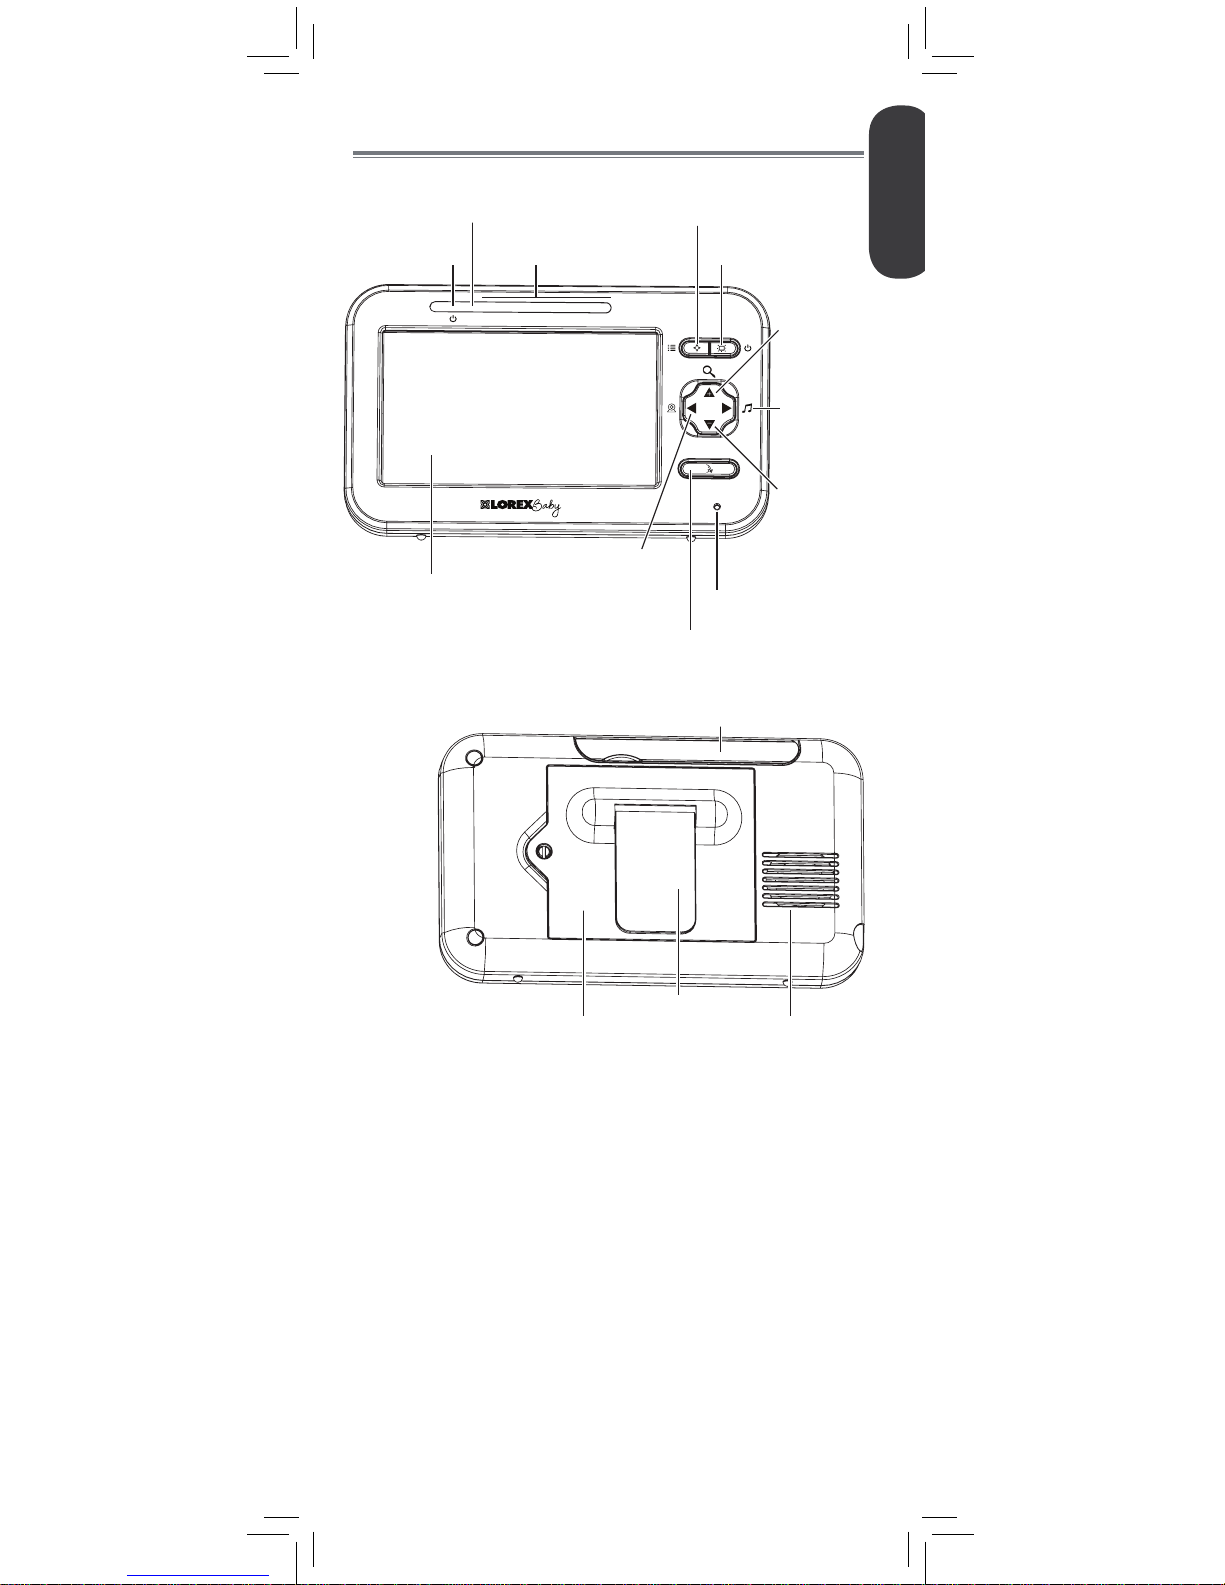
Speaker
Stand
Battery Compartment
Antenna
Monitor Overview
LINK
Power LED
Link LED
Volume LEDs
Menu
Power / Video
Off
2x Zoom /
Volume Up
1x Zoom /
Volume Down
Play / Stop
Lullabies
Microphone
Two-way Talk
Change /
Pair Camera
Video Display
Page 6
4
DC 6V
PAIR
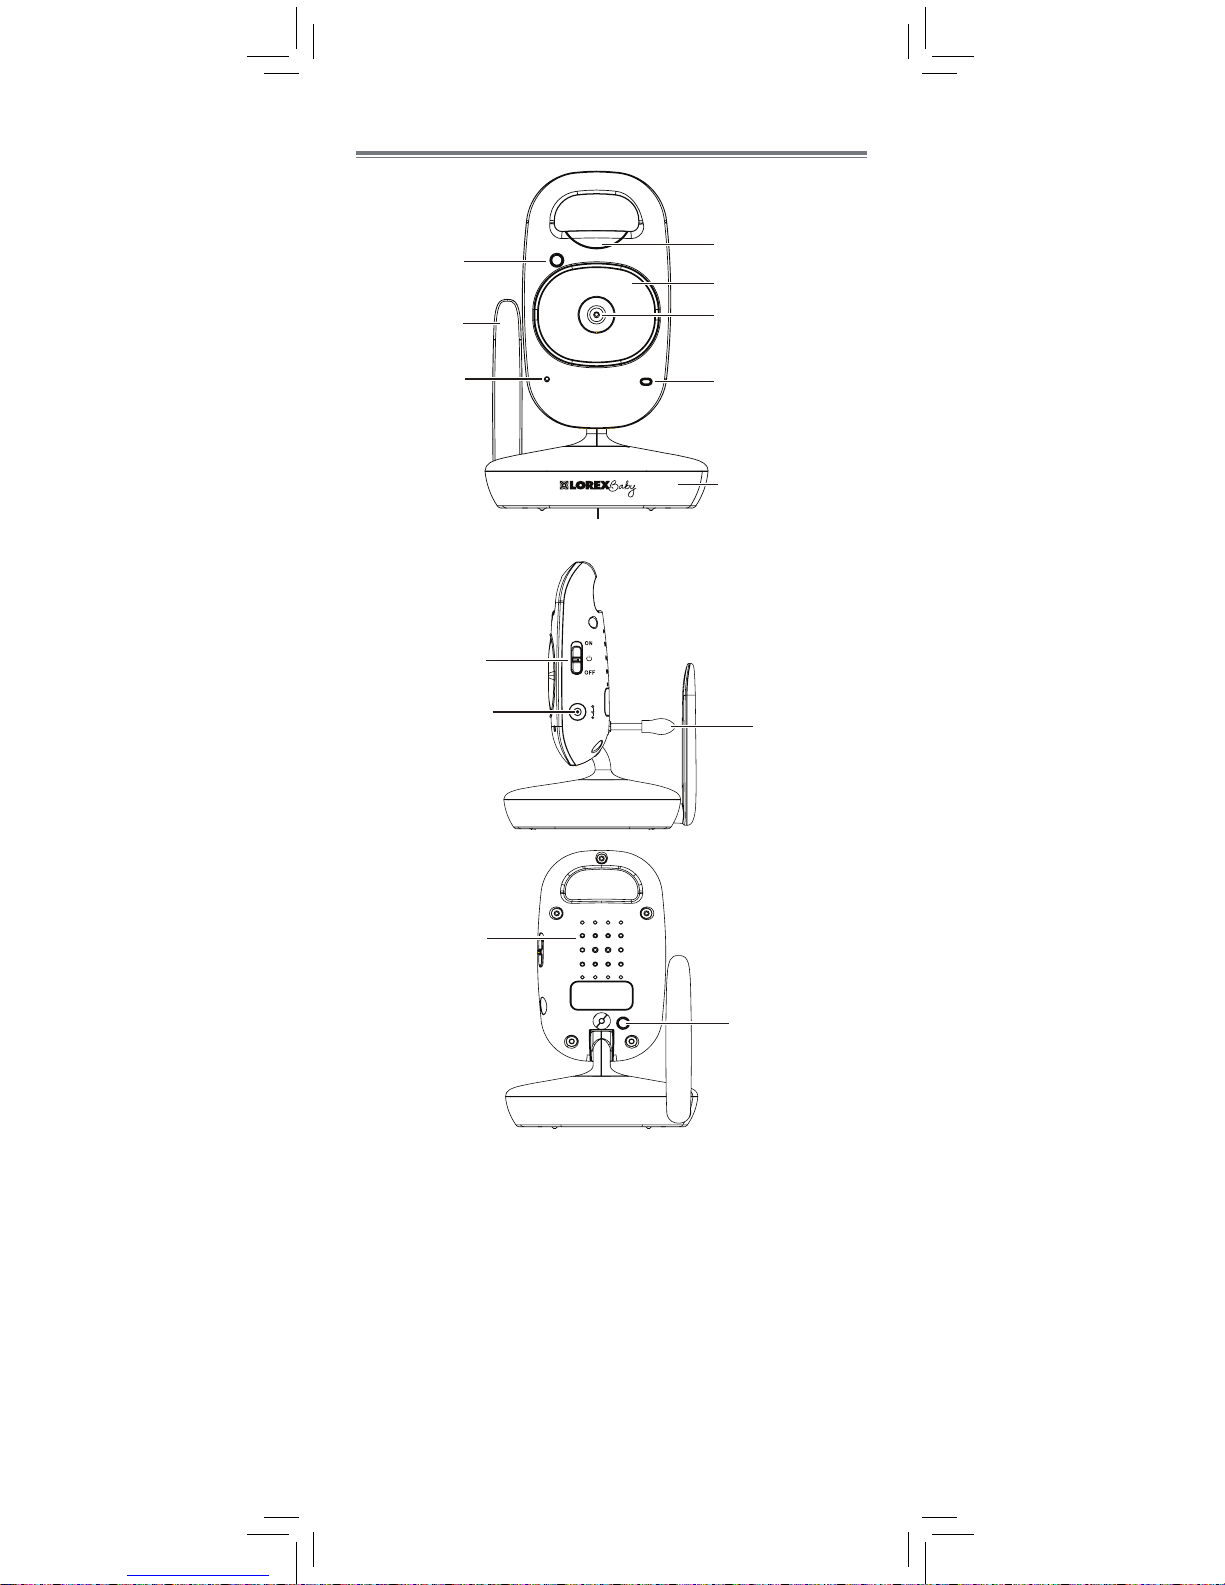
Camera Overview
Light Sensor
Night-light
Lens
Power LED
Microphone
Antenna
Nighttime LED’s
Mounting Stand
AAA Battery Compartment
Power Switch
Power Port
Temperature
Sensor
Speaker
Pair Button
Page 7
DC 6V
DC 6V
Make sure all power cables are at least 3ft
/ 1m away from the crib and out of reach
of your child.
Use the included cable clips to help keep
power cords away from your child.
ENGLISH
5
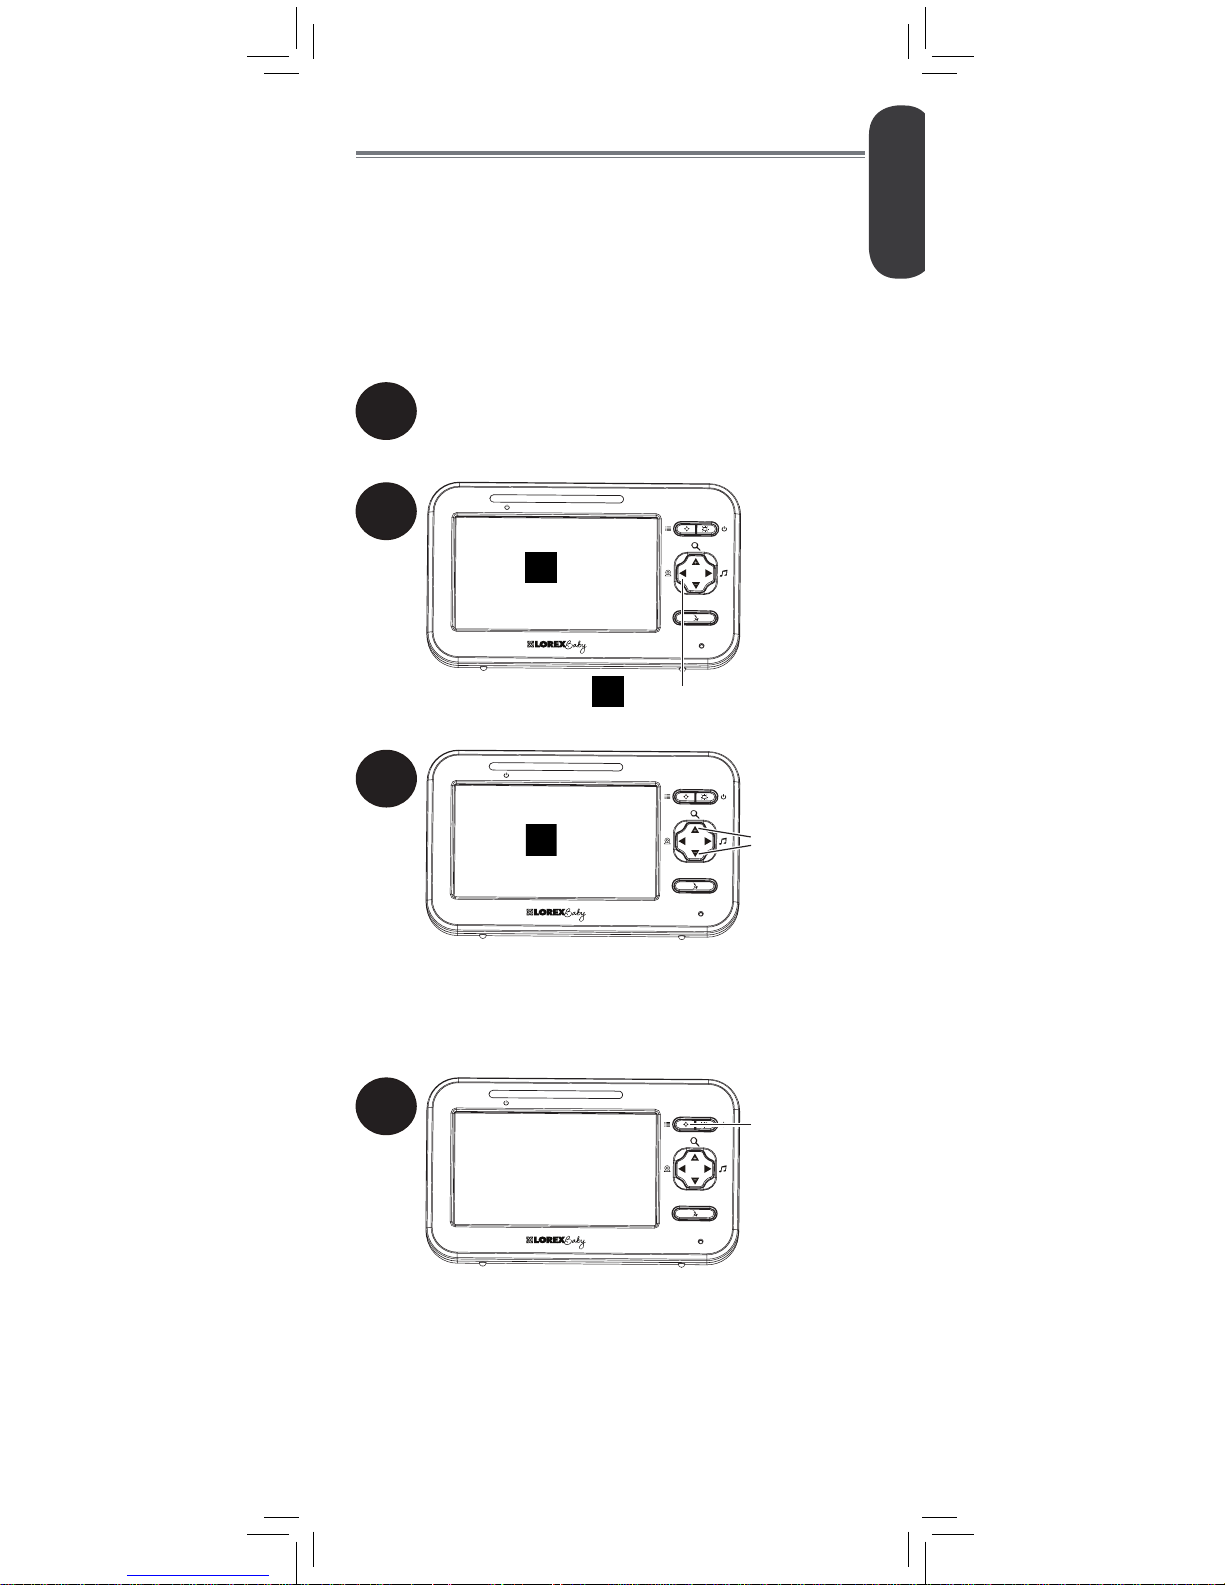
Getting Started
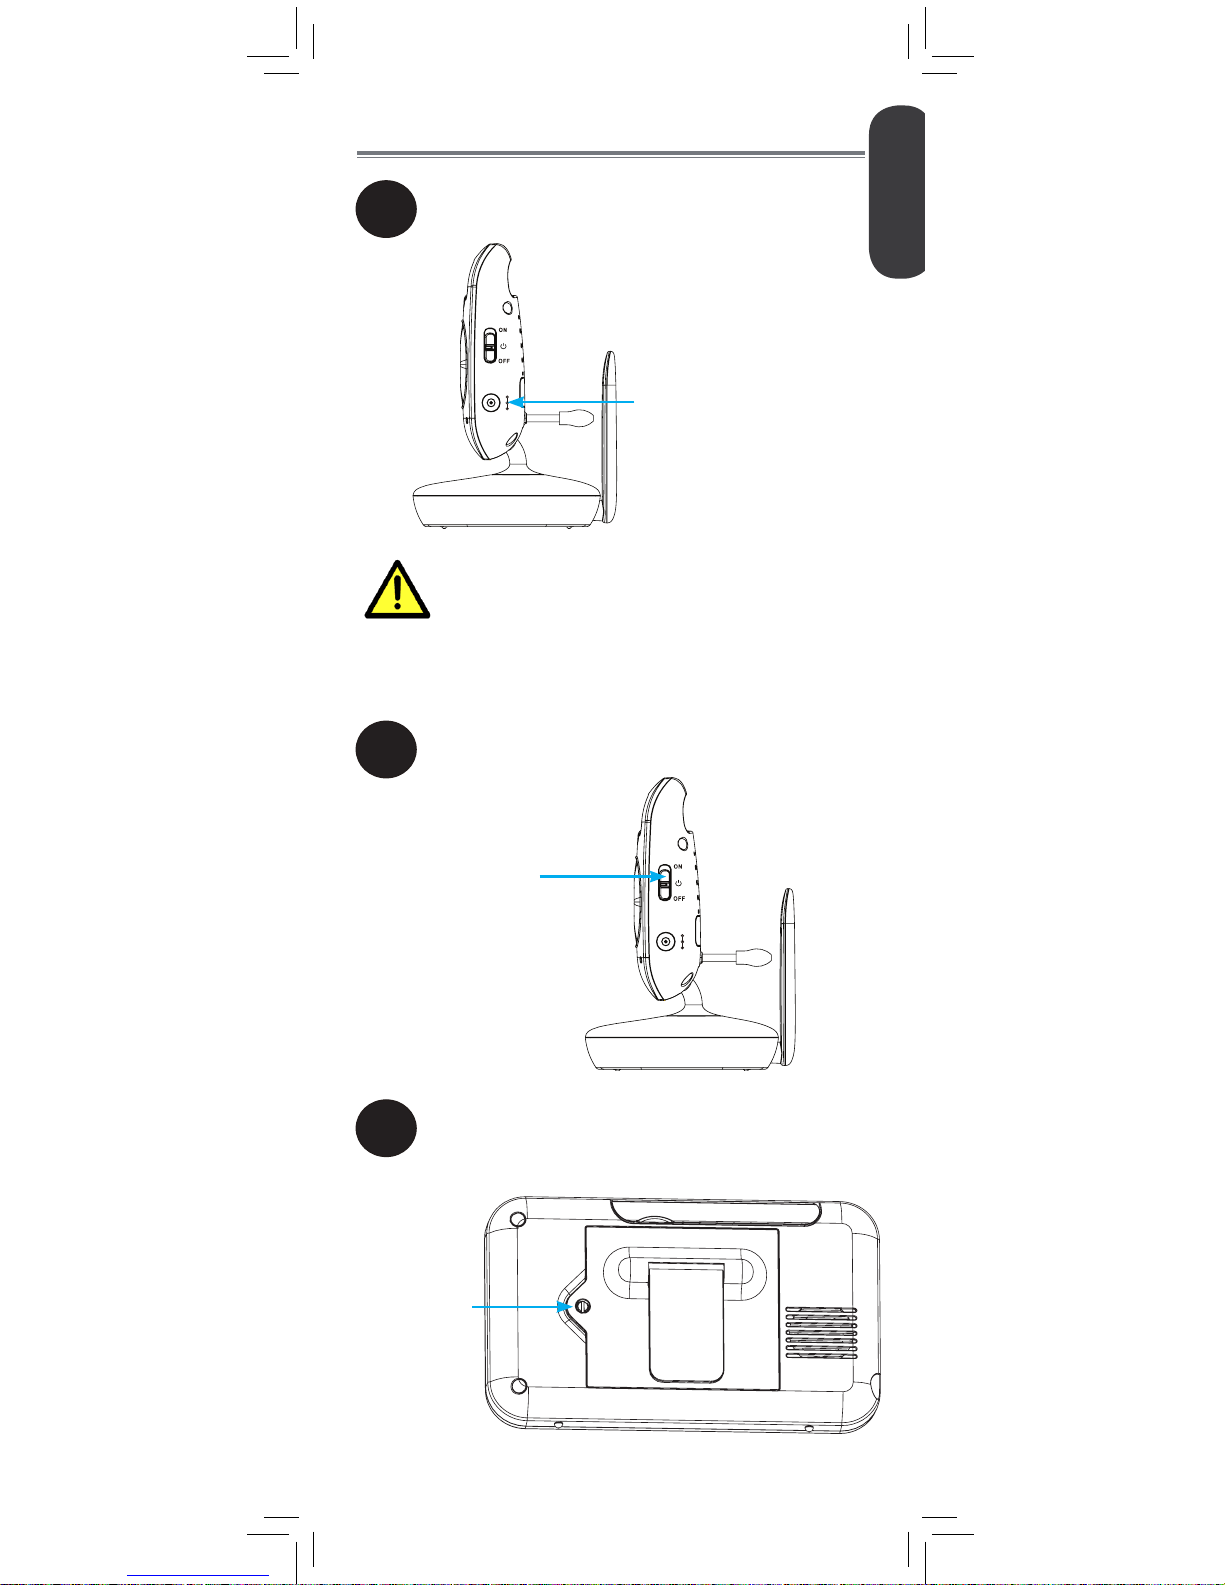
1
2
Connect the power adapter to the
camera.
Slide the power switch to ON. The
power LED glows.
Power Switch
3
Using a flathead screwdriver (not included),
remove the battery compartment cover on
the monitor.
Unscrew using
flathead
screwdriver
Page 8
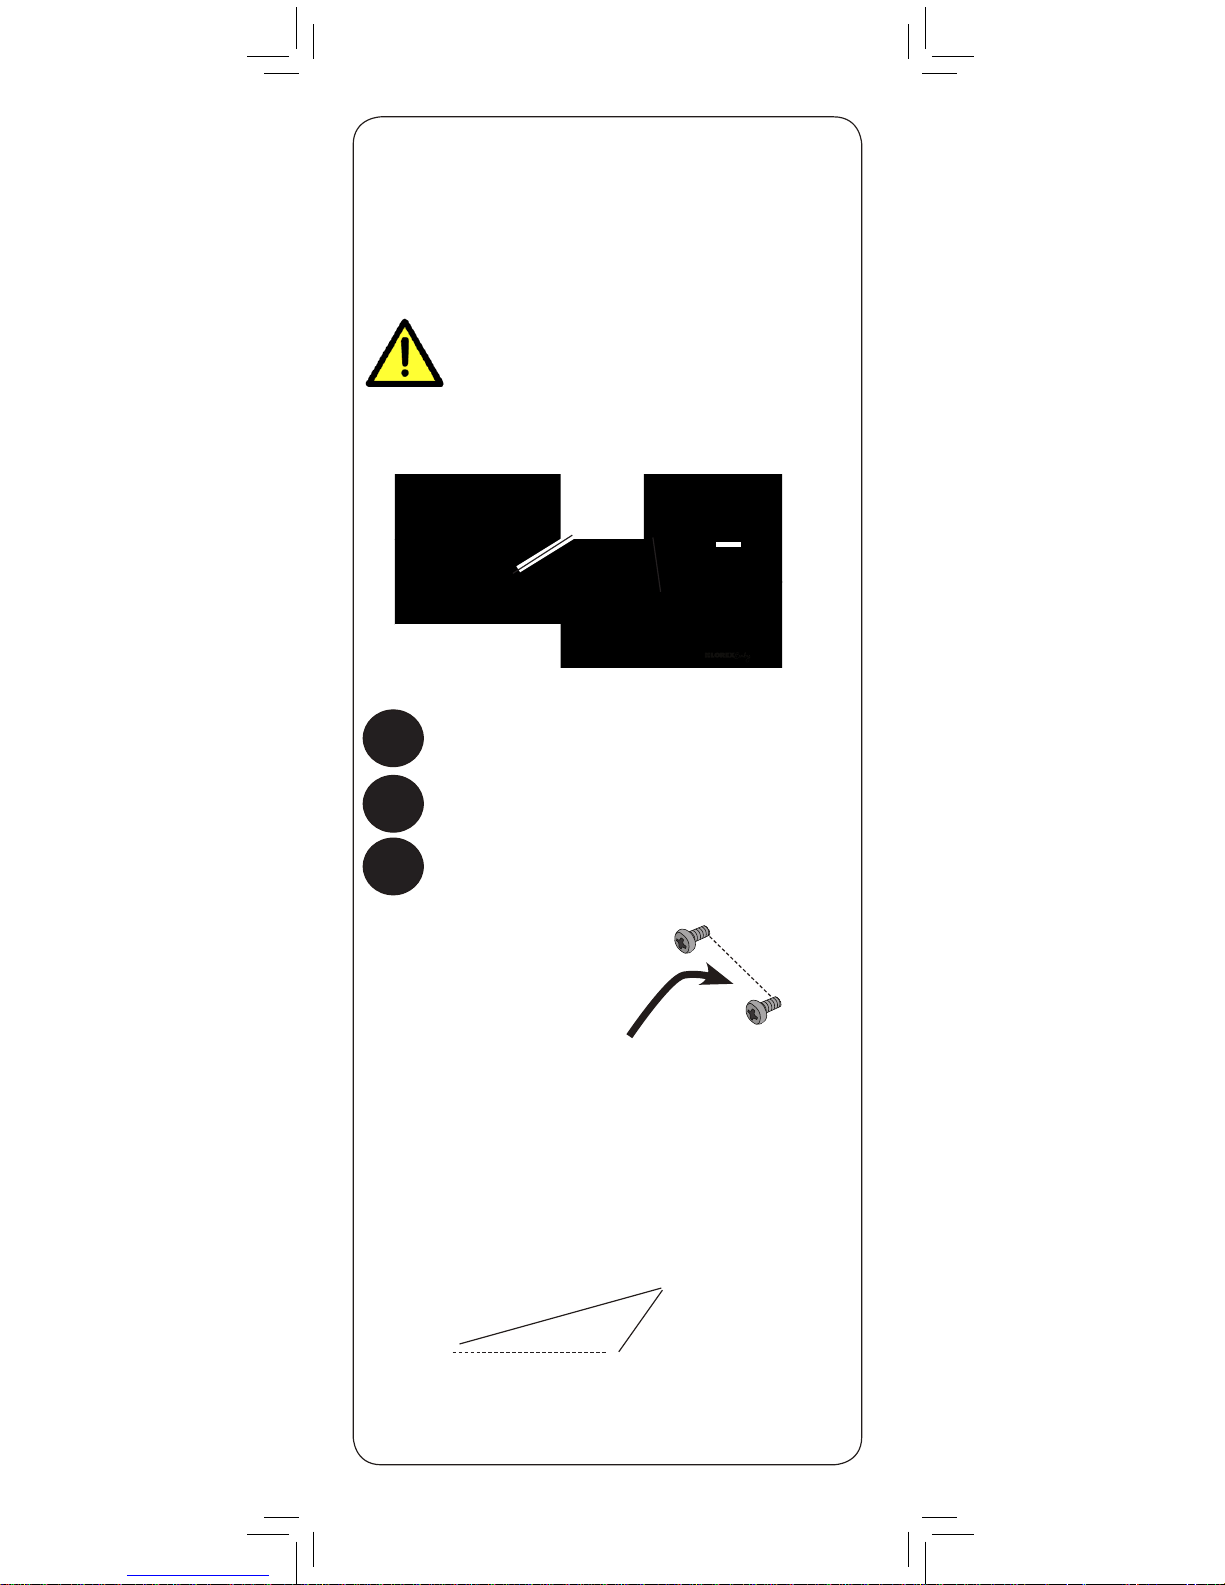
Power Button
7
Press and hold the power button to turn on
the monitor.
6
Connect the power adapter to the monitor.
The power LED glows.
LINK
LINK
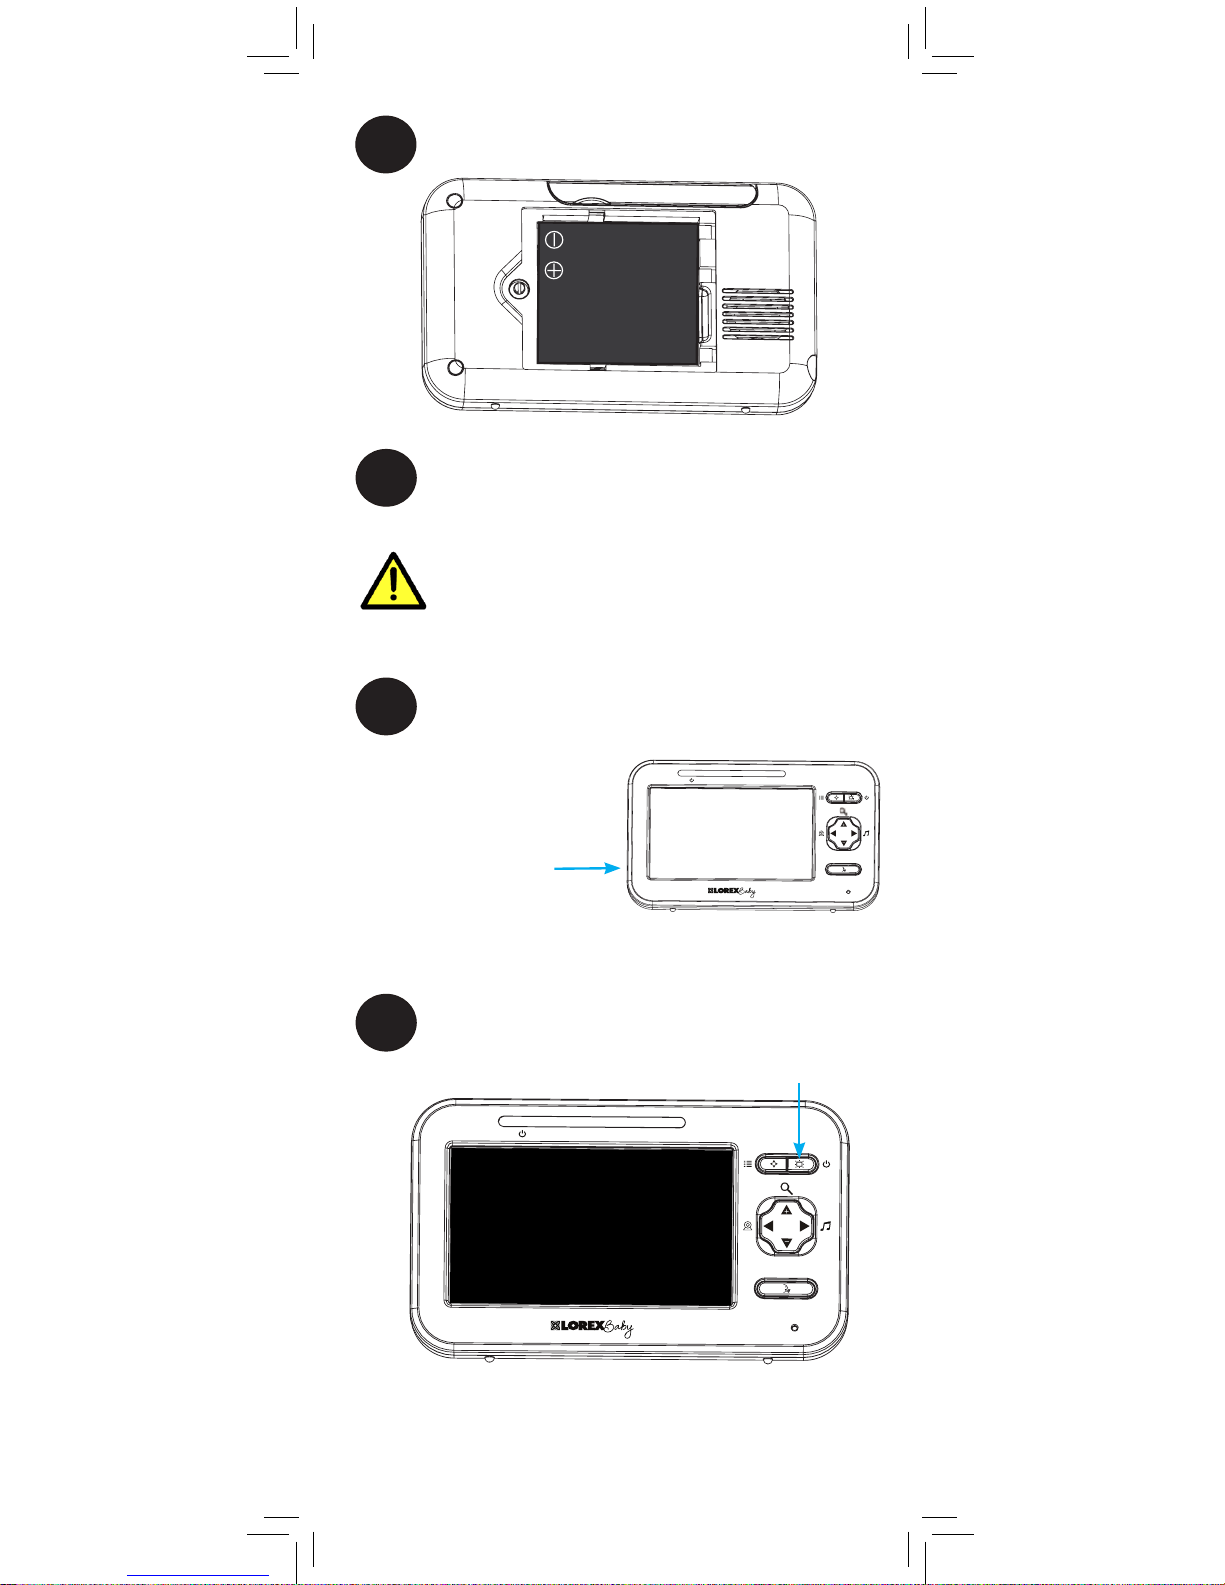
If you do not plan to use the unit for a
prolonged period of time, remove the
battery or ensure you charge it at least
once every 6 months.
6
4
Insert the included battery as shown
below.
5
Replace the battery compartment cover
and secure with screw.
Page 9

Pull up to extend antenna
• It is recommended to charge the battery for 6 hours
before use.
• For overnight monitoring, it is recommended to connect
the power adapter. When fully charged, the monitor will
stay on up to 6 hours in normal mode or 10 hours on
Video OFF mode (see page 18).
• For better reception, flip up the antenna on the monitor
and camera.
Tips
AAA batteries are not intended for
overnight monitoring. The camera can
operate for up to 4 hours on battery
power.
Optional - Camera Batteries
Unscrew the battery compartment under the camera and
insert 4x AAA batteries (not included). Replace the battery
compartment door and screw.
4x AAA Batteries
(not included)
Battery Compartment
Screw
• If using batteries, it is recommended to use the power
adapter whenever possible to save battery life.
• The camera power adapter cannot charge
rechargeable AAA batteries.
Notes
DC 6V
LINK
ENGLISH
7
Page 10
Make sure all power cables are at least
3ft / 1m away from the crib and out of
reach of your child.
Use the included cable clips to help keep
power cords away from your child.
Mounting points
68mm
68mm
Cable Clips
8
Optional - Wall Mounting the
Camera
Tap anchors into holes with a hammer. Insert screws
2/3 of the way.
Before permanently mounting the camera:
• Determine where you will get the best view of your baby.
• Ensure the power cable is long enough to power the
camera.
1
Drill 2 holes in the wall with centers exactly 68mm
apart.
2
3
Align the mounting points with the screws and push
the camera down.
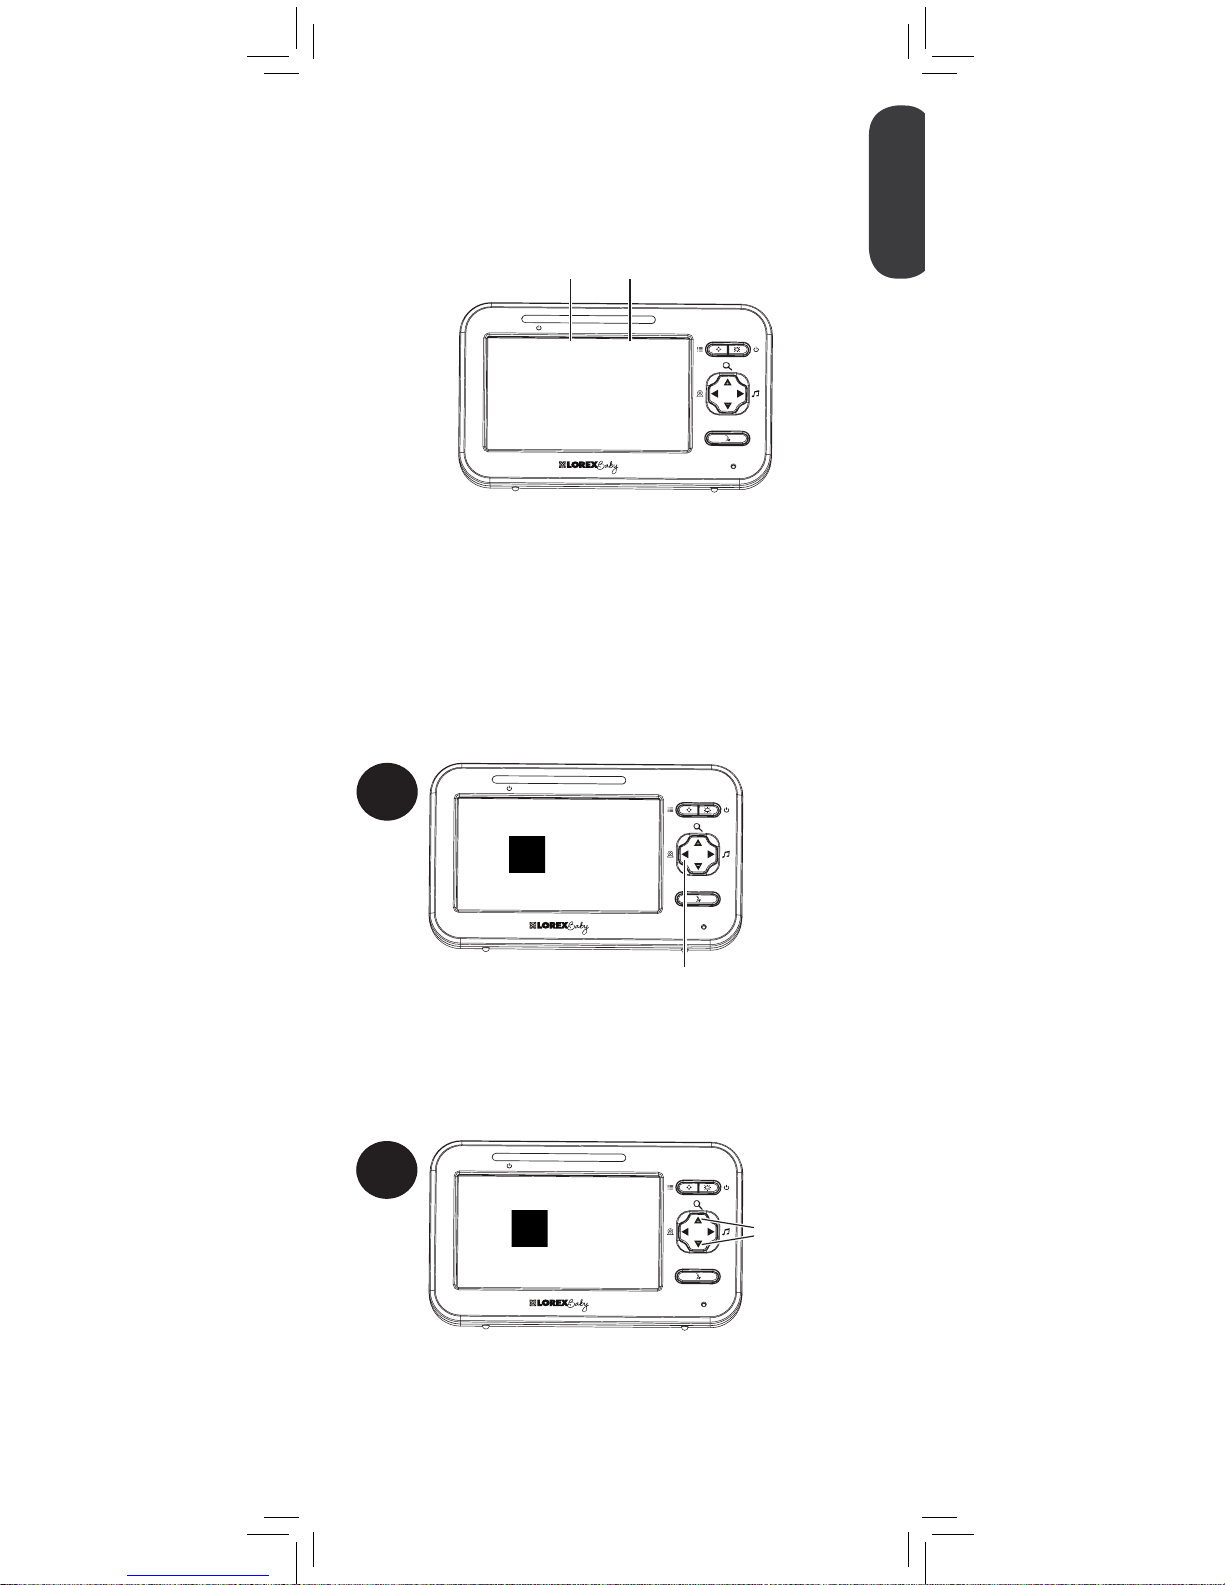
Page 11

1
Press and hold
to open the
menu
LINK
2
Press repeatedly
to browse menu
options
LINK
Press to adjust
menu options
3
Press to save
changes and
exit the menu
LINK
ENGLISH
9
Using Your Baby Monitor
The monitor shows the following icons during use:
Icon Meaning
Signal strength
1
Selected channel
Scan
Scan mode
activated
Volume muted
X2
Digital zoom
activated
Move zoom area
Song currently
playing
Talk activated
Icon Meaning
VOX (Voice
Trigger) on
Battery full
Battery low
Battery charging
Battery finished
charging
70°F
Current room
temperature
Pairing channel
Camera out of
range or off (e.g.
batteries dead)
Using the Menus
Page 12
Press and hold to talk to the currently
selected camera
Press to cycle through connected cameras or select
Scan mode.
The currently selected camera is shown on screen.
The monitor only plays sound from the
camera that is currently being viewed.
1
LINK
1
LINK
Audio from the camera is muted while
using this feature.
When two or more cameras are connected, you
may use Scan mode to cycle through video from
each camera. Each camera channel is displayed
for 10 seconds.
Scan
1
To enable Scan mode:
Using Scan Mode (multiple cameras only)
Press repeatedly until Scan is shown on screen
LINK
10
Talking to Your Baby
Changing Channels
C1
Page 13
When Scan mode is activated, the monitor
changes channel automatically every few
seconds. A Scan icon appears next to the
currently selected channel number.
To connect additional cameras to the monitor, see
“Pairing Additional Cameras” on page 19.
1 Scan
Currently selected channel
Scan mode activated
LINK
LINK
LINK
ENGLISH
11
If you wish to only monitor some of your cameras
using Scan mode, you may choose to hide
certain channels. Hidden channels will not be
shown in Scan mode.
C1
Press to change
a checkmark
and an X
2
C1
Press to cycle through connected cameras to the
channel you wish to show or hide.
1
By default, each channel name has a checkmark
beside it, which means it is enabled for monitoring
and included in the viewing cycle on Scan mode.
To show / hide channels in Scan mode:
An X will disable video from the channel and
remove it from the viewing cycle in Scan mode.
Page 14
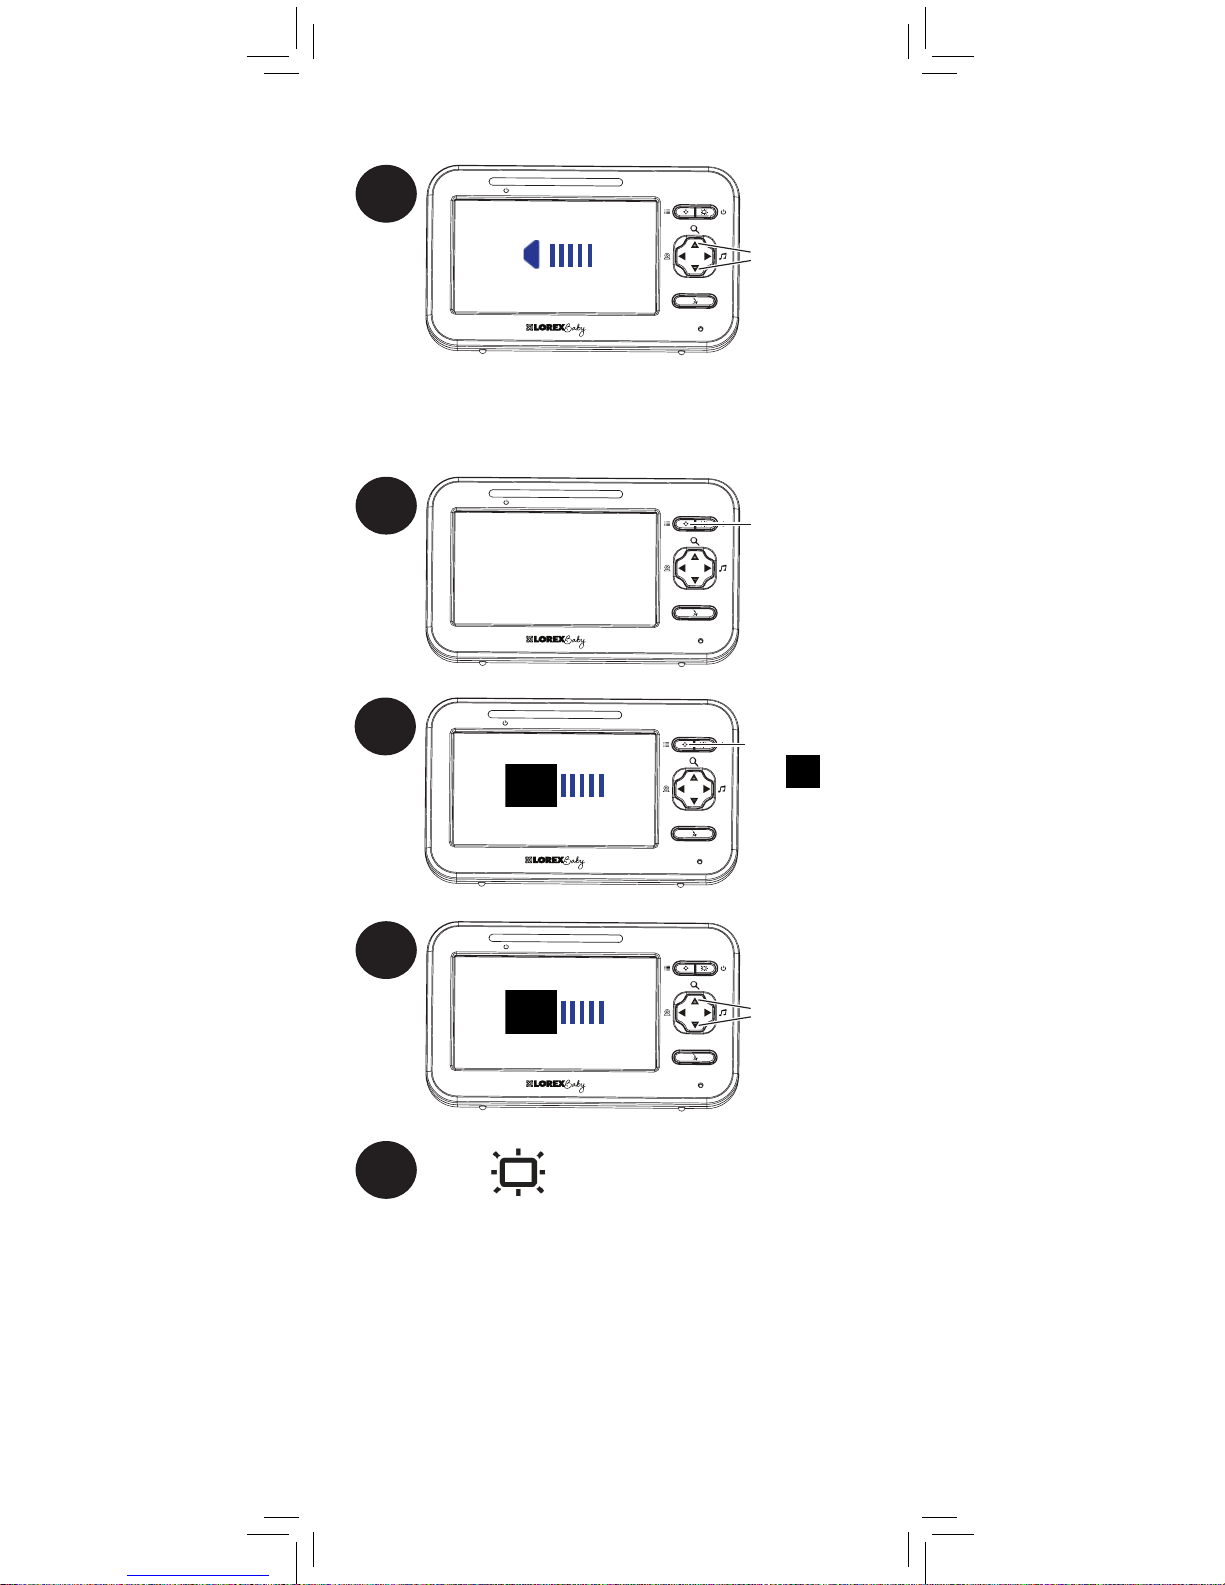
1
LINK
Press to adjust
the volume of
the monitor
1
Press and hold
to open the
menu
LINK
2
Press repeatedly
until
is
shown
LINK
3
LINK
Press to adjust
the brightness
4
Press to save changes and exit menu.
12
Adjusting Volume
Adjusting Screen Brightness
Page 15
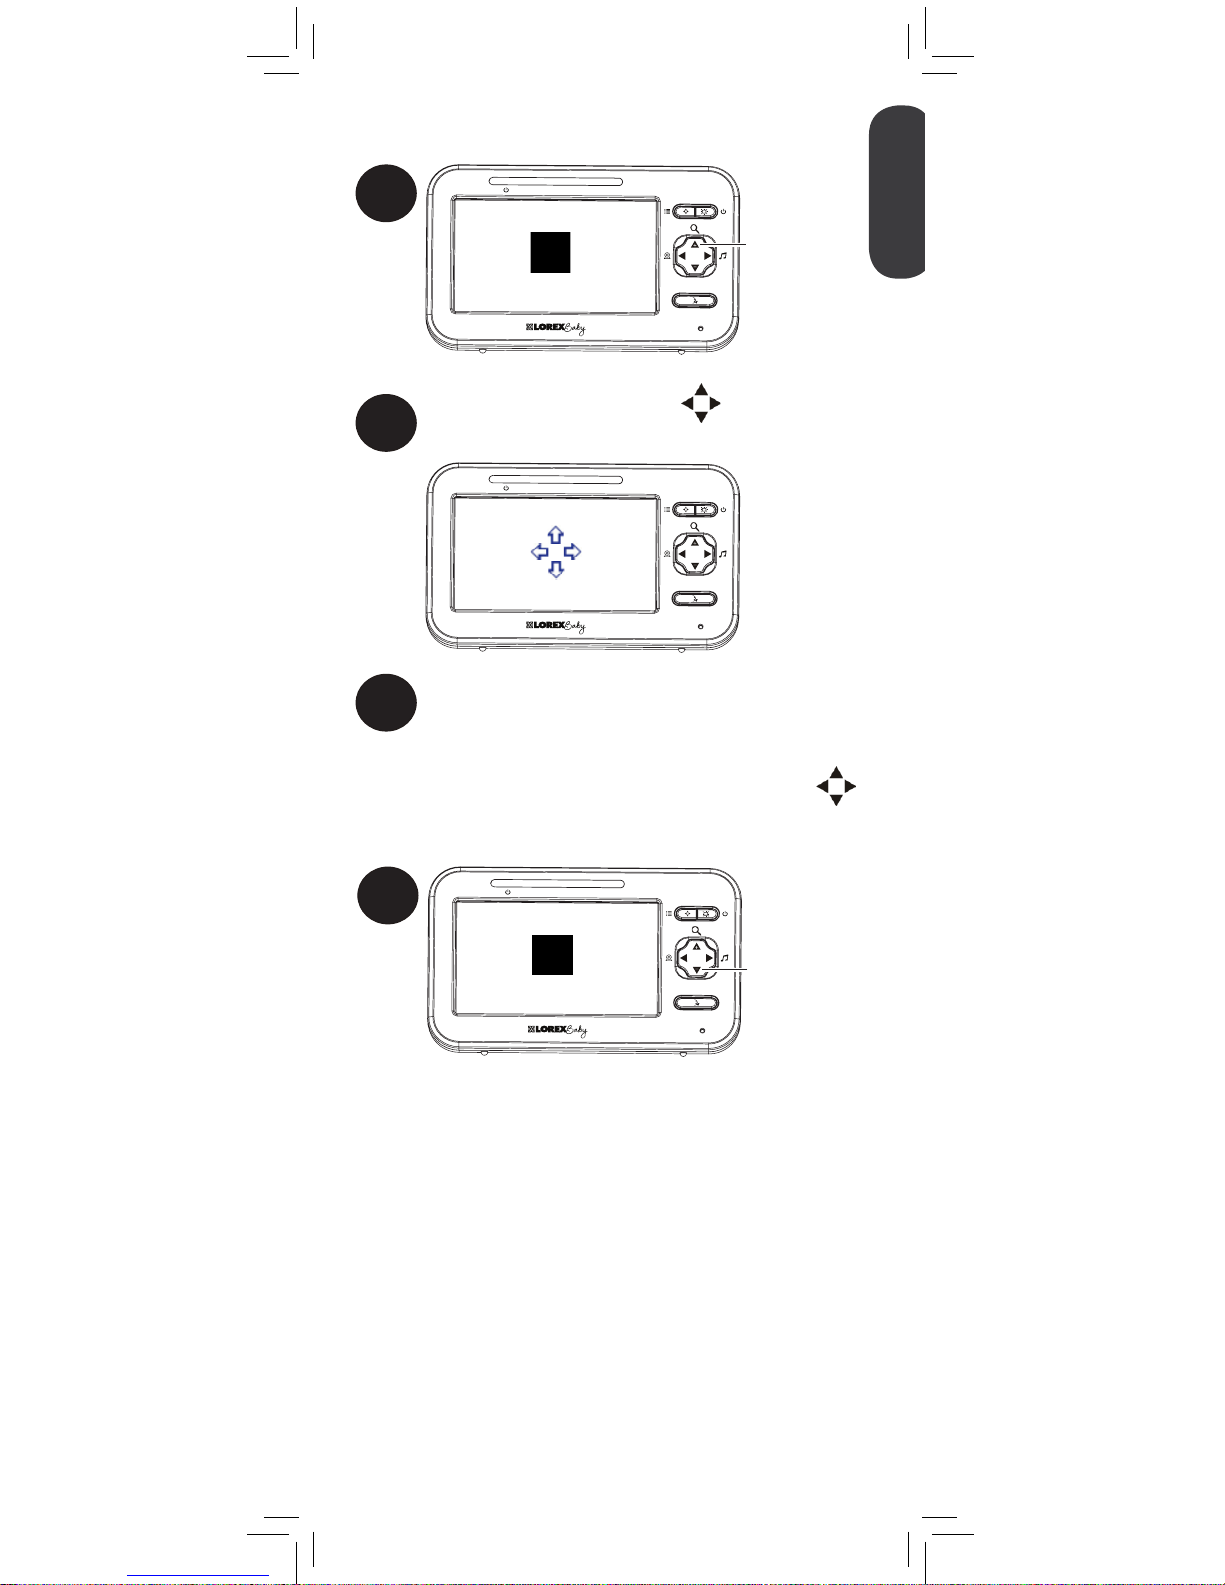
3
Use the arrow keys to move the zoom area.
1
LINK
Press and hold
to zoom in
2
While zoomed in, press . Four arrows
appear on the monitor.
x2
LINK
Before you can return to normal
viewing mode, you must press
to disable the on-screen arrows.
4
LINK
Press and hold
to zoom out
x1
ENGLISH
13
Using Digital Zoom
Page 16
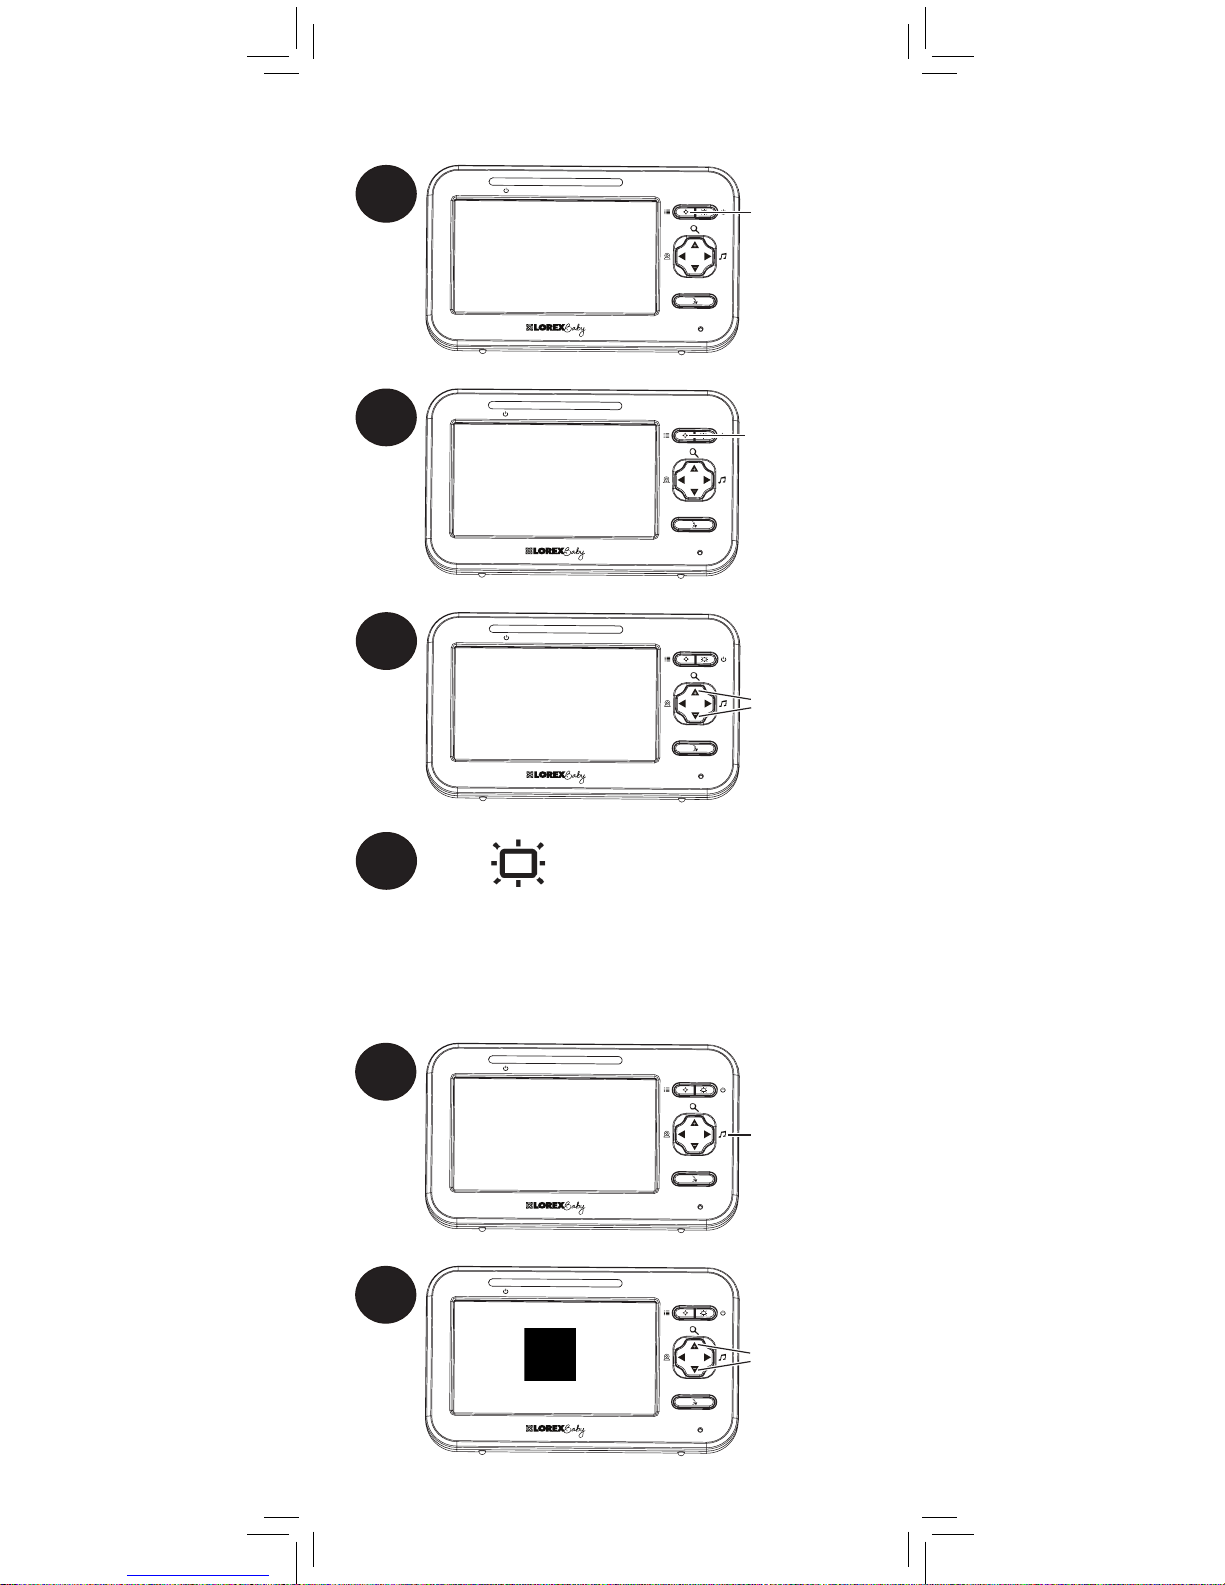
1
Press and hold
to open the
menu
LINK
Turning on the Night-Light
2
Press repeatedly
until
is
shown
LINK
3
LINK
Press to turn
the night-light
on / off
4
Press to save changes and exit menu.
OFF
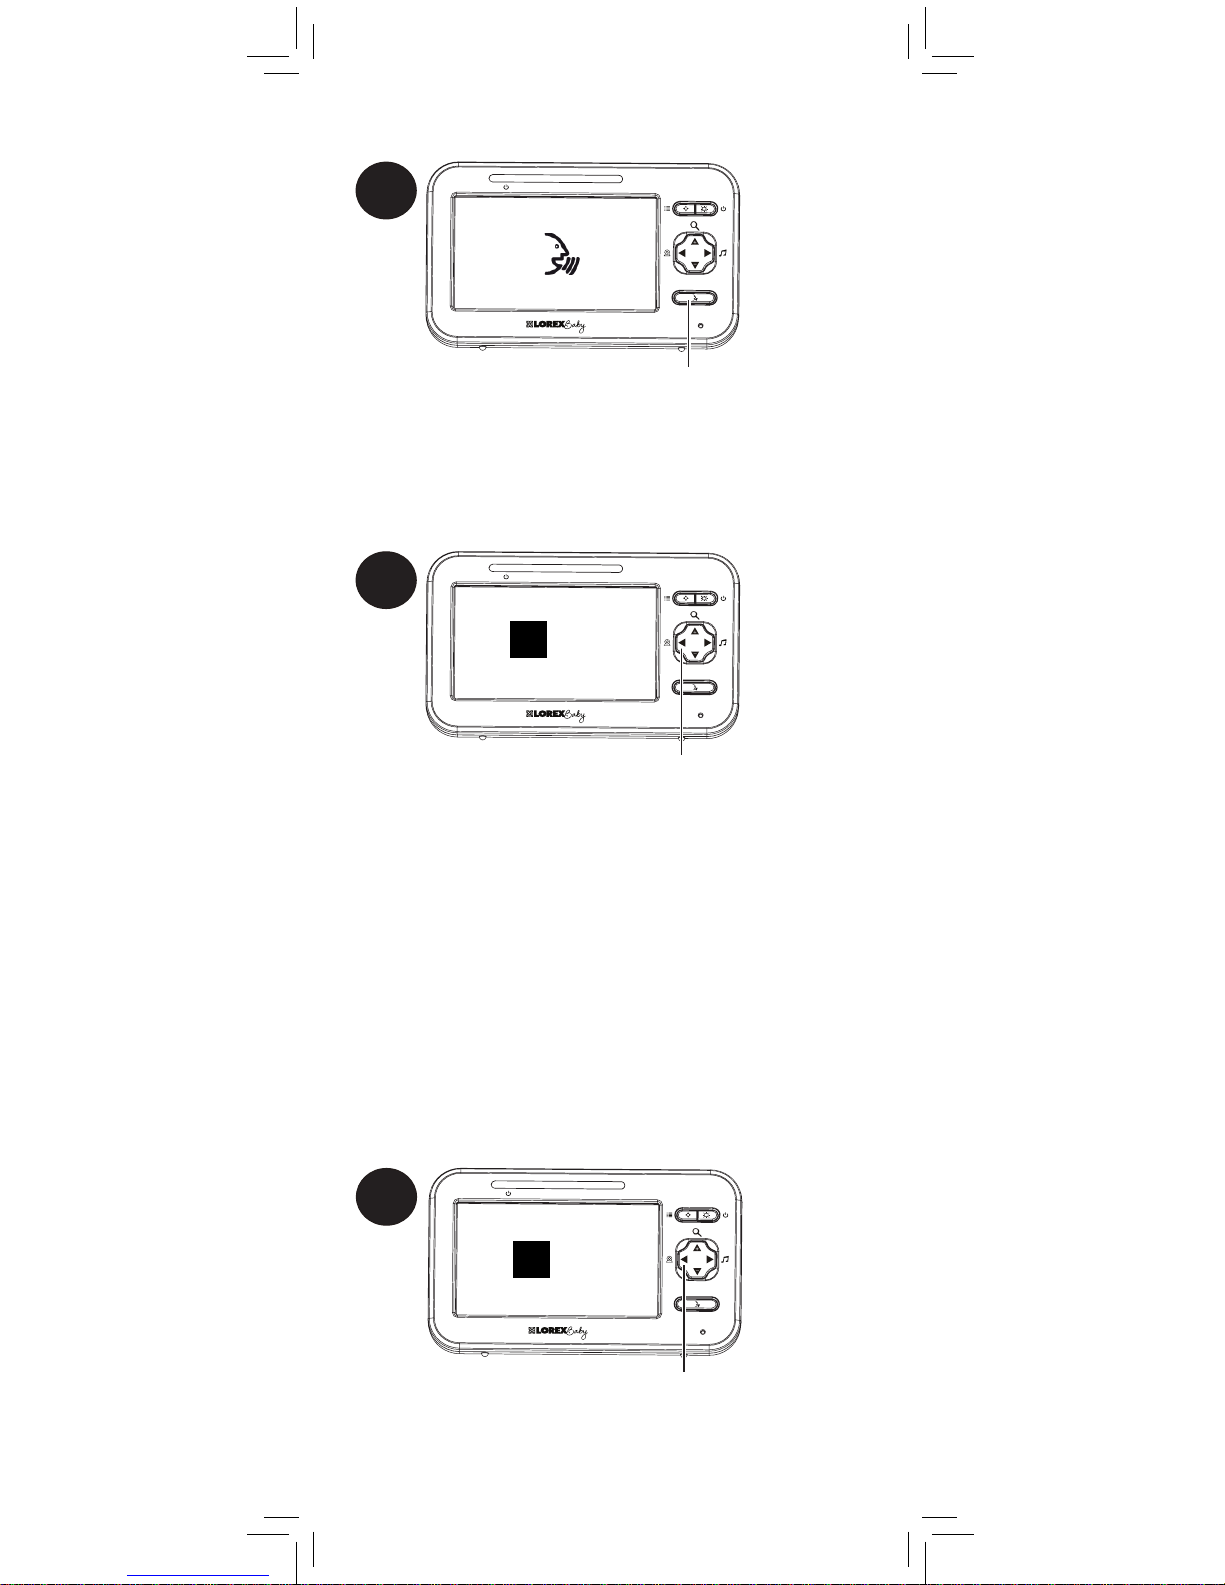
Playing Lullabies
The camera can play 5 different pre-loaded
songs.
1
Press to play
the first lullaby
LINK
2
LINK
Press to select a
different lullaby
ON
14
Page 17
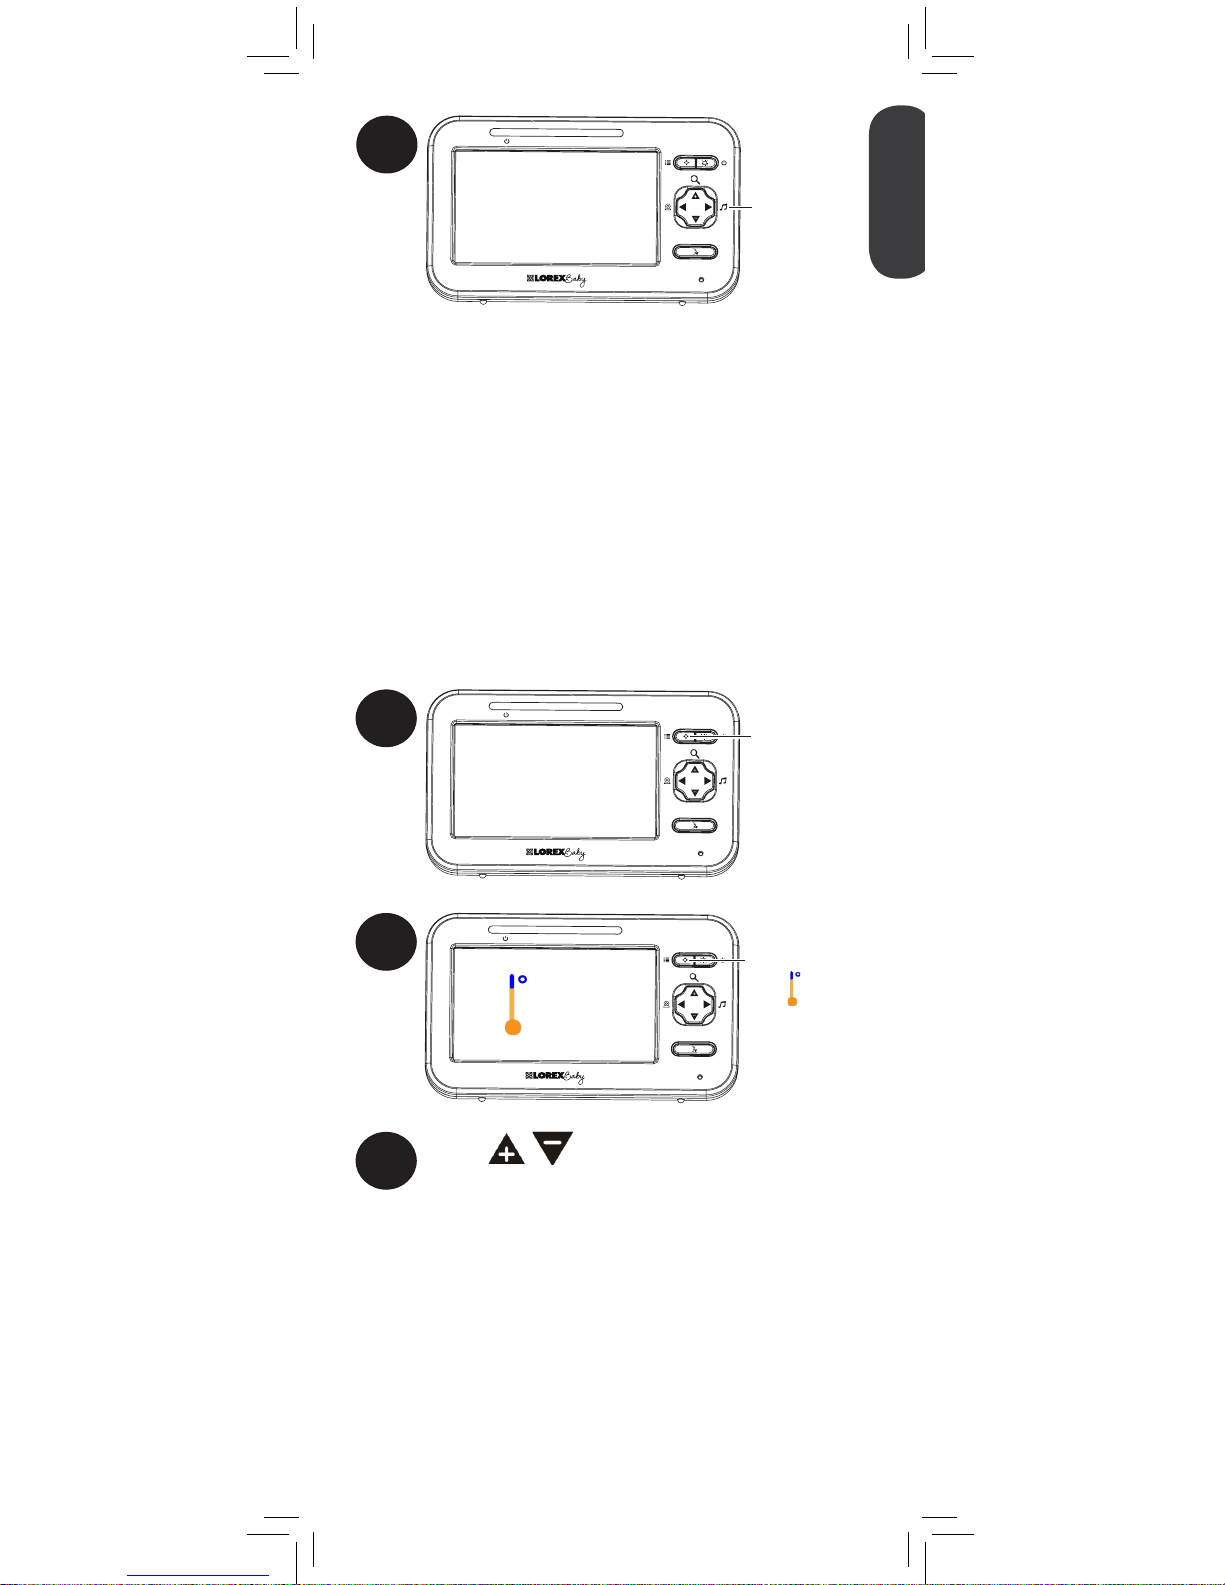
3
Press to stop
playing
lullabies
LINK
3
Press to adjust the low
temperature.
If the temperature at the selected camera
goes below this temperature, the monitor
will beep and the temperature reading on
the monitor will flash orange.
If you select a temperature below 62°F /
17°C, the low temperature alert will be
turned OFF.
The temperature alert feature allows you to ensure the
baby’s room is at a comfortable, safe temperature. The
monitor beeps if the temperature gets too hot or cold.
Temperature sensor is accurate within 3°F/1°C.
You can control the high and low temperatures that
trigger alerts or disable temperature alerts.
Temperature Alerts
To setup temperature alerts:
1
Press and hold
to open the
menu
LINK
2
Press repeatedly
until
Lo is
shown
LINK
Lo 68° F
If a lullaby is playing, it will stop
when the talk feature is used.
ENGLISH
15
Page 18
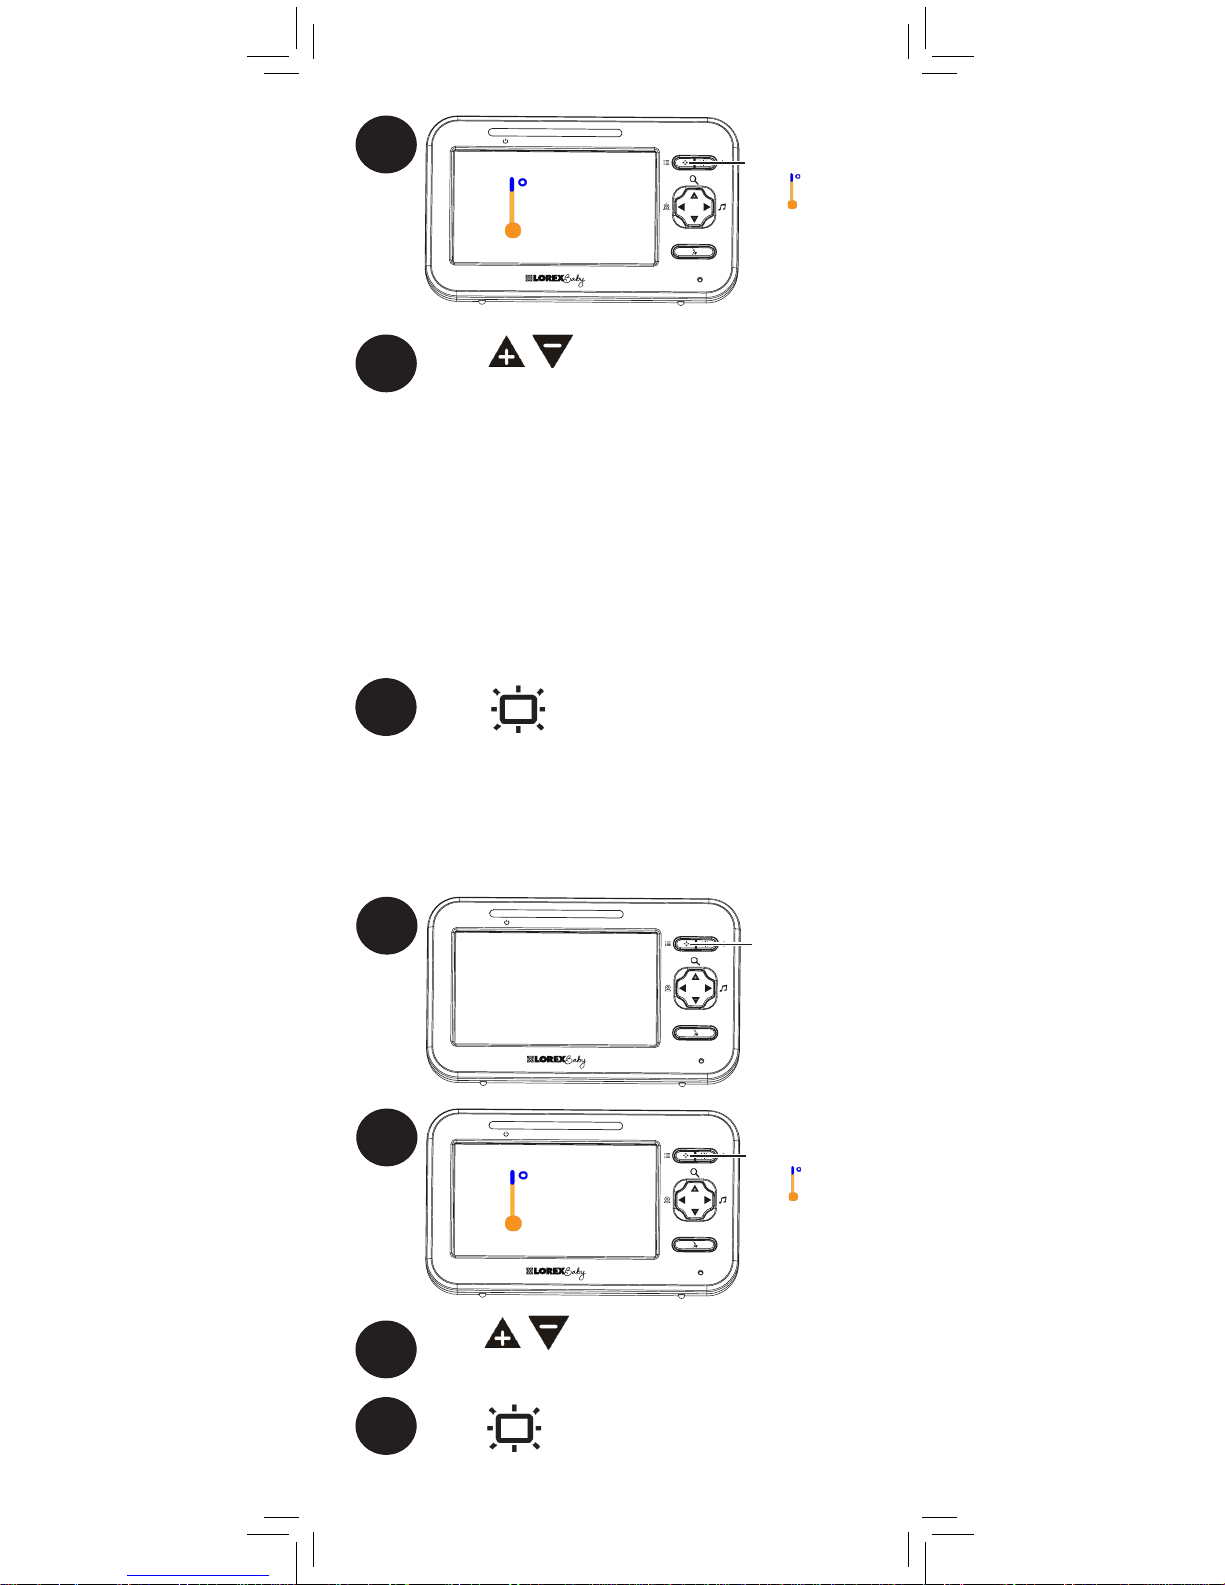
5
Press to adjust the high
temperature.
If the temperature at the selected camera
goes above this temperature, the monitor
will beep and the temperature reading on
the monitor will flash orange.
If you select a temperature above 86°F /
30°C, the high temperature alert will be
turned OFF.
4
Press repeatedly
until
Hi is
shown
LINK
Hi 82° F
6
Press to save changes and exit menu.
3
Press to select °F (Fahrenheit) or
°C (Celsius)
4
Press to save changes and exit menu.
Selecting Fahrenheit or Celsius
You can select if you would like temperature
readings and alerts to be in Fahrenheit or
Celsius.
1
Press and hold
to open the
menu
LINK
2
Press repeatedly
until
is
shown
LINK
° F
16
Page 19
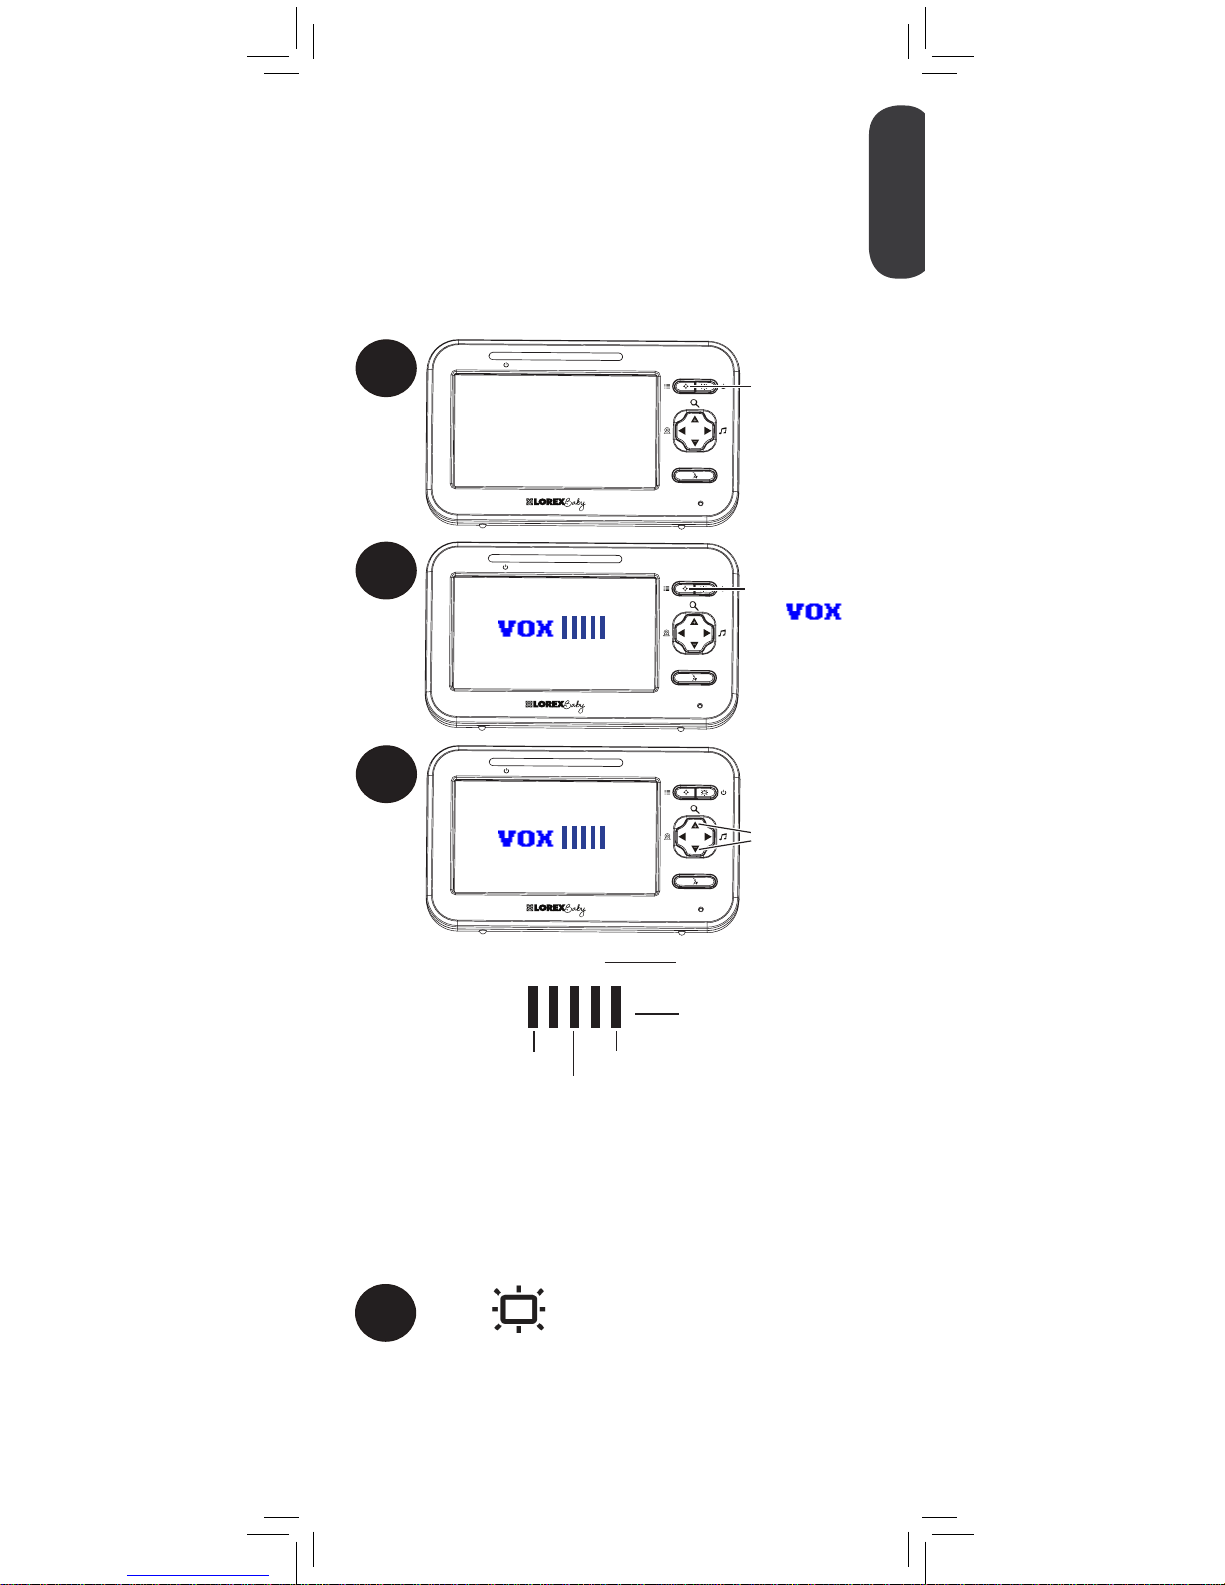
1
Press and hold
to open the
menu
LINK
2
Press repeatedly
until
is
shown
LINK
3
LINK
Press to set
VOX sensitivity
VOX OFF
VOX
VOX mode is off
VOX mode is on
Low sensitivity
Medium Sensitivity
High Sensitivity
If you want softer noises to trigger the monitor (such as
a faint whimper), set the sensitivity setting higher. If you
only want louder noises to trigger the monitor (such as
a loud cry), set the sensitivity setting lower.
4
Press to exit menu.
While VOX is activated, the monitor’s screen and
speaker will turn off after a minute unless sound
is detected at the selected sensitivity level. Press any
button to turn the screen back on. When VOX is on, a
VOX icon is shown on the screen.
VOX mode will not work while
Scan mode is activated.
ENGLISH
17
In VOX mode, the monitor’s screen and speaker
will turn off after a minute unless sound is
detected at the selected sensitivity level. This
conserves battery power, and alerts you only
when needed.
Enabling VOX Mode (Voice
Trigger)
Page 20
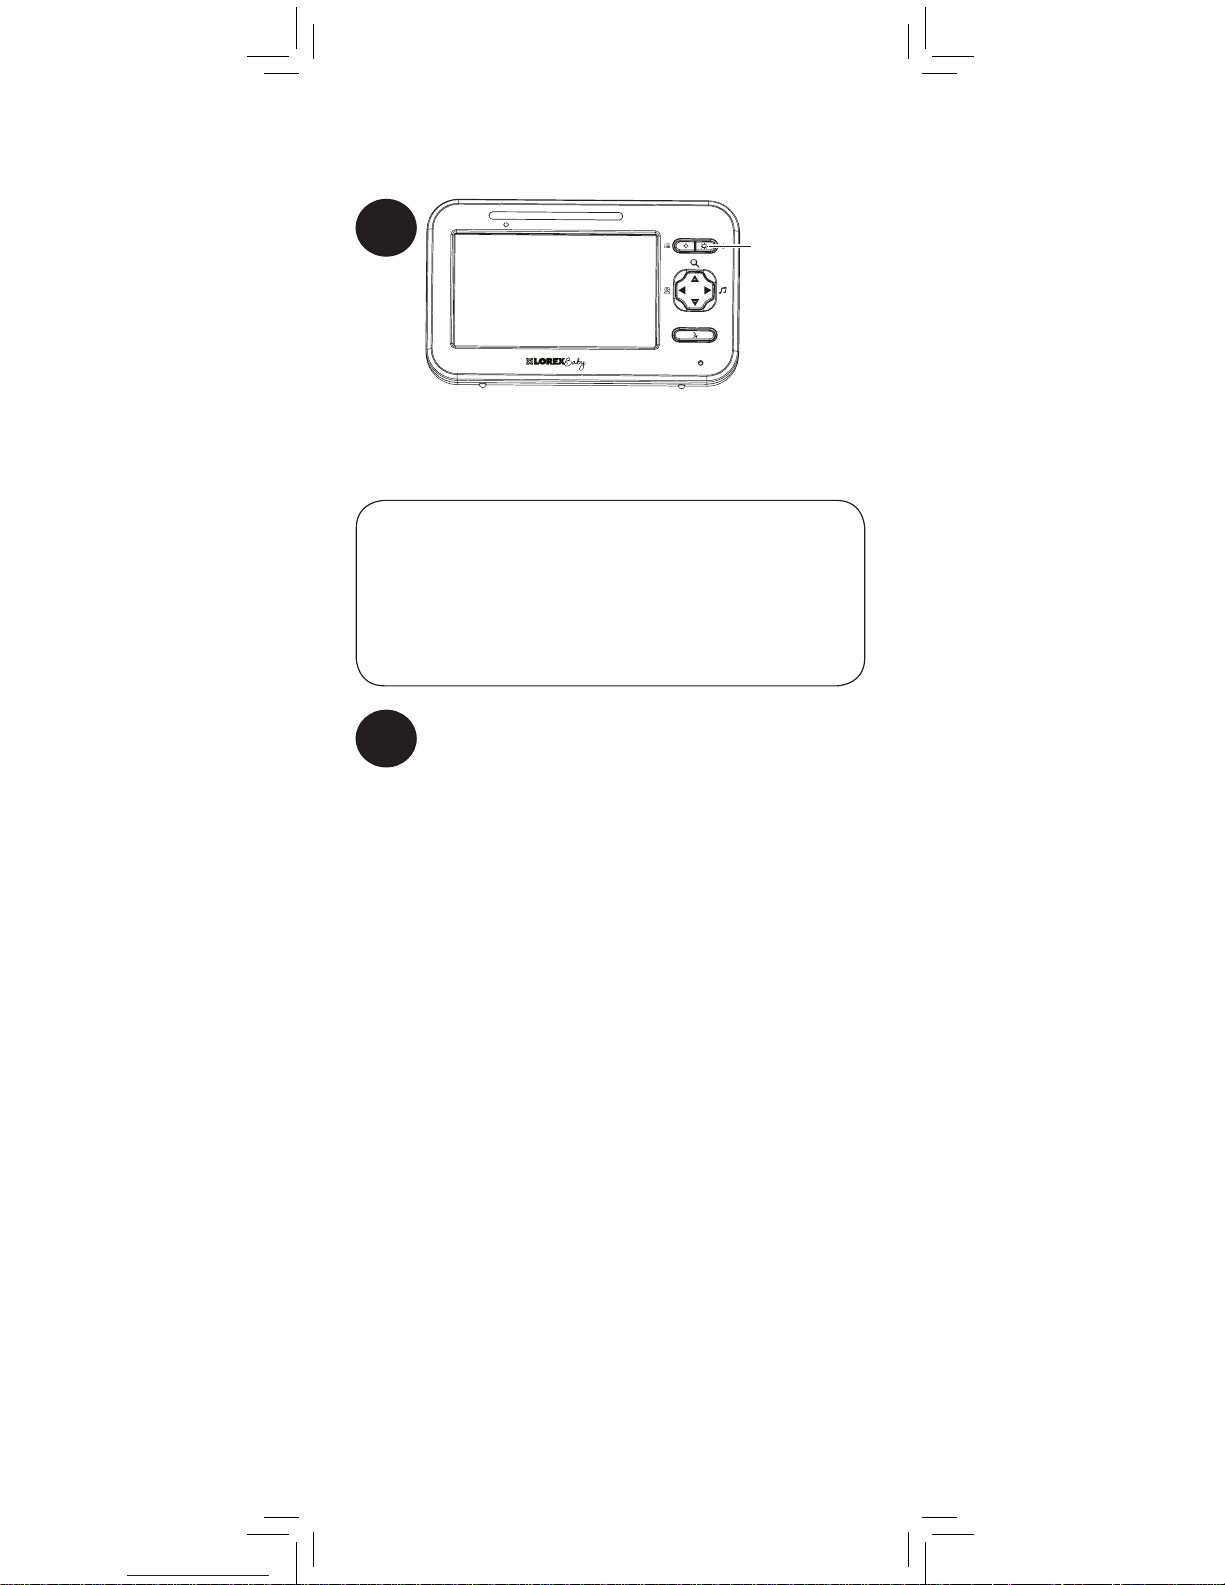
The monitor’s video display is turned off.
The monitor plays sound from the selected
channel only.
Video Off Mode (Audio Only
Mode)
Press any button to turn the video display
back on.
• If Scan mode is enabled, the monitor will play sound
from the channel that is currently selected.
• VOX mode will override Video Off mode. See
“Enabling VOX Mode (Voice Trigger)” on page 17
for details.
Notes
2
1
Press to enter
Video Off
mode
LINK
18
Page 21
2
1
Place the camera and monitor next to each
other. Make sure the camera is turned on.
Press and hold until is shown on the monitor.
LINK
C1
3
LINK
Press to to
select the
channel you
would like to
pair the
camera to
C2
If a camera is already connected to
this channel, the new camera will
replace the existing camera.
4
Press to confirm
the pairing
channel. The
Link LED will
begin flashing
LINK
To pair a camera with the monitor:
ENGLISH
19
Pairing Additional Cameras
The camera(s) included have already
been paired with the monitor. If you have
purchased additional add-on cameras (model#
LB2251AC1), OR if your monitor and camera
are not paired up, follow the steps below.
Page 22
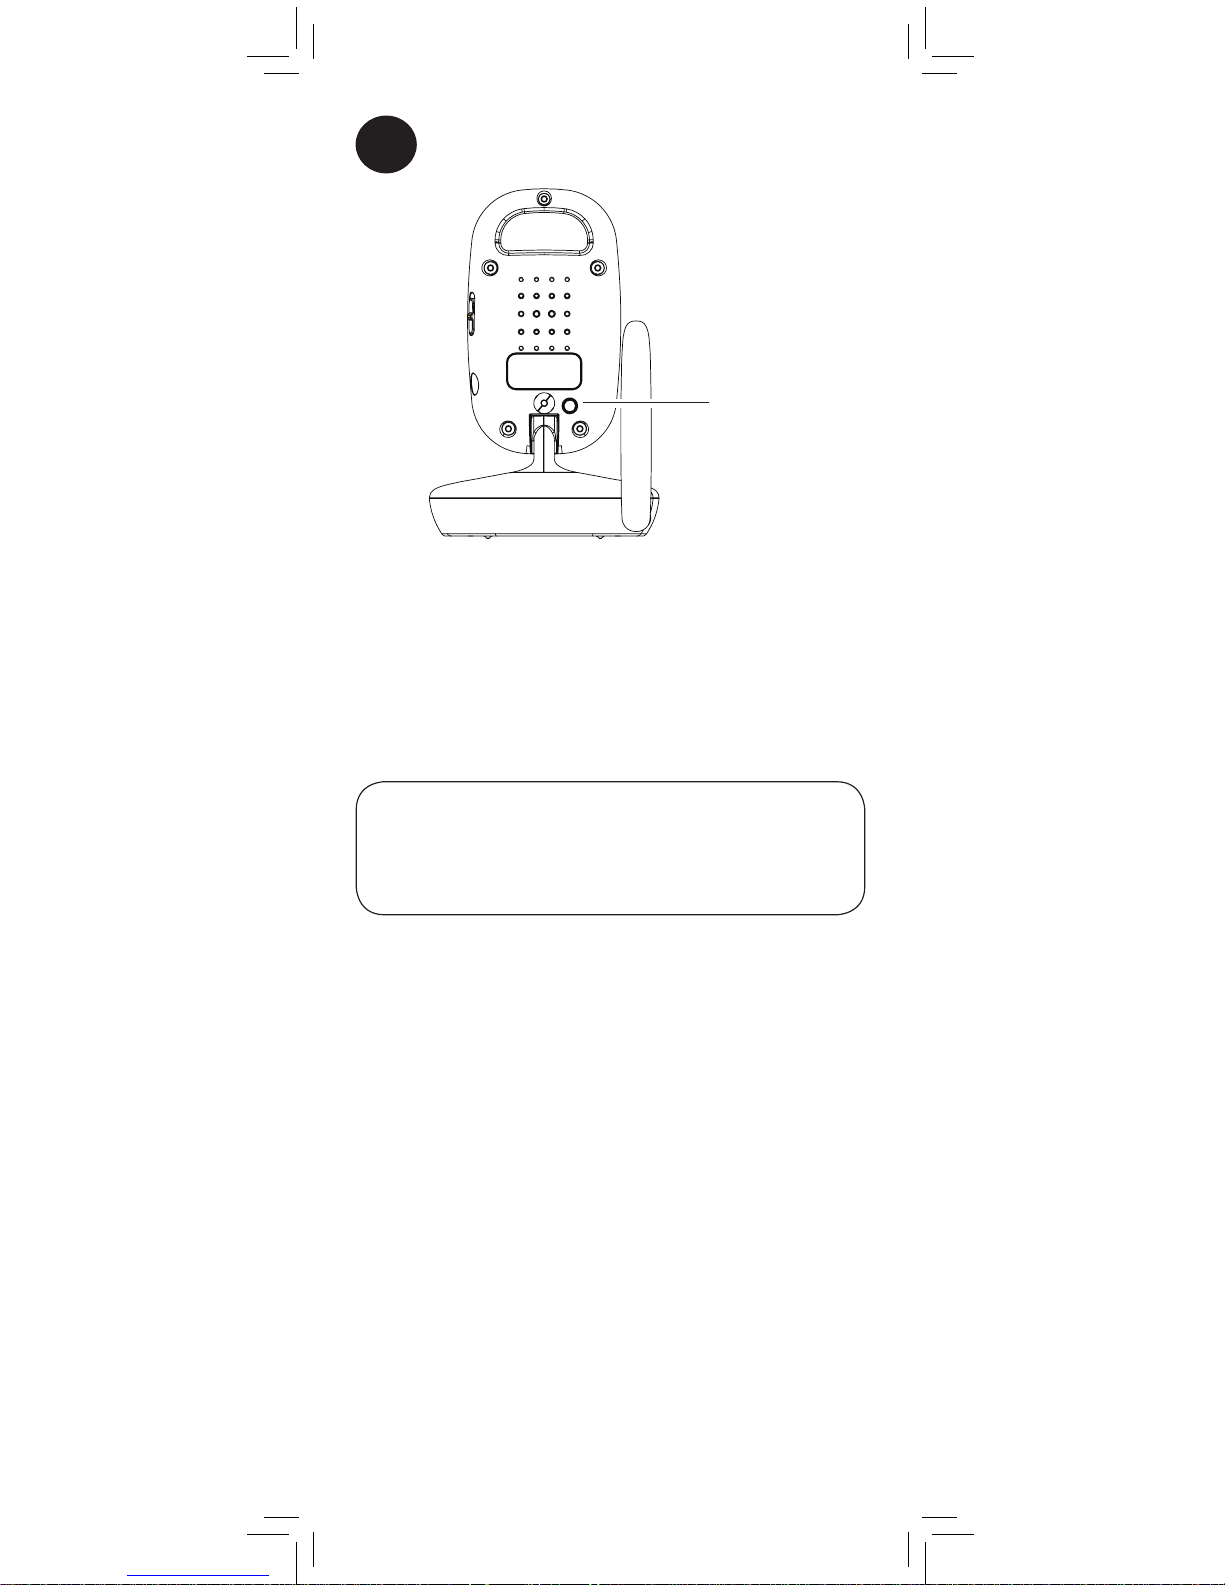
5
Press the PAIR button on the back of the
camera.
PAIR
PAIR button
• Immediately move the camera away from the monitor
to avoid speaker feedback.
• The monitor can connect up to 4 cameras.
Notes
Video from the camera is immediately
shown on the monitor once the camera is
successfully paired.
If your monitor reads “Out of Range“, then
pairing was not successful. Complete the
pairing process again.
20
3.4in
87mm
Page 23
DC 6V
LINK
ENGLISH
21
Technical Specifications
Camera
Frequency 2.4GHz
Maximum Range Up to 450ft / 138m outdoors*
Up to 150ft / 46m indoors*
Image Sensor 1/5” Color CMOS
Lens 3.0mm F2.5
IR LED 6 pcs
Power Adapter 6.0V DC 800mA
Battery Supports 4x AAA Batteries
(not included)
Battery Life Up to 4 hours on AAA batteries
Weight 0.3lbs / 0.1kg
Monitor
Frequency 2.4GHz
Display 4.3” TFT Color LCD
Power Adapter 6.0V DC 800mA
Battery Li-ion Rechargeable Battery 3.7V DC
1700mAh
Battery Life Up to 6 hours in normal mode
Up to 10 hours in Video Off
Weight 0.5lbs / 0.2kg
*Based on unobstructed line of sight. Actual range will vary
based on surroundings.
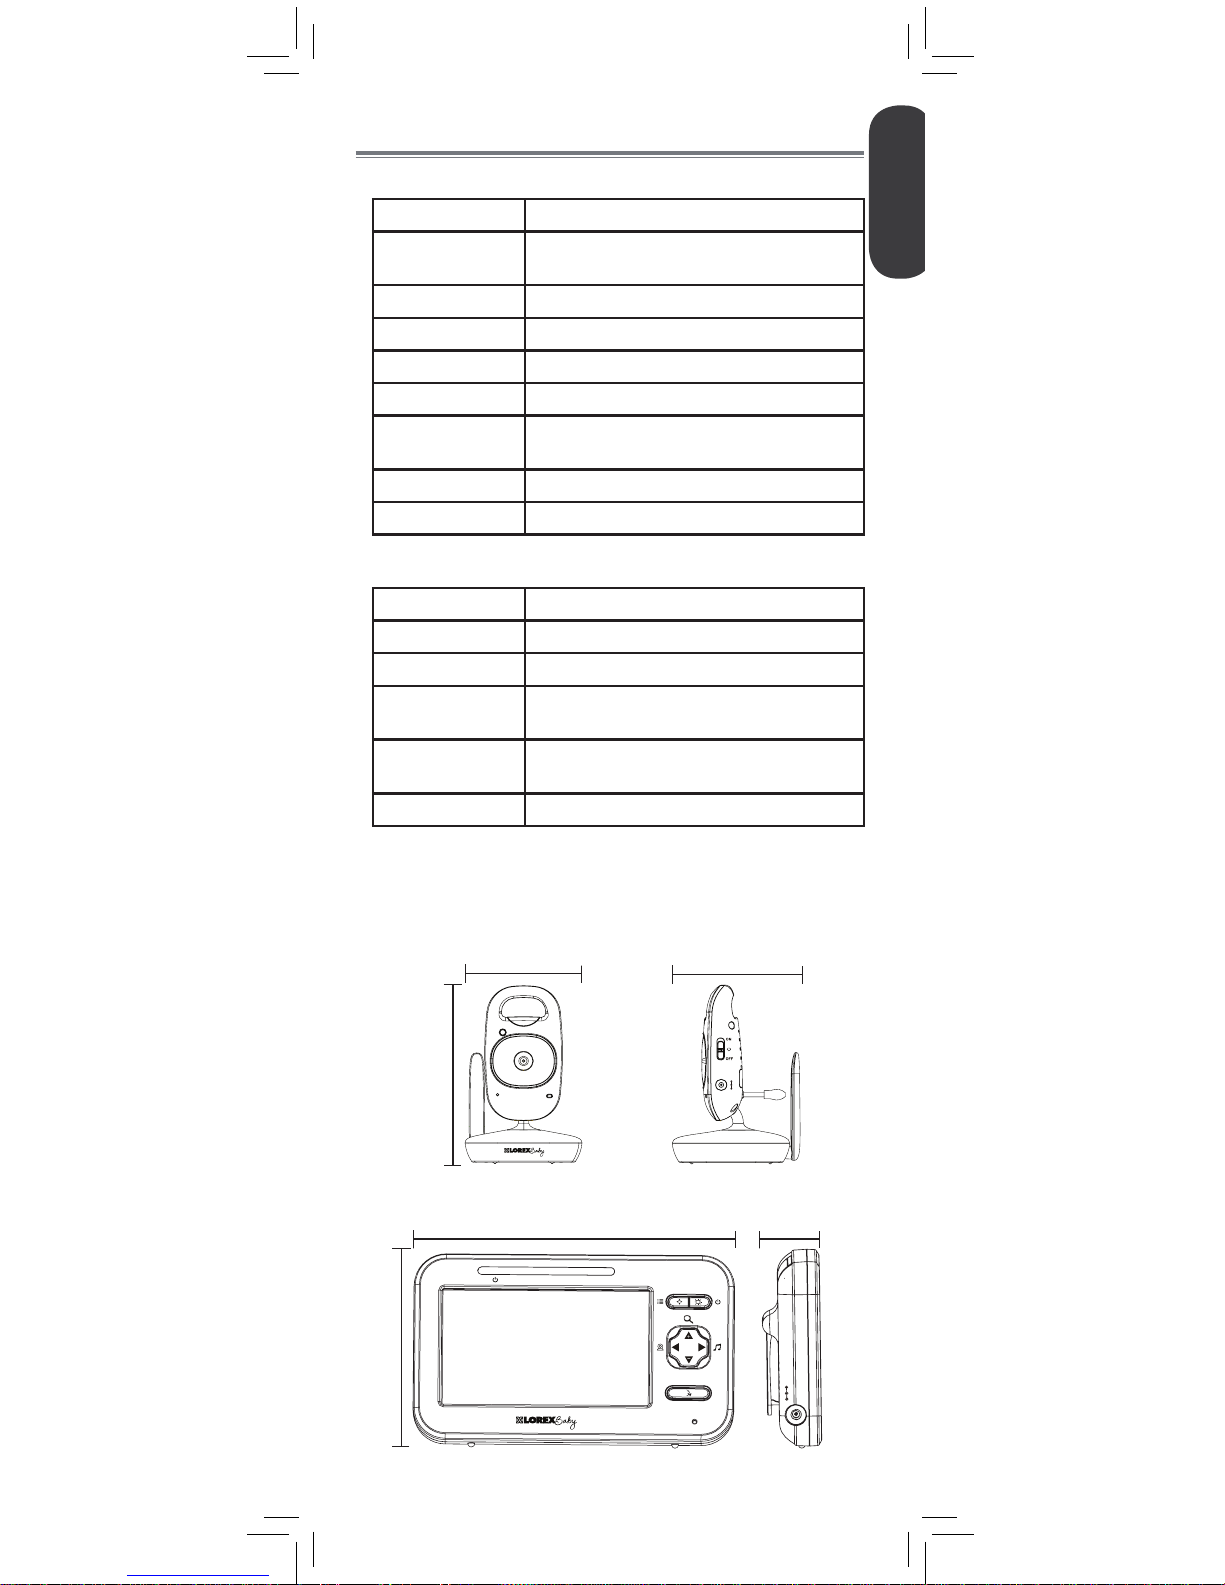
3.4in
87mm
5.8in
148mm
1.0in
25mm
3.4in
87mm
5.3in
135mm
3.8in
97mm
DC 6V
Page 24

22
Troubleshooting
Problem Solution
No video displayed on
the monitor
• Press and hold the button
to power on the monitor.
• Monitor is out of batteries. Plug
in the monitor power adapter.
• Video Off or VOX mode is on.
Press any button to turn the
screen back on.
Monitor screen keeps
turning off
• VOX mode is on. See “Enabling
VOX Mode (Voice Trigger)”
on page 17 for details on
disabling VOX mode.
• The monitor battery is low. Plug
in the monitor power adapter.
The camera is not
detected; “Out of Range”
is shown on the monitor
• Wrong channel selected. Press
repeatedly to select the
channel.
• Make sure the camera is
powered on.
• Camera may be out of batteries.
Replace the batteries or plug in
the camera power adapter.
• The camera and monitor may
be out of range. Extend the
antennas on the monitor and
camera or move the monitor
and camera closer together.
• You may need to pair the
camera and the monitor
again. See “Pairing Additional
Cameras” on page 19 for
details.
Feedback / squealing
noise coming from the
monitor
• Your camera and monitor may
be too close to each other.
Move them further apart.
• For optimal performance, avoid
placing the monitor and camera
near televisions, computers,
cordless/mobile phones, or
other electrical equipment.
• Press to lower the monitor
volume.
Product Support is available 24/7 including product
information, user guides, quick start guides, and FAQ’s at
www.lorexbaby.com/support
Need Help?
Page 25

ENGLISH
23
CLEANING
Clean the monitor and camera with a slightly damp cloth or an antistatic cloth. Never use cleaning agents or abrasive solvents.
• Do not clean any part of the product with cleaners with thinners or
other solvents and chemicals. This may cause permanent damage
to the product, which is not covered by the Warranty. When
necessary, clean it with a damp cloth.
• Keep your camera and monitor away from hot, humid areas or
strong sunlight, and do not get it wet.
• Every effort has been made to ensure high standards of reliability
for your baby monitor. However, if something does go wrong,
please do not try to repair it yourself. Contact Customer Service for
assistance.
DISPOSAL OF THE DEVICE
At the end of the product life cycle, you should
not dispose of this product with normal household
waste, but take the product to a collection point for
the recycling of electrical and electronic equipment.
The symbol on the product, user’s guide, and/or
box indicates this.
Some of the product materials can be re-used if
you take them to a recycling point. By reusing some parts or raw
materials from used products you make an important contribution to
the protection of the environment.
Please contact your local authorities in case you need more information
on the collection points in your area. Dispose of the battery pack in an
environmentally-friendly manner according to your local regulations.
NOTICES
WARNING: Any changes or modifications not expressly approved
by the grantee of this device could void the user’s authority to operate
the device.
FCC NOTICE
This device complies with Part 15, subpart C, of the FCC Rules.
Operation is subject to the following two conditions: (1) this device
may not cause harmful interference, and (2) this device must accept
any interference received, including interference that may cause
undesired operation.
The manufacturer is not responsible for any radio or TV interference
caused by unauthorized modifications to this equipment. Such
modifications could void the user’s authority to operate the equipment.
However, it is imperative that the user follows the guidelines in this
manual to avoid improper usage which may result in damage to the
unit, electrical shock and fire hazard injury.
CAUTION: To maintain compliance with the FCC’s RF exposure
guidelines, place the camera at least 20cm (7.87in) from nearby
persons.
CANADA/IC NOTICE
This device complies with Industry Canada licence-exempt RSS
standard(s). Operation is subject to the following two conditions: (1)
this device may not cause interference, and (2) this device must accept
any interference, including interference that may cause undesired
operation of the device.
Page 26

www.lorexbaby.com
ENGLISH
FRANÇAIS
ESPAÑOL
SWEET PEEP MAX
MONITEUR VIDÉO POUR BÉBÉ
Version 1.0
GUIDE DE L'UTILISATEUR
Page 27

DC 6V
Mesures de sécurité
• Un assemblage effectué par un adulte est nécessaire. Garder les
petites pièces hors de portée des enfants lors de l'assemblage.
• Ce produit n'est pas un jouet. Ne pas laisser les enfants ou les
nourrissons jouer avec ce produit.
• Ce moniteur vidéo ne remplace pas la surveillance d'un adulte
responsable.
• Tester le moniteur vidéo avant de l'utiliser. Se familiariser avec
ses fonctions.
• Garder les cordons hors de portée des enfants et des nourrissons.
• Ne jamais utiliser de rallonges électriques avec des adaptateurs
de courant.
• Utiliser seulement les chargeurs et les adaptateurs de courant
fournis. Ne pas utiliser d'autres chargeurs ou adaptateurs de
courant, car cela pourrait endommager l'appareil et le bloc-piles.
• Insérer uniquement des piles ou un bloc-piles du même type.
• Insérer les piles en respectant la polarité.
• Ne pas mélanger des piles neuves et usées.
• Ne pas mélanger des piles alcalines, standard et rechargeables.
• Retirer les piles usées du produit.
• Garder toutes les piles hors de portée des enfants et des
nourrissons.
• Jeter ou recycler les piles conformément aux lois locales,
lesquelles peuvent varier selon l'emplacement.
• Si vous ne prévoyez pas utiliser l’appareil pendant une période
prolongée, retirez les piles ou assurez-vous de les recharger au
moins une fois tous les 6 mois.
• Ne pas couvrir le moniteur vidéo avec une serviette ou une
couverture.
• Ne pas utiliser le moniteur vidéo près de l'eau.
• Ne pas installer le moniteur vidéo à proximité d'une source de
chaleur.
• Ne pas toucher aux contacts des connecteurs avec des objets
pointus ou métalliques.
• Conserver ce guide de l'utilisateur pour référence future.
Pour éviter des blessures
aux enfants et nourrissons :
• S'ASSURER que la caméra et tous les cordons
d'alimentation sont situés à au moins 1 m (3 pi) du lit
de l'enfant et hors de sa portée.
• Utiliser les boucles attache-câble afin de vous aider
à garder les câbles loin de votre enfant.
3
pi/1
m
Page 28

Le produit comprend .......................2
Vue d'ensemble du moniteur ...........3
Vue d'ensemble de la caméra .........4
Mise en route ..................................5
En option — Piles de caméra ....................7
En option — Montage mural de la caméra
. 8
Utilisation de votre moniteur
pour bébé .......................................9
Utilisation des menus ...............................9
Parler à votre bébé ................................10
Changement de canaux ......................... 10
Utilisation du mode de balayage (pour
caméras multiples seulement)
.............................10
Réglage du volume ................................12
Réglage de la luminosité de l'écran ......... 12
Utilisation du zoom numérique ................ 13
Activation de la lumière de nuit ...............14
Faire jouer les berceuses ........................ 14
Alertes de température ........................... 15
Sélection de Fahrenheit ou Celsius ..........16
Activation du mode VOX (déclenchement
vocal) ..................................................17
Mode Vidéo désactivée (mode Audio
seulement) ............................................ 18
Jumelage de caméras
supplémentaires ...........................19
Spécifications techniques ...............21
Caméra ...............................................21
Moniteur .............................................. 21
Dépannage ...................................22
Besoin d'aide? ..............................22
1
FRANÇAIS
Table des matières :
Page 29

2
Le produit comprend
x1*
x1
Caméra
Moniteur
Adaptateur de courant
x2*
x2*
*Le contenu peut varier selon le modèle.
x1*
Vis et chevilles
Adaptateur de courant
x1
Attache-câbles
x2*
LINK
Piles
x1
Page 30

3
FRANÇAIS
Haut-parleur
Support
Compartiment des
piles
Antenne
Vue d'ensemble du moniteur
LINK
Voyant DEL
d'alimentation
Voyant DEL de
jumelage
Voyant DEL de volume
Menu
Alimentation/ arrêt
de la vidéo
Zoom 2x /
Hausse du
volume
Zoom 1x /
Baisse du
volume
Jouer /
Arrêter les
berceuses
Microphone
Communication
bidirectionnelle
Changement
/ Jumelage
de caméra
Affichage vidéo
Page 31

4
DC 6V
PAIR
Vue d'ensemble de la caméra
Capteur de
lumière
Lumière de nuit
Objectif
Voyant DEL
d'alimentation
Microphone
Antenne
Veilleuse DEL
Socle
Compartiment des piles AAA
Interrupteur
d'alimentation
Port d'alimentation
Capteur de
température
Haut-parleur
Bouton de
jumelage
Page 32

DC 6V
DC 6V
S'assurer que les câbles d'alimentation
soient au moins à 1 m (3 pi) du lit de votre
enfant et hors de sa portée.
Utiliser les boucles attache-câble afin de
vous aider à garder les câbles loin de votre
enfant.
5
FRANÇAIS
Mise en route
1
2
Brancher l'adaptateur de courant à la
caméra.
Glisser l'interrupteur à la position ON.
Le voyant DEL s'illumine.
Interrupteur
d'alimentation
3
Au moyen d'un tournevis à tête plate (non
inclus), retirer le couvercle du compartiment
des piles situé sur le moniteur.
Dévisser au
moyen d'un
tournevis
à tête plate.
Page 33

Bouton d'alimentation
7
Appuyer et maintenir enfoncé le bouton
d'alimentation pour allumer le moniteur.
6
Brancher l'adaptateur de courant au
moniteur. Le voyant DEL s'illumine.
LINK
LINK
6
4
Insérer les piles comme comme montré
ci-dessous.
5
Remettre en place le couvercle du
compartiment des piles et le visser.
Si vous ne prévoyez pas utiliser
l’appareil pendant une période
prolongée, retirez les piles ou
assurez-vous de les recharger au
moins une fois tous les 6 mois.
Page 34

Tirer l'antenne vers le haut pour l'allonger
• Il est recommandé de charger les piles pendant 6 heures
avant d'utiliser la caméra.
• Pour la surveillance de nuit, il est recommandé de
brancher l'adaptateur de courant au secteur. Dès que
les piles sont complètement chargées, le moniteur restera
allumé pour 6 heures en mode normal ou 10 heures en
mode vidéo désactivé (voir la page 17).
• Pour obtenir une meilleure réception, redresser l'antenne
vers le haut sur le moniteur et la caméra.
Conseils
Cet appareil n'a pas été conçu pour utiliser
les piles AAA lors de la surveillance de
nuit. L'appareil peut fonctionner jusqu'à 4
heures lorsqu'il est alimenté par les piles.
En option — Piles de caméra
Dévisser le compartiment des piles sous l'appareil et insérer
4 piles AAA (non incluses). Remettre en place le couvercle
du compartiment des piles et le visser.
4 piles AAA (non
incluses)
Vis du compartiment
des piles
• Si vous utilisez des piles, il est recommandé d'utiliser
l'adaptateur de courant autant que possible pour
économiser les piles.
• L'adaptateur de courant de la caméra ne peut pas
charger des piles rechargeables AAA.
Remarques
DC 6V
LINK
7
FRANÇAIS
Page 35

S'assurer que les câbles d'alimentation
soient au moins à 1 m (3 pi) du lit de
votre enfant et hors de sa portée.
Utiliser les boucles attache-câble afin de
vous aider à garder les câbles loin de
votre enfant.
Points de montage
68mm
68mm
Attache-câbles
8
En option — Montage mural de
la caméra
Insérer les chevilles dans les trous avec un marteau.
Insérer les vis aux 2/3 de la profondeur.
Avant de procéder à l'installation permanente de
la caméra :
• Déterminer l'emplacement où vous aurez la meilleure vue
de votre bébé.
• S'assurer que le câble d'alimentation soit suffisamment
long pour alimenter la caméra.
1
Percer 2 trous dans le mur centrés exactement à
68 mm de distance l'un de l'autre.
2
3
Aligner les points de montage avec les vis et
pousser la caméra vers le bas.
Page 36

1
Appuyer et
maintenir enfoncé
pour accéder au
menu.
LINK
2
Appuyer plusieurs
fois pour
parcourir le menu
d'options
LINK
Appuyer pour
régler les options
du menu
3
Appuyer pour
sauvegarder les
changements et
sortir du menu
LINK
9
FRANÇAIS
Utilisation de votre moniteur
pour bébé
Le moniteur affiche les icônes suivantes lors de l'utilisation :
Icône Signification
Force du signal
1
Canal sélectionné
Scan
Mode de
balayage activé
Volume mis en
sourdine
X2
Zoom numérique
activé
Déplacer la zone
de zoom
Chanson en cours
de lecture
Voix activée
Icône Signification
VOX
(déclenchement
vocal) activé
Piles complètement
chargées
Piles faibles
Recharge des piles
Recharge de piles
terminée
21°C
Température
ambiante actuelle
Canal de jumelage
Caméra hors
de portée ou
hors tension (par
exemple piles
mortes)
Utilisation des menus
Page 37

Appuyer et maintenir enfoncé pour
parler à la caméra sélectionnée
Appuyer pour faire défiler les caméras connectées ou
pour sélectionner le mode de balayage.
La caméra actuellement sélectionnée est affichée à
l'écran.
Le moniteur ne reproduit que le son de la
caméra qui est en cours de visualisation.
1
LINK
1
LINK
Le son de la caméra est mis en sourdine
durant l'utilisation de cette fonction.
Quand deux caméras ou plus sont reliées,
vous pouvez utiliser le mode de balayage pour
passer en revue la vidéo de chaque caméra.
Chaque canal de la caméra s'affiche pendant 10
secondes.
Scan
1
Pour activer le mode de balayage :
Utilisation du mode de balayage
(pour caméras multiples seulement)
Appuyer plusieurs fois jusqu'à ce que Scan s'affiche
à l'écran
LINK
10
Parler à votre bébé
Changement de canaux
C1
Page 38

Lorsque le mode Balayage est activé, le moniteur
change automatiquement de canal à des
intervalles de quelques secondes. Une icône
Balayage apparaît à côté du numéro de canal
actuellement sélectionné.
Afin de connecter des caméras additionnelles
au moniteur, voir «Jumelage de caméras
supplémentaires» à la page 19.
1 Scan
Canal actuellement
sélectionné
Mode de balayage activé
LINK
LINK
LINK
11
FRANÇAIS
Si vous souhaitez seulement surveiller certaines
de vos caméras en utilisant le mode de balayage,
vous pourrez choisir de masquer certains canaux.
Les canaux masqués ne s'afficheront pas dans le
mode de balayage.
C1
Appuyer pour
modifier un
crochet et un X
2
C1
Appuyer pour passer en revue les caméras connectées
au canal que vous souhaitez afficher ou masquer.
1
Par défaut, chaque nom de canal a un crochet
à coté, ce qui signifie qu'il est activé pour la
surveillance et intégré au cycle d'affichage en
mode de balayage.
Pour afficher /masquer les canaux en mode de
balayage, procéder de la manière suivante :
Un X désactivera la vidéo du canal et le retirera
du cycle de visionnement en mode balayage.
Page 39

1
LINK
Appuyer pour
régler
le volume
du moniteur
1
Appuyer et
maintenir enfoncé
pour accéder au
menu.
LINK
2
Appuyer de
manière répétitive
jusqu'à ce que
s'affiche
LINK
3
LINK
Appuyer
pour régler la
luminosité
4
Appuyer sur pour sauvegarder les
changements et sortir du menu
12
Réglage du volume
Réglage de la luminosité de l'écran
Page 40

3
Utiliser les flèches pour se déplacer dans la
zone de zoom.
1
LINK
Appuyer et
maintenir
pour faire un
zoom avant
2
Pendant le zoom avant, appuyer sur .
Quatre flèches apparaitront sur l'écran.
x2
LINK
Avant de pouvoir revenir sur le mode
de visionnement normal, vous devrez
appuyer sur pour désactiver les
flèches sur l'écran.
4
LINK
Appuyer et
maintenir
pour effectuer un
zoom arrière
x1
13
FRANÇAIS
Utilisation du zoom numérique
Page 41

1
Appuyer et
maintenir enfoncé
pour accéder au
menu
LINK
Activation de la lumière de nuit
2
Appuyer de
manière répétitive
jusqu'à ce que
s'affiche
LINK
3
LINK
Appuyer pour
allumer/éteindre
la lumière de
nuit
4
Appuyer sur pour sauvegarder les
changements et sortir du menu
OFF
Faire jouer les berceuses
La caméra peut faire jouer 5 différentes chansons
préchargées.
1
Appuyer pour
faire jouer
la première
berceuse
LINK
2
LINK
Appuyer pour
sélectionner une
autre berceuse
ON
14
Page 42

3
Appuyer pour
arrêter de faire
jouer les
berceuses
LINK
3
Appuyez sur pour définir la
température basse.
Si la température de la caméra
sélectionnée descend en dessous de cette
température, le moniteur émet un signal
sonore et l'affichage de température à
l'écran deviendra orange.
Si vous sélectionnez une température
inférieure à 62 °F (17 °C), l'alerte de
basse température sera désactivée (OFF).
La fonction d'alerte de température vous permet
de vous assurer que la chambre du bébé est à une
température confortable et sécuritaire. Le moniteur
émet un signal sonore si la température devient trop
chaude ou trop froide. Le capteur de température est
précis avec une marge d'erreur de 3 °F/1 °C.
Vous pouvez définir les hautes et basses températures
qui déclenchent des alertes ou désactiver les alertes de
température.
Alertes de température
Pour configurer les alertes de température :
1
Appuyer et
maintenir enfoncé
pour accéder au
menu.
LINK
2
Appuyer de
manière répétitive
jusqu'à ce que
Lo s'affiche
LINK
Lo 68 °F
Si une berceuse joue, elle cessera
de jouer lorsque la communication
bidirectionnelle est utilisée.
15
FRANÇAIS
Page 43

5
Appuyer sur pour définir la
température haute.
Si la température de la caméra
sélectionnée est au-dessus de cette
température, le moniteur émet un signal
sonore et l'affichage de température à
l'écran deviendra orange.
Si vous sélectionnez une température
supérieure à 86 °F (30 °C), l'alerte de
haute température sera désactivée (OFF).
4
Appuyer de
manière répétitive
jusqu'à ce que
Hi s'affiche
LINK
Hi 82 °F
6
Appuyer sur pour sauvegarder les
changements et sortir du menu
3
Appuyer sur pour sélectionner
SDgrF (Fahrenheit) ou SDgrC (Celsius)
4
Appuyer sur pour sauvegarder les
changements et sortir du menu
Sélection de Fahrenheit ou Celsius
Vous pouvez choisir, selon votre préférence, que
l'affichage de température et d'alertes soit en
degrés Fahrenheit ou Celsius.
1
Appuyer et
maintenir enfoncé
pour accéder au
menu.
LINK
2
Appuyer de
manière répétitive
jusqu'à ce que
s'affiche
LINK
°F
16
Page 44

1
Appuyer et
maintenir
enfoncé pour
accéder au
menu
LINK
2
Appuyer de
manière répétitive
jusqu'à ce que
s'affiche
LINK
3
LINK
Appuyer pour
régler
la sensibilité VOX
VOX OFF
VOX
Le mode VOX est désactivé
Le mode VOX est activé
Faible sensibilité
Sensibilité moyenne
Haute sensibilité
Si vous voulez que des bruits plus faibles déclenchent
le moniteur (comme un faible gémissement),
sélectionner le réglage de haute sensibilité. Si vous
voulez que des bruits plus forts déclenchent le moniteur
(comme un cri), sélectionner le réglage de faible
sensibilité.
Le mode VOX ne fonctionnera
pas lorsque le mode Balayage est
activé.
17
FRANÇAIS
Lorsque le mode VOX est activé, l'écran et le
haut-parleur du moniteur s'éteindront après une
minute, sauf si un son est détecté au niveau
de sensibilité sélectionné. Ce mode permet
d'économiser les piles, et ne vous avertit qu'en
cas de besoin.
Activation du mode VOX
(déclenchement vocal)
Page 45

L'écran de la vidéo du moniteur est
éteint. Le moniteur fait jouer la berceuse
uniquement du canal sélectionné.
Mode Vidéo désactivée (mode
Audio seulement)
Appuyer sur n'importe quelle touche pour
rallumer l'écran de la vidéo.
• Si le mode Balayage est activé, le moniteur fera jouer
la berceuse du canal sélectionné à cet instant.
• Le mode VOX aura priorité sur le mode Vidéo
désactivé. Pour plus de détails, voir «Activation du
mode VOX (déclenchement vocal)» à la page 17.
Remarques
2
1
Appuyer pour
entrer en mode
Vidéo désactvé.
LINK
4
Appuyer pour quitter le menu.
Lorsque le mode VOX est activé, l'écran et le hautparleur du moniteur s'éteignent après une minute
sauf si un son est détecté au niveau de sensibilité
sélectionné. Appuyer sur n'importe quelle touche pour
rallumer l'écran. Lorsque le mode VOX est activé,
l'icône de VOX s'affiche sur l'écran.
18
Page 46

2
1
Placer la caméra et le moniteur côte à
côte. S'assurer que la caméra est allumée.
Appuyer et maintenir enfoncé jusqu'à ce que
s'affiche.
LINK
C1
3
LINK
Appuyer pour
sélectionner le
canal auquel vous
souhaitez
jumeler
la caméra
C2
Si une caméra est déjà connectée
à ce canal, la nouvelle caméra la
remplacera.
4
Appuyer pour
confirmer le
canal de
jumelage. La
DEL de
JUMELAGE
commencera à
clignoter
LINK
Pour jumeler une caméra à votre
moniteur :
19
FRANÇAIS
Jumelage de caméras supplémentaires
La (les) caméra(s) incluse(s) a(ont) déjà
été jumelée(s) au moniteur. Si vous avez
acheté d'autres caméras complémentaires
(modèle no LB2251AC1), OU si votre moniteur
et votre caméra ne sont pas jumelés, suivre les
étapes ci-dessous.
Page 47

5
Appuyer sur le bouton de JUMELAGE situé
à l'arrière de la caméra.
PAIR
Bouton de
JUMELAGE
• Déplacer immédiatement la caméra loin du moniteur
afin d'éviter la rétroaction du haut-parleur.
• Le moniteur peut connecter jusqu'à 4 caméras.
Remarques
La vidéo de la caméra est immédiatement
affichée sur le moniteur lorsque la caméra
est correctement jumelée.
Si votre moniteur indique « Out of range »
(hors de portée), cela signifie que le
jumelage a échoué. Effectuer de nouveau
le processus de jumelage.
20
Page 48

DC 6V
LINK
21
FRANÇAIS
Spécifications techniques
Caméra
Fréquence 2,4GHz
Portée maximale
Jusqu'à 450 pi / 138 m à l'extérieur*
Jusqu'à 150 pi / 46 m à l'intérieur*
Capteur d'images CMOS couleur 1/5 po
Objectif 3,0 mm F2.5
DEL IR 6 mcx
Adaptateur de courant 6,0 V DC 800mA
Piles Accepte 4 piles AAA
(non incluses)
Autonomie des piles Jusqu'à 4 heures avec des piles AAA
Poids 0,3 lb / 0,1 kg
Moniteur
Fréquence 2,4GHz
Écran
4,6 cm (4,3 po) ACL Couleur TFT
Adaptateur de
courant
6,0 V DC 800mA
Piles Piles rechargeables au lithium-ion
de 1700mAh 3,7 V c.c.
Autonomie des
piles
Jusqu'à 6 heures en mode normal
Jusqu'à 10 heures en mode Vidéo désactivé
Poids 0,5 lb / 0,2 kg
*Basé sur une ligne de visée non obstruée. La portée réelle
varie en fonction de l'environnement.
3,4 po
87 mm
5,8 po
148 mm
1,0 po
25 mm
3,4 po
87 mm
5,3 po
135 mm
3,8 po
97 mm
DC 6V
Page 49

22
Dépannage
Symptôme Solution
Aucune vidéo
affichée sur l'écran
• Appuyer et maintenir enfoncée la
touche
pour allumer le moniteur.
• Piles du moniteur à sec. Brancher
l'adaptateur de courant du moniteur.
• Le mode Vidéo désactivé (Video
Off) ou VOX est activé. Appuyer sur
n'importe quelle touche pour rallumer
l'écran.
L'écran du
moniteur s'éteint
continuellement
• Le mode VOX est activé (ON).
Pour plus de détails concernant
la désactivation du mode VOX,
«Activation du mode VOX
(déclenchement vocal)» on page
17.
• Les piles du moniteur sont faibles.
Brancher l'adaptateur de courant du
moniteur.
La caméra n'est pas
détectée, « Out of
Range » (hors de
portée) s'affiche à
l'écran du moniteur
• La sélection du canal est erronée.
Appuyer sur
de manière
répétitive pour sélectionner le canal.
• S'assurer que la caméra est allumée.
• La caméra est peut être sans piles.
Remplacer les piles ou brancher
l'adaptateur de courant à la caméra.
• La caméra et le moniteur sont peut-être
hors de portée. Allonger les antennes
du moniteur et de la caméra, ou
approcher le moniteur et la caméra
l'un de l'autre.
• Il se peut qu'il faille jumeler la
caméra et le moniteur de nouveau.
Voir « Jumelage de caméras
supplémentaires » à la page 19 pour
plus de détails.
Rétroaction/bruit
aigu provenant du
moniteur
• Votre caméra et votre moniteur sont
peut-être trop près l'un de l'autre. Les
éloigner l'un de l'autre.
• Pour des performances optimales,
éviter de placer le moniteur et
la caméra près de téléviseurs,
ordinateurs, téléphones sans fil
ou mobiles, ou autres appareils
électriques.
• Appuyer sur pour baisser le
volume du moniteur.
Le service de soutien technique est disponible 24 heures par
jour, 7 jours par semaine, vous trouverez des informations
sur les produits, guides de l'utilisateur, guides de démarrage
rapide et FAQ au www.lorexbaby.com/support
Besoin d'aide?
Page 50

23
FRANÇAIS
NETTOYAGE
Nettoyer le moniteur et la caméra avec un chiffon légèrement humide ou
un chiffon antistatique. Ne jamais utiliser de détergents ou de solvants
abrasifs.
• Ne nettoyer aucune pièce de l'appareil avec des produits nettoyants
contenant des diluants ou d'autres solvants et produit chimique.
Cela peut causer des dommages permanents au produit, lesquels ne
seraient pas couverts par la garantie. Si nécessaire, le nettoyer avec
un chiffon humide.
• Garder votre caméra et votre moniteur loin des zones chaudes,
humides ou sous la lumière directe du soleil, et ne pas les mouiller.
• Tous les efforts ont été déployés pour assurer des normes élevées de
fiabilité pour votre moniteur pour bébé. Cependant, si quelque
chose ne fonctionne pas, ne pas essayer de le
réparer vous-même. Communiquer avec le service
à la clientèle pour de l'assistance.
ÉLIMINATION DU DISPOSITIF
À la fin du cycle de vie de l'appareil, ne pas le jeter
avec les ordures ménagères, mais plutôt l'apporter
à un point de collecte de recyclage d'équipements
électriques et électroniques. Le symbole sur le produit,
le guide de l'utilisateur, ou la boîte le mentionne.
Certains matériaux de l'appareil peuvent être réutilisés si vous les
apportez à un centre de recyclage. En réutilisant certaines pièces ou
matières premières de produits usagés, vous contribuez de manière
importante à la protection de l'environnement.
Veuillez contacter les autorités locales au cas où vous auriez besoin de
plus d'informations sur les points de collecte dans votre région. Éliminer
les piles d'une manière respectueuse de l'environnement conformément
à la réglementation locale.
AVIS
AVERTISSEMENT : Tout changement ou modification non
expressément approuvé par la garantie de cet appareil pourrait annuler
le droit de l'utilisateur à utiliser l'appareil.
AVIS DE LA FCC
Cet appareil est conforme à la Partie 15, sous-partie C, de la
réglementation de la FCC. Son fonctionnement est soumis aux
deux conditions suivantes : (1) cet appareil ne doit pas provoquer
d'interférences nuisibles, et (2) cet appareil doit accepter toute
interférence reçue, incluant toute interférence pouvant causer un
fonctionnement indésirable.
Le fabricant n'est pas responsable des interférences radio ou télévision
causées par des modifications non autorisées de cet équipement. De
telles modifications pourraient annuler le droit de l'utilisateur à utiliser
cet équipement. Cependant, il est impératif que l'utilisateur suive les
directives de ce manuel afin d'éviter une utilisation inappropriée qui
pourrait entraîner un choc électrique, un incendie ou des dommages à
l'appareil,.
MISE EN GARDE : Pour maintenir la conformité aux directives de la
FCC se rapportant à l'exposition aux interférences RF, placez l'appareil
à au moins 20 cm (7,87 po) des personnes à proximité.
CANADA/AVIS D'INDUSTRIE CANADA
Cet appareil est conforme aux normes RSS d'Industrie Canada pour
les produits exempts de licence. Son fonctionnement est soumis aux
deux conditions suivantes : (1) cet appareil ne doit pas provoquer
d'interférences, et (2) cet appareil doit accepter toute interférence,
incluant toute interférence pouvant causer un fonctionnement indésirable
de l'appareil.
Page 51

www.lorexbaby.com
ENGLISH
FRANÇAIS
ESPAÑOL
SWEET PEEP MAX
MONITOR DE VIDEO PARA BEBÉ
Versión 1.0
GUÍA PARA USUARIOS
Page 52

DC 6V
Precauciones de seguridad
• Se requiere que un adulto realice el armado. Mantenga las
piezas pequeñas fuera del alcance de los niños durante el
armado.
• Este producto no es un juguete. No permita que niños o
bebés jueguen con él.
• Este monitor de video no sustituye la supervisión de un adulto
responsable.
• Pruebe el monitor de video antes de utilizarlo. Familiarícese
con sus funciones.
• Mantenga los cables fuera del alcance de los niños.
• Nunca utilice extensiones de cable con adaptadores de
corriente.
• Solo utilice los cargadores y los adaptadores de corriente
provistos. No utilice otros cargadores ni adaptadores de
corriente, ya que estos pueden dañar el dispositivo o las
baterías.
• Solo inserte baterías/paquetes de baterías del mismo tipo.
• Inserte baterías con la polaridad correcta.
• No mezcle las baterías nuevas con las usadas.
• No mezcle baterías alcalinas, estándar y recargables.
• Retire las baterías descargadas del producto.
• Mantenga todas las baterías fuera del alcance de los niños.
• Deseche o recicle las baterías conforme a las leyes locales,
las cuales varían según la ubicación.
• Si no piensa utilizar la unidad durante un prolongado período
de tiempo, retire la batería o asegúrese de que la carga al
menos una vez cada seis meses.
• No cubra el monitor de video con una toalla o sábana.
• No utilice el monitor de video cerca del agua.
• No instale el monitor de video cerca de una fuente de calor.
• No toque los contactos del enchufe con objetos afilados o
metálicos.
• Conserve esta guía de usuario para referencia futura.
Para evitar lesiones a
niños y bebés:
• ASEGÚRESE de mantener la cámara y todos los
cables eléctricos al menos a 3 ft/1 m de distancia
de la cuna y fuera del alcance de su hijo.
• Utilice las grapas de cable que vienen incluidas
para mantener los cables de suministro eléctrico
fuera del alcance de su hijo.
3
ft/1
m
Page 53

Incluido con el producto: .................2
Descripción general del monitor ......3
Descripción general de la cámara ...4
Instrucciones iniciales ......................5
Opcional: Baterías de la cámara ..............7
Opcional: Montaje de la
cámara en la pared .................................8
Cómo usar el monitor de su bebé ....9
Cómo usar los menús ...............................9
Hablar con el bebé ...............................10
Cambio de canales ............................... 10
Utilización del modo Escáner
(sólo para cámaras múltiples) ............................10
Ajuste del volumen ................................12
Ajuste del brillo de pantalla ....................12
Cómo usar el zoom digital .....................13
Cómo encender la luz de noche .............14
Cómo reproducir canciones de cuna .......14
Alertas de temperatura .......................... 15
Cómo seleccionar grados Fahrenheit
o Celsius .............................................. 16
Activación del modo VOX (Transmisor por
voz) .....................................................17
Modo de video desactivado (modo de audio
únicamente) ..........................................18
Emparejamiento de cámaras
adicionales ...................................19
Especificaciones técnicas ................21
Cámara ............................................... 21
Monitor ................................................21
Resolución de problemas ..............22
¿Necesita ayuda? .........................22
1
ESPAÑOL
Índice:
Page 54

2
Incluido con el producto:
x1*
x1
Cámara
Monitor
Adaptador de
alimentación
x2*
x2*
*Los contenidos pueden variar según el modelo.
x1*
Tornillos y anclajes
Adaptador de
alimentación
1
Sujetadores de cables
x2*
LINK
LED de encendido
Batería
x1
Page 55

3
ESPAÑOL
Altavoz
Soporte
Compartimiento de
baterías
Antena
Descripción general del monitor
LINK
LED de encendido
LED de enlace
LED de volumen
Menú
Encendido/apagado
de video Off
2x Zoom/
Subir volumen
1x Zoom/
Bajar
volumen
Reproducir/
Detener
canciones
de cuna
Micrófono
Para hablar en
dos vías
Cambiar/
Emparejar
cámara
Pantalla de
video
Page 56

4
DC 6V
PAIR
Descripción general de la cámara
Sensor de
luz
Luz de noche
Lente
LED de encendido
Micrófono
Antena
Soporte de
montaje
Compartimiento de baterías AAA
Interruptor de
encendido
Toma de
alimentación
eléctrica
Sensor de
temperatura
Altavoz
Botón PAIR
(emparejamiento)
Luces LED de
noche
Page 57

DC 6V
DC 6V
Asegúrese de que todos los cables de
corriente eléctrica se encuentren a por lo
menos 3 ft/1 m de la cuna y fuera del
alcance de su hijo.
Utilice las grapas de cable que vienen
incluidas para mantener los cables de
suministro eléctrico fuera del alcance de su
hijo.
5
ESPAÑOL
Instrucciones iniciales
1
2
Conecte el adaptador de alimentación
a la cámara.
Deslice el interruptor de encendido
hacia la posición ON. El LED de
energía brilla.
Interruptor de
encendido
3
Con un destornillador de cabeza plana (no
incluido), retire la tapa del compartimiento
de baterías en el monitor.
Desajuste con un
destornillador de
cabeza plana
Page 58

Botón de encendido
7
Mantenga presionado el botón de
encendido para activar el monitor.
6
Conecte el adaptador de alimentación al
monitor. El LED de energía brilla.
LINK
LINK
Si no piensa utilizar la unidad durante un
prolongado período de tiempo, retire la
batería o asegúrese de que la carga al
menos una vez cada seis meses.
6
4
Inserte la batería incluida como se
muestra a continuación.
5
Coloque la tapa del compartimiento de
baterías nuevamente y asegure con un
tornillo.
Page 59

Jale hacia arriba para extender la antena
• Se recomienda cargar la batería durante 6 horas antes
de utilizarla.
• Para la supervisión nocturna, se recomienda conectar
el adaptador de alimentación. Cuando está cargado
por completo, el monitor permanecerá encendido hasta
6 horas en modo normal y hasta 10 horas en modo de
video DESACTIVADO (consulte la página 18).
• Para obtener una mejor recepción, suba la antena del
monitor y la cámara.
Consejos
Las baterías AAA no están diseñadas para
utilizarse durante el monitoreo nocturno.
La cámara puede funcionar hasta 4 horas
con la energía de la batería.
Opcional: Baterías de la cámara
Desajuste los tornillos del compartimiento de baterías
ubicados debajo de la cámara e inserte las 4 baterías
AAA (no incluidas). Vuelva a colocar la tapa del
compartimiento de baterías y el tornillo.
4 baterías AAA (no
incluidas)
Tornillo del
compartimiento de
baterías
• Si utiliza baterías, se recomienda utilizar el adaptador
de corriente cuando sea posible para resguardar la
vida útil de la batería.
• El adaptador de corriente de la cámara no puede
cargar las baterías AAA recargables.
Notas
DC 6V
LINK
7
ESPAÑOL
Page 60

Asegúrese de que todos los cables de
corriente eléctrica se encuentren a por lo
menos 3 ft/1 m de la cuna y fuera del
alcance de su hijo.
Utilice las grapas de cable que vienen
incluidas para mantener los cables de
suministro eléctrico fuera del alcance de
su hijo.
Puntos de montaje
68 mm
68 mm
Sujetadores
de cables
8
Opcional: Montaje de la
cámara en la pared
Golpee suavemente los anclajes en los orificios con
un martillo. Inserte 2/3 de los tornillos.
Antes de montar de forma permanente la
cámara:
• Determine desde dónde obtendrá la mejor vista de su
bebé.
• Asegúrese de que el cable de alimentación sea lo
suficientemente largo como para encender la cámara.
1
Perfore 2 orificios en la pared a exactamente
68 mm de distancia.
2
3
Alinee los puntos de montaje con los tornillos y
empuje la cámara hacia abajo.
Page 61

1
Mantenga
presionado
para abrir el
menú
LINK
2
Presione varias
veces para
navegar en las
opciones del menú
LINK
Presione para
ajustar las
opciones del
menú
3
Presione para
guardar los
cambios
y salir del menú
LINK
9
ESPAÑOL
Cómo usar el monitor de su bebé
El monitor muestra los siguientes íconos durante el uso:
Ícono Significado
Intensidad de la
señal
1
Canal
seleccionado
Scan
Modo Escáner
activado
Volumen
silenciado
X2
Zoom digital
activado
Ir al área de
zoom
Canción en
reproducción
Modo Hablar
activado
Ícono Significado
VOX (Transmisor
por voz) encendido
Batería completa
Batería baja
Cargando batería
Se terminó de
cargar la batería.
70°F
Temperatura
ambiente actual
Canal de
emparejamiento
Cámara fuera de
rango o apagada
(por ejemplo,
baterías agotadas)
Cómo usar los menús
Page 62

Mantenga presionado para hablar a la
cámara seleccionada actualmente.
Presione para desplazarse por las cámaras conectadas o
seleccionar el modo Escáner.
La cámara actualmente seleccionada se muestra en
pantalla.
El monitor sólo reproduce el sonido de la cámara
que se está viendo actualmente.
1
LINK
1
LINK
El audio de la cámara está silenciado
mientras se usa esta función.
Cuando dos o más cámaras están conectadas,
puede utilizar el modo Escáner para recorrer el
video de cada cámara. Cada canal de cámara
se muestra por 10 segundos.
Scan
1
Para activar el modo Escáner:
Utilización del modo Escáner
(sólo para cámaras múltiples)
Presione repetidamente hasta que Scan (Escáner)
se muestre en pantalla.
LINK
10
Hablar con el bebé
Cambio de canales
C1
Page 63

Cuando el modo Escáner está activado, el
monitor cambia el canal de forma automática
cada algunos segundos. El ícono de Escáner
aparece junto al número de canal seleccionado.
Para conectar cámaras adicionales al monitor,
consulte “Emparejamiento de cámaras adicionales”
en la página 19.
1 Scan
Canal actualmente
seleccionado
Modo Escáner activado
LINK
LINK
LINK
11
ESPAÑOL
Si desea supervisar sólo algunas de sus cámaras
usando el modo Escáner, puede optar por ocultar
determinados canales. Los canales escondidos no
se mostrarán en el modo Escáner.
C1
Presione para
cambiar una
marca de
verificación y
una X
2
C1
Presione para recorrer las cámaras conectadas al
canal que desea mostrar u ocultar.
1
De forma predeterminada, cada nombre de canal
tiene una marca de verificación detrás, la cual
significa que está activado para la supervisión y
está incluido en el ciclo de visualización del modo
Escáner.
Para mostrar u ocultar canales en el
modo Escáner:
Una X desactiva el video del canal y lo retira del
ciclo de visualización en el modo Escáner.
Page 64

1
LINK
Presione para
ajustar el
volumen del
monitor.
1
Mantenga
presionado
para abrir el
menú
LINK
2
Presione hasta
que
se
muestre
LINK
3
LINK
Presione para
ajustar el brillo
4
Presione para guardar los cambios y
salir del menú.
12
Ajuste del volumen
Ajuste del brillo de pantalla
Page 65

3
Utilice las teclas de flechas para ir al área
de zoom.
1
LINK
Presione y
mantenga
presionado
para acercar
2
Al ampliar, presione . Cuatro flechas
aparecen en el monitor.
X2
LINK
Antes de que pueda regresar al
modo de visualización normal, debe
presionar para desactivar las
flechas de visualización.
4
LINK
Presione y
mantenga
presionado
para alejar
1
13
ESPAÑOL
Cómo usar el zoom digital
Page 66

1
Mantenga
presionado
para abrir el
menú
LINK
Cómo encender la luz de noche
2
Presione hasta
que
se
muestre
LINK
3
LINK
Presione para
activar/desactivar
la luz nocturna
4
Presione para guardar los cambios y
salir del menú.
OFF
Cómo reproducir canciones de cuna
La cámara puede reproducir 5 canciones
precargadas diferentes.
1
Presione para
reproducir
la primera
canción de cuna
LINK
2
LINK
Presione para
seleccionar una
canción de cuna
diferente
ON
14
Page 67

3
Presione para
detener la
reproducción de
las canciones de
cuna
LINK
3
Presione para ajustar la
temperatura baja.
Si la temperatura de la cámara
seleccionada disminuye por debajo de esta
temperatura, el monitor producirá un pitido
y la lectura de temperatura en el monitor
parpadeará en color naranja.
Si selecciona una temperatura por debajo
de 62 °F / 17 °C, la alerta de temperatura
baja se apagará.
La función de alerta de temperatura le permite
garantizar que la habitación del bebé se encuentre a
una temperatura segura y cómoda. El monitor emite
un pitido si la temperatura sube o baja demasiado.
El sensor de temperatura es preciso dentro de los
3 °F/1 °C.
Puede controlar las temperaturas altas y bajas que
activan o desactivan las alertas de temperatura.
Alertas de temperatura
Para configurar alertas de temperatura:
1
Mantenga
presionado
para abrir el
menú
LINK
2
Presione hasta
que
Lo se
muestre
LINK
Lo 68 °F
Si se está reproduciendo una canción
de cuna, esta se detendrá cuando se
utilice la función hablar.
15
ESPAÑOL
Page 68

5
Presione para ajustar la
temperatura alta.
Si la temperatura de la cámara
seleccionada disminuye por debajo de esta
temperatura, el monitor producirá un pitido
y la lectura de temperatura en el monitor
parpadeará en color naranja.
Si selecciona una temperatura por encima
de 86 °F / 30 °C, la alerta de temperatura
alta se apagará.
4
Presione hasta
que
Hi se
muestre
LINK
Hi 82 °F
6
Presione para guardar los cambios y
salir del menú.
3
Presione para seleccionar SDgrF
(Fahrenheit) o SDgrC (Celsius).
4
Presione para guardar los cambios y
salir del menú.
Cómo seleccionar grados Fahrenheit
o Celsius
Puede seleccionar si desea que las temperaturas y
alertas estén en grados Fahrenheit o Celsius.
1
Mantenga
presionado
para abrir el
menú
LINK
2
Presione hasta
que
se
muestre
LINK
°F
16
Page 69

1
Mantenga
presionado
para abrir el
menú
LINK
2
Presione hasta
que
se muestre
LINK
3
LINK
Presione para
establecer la
sensibilidad de
VOX
VOX OFF
VOX
El modo VOX está apagado
El modo VOX está encendido
Sensibilidad baja
Sensibilidad media
Sensibilidad alta
Si desea que los ruidos más suaves activen el monitor
(como un débil murmullo), establezca una configuración
de sensibilidad mayor. Si sólo desea que los ruidos
más fuertes activen el monitor (como un fuerte llanto),
establezca una configuración de sensibilidad menor.
4
Presione para salir del menú.
Mientras esté activo el VOX, la pantalla del monitor y
el altavoz se apagarán después de un minuto a
menos que se detecte el sonido al nivel de sensibilidad
seleccionado. Presione cualquier botón para volver a
encender la pantalla. Cuando se activa VOX, aparece un
ícono de VOX en la pantalla.
El modo VOX no funcionará mientras
el modo Escáner esté activado.
17
ESPAÑOL
En el modo VOX, la pantalla y el altavoz del
monitor se apagarán luego de un minuto, salvo
que se detecte sonido al nivel de sensibilidad
seleccionado. Esto preserva la batería y lo alerta
sólo cuando es necesario.
Activación del modo VOX
(Transmisor por voz)
Page 70

La pantalla de video del monitor está
apagada. El monitor sólo reproducirá el
sonido del canal seleccionado.
Modo de video desactivado
(modo de audio únicamente)
Presione cualquier botón para volver a
encender la pantalla.
• Si el modo Escáner está activado, el monitor
reproducirá el sonido del canal que está actualmente
seleccionado.
• El modo VOX anulará el modo de video desactivado.
Consulte “Activación del modo VOX (Transmisor por
voz)” en la página 17 para obtener más detalles.
Notas
2
1
Presione para
ingresar al
modo de video
desactivado
LINK
18
Page 71

2
1
Coloque la cámara y el monitor uno al lado
del otro. Asegúrese de que la cámara esté
encendida.
Presione y mantenga presionado hasta que aparezca
en el monitor.
LINK
C1
3
LINK
Presione para
seleccionar el
canal con el que
desea
emparejar
la cámara.
C2
Si una cámara ya está conectada
a este canal, la cámara nueva
reemplazará a la cámara existente.
4
Presione para
confirmar
el canal de
emparejamiento.
El LED de enlace
comenzará a
parpadear.
LINK
Para emparejar una cámara con el monitor:
19
ESPAÑOL
Emparejamiento de cámaras
adicionales
Las cámaras incluidas ya se emparejaron
con el monitor. Si compró cámaras adicionales
(modelo n. º LB2251AC1), O si su monitor y
cámara no están emparejados, siga los pasos a
continuación.
Page 72

5
Presione el botón PAIR (emparejamiento)
en la parte trasera de la cámara.
PAIR
Botón PAIR
(emparejamiento)
• Aleje inmediatamente la cámara del monitor para
evitar el acoplamiento del altavoz.
• El monitor puede conectar hasta 4 cámaras.
Notas
Una vez que la cámara se haya
emparejado correctamente, se mostrará
de inmediato el video de la cámara en el
monitor.
Si su monitor presenta el mensaje "fuera
de rango", entonces el emparejamiento
no fue exitoso. Complete el proceso de
emparejamiento de nuevo.
20
3.4 in
87 mm
Page 73

DC 6V
LINK
21
ESPAÑOL
Especificaciones técnicas
Cámara
Frecuencia 2.4 GHz
Alcance máximo Hasta 450 ft/138 m en el exterior*
Hasta 150 ft/46 m en el interior*
Sensor de imagen Color CMOS de 1/5”
Lente
3.0 mm F2.5
LED IR 6 pcs
Adaptador de
alimentación
6.0 V CC 800 mA
Batería Admite 4 baterías AAA
(no incluidas)
Duración de la batería Hasta 4 horas con baterías AAA
Peso
0.3 lb/0.1 kg
Monitor
Frecuencia 2.4 GHz
Pantalla LCD a Color TFT de 4.3”
Adaptador de
alimentación
6.0 V CC 800 mA
Batería Baterías recargables de litio de 3.7 V
de CC 1700 mAh
Duración de la batería Hasta 6 horas en modo normal
Hasta 10 horas en modo de video
desactivado
Peso
0.5 lb/0.2 kg
*Se basa en la línea de visión sin obstrucciones. El alcance
real varía según los alrededores.
3.4 in
87 mm
5.8 in
148 mm
1.0 in
25 mm
3.4 in
87 mm
5.3 in
135 mm
3.8 in
97 mm
DC 6V
Page 74

22
Resolución de problemas
Problema Solución
No se reproduce
ningún video en
el monitor.
• Presione y mantenga presionado el
botón
para activar el monitor.
• El monitor no tiene baterías. Conecte el
adaptador de energía del monitor.
• El modo VOX o video desactivado está
encendido. Presione cualquier botón
para volver a encender la pantalla.
La pantalla
del monitor se
apaga.
• El modo VOX está encendido. Consulte
“Activación del modo VOX (Transmisor
por voz)” en la página 17 para
obtener más detalles sobre la
desactivación del modo VOX.
• La batería del monitor tiene poca carga.
Conecte el adaptador de energía del
monitor.
No se detecta
la cámara; se
muestra "Fuera
de alcance" en el
monitor.
• Canal incorrecto seleccionado. Presione
repetidamente para seleccionar
el canal.
• Asegúrese de que la cámara esté
encendida.
• Las baterías de la cámara pueden estar
agotadas. Reemplace las baterías o
conecte el adaptador de energía de la
cámara.
• La cámara y el monitor pueden estar
fuera de alcance. Extienda las antenas
del monitor y de la cámara o acerque
más el monitor a la cámara.
• Es posible que necesite emparejar
la cámara y el monitor nuevamente.
consulte “Emparejamiento de cámaras
adicionales” en la página 19 para
obtener más detalles.
Ruido de
retroalimentación
o chillido
proveniente del
monitor.
• Es posible que su cámara y monitor
estén muy cerca entre sí. Aléjelos un
poco más.
• Para obtener un rendimiento óptimo,
evite colocar el monitor y la cámara
cerca de televisores, computadoras,
celulares o teléfonos inalámbricos u
otros equipos eléctricos.
• Presione para bajar el volumen del
monitor.
El Servicio de atención al cliente está disponible las 24 horas
del día, los 7 días de la semana. Se incluye información del
producto, guías de usuario, guías de inicio rápido y preguntas
frecuentes en www.lorextechnology.com/support.
¿Necesita ayuda?
Page 75

23
ESPAÑOL
LIMPIEZA
Limpie el monitor y la cámara con un paño suave o un paño
antiestático. Nunca utilice productos de limpieza ni solventes
abrasivos.
• No limpie ninguna parte del producto con limpiadores que
contengan diluyentes u otros solventes y sustancias químicas. Esto
puede causar un daño permanente en el producto, lo que no está
cubierto por la garantía. Cuando sea necesario, límpielo con un
paño húmedo.
• Mantenga su cámara y monitor lejos del calor, las áreas húmedas o
de la luz solar intensa, y no los moje.
• Se ha hecho todo lo posible para garantizar altos estándares de
confiabilidad del monitor de su bebé. Sin embargo, si algo no
funciona, no intente repararlo usted mismo.
Comuníquese con el Servicio de atención al
cliente para obtener ayuda.
ELIMINACIÓN DEL
DISPOSITIVO
Al final del ciclo de vida del producto, no debe
desechar el producto con los residuos normales
del hogar, sino que debe llevarlo a un punto de
recolección donde se reciclen equipos eléctricos y electrónicos. Esto
se indica en el símbolo del producto, la guía de usuario y la caja.
Algunos de los materiales del producto pueden reutilizarse si los lleva
a un punto de reciclaje. Al reutilizar algunas piezas o materia prima
de los productos usados, usted realiza una contribución importante a
la protección del medioambiente.
Comuníquese con sus autoridades locales en caso de necesitar más
información sobre los puntos de recolección de su área. Deseche el
paquete de baterías de manera ecológica según sus regulaciones
locales.
NOTIFICACIONES
ADVERTENCIA: Cualquier cambio o modificación que no esté
expresamente aprobado por el cesionario de este dispositivo puede
anular la autoridad del usuario de utilizar el dispositivo.
AVISO DE LA FCC
Este dispositivo cumple con la Parte 15, subparte C de las normas
FCC. La operación está sujeta a las siguientes dos condiciones: (1)
este dispositivo no debe provocar interferencias peligrosas; y (2) este
dispositivo debe aceptar cualquier interferencia recibida, incluso la
interferencia que pueda provocar el funcionamiento no deseado.
El fabricante no es responsable de las interferencias de radio o
televisión provocadas por las modificaciones no autorizadas a este
equipo. Estas modificaciones pueden anular la autoridad del usuario
para utilizar el equipo. Sin embargo, es imprescindible que el usuario
cumpla las pautas de este manual para evitar el uso inadecuado que
pueda resultar en daños a la unidad, descarga eléctrica y lesiones por
riesgo de incendio.
PRECAUCIÓN: Para mantener el cumplimiento de las pautas de
exposición a RF del FCC, coloque la cámara al menos a 20 cm
(7.87 in) de las personas circundantes.
NOTIFICACIÓN DE CANADÁ/IC
Este dispositivo cumple con las normas RSS exentas de licencia
de Industry Canada. El funcionamiento está sujeto a las siguientes
dos condiciones: (1) este dispositivo no provoca interferencias; y
(2) este dispositivo debe aceptar cualquier interferencia, incluso la
interferencia que pueda provocar el funcionamiento no deseado.
Page 76

USER’S GUIDE
GUIDE DE L’UTILISATEUR
GUÍA PARA USUARIOS
SWEET PEEP MAX
Version / Versión 1.0
Copyright / Droit d’auteur © Lorex Corporation 2014
www.lorexbaby.com
 Loading...