

Page 1
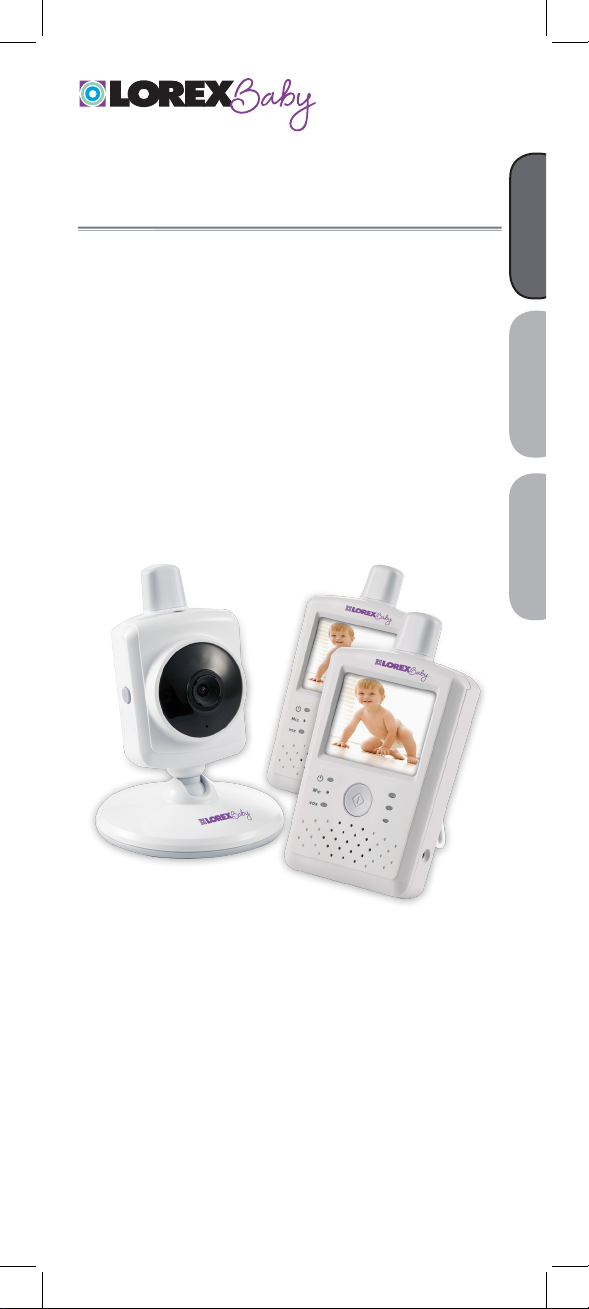
SWEET PEEP DUO
FRANÇAIS
DUAL VIDEO BABY MONITOR
USER’S GUIDE
Version 1.0
ENGLISH
ESPAÑOL
www.lorexbaby.com
Page 2
Safety Precautions
• Adult assembly is required. Keep small parts away
from children when assembling.
• This product is not a toy. Do not allow children to play
with it.
• This video monitor is not a substitute for responsible
adult supervision.
• Keep the cords out of reach from children.
• Do not cover the video monitor with a towel or blanket.
• Never use extension cords with power adapters.
• Only use the power adapters provided.
• Test the video monitor before use. Become familiar with
its functions.
• Do not use the video monitor near water.
• Do not install the video monitor near a heat source.
• Only insert batteries/battery pack of the same type.
• Do not touch the plug contacts with sharp or metal
objects.
• Only use the chargers and power adapters provided.
Do not use other chargers or power adapters as this
may damage the device and battery pack.
• Dispose or recycle batteries in accordance with local
laws, which may vary by location.
• Insert batteries with the correct polarity.
• Do not mix new and used batteries.
• Do not mix alkaline, standard, and rechargeable
batteries.
• Remove exhausted batteries from the product.
• Keep all batteries away from children.
• Keep this user’s guide for future reference.
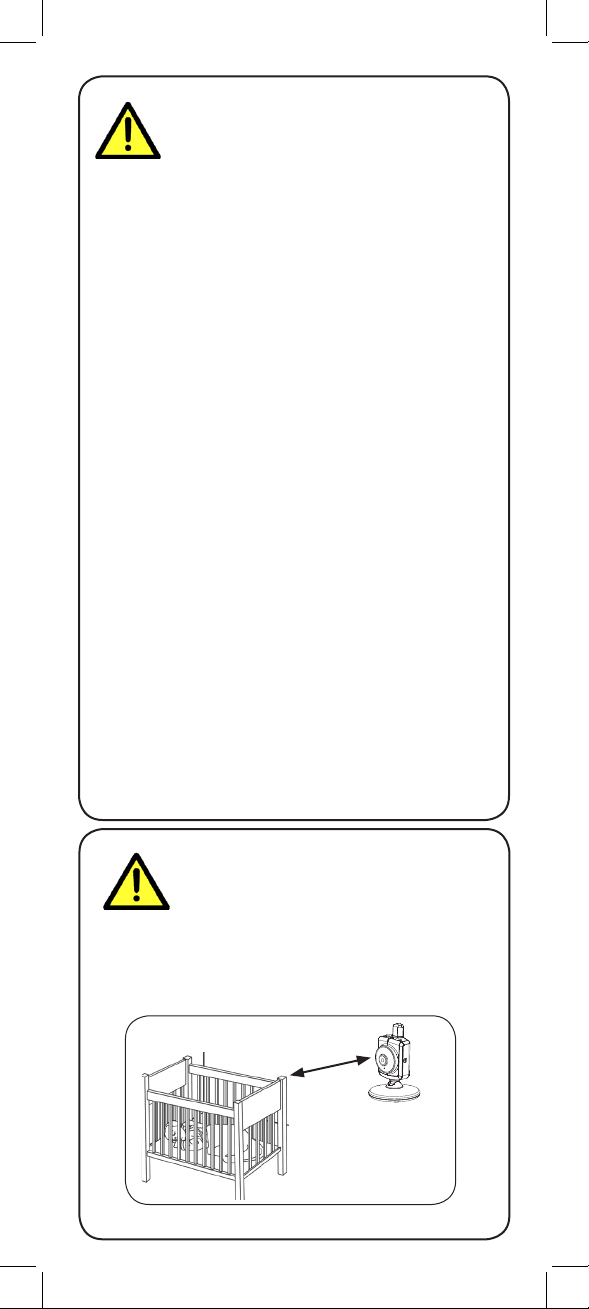
To Avoid Injury to
Children & Infants:
• MAKE SURE to keep the camera and all power
cords are least 3ft / 1m away from cribs and out of
reach of your child.*
• Use the included cable clips to help keep power
cords away from your child.
3ft / 1m
*This is important even if your child is not standing / mobile.
Page 3

ENGLISH
Table of Contents:
Camera Overview ...........................2
Monitor Overview ...........................3
Getting Started ...............................3
Optional - Wall Mounting the Camera ....... 7
Using Your Baby Monitor ................8
Indicator LEDs .................................8
Using Two-way Talk ........................9
Using the Menu .............................10
Adjusting Screen Brightness .................... 10
Adjusting Monitor Volume ......................11
Camera Selection ..................................11
Changing Temperature Units ................... 12
Setting Temperature Alerts ...................... 12
Temperature Compensation ....................13
VOX Mode (Voice Trigger) .....................13
Adjusting Camera Volume ...................... 14
Playing Lullabies ...................................14
Using the Night-light .............................. 15
Color Settings ....................................... 16
Delete Camera ......................................17
Invert Image ......................................... 17
Restore Default Settings .......................... 18
Pairing Additional Cameras ..........19
Technical Specifications .................21
Camera ...............................................21
Monitor ................................................21
Troubleshooting ............................22
Need Help? ...................................22
1
Page 4
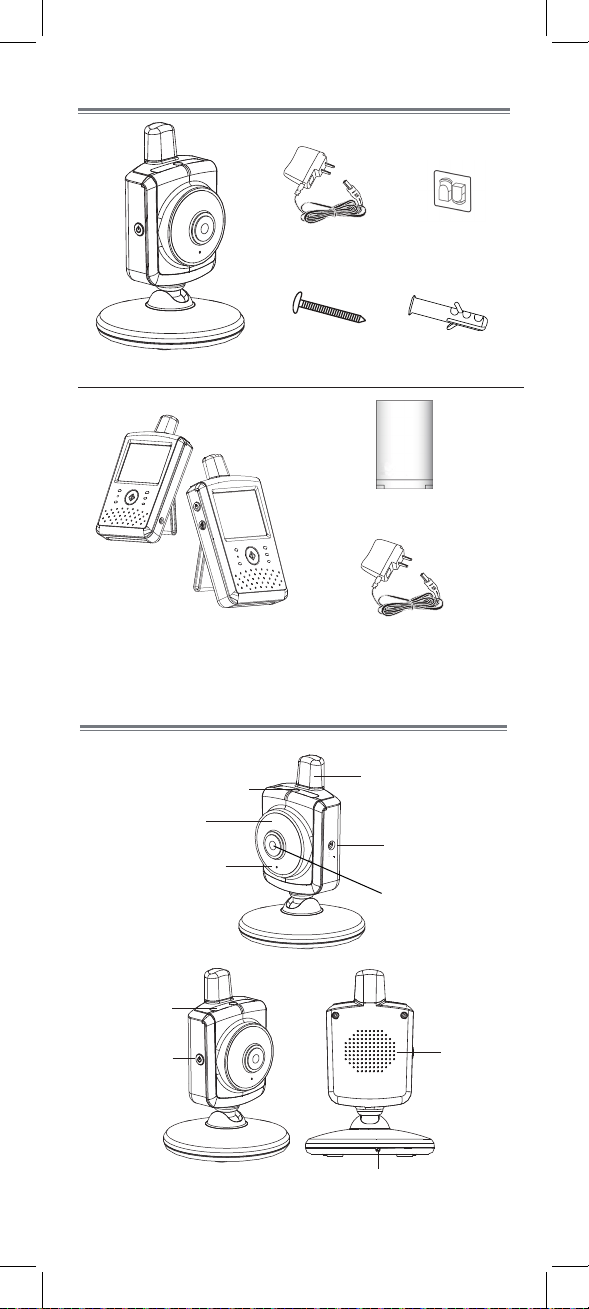
Contents
x1*
x1*
x2*
Power Adapter
Screws
Camera
x2*
Monitors
* Contents may vary by model
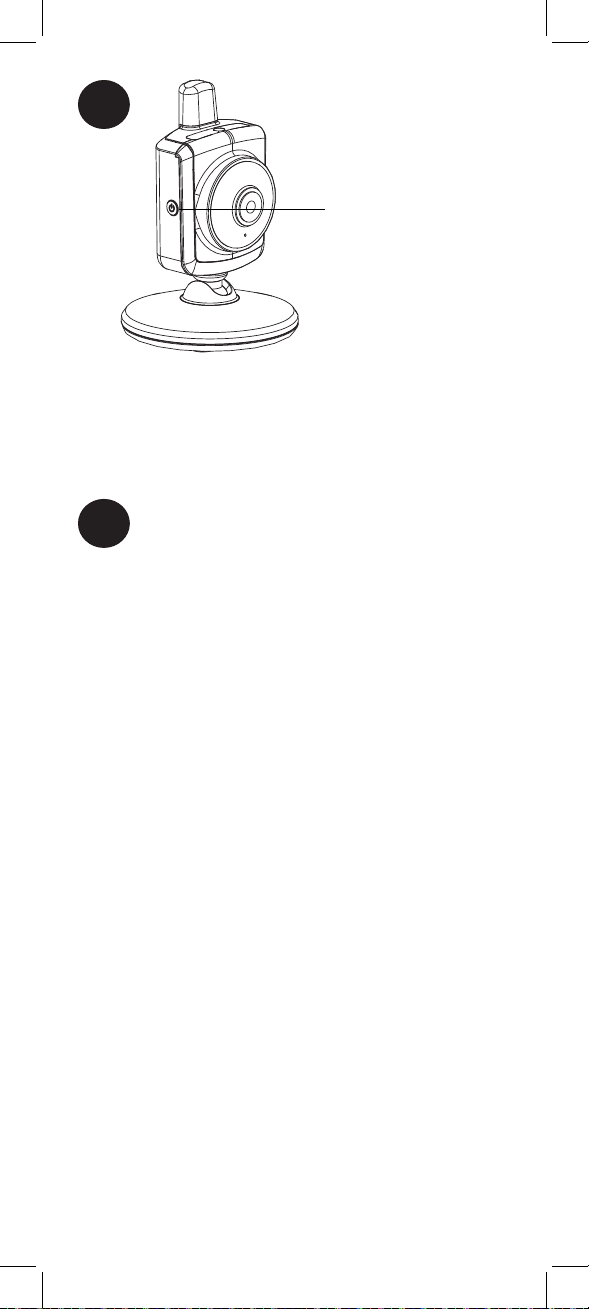
Camera Overview
Light Sensor
Power Indicator
LED
Microphone
Cable Clip
x2*
Anchors
Batteries
Power Adapters
Antenna
6VDC
800mA
Power Port
Lens
x2*
x2*
x2*
Night-light
Power Button
Speaker
Temperature Sensor
2
Page 5
ENGLISH
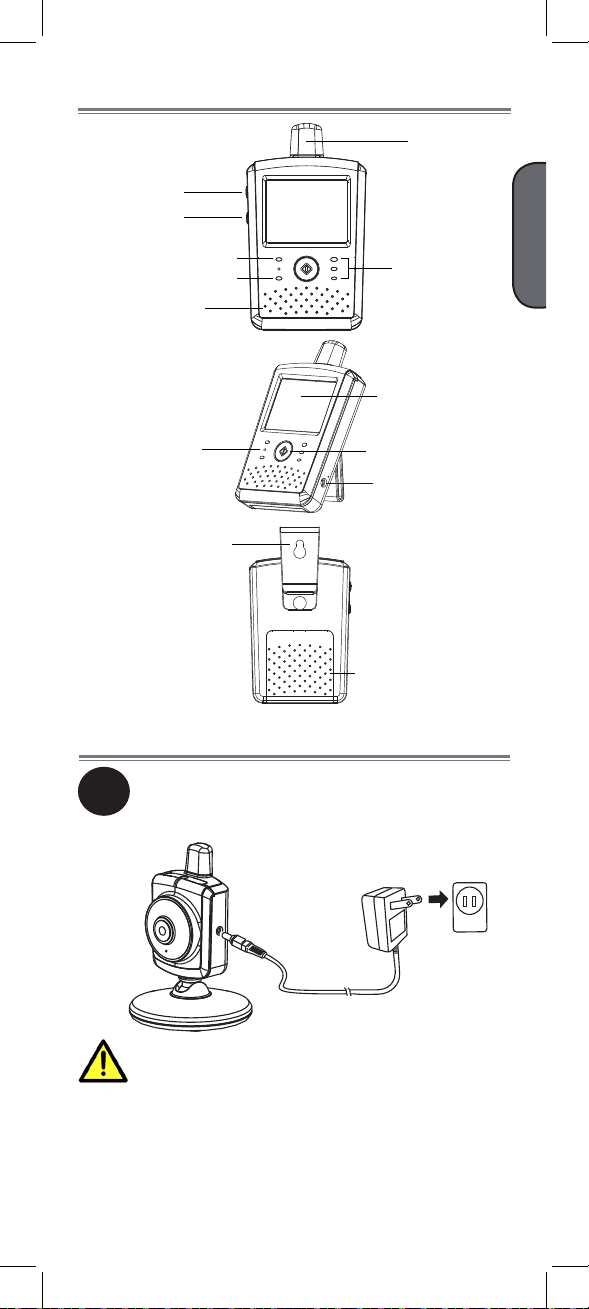
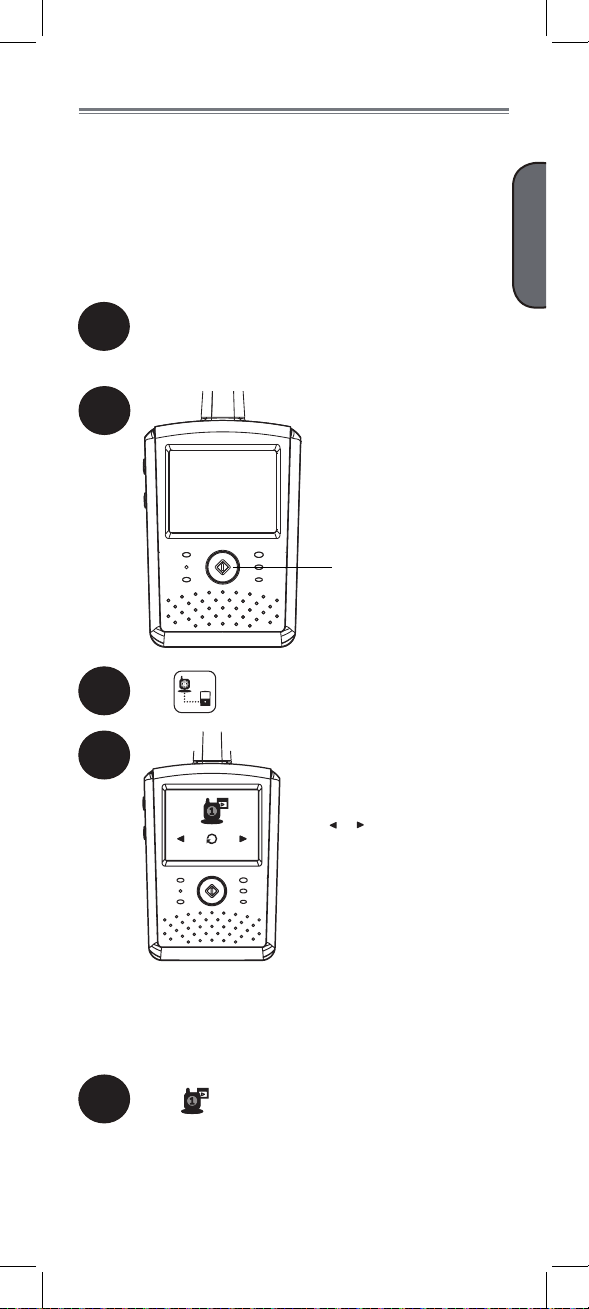
Monitor Overview
Power Button
Talk Button
Antenna
Power Indicator LED
VOX Indicator LED
Speaker
Microphone
Belt Clip / Stand
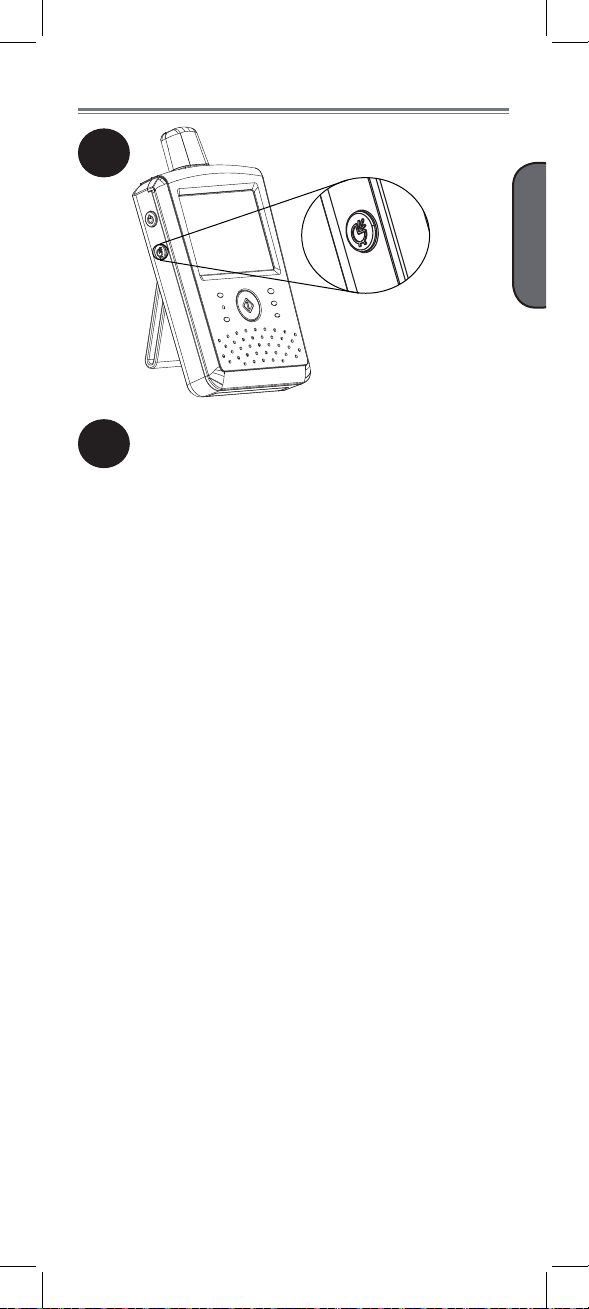
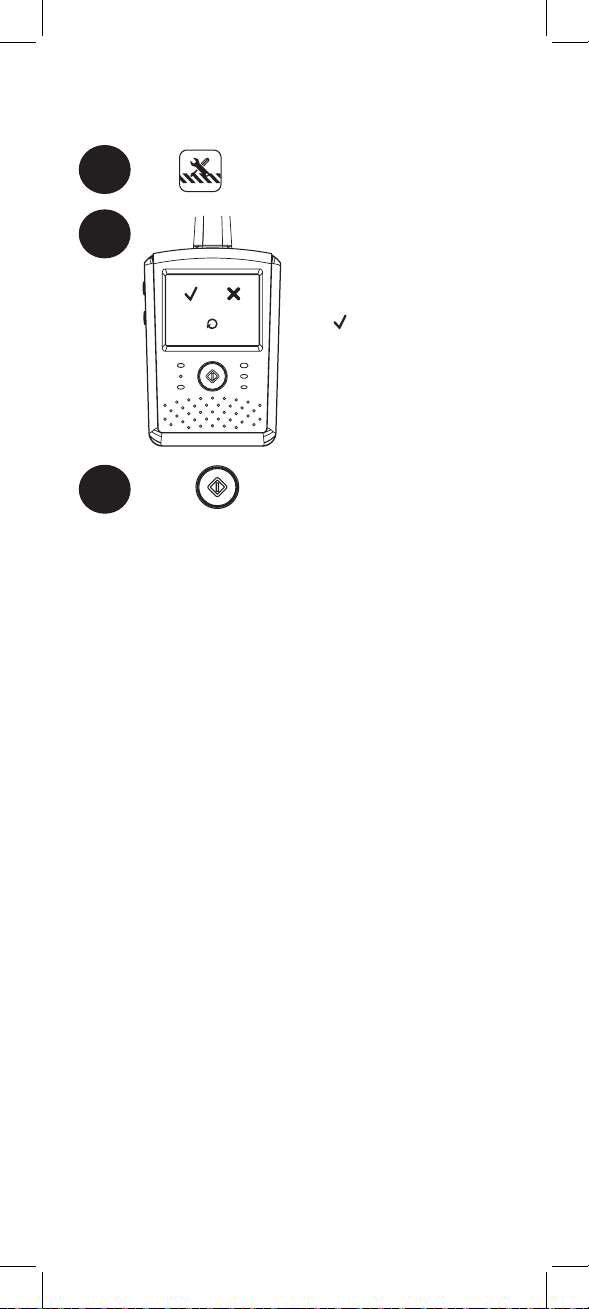
Getting Started
Connect one of the included power
1
adapters from the camera to a power
outlet.
LCD Touchscreen
Menu Button
800mA
6VDC
Power Port
Battery
Compartment
Sound
Indicator LEDs
Make sure all power cables are at least
3ft / 1m away from the crib and out of
reach of your child.
Use the included cable clips to help keep
power cables away from your child.
See “Wall Mounting the Camera” on page
7 for details on installing cable clips.
3
Page 6
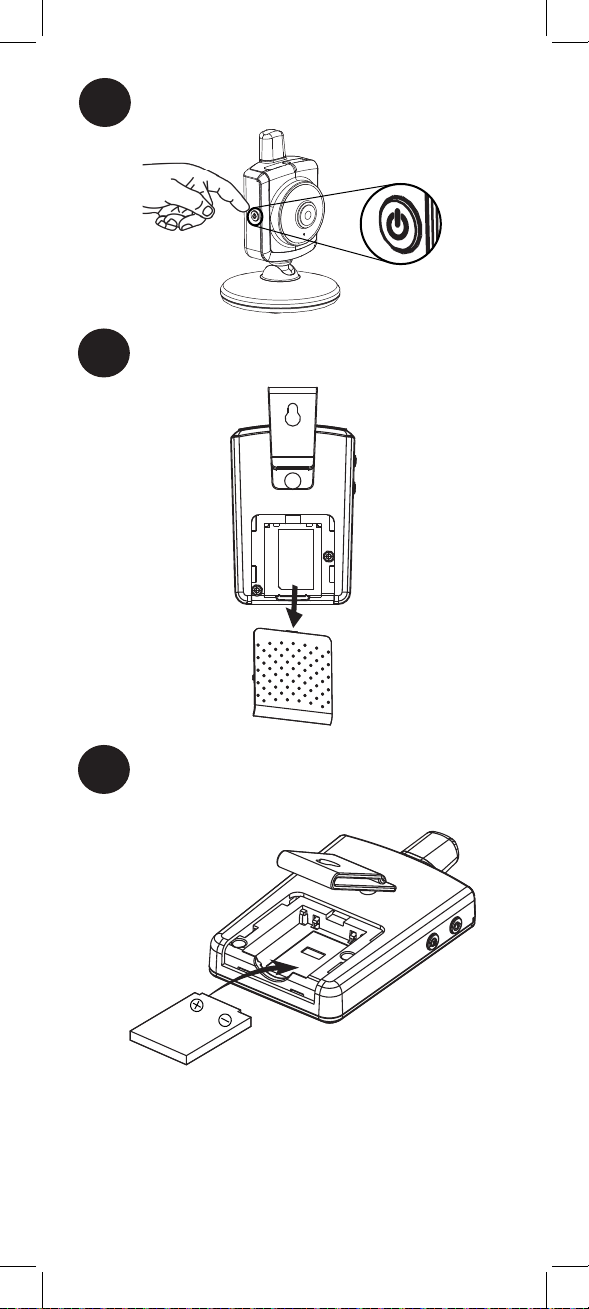
Press the power button to turn on the camera.
2
Push down on the battery compartment
3
door and slide it off the monitor(s).
Insert the battery so the positive and
4
negative signs on the battery line up with
the contacts in the battery compartment as
shown below.
4
Page 7
ENGLISH
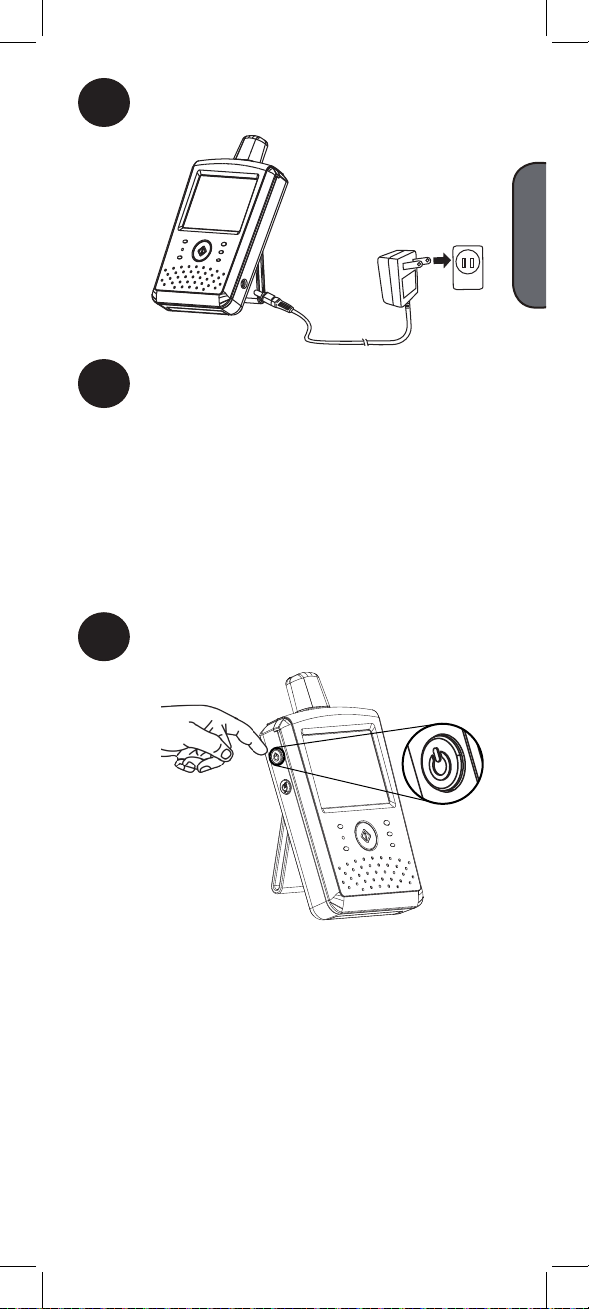
Connect the remaining power adapters from the
5
monitor(s) to a power outlet.
Let the monitor(s) charge for at least 4 hours to
6
charge the batteries. When fully charged, the
monitor(s) can be used cordlessly for up to 3.5
hours.
NOTE: The monitor(s) and the camera should be
plugged in for overnight / prolonged monitoring.
The power indicator LED on the monitor is
red while charging, and turns green when
completely charged.
Press the power button to turn on the monitor(s).
7
5
Page 8

Tips
• If you do not plan to use the unit for a prolonged
period of time, remove the batteries from the
monitor(s).
• For prolonged / overnight monitoring, it is
recommended to connect the monitor(s) to a
power outlet. Battery-powered use is supported
for convenient, short-term portable usage only.
• When fully charged, the monitor(s) will stay on
up to 3.5 hours in normal viewing mode, and up
to 7 hours in VOX mode (see “VOX Mode (Voice
Trigger)” on page 13).
6
Page 9
ENGLISH
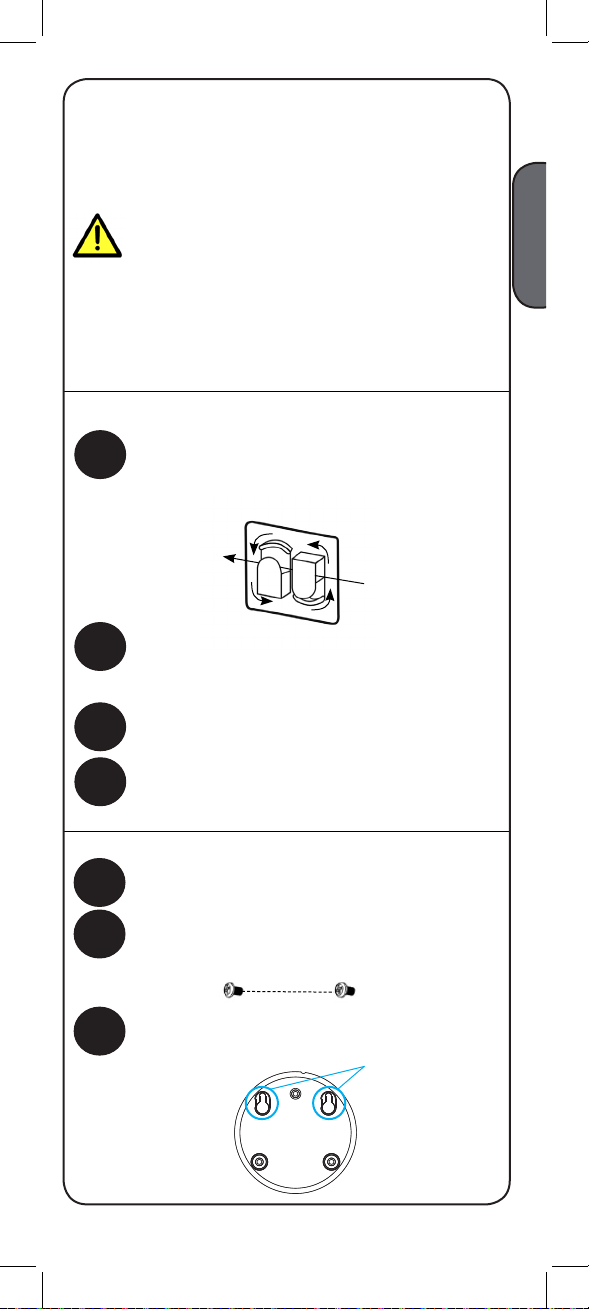
Optional - Wall Mounting the Camera
Before mounting the camera:
• Determine where you will get the best view of your child.
• Ensure the power cable is long enough to power the
camera.
Make sure all power cables are at least
3ft / 1m away from the crib and out of
reach of your child.
Use the included cable clip to help keep
power cables away from your child.
Cable clip should be used even if you
are not mounting the camera.
To install the cable clips:
Place the camera in the desired position.
1
Feed the power cable through the two plastic
brackets on each cable clip. Wrap the cable
around the brackets to shorten the cable.
Position the cable clips against a wall or floor.
2
Mark your chosen position and remove the
power cable from the two brackets.
Remove adhesive guard when you are
3
prepared to attach the clips.
Once the cable clips have been attached, feed
4
the power cable through the two brackets and
wrap excess cable around the brackets.
To mount the camera:
Drill two holes 44mm from one another.
1
Tap anchors into holes with a hammer. Insert
2
screws 2/3 of the way.
44mm
Align the mounting points on the bottom of
3
the camera with the screws and push the
camera down.
7
Mounting
points
Page 10
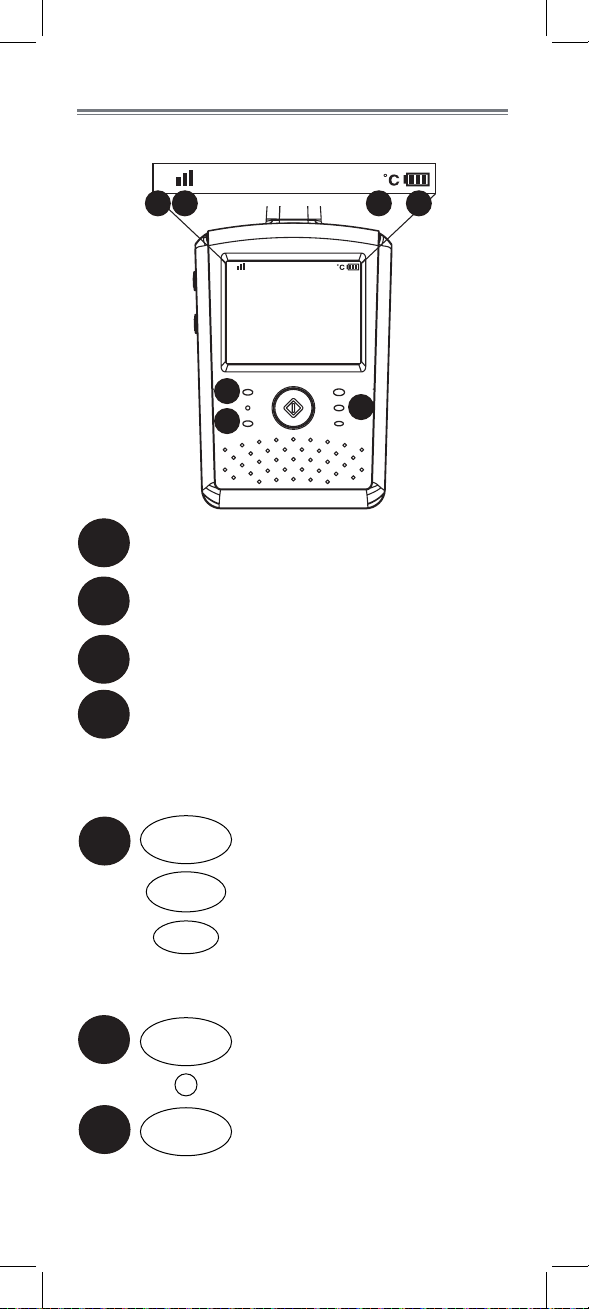
Using Your Baby Monitor
The monitor shows the following icons during use:
1
1 2 3 4
1
27
6
7
Camera number indicator
1
Signal strength indicator
2
Room temperature at camera’s location
3
Battery charge indicator
4
2 7
5
Indicator LEDs
5
6
7
High
Sound Indicator LEDs
Indicate the volume of sounds
heard on the monitors.
Low
Power Indicator LED
Indicates the monitor is turned on.
VOX Indicator LED
Indicates VOX mode is turned on.
See “VOX Mode (Voice Trigger)”
on page 13.
8
Page 11
ENGLISH
Using Two-way Talk
1
Press and hold to talk to
your baby.
Release the talk button to hear audio
2
from the camera again.
9
Page 12
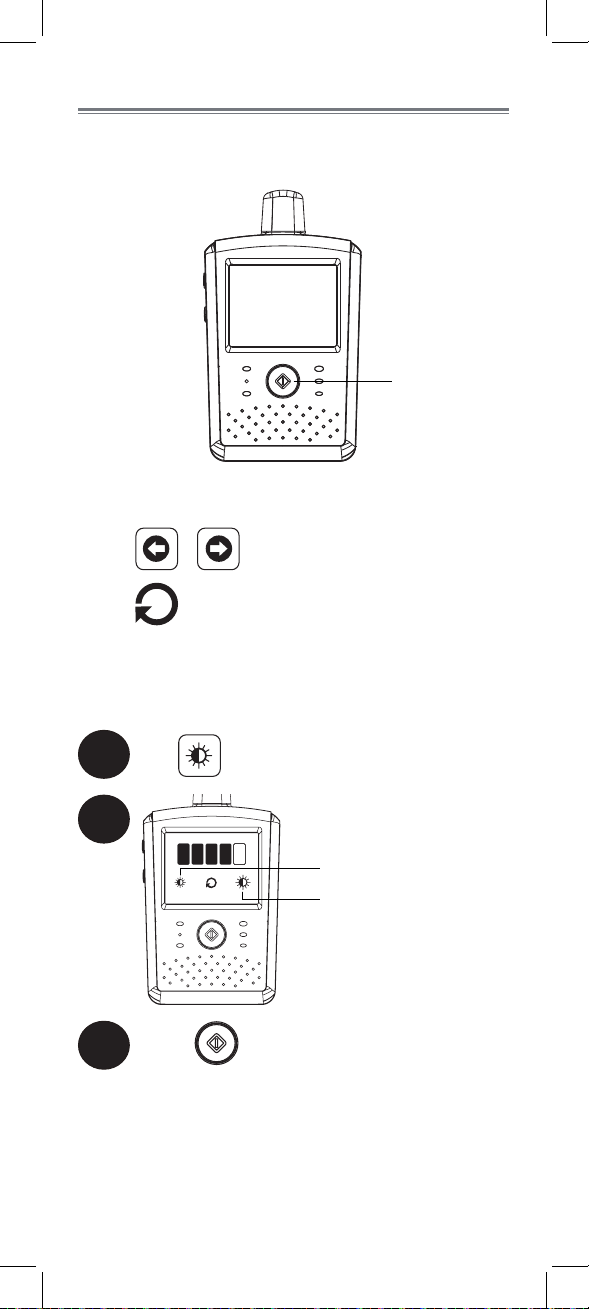
Using the Menu
27
2 7
Use the main menu to enable and configure the
baby monitor’s features.
Press to open
the main menu
The main menu uses touchscreen controls:
• Tap / to navigate through the menu.
• Tap in menus to return to the previous screen.
Adjusting Screen Brightness
1
Tap
2
Tap to decrease brightness
Tap to increase brightness
Press
3
to return to live viewing.
10
Page 13
ENGLISH
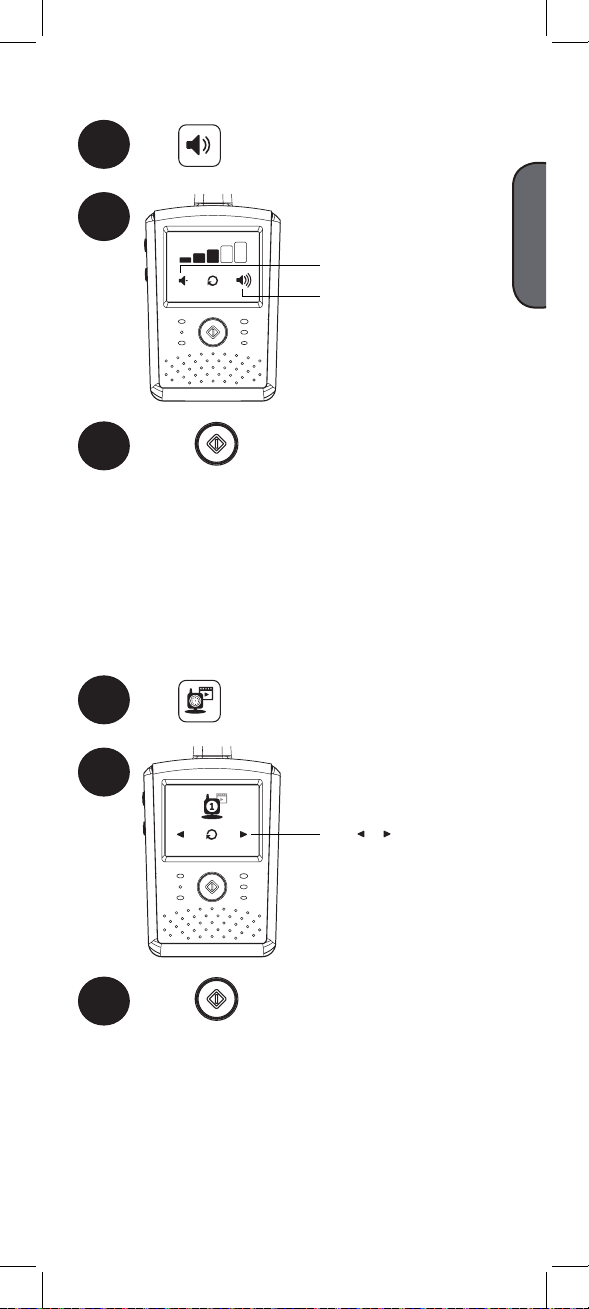
Adjusting Monitor Volume
27
2 7
27
2 7
1
Tap
2
Tap to decrease volume
Tap to increase volume
Press
3
to return to live viewing.
Camera Selection
Choose which camera is displayed on the
monitor. Use this feature only if you have more
than one camera connected.
1
Tap
2
Tap / to select a
camera
Press
3
to return to live viewing.
11
Page 14
Changing Temperature Units
27
2 7
You can select if you would like temperature
readings and alerts to be in Fahrenheit or
Celsius.
1
Tap
Tap to change temperature units
2
between Celsius (ºC) and Fahrenheit (ºF).
The currently selected unit appears larger.
Press
3
to return to live viewing.
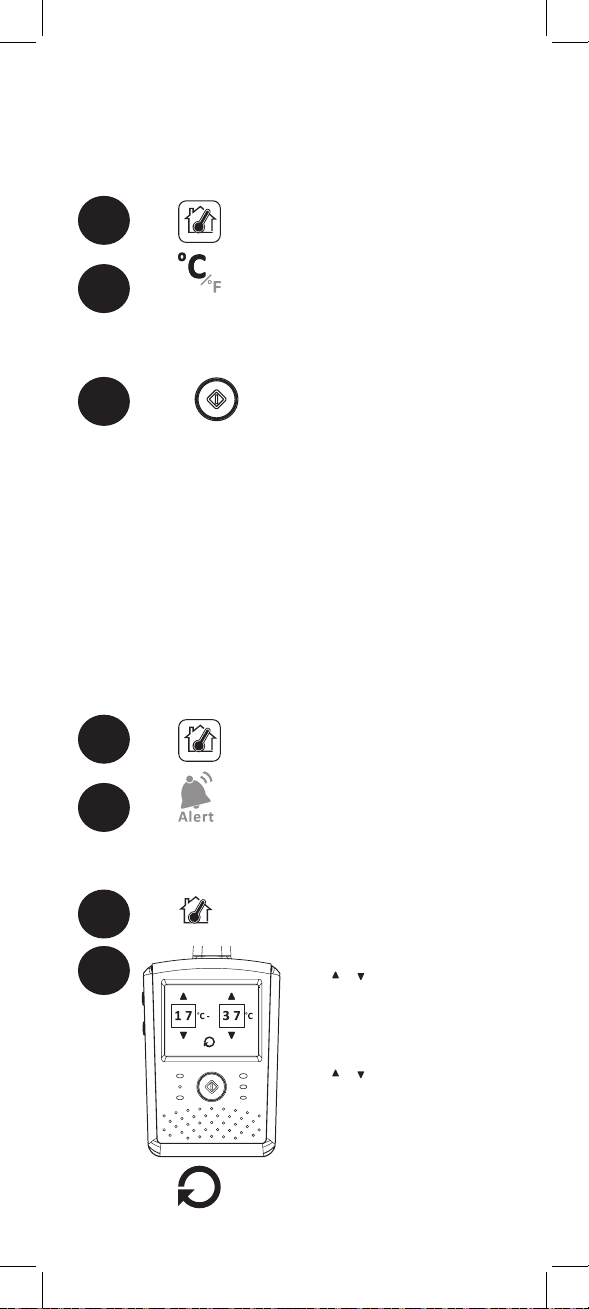
Setting Temperature Alerts
The temperature alert feature allows you to
ensure the baby’s room is at a comfortable, safe
temperature. The monitor beeps if the temperature
gets too hot or cold. Temperature sensor is
accurate within 3°F/1°C.
You can control the high and low temperatures
that trigger temperature alerts.
1
Tap
2
Tap to turn temperature alerts on / off.
The icon is yellow when alerts are turned
on, or grey if turned off.
Tap .
3
4
Tap / on either side of
the leftmost value to set the
low temperature value.
Tap / on either side of
the rightmost value to set
the high temperature value.
Tap when finished.
12
Page 15
ENGLISH
Press
27
2 7
27
2 7
5
to return to live viewing.
If the temperature at the camera end
is lower or higher than the set range,
the monitor will beep twice and the
temperature in the top-right corner will
flash.
Temperature Compensation
1
Tap
Tap and set a value using the arrows.
2
The displayed temperature is adjusted by
the selected value.
Press
3
to return to live viewing.
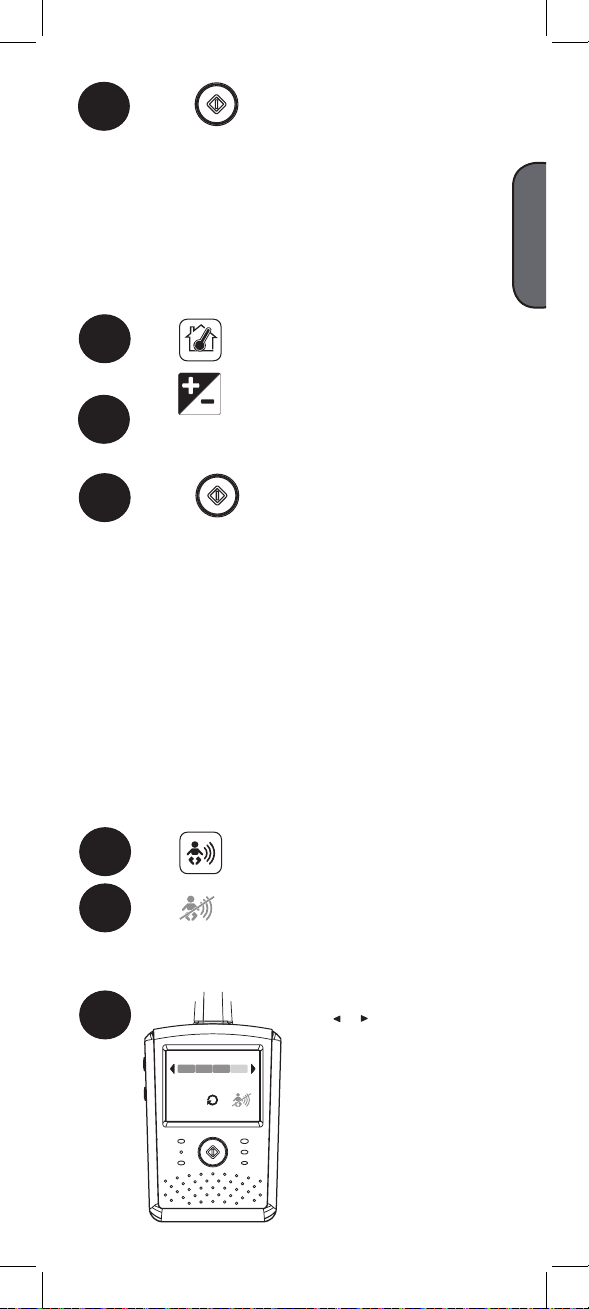
VOX Mode (Voice Trigger)
In VOX mode, the monitor’s screen and speaker
will turn off after 10 seconds unless sound is
detected at the selected sensitivity level. This
conserves battery power, and alerts you only when
needed.
You can turn the display on during VOX mode
by pressing the menu button on the monitor. The
monitor’s screen and speaker will shut off again
after 10 seconds.
1
Tap
Tap to turn VOX mode on / off.
2
The icon is yellow when VOX mode is
turned on, or grey if turned off.
3
Tap / to set the volume
threshold of VOX mode.
With the volume set low
(i.e., one bar), the display
will be turned on by
quieter sounds. Only loud
noises will be detected if
set high (i.e., four bars).
13
Page 16
27
2 7
27
2 7
Press
27
2 7
4
to return to live viewing.
Adjusting Camera Volume
You can adjust the volume of the speaker on the
camera. This will affect the volume of two-way
talk as well as lullabies.
1
Tap
2
Tap to decrease volume
Tap to increase volume
Press
3
to return to live viewing.
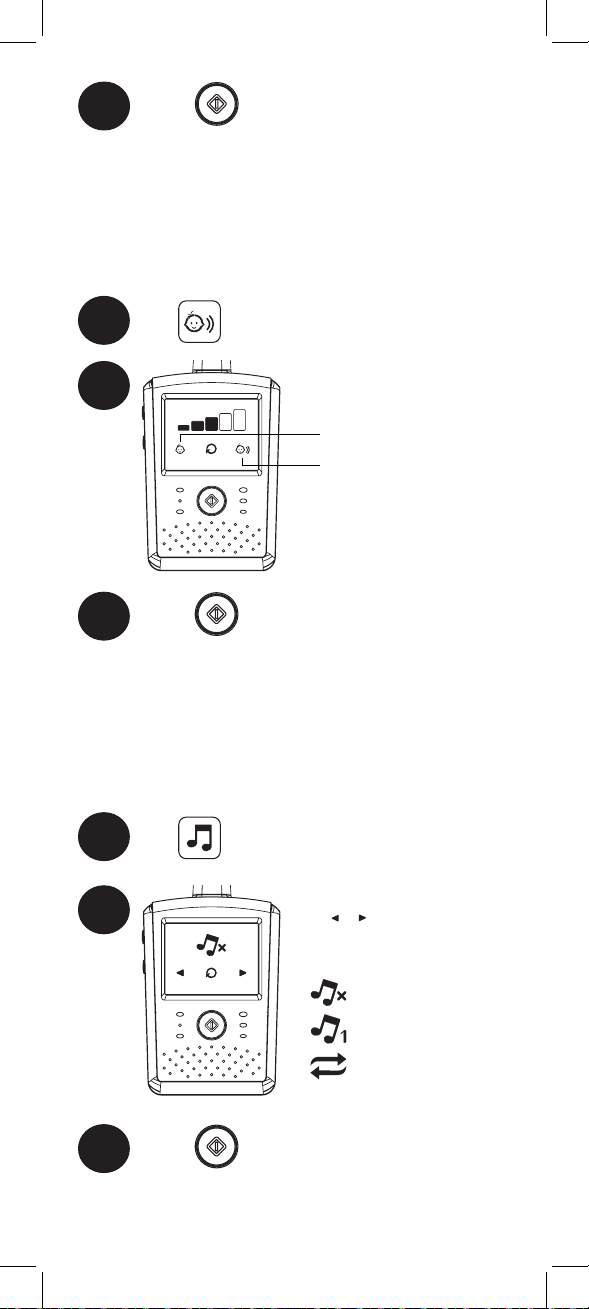
Playing Lullabies
The baby monitor is preloaded with soothing
lullabies to help your little one drift off to sleep.
1
Tap
2
Press
3
Tap / to choose a
playing mode.
• No lullaby
• Lullaby playing
• Play all
to return to live viewing.
14
Page 17
ENGLISH
Using the Night-light
27
2 7
27
2 7
The camera features a built-in night-light. You can
configure the night-light to turn on automatically
in dark conditions or turn it on and off manually.
You can also adjust the brightness and color of
the night-light.
To turn the night-light on manually:
1
Tap
Tap
2
Tap to turn the night-light on / off.
3
The icon appears yellow when the light is
on, and grey when it is off.
Press
4
to return to live viewing.
To turn the night-light on automatically:
1
Tap
Tap
2
3
Tap / to set the level
of darkness needed to turn
the night-light on.
The higher the setting, the
darker it must be for the
night-light to turn on.
Press
4
To change night-light color:
to return to live viewing.
1
Tap
15
Page 18
Tap . The icon changes color to
27
2 7
27
2 7
27
2 7
2
match the color of the night-light.
You can set the night-light to glow
yellow, green and orange.
Press
3
to return to live viewing.
To set night-light brightness:
1
Tap
2
Tap repeatedly to change the
brightness. The icon will be completey
white when set to the highest
brightness.
Press
3
to return to live viewing.
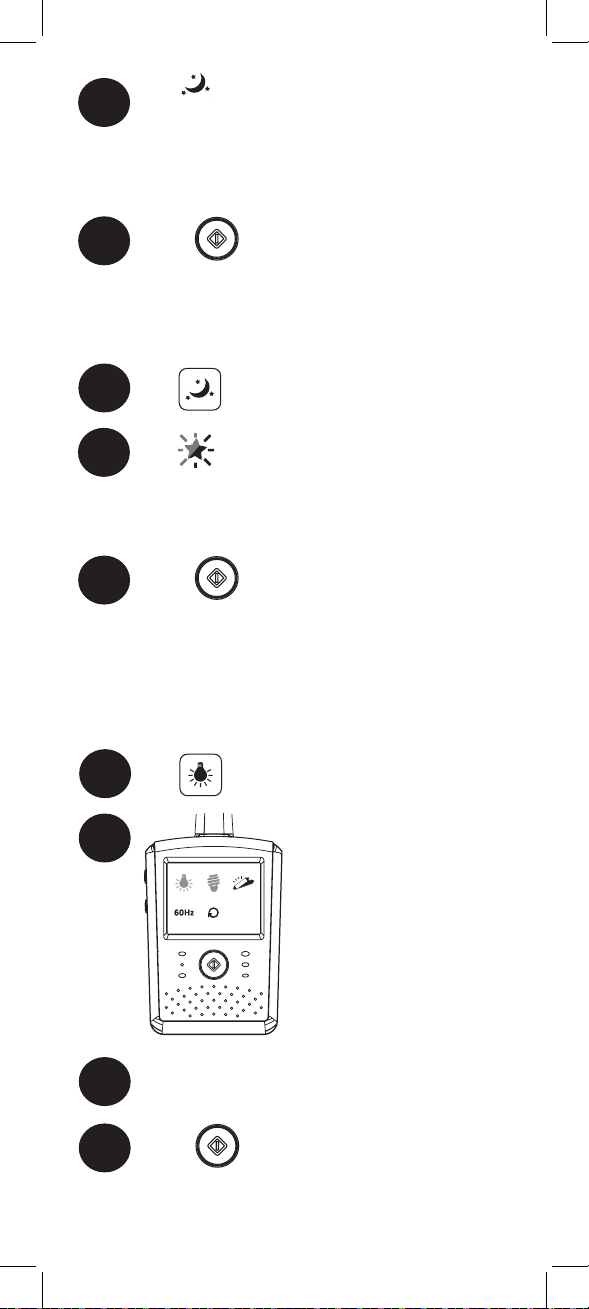
Color Settings
Configure the color settings to get the best
possible image quality on the monitor(s).
1
Tap
2
Tap one of the light
icons to set the color
according to the
lighting at the camera’s
location, or try each
setting to see which
provides the best
picture quality.
Ensure the display frequency is set to 60Hz
3
if being used in North America.
Press
4
to return to live viewing.
16
Page 19

ENGLISH
Delete Camera
27
2 7
27
2 7
Use this menu to remove cameras from the
system.
1
Tap
2
Tap / to select the
camera you wish to
remove.
Tap the delete camera
icon ( ) for the
camera you wish to
remove.
Tap to confirm.
3
Press
4
to return to live viewing.
Invert Image
Invert the image from the camera. Use this feature
if you choose to mount the camera on a ceiling.
1
Tap
2
Tap to invert the
image. This icon will
appear yellow if the
image is inverted.
Press
3
to return to live viewing.
17
Page 20
Restore Default Settings
27
2 7
Restore all settings to their out-of-the-box state.
1
Tap
2
Tap to restore
default settings.
3
Press
to return to live viewing.
18
Page 21
ENGLISH
Pairing Additional Cameras
The included camera has already
been paired with the monitors. If you
have purchased add-on cameras (model#
LB2221AC1B), OR if your monitors and
camera are not paired up, follow the steps
below.
To pair a camera to your monitors:
Place the camera and both monitors within
1
1ft of each other. Make sure the camera
and the monitors are turned on.
2
Press to open
the main menu
Tap
3
4
Tap / to select the
channel you wish to
pair the camera to.
If a camera is already connected
to this channel, the new camera
will replace the existing camera.
Tap
5
NOTE: The number shown in the icon will
vary depending on the pairing channel.
19
Page 22
6
Press and hold the
power button on
the camera you are
pairing for 3 seconds.
Live video from the camera(s) is displayed on
the monitors.
NOTE: You can complete this step whether the
camera is on or off.
OPTIONAL: Repeat steps 1-6 to pair the
7
camera to a second monitor.
20
Page 23
ENGLISH
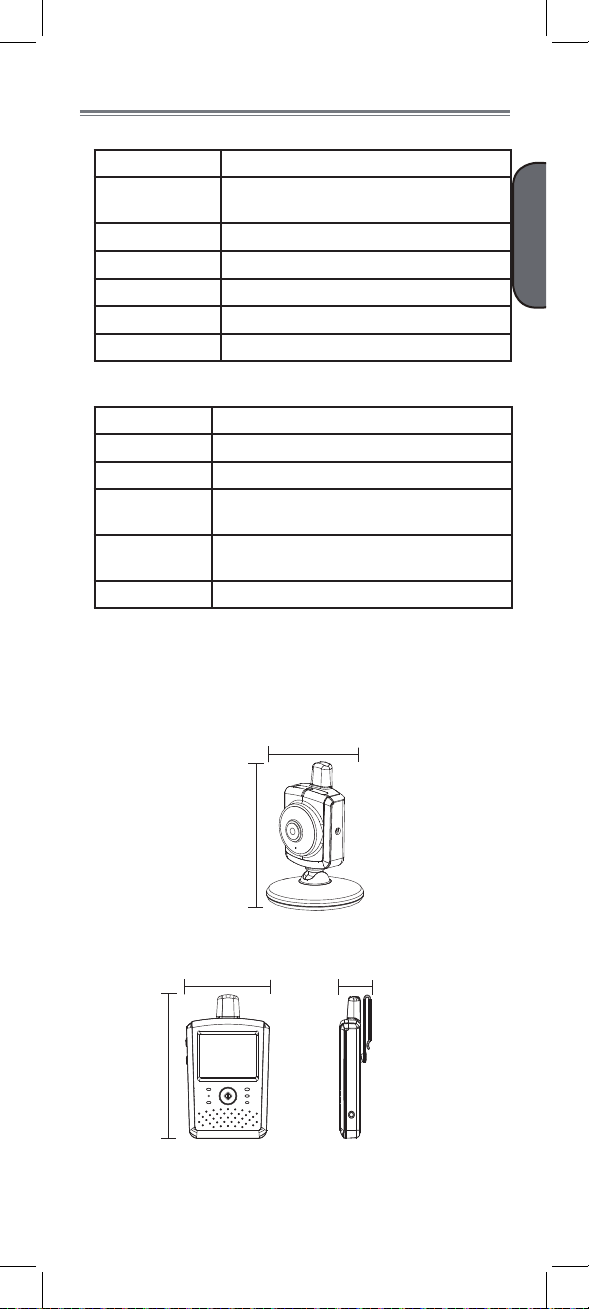
Technical Specifications
Camera
Frequency 2.4GHz
Maximum Range Up to 450ft (137m) outdoors*
Up to 150ft (50m) outdoors*
Image Sensor 1/6” Color CMOS
Lens 3.0mm F2.4
IR LED 8 pcs
Power Adapter 6.0V DC 800mA
Weight 0.2lbs / 0.1kg
Monitor
Frequency 2.4GHz
Display 2.4” Touch panel LCD
Power Adapter 6.0V DC 800mA
Battery Li-ion Rechargeable Battery 3.7V DC
700mAH
Battery Life Up to 3.5 hours in normal mode
Up to 7 hours in VOX mode**
Weight 0.2lbs / 0.1kg (with battery)
*Based on unobstructed line of sight. Actual range will vary
based on surroundings.
**May vary based on how often the display is triggered.
4.8in
123mm
4.6in
117mm
2.7in
69mm
3.1in
80mm
1.3in
32mm
21
Page 24
Troubleshooting
Problem Solution
No video
displayed on
the monitor(s)
The camera
and monitor(s)
are not
detecting each
other
Feedback /
squealing noise
coming from
the monitor(s)
Video image is
upside-down
The screen
keeps turning
off
• Ensure the camera is plugged into a
power outlet and is powered on.
• Ensure the monitor(s) is powered on.
• The monitor(s) may be out of batteries.
Connect them to a power outlet.
• If you have enabled VOX mode, the
monitor(s) will not display video unless
the camera detects sound. See “VOX
Mode (Voice Trigger)” on page 13.
• Make sure the camera is plugged in.
• Make sure the camera is powered on.
• The camera and monitor(s) may be
out of range. Move the monitor(s) and
camera closer together.
• You may need to pair the camera and
the monitor(s) again. See “Pairing
Additional Cameras” on page 19
for details.
• For optimal performance, avoid
placing the monitor(s) and camera
near televisions, computers, cordless
/ mobile phones, or other electrical
equipment.
• Your camera and monitor(s) may be
too close to each other. Move them
further apart.
• Lower the volume of the monitor(s).
• The image has been inverted by
accident. See “Invert Image” on page
17 for details.
• VOX mode is enabled. The monitor(s)
will not display video unless the
camera detects sound. See “VOX
Mode (Voice Trigger)” on page 13.
Need Help?
Product Support is available 24/7 including product
information, user manuals, quick start up guides and
FAQ’s at www.lorexbaby.com/support
22
Page 25

ENGLISH
CLEANING
Clean the monitors and camera with a slightly damp cloth or an antistatic cloth. Never use cleaning agents or abrasive solvents.
• Do not clean any part of the product with cleaners with thinners or
other solvents and chemicals. This may cause permanent damage to
the product, which is not covered by the Warranty. When necessary,
clean it with a damp cloth.
• Keep your camera and monitors away from hot, humid areas or
strong sunlight, and do not get it wet.
• Every effort has been made to ensure high standards of reliability
for your baby monitor. However, if something does go wrong,
please do not try to repair it yourself. Contact Customer Service for
assistance.
DISPOSAL OF THE DEVICE
At the end of the product lifecycle, you should not
dispose of this product with normal household waste,
but take the product to a collection point for the
recycling of electrical and electronic equipment. The
symbol on the product, user’s guide, and/or box
indicates this.
Some of the product materials can be re-used if you
take them to a recycling point. By reusing some
parts or raw materials from used products you make an important
contribution to the protection of the environment.
Please contact your local authorities in case you need more information
on the collection points in your area. Dispose of the battery pack in an
environmentally-friendly manner according to your local regulations.
NOTICES
WARNING: Any changes or modifications not expressly approved by
the grantee of this device could void the user’s authority to operate the
device.
FCC NOTICE
This device complies with Part 15, subpart C, of the FCC Rules.
Operation is subject to the following two conditions: (1) this device may
not cause harmful interference, and (2) this device must accept any
interference received, including interference that may cause undesired
operation.
The manufacturer is not responsible for any radio or TV interference
caused by unauthorized modifications to this equipment. Such
modifications could void the user’s authority to operate the equipment.
However, it is imperative that the user follows the guidelines in this
manual to avoid improper usage which may result in damage to the
unit, electrical shock and fire hazard injury.
CAUTION: To maintain compliance with the FCC’s RF exposure
guidelines, place the camera at least 20cm (7.87in) from nearby
persons.
CANADA/IC NOTICE
This device complies with Industry Canada licence-exempt RSS
standard(s). Operation is subject to the following two conditions: (1)
this device may not cause interference, and (2) this device must accept
any interference, including interference that may cause undesired
operation of the device.
23
Page 26

USER’S GUIDE
SWEET PEEP DUO
www.lorexbaby.com
Copyright © Lorex Corporation 2014
Page 27

DUO SWEET PEEP
ENGLISH
FRANÇAIS
ESPAÑOL
MONITEUR VIDÉO DOUBLE
POUR BÉBÉ
GUIDE DE L'UTILISATEUR
Version 1.0
www.lorexbaby.com
Page 28

Mesures de sécurité
• L'assemblage doit être effectué par un adulte. Tenir
les petites pièces hors de portée des enfants lors de
l'assemblage.
• Ce produit n'est pas un jouet. Ne pas laisser les enfants
jouer avec ce produit.
• Ce moniteur vidéo ne remplace pas la surveillance d'un
adulte responsable.
• Garder les cordons hors de portée des enfants.
• Ne pas couvrir le moniteur vidéo avec une serviette ou
une couverture.
• Ne jamais utiliser de rallonges électriques avec les
adaptateurs de courant.
• N'utiliser que les adaptateurs de courant fournis.
• Tester le moniteur vidéo avant de l'utiliser. Se familiariser
avec ses fonctions.
• Ne pas utiliser le moniteur vidéo près de l'eau.
• Ne pas installer le moniteur vidéo près d'une source de
chaleur.
• Insérer uniquement des piles ou un bloc-piles de même
type.
• Ne pas toucher aux contacts des connecteurs avec des
objets pointus ou métalliques.
• N'utiliser que les chargeurs et les adaptateurs de courant
fournis. Ne pas utiliser d'autres chargeurs ou adaptateurs
de courant, car cela pourrait endommager l'appareil et
le bloc-piles.
• Jeter ou recycler les piles conformément aux lois locales,
lesquelles peuvent varier selon l'emplacement.
• Insérer les piles en respectant la polarité.
• Ne pas mélanger des piles neuves et des piles usées.
• Ne pas mélanger des piles alcalines, standard et
rechargeables.
• Retirer les piles usées du produit.
• Garder toutes les piles hors de portée des enfants.
• Conserver ce guide de l'utilisateur pour référence future.
Pour éviter les blessures
aux enfants et nourrissons :
• ASSUREZ-VOUS de garder la caméra et tous les
cordons d'alimentation à au moins 3pi / 1m du
berceau et hors de portée de votre enfant.*
• Utiliser des boucles attache-câble afin de vous aider
à garder les cordons d'alimentation éloignés de
votre enfant.
3 pi/1 m
*Ceci est important même si votre enfant n'est pas debout ou
mobile.
Page 29

FRANÇAIS
Table des matières :
Vue d'ensemble de la caméra .........2
Vue d'ensemble du moniteur ...........3
Mise en route ( .............................. )3
En option - Montage mural de la caméra ...7
Utilisation de votre moniteur pour
bébé ...............................................8
Indicateur lumineux DEL ..................8
Utiliser la conversation bi-
directionnelle ..................................9
Utilisation du menu .......................10
Réglage de la luminosité de l'écran ......... 10
Réglage du volume du moniteur .............. 11
Choix de caméra ..................................11
Modification de l'appareil de température 12
Réglage de l'alerte de température .......... 12
Compensation de la température .............13
Mode VOX (déclenchement par la voix) ...13
Réglage du volume de la caméra ............ 14
Faire jouer des berceuses ....................... 14
Utilisation de la veilleuse ........................ 15
Réglage de la couleur ............................ 16
Effacement de la caméra ........................17
Inversion de l'image .............................. 17
Rétablissement des paramètres par défaut 18
Jumelage de caméras
supplémentaires ..........................19
Caractéristiques techniques ...........21
Caméra ...............................................21
Moniteur .............................................. 21
Dépannage ...................................22
Besoin d'aide? ..............................22
1
Page 30

Table des matières
x1*
x1*
x2*
Adaptateur de
courant
Boucle
attache-câble
x2*
Vis
Ancrages
Caméra
x2*
x2*
Piles
x2*
Moniteurs
*La table des matières peut varier selon le modèle.
Adaptateurs de courant
Vue d'ensemble de la caméra
Capteur de lumière
Indicateur
d'alimentation DEL.
Microphone
Antenne
6VDC
800mA
Port d'alimentation
Objectif
x2*
Veilleuse
Bouton de
mise en
marche
Haut-parleur
Capteur de température
2
Page 31

FRANÇAIS
Vue d'ensemble du moniteur
Bouton
d'alimentation
Bouton pour
parler
Voyant DEL
d'alimentation
Voyant DEL de VOX
Haut-parleur
Microphone
Support pour agrafe
de ceinture / socle
Mise en route
Antenne
Voyant DEL de
son
Écran tactile
ACL
Touche de menu
800mA
6VDC
Port d'alimentation
Compartiment des
piles
Brancher un des blocs d'alimentation
1
fournis de la caméra à une prise
électrique.
S'assurer que les câbles d'alimentation
soient au moins à 1 m (3 pi) du lit de
votre enfant et hors de sa portée.
Utiliser les attaches-câble afin de garder
les câbles d'alimentation loin de vos
enfants.
Voir « Montage mural de la caméra » à la page
7 pour les détails du montage des attachescâbles.
3
Page 32

Appuyer sur le bouton d'alimentation pour
2
allumer la caméra.
Appuyer sur le couvercle du compartiment des
3
piles et faire glisser de façon à le détacher du
(des) moniteur (s).
Insérer la pile de sorte à faire correspondre
4
les bornes positives et négatives de la pile
avec celle du compartiment à pile comme
indiqué ci-dessous.
4
Page 33

FRANÇAIS
Brancher les blocs d'alimentation restants du
5
(des) moniteur (s) au secteur.
Laisser charger les piles du (des) moniteur(s)
6
pour au moins 4 heures. Lorsque charger, le
(les) moniteur(s) peut (peuvent) fonctionner sur
pile pour 3,5 heures.
REMARQUE : Le (les) moniteur (s) et que la
caméra doit être branché pour la surveillance
la nuit / prolongée.
Le voyant DEL d'alimentation est rouge
pendant la charge et devient vert lorsque la
pile est chargée.
Appuyer sur le bouton d'alimentation pour
7
allumer le (les) moniteur (s).
5
Page 34

Conseils
• Si vous prévoyez de ne pas utiliser l'appareil
pour une longue période de temps, retirer les
piles du (des) moniteur (s).
• Pour la surveillance prolongée / de nuit, il est
recommandé de brancher le bloc d'alimentation
au secteur. L'alimentation par pile est prise
en charge pour la commodité, utilisation par
portable à court terme seulement.
• À pleine charge, le (les) moniteur (s) restera (ont)
allumer pour 3,5 heures en mode normal ou
7 heures en mode VOX (s). Voir « Mode( VOX
(Activation par la voix) » à la page. 13
6
Page 35

FRANÇAIS
En option — Montage mural de la
caméra
Avant de monter la caméra :
• Déterminer l'emplacement où vous aurez la meilleure vue
de votre enfant.
• S'assurer que le câble d'alimentation soit suffisamment
long pour alimenter la caméra.
S'assurer que les câbles d'alimentation soient au moins
à 1 m (3 pi) du lit de votre enfant et hors de sa portée.
Utiliser les attaches-câble afin de garder les câbles
d'alimentation loin de vos enfants.
L'attache-câble doit être utilisé même si la caméra n'est
pas montée.
Pour installer les attaches-câbles :
Placer la caméra à la position désirée. Passer le
1
câble dans les deux supports en plastique sur chaque
attache-câble. Enrouler le câble autour des supports
pour raccourcir le câble.
Placer les attaches-câble contre un mur ou au sol.
2
Marquer l'emplacement choisi et retirer le câble
d'alimentation de deux supports.
Retirer le protecteur adhésif lorsque vous êtes prêt à
3
installer l'attache-câble.
Une fois l'attache-câble installé, passer le câble
4
dans les deux supports en plastique sur chaque
attache-câble et enrouler l'excès de câble autour des
supports.
Pour installer la caméra :
Percer deux trous espacés de 44 mm
1
Insérer les chevilles dans les trous avec
2
un marteau. Insérer les vis aux 2/3 de la
profondeur.
44 mm
Aligner les points de fixation dans le fond de
3
la caméra avec les vis et pousser l'appareil
vers le bas
7
Points de
montage
Page 36

Utilisation de votre moniteur
pour bébé
Le moniteur affiche les icônes suivantes lors de
l'utilisation :
1
1 2 3 4
2 7
6
7
Indicateur du numéro de
1
la caméra
Indicateur du niveau du
2
signal
Température ambiante. à l'emplacement de la
3
caméra
Indicateur du niveau de charge de la pile
4
Voyants DEL
5
High
Low
1
27
5
Indicateurs DEL du niveau
du son
Indique le niveau du volume des
sons entendus sur les écrans.
6
7
Voyant DEL d'alimentation
Indique que le moniteur est éteint.
Voyant DEL de VOX
Indique que le mode VOX
est activé. .Voir « Mode VOX
(Activation vocal) » à la page .
13
8
Page 37

FRANÇAIS
Utilisation de la communication
bidirectionnelle
1
Maintenir appuyé
pour parler à votre
bébé.
Relâcher le bouton pour parler afin
2
d'entendre l'audio de la caméra de
nouveau.
9
Page 38

Utilisation des menus
27
2 7
Utiliser le menu principal pour activer et
configurer les fonctions du moniteur de bébé.
Appuyer pour
ouvrir le menu
principal
Le menu principal utilise des commandes tactiles :
• Appuyer / pour naviguer à travers le menu.
• Appuyer sur menu pour retourner à l'écran
précédent.
Réglage de la luminosité de l'écran
1
Appuyer
2
Appuyer pour diminuer la
luminosité
Appuyer pour augmenter
la luminosité
Appuyer sur
3
visualisation en direct.
pour revenir à la
10
Page 39

FRANÇAIS
Réglage du volume du moniteur
27
2 7
27
2 7
1
Appuyer
2
Appuyer pour diminuer
le volume
Appuyer pour
augmenter le volume
Appuyer sur
3
pour revenir à la
visualisation en direct.
Sélection de la caméra
Choisir la caméra qui s'affichera sur le moniteur.
Utiliser cette fonction uniquement si vous avez
plus d'une caméra branchée.
Appuyer
1
2
Appuyer sur /
pour choisir une
caméra
Appuyer sur
3
visualisation en direct.
pour revenir à la
11
Page 40

Pour changer les unités de tem-
27
2 7
pérature
Vous pouvez choisir, selon votre préférence, que
l'affichage de température et d'alertes soit en
degrés Fahrenheit ou Celsius.
1
Appuyer
Appuyer sur pour basculer l'unité
2
de température entre le (ºC) Celsius et (ºF)
Fahrenheit.
L'appareil sélectionné apparaît plus grand.
Appuyez
3
visualisation en direct.
pour revenir à la
Réglage des alertes de température
La fonction d'alerte de température vous permet
de vous assurer que la chambre du bébé est à
une température confortable et sécuritaire. Le
moniteur émet un signal (bip) si la température
devient trop chaude ou trop froide. Le capteur de
température est précis à 3°F/1°C près.
Vous pouvez définir les hautes et basses
températures qui déclenchent des alertes ou
désactiver les alertes de température.
1
Appuyer
Appuyer pour mettre les alertes de
2
température en mode marche / arrêt.
L'icône est jaune quand les alertes sont
allumées, ou grise si éteintes.
Appuyer .
3
4
Appuyer / sur l'un des
côtés de la valeur la plus
à gauche pour régler la
température la plus basse.
Appuyer / sur l'un des
côtés de la valeur la plus
Appuyer lorsque vous avez terminé.
à gauche pour régler la
température la plus haute.
12
Page 41

FRANÇAIS
5
27
2 7
27
2 7
Appuyez
pour revenir à la
visualisation en direct.
Si la température à l'extrémité de
la caméra est plus basse ou plus
haute que la plage fixée, le moniteur
sonnera deux fois et la température
dans le coin supérieur droit clignotera.
Compensation de température
1
Appuyer
Appuyer et régler la valeur en
2
se servant des flèches. La température
affichée est ajustée par la valeur choisie.
3
Appuyez
pour revenir à la
visualisation en direct.
Mode VOX (déclencheur vocal)
Lorsque le mode VOX est activé, l'écran et le
haut-parleur du moniteur s'éteindront après 10
secondes sauf si un son est détecté au niveau
de sensibilité sélectionné. Ce mode permet
d'économiser les piles, et ne vous avertit qu'en
cas de besoin.
Vous pouvez allumer l'affichage pendant le mode
VOX en appuyant les boutons sur le moniteur.
L'écran et le haut-parleur du moniteur s'éteindront
à nouveau après 10 secondes.
1
Appuyer
Appuyer pour mettre VOX en marche
2
/ arrêt.
L'icône est jaune quand le mode VOX est
activé, ou grise si désactivé.
Appuyer / pour régler
3
le seuil du volume du mode
VOX.
Avec le volume le niveau
bas fixe (c.-à-d., une barre),
l'affichage sera allumé
par les sons plus calmes.
Seuls les bruits forts seront
détectés si a réglé sur haut.
(c.-à-d., quatre barres).
13
Page 42

27
2 7
27
2 7
4
27
2 7
Appuyez
pour revenir à la
visualisation en direct.
Réglage du volume de la caméra
Vous pouvez ajuster le volume du haut-parleur
sur la caméra. Ceci affectera le volume
communication vocale bidirectionnelle de même
que les berceuses.
1
Appuyer
2
Tapoter pour diminuer le
volume
Tapoter pour augmenter
le volume
3
Appuyez
pour revenir à la
visualisation en direct.
Écoute de berceuses
Le moniteur pour bébé est préchargé avec calmer
avec des berceuses pour aider votre petit votre
tout petit à s'endormir.
1
Appuyer
2
Appuyez
3
visualisation en direct.
Appuyer / pour choisir
le mode lecture.
• Aucune berceuse
• Berceuse qui joue
• Tout lire
pour revenir à la
14
Page 43

FRANÇAIS
Utiliser la veilleuse
27
2 7
27
2 7
La caméra présente une veilleuse intégrée. Vous
pouvez configurer la veilleuse pour allumer
automatiquement dans les conditions sombres ou
allumer ou éteindre manuellement. Vous pouvez
ajuster aussi la luminosité et la couleur de la
veilleuse.
Pour allumer la veilleuse manuellement :
Appuyer
1
Appuyer
2
Appuyer pour allumer/ éteindre la
3
veilleuse.
L'icône apparaît en jaune quand la
lumière est allumée et en gris quand elle
est éteinte.
4
Appuyez
pour revenir à la
visualisation en direct.
Pour allumer la veilleuse
automatiquement :
1
Appuyer
Appuyer
2
3
Appuyer / pour
régler le niveau de
noirceur nécessaire pour
allumer la veilleuse.
Plus haut est le réglage, le
plus sombre il sera pour
que la veilleuse s'allume.
Appuyez
4
visualisation en direct.
Pour changer la couleur de veilleuse :
pour revenir à la
1
Appuyer
15
Page 44

Appuyer . L'icône change de
27
2 7
27
2 7
27
2 7
2
couleur pour s'apparier à la couleur de
la veilleuse.
Vous pouvez régler la veilleuse pour
s'illuminer en jaune, vert et orange.
3
Appuyez
pour revenir à la
visualisation en direct.
Pour régler la luminosité de la veilleuse :
1
Appuyer
2
Appuyer de façon répétée pour
changer le degré de luminosité. L'icône
sera complètement blanche quand
réglé sur la plus haute luminosité.
3
Appuyez
pour revenir à la
visualisation en direct.
Réglages de couleurs
Configurer les réglages de couleur pour obtenir
la qualité de l'image la meilleure possible sur les
moniteurs.
1
Appuyer
Appuyerun des icônes
2
Garantir que la fréquence d'affichage est
3
réglée à 60 Hz si est utilisé en Amérique
du Nord.
Appuyez
4
visualisation en direct.
de lumière pour
régler la couleur
selon la luminosité à
l'emplacement de la
caméra, ou essayer
chaque réglage pour
voir lequel donne
la meilleur qualité
d'image.
pour revenir à la
16
Page 45

FRANÇAIS
Supprimer les caméras :
27
2 7
27
2 7
Utiliser ce menu pour enlever des caméras du
système.
1
Appuyer
2
Appuyer / pour
sélectionner la caméra
que vous voulez enlever.
Appuyer sur l'icône
pour supprimer la
caméra ( ) pour la
caméra que vous voulez
enlever.
Appuyer pour confirmer.
3
4
Appuyez
pour revenir à la
visualisation en direct.
Inverser l'Image
Inverser l'image de la caméra. Utiliser cette
fonction si vous choisissez de monter l'appareil
photo sur un plafond.
1
Appuyer
2
Appuyer pour
inverser l'image. Cette
icône apparaîtra en
jaune si l'image est
inversée.
Appuyez
3
visualisation en direct.
pour revenir à la
17
Page 46

Rétablissement des paramètres
27
2 7
par défaut
Restaurer tous les paramètres à leur valeur hors
de la boîte.
1
Appuyer
2
Appuyer pour
restaurer les
paramètres par défaut.
Appuyez
3
visualisation en direct.
pour revenir à la
18
Page 47

FRANÇAIS
Jumelage de caméras supplémentaires
La caméra incluse a déjà été jumelée
aux moniteurs. Si vous avez acheté
d'autres caméras complémentaires (modèle no
LB2221AC1), OU si vos moniteurs et votre
caméra ne sont pas jumelés, suivre les étapes
ci-dessous.
Pour jumeler une caméra à vos
moniteurs :
Placer la caméra et les deux moniteurs
1
dans un rayon d'un pied l'un de l'autre.
S'assurer que la caméra est branchée et
allumée.
2
Appuyez pour
ouvrir le menu
principal.
Appuyer
3
4
Appuyer / pour
choisir le canal
auquel vous désirez
associer la caméra.
Si une caméra est déjà connectée
à ce canal, la nouvelle caméra la
remplacera.
Appuyer
5
REMARQUE : Le numéro affiché
sur l'icône qui variera en fonction du
jumelage de canaux.
19
Page 48

6
Maintenir le bouton
d'alimentation sur
la caméra que vous
jumelez enfoncé
pendant 3 secondes.
La vidéo en direct de la caméra(s) est affichée
sur les écrans.
REMARQUE : Vous pouvez terminer cette
étape qu'importe si la caméra est en marche ou
éteinte.
OPTIONNEL Répétez les étapes 1-6 pour
7
jumeler la caméra à un second écran.
20
Page 49

FRANÇAIS
Spécifications techniques
Caméra
Fréquence 2,4 GHz
Portée maximale Jusqu'à 137 m/450 pi à l'extérieur*
Capteur
d'images
Objectif 3,0 mm F2.4
DEL IR 8 mcx
Bloc
d'alimentation
Poids 0,2 lb / 0,1 kg
Moniteur
Fréquence 2,4 GHz
Affichage Écran tactile LCD de 2,4 po
Bloc
d'alimentation
Piles Piles rechargeables au lithium-ion
Autonomie des
piles
Poids 0,2 lb/0,1 kg (avec la pile)
Jusqu'à 50 m/450 pi à l'extérieur*
CMOS couleur 1/6 po
6,0 V DC 800mA
6,0 V DC 800mA
de 700 mAh 3,7 V CC
Jusqu'à 3,5 heures en mode normal
Jusqu'à 7 heures en mode VOX**
*Basé sur une ligne de visée non obstruée. La portée réelle
varie en fonction de l'environnement.
**Peut varier en fonction de la fréquence de déclenchement
de l'affichage.
80 mm / 3,1 po
117 mm /4,6 po
32 mm /
69 mm / 2,7 po
1,3 po
123 mm
/4.8 po
21
Page 50

Dépannage
Symptôme Solution
Aucune vidéo
affichée sur
l'écran(s)
La caméra et
le moniteur(s)
ne se détectent
pas
Rétroaction/
bruit aigu
provenant du
moniteur(s)
L'image vidéo
est à l'envers
L'écran du
moniteur
s'éteint
continuellement
• Garantir que la caméra est branchée
à une prise de courant et sous-tension.
• Garantir que le moniteur(s) est sous
tension.
• Le moniteur(s) est peut-être sans piles.
Connectez-les à une prise de courant.
• Si vous avez activé le mode VOX, le
moniteur(s) n'affichera pas la vidéo
à moins que la caméra ne détecte le
son. Voir « Mode VOX (déclencheur
vocal) » sur la page 13
• S'assurer que la caméra est branchée.
• S'assurer que la caméra est allumée.
• La caméra et le moniteur(s) sont
peut-être hors de portée. Déplacer le
moniteur(s) et la caméra l'un à côté de
l'autre.
• Il se peut qu'il faille jumeler la caméra
et le moniteur(s) de nouveau. Pour les
détails.
• voir « Jumelage de caméras
supplémentaires » à la page
19Pour des performances
optimales, éviter de placer le moniteur
et la caméra près de téléviseurs,
ordinateurs, téléphones sans fil
ou mobiles, ou autres appareils
électriques.
• Votre caméra et votre moniteur(s) sont
peut-être trop près l'un de l'autre. Les
éloigner l'un de l'autre.
• Baissez le volume du moniteur(s).
• L'image a été inversée par l'accident.
Pour les détails. Voir « Inverser
l'image » sur la page 17
• Le mode VOX est activé. Le moniteur(s)
n'affichera pas la vidéo à moins que
la caméra ne détecte le son. Voir
« Mode VOX (déclencheur vocal) » sur
la page 13
Besoin d'aide?
Le service de soutien technique est disponible 24
heures par jour, 7 jours par semaine, vous trouverez
des informations sur les produits, guides de l'utilisateur,
guides de démarrage rapide et FAQ à
www.lorexbaby.com/support
22
Page 51

FRANÇAIS
NETTOYAGE
Nettoyer les moniteurs et la caméra avec un chiffon légèrement humide
ou un chiffon antistatique. Ne jamais utiliser de détergents ou de
solvants abrasifs.
• Ne nettoyer aucune pièce de l'appareil avec des produits nettoyants
contenant des diluants ou d'autres solvants et produit chimique.
Cela peut causer des dommages permanents au produit, lesquels ne
seraient pas couverts par la garantie. Si nécessaire, le nettoyer avec
un chiffon humide.
• Garder votre caméra et vos moniteurs loin des zones chaudes,
humides ou sous la lumière directe du soleil, et ne pas les mouiller.
• Tous les efforts ont été déployés pour assurer des normes élevées
de fiabilité pour votre moniteur pour bébé. Cependant, si quelque
chose ne fonctionne pas, ne pas essayer de le réparer vous-même.
Communiquer avec le service à la clientèle pour de
l'assistance.
DISPOSITION DE L'APPAREIL
À la fin du cycle de vie de l'appareil, ne pas l'éliminer
avec les ordures ménagères, mais plutôt l'apporter
à un point de collecte de recyclage d'équipements
électriques et électroniques. Le symbole sur le produit,
le guide de l'utilisateur, ou la boîte le mentionnent.
Certains matériaux de l'appareil peuvent être réutilisés si vous les
apportez à un centre de recyclage. En réutilisant certaines pièces ou
matières premières de produits usagés, vous contribuez de manière
importante à la protection de l'environnement.
Veuillez contacter les autorités locales au cas où vous auriez besoin de
plus d'informations sur les points de collecte dans votre région. Éliminer
les piles d'une manière respectueuse de l'environnement conformément
à la réglementation locale.
AVIS
AVERTISSEMENT : Tout changement ou modification non
expressément approuvé par la garantie de cet appareil pourrait annuler
le droit de l'utilisateur à utiliser l'appareil.
AVIS DE LA FCC
Cet appareil est conforme à la Partie 15, sous-partie C, de la
réglementation de la FCC. Son fonctionnement est soumis aux
deux conditions suivantes : (1) cet appareil ne doit pas provoquer
d'interférences nuisibles, et (2) cet appareil doit accepter toute
interférence reçue, incluant toute interférence pouvant causer un
fonctionnement indésirable.
Le fabricant n'est pas responsable des interférences radio ou télévision
causées par des modifications non autorisées de cet équipement. De
telles modifications pourraient annuler le droit de l'utilisateur à utiliser
cet équipement. Cependant, il est impératif que l'utilisateur suive les
directives de ce manuel pour éviter une utilisation inappropriée qui
pourrait causer des dommages à l'appareil, une décharge électrique et
un risque d'incendie et des blessures.
MISE EN GARDE : Pour maintenir la conformité aux directives de la
FCC se rapportant à l'exposition aux interférences RF, placer l'appareil
à au moins 20 cm (7,87 po) des personnes à proximité.
CANADA/AVIS D'INDUSTRIE CANADA
Cet appareil est conforme aux normes RSS d'Industrie Canada pour
les produits exempts de licence. Son fonctionnement est soumis aux
deux conditions suivantes : (1) cet appareil ne doit pas provoquer
d'interférences, et (2) cet appareil doit accepter toute interférence,
incluant toute interférence pouvant causer un fonctionnement indésirable
de l'appareil.
23
Page 52

GUIDE DE L'UTILISATEUR
SWEET PEEP DUO
www.lorexbaby.com
Copyright © Lorex Corporation 2014
Page 53

SWEET PEEP DUO
MONITOR PARA EL BEBÉ CON
VIDEO DOBLE
GUÍA PARA USUARIOS
Versión 1.0
ENGLISH
FRANÇAIS
ESPAÑOL
www.lorexbaby.com
Page 54

Precauciones de seguridad
• Se requiere que un adulto realice el armado. Mantenga las
piezas pequeñas fuera del alcance de los niños durante el
armado.
• Este producto no es un juguete. No permita que los niños
jueguen con él.
• Este monitor de video no sustituye la supervisión de un adulto
responsable.
• Mantenga los cables fuera del alcance de los niños.
• No cubra el monitor de video con una toalla o sábana.
• Nunca utilice extensiones de cable con adaptadores eléctricos.
• Utilice solo los adaptadores eléctricos proporcionados.
• Pruebe el monitor de video antes de utilizarlo. Familiarícese
con sus funciones.
• No utilice el monitor de video cerca del agua.
• No instale el monitor de video cerca de una fuente de calor.
• Solo inserte baterías/paquetes de baterías del mismo tipo.
• No toque los contactos del enchufe con objetos cortantes o
metálicos.
• Solo utilice los cargadores y los adaptadores de corriente
provistos. No utilice otros cargadores ni adaptadores de
corriente, ya que estos pueden dañar el dispositivo o las
baterías.
• Deseche o recicle las baterías conforme a las leyes locales, las
cuales varían según la ubicación.
• Inserte baterías con la polaridad correcta.
• No mezcle las baterías nuevas con las usadas.
• No mezcle baterías alcalinas, estándares y recargables.
• Retire las baterías descargadas del producto.
• Mantenga todas las baterías fuera del alcance de los niños.
• Conserve esta guía de usuario para referencia futura.
Para evitar lesiones en
los niños:
• ASEGÚRESE de mantener la cámara y todos los cables
eléctricos al menos a 3 ft/1 m de distancia de la cuna y
fuera del alcance de su hijo.
• Utilice las grapas de cable que vienen incluidas para
mantener los cables de suministro eléctrico fuera del
alcance de su hijo.
3 ft/1 m
* Esto es importante, incluso si su hijo no está de pie/en movimiento.
Page 55

ESPAÑOL
Índice:
Contenido .......................................2
Descripción general de la cámara ...2
Descripción general del monitor ......3
Instrucciones iniciales ......................3
Opcional: Montaje de la cámara en la
pared ....................................................7
Cómo usar el monitor de su bebé ....8
Indicador LED ..................................8
Uso de dos vías de conversación ....9
Cómo utilizar el menú ...................10
Ajuste del brillo de pantalla ....................10
Ajuste del Volumen del Monitor ...............11
Selección de cámara ............................. 11
Cambio de las unidades de temperatura ..12
Configuración de las Alertas de
Temperatura .........................................12
Compensación de temperatura ............... 13
Modo VOX (Transmisor por voz) ............. 13
Ajuste del Volumen de la Cámara ...........14
Cómo reproducir canciones de cuna .......14
Uso de la luz nocturna ........................... 15
Configuraciones de color ....................... 16
Elimine la cámara .................................17
Imagen invertida ................................... 17
Restaure la configuración predeterminada 18
Emparejamiento de cámaras
adicionales ...................................19
Especificaciones técnicas ................21
Cámara ............................................... 21
Monitor ................................................21
Resolución de problemas ..............22
¿Necesita ayuda? .........................22
1
Page 56

Contenido
x1*
Adaptador de
alimentación
Tornillos
x1*
x2*
x2*
Grapa de
cable
x2*
Anclas
Cámara
x2*
x2*
Baterías
x2*
Monitores
* Los contenidos pueden variar según el modelo
Adaptadores de
corriente
Descripción general de la cámara
Sensor de luz
Indicador LED
de energía
Micrófono
Luz de noche
Botón de
encendido
Antena
Toma de
alimentación
6VDC
800mA
eléctrica
Lente
Sensor de temperatura
2
Altavoz
Page 57

ESPAÑOL
Descripción general del monitor
Antena
Botón de
encendido
Botón para
hablar
Micrófono
Indicador LED del
modo VOX
Indicador LED de
sonido
Altavoz
Pantalla táctil LCD
Indicador LED de
energía
Botón de Menú
800mA
6VDC
Toma de
alimentación
eléctrica
Grapa/soporte del
cinturón
Compartimiento de
baterías
Instrucciones iniciales
Conecte uno de los adaptadores de
1
corriente incluidos desde la cámara a una
toma de corriente.
Asegúrese de que todos los cables de corriente
eléctrica se encuentren a por lo menos 3 ft/1 m
de la cuna y fuera del alcance de su hijo.
Utilice las grapas de cable que vienen incluidas
para mantener los cables de suministro
eléctrico fuera del alcance de su hijo.
Vea “Montaje de la Cámara en la pared” en la página
<?> para obtener más detalles sobre la instalación de
grapas de cable.
3
Page 58

Mantenga presionado el botón de encendido
2
para activar la cámara.
Presione la tapa del compartimiento de batería y
3
deslícela hacia afuera del monitor.
Inserte la batería de modo que los signos
4
positivos y negativos en la batería estén
alineados con los contactos del compartimento
de la batería, como se muestra a continuación.
4
Page 59

ESPAÑOL
Conecte los adaptadores de corriente que
5
queden en el monitor a una toma de corriente.
Deje que el monitor cargue durante al menos
6
4 horas para cargar las baterías. Cuando esté
completamente cargada, el monitor se puede
utilizar sin cable hasta por 3.5 horas.
NOTA: El monitor y la cámara deben estar
conectados para el monitoreo durante la
noche/prolongado.
El indicador LED de energía del monitor es rojo
durante la carga y cambia a verde cuando está
completamente cargada.
Mantenga presionado el botón de encendido
7
para activar el monitor.
5
Page 60

Consejos
• Si no piensa utilizar la unidad durante un
período prolongado de tiempo, retire las
baterías del monitor.
• Para el monitoreo prolongado/nocturno, se
recomienda conectar el monitor a una toma
de corriente. El uso de la batería cargada es
compatible solo para su uso portátil a corto
plazo.
• Cuando esté completamente cargada, el monitor
permanecerá encendido hasta 3.5 horas en
modo de visualización normal y hasta 7 horas
en modo VOX (vea el "Modo VOX (Transmisor
por voz)" en la página<?>).
6
Page 61

ESPAÑOL
Opcional: Montaje de la cámara en la pared
Antes de montar la cámara:
• Determine desde dónde obtendrá la mejor vista de su
bebé.
• Asegúrese de que el cable de alimentación sea lo
suficientemente largo para encender la cámara.
Asegúrese de que todos los cables de corriente
eléctrica se encuentren a por lo menos 3 ft/1 m
de la cuna y fuera del alcance de su hijo.
Utilice las grapas de cable que vienen incluidas
para mantener los cables de suministro eléctrico
fuera del alcance de su hijo.
La grapa de cable debe utilizarse incluso si
usted no está montando la cámara.
Para instalar las grapas de cable:
Coloque la cámara en la posición deseada.
1
Introduzca el cable de alimentación a través de los
dos soportes de plástico en cada grapa de cable.
Envuelva el cable alrededor de los soportes para
acortar el cable.
Coloque las grapas de cable en la pared o el piso.
2
Marque su posición elegida y quite el cable de
alimentación de los dos soportes.
Quite el protector adhesivo cuando esté preparado
3
para fijar las grapas.
Una vez que las grapas de cable han sido fijadas,
4
alimente el cable de alimentación a través de los
dos soportes y envuelva el cable sobrante alrededor
de los soportes.
Para montar la cámara:
Taladre dos agujeros de 44 mm desde uno
1
hasta el otro.
Golpee suavemente los anclajes en los
2
orificios con un martillo. Inserte 2/3 de los
tornillos.
Alinee los puntos de montaje en la parte
3
inferior de la cámara con los tornillos y
44 mm
empuje la cámara hacia abajo.
Puntos de
montaje
7
Page 62

Cómo usar el monitor de su bebé
Indica que el monitor está encendido.
El monitor muestra los siguientes íconos durante el
uso:
1
1 2 3 4
2 7
1
6
7
Indicador del número de cámaras
1
Indicador de intensidad de señal
2
Temperatura del ambiente en el lugar de la
3
cámara
Indicador de carga de la batería
4
Indicador LED
5
Alto
Bajo
Indicador LED de sonido
Indica el volumen de los
sonidos que se escuchan en los
monitores.
27
5
6
7
Indicador LED de energía
Indicador LED del modo VOX
Indica que el modo VOX está
activado. Vea "Modo VOX
(Transmisor por voz)" en la
página<?>.
8
Page 63

ESPAÑOL
Uso de dos vías de conversación
1
Mantenga presionado
para hablarle a su
bebé.
Suelte el botón para hablar para
2
escuchar el audio de la cámara de
nuevo.
9
Page 64

Cómo utilizar el menú
27
2 7
Utilice el menú principal para activar y
configurar las características del monitor de su
bebé.
Presione para
abrir el menú
principal
El menú principal utiliza controles de pantalla
táctil:
• Presione / para navegar a través del menú.
• Presione en los menús para volver a la pantalla
anterior.
Ajuste del brillo de pantalla
1
Presione
2
Presione para reducir el
brillo
Presione para aumentar
el brillo
Presione
3
visualización en vivo.
para regresar a la
10
Page 65

ESPAÑOL
Ajuste del Volumen del Monitor
27
2 7
27
2 7
1
Presione
2
Presione para bajar el
volumen
Presione para subir el
volumen
Presione
3
visualización en vivo.
para regresar a la
Selección de cámara
Elija cuál cámara es mostrada en el monitor.
Utilice esta función solo si tiene más de una
cámara conectada.
1
Presione
2
Presione / para
seleccionar una
cámara
Presione
3
visualización en vivo.
para regresar a la
11
Page 66

Cambio de las unidades de temperatura
27
2 7
Puede seleccionar si desea que las temperaturas
y alertas estén en grados Fahrenheit o Celsius.
1
Presione
Presione para cambiar las unidades
2
de temperatura entre Celsius (ºC) y
Fahrenheit (ºF).
La unidad seleccionada actualmente
aparece más grande.
Presione
3
visualización en vivo.
para regresar a la
Configuración de las Alertas de
Temperatura
La función de alerta de temperatura le permite
garantizar que la habitación del bebé se encuentre
a una temperatura segura y cómoda. El monitor
emite un pitido si la temperatura sube o baja
demasiado. El sensor de temperatura es preciso
dentro de los 3 °F/1 °C.
Usted puede controlar las altas y bajas temperaturas
que activan las alertas de temperatura.
Presione
1
2
Presione para activar/desactivar las
alertas de temperatura.
El icono es de color amarillo, cuando las
alertas están activadas, o gris si están
desactivadas.
Presione .
3
4
Presione / a cada lado
del valor que está más a la
izquierda para establecer el
valor de temperatura baja.
Presione / a cada lado
del valor que está más a la
derecha para establecer el
valor de temperatura alta.
Presione cuando haya terminado.
12
Page 67

ESPAÑOL
5
27
2 7
27
2 7
Presione
para regresar a la
visualización en vivo.
Si la temperatura en el extremo de la
cámara es menor o mayor que el rango
establecido, el monitor emitirá un pitido
dos veces y la temperatura en la esquina
superior derecha parpadeará.
Compensación de temperatura
1
Presione
Presione y defina un valor utilizando
2
las flechas. La temperatura mostrada se
ajusta por el valor seleccionado.
Presione
3
visualización en vivo.
para regresar a la
Modo VOX (Transmisor por voz)
En el modo VOX, la pantalla y el altavoz del
monitor se apagarán luego de 10 segundos, salvo
que se detecte sonido al nivel de sensibilidad
seleccionado. Esto preserva la batería y lo alerta
solo cuando es necesario.
Puede encender la pantalla durante el modo VOX
pulsando el botón de menú en el monitor. La
pantalla del monitor y el altavoz se apagarán de
nuevo después de 10 segundos.
1
Presione
Presione para activar/desactivar el
2
modo VOX.
El icono es de color amarillo, cuando el
modo VOX está activado, o gris si está
desactivado.
3
Presione / para fijar el
umbral de volumen del modo
VOX.
Con el volumen fijado en bajo
(es decir, una barra), la pantalla
se encenderá cuando detecte
sonidos más suaves. Solo los
ruidos fuertes serán detectados
si está configurado como alto (es
decir, cuatro barras).
13
Page 68

27
2 7
27
2 7
Presione
27
2 7
4
visualización en vivo.
para regresar a la
Ajuste del Volumen de la Cámara
Puede ajustar el volumen del altavoz de la
cámara. Esto afectará el volumen de las dos vías
de conversación, así como las canciones de cuna.
1
Presione
2
Presione para bajar el
volumen
Presione para subir el
volumen
Presione
3
visualización en vivo.
para regresar a la
Cómo reproducir canciones de cuna
El monitor del bebé está precargado con
canciones de cuna para ayudar a su pequeño a
conciliar el sueño.
1
Presione
2
Presione
3
visualización en vivo.
Presione / para elegir
un modo de juego.
• Ninguna canción de
cuna
• Activar la canción de
cuna
• Reproducir todos
para regresar a la
14
Page 69

ESPAÑOL
Uso de la luz nocturna
27
2 7
27
2 7
La cámara tiene incorporada una luz nocturna.
Es posible configurar la luz nocturna para que
se encienda automáticamente en condiciones
de poca luz o se encienda y se apague
manualmente. También puede ajustar el brillo y
el color de la luz nocturna.
Para encender la luz nocturna de forma
manual:
1
Presione
Presione
2
Presione para activar/desactivar la
3
luz nocturna.
El icono aparece en amarillo cuando la
luz está encendida, y en gris cuando está
apagada.
4
Presione
para regresar a la
visualización en vivo.
Para encender la luz nocturna en forma
automática:
1
Presione
Presione
2
3
Presione / para
establecer el nivel de
oscuridad necesaria para
encender la luz nocturna.
Cuanto más alto sea el
valor, más oscuro debe
estar el ambiente para
que la luz nocturna se
active.
Presione
4
visualización en vivo.
Para cambiar del color de la luz nocturna:
1
Presione
para regresar a la
15
Page 70

Presione . El icono cambia de color
27
2 7
27
2 7
27
2 7
2
para que coincida con el color de la luz
nocturna.
Usted puede configurar la luz nocturna
para que se ilumine de color amarillo,
verde y naranja.
3
Presione
para regresar a la
visualización en vivo.
Para configurar el brillo de la luz
nocturna:
1
Presione
Presione varias veces para
2
cambiar el brillo. El icono será
completamente blanco cuando esté
configurado en el nivel más alto de
brillo.
Presione
3
visualización en vivo.
para regresar a la
Configuraciones de color
Configure los ajustes de color para obtener la
mejor calidad de imagen en el monitor.
1
Presione
2
Presione uno de los iconos
de luz para configurar
el color de acuerdo a la
iluminación en la ubicación
de la cámara, o pruebe
cada opción para ver cuál
ofrece la mejor calidad de
imagen.
Asegúrese de que la frecuencia de la
3
pantalla esté configurada para 60Hz si se
utiliza en América del Norte.
Presione
4
visualización en vivo.
para regresar a la
16
Page 71

ESPAÑOL
Elimine la cámara
27
2 7
27
2 7
Utilice el menú para retirar cámaras del sistema.
1
Presione
2
Presione / para
seleccionar la cámara que
desea eliminar.
Presione el icono para
eliminar la cámara ( )
para la cámara que desea
Presione para confirmar.
3
eliminar.
Presione
4
visualización en vivo.
para regresar a la
Imagen invertida
Invierta la imagen desde la cámara. Utilice esta
función si decide montar la cámara en un techo.
1
Presione
2
Presione para
invertir la imagen.
Este icono aparecerá
de color amarillo si la
imagen está invertida.
Presione
3
visualización en vivo.
para regresar a la
17
Page 72

Restaure la configuración
27
2 7
predeterminada
Restaure todos los valores al estado fuera de la
caja.
1
Presione
2
Presione para
restaurar la configuración
predeterminada.
Presione
3
visualización en vivo.
para regresar a la
18
Page 73

ESPAÑOL
Emparejamiento de cámaras
adicionales
La cámara que se incluye ya ha sido
emparejada con los monitores. Si compró
cámaras adicionales (modelo n.º LB2221AC1),
O si su monitor y cámara no están emparejados,
siga los pasos a continuación.
Para emparejar una cámara a sus
monitores:
Coloque la cámara y ambos monitores a
1
1 ft de distancia uno de otro. Asegúrese
de que la cámara y el monitor están
encendidos.
2
Presione para
abrir el menú
principal
Presione
3
4
Presione / para
seleccionar el canal
con el que desea
emparejar la cámara.
Si una cámara ya está conectada
a este canal, la cámara nueva
reemplazará a la cámara
existente.
Presione
5
NOTA: El número que se muestra en el
icono variará dependiendo del canal de
emparejamiento.
19
Page 74

6
Mantenga presionado el
botón de encendido de
la cámara que usted está
emparejando durante 3
segundos.
El video en directo desde la cámara se muestra
en los monitores.
NOTA: Usted puede completar este paso si la
cámara está encendida o apagada.
OPCIONAL: Repita los pasos 1-6 para
7
emparejar la cámara con un segundo
monitor.
20
Page 75

ESPAÑOL
Especificaciones técnicas
Cámara
Frecuencia 2.4 GHz
Alcance máximo Hasta 450 ft/137 m en el exterior*
Sensor de imagen Color CMOS de 1/6 in
Lente 3.0 mm F2.4
LED IR 8 pcs
Adaptador de
alimentación
Peso 0.2 lb/0.1 kg
Monitor
Frecuencia 2.4 GHz
Pantalla Pantalla LCD táctil de 2.4 in
Adaptador de
alimentación
Batería Baterías recargables de litio de 3.7 V
Duración de la
batería
Peso 0.2 lb/0.1kg (con batería)
*Se basa en la línea de visión sin obstrucciones. El alcance real varía
según los alrededores.
** Puede variar en función de la frecuencia con que se active la pantalla.
Hasta 150 ft/50 m en el exterior*
6.0 V CC 800 mA
6.0 V CC 800 mA
de CC 700 mAh
Hasta 3.5 horas en modo normal
Hasta 7 horas en modo VOX**
4.8 in
123 mm
4.6 in
117 mm
2.7 in
69 mm
3.1 in
80 mm
1.3in
32mm
21
Page 76

Resolución de problemas
Problema Solución
No se
reproduce
ningún video en
el monitor.
La cámara
y el monitor
no se están
detectando
entre sí.
Ruido de retroalimentación
o chillido
proveniente del
monitor.
La imagen
de video está
invertida.
La pantalla
se mantiene
apagada.
• Asegúrese de que la cámara esté
conectada a una toma de corriente y
esté encendida.
• Asegúrese de que el monitor esté
encendido.
• El monitor puede estar sin baterías.
Conéctelos a una toma de corriente.
• Si ha activado el modo VOX, el
monitor no mostrará el video a menos
que la cámara detecte un sonido. Vea
"Modo VOX (Transmisor por voz)" en
la página .
• Asegúrese de que la cámara está
enchufada.
• Asegúrese de que la cámara está
encendida.
• La cámara y el monitor pueden estar
fuera de alcance. Mueva el monitor y
la cámara para que estén más cerca
entre ellos.
• Es posible que necesite emparejar
la cámara y el monitor nuevamente.
Consulte "Emparejamiento de cámaras
adicionales" en la página para
obtener más detalles.
• Para obtener un rendimiento óptimo,
evite colocar el monitor y la cámara
cerca de televisores, computadoras,
celulares o teléfonos inalámbricos u
otros equipos eléctricos.
• Es posible que su cámara y su monitor
estén muy cerca entre sí. Aléjelos un
poco más.
• Baje el volumen del monitor.
• La imagen ha sido invertida
accidentalmente. Consulte "Invertir
imagen" en la página para obtener
más información.
• El modo VOX está activado. El
monitor no mostrará el video a menos
que la cámara detecte un sonido. Vea
"Modo VOX (Transmisor por voz)" en
la página .
¿Necesita ayuda?
El Servicio de atención al cliente está disponible las
24 horas del día, los 7 días de la semana. Se incluye
información del producto, guías de usuario, guías de
inicio rápido y preguntas frecuentes en
www.lorextechnology.com/support.
22
Page 77

ESPAÑOL
LIMPIEZA
Limpie los monitores y la cámara con un paño suave o un paño
antiestático. Nunca utilice agentes de limpieza ni disolventes abrasivos.
• No limpie ninguna pieza del producto con limpiadores diluyentes u
otros disolventes o químicos. Esto puede provocar daño permanente al
producto, que no está cubierto por la garantía. Cuando sea necesario,
límpielo con un paño húmedo.
• Mantenga su cámara y sus monitores lejos del calor, áreas húmedas o
de la luz solar intensa y no los moje.
• Se ha hecho todo lo posible para garantizar altos estándares de
confiabilidad del monitor de su bebé. Sin embargo, si algo no
funciona, no intente repararlo usted mismo. Comuníquese con el
Servicio de atención al cliente para obtener ayuda.
ELIMINACIÓN DEL
DISPOSITIVO
Al final de su vida útil, no debe desechar este
producto con los desperdicios normales del hogar,
debe llevarlo a un punto de recolección para el
reciclado de equipos eléctricos y electrónicos. Esto se
indica en el símbolo del producto, la guía de usuario
y la caja.
Algunos de los materiales del producto se pueden
volver a utilizar si los lleva a un punto de reciclado. Al reutilizar
algunas piezas o materia prima de los productos usados, usted
realiza una contribución importante a la protección del medioambiente.
Comuníquese con sus autoridades locales en caso de necesitar más
información sobre los puntos de recolección de su área. Deseche las
baterías de forma ecológica conforme con las regulaciones locales.
NOTIFICACIONES
ADVERTENCIA: cualquier cambio o modificación que no esté
expresamente aprobado por el cesionario de este dispositivo puede
anular la autoridad del usuario para utilizar el dispositivo.
NOTIFICACIÓN DE FCC
Este dispositivo cumple con la Parte 15, subparte C de las normas
FCC. La operación está sujeta a las siguientes dos condiciones: (1)
este dispositivo no debe provocar interferencias peligrosas; y (2) este
dispositivo debe aceptar cualquier interferencia recibida, incluso la
interferencia que pueda provocar el funcionamiento no deseado.
El fabricante no es responsable de las interferencias de radio o televisión
provocadas por las modificaciones no autorizadas a este equipo. Estas
modificaciones pueden anular la autoridad del usuario para utilizar el
equipo. Sin embargo, es imprescindible que el usuario cumpla las pautas
de este manual para evitar el uso inadecuado que pueda resultar en
daños a la unidad, descarga eléctrica y lesiones por riesgo de incendio.
PRECAUCIÓN: para mantener el cumplimiento de las pautas de
exposición a RF del FCC, coloque la cámara al menos a 20 cm (7.87 in)
de las personas circundantes.
NOTIFICACIÓN DE CANADÁ/IC
Este dispositivo cumple con las normas RSS exentas de licencia de Industry
Canada. El funcionamiento está sujeto a las siguientes dos condiciones:
(1) este dispositivo no provoca interferencias; y (2) este dispositivo
debe aceptar cualquier interferencia, incluso la interferencia que pueda
provocar el funcionamiento no deseado.
23
Page 78

USER’S GUIDE
GUIDE DE L’UTILISATEUR
GUÍA PARA USUARIOS
SWEET PEEP DUO
www.lorexbaby.com
Copyright © Lorex Corporation 2014
 Loading...