

Page 1

SHS-4QM SERIES Quick Set-Up Guide R1
The SHS System comes with the following components:
• Quad Processor
• 2 x Weatherproof Color Cameras with Stands
• 2 x Weatherproof Color Day/Night IR Cameras with Stands
• 4 x 60’ DIN Extension Cables
• DIN Video Cable
• Remote Control
• Power Adapter
Getting Started
QUAD SURVEILLANCE SYSTEM
WITH 4 CCD INDOOR/OUTDOOR CAMERAS*
Before you install the camera, carefully plan where and how you will position the camera, and where you will route the cables
* IR illumination range up to 16 ft. (5M) under ideal conditions. Objects at or beyond this range may be partially or completely obscured,
depending on the camera application. Picture changes from Color to B&W under low light conditions.
* Note that the IR Night Vision Cameras have a black lens cover.
A. Connect Cameras
Check your package to confirm that you have received the
complete system, including all components shown above.
Connect the female end of the supplied 60’
extension’ cable to the camera.
1
NOTE: Confirm that the arrows
on the DIN Camera Cable and the
DIN Extension cable are aligned
when connecting the cable. If the
pins in the DIN Cable are bent, the
Camera will NOT function.
Connect the male end of the supplied 60’
extension cable to an open DIN channel on
the back of the Quad Processor. Continue
connecting additional DIN cameras.
2
NOTE: The arrow on
the DIN Connector
Connector should
be facing up when
connecting it to the
Quad Processor.
Connect the DIN end of the Video Cable to the Quad Processor. Connect the RCA VIdeo cable
to the TV, VCR or Monitor.
B. Connecting the DIN Video Cable
Connectivity Diagram
TV / VCR / MONITOR
Connect the Yellow RCA
connector to the TV Video IN
Port (yellow)
QUAD PROCESSOR
Connect the DIN Cable end
to the Video Output port
SHS CABLE
RCA to DIN Cable
TV / VCR / MONITOR
4 x CAMERAS
POWER ADAPTER
DIN CABLE
QUAD PROCESSOR
SHS-4QM SERIES
QUICK SET-UP GUIDE
www.lorexcctv.com
Night Vision
Cameras
Day Use
Cameras
4 x 60’ EXTENSION CABLES
STEP 1
under 30 minutesunder 15 minutes under 60 minutes
Hand Tools Hardware
Router
Hi Speed
over 60 minutes
Skill Level
Time
under 30 minutesunder 15 minutes under 60 minutes
Hand Tools Hardware
Router
Hi Speed
over 60 minutes
Time Tools Skills - Easy
Under 10 Minutes*
Hand Tools
Plug & Play connectors, On
screen set up
* Installation time may vary based
on application and camera cabling
Page 2
It’s all on the Web
For detailed setup information, please
refer to your User’s Manual. For additional
information, please visit our website
ww w. lo r ex cc tv . co m/ su p po rt
www.lorexcctv.com
under 30 minutesunder 15 minutes under 60 minutes
Hand Tools Hardware
Router
Hi Speed
over 60 minutes
Skill Level
Time
under 30 minutesunder 15 minutes under 60 minutes
Hand Tools Hardware
Router
Hi Speed
over 60 minutes
Time Tools Skills - Easy
Under 20 Minutes*
Hand Tools
Plug & Play connectors, On
screen set up
* Installation time may vary based
on application and camera cabling
SHS-4QM SERIES Quick Set-Up Guide R1
www.lorexcctv.com
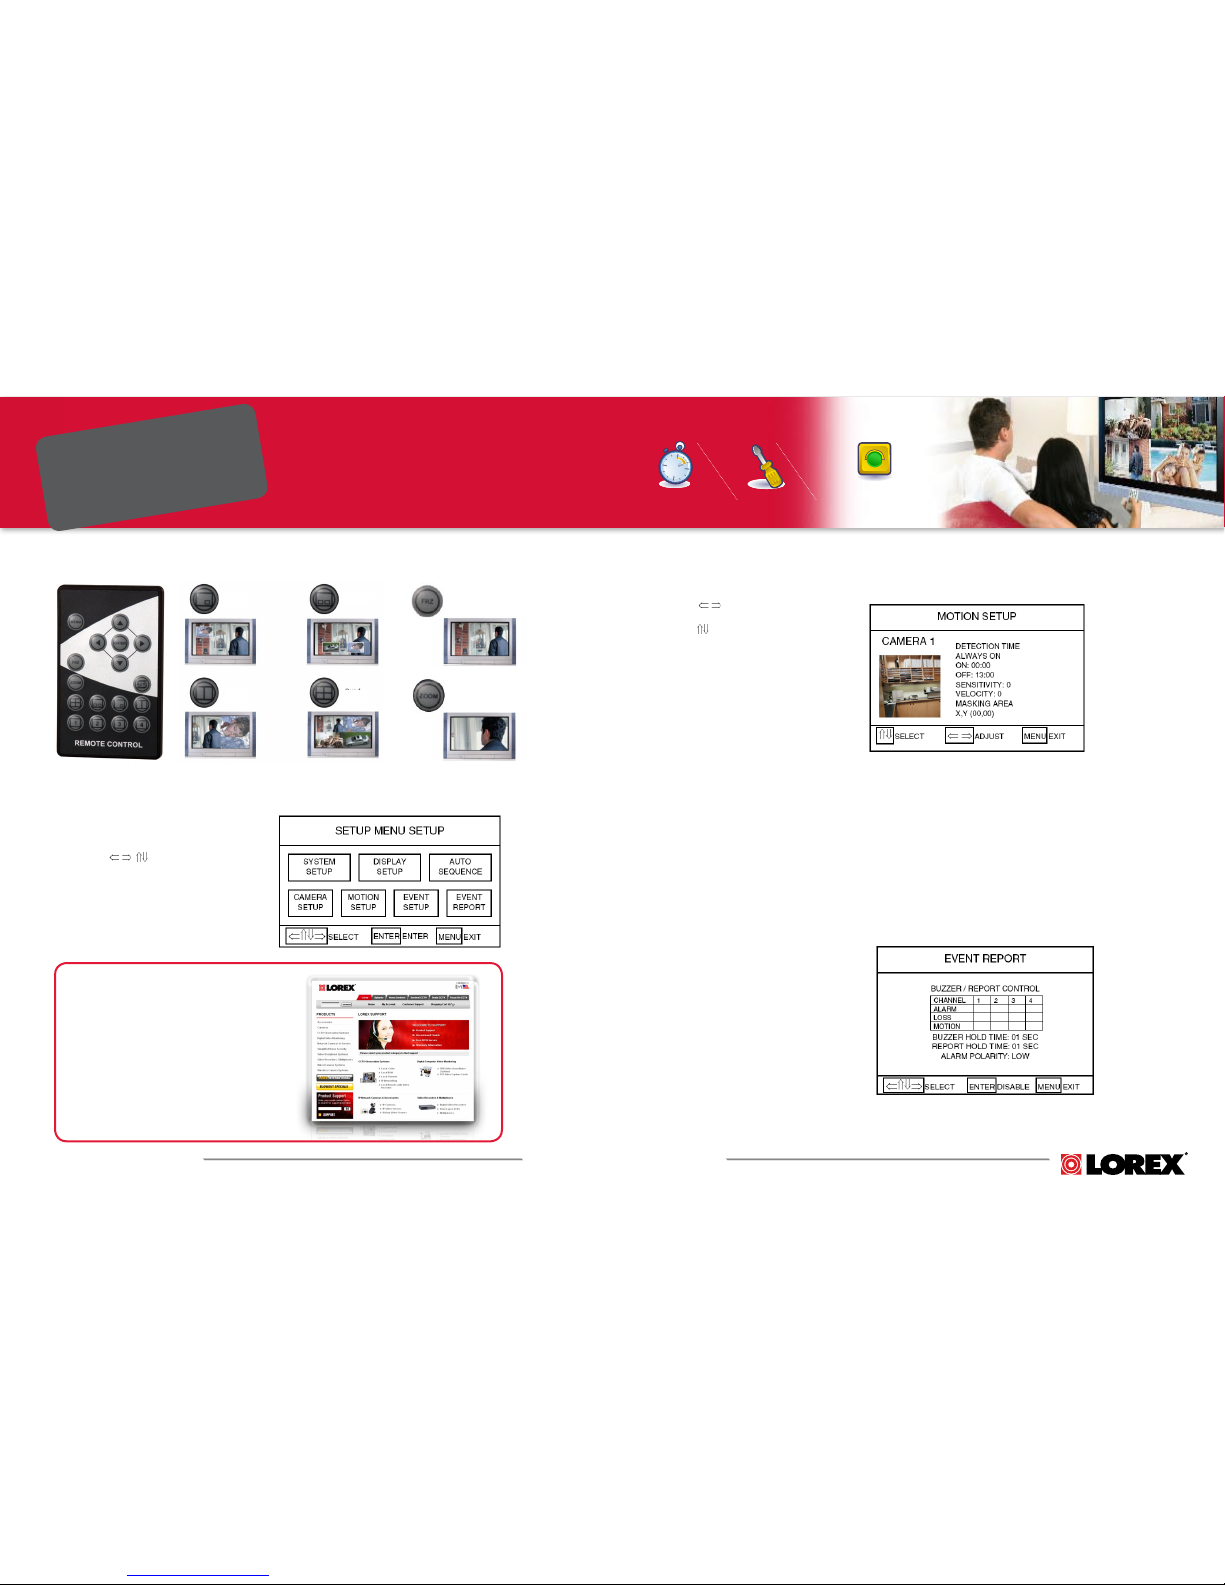
C: Access the Event Setup Menu
• Use the arrow keys to navigate
• Press ENTER to turn on ALARM EVENT
REPORTING for each camera detecting
Motion.
• Press ENTER to turn on MOTION EVENT
REPORTING for each camera detecting
Motion.
• When Motion is detected, the SHS
system will switch to the Camera, and an
audible alarm will sound.
Event Setup
Menu Set-up
A: Access the Menu System
• Press the MENU button for 3 seconds to
enter Menu Mode.
• Press the buttons to navigate
within the Menu and choose the desired
selection.
• Press the ENTER button to accept the
selection.
• Press the MENU button to Exit the Menu
Setup.
Full Function Remote Control with Multiple Viewing Modes
• Use the arrows to move between
cameras.
• Use the arrows to move between
Menu Settings.
• Set the Motion Detection Time as
desired (Always ON, OFF or for a
specific timeframe).
• Set the Sensitivity (amount of motion
needed to trigger an alarm) and the
Velocity (speed of motion needed to
trigger an alarm).
• Set the Masking Area:
· Use the arrow keys to navigate
through grid.
· Press the ENTER button to select or
deselect a square on the grid.
· Areas set to detect motion are not
shaded. Masked areas in blue do not
detect motion.
· Each area (grid square) must be
selected individually.
• Press the MENU button to Exit. All
settings will be saved.
Motion Setup
B: Enter the Motion Setup Menu
PIP
Dual PIP
Split
Quad
Freeze
Zoom
SHS-4QM SERIES
QUICK SET-UP GUIDE
STEP 2
MENU, MOTION SENSING
& EVENT SET-UP
 Loading...