

Page 1
ACCESSORY 2.4 GHz 4 CHANNEL COLOR
WIRELESS CAMERA SYSTEM
MODEL SG6217 - QUICK SET UP GUIDE
1. UNPACK SYSTEM CONTENTS FROM THE
GIFTBOX
• Wireless Color Camera (with battery compartment)
• Power Adapter
• Metal Mounting Bracket and Screws
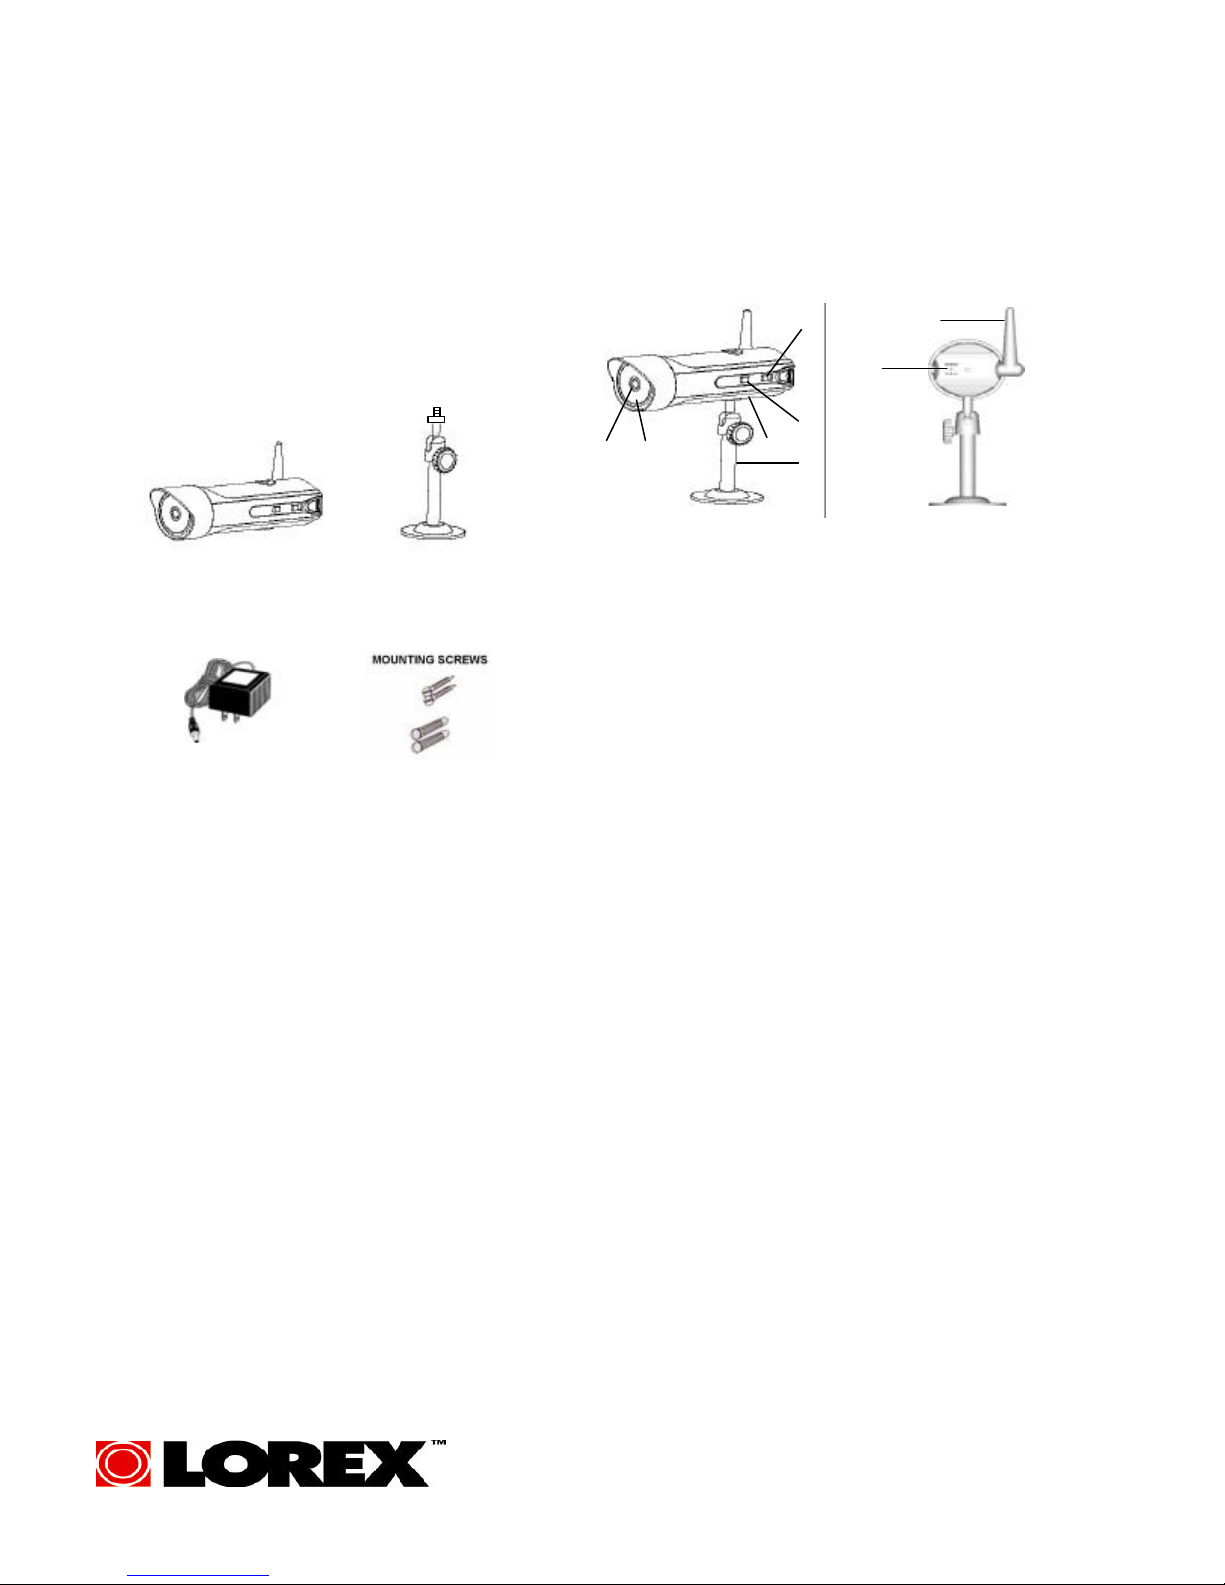
WIRELESS COLOR CAMERA
POWER ADAPTER
MOUNTING BRACKET
2. CAMERA CONTROLS & FUNCTIONS
FRONT/ SIDE VIEW REAR VIEW
3
4
2
1
1. Microphone – Built-in condenser microphone provides listen-in audio
2. Lens – Color CMOS Image Sensor
3. Channel Selector Switch – Slide switch for channels 1-4
4. ON/OFF Power Switch – Controls power to the camera. Note: Please
ensure that you set the switch to the OFF position before plugging the
AC adapter into the unit
5. Battery Compartment – Optional 4 “AA” batteries (not included) can
be used to power the camera
6. Bracket – Metal bracket connects to camera for mounting to walls,
ceilings or table
7. DC IN Jack – Connects to the 9V DC (500mA) adapter.
8. 2.4GHz Antenna – High gain dipole antenna sends audio and video
signals to the receiver
5
6
capability from camera to TV
8
7
3. WIRELESS CAMERA – INSTALLATION
1. Attach the stand base to the wall or ceiling where you want to install the camera. Locate a wall stud or ceiling
joist and secure bracket using the three supplied screws.
2. Attach the camera to the stand and firmly tighten the swivel..
3. Connect the supplied 9V 500mA DC adapter to the DC IN jack at the rear of the camera and plug it into an electrical outlet.
Your wireless camera has both AC or battery option. When usi ng the AC option with rechargeable batteries, your camera will
automatically switch to back up battery feature during a power outage providing you with uninterrupted power to the camera. The
battery option also provides you the flexibility to move the camera from room to room.
WIRELESS CAMERA - AC OPTION ONLY
1. Ensure the power switch on the camera is turned OFF.
2. Connect one end of the power supply to the DC IN jack located at the back of the camera. Plug the
other end into an electrical outlet
WIRELESS CAMERA - USING BATTERIES
1. Ensure the power switch on the camera is turned OFF.
2. Carefully slide open the battery compartment (bottom of camera)
3. Insert 4 alkaline ‘AA’ batteries (not included) into the camera battery compartment. Close compartment. WARNING: TO
PREVENT INJURY AND/OR DAMAGE TO THE UNIT, ENSURE THE BATTERIES ARE ALIGNED PROPERLY AND BATTERY
TYPES ARE NOT MIXED..
4. Connect one end of the power supply to the DC IN Jack located at the back of the
camera. Plug the other end into an electrical outlet.
5. Turn camera “ON”
Page 2

ACCESSORY 2.4 GHz 4 CHANNEL COLOR
WIRELESS CAMERA SYSTEM
MODEL SG6217 - QUICK SET UP GUIDE
4. OPERATION
Set the accessory wireless camera to a different channel than the other wireless cameras that are already connected.
Note: For optimum reception, for a clear signal, you may need to adjust the antenna . If there’s still interference, then
change the channel on both the receiver and camera, between 1-4.
Please refer to the Owner’s Manual for instructions on setting the Dwell Time and Auto Scanning features
5. WIRELESS CAMERA - SPECIFICATIONS
Image sensor
Lens
Scanning system
Scanning frequency
Sync. system
Resolution
Min. illuminations
Video Output
Gamma characteristics
Auto Iris
Microphone
Transmitting frequency
Modulation
RF out level
Video Output level
Antenna
Battery Option
Operating temperature
Power source
Dimensions
Weight
Because our products are subject to continuous improvement, SVII and its subsidiaries reserve the right to modify
product design and specifications without notice and without incurring any obligation. E&OE
Color CMOS
3.6mm
2:1 interlace
15.734 KHz(H) 59.94Hz (V)
Internal Negative synchronization
380 Lines
2 Lux @ F2.0
1.0Vp-p/75 Ohm
r=0.45
Electrical Auto Iris
Shutter sensitivity :1/60-1/6,000
Electrronic Condenser
2.4 GHz-2.4835 GHz (4Ch)
FM
90dBu/V, 3m
1.0Vp-p/75 Ohm
Dipole
4 “AA” batteries, not included
-14 º to + 122º F (-10ºC to + 50 ºC)
9V DC 500mA Adapter
6.2”(Length) x 2.2” (Diameter)
136 grams or 4.8 oz
FOR MORE INFORMATION
www.strategicvista.com
 Loading...