

Page 1
ACCESSORY 2.4 GHz 4 CHANNEL B&W
WIRELESS CAMERA SYSTEM
MODEL SG6110X - QUICK SET UP GUIDE
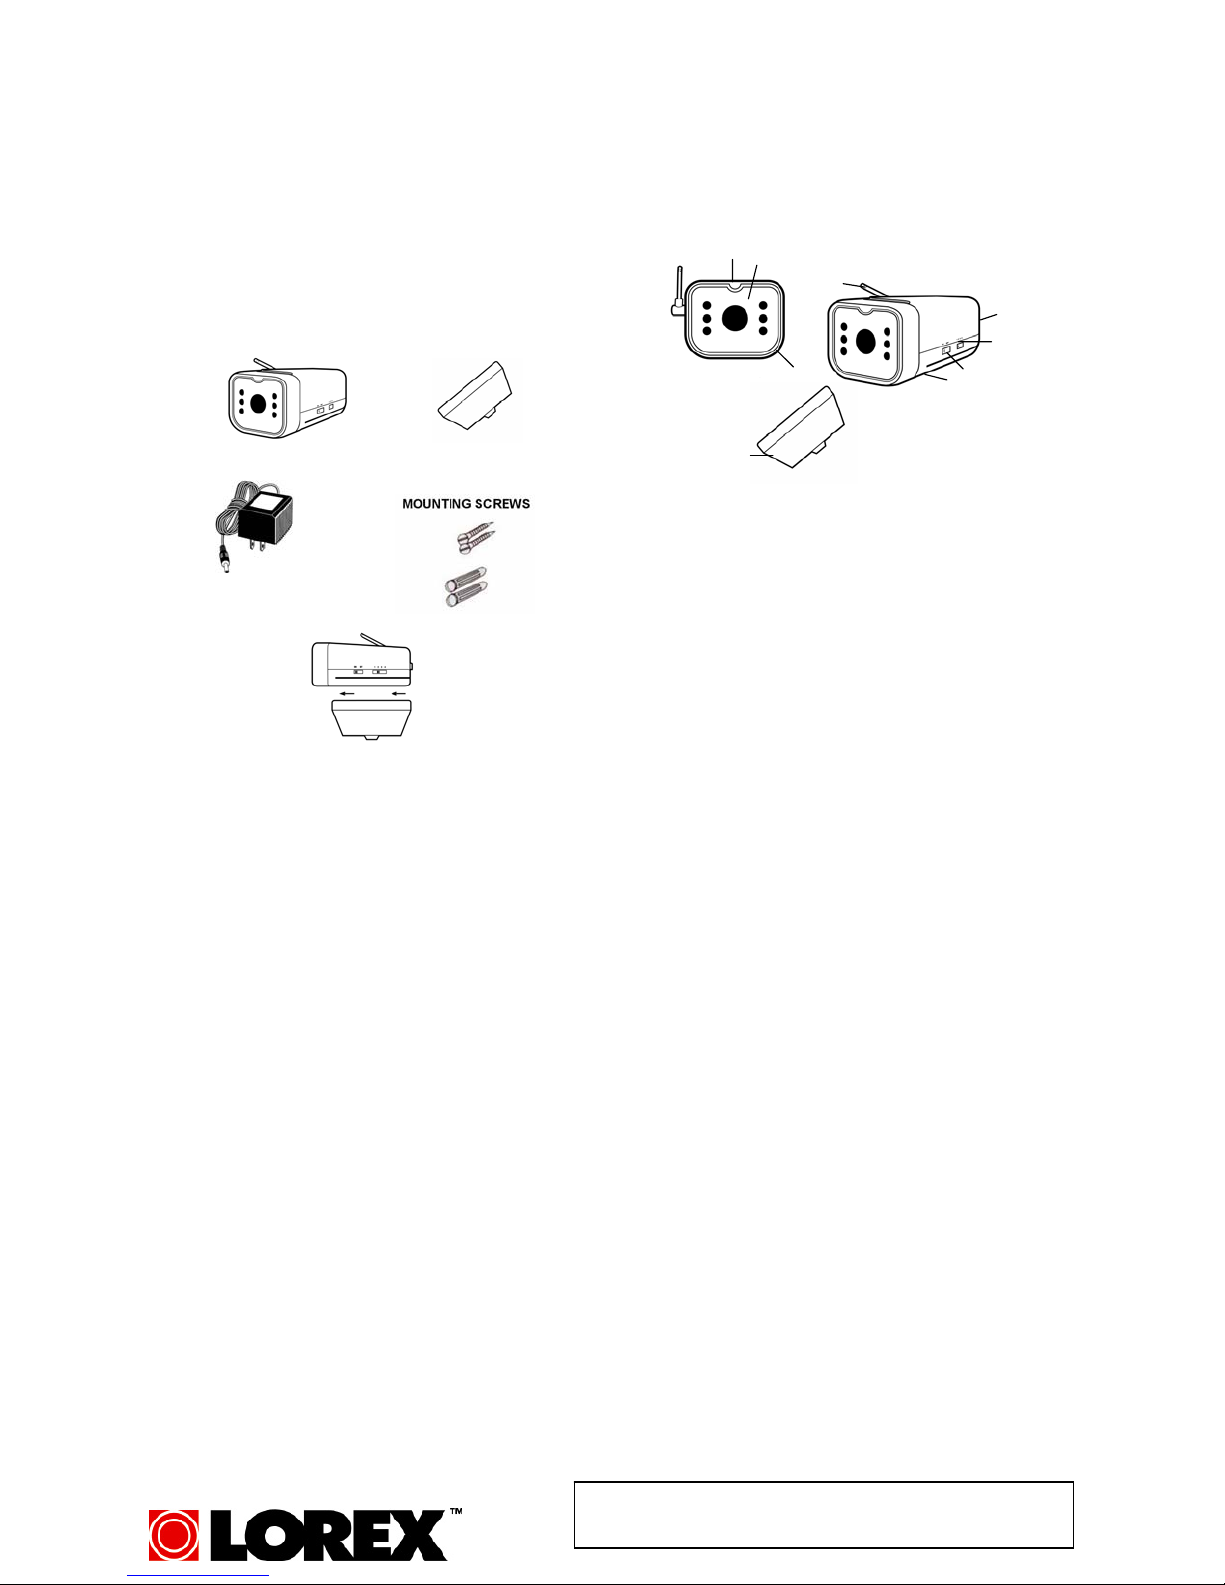
1. UNPACK SYSTEM CONTENTS FROM THE
GIFTBOX
• Wireless B&W Camera
• Battery Compartment
• Power Adapter
• Metal Mounting Bracket and Screws
WIRELESS B&W CAMERA
POWER ADAPTER
WIRELESS CAMERA – BATTERY OPTION
BATTERY COMPARTMENT
SLIDE IN
3. WIRELESS CAMERA – INSTALLATION
2. CAMERA CONTROLS & FUNCTIONS
1
SIDE VIEW
4
6
6. STAND MOUNTING SOCKET
Reinforcement lock for camera stand.
7. CHANNEL SELECTOR SWITCH
Slide switch for the channel 1-4
selection.
8. ON/OFF POWER SWITCH
Controls power to the camera. Note:
Please ensure you set the switch to the
OFF position before plugging the
AC adapter into the unit.
9. DC IN JACK
Plug the 12V(500mA) AC Adapter in
here.
FRONT VIEW
1. LENS
B&W
2. MICROPHONE
Built-in condenser microphone provides
audio capability from camera to monitor
television
3. 6 INFRA RED LED’s - Enhances
picture quality in low light conditions.
(available in B&W system only)
4. 2.4 GHz ANTENNA
High gain directional dipole antenna
sends Audio and Video signals to the
monitor.
5. BATTERY COMPARTMENT
Provides 4-5 hours of power
to camera. Requires 8 rechargeable
NiCd/NiMh batteries, or 8 1.5V alkaline
batteries
3
2
5
9
7
8
1. Attach the stand base to the wall or ceiling where you want to instal l the camera. Locate a wall stud or ceiling joist and secure
bracket using the three sup plied screws.
2. Attach the camera to the stan d and firmly tighten the swivel..
3. Attach the camera with the stand to the stand base and firmly tighten the joint knob on the stand base.
4. Connect the supplied 12V 500mA DC adapter to the DC IN jack at the rear of the camera and plug it into the electrical outlet.
Your wireless camera has both AC or battery option. When using the AC option with rechargeable batteries, your camera will
automatically switch to back up battery feature during a power outa ge providing you with uninterru pted power to the camera. The
battery option also provides you the fle xibility to move the camera from room to room.
WIRELESS CAMERA - AC OPTION ONLY
1. Ensure the power switch on the camera is turned OFF.
2. Connect one end of the power supply to the DC IN jack located at the back of the camera. Plug the other end into an electrical outlet
WIRELESS CAMERA - USING RECHARGEABLE BATTERIES
1. Insert 8 rechargeable ‘AA’ batteries (not included) into the camera battery compartment. WARNING: TO PREVENT INJURY
AND/OR DAMAGE TO THE UNIT, ENSURE THE BATTERIES ARE ALIGNED PROPERLY AND BATTERY TYPES ARE NOT
MIXED.
2. Ensure the slide switch labeled Recharge/Alkaline is set to the ‘Rechargeable’ setting.
3. Carefully slide the batter compartment into the camera
4. Ensure the power switch on the camera is turned OFF.
5. Connect one end of the power supply to the DC IN Jack located at the back of the
camera. Plug the other end into an electrical outlet.
WIRELESS CAMERA - USING ALKALINE BATTERIES
1. Insert 8 alkaline ‘AA’ batteries (not included) into the camera battery compartment. WARNING: TO PREVENT INJURY AND /OR
DAMAGE TO THE UNIT, ENSURE THE BATTERIES ARE ALIGNED PROPERLY AND BATTERY TYPES ARE NOT
MIXED
2. Ensure the slide switch labeled Rechargeable/Alkaline is set to the ‘Alkaline’setting.
3. Carefully slide the battery compartment into the camera
4. Ensure the power switch on the camera is turned OFF.
5. Connect one end of the power supply to the DC IN Jack located at the back of the camera. Plug the other end into an electrical
outlet
This product broadcasts over public airwaves and its
video and audio signals may be intercepted without your
consent.
Page 2

ACCESSORY 2.4 GHz 4 CHANNEL B&W
WIRELESS CAMERA SYSTEM
MODEL SG6110X - QUICK SET UP GUIDE
4. WIRELESS CAMERA - SPECIFICATIO NS
Image sensor
Lens
Picture element
Scanning system
Battery Life (assume 1300mAH)
Current Consumption
Scanning frequency
Sync. system
Resolution
Min. illuminations
Video Output
Gamma characteristics
Auto Iris
Microphone
Transmitting frequency
Modulation
RF out level
Video Input level
Audio input level
Antenna
Oper. temperature
Power source
Dimensions
Weight
B&W CMOS
F2.0/f 3.7mm, 92°wide-angle lens
320X240 (B&W)
2:1 interlace
4-5 Hours (B&W)
230mA typ (with LED)-
15.734 KHz(H) 59.9Hz(V) ,EIA
Internal Synchronization
240 Lines (B&W)
0 Lux (B&W
1.0Vp-p/75 Ohm
r=0.45
Electrical Auto Iris
Shutter sensitivity :1/60-1/100,00 0
Condenser
2.4 GHz-2.4835 GHz
FM
90dBu/V, 3m
1.0Vp-p/75 Ohm
2.0Vp-p/600 Ohm
Dipole antenna
-14º to + 122º F or (-10ºC to + 50 ºC)
DC12V 500mA DC Adapter
7.3 (W) x4.7 (H) x 11(D) cm or
2.8’ (W) x 1.85’ (H) x 4.3’ (D)
118 grams or 3.79 Oz
Because our product is subject to continuous improvement, SVC reserves the right to modify product designs and specifications without notice and
without incurring any obligation. E&OE
FOR MORE INFORMATION
www.strategicvista.com
Head Office
300 Alden Road,
Markham, Ontario
Canada, L3R 4C1
Tel: (905) 946-8589
Fax: (905) 947-0138
Email: info@strategicvista.com
 Loading...