

Page 1
RW2S Quick Setup Guide - English - R1
b
1 x LOREX ROAD WARRIOR
1 x MOUNTING BRACKET WITH BUILT-IN
GPS ANTENNA
1 x MONITOR CABLE (VIDEO)
1 x CAR ADAPTER (CIGAR JACK)
1 x PANIC BUTTON EXTENSION CABLE
1 x SDHC MEMORY CARD
1 x SDHC MEMORY CARD READER
1 x DOUBLE SIDED ADHESIVE, ZIP TIES, ZIP
TIE ANCHORS
1 x ELECTRONIC INSTRUCTION MANUAL
(INSIDE CD)
1 x QUICK START GUIDE
1 x SOFTWARE CD
PACKAGE CONTENTS:
2 CAMERA MOBILE DIGITAL VIDEO RECORDER
Information in this documen t is su bject to change without notice. As our produc ts are subject to
continuous i mprovemen t, Lorex Technology INC. and o ur subsidi aries re serve th e right to modify
product design , sp ecificatio ns a nd pr ices, witho ut no tice and without incur ring any obligatio n.
E&OE © 2009 LOR EX. All r ights rese rved.
RW2S Road Warrior Series
Quick Setup Guide
under 30 minutesunder 15 minutes under 60 minutes
Hand Tools Hardware
Hi Speed
over 60 minutes
Skill Level
Time
under 30 minutesunder 15 minutes under 60 minutes
Hand Tools Hardware
Router
Hi Speed
over 60 minutes
Time: 20 Minutes
Hand Tools Skills - Easy
BAS IC I NST ALL AT ION G UI DE
BASIC SETUP
STEP 1
GETTING TO KNOW YOUR ROAD
WARRIOR
STEP 2
Skill Level
Time
under 30 minutesunder 15 minutes under 60 minutes
Hand Tools Hardware
Router
Hi Speed
over 60 minutes
Time: 20 Minutes
Skills - Easy
BAS IC I NST ALL AT ION G UI DE
Getting to Know Your Road Warrior
1
Congratulations! You have completed
STEP 1 & 2 successfully. Your Road
Warrior is now ready to use. Refer to the
owner’s manual to learn how to record,
playback, use the other features available
with this device.
under 30 minutesunder 15 minutes under 60 minutes
Hand Tools Hardware
Hi Speed
over 60 minutes
Skill Level
Time
under 30 minutesunder 15 minutes under 60 minutes
Hand Tools Hardware
Router
Hi Speed
over 60 minutes
Time: 20 Minutes
Hand Tools Skills - Easy
BAS IC I NST ALL AT ION G UI DE
BASIC SETUP
STEP 1
CONTINUED
It’s all on the Web
www.lorexcctv.com
For detailed setup
information, please
refer to your electronic
User’s Manual inside
the software CD. For
additional information,
please visit our website
www.lorexcctv.com
5
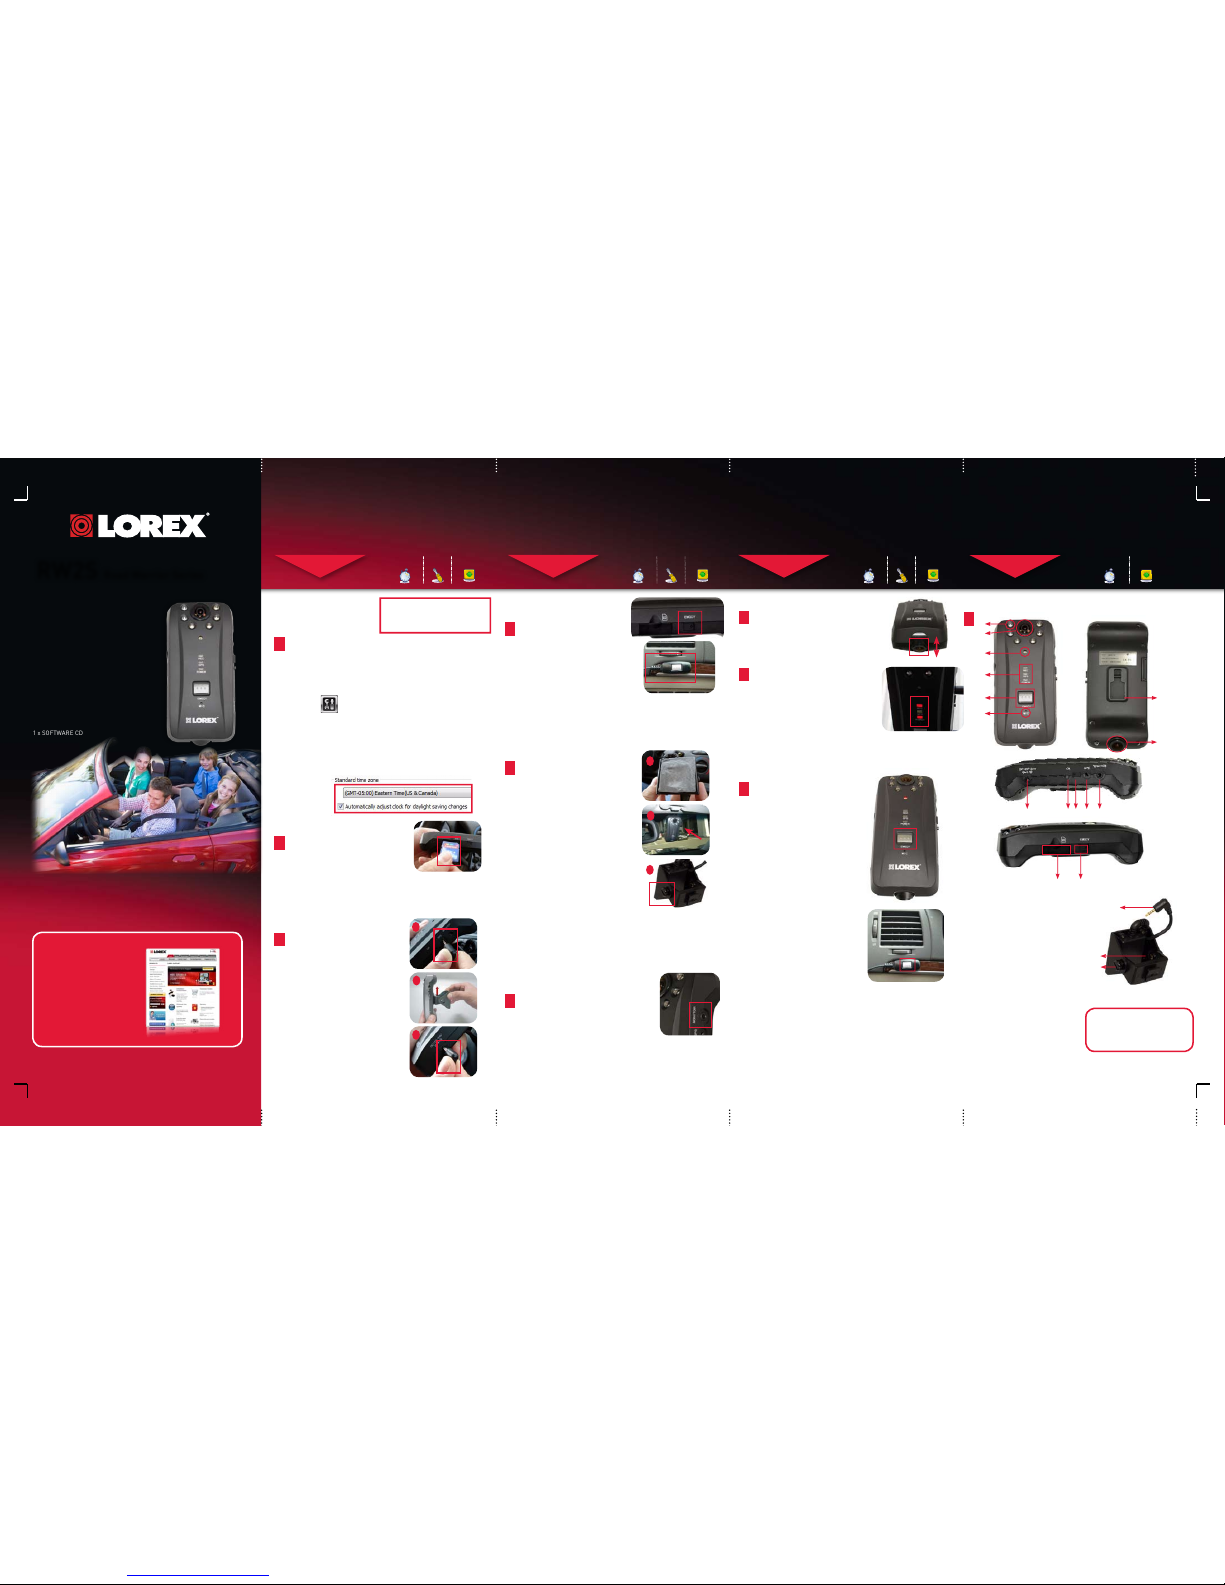
Mount the Road Warrior:
Mounting the Road Warrior at the correct
angle allows the unit to recieve optimal
GPS reception and recording angles.
a. Stick the double-sided adhesive
onto the base of the mounting
bracket.
b. Secure the unit to the right of
your rear-view mirror. Position
the unit so that it does not
interfere with your view.
c. Press and hold mounting base
firmly to the windshield for three
seconds to secure the unit in
place.
d. Adjust mounting bracket angle
by loosening the screws on the
side. Tighten screws to secure
position.
NOTE: The Road Warrior takes 30 seconds
to start up. Wait for the GPS LED to glow
solid green, followed by a beep before
driving. The REC and POWER LEDs glow
solid red.
CAUTION: During normal operation, the
REC, GPS and POWER LEDs will always
be on.
2
Insert the SDHC Memory Card:
a. Open the SD memory slot cover.
b. Insert the SDHC memory card
into the slot with the sticker face
up, and upright. Push memory
card firmly until you hear a click.
Memory card locks in place.
c. Close SD memory slot cover.
NOTE: The SDHC memory card
should slide smoothly into the
memory slot. The SDHC memory
card is designed to go in one way
only. Do not force in the card.
3
Install the Mounting Bracket:
a. Plug the minijack connector from the
mounting bracket into the side of the
Road Warrior labeled GPS.
b. Slide mounting bracket upwards on
the back of the device. Mounting
bracket locks in place.
c. Connect one end of the car adapter
to the Road Warrior and the other end
to the car cigar lighter port.
a
c
1. Infrared LEDs (IR LEDs)
2. In-car Camera
3. Daylight Sensor
4. REC LED, GPS LED, POWER LED
5. Emergency Button
6. Mic
7. DC12V Port
8. Channel Switch Button
9. Mini Serial Port
10. GPS Jack
11. Monitor OUT
12. SDHC Memory Slot
13. Emergency Button Port
14. Adjustable Driver-View camera
15. Rear Mounting Slot
16. Mini-jack connector
17. GPS Sensor
18. Mounting Bracket Screws
4
Installing the Panic Button
Extension Cable: (Optional)
1. Remove rubber cover on the left
side of the unit with a thin, rigid
object such as a paper clip
2. Insert the end of the panic button
extension into the EMGCY port.
3. Run the cable through the
dashboard so that it is concealed
and out of view.
4. Remove double-sided adhesive on
the back of the panic button, and
stick on a clean surface.
NOTE: The end of the
panic button extension only
connects one way into the
EMGCY port. Do not force in.
The panic button extension allows you
to record an event immediately. Place
the panic button extension where you
can easily reach.
Powering the Road Warrior:
6
Connecting a Monitor (Optional):
(not included)
1. Connect the mini-jack from the video cable
into the Monitor port on the side of the unit.
2. Connect the yellow RCA cable into the portable
display (not included).
3. Video displays on monitor. Adjust camera
angles as needed.
To change camera views:
1. Press the CH button on the side of the unit to
change between channel 1 and channel 2. This
switches camera views between the in-car
camera, and the Driver-View Camera.
8
Power ON your car. It takes about 30
seconds for the device to boot up. Once
the 3 LEDs on the device lights up and you
hear a short beep, the device is ready to
record.
NOTE: The 3 LEDs will always be seen lit
once the device powered up.
7
Camera Adjustment:
The Driver-View Camera adjusts to three
angles. Push camera up or down to lock in
place.
NOTE: UP position is recommended.
16
17
18
12 13
7 8 9 10 11
14
15
1
2
3
4
5
6
9
Using the Emergency Button:
The emergency button engages the
Road Warrior to record at maximum
quality, and marks the event as
“Emergency” when viewing the file in
the Lorex Viewer.
When you press the emergency button:
a. The video records at maximum of
30 FPS.
b. The video is tagged as an
“Emergency” event that you can
later search and categorize using
the Lorex Viewer.
under 30 minutesunder 15 minutes under 60 minutes
Hand Tools Hardware
Hi Speed
over 60 minutes
Skill Level
Time
under 30 minutesunder 15 minutes under 60 minutes
Hand Tools Hardware
Router
Hi Speed
over 60 minutes
Time: 20 Minutes
Hand Tools Skills - Easy
BAS IC I NST ALL AT ION G UI DE
BASIC SETUP
STEP 1
CONTINUED
Setting the Date & Time:
1
1. Insert the SDHC memory card into the memory card reader and plug
memory card reader into your computer’s USB port.
NOTE: Use the included memory card reader to ensure compatibility.
NOTE: The SDHC memory card smoothly slides all the way into the
memory card reader. The SDHC memory card goes in one way only. Do
not force in the card.
2. Click OK on the log in window prompt. The default login is: admin.
The default password is left blank.
3. Click the (Setup) button.The Setup window opens.
2. In the Systems tab, under Standard time zone, select your time zone.
Click OK. The Save As window appears.
3. Locate the SDHC memory card reader directory. Click Save.
NOTE: Make sure that you save the .CFG file onto your SDHC memory
card, and NOT onto your computer hard drive (i.e. C:\). All Road Warrior
Settings must save onto the SDHC memory card.
4. Eject memory card and insert into the Road Warrior. Your Road
Warrior automatically synchronizes the date with the satellite once
powered on.
(On your Computer)
To set the time and date, you must
first install the Lorex Viewer software
(included) to your computer. See Step
3 for Software Installation.
ATTENTION:
• Monitor is not includ ed.
• Computer (not inclu ded) is required for pl ayback and view ing the downloade d
video files.
• For detailed setup a nd software in formation, pleas e refer to the User’s
manual included in side the softwa re CD.
a
b
c
NOTE: In some vehicles, the cigar lighter
continues to provide power even when the
engine of the vehicle is turned off. In such
vehicles the Road Warrior will continue to
record the events .
Page 2
RW2S Quick Setup Guide - English - R1
USING THE LOREX VIEWER
STEP 4
It’s all on the Web
www.lorexcctv.com
For detailed setup
information, please
refer to your electronic
User’s Manual inside
the software CD. For
additional information,
please visit our website
www.lorexcctv.com
SOF TW AR E I NS TAL LAT IO N G UI DE
Time: 30 Minutes
Skills - IntermediateHardware
PC
Router
Hi Speed
over 60 minutes
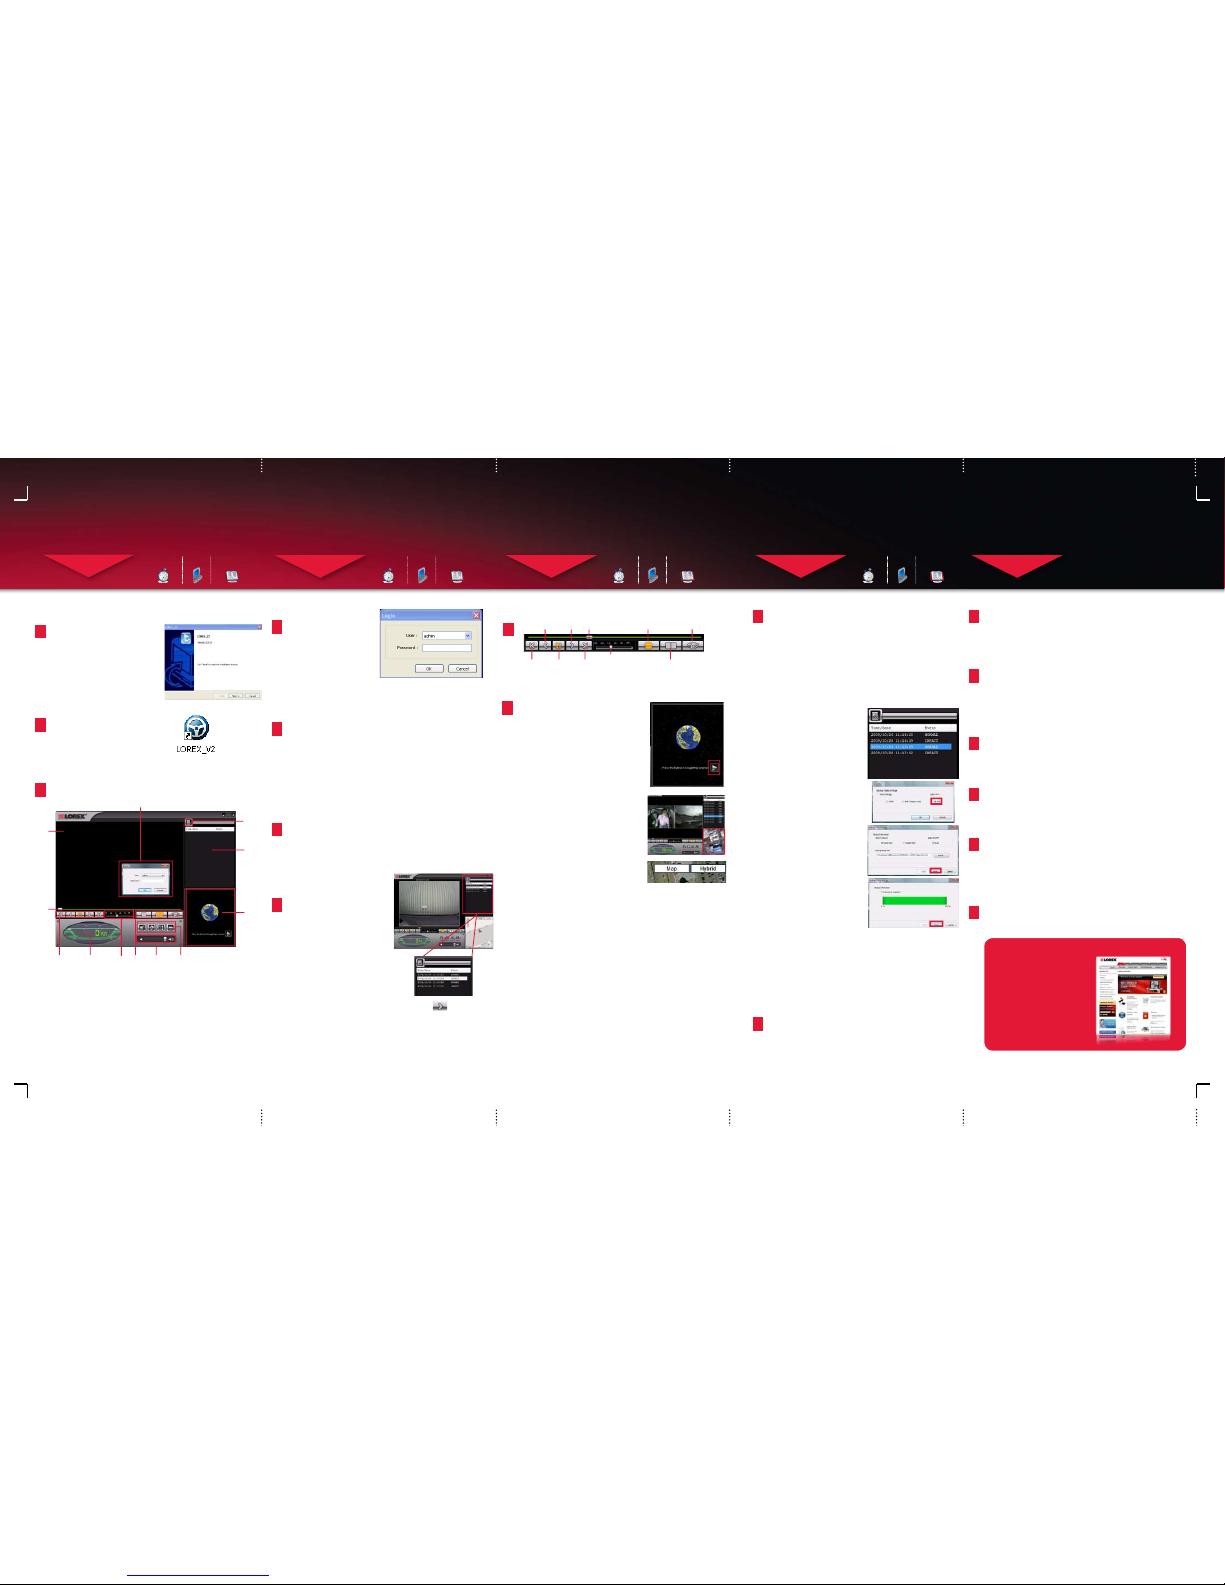
9
Enabling Google Maps View
The Lorex Viewer tracks the location of
your vehicle, and displays the tracking
information on Google Maps. This feature
allows you to pinpoint the location that an
event occoured.
To start Google Maps™ view:
Click on the play button on the Google
Maps window. Google Map connects,
and shows the current location of the
vehicle on the map.
NOTE: Google Maps requires an internet
connection to function.
You can manipulate how Google Maps
displays the map by clicking the Hybrid
or Map button.
1
Converting files into AVI format
You can convert your video files into .AVI format so that you
can archive the video. By default, the video files are encrypted
with proprietary compression that is NOT playable alone. The
video files by default, encrypts with a proprietary compression
that is NOT playable alone. To have your video files play as a
stand-alone file, you must compress the files using the Lorex
Viewer.
NOTE: To play back the video after you have converted it using the
Lorex Viewer, you need a third party video codec. Search online for
the “FFDSHOW CODEC”. Download and install FFDShow. Once you
have installed the codec, you are ready to view backed up files from
Lorex Viewer.
To compress your video file:
1. Click the video you wish to
backup from the Event
browser. You can only select
one event at a time.
2. Click the button to open the
backup button icon.
3. Click the radio button.
Under Select AVI, select AVI
and click OK.
4. The Backup-Data Settings
window opens.
5. Select the channel you wish
to back up under Select
Channel (Inside Cam or
Outside Cam).
6. Select the checkbox under
Audio ON/OFF to enable or
disable sound.
7. Click the browse button
under Backup-Data Path to
select the directory you wish
to save your file and then
click Save.
8. Click Next to backup and
compress your video. A
confirmation window
appears. Click Finish to
close the window.
STEP 4
CONTINUED
USING THE LOREX VIEWER
SOF TW AR E I NS TAL LAT IO N G UI DE
Time: 30 Minutes
Skills - IntermediateHardware
PC
Router
Hi Speed
over 60 minutes
2
How the Road Warrior Interprets Bumps and
Impacts
When your vehicle goes over a bump or recieves sudden
forces, the built-in sensor causes the REC LED on the unit to
flash for several seconds. This means the Road Warrior has
marked the event. When an event is marked, you can easily
categorize and find the particular moment when you
encountered the sudden bump or impact.
5
Viewing Recorded Video Files
The Lorex Viewer allows you to play, save,
and manage your recorded footage from
the Road Warrior memory card. Always
use the Lorex Viewer to play files recorded
from the Road Warrior.
Once you have recorded video files on your
Road Warrior, you can view them on the
Lorex Viewer.
Connect memory card to computer
6
1. Insert the SDHC memory card from the
Road Warrior into the memory card
reader.
2. Plug in the memory card reader into
your computer’s USB port.
Launch Lorex Viewer
7
1. Launch Lorex Viewer from the
desktop shortcut, or navigate to
Start>Programs>
Lorex_V2>Lorex_V2
2. Click the OK button to log in to
the viewer. By default, the user
name is “admin” (no quotes)
and the password field is left
blank.
3. Your video files on the memory
card appear in the Event Viewer
on the top-right corner of the
Lorex Viewer.
4. Click on the desired file in the
Event Viewer. Your video files
are categorized by Time/
Date or by Event type. Click on
Time/Date or Event to sort. For
example, if you want to sort
your videos by event type, click
Event in the Event Window.
4
Lorex Viewer Software Setup:
(On your Computer)
In the LOGIN screen, click
OK. By default, the LOGIN
name is admin. PASSWORD
field is blank.
NOTE: You can assign a
Password to the device by
clicking the Setup Menu and
adding a Password under
the User Settings tab.
(On your Computer)
(On your Computer)
(On your Computer)
5. Click the (Play) button
to start the video.
Using Video Controls
8
Rewind
Play
Timeline Slider
Picture in
Picture
Single-Channel
View
Step Backward
Single Frame
Pause
Step Forward
Single Frame
Speed Slider
Two Channel View
(On your Computer)
STEP 5
DID YOU KNOW
SOF TW AR E I NS TAL LAT IO N G UI DE
Time: 10 Minutes
Skills - IntermediateHardware
PC
Router
Hi Speed
over 60 minutes
LOREX VIEWER SOFTWARE
STEP 3
1
Insert the Lorex Viewer Software
CD into your computer’s CD ROM.
Click Next and follow the installation
screens to complete the Software
installation.
Install Software:
Close the CD Menu Screen. Lorex
Viewer icon will appear on your
desktop.
2
Lorex Viewer Software:
(On your Computer)
(On your Computer)
Double-click the Lorex Viewer software icon on your desktop
to run the program.
3
Run the Lorex Viewer Software:
(On your Computer)
SOF TW AR E I NS TAL LAT IO N G UI DE
Time: 30 Minutes
Skills - IntermediateHardware
PC
Router
Hi Speed
over 60 minutes
1
2
3
4
5
6 7 8 9
10
11
12
1. Main Viewer Window
2. Login Prompt
3. Video Slider
4. Video Controls
5. Vehicle Speed Display
6. Playback Speed Slider
7. Channel View Modes
8. Volume Slider
9. Viewer Settings
10. Google Maps Viewer
11. Event Window
12. Event Search Button
The Lorex Viewer allows you to
organize, view, and save your
video files. The Lorex Viewer also
allows you to change specific
recording parameters of your
Road Warrior.
STEP 6
TIPS
1
Back up your videos
Back up your videos regularly to external media such as blank
CDs or DVDs (not included). To reduce the risk of losing recorded
video on the Road Warrior, make an extra copy of all important
videos. All Road Warrior videos are stored in the data folder in the
SDHC memory card. Videos end in a .JDF extension.
2
Replacing your SDHC memory card
The SDHC memory card included with your Road Warrior is a
high-grade, Class-6 memory card. SDHC stands for Secure Digital
High Capacity, and provides extended memory capacity compared
to normal SD memory cards. Always replace damaged memory
cards with Class-6 SDHC memory cards. The maximum
supported size is 32 GB gigabytes.
3
Maintaining memory card health
Back up your files regularly, and format your SDHC memory card
monthly. This ensures that the memory card operates error-free.
After you format your SDHC memory card, you can restore your
user settings.
4
Viewing videos on your SDHC memory card
Always use the included SDHC memory card reader to view video
files on your computer. Should you lose or damage the included
memory card reader, replace it with a SDHC memory card reader
only.
5
Obtaining GPS signals
Always keep the GPS mounting bracket clear of obstructions.
The Road Warrior seeks GPS signals when it is powered on.
Depending on weather conditions and your environment, it may
take longer than usual for the GPS signal to lock in. If you are
inside a garage, you may have to move your vehicle outdoors
before the Road Warrior can detect a signal.
6
Preventing data loss on your SDHC memory card
Always power off your Road Warrior before removing the
SDHC memory card. Removing the SDHC memory card when
the Road Warrior is on may corrupt the files.
 Loading...