

Page 1
under 30 minutesunder 15 minutes under 60 minutes
Hand Tools Hardware
Router
Hi Speed
over 60 minutes
Skill Level
Time
under 30 minutesunder 15 minutes under 60 minutes
Hand Tools Hardware
Router
Hi Speed
over 60 minutes
Time
Tools
Skills - Easy
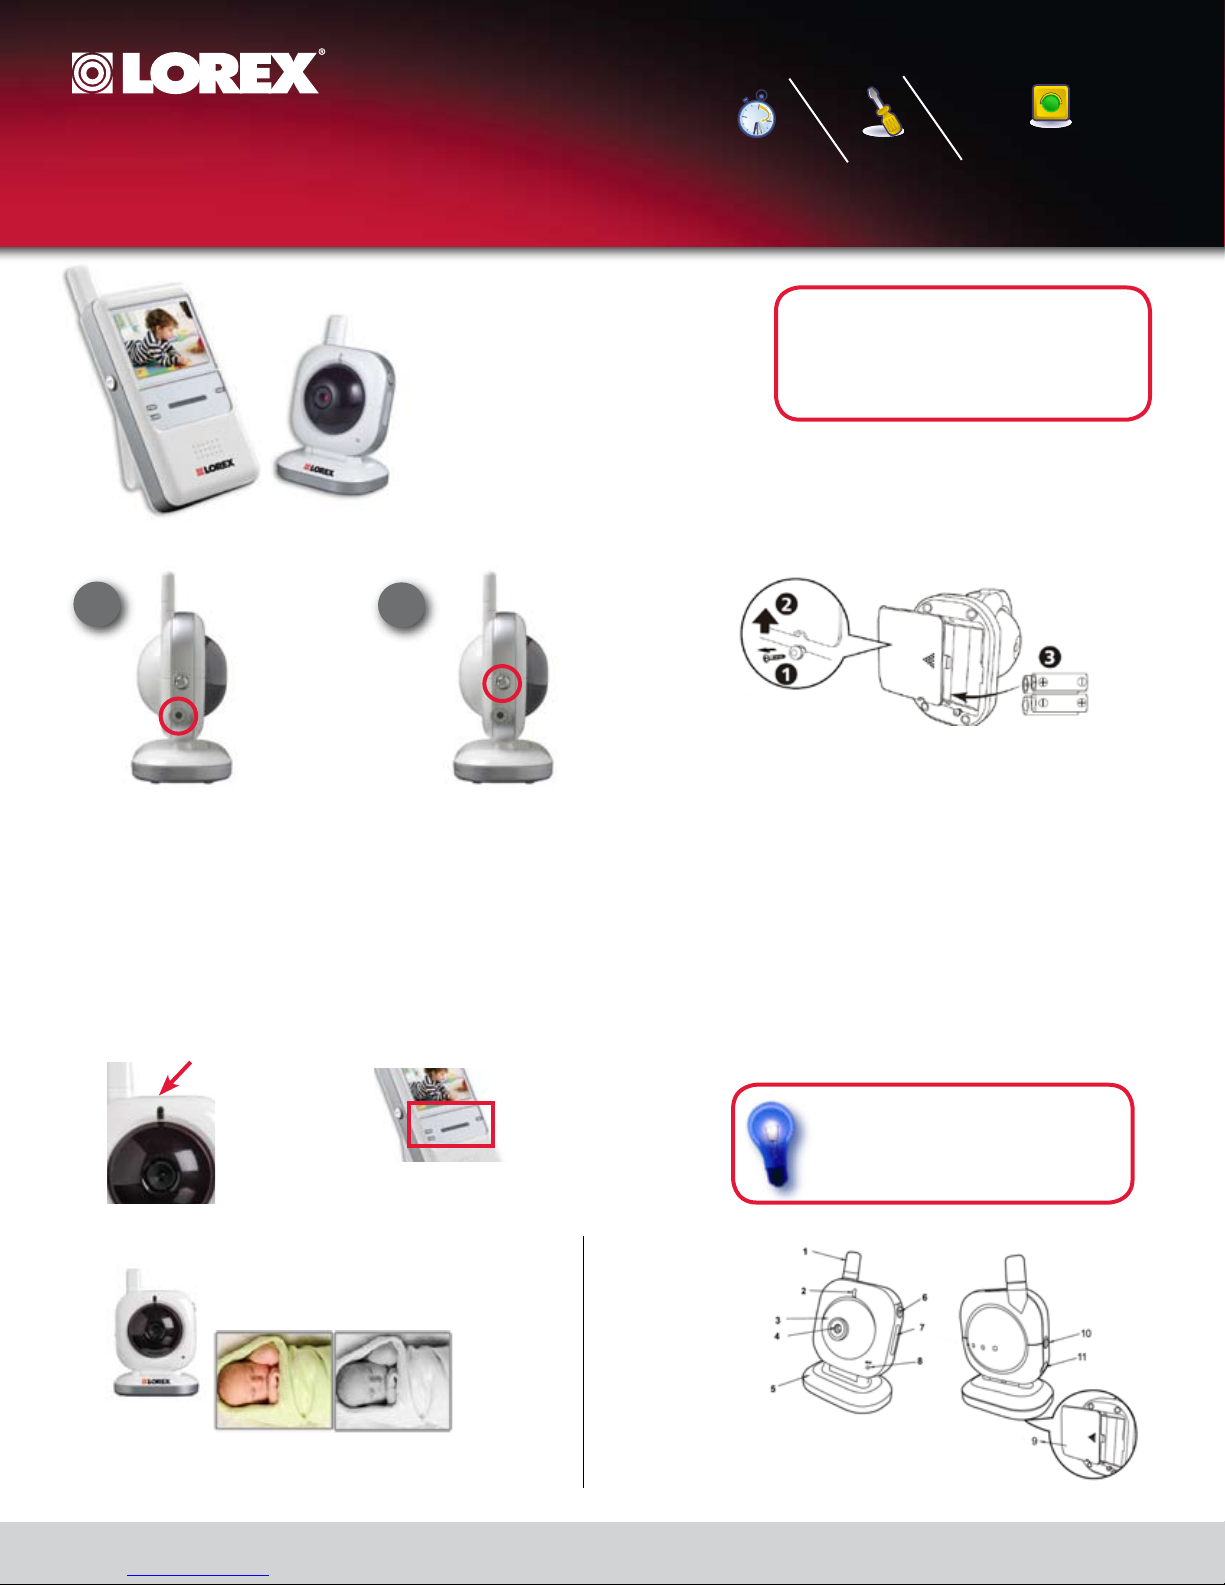
Portable Wireless Color Video
Monitor And Camera
LW2001 Quick Start Guide
Includes:
1 x Video Monitor with 2.4” LCD screen
2 x Power Adapters (for video monitor & camera)
1 x Wireless IR Night Vision Camera
1 x Rechargeable battery for video monitor
Step 1 - Wireless Camera Installation
1
2
Under 5 Minutes*
* Installation time may vary based on
application and camera cabling
Screw driver*
*only for optional battery
operated use of the camera
NOTE: AVOID INSTALLING IN A LOCATION WHICH
REQUIRES THE WIRELESS SIGNAL TO PASS
THROUGH CEMENT, CONCRETE AND METAL
STRUCTURES. THIS WILL REDUCE THE
TRANSMISSION RANGE.
Optional - Battery Operation
Plug the Camera power cable into the
socket on the side of the camera. Plug
the power adaptor into a wall outlet
or surge protector.
NOTE: Wireless cameras require a power source (either an electrical outlet or battery power) to
operate. Battery operation option is offered for convenience in case of temporary portable camera
use (i.e. watch the kids play in the back yard). To prevent interruptions in the image, we recommend
using the included power adapter whenever possible.
NOTE: POWER UP THE CAMERA BEFORE POWERING UP THE VIDEO MONITOR TO ENSURE
A PROPER CONNECTION.
How to use the Night Light
Night Vision
NOTE that the picture will turn black and white when the night vision feature
is activated because color cannot be reproduced in the dark.
Slide the ON/OFF switch to the ON
position. The LED on the camera
will light up (red).
Audio Level Indicator
Press the night light button,
the night light LEDs will
remain ON.
The camera has nine high-intensity LEDs for picking up clear
images in the dark. When the built-in photo sensor detects
low ambient light levels, the LEDs will automatically activate.
LED indicator lights display audio
level detected by the camera.
When the audio level increases an
increasing amount of lights light
up. This is perfect for situations
where surrounding noise (i.e.
running water makes hearing the
video monitor difficult)
Camera:
1. Antenna
2. Power indicator LED
3. Infrared LEDs
4. Lens
5. Supporting stand
6. Night-light button
7. Night-light
8. Microphone
9. Battery compartment
10. Power ON / OFF switch
11. Power adapter socket
The camera uses 4 AAA-Size batteries (not included)
LOADING THE BATTERIES
1. Loosen the screw on the bottom of the camera by using a
screw driver.
2. Open the battery compartment cover.
3. Insert 4 AAA-size batteries (follow the plus (+) and minus
(-) signs inside the battery compartment).
4. Close the battery compartment cover, and make sure it is
locked securely.
NOTE 1: When the battery power is sufficient, the light is
constantly red; when the battery is low, the LED light will
start blinking.
NOTE 2: Remove the batteries from the camera if you do not
plan to use it for a prolonged period of time.
NOTE 3: Do not mix old batteries with new ones.
Did you know?
You can move your camera around the house
or from one room to another with the use of
the included battery compartment.
LW2001 Quick Start Guide_EN_R2 - Page 1
Page 2
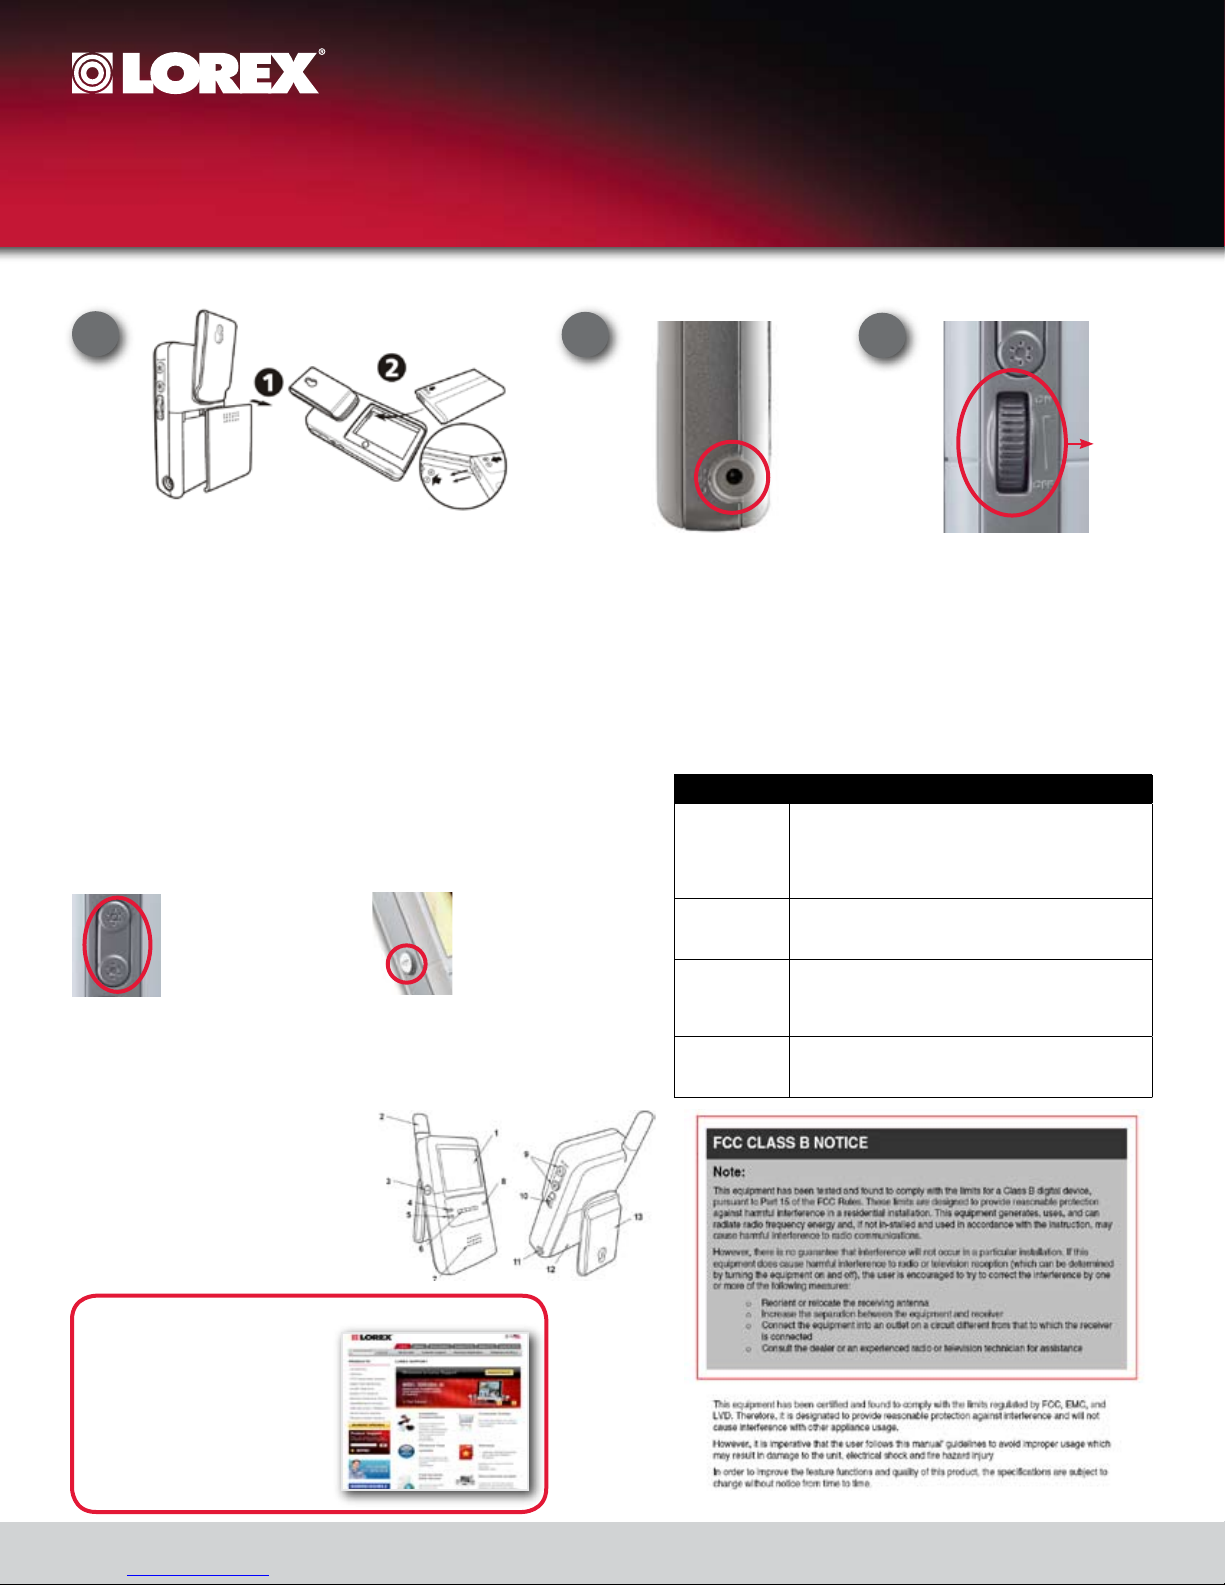
Portable Wireless Color Video
Monitor And Camera
LW2001 Quick Start Guide
Step 2 - Video Monitor Installation
1
The monitor uses a 3.7V 1000mAH (Li-ion) battery (included)
LOADING THE BATTERY
1. Open the battery compartment cover on the rear of the monitor by
pressing on it and sliding it downwards at the same time.
2. Insert the battery and make sure the polarity is correct by matching the
3 copper connectors at the top of the battery with the connectors
inside the compartment. The black strip in the centre of the battery
should face outwards.
3. Close the battery compartment cover, and make sure it is locked
securely.
4. Turn the monitor on. Adjust the Volume to a comfortable level.
NOTE 1: When battery power is sufficient, the light is constantly red;
when the battery is low, the red LED light will start blinking.
NOTE 2: Remove the battery from the monitor if you do not plan to use it
for a prolonged period of time.
How to adjust Screen Brightness
Adjust screen brightness by
pressing the top and bottom
button located above the click
wheel.
Receiver:
1. LCD screen
2. Antenna
3. VOX: Voice Operated Transmission button
4. Power indicator LED
5. Link indicator LED
6. Volume indicator LEDs
7. Speaker
8. VOX (Voice Operated Transmission) indicator LED
9. Brightness adjustment buttons
10. Power / Volume control click wheel
11. Power adapter socket
12. Battery compartment
13. Belt clip/tabletop stand (pivot for tabletop stand use)
How to use the VOX feature
1. Press the “VOX” button
on the side of the monitor.
This will turn off the screen
but the “VOX” indicator LED
will turn ON (blue).
2. When sound from the
camera reaches preset
level, the screen will turn on
automatically. It will turn off
again after 30 seconds if
no sound is detected.
2
3
Click Wheel
Plug the Video Monitor power cable into the
socket on the side of the monitor. Plug the
power adaptor into a wall outlet or surge
protector.
Turn the click wheel on the side of the
monitor upwards. When you hear a
click the monitor turns on. Continue to
turn up or down to adjust volume level.
NOTE 1: When charging starts, the “POWER” LED will appear blue . If charging is
finished (fully charged), the “POWER”LED light will turn red.
NOTE 2: When the camera and the monitor are connected, the “Link” LED will become
green; otherwise, the “Link” LED will become red and blink.
NOTE 3: “OUT OF RANGE” will be displayed on the LCD screen if the camera is out
of the range of the monitor
PROBLEM SOLUTION
There is no
picture from a
camera.
The picture is
dropping
There are
problems with
the audio.
The picture is
or has become
choppy
• Check all connections to the camera. Make sure the
adaptor is plugged in.
• Make sure that the cameras and receiver are both ON.
• Make sure that the camera is in range of the receiver.
• If using the battery power, try replacing the batteries
• Move the camera closer to the receiver.
• Try repositioning the camera, receiver or both to
improve the reception.
• Make sure that there is sound within range of the
camera Microphone
• If the unit emits a loud screeching noise (feedback),
move the camera or receiver farther apart.
• Try moving the camera closer to the receiver.
• Remove obstructions between the receiver and
camera.
It’s all on the W e b
ww w. lo r ex cc tv .c om
For additional information, please
visit our website
www.lorexcctv.com/support
©2009 Lorex Technology Inc.
As our product is subject to continuous improvement, Lorex Technology & subsidiaries reserve the right to
modify product design, specifications & prices without notice and without incurring any obligation. E&OE
LW2001 Quick Start Guide_EN_R1 - Page 2
 Loading...