

Page 1

USER’S GUIDE
LW1740 /
LW2740
SERIES
English / Français / Español
Page 2
Thank you for purchasing this product. Lorex is committed to providing our
customers with a high quality, reliable security solution.
This manual refers to the following models:
• LW1741
• LW1742
• LW1744
• LW2742
For the latest online manual, downloads and product updates, and to learn
about our complete line of accessory products, please visit our website at:
www.lorextechnology.com
WARNING
• Risk of electric shock. Do not open.
• To reduce the risk of electric shock, do not remove cover. No user serviceable parts
inside. Refer servicing to qualified service personnel.
• To prevent fire or shock hazard, do not expose this unit to rain or moisture.
• To prevent electric shock, match wide blade of the plug to the wide slot and fully insert.
CAUTION
• Test the video monitor before use. Become familiar with its functions.
• If you do not plan to use the unit for a prolonged period of time, disconnect the battery
or ensure you charge it at least once every 3 months.
• Never use extension cords with power adapters.
• Only use the chargers and power adapters provided. Do not use other chargers or
power adapters as this may damage the device and battery pack.
• Only insert batteries / battery pack of the same type.
• Do not cover the video monitor with a towel or blanket.
• Do not use this product in humid or wet places.
• Do not install the video monitor near a heat source.
• Do not touch the plug contacts with sharp or metal objects.
• It is highly recommended to connect the product to a surge protector to protect from
damage caused by electrical surges. It is also recommended to connect the product to
an uninterruptible power supply (UPS), which has an internal battery that will keep the
product running in the event of a power outage.
• Keep this user’s guide for future reference.
#LX400030; r. 1.0/17112/17628; en-US iv
Page 3

Table of contents
1 LW1740 / LW2740 Series Features.........................................1
2 Getting Started ...................................................................3
3 Installing the Camera(s).......................................................4
3.1 Installation Tips .......................................................... 4
3.2 Mounting Positions...................................................... 4
4 Installing the Receiver .........................................................7
4.1 Setting the Time .........................................................9
5 Camera Overview.............................................................. 10
6 LCD Receiver Overview...................................................... 11
6.1 Front Panel.............................................................. 11
6.2 Side Panel .............................................................. 12
6.3 Rear Panel .............................................................. 13
7 Using the System .............................................................. 14
7.1 Understanding the On-screen Display ........................... 14
7.2 Navigating Menu Screen ............................................ 16
7.3 Viewing Modes ........................................................ 16
7.3.1 Auto Sequence Viewing Mode .......................... 16
7.3.2 Quad Mode .................................................. 17
7.4 Digital Zoom............................................................ 18
7.5 Changing Audio Volume............................................. 18
8 Recording ........................................................................ 20
8.1 Format Memory........................................................ 20
8.2 Recording Mode Summary ......................................... 21
8.3 Scheduled Recording ................................................ 22
8.3.1 Creating a Recording Schedule......................... 23
8.3.2 Pausing Scheduled Recording .......................... 24
8.3.3 Modifying / Disabling a Recording
Schedule ......................................................24
8.3.4 Deleting a Recording Schedule ......................... 25
8.4 Manual Recording .................................................... 26
8.5 Taking a Snapshot .................................................... 26
8.6 Enabling / Disabling File Overwrite ............................... 27
8.7 Configure Recording Time for Motion Events .................. 28
8.8 Motion Detection Sensitivity ........................................ 29
8.9 Motion Detection Area ............................................... 30
8.10 Enabling / Disabling Alarm for Motion Events .................. 32
#LX400030; r. 1.0/17112/17628; en-US
v
Page 4

Table of contents
8.11 Maximum Recording Times ........................................ 34
9 Playback .......................................................................... 35
9.1 Video Playback ........................................................ 35
9.1.1 Playback Controls .......................................... 36
9.2 Viewing Snapshots ................................................... 37
9.3 Deleting Files........................................................... 38
9.4 Viewing Video Directly from the microSD Card ................ 39
9.4.1 Player Overview............................................. 41
10 Settings ........................................................................... 43
10.1 Camera Brightness ................................................... 43
10.2 Enabling / Disabling Date & Time Stamps ...................... 44
10.3 Changing Date & Time Format..................................... 45
10.4 Power Saving Mode .................................................. 46
10.5 Activating / De-activating Channels............................... 47
10.6 Changing Scan Interval for Auto Sequence
Viewing...................................................................49
10.7 Update Firmware...................................................... 50
10.8 Restore Default Settings ............................................ 51
11 Pairing Additional Cameras ................................................ 53
12 Technical Specifications .................................................... 56
12.1 General Specifications............................................... 56
12.2 Camera Specifications............................................... 56
12.3 Receiver Specifications.............................................. 57
12.4 Dimensions ............................................................. 58
12.4.1 LCD Receiver................................................ 58
12.4.2 Camera with Metal Stand................................. 58
13 Troubleshooting................................................................ 59
14 Notices ............................................................................ 61
14.1 FCC Notice ............................................................. 61
14.2 Industry Canada Notice ............................................. 62
14.3 Modification............................................................. 62
14.4 RoHS..................................................................... 62
#LX400030; r. 1.0/17112/17628; en-US vi
Page 5

LW1740 / LW2740 Series
Features
1
• 7” rechargeable wireless LCD monitor.
1
• Weather resistant wireless camera.
2
• Manual, motion, and schedule recording.
• Listen-in audio monitoring.
3
• Expandable up to 4 cameras.
• microSD memory card included; 32GB supported.
• Easy to use menu with icons.
• Simple installation. No video cables required.
• Video motion detection.
• Time and date stamped recordings for easy retrieval.
• Front panel feather touch controls.
• Motorized camera filter provides accurate color reproduction in all lighting
conditions.
• Night time viewing up to 65ft (20m) away in ambient night time lighting conditions and up to 45ft (14m) away in total darkness.
4
• View and record up to 4 cameras at the same time in quad screen.
• Secure wireless signal (FHSS).
• Up to 150ft (50m) indoor / 450ft (150m) outdoor wireless range.
5
• Record in real time video.
• 2x Digital Zoom.
#LX400030; r. 1.0/17112/17628; en-US
1
Page 6

LW1740 / LW2740 Series Features
1
Note
1. Up to 5 hours of portable wireless monitoring. For extended monitoring ensure the
wireless monitor is connected to a local power outlet.
2. Wireless cameras require a wired connection to power outlet. Not intended for direct
exposure to rain or snow. For outdoor applications, install under shelter protected
from the elements.
3. Audio recording without consent is illegal in certain jurisdictions. Lorex Corporation
assumes no liability for use of its products that does not conform with local laws.
4. Stated IR illumination ranges are based on ideal conditions in total darkness and typical outdoor night time ambient lighting. Actual range and image clarity depends on installation location, viewing area and light reflection / absorption.
5. Range up to 450ft (150m) outdoor and 150ft (50m) indoor based on line of sight. Actual range will vary depending on obstructions.
#LX400030; r. 1.0/17112/17628; en-US
2
Page 7

Getting Started
2
The system includes the following components:
Indoor / outdoor
wireless camera(s)*
7” rechargeable
LCD receiver
Power adapters for
receiver and cam-
era(s)*
Rechargeable Lith-
ium polymer battery
Wireless antenna
(s)
for camera(s)
(SMA)*
microSD memory
card
(pre-inserted into
receiver)
Mounting kit(s)*
Quick Start Guide
* Configuration may vary by model
Note
Camera configuration, memory card size, and the number of accessories may vary by
model. Please refer to your package for specific details. Check your package to confirm
that you have received the complete system.
#LX400030; r. 1.0/17112/17628; en-US
3
Page 8
Installing the Camera(s)
3
CAUTION
Cameras are suitable for outdoor installation, but are weather resistant, not weatherproof. Cameras are not intended for
direct exposure to rain or snow. For
outdoor applications, install under shelter
protected from the elements, such as beneath roof eaves. The diagram to the right
shows an example of an ideal location for
outdoor placement.
3.1 Installation Tips
• Before you install the camera, plan where and how it will be positioned,
and where you will route the cable that connects the camera to the power
adapter.
• Before starting permanent installation, check the camera image on the receiver when camera is positioned in the same place it will be permanently
installed.
• It is recommended to ensure a clear line-of-sight between the camera and
receiver and to limit the amount of obstructions, such as walls and tree
branches, between the camera and receiver. Walls made of heavy building
materials such as brick or concrete will significantly reduce signal range.
• If the signal will have to pass through a wall, placing the receiver or camera
next to a window will improve the signal strength.
• Do not install the camera pointing out of a window. The nighttime picture
will be unusable due to reflection from the night vision LED’s.
• The cameras are pre-paired so they work out of the box. Each camera has
a channel number sticker indicating what channel they are paired to. If you
have purchased additional cameras, you will need to pair them to the receiver, see 11 Pairing Additional Cameras, page 53.
3.2 Mounting Positions
You may mount your cameras on a wall or counter. See the images below for
recommended configurations of the camera stand and antenna.
#LX400030; r. 1.0/17112/17628; en-US
4
Page 9

Installing the Camera(s)
3
Wall Counter
To install the camera(s):
1. Use the included mounting screws to attach the camera stand(s) to the
mounting surface:
• Mark the positions of the screw holes on the mounting surface with the
base of the mounting stand.
• Drill holes and insert the drywall plugs (included) if installing on a drywall surface.
• Firmly attach the camera(s) to the mounting surface using the included
screws.
Note
If you run the power cable through the mounting surface, connect power before attaching the camera to the wall.
2. Attach the camera stand(s) and antenna(s) to the camera(s).
#LX400030; r. 1.0/17112/17628; en-US
5
Page 10
Installing the Camera(s)
3
3. Loosen the adjustment ring on the metal camera stand(s) and move the
camera to the desired position. Tighten the adjustment ring when finished,
holding the camera firmly in position.
4. Connect one end of the camera’s power adapter to the camera and the
other end to an electrical outlet or surge protector. Make sure the power
connector is fully inserted to avoid water getting in the plug.
Note
Power cables are only weather resistant when fully inserted at the connection point.
Power cables may not be submerged in water.
5. Remove the protective film from the front of the camera. If the film is not
removed, it will affect the quality of the picture.
#LX400030; r. 1.0/17112/17628; en-US
6
Page 11
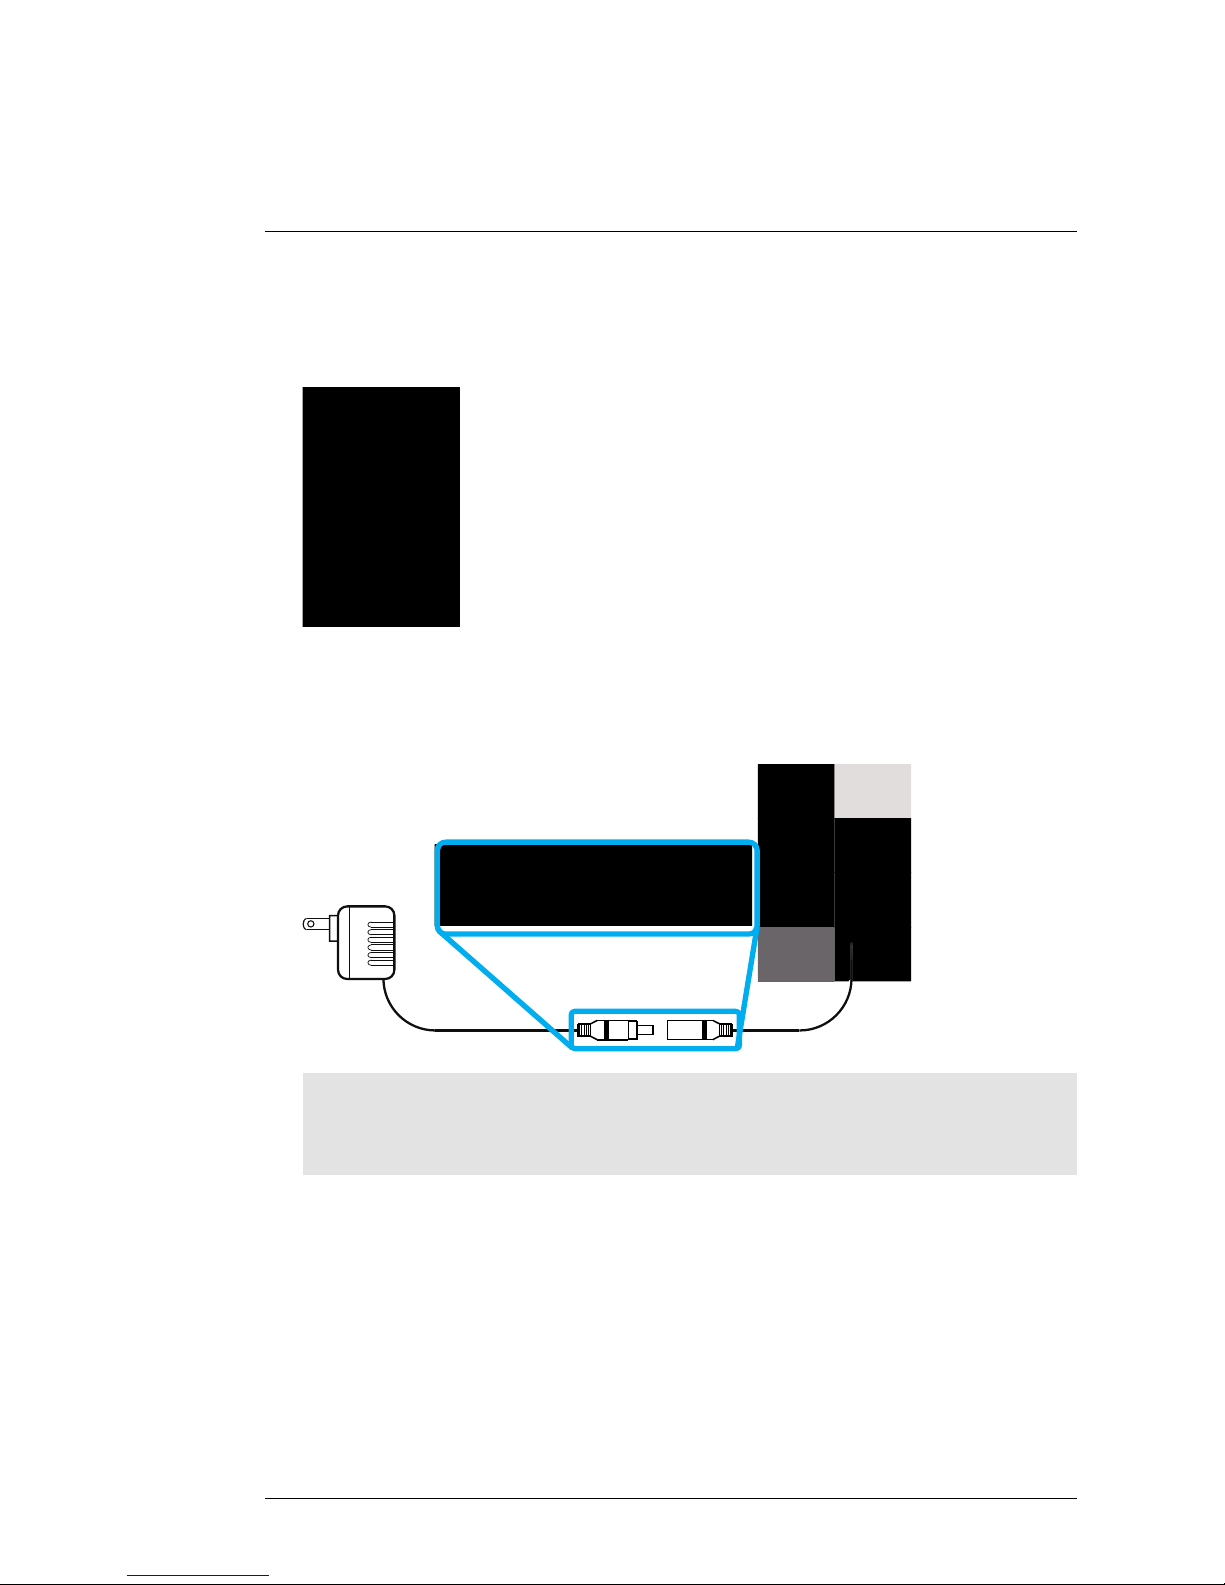
Installing the Receiver
4
1. Use a Phillips screwdriver (not included) to open the battery compartment
on the back panel.
2. Insert the included battery so the statement "THIS SIDE UP" is visible,
and the clear plastic tabs on the side of the battery face outwards. Replace the battery compartment cover.
THIS SIDE UP
CAUTION
If you do not plan to use the unit for a prolonged period of time, remove the battery or
ensure you charge it at least once every 3 months.
#LX400030; r. 1.0/17112/17628; en-US
7
Page 12
Installing the Receiver
4
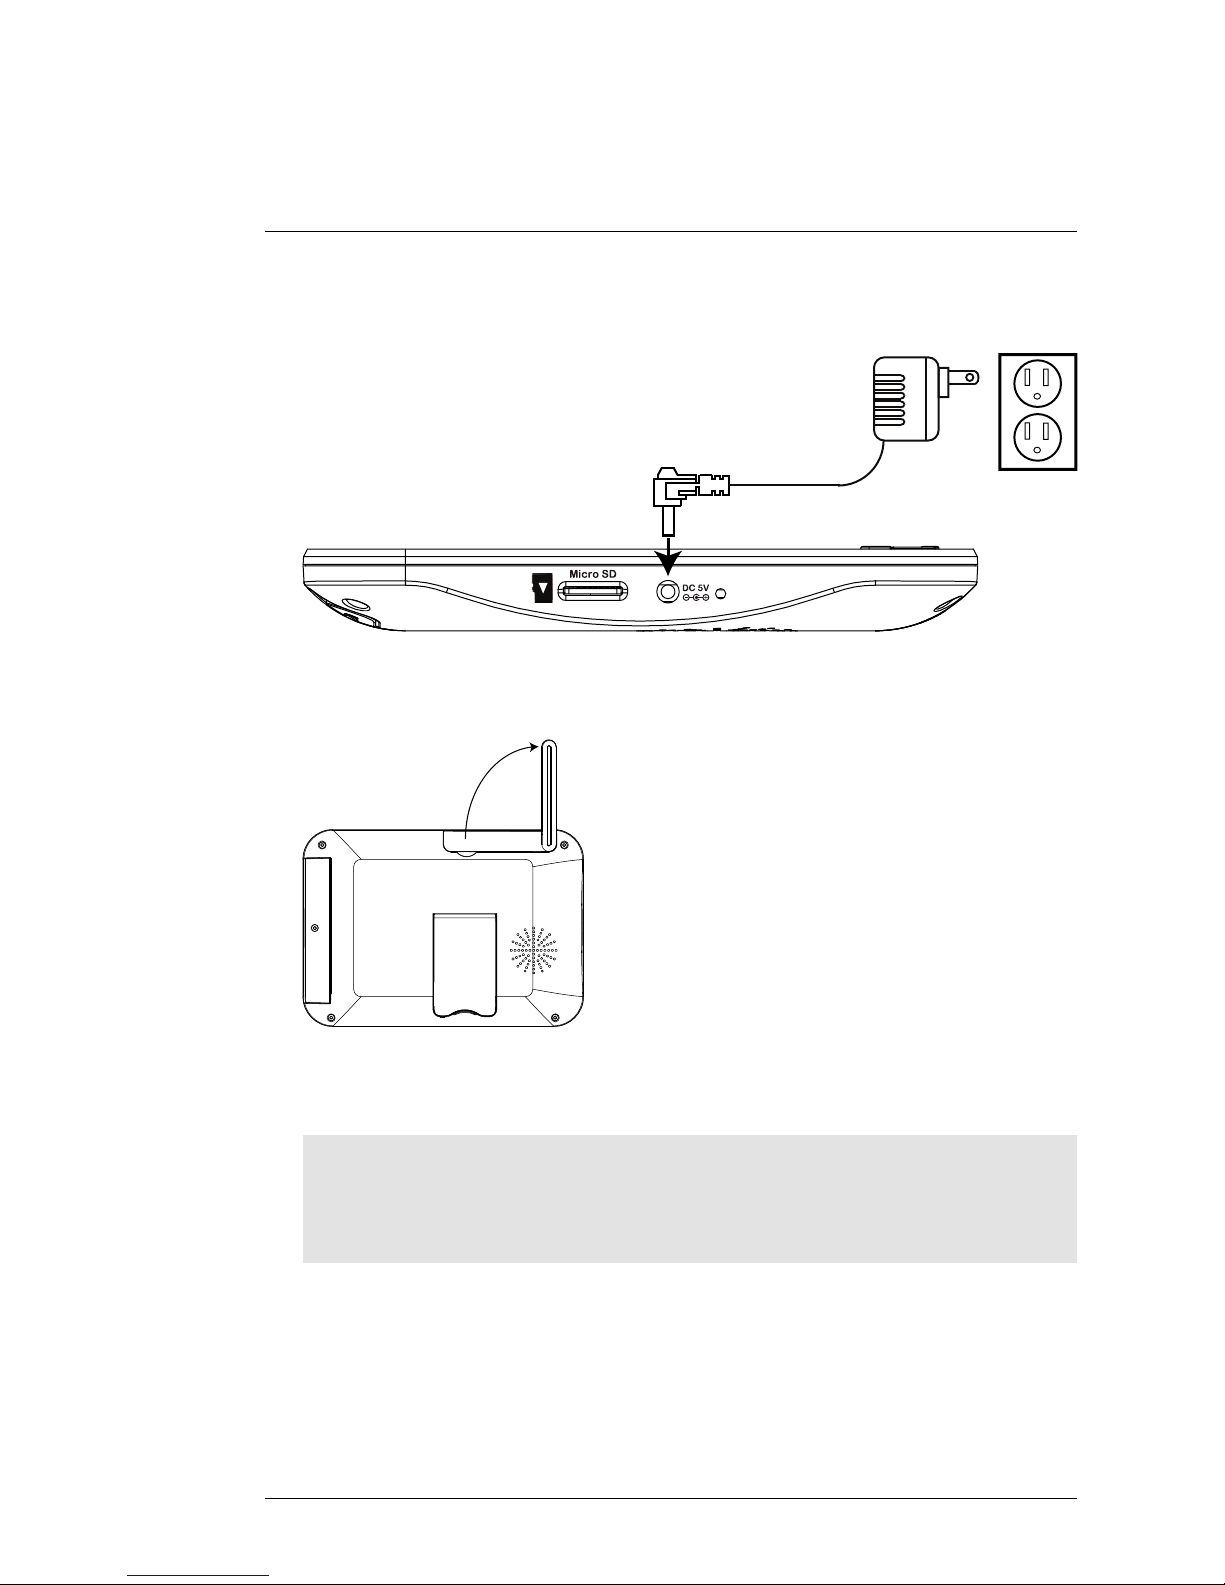
3. Connect the included power adapter to the receiver and to an electrical
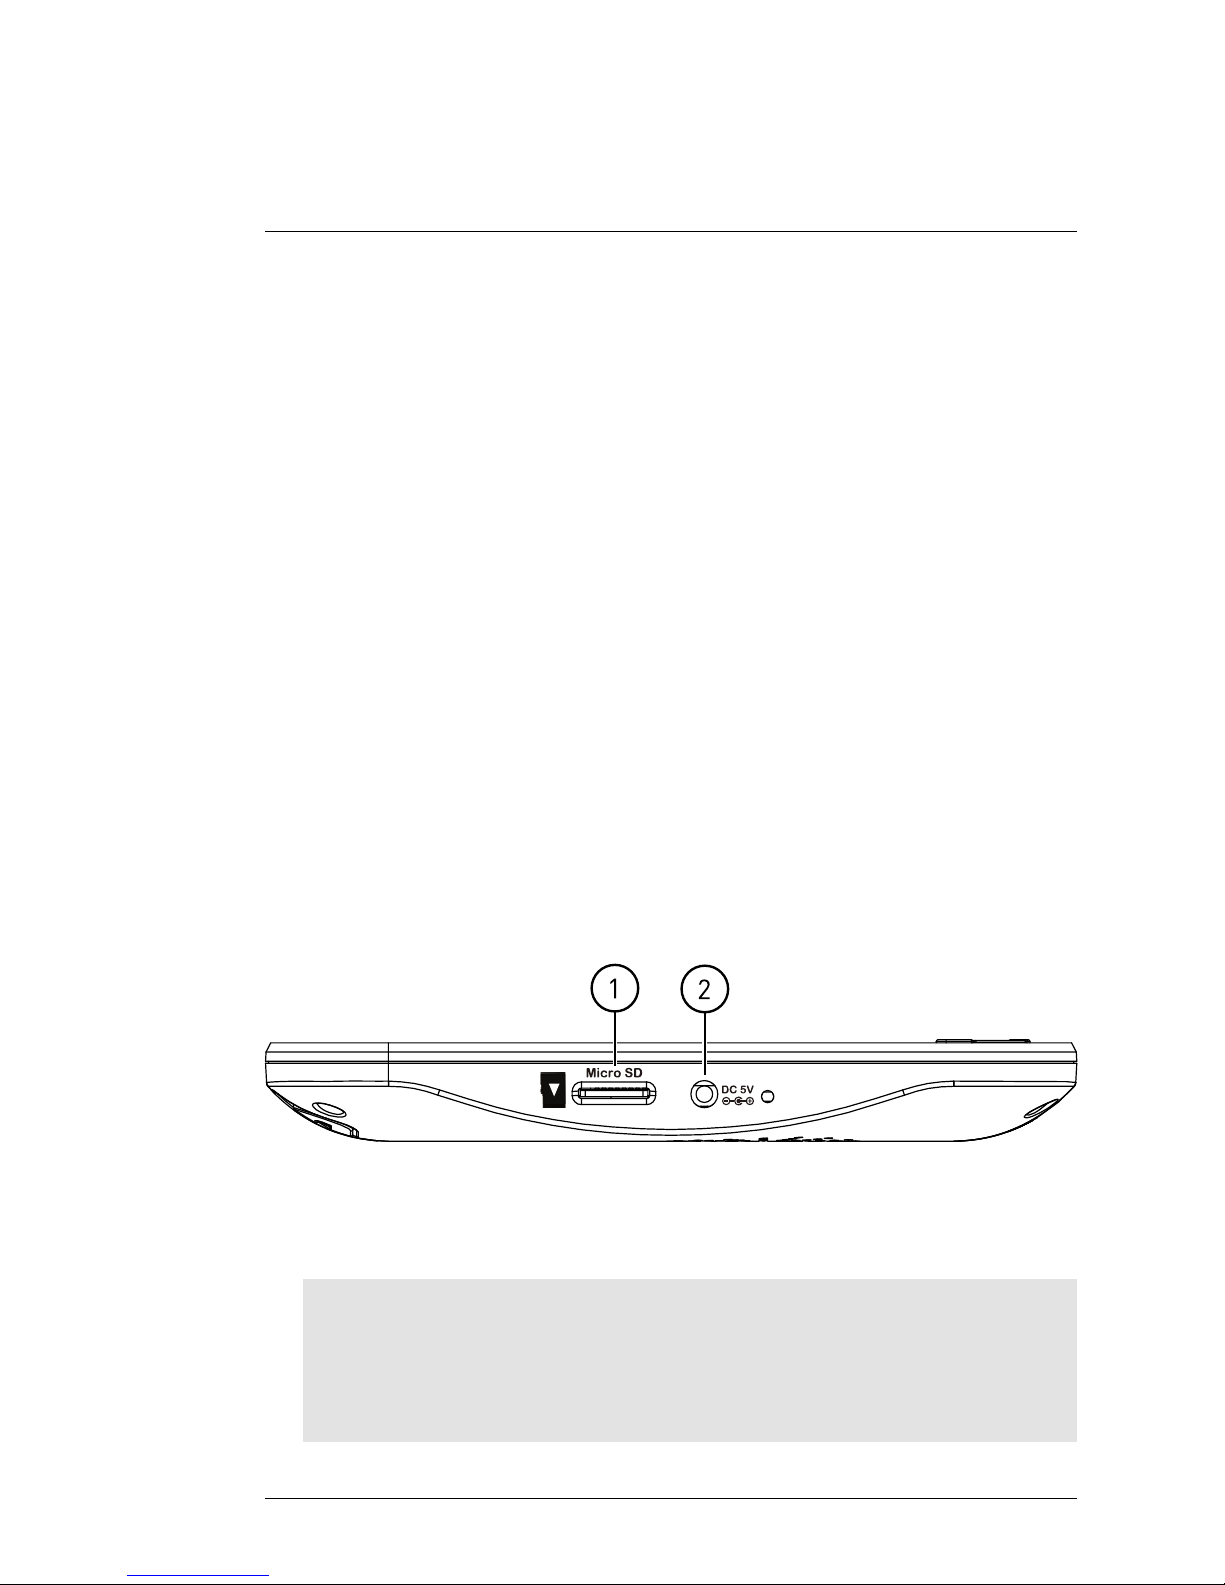
outlet.
Micr o SD
DC 5V
4. Charge the receiver overnight before using for the first time.
5. Pull up the antenna on the back of the LCD receiver.
6. Press and hold the power button on the front panel for 2 seconds. The
startup screen appears, followed by live video from your camera(s).
Note
If one or more cameras do not appear when selected (for example, Camera 2 is
plugged in but does not appear on channel 2), see 11 Pairing Additional Cameras,
page 53.
Tips:
• Place the receiver in a location that will have a clear reception to your cam-
era. Try to maintain line-of-sight and minimize the number of obstructions
between the camera and receiver.
#LX400030; r. 1.0/17112/17628; en-US
8
Page 13
Installing the Receiver
4
• Adjust the antenna on the receiver as necessary to provide the clearest
reception.
• The receiver comes with a microSD card pre-inserted, so you can start re-
cording right away. The receiver is compatible with most major brands of
microSD cards up to 32 GB. For recording times on microSD cards, see
8.11 Maximum Recording Times, page 34.
4.1 Setting the Time
It is highly recommended to set the date and time on the system prior to recording, as they will be used to stamp recordings. You must set the correct
date and time in order to use schedule recording.
To set the time:
1. Press
to open the main menu.
2. Select the System Setting icon using the
/ keys, then press .
3. Select Clock setup, then press .
4. Press
/ to configure the current date and time. Press / to
move between items.
5. When finished, press to save settings.
6. Press
repeatedly to close any remaining menu windows.
The date and time appears at the bottom of the screen in live viewing
mode. The date and time also appears in recorded video at the top of the
video display.
#LX400030; r. 1.0/17112/17628; en-US
9
Page 14
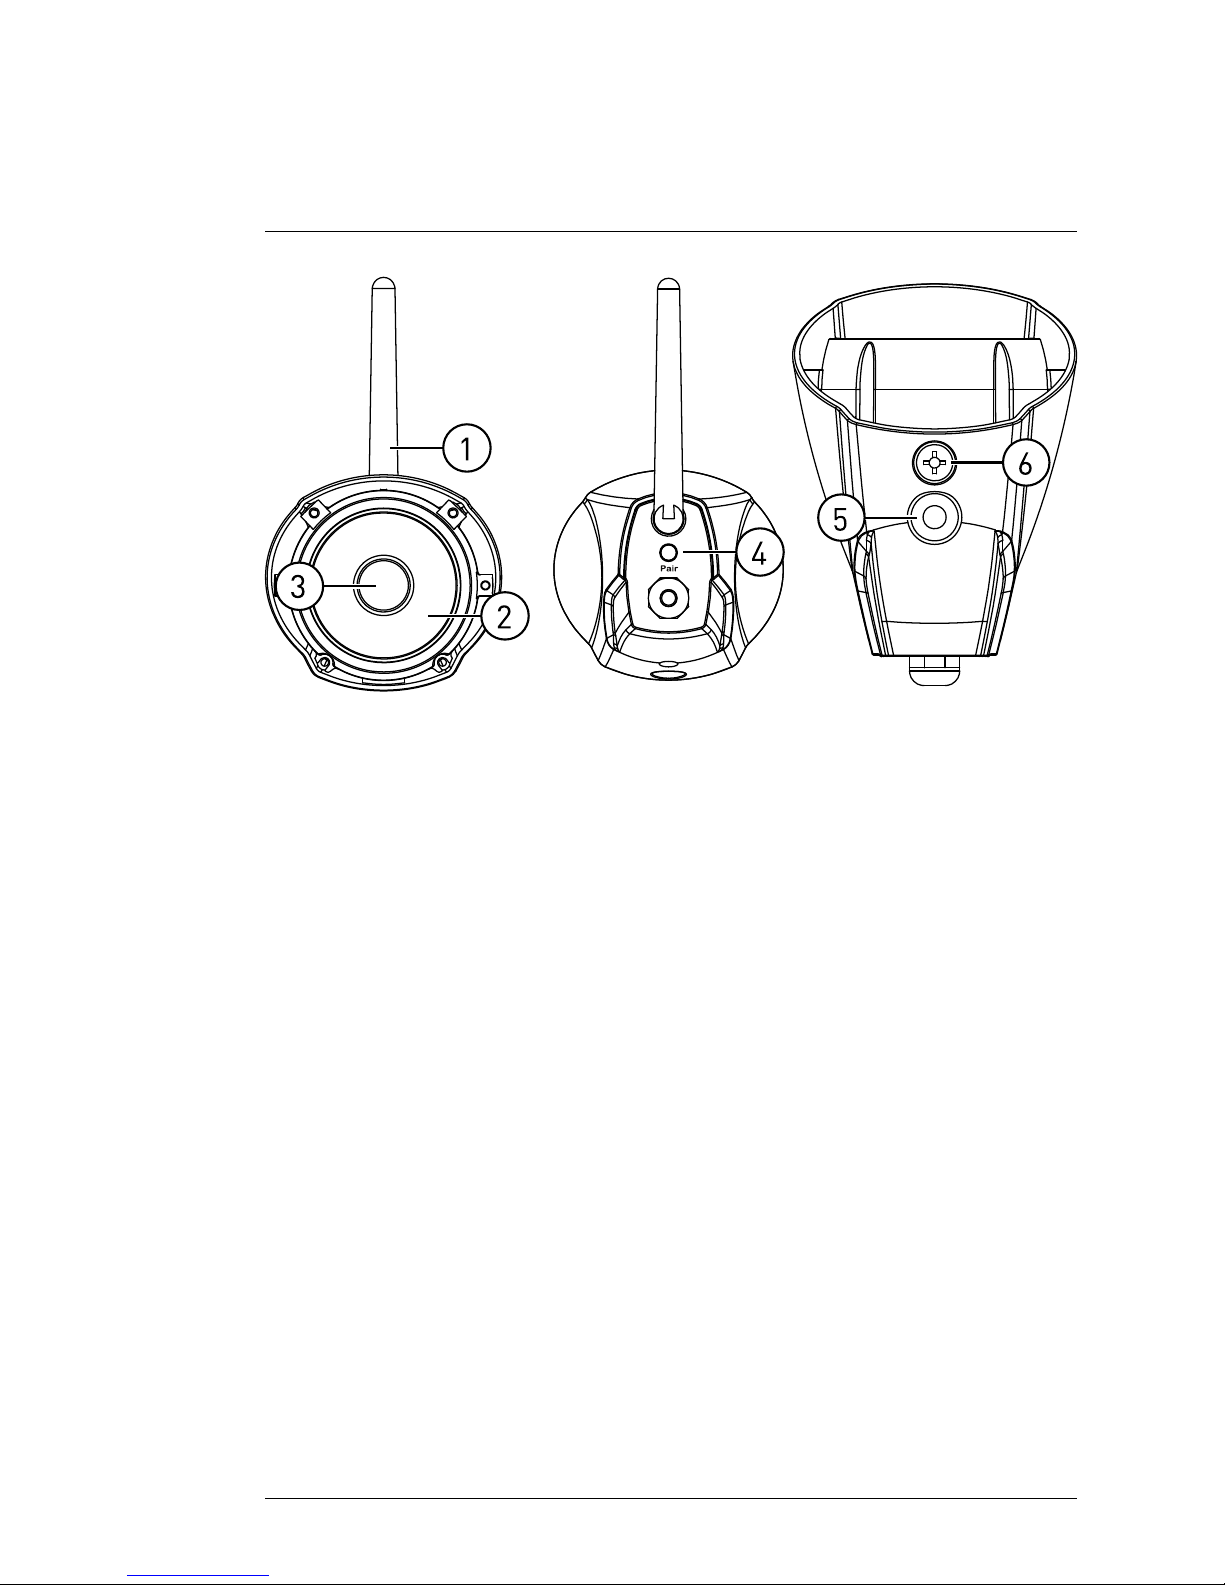
Camera Overview
5
1
2
3
Pai r
4
6
5
1. Antenna: Removable wireless antenna (SMA).
2. IR LEDs: Night vision IR LEDs.
3. Lens.
4. Pair: Press to pair additional cameras to the system. See 11 Pairing Addi-
tional Cameras, page 53 for full details.
5. Attachment Point: Attach the included metal stand to the camera. See 3
Installing the Camera(s), page 4 for full details.
6. Microphone: Built-in microphone for listen-in audio.
#LX400030; r. 1.0/17112/17628; en-US
10
Page 15
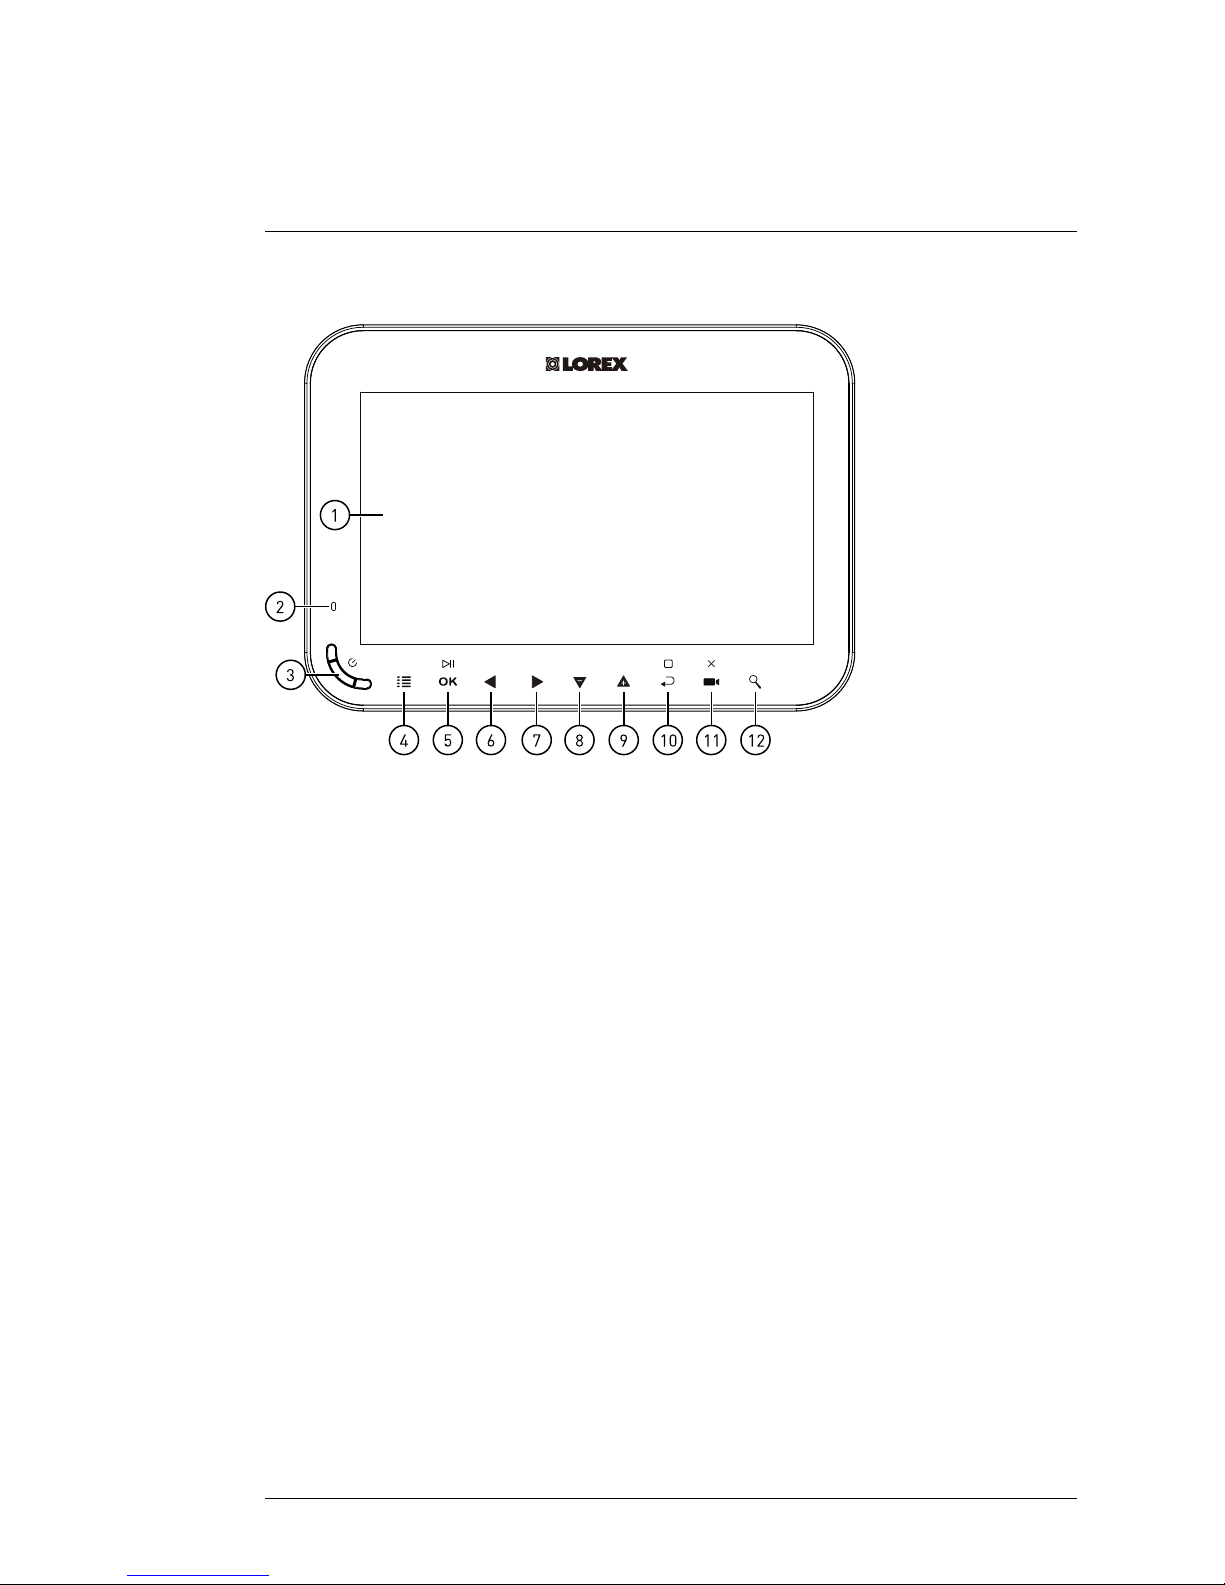
LCD Receiver Overview
6
6.1 Front Panel
OK
2
3
45678910111
2
1
1. LCD Screen.
2. Indicator LED: Indicates system status in the following ways:
• Solid green: Indicates that battery life is half-full or greater.
• Solid red: Indicates that the receiver is plugged in and turned off.
• Flashing red: Indicates that the battery is low and needs to be con-
nected to power OR, the receiver is plugged in but the battery is not
inserted.
3. Power Button: Press and hold for 2 seconds to turn the receiver on or off.
4. Menu: Press to enter the system menu.
5. Enter / Play / Pause:
• In menus, press to confirm a selection.
• In video playback, press to play / pause video.
6. Left / Rewind:
• In menus, press to move selection to the left.
• In live view, press to switch the viewing mode. For details, see 7.3 View-
ing Modes, page 16.
• In video playback, press and hold to rewind.
#LX400030; r. 1.0/17112/17628; en-US
11
Page 16
LCD Receiver Overview
6
7. Right / Fast-Forward:
• In menus, press to move selection to the right.
• In live view, press to switch the viewing mode. For details, see 7.3 View-
ing Modes, page 16.
• In video playback, press and hold to fast-forward.
8. Down / Decrease Volume: Press to move selection down in menus, or to
decrease volume in live view.
9. Up / Increase Volume: Press to move selection up in menus, or to in-
crease volume in live view.
10. Back / Stop: Press to go back to the previous menu or to stop video
playback.
11. Record / Snapshot / Delete:
• Press in live view to take a snapshot. For full details on taking snap-
shots, see 8.5 Taking a Snapshot, page 26.
• Press and hold in live view to begin manually recording video. For full
details on manual recording, see 8.4 Manual Recording, page 26.
• Press while selecting a snapshot or video in the playback menu to de-
lete the file. For full details on deleting snapshots and video recordings,
see 9.3 Deleting Files, page 38.
12. Zoom: Press to enter 2x digital zoom.
6.2 Side Panel
Micro S D
DC 5V
2
1
1. Power Port: Connect the included 5V DC adapter to the power port and
an electrical outlet or surge protector to provide power to the receiver.
2. microSD Card Slot: The included microSD card comes pre-inserted.
Note
• The receiver supports microSD cards up to 32 GB.
• Lorex recommends microSD or microSDHC (Class 4 or higher) cards for use with
this receiver. The following brands of microSD cards are recommended by Lorex:
Adata, Kingston, Patriot, Sandisk, and Toshiba.
#LX400030; r. 1.0/17112/17628; en-US
12
Page 17

LCD Receiver Overview
6
6.3 Rear Panel
231
4
1. Wireless Antenna: Position the antenna as needed for best reception.
2. Battery Compartment: Insert the included rechargeable battery. See 4
Installing the Receiver, page 7 for full installation instructions.
3. Support Stand: Pull out the support stand to for placement on a flat
surface.
4. Speaker.
#LX400030; r. 1.0/17112/17628; en-US
13
Page 18
Using the System
7
By default, the camera(s) included with your system are automatically paired
to the receiver. The camera(s) and receiver will communicate with each other
once they are powered on.
Note
It is recommended to power on the camera(s) before powering on the receiver.
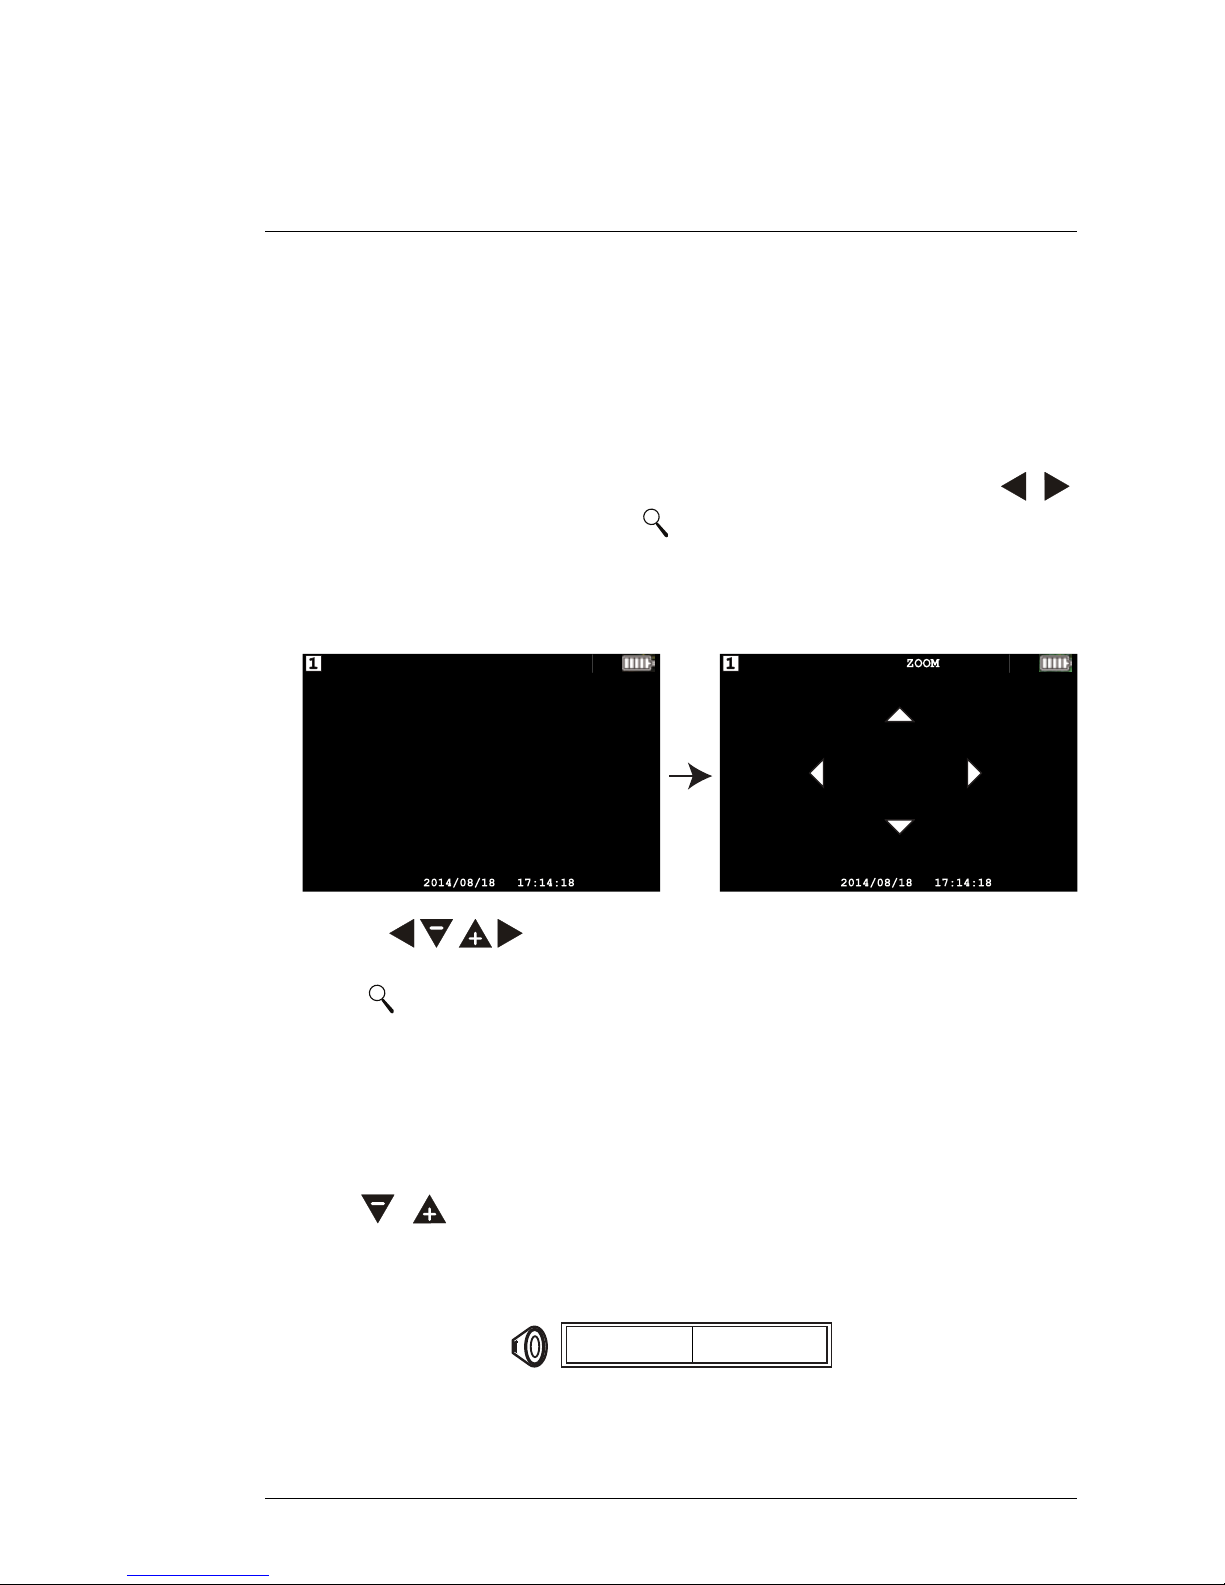
7.1 Understanding the On-screen Display
With camera 1 properly connected and powered on, the system displays a
full-screen live view of the camera.
2014/0 8/18 17:14:18
1
3
4
5
7
6
ZOOM
8
When viewing all channels in Quad mode, the interface appears slightly
different.
#LX400030; r. 1.0/17112/17628; en-US
14
Page 19

Using the System
7
2014/0 8/18 17:14:18
1
2
4
5
7
6
1. Channel indicator: Displays the camera you are presently viewing. If
viewing in Quad mode, the camera indicator will appear above each video
display.
2. Viewing mode indicator: Indicates the viewing mode by showing a differ-
ent icon for Quad Viewing (
) and Auto Sequence Viewing (
) modes. If there is no viewing mode indicator during live view,
then the system is in Single Channel Viewing mode.
3. Zoom indicator: Indicates that the current live view is zoomed in to twice
the original size. Digital zoom is disabled in Quad mode.
4. Signal indicator: The signal indicator shows the strength of the wireless
signal from each connected camera. The number of bars indicates the
strength of the signal. One or no bars indicates the signal is poor, and 4
bars indicate a very strong signal.
Note
If the signal is low (for example, 1 or 2 bars) adjust the antennas, or reposition the
camera(s) or receiver for best performance.
#LX400030; r. 1.0/17112/17628; en-US
15
Page 20
Using the System
7
5. Battery indicator: Shows remaining battery life. The icon flashes on and
off when battery is critically low to indicate that the receiver should be
plugged into a power outlet right away.
6. Date & time stamp: The current date and time on the system.
7. Recording indicator: A red circle appears in the bottom right-hand cor-
ner of the screen when recording is in progress.
8. Volume indicator: Shows the current volume of the receiver. The volume
indicator appears on screen when you change the volume using the
/
keys.
7.2 Navigating Menu Screen
Use the system menus to configure settings.
• Press to open the Main Menu.
• Press the
keys to move the cursor left, right, up, and down.
• Press
to open sub-menus and confirm menu selections.
• Press
to go back or exit out of menus.
7.3 Viewing Modes
There are 3 different viewing modes available on the system: Single Channel
Viewing mode, Auto Sequence Viewing mode (view individual channels
automatically in sequence), and Quad Viewing mode (view all 4 channels at
once in split-screen).
To change viewing modes:
• Press
/ to select between channels 1–4 in single channel view, as
well as to enable Quad and Auto Sequence Viewing modes.
7.3.1 Auto Sequence Viewing Mode
By default, Auto Sequence Viewing mode cycles through all connected channels in full-screen. If you wish to view only 2 or 3 cameras in each cycle, you
#LX400030; r. 1.0/17112/17628; en-US
16
Page 21
Using the System
7
can remove connected channels from the Auto Sequence Viewing pattern.
See 10.5 Activating / De-activating Channels, page 47 for details.
Auto Sequence Example
To enable Auto Sequence Viewing:
• Press
/ until a single channel is shown on screen with the Auto Se-
quence icon (
) at the top of the display. The receiver automati-
cally cycles through connected channels.
• To return to single channel viewing, press
/ until the viewing mode in-
dicator icon disappears from the on-screen display.
7.3.2 Quad Mode
Use Quad mode to view all four channels simultaneously.
To enable Quad mode:
• Press
/ until a split-screen display appears with the Quad icon (
) at the top of the display. The receiver displays all 4 channels
simultaneously.
Quad Example
#LX400030; r. 1.0/17112/17628; en-US
17
Page 22
Using the System
7
7.4 Digital Zoom
The digital zoom feature allows you to zoom in 2x on a single camera during
live viewing. This is useful if you need a closer look at something happening
far away from the camera.
To use digital zoom:
1. Select the desired camera in Single Channel Viewing mode (press
/
to select the channel) and press on the front panel of the receiver to
zoom in. When digital zoom is activated, the live view zooms in to 2x normal magnification. The word ZOOM appears in the top of the screen, and
4 arrows appear over the camera image.
2014/0
8/18 17:14:18
2014/0
8/18 17:14:18
ZOOM
2. Use the keys to pan in the desired direction and look at different parts of the image.
3. Press
again to exit digital zoom.
7.5 Changing Audio Volume
The receiver can play and record audio from the camera you are currently
viewing.
To change the volume:
• Press
/ to change the audio volume.
The volume meter appears on screen to indicate the volume of audio coming
from the currently selected camera:
#LX400030; r. 1.0/17112/17628; en-US
18
Page 23

Using the System
7
Note
There is no audio in Quad mode.
#LX400030; r. 1.0/17112/17628; en-US
19
Page 24
Recording
8
The following recording modes are available on the system: manual recording, scheduled continuous recording, and scheduled motion recording. The
system records video to the included microSD card.
Recording Prerequisites:
• A microSD card must be inserted into the receiver in order to record video.
You should always format the microSD card prior to initial recording. For
details, see 8.1 Format Memory, page 20.
Note
The system supports microSD or microSDHC (Class 4 or higher) cards up to 32 GB. The
following brands of microSD cards are recommended by Lorex: Adata, Kingston, Patriot,
Sandisk, and Toshiba.
8.1 Format Memory
It is highly recommended to format the microSD card prior to initial recording.
To format the microSD card:
CAUTION
Formatting erases all data on the microSD card. This step cannot be undone.
1. Insert the microSD card into the card slot on the receiver until you hear a
"click." Please insert the card according to the diagram on the side panel
of the receiver.
2. Press
, then select the Recording icon. Press to confirm.
#LX400030; r. 1.0/17112/17628; en-US
20
Page 25

Recording
8
3. Select Format card and press
to confirm.
4. Select Confirm and press to confirm.
Note
Please allow a few moments for formatting to finish. Formatting time will vary depending on the size of the card.
5. A message appears to confirm formatting. Press
repeatedly until all
menus are closed.
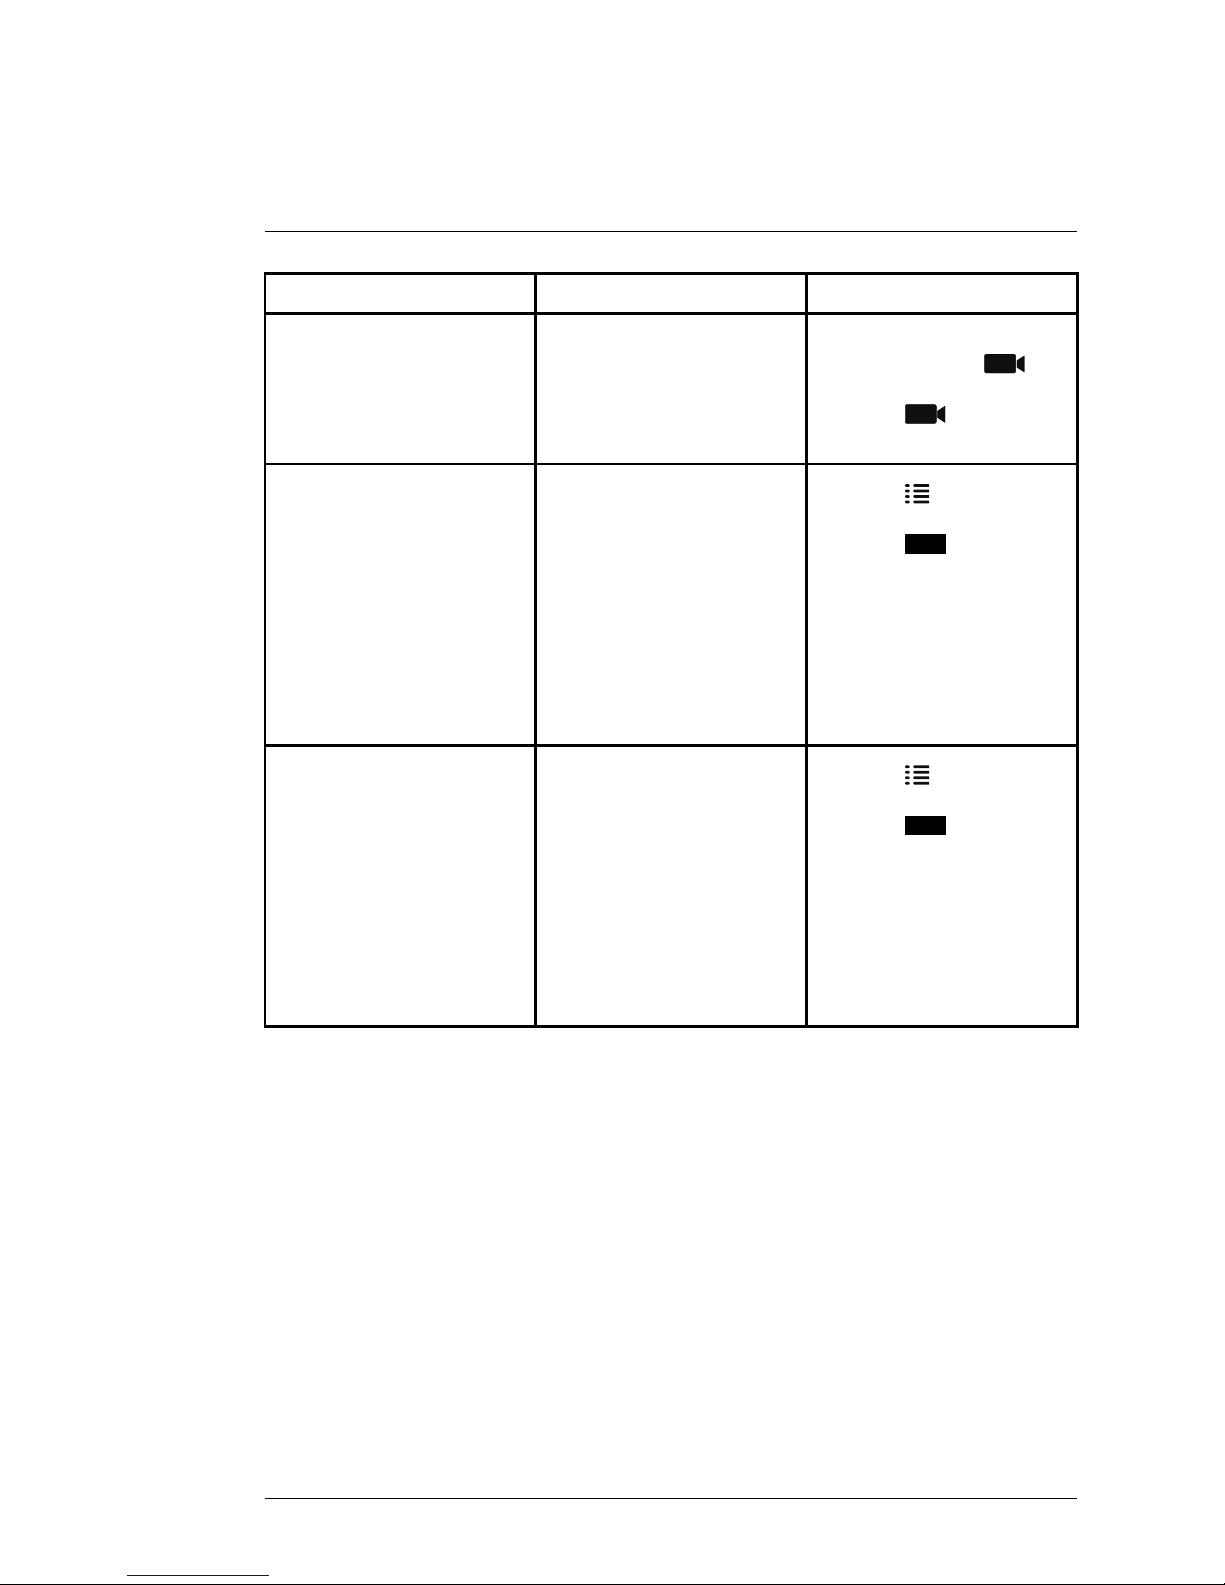
8.2 Recording Mode Summary
The following table provides an overview of the system’s recording
capabilities.
#LX400030; r. 1.0/17112/17628; en-US
21
Page 26
Recording
8
Mode Description How to Operate
Manual Recording
• Continuous recording
from a single channel in
full screen or all 4 channels in a single video file.
• During live viewing,
press and hold
to
begin manual recording.
Press
again to stop
manual recording.
Scheduled Continuous
Recording
• Records continuously
from all 4 channels in a
single video file. Recording starts and stops
automatically based on
a daily schedule.
• Press
and select the
recording schedule icon.
Press
to confirm.
Set a time range for the
system to record continuous video during each
day. For full setup instructions, see 8.3
Scheduled Recording,
page 22.
Scheduled Motion
Recording
• Records motion-events
only from all 4 channels
in a single video file. Recording starts and stops
automatically based on
a daily schedule.
• Press
and select the
recording schedule icon.
Press
to confirm.
Set a time range for the
system to record motion-events during each
day. For full setup instructions, see 8.3
Scheduled Recording,
page 22.
8.3 Scheduled Recording
Use scheduled recording to have the system automatically record continuously between a selected start and stop time. You can record everything between a start and end time, or record only motion-events between the
selected times.
Prerequisite:
Please ensure you have set the proper date and time on the receiver prior to
setting a recording schedule. See 4.1 Setting the Time, page 9.
When should I use schedule recording?
• Use a continuous recording schedule if the camera is pointed at an area
with high traffic, such as a entry / exit or a road.
#LX400030; r. 1.0/17112/17628; en-US
22
Page 27
Recording
8
• Use a motion recording schedule if the camera is pointed at an area with
low traffic, such as a storage room or side entrance.
CAUTION
Do not remove the microSD card while the system is recording. Removing the microSD
card during recording will interrupt file writing and may damage your video recordings.
8.3.1 Creating a Recording Schedule
Follow the procedure below to setup a continuous recording schedule or a
motion recording schedule.
To create a recording schedule:
1. Press
, then select the Schedules icon. Press to confirm.
2. Select the first available slot and press to begin configuring a new
recording schedule.
#LX400030; r. 1.0/17112/17628; en-US
23
Page 28
Recording
8
3. Use the
/ keys to move between the start time, end time, and record-
ing schedule type, and use the
/ keys to change each value:
• To record everything during the schedule: Set the recording sched-
ule type to SCHEDULE. In the example below, the system will record
continuously between 7:00PM and 10:00AM each day.
• To record motion only during the schedule: Set the recording
schedule type to MOTION. In the example below, the system will record
motion events only between 7:00PM and 10:00AM each day.
4. Press when finished to save the recording schedule.
5. Press
repeatedly until all menus are closed.
8.3.2 Pausing Scheduled Recording
You must pause scheduled recording in order to access the main menu during
scheduled recording time.
To pause schedule recording:
• Press
to temporarily pause scheduled recording. When the record-
ing indicator (
) re-appears on the screen, access to the main menu will
be blocked again, and scheduled recording will resume.
8.3.3 Modifying / Disabling a Recording Schedule
You can modify schedules you have created at any time, as well as disable
schedules without deleting them.
#LX400030; r. 1.0/17112/17628; en-US
24
Page 29

Recording
8
To modify / disable a recording schedule:
1. Press
, then select the Schedules icon. Press to confirm.
2. Select the recording schedule you want to modify or disable and press
.
3. Choose one of the following options:
• To modify a recording schedule: Use the
/ keys to move be-
tween the start time, end time, and recording schedule type, and use
the
/ keys to modify each value.
• To disable a recording schedule: Use the
/ keys to move to the
recording schedule type, and use the
/ keys to select NONE.
4. Press when finished to save the recording schedule.
5. Press
repeatedly until all menus are closed.
8.3.4 Deleting a Recording Schedule
You can delete any recording schedule to remove it from the schedule list.
#LX400030; r. 1.0/17112/17628; en-US
25
Page 30
Recording
8
To delete a recording schedule:
1. Press
, then select the Schedules icon. Press to confirm.
2. Select the recording schedule you want to delete and press to delete.
Press
to confirm, or press to cancel.
3. Press
repeatedly until all menus are closed.
8.4 Manual Recording
Manual recording allows you to manually start and stop recording on any one
camera or all 4 cameras in Quad mode.
When should I use manual recording?
• Recording of unexpected events or emergencies.
To enable manual recording:
1. Press
/ until the channel or view you want to record is displayed.
2. Press and hold
to begin recording the current view.
A recording indicator (
) appears on screen to indicate the system is
recording.
CAUTION
Do not remove the microSD card while the system is recording. Removing the microSD
card during recording will interrupt file writing and may damage your video recordings.
8.5 Taking a Snapshot
You can take snapshots of a single channel in full-screen or all 4 channels in
Quad mode as a single image.
#LX400030; r. 1.0/17112/17628; en-US
26
Page 31

Recording
8
To take a snapshot:
• Press
on the desired channel to take a snapshot. You can view snap-
shots on the receiver or on your computer.
8.6 Enabling / Disabling File Overwrite
Enabling file overwrite will delete the oldest recorded data on the microSD
card once it is full to make room for new recordings.
To enable file overwrite:
1. Press
, then select the Recording icon. Press to confirm.
2. Select Overwrite and press to confirm.
3. Select ON and press to enable file overwrite.
4. Press repeatedly until all menus are closed.
#LX400030; r. 1.0/17112/17628; en-US
27
Page 32

Recording
8
Note
If the microSD card is full and you have not enabled overwrite, the system will not record
new files. You will need to manually delete files from the microSD card or insert a new card
into the receiver.
8.7 Configure Recording Time for Motion Events
Choose how long the system records video when motion is detected by one
of your cameras.
To configure the recording time for motion events:
1. Press
, then select the Recording icon. Press to confirm.
2. Select Record Time and press to confirm.
3. Select how long the system will record video for when motion is detected
by one of the cameras. Press
to confirm.
#LX400030; r. 1.0/17112/17628; en-US
28
Page 33

Recording
8
4. Press
repeatedly until all menus are closed.
8.8 Motion Detection Sensitivity
Set how sensitive the system is to movement in the scene. You can change
motion detection sensitivity for certain channels or turn motion detection off
using this procedure.
To set motion detection sensitivity:
1. Press
, then select the Camera Setting icon. Press to confirm.
2. Select MD Sensitivity and press to confirm.
#LX400030; r. 1.0/17112/17628; en-US
29
Page 34

Recording
8
3. Choose the channel that you want to change the motion detection sensi-
tivity for. Press
repeatedly to change the sensitivity.
Note
If you set the sensitivity level to the lowest setting, motion detection will be turned off
for the selected channel.
4. Press
repeatedly until all menus are closed.
8.9 Motion Detection Area
By default, the cameras will start recording in a motion schedule if motion is
detected on any part of the camera image. You can set cameras to detect motion only in certain areas of the camera image and ignore motion in others.
For example, if one of your cameras is pointed at a tree that moves with the
wind or a busy street, you may want to block such areas of the camera image
from the motion detection area. Otherwise, the system will detect this movement and record more often than desired.
To set a custom motion detection area:
1. Press
, then select the Camera Setting icon. Press to confirm.
#LX400030; r. 1.0/17112/17628; en-US
30
Page 35

Recording
8
2. Select MD Area and press
to confirm.
3. Choose the channel that you want to change the motion detection area for.
Press
to confirm.
#LX400030; r. 1.0/17112/17628; en-US
31
Page 36

Recording
8
4. The selected channel appears behind a blue grid. Use the arrow keys to
select a cell in the grid and press
to allow or block them from the
motion detection area. By default, all cells are allowed in the motion detection area. Blocked cells have an ‘X’ in the center.
Shortcuts:
To block an entire row:
• Press
to block the first cell in the row, then hold the button.
The entire row will be blocked from the motion detection area.
To allow an entire row:
• Press
to allow the first cell in the row, then hold the button.
The entire row will be allowed in the motion detection area.
5. Press
repeatedly until all menus are closed.
8.10 Enabling / Disabling Alarm for Motion Events
With the alarm enabled, the receiver will ‘beep’ when motion is detected by
one of your cameras during scheduled motion recording.
To enable / disable alarm:
1. Press
, then select the Alarm icon.
2. Press to toggle the alarm on and off. The Alarm icon displays ON
or OFF to indicate the current setting.
#LX400030; r. 1.0/17112/17628; en-US
32
Page 37

Recording
8
3. Press
repeatedly until all menus are closed.
#LX400030; r. 1.0/17112/17628; en-US
33
Page 38

Recording
8
8.11 Maximum Recording Times
The system supports microSD cards up to 32 GB. Use the table below to help
you estimate the recording times on various sizes of microSD cards. Times
shown are in hours and minutes.
microSD Card Capacity Single Channel Recording @ VGA Resolution
1 GB
3.5 hours
2 GB
7 hours
4 GB 14 hours
8 GB 28 hours
16 GB 56 hours
32 GB
112 hours
#LX400030; r. 1.0/17112/17628; en-US
34
Page 39

Playback
9
Playback mode allows you to view recorded video files and snapshots from
the microSD card. You can view videos and snapshots directly on the system
or by connecting the microSD card to your computer.
9.1 Video Playback
To playback recorded video on the system:
1. Press
, then select the Playback icon. Press to confirm.
2. Select Video and press to confirm.
3. Use the / keys to select the date that you would like to search for
video from and press
.
#LX400030; r. 1.0/17112/17628; en-US
35
Page 40

Playback9
4. Use the
/ keys to select the hour that you would like to search for
video from and press
.
5. Use the / keys to select the video file that you would like to playback and press
to begin playback.
9.1.1 Playback Controls
•
: Press to decrease playback volume.
•
: Press to increase playback volume.
•
: Press and hold to rewind.
•
: Press and hold to fast-forward.
•
: Press to play / pause video.
•
: Press to stop video.
•
: Press to return to the file list.
#LX400030; r. 1.0/17112/17628; en-US
36
Page 41

Playback9
9.2 Viewing Snapshots
To view snapshots on the system:
1. Press
, then select the Playback icon. Press to confirm.
2. Select Picture and press to confirm.
3. Use the / keys to select the date that you would like to search for
snapshots from and press
.
#LX400030; r. 1.0/17112/17628; en-US
37
Page 42

Playback9
4. Use the
/ keys to select the hour that you would like to search for
snapshots from and press
.
5. Use the / keys to select the snapshot that you would like to view
and press
.
9.3 Deleting Files
You can delete files on the microSD card directly on the system. Delete files if
you need to clear space on the microSD card (if file overwrite is disabled), or
for your own file management purposes.
To delete recordings:
1. Press
, then select the Playback icon. Press to confirm.
2. Select Video to delete a video file, or Picture to delete a snapshot. Press
to confirm.
#LX400030; r. 1.0/17112/17628; en-US
38
Page 43

Playback9
3. Use the
/ keys to select the date that you would like to search and
press
.
4. Use the / keys to select the hour that you would like to search and
press
.
5. Use the / keys to select the file that you would like to delete and
press
to delete. Press to confirm or press to go back to the
file list.
9.4 Viewing Video Directly from the microSD Card
You can view the saved video files on your PC by using a microSD card reader
(not included). Saved video files are in ASF format.
Note
Some PCs may have a microSD card reader built-in. Please refer to your computer's instruction manual for more details.
To playback recorded video on a PC:
1. Download and install the video player for LW1740 Series from
www.lorextechnology.com.
2. Remove the microSD card from the receiver by gently pushing on the microSD card and then releasing. The card will eject.
#LX400030; r. 1.0/17112/17628; en-US
39
Page 44

Playback9
3. Insert the microSD card into a microSD card reader (not included) connected to your PC. Your PC should load the microSD card as a new Removable Drive and an Autorun window opens.
4. Double-click RFSMediaPlayer on your desktop to launch the video player.
5. Click Load to open the file browser. Navigate to the video files on the microSD card. Double-click any video file to playback, or select multiple files
and click open to add multiple video files to the playback queue.
CAUTION
Do NOT delete folders on the microSD card using your computer. Deleting fold-
ers may affect your access to other files on the card or may affect normal operation of
the microSD card with the system. If you want to delete the entire contents of the microSD card, it is highly recommended to format the card using the system. For details,
see 8.1 Format Memory, page 20.
#LX400030; r. 1.0/17112/17628; en-US
40
Page 45

Playback9
9.4.1 Player Overview
4
6
5
7
891011121314151
6
1
2
3
09/10/14 10:25:11 AM
1. Video display
2. Progress bar — click-and-drag to jump to different parts of the video
3. Date & time stamp
4. Playback queue
5. Start the video file currently in the playback queue
6. Remove video file currently in the playback queue
7. Play
8. Pause
9. Stop
10. Previous video in the playback queue
11. Next video in the playback queue
12. Rotate video counter-clockwise
13. Rotate video clockwise
14. Add video file(s) to the playback queue
#LX400030; r. 1.0/17112/17628; en-US
41
Page 46

Playback9
15. Start the currently playing video file over
16. Video checkboxes — enable or disable video channels
#LX400030; r. 1.0/17112/17628; en-US
42
Page 47

Settings
10
Configure additional settings for the system.
10.1 Camera Brightness
Change the brightness of the picture for each camera.
To set camera brightness:
1. Press
, then select the Camera Setting icon. Press to confirm.
2. Select Brightness and press to confirm.
3. Choose the channel that you want to change the brightness for. Press
repeatedly to change the brightness level.
4. Press repeatedly until all menus are closed.
#LX400030; r. 1.0/17112/17628; en-US
43
Page 48

Settings
10
10.2 Enabling / Disabling Date & Time Stamps
It is important to enable date and time stamps on your recordings in case you
want to submit them as legal evidence. By default, date and time stamps are
enabled on the system.
To enable / disable date & time stamps:
1. Press
to open the main menu. Select the Recording icon using the
/ keys, then press .
2. Press / to select Date Stamp and press to confirm.
3. Select ON and press to confirm.
Turning date stamps on will display the date and time of each recording at
the top of the video display.
4. Press repeatedly to close any remaining menu windows.
#LX400030; r. 1.0/17112/17628; en-US
44
Page 49

Settings
10
10.3 Changing Date & Time Format
You can choose how the system displays the date and time.
To change the date format:
1. Press
to open the main menu. Select the System Setting icon using
the
/ keys, then press .
2. Press / to select Date Format and press to confirm.
3. Select DD/MM/YY or MM/DD/YY and press to confirm.
Note
The date format you select will affect date stamps used on recordings as well as the
dates used to sort recordings and snapshots.
4. Press
repeatedly to close any remaining menu windows.
#LX400030; r. 1.0/17112/17628; en-US
45
Page 50

Settings
10
To change the time format:
1. Press
to open the main menu. Select the System Setting icon using
the
/ keys, then press .
2. Press / to select Time Format and press to confirm.
3. Select 12 Hour or 24 Hour and press to confirm.
Note
The time format you select will affect time stamps used on recordings as well as the
times used to sort recordings and snapshots.
4. Press
repeatedly to close any remaining menu windows.
10.4 Power Saving Mode
Power saving mode turns the video display on the monitor off to save battery
life.
#LX400030; r. 1.0/17112/17628; en-US
46
Page 51

Settings
10
To enable power saving mode:
1. Press
, then select the System Setting icon. Press to confirm.
2. Select Power Saving and press to confirm.
3. Select how long it takes before the system enters power saving mode after
the last system activity.
10.5 Activating / De-activating Channels
Use the activation setting to remove connected channels from the Auto Sequence Viewing pattern.
#LX400030; r. 1.0/17112/17628; en-US
47
Page 52

Settings
10
To activate / de-activate channels:
1. Press
, then select the Camera Setting icon. Press to confirm.
2. Select Activation and press .
#LX400030; r. 1.0/17112/17628; en-US
48
Page 53

Settings
10
3. Select the channel you want to activate or de-activate and press
to
toggle between ON and OFF.
Note
De-activated channels with a connected camera will show the wireless signal
strength, but do not show live video from the camera (see image below).
2014/0
8/18 17:14:18
1
2
1. De-activated channel with connected camera
2. No camera connected
4. Press
repeatedly until all menus are closed.
10.6 Changing Scan Interval for Auto Sequence Viewing
Set how long each connected camera is displayed on the monitor during Auto
Sequence Viewing.
#LX400030; r. 1.0/17112/17628; en-US
49
Page 54

Settings
10
To set scan interval:
1. Press
, then select the System Setting icon. Press to confirm.
2. Select Camera scan interval and press .
3. Choose how long each camera will be displayed on the monitor in Auto
Sequence Viewing mode and press
to confirm.
4. Press repeatedly until all menus are closed.
10.7 Update Firmware
It is important to keep the system up-to-date with the latest firmware. You can
check for and download available firmware upgrades at
www.lorextechnology.com.
To update firmware:
1. Download the latest firmware for the unit from www.lorextechnology.com.
#LX400030; r. 1.0/17112/17628; en-US
50
Page 55

Settings
10
2. Insert the microSD card into the card reader (not included) on your computer. Move the firmware file to the root folder of the microSD card, then
eject the microSD card.
3. Insert the microSD card with the new firmware file into the receiver.
4. Press
, then select the SD Capacity icon. Press to confirm.
5. Follow the on-screen prompts to complete the firmware upgrade.
10.8 Restore Default Settings
Restore all menu settings to their out-of-the-box state. Video recordings and
snapshots on the microSD card are not affected when restoring default
settings.
To restore default settings:
1. Press
, then select the System Setting icon. Press to confirm.
2. Select Restore factory default and press to confirm.
#LX400030; r. 1.0/17112/17628; en-US
51
Page 56

Settings
10
3. Select Confirm and press
to restore default settings.
4. Press repeatedly to exit all menus.
#LX400030; r. 1.0/17112/17628; en-US
52
Page 57

Pairing Additional Cameras
11
Note
If you have purchased additional cameras, it is highly recommended to pair the cameras
to the receiver before permanent installation.
"Pairing" is an electronic handshake between wireless devices. Wireless devices and components need to be paired in order to communicate with each
other.
The camera(s) provided with the system have already been paired to the receiver. By default, the camera(s) included are automatically paired to channels 1 & 2 on the receiver. See the channel label on the camera to check
which channel it has been set to.
If you have purchased additional accessory cameras, you will need to pair
them to the receiver. When pairing cameras, you can select the channel you
would like the cameras to be assigned to. You can also use the steps below to
reassign your existing cameras to different channels.
Note
Accessory cameras (model# LW1741AC1) are available from www.lorextechnology.com.
To pair an additional camera:
1. Connect the new camera to a power outlet. Place the camera and the receiver within 1ft of each other.
2. Press
, then select the Camera Setting icon. Press to confirm.
#LX400030; r. 1.0/17112/17628; en-US
53
Page 58

Pairing Additional Cameras
11
3. Select Pairing and press
.
4. Use the arrow keys on the receiver to select the channel you want to pair
the camera to. Channels that are paired to an existing camera show the
statement PAIR OK, while open channels show NO PAIR. Press
on
the desired channel to begin pairing.
• If you pair a new camera to a channel that is already being used by an
existing camera, the new camera will be connected to that channel.
The old camera will automatically be disconnected.
#LX400030; r. 1.0/17112/17628; en-US
54
Page 59

Pairing Additional Cameras
11
5. Following the on-screen prompt (the selected channel shows the statement PAIRING), press the Pair button behind the camera. You have 30
seconds to press the Pair button on the camera. If pairing was successful,
the pairing channel shows the statement PAIR OK.
CAUTION
Do not press and hold the Pair button.
6. Press
until you have exited all menus. You can now view live video
from the camera by selecting the channel using the arrow keys on the
receiver.
Note
• If pairing was unsuccessful, the pairing channel shows the statement TIME OUT. Re-
peat steps 2~5 to try the pairing process again.
• If the speaker begins squealing, move the camera and receiver away from each other.
#LX400030; r. 1.0/17112/17628; en-US
55
Page 60

Technical Specifications
12
12.1 General Specifications
Description Specification
Transmission Frequency 2,400 ~ 2,4835GHz
Transmission Power 18dBm
Data Rate 3 Mbps
Unobstructed Wireless Range Up to 450ft (150m) outdoors
Up to 150ft (50m) indoors
1
Spread Spectrum FHSS
Modulation GFSK
Operating Humidity
>80%
12.2 Camera Specifications
Description Specification
Image Sensor 1/4" CMOS Image Sensor
Supported Resolutions VGA (640x480) up to 25 fps
2
AGC Auto
IR LEDs 16 pieces; 850nm
Night Vision Range
65ft (20m) / 45ft (14m)
3
Lens / Lens Type 3.6mm F2.0 / Fixed
Field of View (Diagonal)
69°
Power Consumption
570mA
Power Supply 6V DC 800mA ±5%
Indoor / Outdoor Both (IP65)
4
Operating Temperature 14 ~ 122°F / –10 ~ 50°C
Dimensions (W x D x H) 5.4” x 3.1” x 9.1”
138mm x 78mm x 232mm
Weight 0.34kg / 0.75lbs (camera alone)
0.40kg / 0.90lbs (with stand)
#LX400030; r. 1.0/17112/17628; en-US
56
Page 61

Technical Specifications
12
12.3 Receiver Specifications
Description Specification
LCD Display 7” Diagonal
LCD Resolution
800x480
Receiving Sensitivity -88dBm
Image Processing
MPEG4
Battery 3.7V 3000mAh Li-polymer
Power Consumption 1050mA
Power Supply 5V DC 2A ±5%
Operating Temperature 32 ~ 122°F / 0 ~ 50°C
Dimensions (W x D x H) 7.4” x 5.2” x 0.7”
188mm x 132mm x 17mm
Weight
0.34kg / 0.75lbs
Note
1. Maximum wireless transmission range. Actual range dependent upon building materials and other obstructions in path of wireless signal.
2. At full signal strength. Limit number of obstructions to ensure best performance.
3. Stated IR illumination ranges are based on ideal conditions in typical outdoor night
time ambient lighting and total darkness. Actual range and image clarity depends on
installation location, viewing area and light reflection/absorption level of object.
4. Not intended for submersion in water. Installation in a sheltered area required.
#LX400030; r. 1.0/17112/17628; en-US
57
Page 62

Technical Specifications
12
12.4 Dimensions
12.4.1 LCD Receiver
OK
5.2” /
132mm
7.4” /
188mm
Micro S D
DC 5V
0.7” /
17mm
12.4.2 Camera with Metal Stand
9.1” /
232mm
5.4” /
138mm
3
.1” /
78mm
#LX400030; r. 1.0/17112/17628; en-US
58
Page 63

Troubleshooting
13
Problem Solution
There is no picture
from the camera(s)
• Check power to the camera.
• Make sure that the cameras and receiver are both on.
• Make sure that the camera is within range of the receiver.
• The receiver’s battery is dead. Connect the receiver to a
power outlet using the included power adapter.
• The camera channel has been de-activated. See 10.5 Acti-
vating / De-activating Channels, page 47 for full instructions
on activating the channel.
The picture is dropping
• Move the camera(s) closer to the receiver.
• Try repositioning the camera(s), receiver or both to improve
the reception.
• Ensure you have raised the antenna on the receiver.
The picture is or has
become choppy
• The picture may become choppy when experiencing a lower
frame rate due to reduced signal strength (i.e. 10 frames per
second vs. a higher 25 frames per second).
• Try moving the camera(s) closer to the receiver.
• Remove obstructions between the receiver and camera(s).
Video display on the receiver is turned off
• Make sure that the receiver is turned on.
• The receiver’s battery is dead. Connect the receiver to a
power outlet using the included power adapter.
• Power saving mode is active. Press any button on the receiver to turn the video display on again.
Can’t access the main
menu
• The system is recording. The main menu cannot be accessed while the system is recording. See 8 Recording,
page 20 for details on pausing / stopping recording on the
unit.
The picture is white
• Common situation know as "washout" or "whitewash" where
a strong light source is pointed at the camera lens. The camera lens IS NOT harmed during a whitewash.
• DO NOT point your camera towards a light source.
#LX400030; r. 1.0/17112/17628; en-US
59
Page 64

Troubleshooting
13
Problem Solution
Bright spot in image
while viewing camera
at night
• This occurs when a camera is pointed at a window to see
outside, because the night vision LED's produce Infrared
light that reflects off the glass. If you need to look outside, install the camera outdoors. Please note that the camera
must be installed under shelter when placed outdoors.
There is no audio from
the camera(s)
• Make sure the receiver volume is not muted. Turn the receiver volume up.
• Ensure you are viewing your cameras in Single Channel or
Auto Sequence Viewing mode. There is no audio in Quad
mode.
#LX400030; r. 1.0/17112/17628; en-US
60
Page 65

Notices
14
WARNING
Infants have been STRANGLED in power cords. Keep power cords more than 3 feet away
from cribs, bassinets, play yards and other safe sleep environments for infants.
14.1 FCC Notice
This equipment has been certified and found to comply with the limits regulated by the FCC part 15, subpart C. Operation is subject to the following two
conditions: (1) this device may not cause harmful interference, and (2) this device must accept any interference received, including interference that may
cause undesired operation.
This equipment has been tested and found to comply with the limits for a
Class B digital device, pursuant to Part 15 of the FCC rules. These limits are
designed to provide reasonable protection against harmful interference in a
residential installation. This equipment generates, uses and can radiate radio
frequency energy and, if not installed and used in accordance with the instructions, may cause harmful interference to radio communications.
However, there is no guarantee that interference will not occur in a particular
installation. If this equipment does cause harmful interference to radio or television reception (which can be determined by turning the equipment on and
off), the user is encouraged to try to correct the interference by one or more of
the following measures:
• Reorient or relocate the receiving antenna
• Increase the separation between the equipment and receiver
• Connect the equipment into an outlet on a circuit different from that to
which the receiver is connected
• Consult the dealer or an experienced radio or television technician for
assistance
WARNING
To ensure compliance with the FCC’s RF exposure guidelines, this equipment should be
installed and operated with minimum distance 20cm (7.87in) between the radiator and
nearby persons.
#LX400030; r. 1.0/17112/17628; en-US
61
Page 66

Notices
14
14.2 Industry Canada Notice
This device complies with Industry Canada licence-exempt RSS standard(s).
Operation is subject to the following two conditions: (1)This device may not
cause harmful interference, and (2) This device must accept any interference
received, including interference that may cause undesirable operation.
This Class B digital apparatus complies with Canadian ICES-003.
Le présent appareil est conforme aux CNR d'Industrie Canada applicables
aux appareils radio exempts de licence. L'exploitation est autorisée aux deux
conditions suivantes : (1) l'appareil ne doit pas produire de brouillage, et (2)
l'utilisateur de l'appareil doit accepter tout brouillage radioélectrique subi,
même si le brouillage est susceptible d'en compromettre le fonctionnement.
Cet appareil numérique de la classe B est conforme à la norme NMB-003 du
Canada.
14.3 Modification
Any changes or modifications not expressly approved by the grantee of this
device could void the user's authority to operate the device.
Toute modification non approuvée explicitement par le fournisseur de licence
de l'appareil peut entraîner l'annulation du droit de l'utilsateur à utiliser
l'appareil.
14.4 RoHS
This product is fully compliant with the European Union Restriction of the Use
of Certain Hazardous Substances in Electrical and Electronic Equipment
("RoHS") Directive (2002/95/EC). The RoHS directive prohibits the sale of
electronic equipment containing certain hazardous substances such as lead,
cadmium, mercury, and hexavalent chromium, PBB, and PBDE in the European Union.
Note
• It is imperative that the user follows the guidelines in this manual to avoid improper usage which may result in damage to the product, electrical shock, and fire hazard injury.
In order to improve the features, functions, and quality of this product, the specifications are subject to change without notice from time to time.
• Please see the label on your device for FCC/IC certification numbers.
#LX400030; r. 1.0/17112/17628; en-US
62
Page 67

last page
Publ. No.: LX400030
Release: 1.0
Commit:
17112
Head: 17628
Language: en-US
Modified: 2014-09-12
Formatted: 2014-09-25
Website
www.lorextechnology.com
Copyright
© 2014, Lorex Corporation
All rights reserved worldwide. Names and marks appearing herein are either registered trademarks or
trademarks of Lorex Corporation and/or its subsidiaries. All other trademarks, trade names or company
names referenced herein are used for identification only and are the property of their respective owners.
Legal disclaimer
As our product is subject to continuous improvement, Lorex Corporation & subsidiaries reserve the right to
modify product design, specifications & prices without notice and without incurring any obligation.E&OE.
Page 68

GUIDE DE
L'UTILISATEUR
SÉRIES LW1740 /
LW2740
Page 69

Merci d’avoir acheté ce produit. Lorex s'engage à fournir à nos clients une
solution de sécurité fiable et de haute qualité.
Ce manuel fait référence aux modèles suivants :
• LW1741
• LW1742
• LW1744
• LW2742
Pour le manuel en ligne le plus récent, les téléchargements et mises à jour du
produit, et pour en savoir plus sur notre gamme complète d'accessoires,
veuillez visiter notre site Web : www.lorextechnology.com
AVERTISSEMENT
• Risque de décharge électrique. Ne pas ouvrir.
• Ne pas retirer le couvercle pour réduire le risque de court circuit. Aucune pièce
réparable par l'utilisateur à l'intérieur. S'adresser à un service personnel qualifié pour
l'entretien.
• Pour prévenir tout risque d'incendie ou d'électrocution, n'exposez pas cet appareil à la
pluie ou l'humidité.
• Afin d'éviter un court circuit, engager la fiche large de la fiche dans la large rainure et
l'encastrer complètement.
ATTENTION
• Tester le moniteur vidéo avant de l'utiliser. Se familiariser avec ses fonctions.
• Si vous n'envisagez-pas d'utiliser l'unité pour une période de temps prolongée,
déconnectez la batterie ou assurez-vous de la recharger au moins tous les 3 mois.
• Ne jamais utiliser de rallonges électriques avec des adaptateurs de courant.
• Utiliser seulement les chargeurs et les adaptateurs de courant fournis. Ne pas utiliser
d'autres chargeurs ou adaptateurs de courant, car cela pourrait endommager l'appareil
et le bloc-piles.
• Insérez des batteries / paquets de batteries du même type seulement.
• Ne pas couvrir le moniteur vidéo avec une serviette ou une couverture.
• N'utilisez pas cet outil dans des conditions humides ou mouillées.
• Ne pas installer le moniteur vidéo à proximité d'une source de chaleur.
• Ne pas toucher aux contacts des connecteurs avec des objets pointus ou métalliques.
• Il est fortement recommandé que le produit soit branché à un parasurtenseur pour le
protéger des surtensions électriques. Il est également recommandé de brancher le
produit sur une alimentation sans interruption (ASI) qui comprend une batterie interne
qui fait en sorte que le produit fonctionne même en cas de panne de courant.
• Conserver ce guide de l'utilisateur pour référence future.
#LX400030; r. 1.0/17626/17626; fr-CA iv
Page 70

Tables des matières
1 Fonctions des séries LW1740 / LW2740..................................1
2 Mise en route......................................................................3
3 Installation de la caméra ou des caméras...............................4
3.1 Conseils d'installation ..................................................4
3.2 Positions de montage ..................................................4
4 Installation du récepteur ......................................................7
4.1 Régler l'heure ............................................................9
5 Vue d'ensemble de la caméra ............................................. 11
6 Aperçu du récepteur ACL................................................... 12
6.1 Panneau avant......................................................... 12
6.2 Panneau latéral ........................................................ 13
6.3 Panneau arrière........................................................ 14
7 Utilisation du système ....................................................... 15
7.1 Compréhension de l'affichage sur l'écran....................... 15
7.2 Écran du menu de navigation ...................................... 17
7.3 Modes de visualisation .............................................. 17
7.3.1 Mode de vision en séquence
automatique ..................................................18
7.3.2 Mode Quad .................................................. 18
7.4 Zoom numérique ...................................................... 19
7.5 Modification du volume de l'audio. ................................ 19
8 Enregistrement ................................................................. 21
8.1 Formatage de la mémoire........................................... 21
8.2 Sommaire du mode enregistrement .............................. 22
8.3 Enregistrement programmé ........................................ 23
8.3.1 Création d'un enregistrement programmé............ 24
8.3.2 Mettre en pause l'enregistrement
programmé ...................................................25
8.3.3 Modifier / désactiver un enregistrement
programmé ...................................................26
8.3.4 Suppression d'un enregistrement
programmé ...................................................27
8.4 Enregistrement manuel.............................................. 27
8.5 Faire une capture d'image .......................................... 28
8.6 Activation / désactivation d'écrasement de fichier ............ 28
8.7 Configurer l'heure d'enregistrement pour les
événements sur détection de mouvement.......................29
#LX400030; r. 1.0/17626/17626; fr-CA
v
Page 71

Tables des matières
8.8 Sensibilité de la détection de mouvement ...................... 30
8.9 Zone de détection de mouvement ................................ 31
8.10 Activation / Désactivation de l'alerte de détection de
mouvement..............................................................33
8.11 Durée maximum d'enregistrement................................ 35
9 Lecture ............................................................................ 36
9.1 Lecture vidéo........................................................... 36
9.1.1 Commandes de Lecture .................................. 37
9.2 Visionnement des captures d'image ............................. 38
9.3 Suppression de fichiers.............................................. 39
9.4 Visionner les vidéo directement sur la carte
microSD..................................................................40
9.4.1 Aperçu du lecteur........................................... 42
10 Paramètres....................................................................... 44
10.1 Luminosité de la caméra ............................................ 44
10.2 Activation / désactivation de l'horodatage....................... 45
10.3 Modification du format de l'horodatage .......................... 46
10.4 Mode d'économie d'énergie ........................................ 48
10.5 Activation désactivation des canaux ............................. 49
10.6 Modifier l'intervalle de balayage pour la vision en
séquence automatique...............................................51
10.7 Mise à jour du micrologiciel......................................... 52
10.8 Rétablissement des paramètres par défaut .................... 52
11 Jumelage de caméras supplémentaires ............................... 54
12 Spécifications techniques .................................................. 57
12.1 Spécifications générales ............................................ 57
12.2 Spécifications de la caméra ........................................ 57
12.3 Spécifications du récepteur......................................... 58
12.4 Dimensions ............................................................. 59
12.4.1 Récepteur LCD ............................................. 59
12.4.2 Caméra avec support de métal ......................... 59
13 Dépannage....................................................................... 60
14 Avis ................................................................................. 62
14.1 Avis de la FCC ......................................................... 62
14.2 Remarque de l'industrie canadienne ............................. 63
14.3 Modification............................................................. 63
14.4 RoHS..................................................................... 63
#LX400030; r. 1.0/17626/17626; fr-CA vi
Page 72

Fonctions des séries
LW1740 / LW2740
1
• Moniteur ACL rechargeable sans fil de 7 po
1
• Caméra étanche sans fil.
2
• Enregistrement programmé, manuel et par détection de mouvement.
• Contrôle sur écoute.
3
• Expansible à jusqu'à 4 caméras.
• Carte mémoire microSD incluse; prend en charge 32Go.
• Menu facile à utiliser avec des icônes.
• Installation facile. Aucun câble vidéo requis.
• Détection de mouvement vidéo.
• Enregistrement horodatés pour récupération facile.
• Tableau de commande à effleurement.
• Un filtre infrarouge motorisé garanti une reproduction de la couleur dans
toutes les conditions d'éclairage.
• Vision nocturne jusqu'à 65 pi (20 m) de distance en conditions d'éclairage
nocturne et jusqu'à 45 pi (14 m) de distance dans l'obscurité totale.
4
• Vision et enregistrement simultané jusqu'à 4 caméras en quadravision.
• Signal sans fil sécurisé (FHSS).
• Rayon intérieur sans fil de jusqu'à 150 pi (50 m) / et extérieur de jusqu'à
450 pi (150 m).
5
• Enregistrement vidéo en temps réel.
• Zoom numérique 2 x.
#LX400030; r. 1.0/17626/17626; fr-CA
1
Page 73

Fonctions des séries LW1740 / LW2740
1
REMARQUE
1. Jusqu'à 5 heures de contrôle portable sans fil. Pour de longues surveillances, assurez-vous que le moniteur sans fil soit connecté à une prise de courant.
2. Les caméras sans fil nécessitent une connexion câblée à une prise de courant. Non
destiné à une exposition directe à la pluie ou la neige. Pour des applications à l'extérieur, installez sous un abri protégé contre les intempéries.
3. L'enregistrement audio sans consentement est illégal dans certaines juridictions. Lorex Corporation décline toute responsabilité concernant l'usage de produits non
conforme aux lois locales.
4. Les plages de portée IR sont basées sur des conditions idéales dans l'obscurité totale et dans la luminosité ambiante de l'extérieur durant la nuit. La portée réelle et la
clarté de l'image dépendent de l'emplacement, de la zone visualisée et du degré de
réflexion/absorption de la lumière.
5. Distance extérieure de visibilité de jusqu'à 450 pi (150 m) et intérieur de jusqu'à
150 pi (50 m). La portée réelle varie en fonction des obstacles.
#LX400030; r. 1.0/17626/17626; fr-CA
2
Page 74

Mise en route
2
Le système comprend les éléments suivants :
Caméra(s)* sans fil
intérieure /
extérieure
Récepteur ACL re-
chargeable de 7 po.
Adaptateurs d'ali-
mentation pour ré-
cepteurs et caméra
(s)*
Batterie au Lithium
polymère
rechargeable
Antenne(s) sans fil
pour caméra(s)
(SMA)*
Carte mémoire
microSD
(pré-insérée dans
le récepteur)
Trousse(s) de
montage*
Guide de démarrage
rapide
* La configuration peut varier en fonction du modèle
REMARQUE
La configuration de la caméra, la capacité de la carte de mémoire, et le nombre d'accessoires peuvent varier en fonction du modèle. Pour de plus amples informations, veuillez
vous référer à votre emballage. Vérifier votre emballage pour vous assurer d'avoir reçu le
système complet.
#LX400030; r. 1.0/17626/17626; fr-CA
3
Page 75

Installation de la caméra ou
des caméras
3
ATTENTION
Les caméras peuvent être installées à
l'extérieur, elles sont résistantes aux intempéries, mais pas imperméables. Les
caméras ne sont pas destinées à une
exposition directe à la pluie ou la
neige. Pour des applications à l'extérieur,
installez sous un abri protégé contre les
intempéries, par exemple sous l'avant-toit
de la toiture. Le schéma ci-dessous présente un emplacement idéal pour une installation extérieure.
3.1 Conseils d'installation
• Avant d'installer la caméra, prévoyez son emplacement et son orientation,
ainsi que son câblage jusqu'à la prise de courant.
• Avant de commencer l'installation définitive, vérifiez l'image de la caméra
sur le récepteur en la présentant sur son emplacement définitif.
• Il est recommandé de laisser une ligne de vision directe entre la caméra et
le récepteur et de limiter la quantité d'obstacles, tels que des murs et des
branches d'arbres, entre la caméra et le récepteur. Les murs faits de matériaux de construction lourds comme la brique ou le béton réduiront considérablement la portée du signal.
• Si le signal doit passer à travers un mur, placer le récepteur ou la caméra à
côté d'une fenêtre permettra d'améliorer la puissance du signal.
• N'installez pas la caméra pointant à travers une fenêtre. La photo de nuit
sera inutilisable en raison de la réflexion de la DEL de vison nocturne.
• Les caméras sont pré-jumelées afin de fonctionner dès l'installation.
Chaque caméra a un autocollant de numéro de canal indiquant à quel canal elle est couplée. Si vous avez acheté des caméras additionnelles, vous
devrez les jumeler au récepteur, voir 11 Jumelage de caméras supplémen-
taires, page 54.
3.2 Positions de montage
Vous pouvez fixer vos caméras au mur ou sur un comptoir. Pour les recommandations visant le support de la caméra et de l’antenne, voir les images cidessous.
#LX400030; r. 1.0/17626/17626; fr-CA
4
Page 76

Installation de la caméra ou des caméras
3
Mur
Comptoir
Installation de la caméra ou des caméras :
1. Utiliser les vis de montage incluses pour fixer le(s) support(s) de la camé-
ra sur la surface de montage :
• Marquer la position des orifices des vis de la base du support de montage sur la surface de montage.
• Percer les orifices et insérer les bouchons de cloisons sèches (inclus)
si l'installation s'effectue sur un surface de cloison sèche.
• Fixer fermement la/les caméra(s) sur la surface de montage au moyen
des vis incluses.
REMARQUE
Si vous passez le câble d'alimentation à travers la surface de montage, bien connecter l'alimentation avant de fixer la caméra au mur.
2. Fixez le(s) support(s) et l'antenne ou les antennes à la caméra ou aux
caméras.
#LX400030; r. 1.0/17626/17626; fr-CA
5
Page 77

Installation de la caméra ou des caméras
3
3. Desserrer la bague de réglage du/des support(s) de métal de la caméra
et orienter la caméra comme souhaité. Resserrer la bague de réglage une
fois terminé, en maintenant fermement la caméra sur sa position.
4. Connecter une extrémité de l'adaptateur d'alimentation de la caméra à la
caméra et l'autre à une prise de courant ou protecteur de surtension. Assurez-vous que le connecteur d'alimentation est complètement inséré afin
d'éviter que l'eau n'entre dans la fiche.
REMARQUE
Les câbles ne sont étanches que lorsque complètement encastrés sur le point de
connexion. Les câbles d'alimentation ne doivent pas être submergés d'eau.
5. Retirer le film protecteur à l'avant de la caméra. Si le film n'est pas retiré,
ceci affectera la qualité de l'image.
#LX400030; r. 1.0/17626/17626; fr-CA
6
Page 78

Installation du récepteur
4
1. Utiliser un tournevis Phillips (non inclus) pour ouvrir le compartiment de la
batterie sur le panneau arrière.
2. Insérer la batterie incluse de façon à ce que l'indication « THIS SIDE UP »
soit visible, et les onglets de plastique transparent soient tournés vers l'extérieur. Replacer le couvercle du compartiment de la batterie.
THIS SIDE UP
ATTENTION
Si vous n'envisagez-pas d'utiliser l'unité pour une période de temps prolongée, déconnectez la batterie ou assurez-vous de la recharger au moins tous les 3 mois.
#LX400030; r. 1.0/17626/17626; fr-CA
7
Page 79

Installation du récepteur
4
3. Connecter l'adaptateur d'alimentation inclus au récepteur et à une prise
de courant.
Micr o SD
DC 5V
4. Charger le récepteur toute une nuit avant de l'utiliser pour la première fois.
5. Tirez l'antenne à l'arrière du récepteur ACL vers le haut.
6. Enfoncer et retenir le bouton de mise en marche sur le tableau avant pour
2 secondes. L'écran de démarrage apparait, suivi de la vidéo en direct de
votre/vos caméra(s).
REMARQUE
Si l'une des caméras n'apparait pas si sélectionnée (par exemple, la caméra 2 est
branchée mais n'apparait pas sur le canal 2), voir 11 Jumelage de caméras supplé-
mentaires, page 54.
Conseils :
• Placez le récepteur dans un endroit qui lui permette une bonne réception
de la caméra. Essayez de maintenir la ligne de mire et de réduire au minimum le nombre d'obstacles entre la caméra et le récepteur.
#LX400030; r. 1.0/17626/17626; fr-CA
8
Page 80

Installation du récepteur
4
• Orienter l'antenne sur récepteur de façon à obtenir une bonne réception.
• Le récepteur vient une carte microSD pré-insérée, pour vous permettre
d'enregistrer immédiatement. Le récepteur est compatible avec la plupart
des grandes marques de carte microSD de jusqu'à 32 Go. Pour la durée
des enregistrements sur carte microSD, voir 8.11 Durée maximum d'enre-
gistrement, page 35.
4.1 Régler l'heure
Il est fortement recommandé de régler la date et l'heure du système avant
d'enregistrer, pour l'horodatage. Le réglage de la date et de l'heure vous permettra de planifier les enregistrements.
Pour régler l'heure :
1. • Appuyer
pour ouvrir le menu principal.
2. Sélectionnez l'icône System Setting au moyen de la touche
/ en-
suite appuyez sur
.
3. Sélectionnez Clock Setup, ensuite appuyez sur .
4. Appuyez sur
/ pour régler la date actuelle et l'heure. Appuyez sur
/ pour vous déplacer entre les éléments.
5. Une fois terminé, appuyez sur pour sauvegarder les paramètres.
#LX400030; r. 1.0/17626/17626; fr-CA
9
Page 81

Installation du récepteur
4
6. Appuyez sur
plusieurs fois pour fermer toutes les fenêtres restantes
du menu.
La date et l'heure apparaitront sur le bas de l'écran en mode de vision en
temps réel. La date et l'heure apparaitront aussi sur la vidéo enregistrée
sur le haut de l'affichage de la vidéo.
#LX400030; r. 1.0/17626/17626; fr-CA
10
Page 82

Vue d'ensemble de la caméra
5
1
2
3
Pai r
4
6
5
1. Antenne : Antenne démontable sans fil (SMA).
2. DEL IR : Vision nocturne DEL IR.
3. Lentilles.
4. Jumeler : Appuyer pour jumeler les caméras additionnelles au système.
Voir 11 Jumelage de caméras supplémentaires, page 54 pour une description complète.
5. Point de fixation : Fixer le support de métal inclus à la caméra. Voir 3 In-
stallation de la caméra ou des caméras, page 4 pour une description
complète.
6. Microphone : Microphone intégré pour l'écoute audio.
#LX400030; r. 1.0/17626/17626; fr-CA
11
Page 83

Aperçu du récepteur ACL
6
6.1 Panneau avant
OK
2
3
45678910111
2
1
1. Écran ACL.
2. Indicateur DEL : Indique le statut du système de la manière suivante :
• Vert prononcé : Indique que la batterie est à la moitié ou plus.
• Rouge prononcé : Indique que le récepteur est branché et éteint.
• Rouge clignotant : Indique que la batterie est basse et doit être bran-
chée à une prise de courant OU, le récepteur est branché mais la batterie n'est pas en place.
3. Bouton de mise en marche : Appuyer et retenir pour 2 secondes pour al-
lumer et éteindre le récepteur.
4. Menu : Appuyer pour entrer dans le menu du système.
5. Entrer / Lecture / Pause :
• Dans les menus, appuyer pour confirmer une sélection.
• En mode lecture, appuyez pour lire ou mettre en pause la vidéo.
6. Gauche / rebobiner :
• Dans les menus, appuyer pour déplacer la sélection vers la gauche.
• En mode direct, appuyer pour changer à mode vision. Pour de plus am-
ples renseignements, consulter 7.3 Modes de visualisation , page 17.
• Dans lecture de vidéo, appuyer et retenir pour rebobiner.
#LX400030; r. 1.0/17626/17626; fr-CA
12
Page 84

Aperçu du récepteur ACL
6
7. Droite / Avance rapide :
• Dans les menus, appuyer pour déplacer la sélection vers la droite.
• En mode direct, appuyer pour changer à mode vision. Pour de plus am-
ples renseignements, consulter 7.3 Modes de visualisation , page 17.
• Dans lecture de vidéo, appuyer et maintenir enfoncé pour avancer
rapidement.
8. Bas / diminuer le volume : Appuyer pour déplacer la sélection vers le
bas dans menus, ou pour diminuer le volume en vision en direct.
9. Haut / augmenter le volume : Appuyer pour déplacer la sélection vers le
haut dans menus, ou pour augmenter le volume en vision en direct.
10. Revenir / Arrêter : Appuyer pour revenir sur le menu précédant ou pour
arrêter la lecture de la vidéo.
11. Enregistrement / capture d'écran / supprimer :
• Appuyer en vision en direct pour obtenir une capture d'écran. Pour de
plus amples renseignements concernant les captures d'écran, voir 8.5
Faire une capture d'image, page 28.
• Appuyer et retenir en mode de vision en direct pour commencer l'enre-
gistrement manuellement. Pour de plus amples renseignements
concernant les enregistrements manuels, voir 8.4 Enregistrement ma-
nuel, page 27.
• Appuyer lors de la sélection d'une capture d'écran ou une vidéo dans
le menu de lecture pour supprimer le fichier. Pour de plus amples renseignements concernant la suppression des captures d'écran et les enregistrements vidéo, voir 9.3 Suppression de fichiers, page 39.
12. Zoom : Appuyer pour démarrer le zoom numérique 2 x.
6.2 Panneau latéral
Micro S D
DC 5V
2
1
1. Port d'alimentation : Connecter l'adaptateur 5V c.c.inclus au port d'ali-
mentation et à la prise de courant ou parasurtenseur afin d'alimenter le
récepteur.
#LX400030; r. 1.0/17626/17626; fr-CA
13
Page 85

Aperçu du récepteur ACL
6
2. Fente pour carte microSD : La carte microSD incluse est déjà pré-
insérée.
REMARQUE
• Le récepteur prend en charge des cartes microSD de jusqu'à 32 Go.
• Lorex Il est recommandé d'utiliser des cartes microSD ou microSDHC (classe 4
ou supérieure) pour ce récepteur. Lorex recommande les marques suivantes de
carte microSD : Adata, Kingston, Patriot, Sandisk, et Toshiba.
6.3 Panneau arrière
231
4
1. Antenne sans fil : Orienter l'antenne en fonction d'une bonne réception.
2. Compartiment de la batterie : Insérer la batterie rechargeable incluse :
Consulter 4 Installation du récepteur, page 7 afin d’obtenir les directives
d’installation complètes.
3. Support de soutien : Retirer le support de soutien pour le placer sur une
superficie plate.
4. Haut-parleur.
#LX400030; r. 1.0/17626/17626; fr-CA
14
Page 86

Utilisation du système
7
Par défaut, la/les caméra(s) incluses avec votre système sont automatiquement jumelées au récepteur. Les caméras et le récepteur communiqueront
entre eux dès qu'ils seront allumés.
REMARQUE
Il est recommandé de brancher la/les caméra(s) sur le courant avant de les brancher sur
le récepteur.
7.1 Compréhension de l'affichage sur l'écran
Avec la caméra 1 correctement connectée et branchée, le système affiche
une vision en direct de la caméra en plein écran.
2014/0 8/18 17:14:18
1
3
4
5
7
6
ZOOM
8
Lors du visionnement de tous les canaux en quadravision, l'interface se montre légèrement différente.
#LX400030; r. 1.0/17626/17626; fr-CA
15
Page 87

Utilisation du système
7
2014/0 8/18 17:14:18
1
2
4
5
7
6
1. Indicateur de canal : Affiche le canal de lecture. En cas de visionnement
en quadravision, l'indicateur de la caméra apparaitra sur chaque affichage
de la vidéo.
2. Indicateur du mode visionnement : Indique le mode visionnement en
montrant un icône différent pour les modes quadravision (
) vi-
sionnement de séquence automatique (
). Si aucun indicateur
de mode visionnement n'apparait durant la vision en direct, le système adopte le mode de vision d'un seul canal.
3. Indicateur de zoom : Indique que la vision en direct actuelle augmente
deux fois la taille originelle. Le zoom numérique est désactivé en mode
quadravision.
#LX400030; r. 1.0/17626/17626; fr-CA
16
Page 88

Utilisation du système
7
4. Indicateur de signal : L'indicateur de signal affiche la force du signal
sans fil de chaque caméra connectée. Le nombre de barres indique la
force du signal. Une barre ou plus indique un signal pauvre, et 4 barres indiquent un signal très fort.
REMARQUE
Si le signal est bas (par exemple, 1 ou 2 barres) ajuster les antennes, ou ré-orienter
la/les caméra(s) ou du récepteur pour obtenir un meilleur résultat.
5. Indicateur de batterie : Affiche le niveau de la batterie. L'icône clignote
quand la batterie est critiquement basse, pour indiquer que le récepteur
doit être branché sur une prise de courant tout de suite.
6. Horodatage : La date et l'heure actuelle du système.
7. L'indicateur d'enregistrement : Un cercle rouge s'affiche dans le bas de
l'écran sur la droite lorsqu'un enregistrement s'effectue.
8. Indicateur de volume : Affiche le volume actuel du récepteur. L'indica-
teur de volume s'affiche sur l'écran lorsque que vous modifiez le volume
au moyen de la touche
/ .
7.2 Écran du menu de navigation
Utiliser les menus du système pour configurer les paramètres.
• Appuyer sur pour entrer dans le menu principal.
• Appuyer sur les touches
pour déplacer le curseur vers la gau-
che, la droite, monter ou descendre.
• Appuyer sur
pour ouvrir les sous-menus et confirmer les sélections
de menu.
• Appuyer sur
pour revenir sur les menus ou en sortir.
7.3 Modes de visualisation
Il y a 3 modes différents de visualisation disponibles sur le système : Mode
de visualisation d'un seul canal , mode de visualisation de séquence
#LX400030; r. 1.0/17626/17626; fr-CA
17
Page 89

Utilisation du système
7
automatique (vision des canaux individuels par séquence), et mode quadravision (vision des 4 canaux à la fois en écran partagé)
Pour passer d'un mode d'affichage à un autre :
• Appuyer sur
/ pour sélectionner un seul canal parmi les 4, ainsi que
pour activer les modes de vision quad et séquence automatique.
7.3.1 Mode de vision en séquence automatique
Par défaut, le mode de vision en séquence automatique circule parmi tous les
canaux connectés en plein écran. Si vous ne souhaitez voir que 2 o 3 caméras sur chaque cycle, vous pouvez retirer les canaux connectés du format de
vision en séquence automatique. Consulter 10.5 Activation désactivation des
canaux, page 49 pour plus de détails.
Exemple de séquence automatique
Pour activer la vision en séquence automatique :
• Appuyer sur
/ jusqu'à ce qu'un seul canal soit affiché sur l'écran avec
l'icône de séquence automatique (
) sur le haut. Le récepteur cir-
cule automatiquement parmi les canaux connectés.
• Pour revenir sur la vision de canal unique, appuyer sur
/ jusqu'à ce
que l'icône de l'indicateur du mode vision disparaisse de l'écran.
7.3.2 Mode Quad
Utiliser le mode quad pour visionner quatre canaux simultanément.
Pour activer le mode quad :
• Appuyer sur
/ jusqu'à ce que l'écran partagé apparaisse avec l'icône
quad (
) sur le haut. Le récepteur affiche les 4 canaux
simultanément.
#LX400030; r. 1.0/17626/17626; fr-CA
18
Page 90

Utilisation du système
7
Exemple quad
7.4 Zoom numérique
La fonction de zoom numérique vous permet de vous rapprocher en 2 x sur
une seule caméra lors de la vision en direct. Ceci est utile si vous avez besoin
de vous rapprocher sur un évènement à quelque distance de la caméra.
Pour utiliser le zoom numérique :
1. Sélectionner la caméra souhaitée en mode de canal unique (appuyer sur
/ pour choisir le canal) et appuyer sur sur le panneau frontal du
récepteur pour vous rapprocher. Lorsque le zoom numérique est activé, la
vision en direct affiche un agrandissement 2 x normal. Le mot ZOOM s'affiche sur le haut de l'écran, et 4 flèches apparaissent sur l'image de la
caméra.
2014/0
8/18 17:14:18
2014/0
8/18 17:14:18
ZOOM
2. Utiliser les touches pour balayer dans la direction souhaitée
et focaliser sur les différentes sections de l'image.
3. Appuyer sur
à nouveau pour sortir du zoom numérique.
7.5 Modification du volume de l'audio.
Le récepteur peut lire et enregistrer l'audio depuis la caméra que vous
regardez.
Pour modifier le volume :
#LX400030; r. 1.0/17626/17626; fr-CA
19
Page 91

Utilisation du système
7
• Appuyer sur
/ pour modifier le volume de l'audio.
Le volumètre s'affiche sur l'écran pour indiquer que le volume de l'audio vient
de la caméra sélectionnée :
REMARQUE
L'audio n'est pas disponible en mode quadravision.
#LX400030; r. 1.0/17626/17626; fr-CA
20
Page 92

Enregistrement
8
Les modes d'enregistrement suivants sont disponibles sur le système : l'enregistrement manuel , l'enregistrement manuel planifié, et l'enregistrement sur
détection de mouvement. Le système enregistre la vidéo sur la carte microSD
incluse.
Préalables de l'enregistrement :
• Une carte microSD doit être insérée dans le récepteur afin d'enregistrer la
vidéo. Toujours formater la carte microSD avant de commencer à enregistrer. Pour de plus amples renseignements, consulter 8.1 Formatage de la
mémoire, page 21.
REMARQUE
Le système prend en charge les cartes microSD ou les microSDHDC (classe 4 ou supérieur) de jusqu'à 32 Go. Lorex recommande les marques suivantes de carte microSD : Adata, Kingston, Patriot, Sandisk, et Toshiba.
8.1 Formatage de la mémoire
Il est fortement recommandé de formater la carte microSD avant de commencer à enregistrer.
Pour formater la carte microSD :
ATTENTION
Le formatage supprime toutes les données de la carte microSD. Cette étape ne peut pas
être inversée.
1. Insérer la carte microSD dans la fente de la carte du récepteur jusqu'à en-
tendre un « clic. » Veuillez insérer la carte en fonction du diagramme sur
le panneau latéral du récepteur.
#LX400030; r. 1.0/17626/17626; fr-CA
21
Page 93

Enregistrement
8
2. Appuyer sur
, ensuite sélectionner l'icône Recording. Appuyer sur
pour confirmer.
3. Sélectionner Format card et appuyer sur pour confirmer.
4. Sélectionner Confirm et appuyer sur pour confirmer.
REMARQUE
Patientez quelques instants pour que le formatage se termine. La durée du format
peut varier en fonction de la capacité de la carte.
5. Un message s'affichera pour confirmer le format. Appuyer sur
plu-
sieurs fois jusqu'à la fermeture des menus.
8.2 Sommaire du mode enregistrement
Le tableau suivant fourni un aperçu des capacités d'enregistrement du
système.
#LX400030; r. 1.0/17626/17626; fr-CA
22
Page 94

Enregistrement
8
Mode Description Fonctionnement
Enregistrement manuel
• Un enregistrement
continu sur canal unique
en plein écran ou les 4
canaux sur un fichier vidéo unique.
• Durant la vision en direct, appuyer et retenir
pour commencer
l'enregistrement manuel.
Appuyer sur
à nouveau pour arrêter l'enregistrement manuel.
Planifier l'enregistrement
manuel continu
• Enregistre en continu
sur les 4 canaux sur un
fichier unique. L'enregistrement commence et
arrête automatiquement
en fonction d'un horaire
quotidien.
• Appuyer sur
et sélectionner l'icône d'enregistrement planifié.
Appuyer sur
pour
confirmer. Établir une
période de temps pour
que le système enregistre chaque jour une vidéo en continu. Pour les
instructions complètes
de réglage, voir 8.3 En-
registrement programmé, page 23.
Enregistrement planifié par
détection de mouvement.
• Enregistre les évènements sur détection de
mouvement sur les 4 canaux sur un fichier
unique. L'enregistrement commence et arrête automatiquement
en fonction d'un horaire
quotidien.
• Appuyer sur
et sélectionner l'icône d'enregistrement planifié.
Appuyer sur
pour
confirmer. Établir une
période de temps pour
que le système enregistre chaque jour une vidéo sur détection de
mouvement. Pour les
instructions complètes
de réglage, voir 8.3 En-
registrement programmé, page 23.
8.3 Enregistrement programmé
Utiliser l'enregistrement programmé pour que le système enregistre automatiquement en continu pour une période de temps sélectionnée. Vous pouvez
tout enregistrer dans une période de temps, ou enregistrer seulement les évènements sur détection de mouvement pour une période de temps déterminée.
#LX400030; r. 1.0/17626/17626; fr-CA
23
Page 95

Enregistrement
8
Conditions préalables :
Veuillez vous assurer d'avoir correctement réglé la date et l'heure sur le récepteur avant de programmer un enregistrement. Consultez 4.1 Régler
l'heure, page 9.
Quand dois-je utiliser l'enregistrement programmé?
• Utiliser un programme d'enregistrement en continu si la caméra est orientée à un secteur de trafic important, tel que l'entrée ou la sortie d'une route.
• Utiliser un programme d'enregistrement sur détection de mouvement si la
caméra est orientée à un secteur de peu de trafic, tel qu'un dépôt ou entrée
latérale.
ATTENTION
Ne pas retirer la carte microSD lorsque le système enregistre. Retirer la carte microSD durant un enregistrement interrompra l'écriture du fichier et peut endommager les enregistrements de votre vidéo.
8.3.1 Création d'un enregistrement programmé
Suivre la procédure ci-dessous pour régler un enregistrement programmé en
continu ou sur détection de mouvement.
Création d'un enregistrement programmé :
1. Appuyer sur
, ensuite sélectionner l'icône Schedules. Appuyer sur
pour confirmer.
#LX400030; r. 1.0/17626/17626; fr-CA
24
Page 96

Enregistrement
8
2. Sélectionner la première fente disponible et appuyer sur
pour
commencer à configurer un nouvel enregistrement programmé.
3. Utiliser les touches / pour vous déplacer dans la période de temps,
et enregistrer le type de programmation, et utiliser les touches
/
pour modifier chaque paramètre :
• Pour enregistrer quoique ce soit durant la programmation : Régler
le type de programmation d'enregistrement sur SCHEDULE. Dans
l'exemple ci-dessous, le système enregistrera en continu entre 19 h 00
et 10 h 00 tous les jours.
• Pour enregistrer sur détection de mouvement seulement durant
la programmation : Régler le type de programmation d'enregistrement sur MOTION. Dans l'exemple ci-dessous, le système enregistrera
sur détection de mouvement entre 19 h 00 et 10 h00 tous les jours.
4. Appuyer sur une fois l'enregistrement programmé sauvegardé.
5. Appuyer sur
plusieurs fois jusqu'à la fermeture des menus.
8.3.2 Mettre en pause l'enregistrement programmé
Vous devez mettre en pause l'enregistrement programmé afin d'accéder au
menu principal durant la période d'enregistrement.
Pour mettre en pause l'enregistrement programmé :
#LX400030; r. 1.0/17626/17626; fr-CA
25
Page 97

Enregistrement
8
• Appuyer sur
pour mettre momentanément en pause l'enregistrement
programmé. Lorsque l'indicateur d'enregistrement (
) réapparait sur
l'écran, l'accès au menu principal se bloquera à nouveau et l'enregistrement programmé se réinitialisera.
8.3.3 Modifier / désactiver un enregistrement programmé
Vous pouvez modifier les programmations que vous avez créées à tout moment, ainsi que les désactiver sans les supprimer.
Modification / désactivation d'un enregistrement programmé :
1. Appuyer sur
, ensuite sélectionner l'icône Schedules. Appuyer sur
pour confirmer.
2. Sélectionner l'enregistrement programmé que vous souhaitez modifier ou
désactiver et appuyer sur
.
3. Choisir l'une des options suivantes :
• Modification d'un enregistrement programmé : Utiliser les touches
/ pour vous déplacer dans la période de temps, et enregistrer le
type de programmation, et utiliser les touches
/ pour modifier
chaque paramètre.
• Désactivation d'un enregistrement programmé : Utiliser les tou-
ches
/ pour vous déplacer vers le type d'enregistrement pro-
grammé, et utiliser les touches
/ pour sélectionner NONE.
4. Appuyer sur une fois sauvegardé l'enregistrement programmé.
5. Appuyer sur
plusieurs fois jusqu'à la fermeture des menus.
#LX400030; r. 1.0/17626/17626; fr-CA
26
Page 98

Enregistrement
8
8.3.4 Suppression d'un enregistrement programmé
Vous pouvez supprimer tout enregistrement programmé pour le retirer de la
liste de programmation.
Suppression d'un enregistrement programmé :
1. Appuyer sur
, ensuite sélectionner l'icône Schedules. Appuyer sur
pour confirmer.
2. Sélectionner l'enregistrement programmé que vous souhaiter supprimer
et appuyer sur
pour le supprimer. Appuyer sur pour confirmer, ou
appuyer sur
pour annuler.
3. Appuyer sur
plusieurs fois jusqu'à la fermeture des menus.
8.4 Enregistrement manuel
L'enregistrement manuel vous permet de commencer et arrêter un enregistrement sur l'une des caméras ou les 4 en mode quadravision.
Quand dois-je utiliser l'enregistrement manuel?
• Enregistrement d'un évènement imprévu ou d'une urgence.
Pour activer l'enregistrement manuel :
1. Appuyer sur
/ jusqu'à voir affiché le canal souhaité.
2. Appuyer et retenir
pour commencer à enregistrer la vue actuelle.
Un indicateur d'enregistrement (
) s'affiche sur l'écran pour indiquer
que le système enregistre.
#LX400030; r. 1.0/17626/17626; fr-CA
27
Page 99

Enregistrement
8
ATTENTION
Ne pas retirer la carte microSD lorsque le système enregistre. Retirer la carte microSD durant un enregistrement interrompra l'écriture du fichier et peut endommager les enregistrements de votre vidéo.
8.5 Faire une capture d'image
Vous pouvez obtenir une capture d'écran sur un seul canal en plein écran ou
sur les 4 en mode quadravision en une seule image.
Pour faire une capture d'écran :
• Appuyer sur
sur le canal souhaité pour obtenir une capture d'écran.
Vous pouvez visionner les captures d'écran sur le récepteur ou sur votre
ordinateur.
8.6 Activation / désactivation d'écrasement de fichier
L'activation de l'écrasement de fichier supprimera les précédentes données
enregistrées sur la carte microSD une fois pleine afin de faire place aux nouveaux enregistrements.
Pour activer l'écrasement de fichier :
1. Appuyer sur
, ensuite sélectionner l'icône Recording. Appuyer sur
pour confirmer.
2. Sélectionner Overwrite et appuyer sur pour confirmer.
#LX400030; r. 1.0/17626/17626; fr-CA
28
Page 100

Enregistrement
8
3. Sélectionner ON et appuyer sur
pour activer l'écrasement de fichier.
4. Appuyer sur plusieurs fois jusqu'à la fermeture des menus.
REMARQUE
Si la carte microSD est pleine et vous n'avez pas activé l'écrasement de fichier, le système
n'enregistra pas de nouveaux fichiers. Vous devrez supprimer manuellement les fichiers
sur la carte microSD ou insérer une nouvelle carte dans le récepteur.
8.7 Configurer l'heure d'enregistrement pour les événements sur
détection de mouvement
Choisir la durée d'enregistrement de la vidéo lors de la détection d'un mouvement sur l'une des caméras.
Configurer l'heure d'enregistrement pour les évènements sur détection
de mouvement :
1. Appuyer sur
, ensuite sélectionner l'icône Recording. Appuyer sur
pour confirmer.
#LX400030; r. 1.0/17626/17626; fr-CA
29
 Loading...