

Page 1
HD Wi-Fi Active Deterrence Camera
Quick Start Guide
www.lorex.com
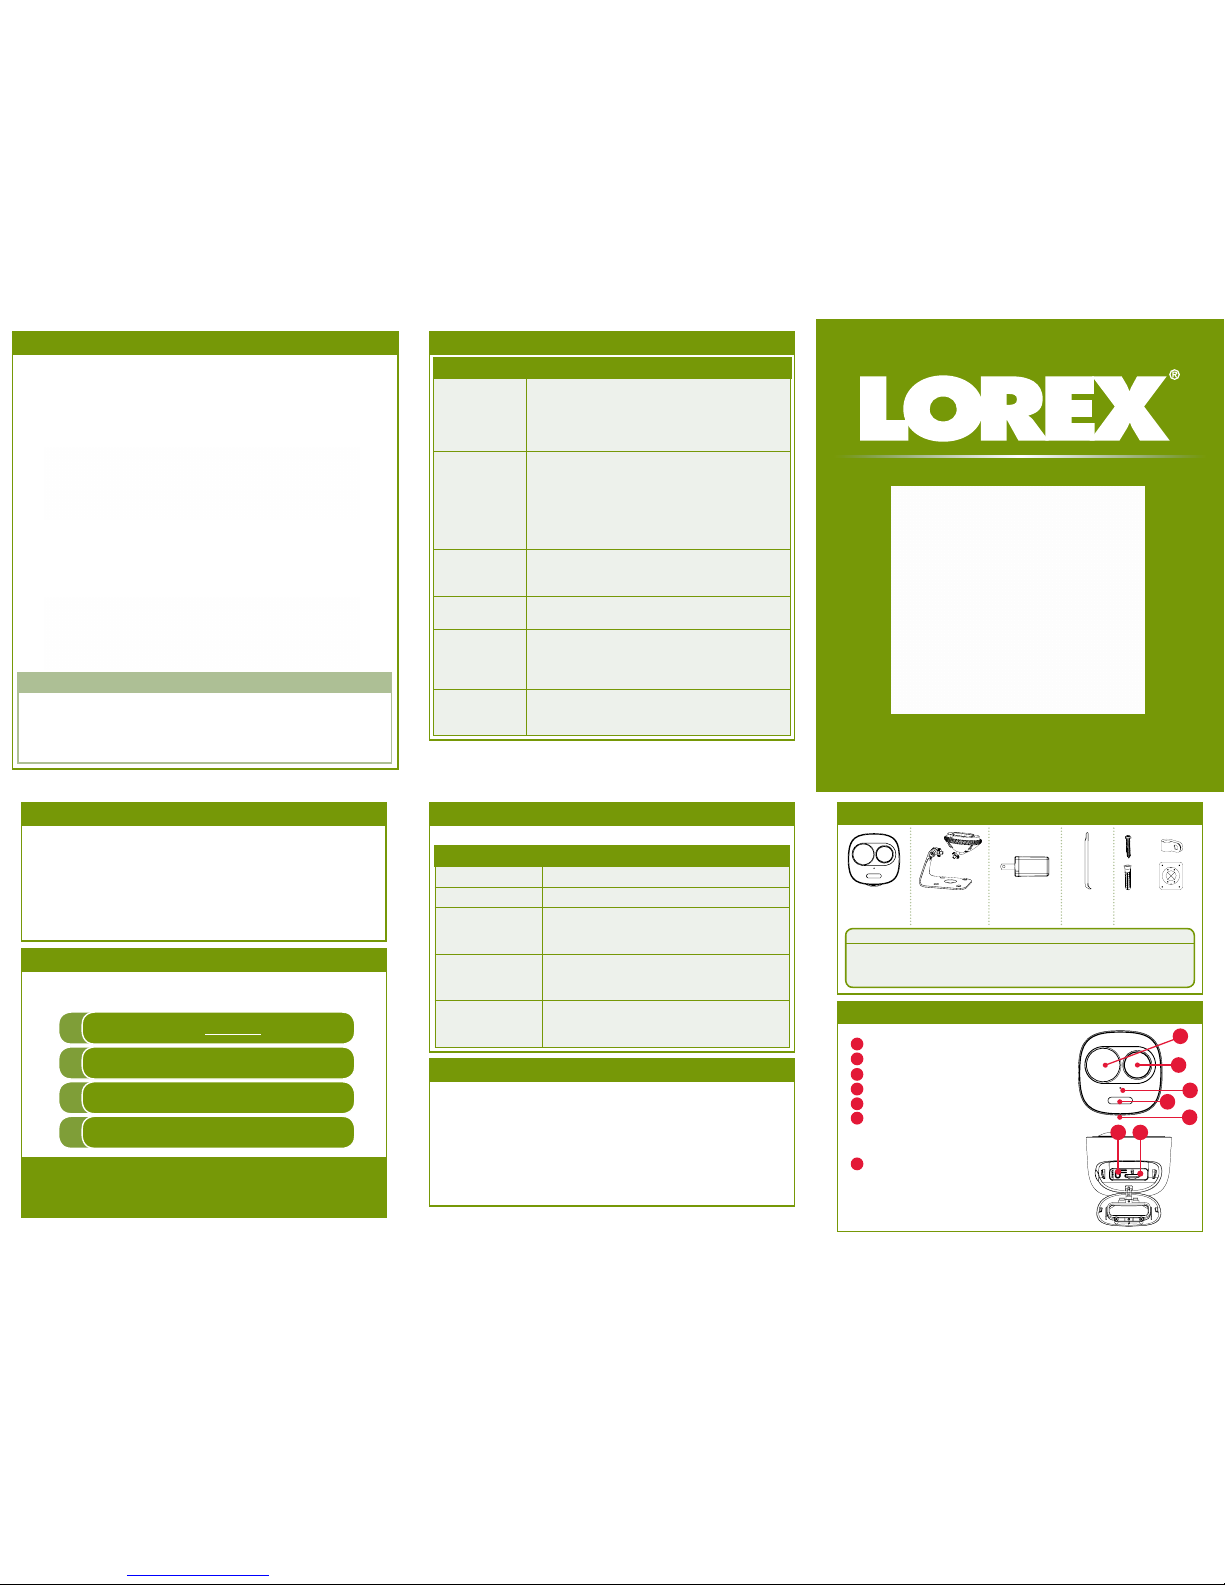
Package Contents
HD Wi-Fi
Camera
Mounting Kit
ATTENTION:
A REGULATED UL / CSA APPROVED power supply is REQUIRED for use
with this camera (included). Use of a non-regulated, non-conforming
power supply can damage this product and voids the warranty.
Camera Overview
Lens
Motion (PIR) Sensor
Microphone
Spotlights
Speaker
Reset Button: Press and hold
for 10 seconds to restore default
settings.
microSD Slot: microSD card preinserted (expandable up to 128GB).
A
B
C
D
E
A
B
C
D
E
F
F
G
G
Mounting
Stands
USB Power
Adapter
Mounting Kit
Safety Precautions
• Read this guide carefully and keep it for future reference.
• Follow all instructions for safe use and handling of the product.
• Use the camera within given temperature, humidity and voltage levels
noted in the camera’s specifications.
• Do not disassemble the camera.
• Do not point the camera directly at the sun or a source of intense
light.
• Periodic cleaning may be required. Use a damp cloth only. Do not use
any harsh, chemical-based cleaners.
Visit us online for up-to-date software and
complete instruction manuals.
Click on the Downloads tab
4
Visit lorex.com
Search for the model number
of your product
Click on your product in the
search results
3
2
1
Copyright © 2018 Lorex Corporation
As our products are subject to continuous improvement, Lorex reserves the
right to modify product design, specifications and prices, without notice and
without incurring any obligation. E&OE. All rights reserved.
• Place the camera as close to your Wi-Fi router or access point as possible.
• Reduce the number of obstructive materials between the camera and
the router or access point. Concrete, brick, metal and wood are the most
common materials in your house that can cause poor signal strength.
To ensure the best possible wireless performance, it is
recommended to keep the following installation tips in mind when
choosing a location for the camera:
• The camera uses the 2.4GHz band exclusively. Most new routers support
both 2.4GHz and 5GHz bands. It is recommended to use other Wi-Fi
devices on the 5GHz band when possible to ensure the 2.4GHz band is not
overcrowded.
• Other electronic devices such as microwaves, TVs, cordless phones, and
baby monitors can cause signal interference. It is recommended to install
the camera as far away from these devices as possible.
• Point the camera where there is the least amount of obstructions (i.e.,
tree branches).
• Install the camera where vandals cannot easily reach.
• This camera is rated for outdoor use. Installation in a sheltered location
is recommended.
Additional Positioning Tips
LNWCM23X_QSG_EN_R1
Installation Tips
Troubleshooting
Problem Solution
Cannot set up
camera
• Ensure you are using a 2.4GHz Wi-Fi network to
configure the camera. The camera does not work
with 5GHz networks.
• Ensure your mobile device is within 1ft (30cm) of
the camera during setup.
No picture /
signal
• Ensure the LED indicator on the camera is
glowing steady green. See ‘LED Behavior’ section
for details if otherwise.
• Ensure the camera is properly connected to
power using the included USB power adapter.
• Try repositioning the camera, router, or both to
improve signal strength.
Picture is not
clear
• Check the camera lens for dirt, dust, spiderwebs.
Clean the lens with a soft, clean cloth.
• Remove the vinyl cover on the camera lens.
No audio • Ensure audio function on camera is turned on.
• Ensure audio is turned up on viewing device.
The warning
light is not
switching on
automatically
• Ensure that you have enabled and configured
white light deterrence.
The siren is not
switching on
automatically
• The camera siren cannot switch on automatically.
You can control the camera siren manually using
the Lorex Home app.
×9×9×4
×1
LED Behavior
See table below for definitions of camera’s LED behaviors:
Behavior Meaning
Steady green
Operating correctly
Flashing green
Connecting to network
Steady red
Device malfunction. Try resetting the camera
(see ‘Camera Overview’ for details) and
repeating the setup.
Flashing red
Network connection failed. Try resetting the
camera (see ‘Camera Overview’ for details) and
repeating the setup.
Rapid flashing red
microSD error. Try removing and re-inserting
the included microSD card, or try a different
card.
Need Help?
Disclaimers
• Not intended for submersion in water. Installation in a sheltered location
recommended.
• This camera includes an Auto Mechanical IR Cut Filter. When the camera
changes between Day/Night viewing modes, an audible clicking noise may
be heard from the camera. This clicking is normal, and indicates that the
camera filter is working.
• Audio recording without consent is illegal in certain jurisdictions. Lorex
Corporation assumes no liability for use of its products that does not
conform with local laws.
3
2
1
*
* Use the included access tool to remove the
service compartment cover.
Access
Tool
Page 2
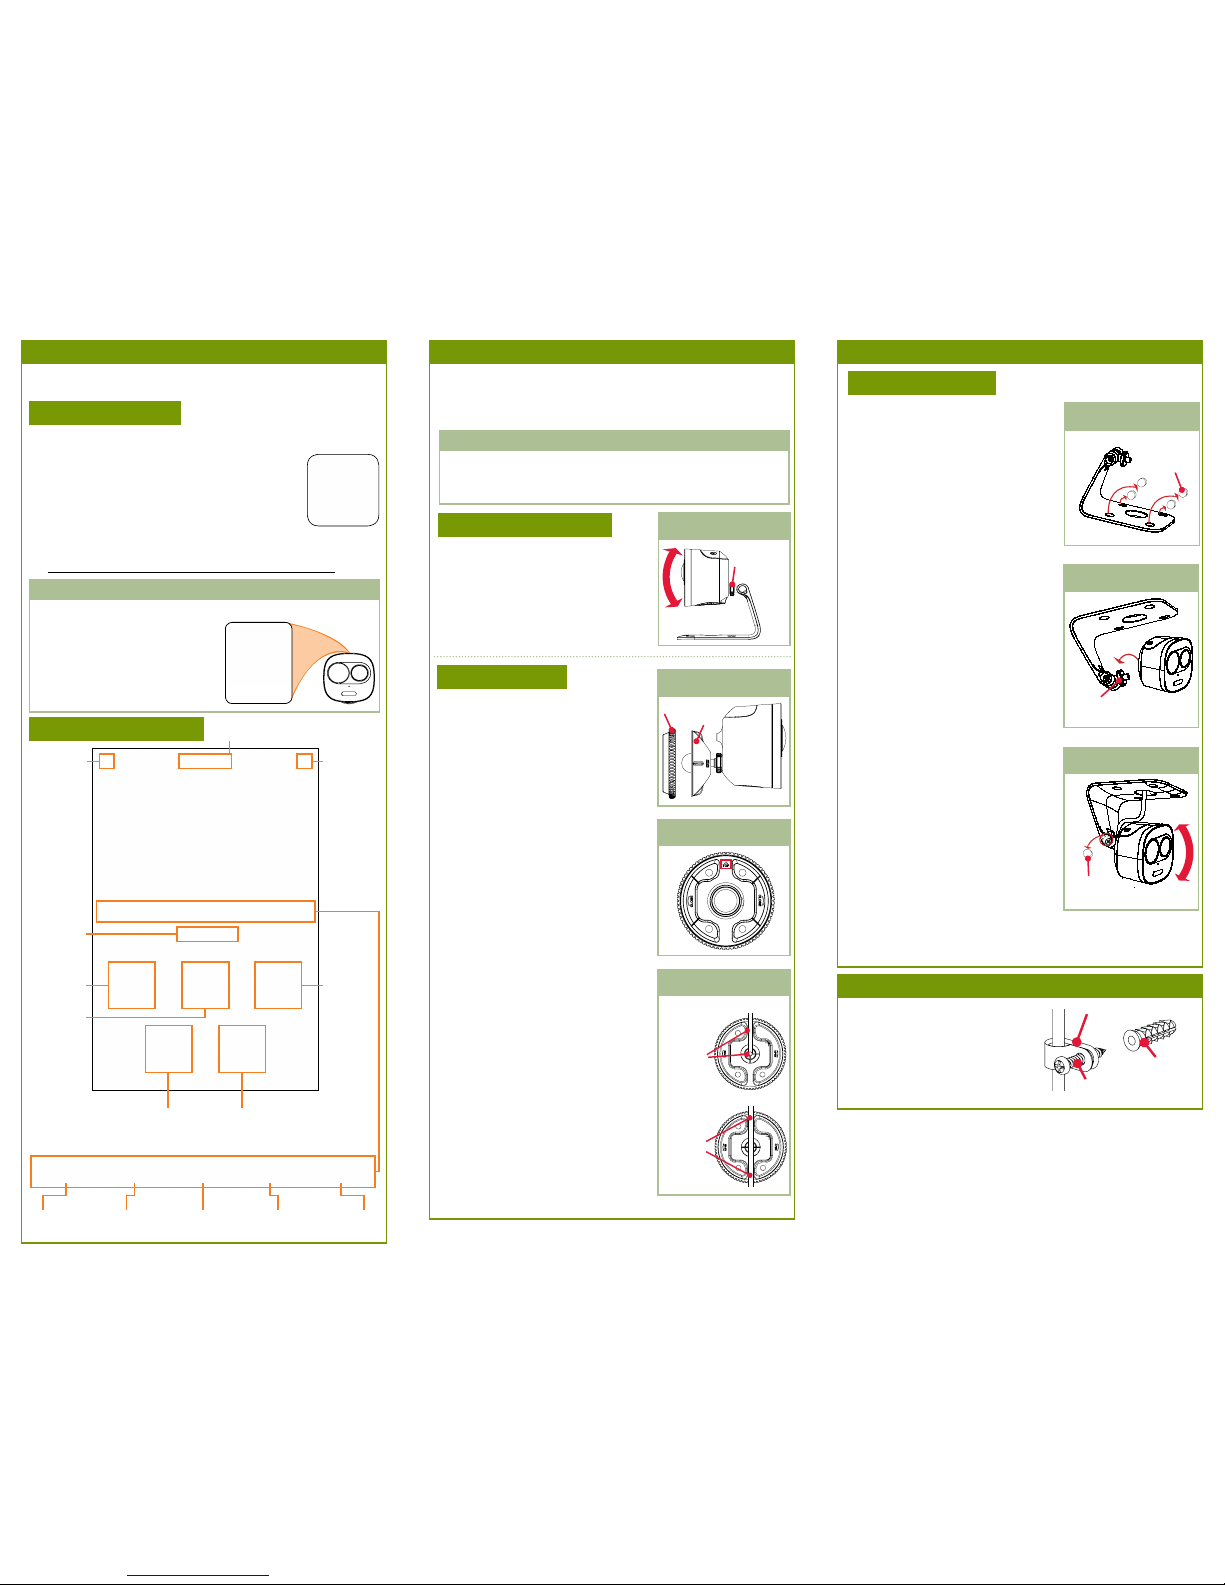
STEP 2: Installing the Camera
CEILING MOUNTING:
The camera comes with 2 mounts for 3 total installation
options: ceiling mounting, table top placement, or wall
mounting. Select a mounting option then follow the relevant
procedure below:
1. Remove the pre-inserted silicon plugs
(4×) from the base (see Figure 5).
2. Set the ceiling mount in the desired
mounting position and mark holes
for screws and cables through the
mounting base, or use the included
mounting template.
NOTE: Adjusting the angle of the
camera is limited with this
installation. Ensure you angle the
ceiling mount towards the desired
viewing area.
3. Drill holes where marked. If required,
insert the included drywall anchors.
4. Secure the ceiling mount to the
mounting surface using the provided
screws (4×). Make sure all screws
are fastened tightly.
5. With the adjustment ring securely
fastened to the bolt on the ceiling
mount, screw the camera onto the
ceiling mount (see Figure 6).
6. Twist the camera onto the ceiling
mount until the camera is level, then
tighten the adjustment ring.
7. Angle the camera up-and-down as
needed. Remove the pre-inserted
silicon plug on the side of the ceiling
mount and tighten the screw using
a Phillips screwdriver. Replace the
silicon plug (see Figure 7).
8. Feed the camera cable through the
cable opening on the ceiling mount
base and the mounting surface or
run the cables along the wall.
9. Connect the included USB power
adapter to the camera cable and
connect to a nearby power outlet.
Silicon
Plug
Adjustment
Ring
Silicon
Plug
Before Installing the Camera
• Review the “Installation Tips” section on the other side of the
guide to help you choose an ideal mounting location.
• Decide whether to run the cables through the wall or along the wall.
Figure 5
Figure 6
Figure 7
STEP 2: Installing the Camera (CONTINUED)
STEP 1: Connecting to Lorex Home
Connect to the camera using the free Lorex Home app on your
iPhone® or Android™ phone.
LOREX HOME SETUP:
1. Connect the camera cable to the included USB adapter and plug
into a nearby outlet.
Important Notes
LOREX HOME OVERVIEW:
Back to
previous
screen
Camera
and system
settings
Camera name
When you are prompted to enter the camera’s Device ID:
Pause / Play FullscreenViewing
Modes
Mute /
Unmute
Video
Quality
Play back
recorded
video
Snapshot
Manual
recording
2-way
audio: tap
to speak,
tap again
to disable
Siren: tap to
enable, tap again
to disable
Spotlights: tap to
enable, tap again
to disable
2. Download and install the free Lorex Home app
from the App Store or Google Play Store.
3. Tap the Lorex Home icon to launch the app.
Follow the on-screen instructions to complete
the setup.
Device ID: × × × × × × ××
LNWCM23X_QSG_EN_R1
• Scan the QR code on top of the
camera.
• If you are having trouble scanning
the QR code, tap Manually enter
Device ID and enter the sequence
written under the QR code.
NOTE: Ensure your mobile device is connected to the same
2.4GHz Wi-Fi network that will be used with for the camera.
The camera does not work with 5GHz Wi-Fi networks.
1. Attach the wall mount to the back of
the camera.
2. Twist the wall mount cover counterclockwise to separate it from the
base (see Figure 2).
3. Set the base of the wall mount in
the desired mounting position with
the TOP indicator pointing up (see
Figure 3).
4. Mark holes for screws and cables
through the mounting base.
5. Drill holes where marked. If required,
insert the included drywall anchors
(4×).
6. (OPTIONAL) For a cleaner installation,
you may wish to run the camera
cable through the cable notches on
the back on the wall mount:
Figure 2
Figure 3
Figure 4
Cover
Base
• If you are running the cable through
the wall, feed it through the top cable
notch, then through the cable hole you
drilled in the mounting surface.
• If running the cable along the wall,
feed the cable through both cable
notches (see Figure 4).
Running
through
wall:
Use the
top cable
notch
only
1. With the adjustment ring securely
fastened to the bolt on the table top
stand, screw the camera onto the
table top stand (see Figure 1).
2. Connect the included USB power
adapter to the camera cable and
connect to a nearby power outlet.
Figure 1
Adjustment
Ring
TABLE TOP PLACEMENT:
WALL MOUNTING:
7. Secure the wall mount base to the
mounting surface using the provided
screws (4×).
8. Twist the wall mount cover clockwise
onto the base. Adjust the angle of
the camera before fully tightening
the wall mount cover.
9. Connect the included USB power
adapter to the camera cable and
connect to a nearby power outlet.
Running
along
wall:
Use both
cable
notches
[OPTIONAL] If you run the cables
along the wall, you may use the
included cable guides with the
cable guide screws and optional
drywall anchors as needed.
Drywall
Anchor
Cable Guide
Screw
Cable Guide
STEP 3: Finishing the Installation
 Loading...