

Lorex LNK7000 Series, LNK7000X Series Quick Connection Manual
Information in this document is subject to change without notice. As our products are subject
to continuous improvement, FLIR Systems, Inc. and our subsidiaries reserve the right to modify
product design, specifications and prices, without notice and without incurring any obligation.
E&OE © 2017 FLIR Systems, Inc. All rights reserved.
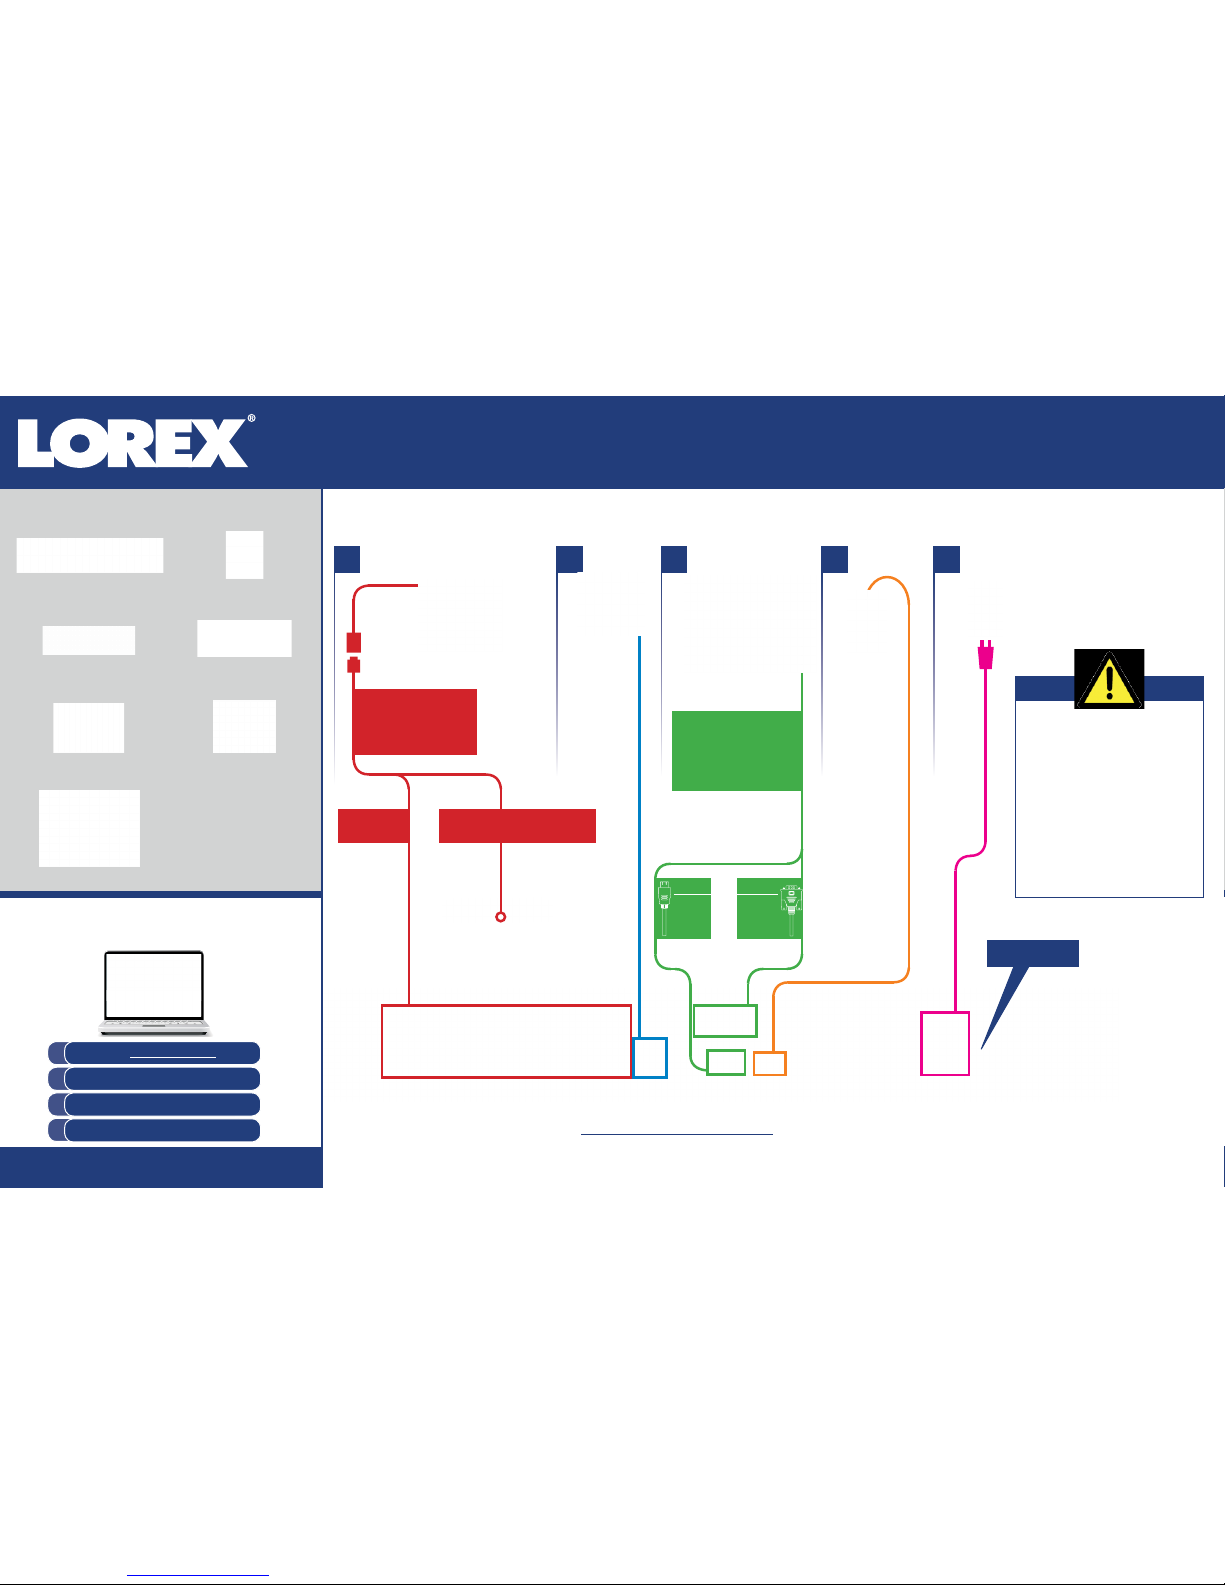
Package Contents:
Connecting Your System
HD Network Video Surveillance Recorder
LNK7000 Series
Quick Connection Guide
2
IP Cameras*
Monitor*
Router* Mouse
Ethernet Extension Cable*
NOTE: It may take up to 1
minute for cameras to start
up and transmit video to
your NVR.
Power
1
OR
LNK7000_LS_QCG_EN_R1
3 4 5
This system features automatic firmware
upgrades for enhanced functionality. It is
required to upgrade your system to the latest
firmware version.
If a firmware upgrade is available:
1. After startup, a notification will appear
asking you to upgrade the firmware. Click OK to
upgrade.
2. The system will download and install the
firmware upgrade. Wait for the firmware update
to complete. The system may restart during the
firmware upgrade process.
DO NOT power off or disconnect the power
cable during firmware installation.
The NVR is set to 720p
output by default. To optimize
picture quality, set the NVR’s
video output to match the
resolution of your monitor.
!
HD NVR
Quick Start Guides
USB Mouse
Power Cable**
Remote Control
Ethernet Cable HDMI Cable
Need Help?
Visit us online for up-to-date software and
complete instruction manuals
Click on the Downloads tab
4
Visit lorextechnology.com
Search for the model number
of your product
Click on your product in the
search results
3
2
1
HDMI VGA*
Supports
up to 1080p
Recommended:
Connect cameras
to the NVR.
OR
Supports
up to 4K
Connect cameras to a PoE switch* or router*
on your network. See “Adding Cameras from
the LAN” on reverse for more details.
6: ON**
*
**
16/32 channel configuration shown. 8 channel units will have the respective number of video inputs.
For camera compatibility information, visit lorextechnology.com/compatibility
Not included / sold separately.
8-channel units include a 48V DC power adapter rather than an AC power cord, and do not have a power switch on the back panel.
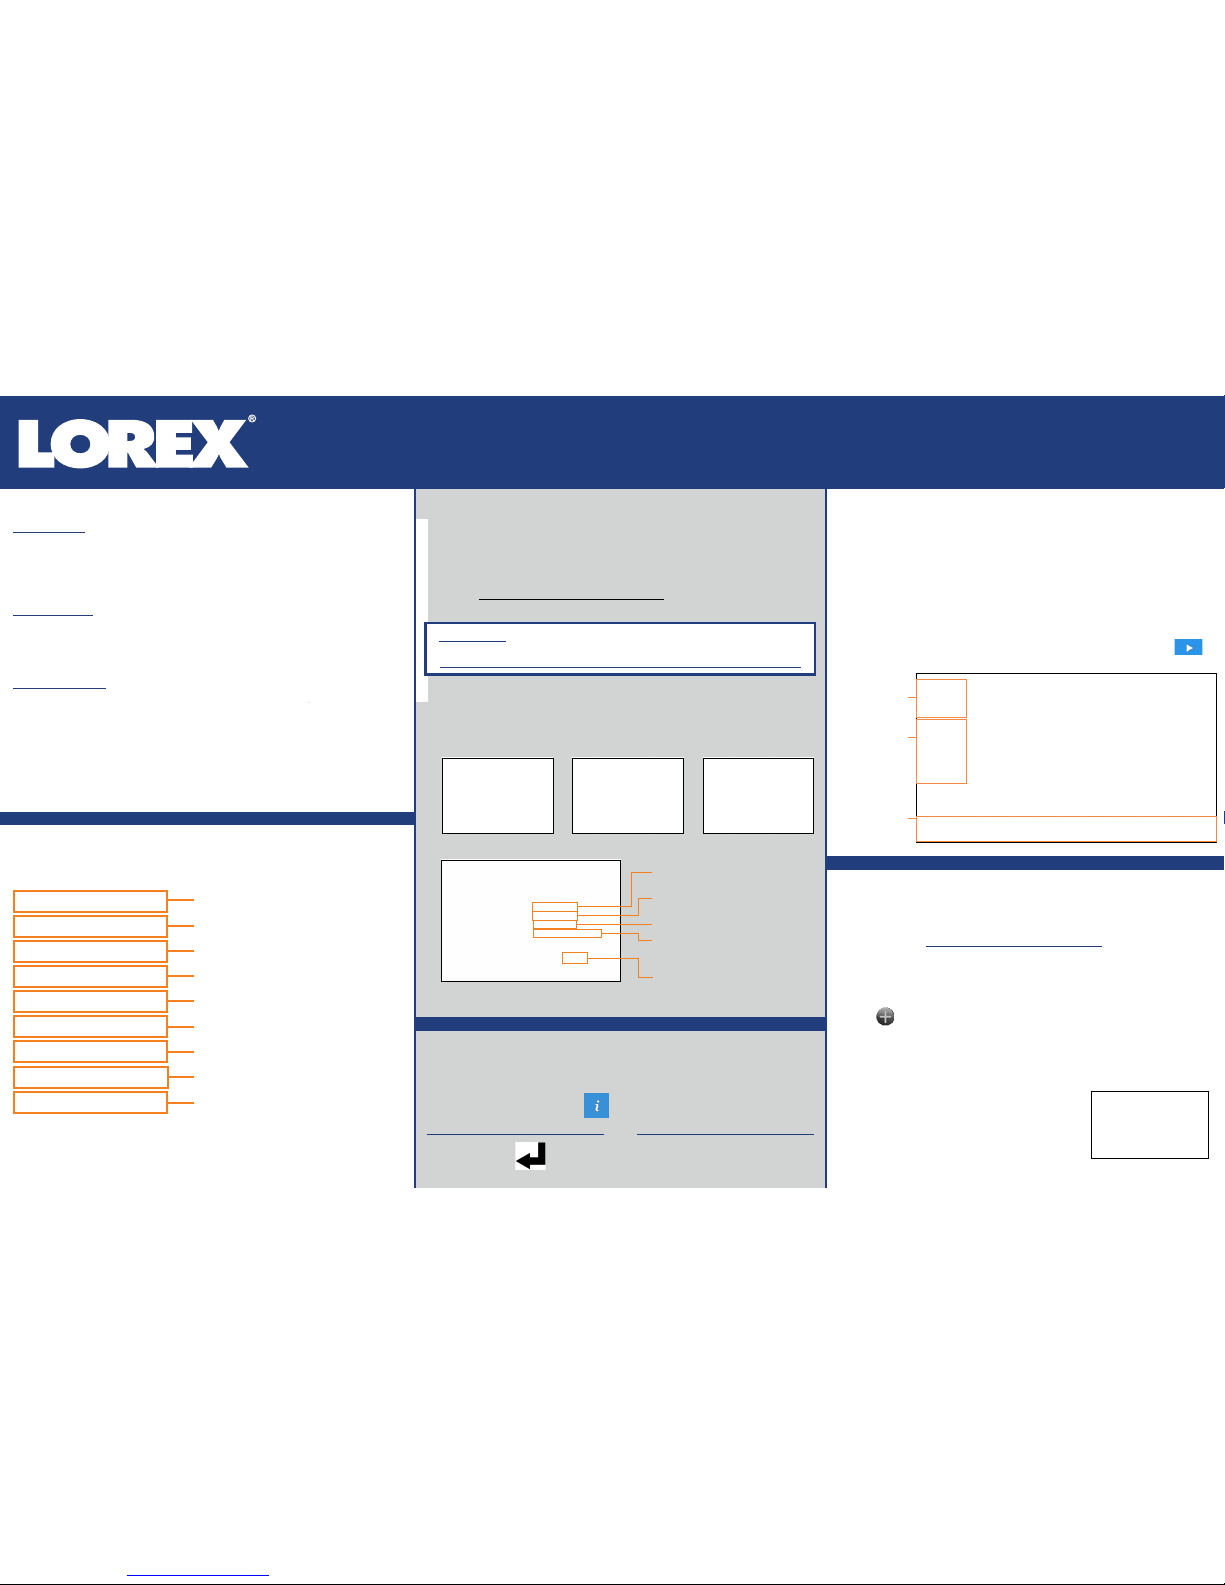
1. LEFT-CLICK:
• During split-screen display mode: Double-click an individual
channel to view it in full-screen. Double-click again to
return to the split-screen display mode.
• While navigating menus: Click to open a menu option.
2. RIGHT-CLICK:
• During live view: Right-click anywhere on the screen to
open the Quick Menu.
• While navigating menus: Right-click to exit menus.
3. SCROLL WHEEL:
• While navigating menus: Scroll to move up / down through
the menu content.
• During live view: Hover over the volume control wheel and scroll to turn
system volume up / down.
Using the Mouse
1 2
Playback and Search
1. From live view, right-click and then click Playback.
2. Log in using the system user name (default: admin) and your new,
secure password you recorded in the section ‘NVR Setup Wizard’.
3. Use the calendar on the left-side of the screen to select the date to
playback.
4. Check off the channels you would like to search for recordings from on
the left-side of the screen.
5. Click inside the video bar to select the playback time and press
to begin playback.
Select the day
to playback.
Select channels
to playback.
NVR Setup Wizard
1. Log in using the system user name (default: admin) and password (default:
00000000).
2. Enter a new, secure 8-15 character password, which will be used to access
the system from now on.
When you power up the NVR for the first time, you will be asked to create
a new, secure password for the system before using the Setup Wizard:
Using the Quick Menu
Right-click to open the Quick Menu.
LNK7000_LS_QCG_EN_R1
7. Review the information you have set for the NVR. To confirm, click Accept.
Click inside the
bar to select a
playback time.
NOTE: In live view, hover the mouse cursor over the top of the screen to open the
Navigation Bar. Move the mouse cursor away from the top of the screen to close
the Navigation Bar.
System Information
To quickly open a window that displays vital system information such as device
ID, firmware version, and IP address:
• From live view, click
at the bottom of the screen.
Control PTZ cameras (not included)
Start/stop sequence mode
View the previous camera or page
Search and play back recordings
Select camera / live display view
Open Main Menu
View the next camera or page
3
PASSWORD:
3. Log in using your
new, secure
password to launch
the Setup Wizard.
Click Next to begin.
4. Click the arrow keys
to select a language
for the on-screen
display. Click Next to
confirm.
5. Click the arrow
keys to select your
region. Click Next to
confirm.
6. Enter the date and time:
Click to select the correct date from the
calendar.
Click to enter time using the on-screen
keyboard.
Select a date format from the dropdown.
Select a time format from the dropdown.
For 12Hour format, select either AM or
PM from the second dropdown.
Click Next to confirm.
• Press on the included remote control.
OR
Adding Cameras from the LAN
Follow the steps below to add cameras that are not directly connected to the
Power over Ethernet (PoE) ports on the back of the NVR.
NOTE: Please visit lorextechnology.com/compatibility for a list of compatible
Lorex IP cameras.
1. Connect the camera to a router or switch on the same network as the NVR.
2. From live view, hover over a blank channel.
Click
in the center of the channel to add
an IP camera from the LAN.
NOTE: If prompted, enter the system user name (default: admin) and your
new, secure password recorded in the section ‘NVR Setup Wizard’.
3. The Quick Add menu opens and scans the
network for compatible cameras.
4. Click the camera you would like to add, then
click Add.
Set video quality
Set video stream
HD Network Video Surveillance Recorder
LNK7000 Series
Quick Connection Guide
 Loading...