

Page 1
www.lorextechnology.com
QUICK MOBILE GUIDE
LNC230 LOREX PING SERIES
QUICK START GUIDE
IPHONE® / IPAD® / ANDROID™ WIFI SETUP
IPHONE® / IPAD® / ANDROID™ ETHERNET SETUP
1: Connect the power adapter to the camera
and connect the other end to a power outlet.
2: Connect an Ethernet cable (included) to the NET
port on the camera and connect the other end to
your router (not included).
Ethernet Cable
Internet
LAN
3: Download the free Lorex Ping app, and
tap the Lorex Ping icon to open the app.
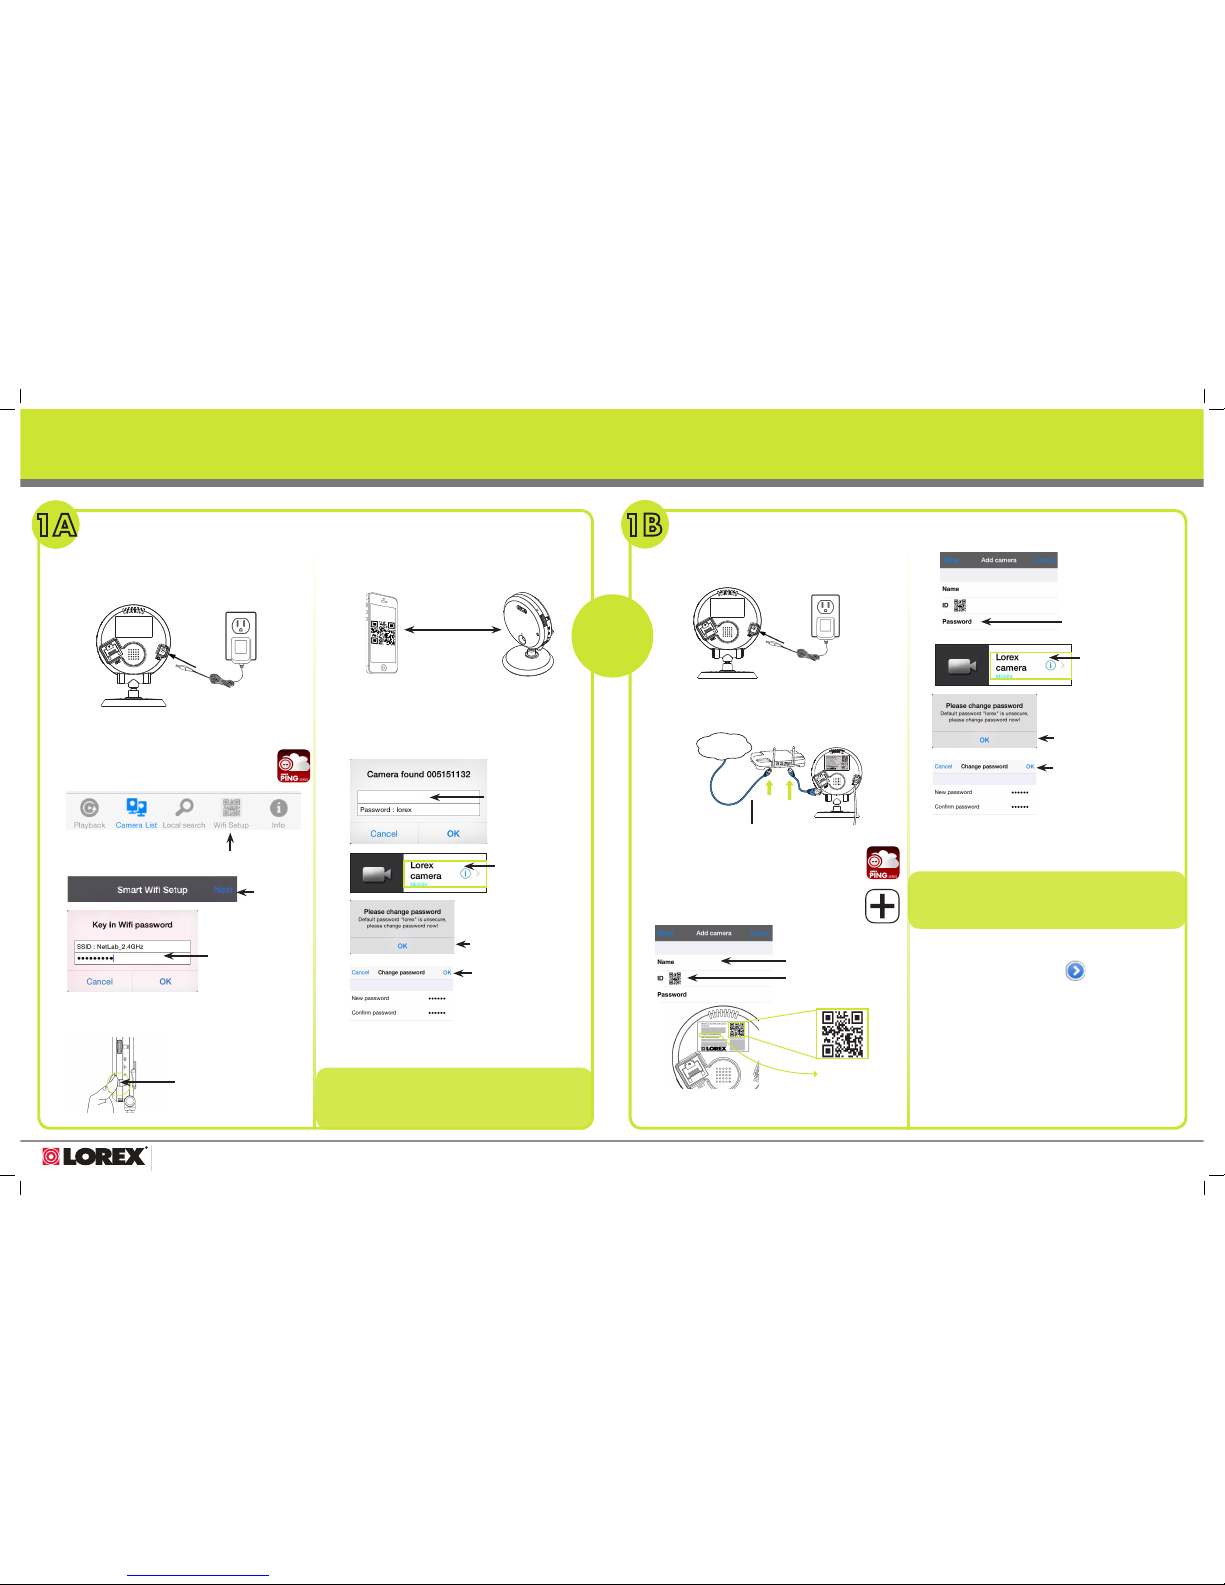
4: Press + to add a camera.
CamID #
5:
OR
Alternatively, you can manually enter the
CamID found on the back of your camera.
Press the QR code button and
scan the QR code on the back
of the camera
6:
Tap the camera to
connect
Enter a name for your camera
7:
Lorex Camera
Enter the camera password.
The password is lorex the
first time you connect to the
camera. Press Done
You will be prompted to create
your own password. Tap OK
8: Tap the name of the camera in Camera List
again to connect to the camera. Lorex Ping
streams live video from your camera.
Enter a new password
and then tap OK/Done
1: Connect the power adapter to the camera
and connect the other end to a power outlet.
Do not connect the Ethernet cable.
2: Connect your smartphone or tablet to your WiFi
network.
3: Download the free Lorex Ping app, and
tap the Lorex Ping icon to open the app.
4:
5:
Press Wifi Setup
Press Next
6:
Enter the password
for your WiFi network
and press OK
A QR code appears on the screen with your WiFi
network details.
8:
Press the WPS button on the
camera. The LEDs will start flashing
9:
1ft (30cm)
Tap the camera to
connect
10: Tap the name of the camera in Camera List again
to connect to the camera. Lorex Ping streams live
video from your camera.
Enter a name for your
camera and press OK
Lorex Camera
NOTE
For security, a separate admin user name and
password is required to change camera settings.
Default admin user name: admin
Default admin password: ______ (leave blank)
Then
7: Place your phone or tablet about 1ft (30cm)
away from the camera.
The camera scans the QR code on your device to connect to the WiFi
network and beeps once it is successfully scanned. In a few seconds,
the connection starts and a message appears on your device.
You will be prompted to create
your own password. Tap OK
Enter a new password
and then tap OK/Done
NOTE
For security, a separate admin user name and
password is required to change camera settings.
Default admin user name: admin
Default admin password: ______ (leave blank)
1A
1B
OPTIONAL WIFI SETUP
1: From the Camera List, tap .
2: Tap Camera Settings and enter the admin
user name/password above.
3: Tap Network>WiFi Network.
4: Slide Wi-Fi to ON or check Wi-Fi and select
your WiFi network. Enter the password and tap
OK. Wait for the update to complete.
5: Remove the Ethernet cable from the camera and
it will connect to the WiFi network.
NOTE: If the QR code does not scan, complete option 1B and then
complete the Optional WiFi setup instead.
LNC230_Series_QSG_EN_R1
Page 2
www.lorextechnology.com
QUICK PC/MAC GUIDE
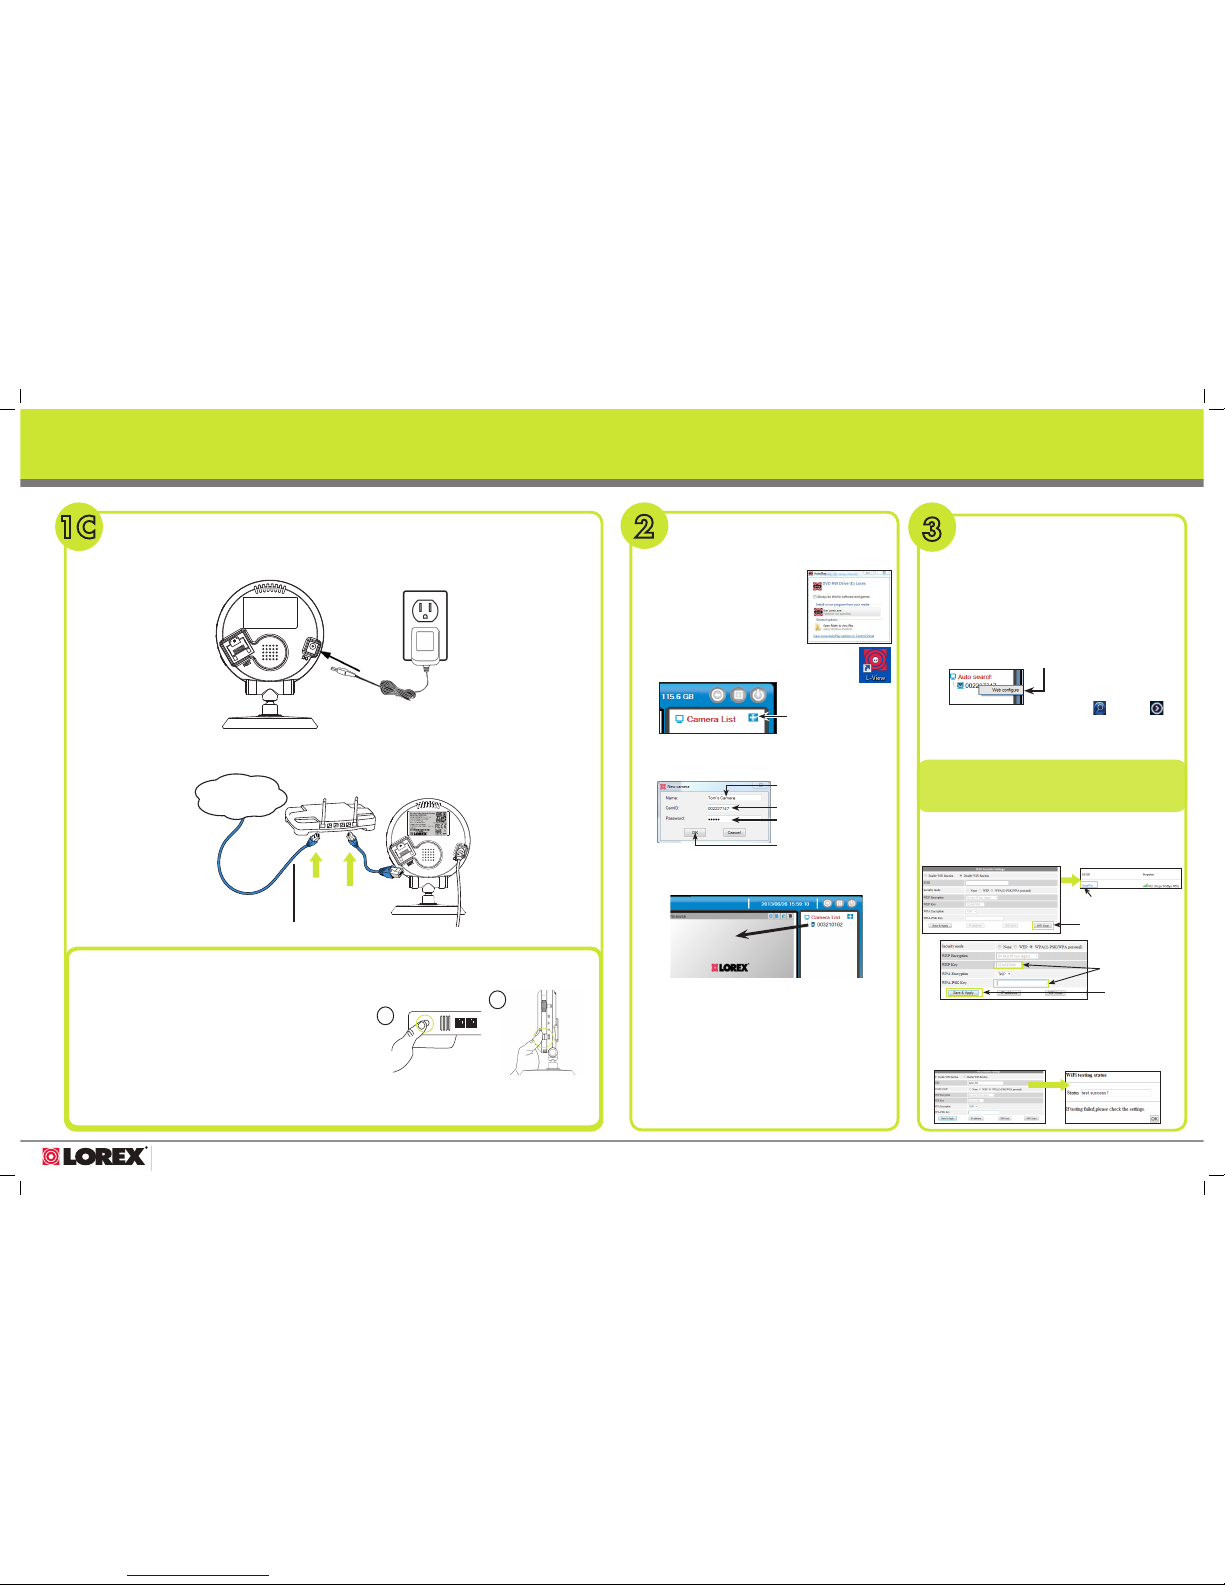
Click WiFi Scan
Select your WiFi network
Click Save & Apply
Enter WiFi Password
(WPA-PSK or WEP)
1C
PC/MAC SETUP—CONNECTING THE CAMERA
A: Connect the power adapter to the camera and connect the other end to a power outlet.
B: Connect an Ethernet cable (included) to the NET port on the
camera and connect the other end to your router (not included).
Ethernet Cable
Internet
LAN
2
CONNECTING ON
PC OR MAC
A: Download the
L-View software from
www.lorextechnology.com
B: Double-click the L-View icon.
C:
Click +
NOTE: Mac users, click +
beside Camera List, then
click the New Camera
tab.
Enter a camera name
Enter the camID printed on the
back of the camera
Enter the camera password
(default: lorex)
D:
Click OK
E: Click and drag the camera to a display screen
to connect to the camera.
F: L-View will prompt you to create your own
password for the camera. Click OK.
G: Create a new password for the camera and
click OK.
H: Click and drag the camera to a display screen
again to connect. L-View streams live video from
your camera.
3
OPTIONAL—
PC / MAC WIFI SETUP
A: Install L-View on a PC in your local network (must
be connected to the same router as the camera)
and connect to the camera.
NOTE: The camera must be connected to your router using an
Ethernet cable before you can set it up to use WiFi.
B:
PC users, right-click on the camera ID in the Auto Search
area and click Web Configure.
C: Enter the camera admin user name and
password. Click Log in.
D: Click on Network and then WiFi Security.
E: Click WiFi Scan and select your WiFi network.
F:
G: Click WiFi Security again and click WiFi Test.
When successful, Status will say Test Success. You may then disconnect the
Ethernet cable from the camera. If unsuccessful, double check your wireless
password and make sure your camera is close enough to the wireless
router to get a good signal.
OPTIONAL—WPS SETUP
A: Power on the camera.
B: Press and hold the WPS button on your router until the
WPS light turns on.
C: Then, press the WPS button on the camera within
1 minute. The camera will automatically connect to
your WiFi network and the blue Network LED on the
camera will turn on.
WPS
Use these steps to set up WiFi if your router supports WPS.
B
C
NOTE
Default admin user name: admin
Default admin password: ______ (leave blank)
Your camera admin user name and password differs from
the password used to connect to your camera to view video.
Mac users, click the Auto Search icon ( ), then click
beside the camera ID.
LNC230 LOREX PING SERIES
QUICK START GUIDE
 Loading...