

Page 1
24” Wide Screen
LED Monitor with HDMI
USER MANUAL
Please read this manual carefully before using,
and keep it for future reference.
L24LE11B_MANUAL_EN_R1
Page 2

TABLE OF CONTENTS
GETTING STARTED
Monitor Stand Assembly................................................................................................................1
Basic Connection.........................................................................................................................2-3
Wall Mounting..................................................................................................................................3
OPERATIONS
General Parts and Operations.......................................................................................................4
Menu Operations..........................................................................................................................5-8
FOR REFERENCE
Maintenance.....................................................................................................................................9
Specifications....................................................................................................................................9
Accessories.......................................................................................................................................9
Page 3

Important Instructions
SAFETY INSTRUCTIONS
Warning – To reduce the risk of fire, electric shock, or serious personal injury:
●
This product should not be exposed to dripping or splashing. Ensure that no objects filled with
liquids, such as vases, are placed on or near the apparatus.
●
Situate this product away from heat sources such as radiators, heat registers, stoves, or other
appliances (including amplifiers) that produce heat.
●
Operate the product only with the supplied power adapter. Route power cords so they are not
likely to be stepped on or tripped over.
●
Clean the product only as recommended by the manufacturer (see the “Maintenance” section
for details). Unplug the power cord from the wall outlet before cleaning.
●
Unplug the power cord from the wall outlet when left unused for an extended period.
●
Prevent objects/liquids from falling or spilling on the monitor.
●
Where the MAINS plug or an appliance coupler is used as the disconnect device, the disconnect
device will remain readily operable.
●
Do not operate this product under the following conditions:
- When the power-supply cord or plug is damaged.
- If liquid has been spilled into or objects have fallen into the product.
- If the product has been exposed to rain or water.
- If the product does not operate when used according to the operation instructions.
- If the product has been dropped or damaged in any way.
●
Do not attempt to service the product.
●
Do not overload wall outlets, extension cords, or surge protectors.
●
Do not touch the surface of the monitor with sharp or hard objects.
●
It is recommended to use a UL-1449 approved surge protector with this product.
CAUTION – To reduce the risk of personal injury or product/property damage:
●
Do not subject the product to violent shocks, extreme temperatures, or lengthy periods of
direct sunlight.
●
Keep the product away from magnetic objects, motors, and transformers.
●
Do not use outdoors.
●
Connect this product to the grounded power outlet.
Page 4
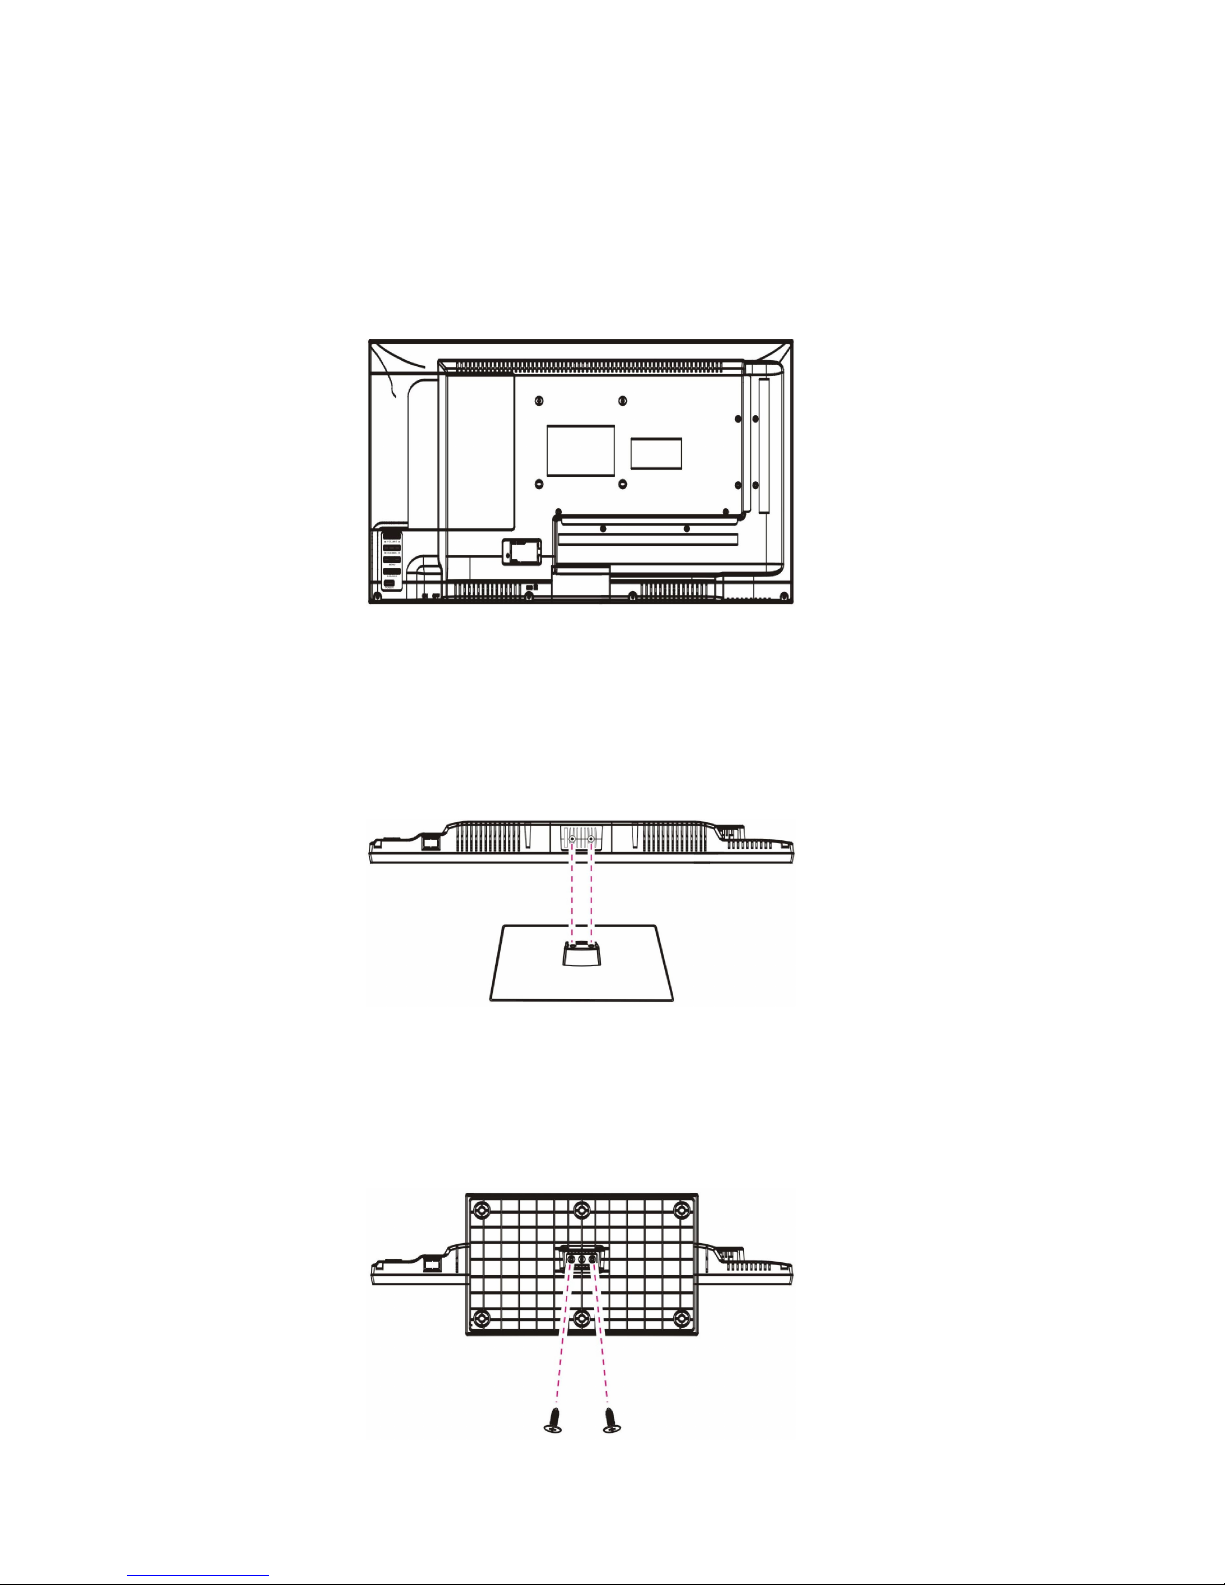
Monitor Stand Installation
Assemble the monitor stand before using the monitor.
To assemble the monitor stand:
1. Lay the monitor face on a clean, soft surface.
2. Align the openings on the monitor stand with the screw holes on the base of the
monitor.
NOTE: The monitor stand only connects to the monitor base one way. Do not force the
monitor stand.
3. Insert the included screws (2 x) into the screw holes on the bottom of the monitor stand.
Tighten using a Phillips screwdriver (not included).
1
Page 5

BASIC CONNECTION
Connect to power source
PC Connection
To power input
AC adaptor
To power outlet
Built-in
speakers
Audio cable
(optional)
VGA cable
(included)
Back of DVR,
NVR or PC
Use the included VGA
cable to connect the
monitor to your DVR,
NVR or PC.
Built-in
speakers
2
Page 6

HDMI Connection
Wall Mounting
●
Contact a professional for assistance when wall mounting your monitor. We are not
responsible for any damage to the product or injury to yourself, if you mount the monitor
on your own.
●
Do not wall mount the monitor while monitor is turned on. It may cause personal injury
due to electric shock.
●
Use standard M4*10mm screws (4 pieces) to mount this monitor.
Headphone cable
(optional)
HDMI cable
(included)
Back of DVR, NVR or PC
Use HDMI cable to connect the unit to your
DVR, NVR, PC or other device to receive
high-definition multimedia signal.
3
Page 7

General Parts and Operations
1. POWER indicator LED
- When the unit is
in standby mode, the indicator glows red;
when powered on, the indicator glows blue.
2. + button- Press this button to increase
the volume level; to adjust the value in
menu setting page; to confirm selection
when selecting an input source.
3. - button
- Press this button to decrease
the volume level; to adjust the value in
menu setting page.
4. UP button
- In menu setting page, press
this button to move UP/LEFT.
5. DOWN button- In menu setting page,
press this button to move DOWN/RIGHT.
6. MENU button
- Press this button to enter
menu setting page.
7. SOURCE button- Press this button to
display the input sources list; confirm
selection in menu setting page.
8. POWER button
- Press this button to
power ON/OFF the unit.
4
Page 8

Menu Operations
●
Use the included VGA cable to connect this Monitor with your PC and power on both of
them. Then press the MENU button to enter the menu setting page.
●
Press + / - button to select SCREEN/PICTURE/SOUND/TIME/OPTION submenus
indicated by the icons on the top of the monitor's display. Press UP/DOWN button to
highlight desired option.
●
Press the SOURCE button to select the highlighted option. Press UP/DOWN button to
highlight desired option; press + / - button to adjust the value. Then press SOURCE button
again to confirm selection.
●
Press MENU button to return to previous menu page.
1. SCREEN
NOTE: This submenu is available only when correctly connected to a PC.
1.1 Auto Adjust
Adjust the value of screen automatically.
1.2 Horizontal Pos.
Adjust the value of horizontal position from 0-100.
1.3 Vertical Pos.
Adjust the value of vertical position from 0-100.
1.4 Clock
Adjust the value of clock from 0-100.
1.5 Phase
Adjust the value of phase from 0-100.
NOTE: The picture will shake with unsuitable phase setting.
5
Page 9

2. PICTURE
2.1 Picture Mode
Available options: User, Dynamic, Standard, Mild.
NOTE: The value of Contrast, Brightness, Color, and Sharpness is adjustable only when
Picture Mode is User.
2.2 Contrast
The value of contrast can be adjusted from 0-100.
2.3 Brightness
The value of brightness can be adjusted from 0-100.
2.4 Color
The value of color saturation can be adjusted from 0-100.
2.5 Tint
It may be not adjustable for this monitor.
2.6 Sharpness
The value of sharpness can be adjusted from 0-100.
2.7 Color Temperature
Adjust the optimum color temperature for suitable viewing.
Available options: Medium, Cool, Warm.
2.8 Noise Reduction (for HDMI input source only)
Available options: Off, Low, Middle, High.
6
Page 10

3. SOUND
3.1 Sound Mode
Available options: Standard, Music, Movie, Sports, User.
NOTE: The value of Treble and Brass is adjustable only when Sound Mode is User.
3.2 Treble
Adjust the level of higher-pitched sounds from 0-100.
3.3 Bass
Adjust the level of lower-pitched sounds from 0-100.
3.4 Balance
Adjust the audio output between left and right speakers from -50 to 50.
3.5 Auto Volume
Turn on/off Auto Volume function.
4. TIME
7
Page 11

4.1 Sleep Timer
Set the automatic sleep time in standby mode.
Available options: Off, 10min, 20min, 30min, 60min, 90min, 120min, 180min, 240min.
4.2 Auto Standby
Set the auto standby duration.
Available options: Off, 3H, 4H, 5H.
4.3 OSD Timer
Set the length of time that the OSD (on screen display) menu remains on the screen.
Available options: 5S, 10S, 15S, 20S, 25S, 30S.
5. OPTION
5.1 OSD Language
Select the desired On Screen Display language.
5.2 TT Language
Select desired TT language.
5.3 Aspect Ratio
Available options: 4:3, 16:9
NOTE: The available options may vary for different input source.
5.4 Blue Screen
Set the blue background ON or OFF. The screen background will turn blue at very weak
or no signal condition, if BLUE SCREEN is ON.
5.5 Reset
Reset the unit to factory default settings.
NOTE: This function cannot be undone.
8
Page 12

Maintenance
●
Be sure to press POWER to set the player to the standby mode and disconnect the AC
adaptor before storing the monitor.
●
Wipe the monitor with a dry, soft cloth.
●
If the surfaces are extremely dirty, wipe clean with a cloth which has been dipped in a
weak soap-and-water solution and wrung out thoroughly, and then wipe again with a dry
cloth.
●
Never use alcohol, benzine, thinner, cleaning fluid or other chemicals. Do not use
compressed air to remove dust.
●
When attaching or removing the monitor base, lay the monitor face down on a soft area
to prevent it from getting scratched, defaced, or broken.
Specifications
1. Display Device: 24 inch TFT LED
2. Resolution: 1920 (H)*1080 (V)
3. Dots Distance: 0.27675(H) X 0.27675(V) mm
4. Visible Range: 531.36(H) X 298.89(V) mm
5. Power Source: AC adaptor (normal: DC 12V
3A)
6. Power Consumption: <36W
7. Operation Temperature: -5°C to +45°C
8. Measurement: 567(W) X 377(H) X 170(D) mm
9. Weight: Approx. 3.5 kg
Specifications are subject to change without notice.
Accessories
User Manual X 1 VGA cable X 1 HDMI cable X 1
AC adaptor X 1 Monitor Base X 1 Monitor Base Screws X 2
 Loading...