

Page 1

Page 2

IMPORTANT INSTRUCTIONS
SAFETY INSTRUCTIONS
Warning – To reduce the risk of fire, electric shock, or serious personal injury:
• Do not use this product near water; e.g. near a bathtub, washbowl, kitchen sink,
laundry tub, in a wet basement, near a swimming pool, or the like.
• Situate this product away from heat sources such as radiators, heat registers, stoves, or
other appliances (including amplifiers) that produce heat.
• Operate the product only with the supplied power adapter. Route power cords so they are
not likely to be stepped on, paying particular attention to the power cords and power outlets.
• Clean the product only as recommended by the manufacturer (see the “Maintenance”
section for details). Unplug the power cord from the wall outlet before cleaning.
• Unplug the power cord from the wall outlet when left unused for an extended period.
• Prevent objects/liquids from falling or spilling on the monitor.
• Do not operate this product under the following conditions:
- When the power-supply cord or plug is damaged.
- If liquid has been spilled into or objects have fallen into the product.
- If the product has been exposed to rain or water.
- If the product does not operate when used according to the operation instructions.
- If the product has been dropped or damaged in any way.
• Do not attempt to service the product.
• Do not overload wall outlets, extension cords, or integral convenience receptacles.
CAUTION – To reduce the risk of personal injury or product/proper damage:
• Do not subject the product to violent shocks, extreme temperatures, or lengthy periods of
direct sunlight.
• Keep the product away from magnetic objects, motors, and transformers.
• Do not use outdoors in inclement weather.
Page 3
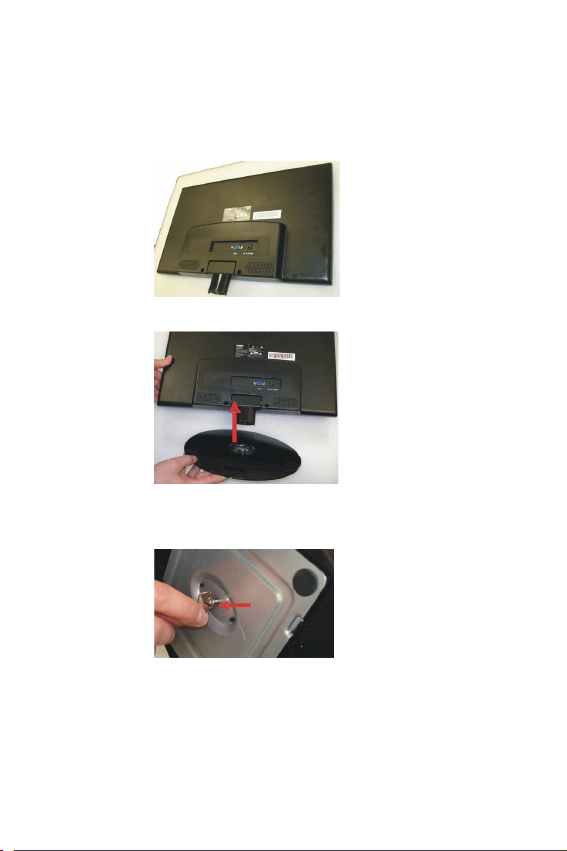
MONITOR STAND INSTALLATION
Assemble the monitor stand before using the monitor.
To assemble the monitor stand
1. Lay the monitor face on a clean, soft surface.
2. Align the monitor stand to the base of the monitor.
3. Tighten the screw clockwise to secure the monitor stand.
NOTE: The screw is included with the package contents.
Page 4

BASIC CONNECTION
GENERAL PARTS AND OPERATIONS
1.AUTO button- Press this button to
automatically adjust the screen display;
in menu setting page, press this button to
return to previous menu page.
2.UP button- In menu setting page, press
this button to move UP/RIGHT.
3.DOWN button- In menu setting page,
press this button to move DOWN/LEFT.
4.+ button- Press this button to enter
BRIGHTNESS setting page directly.
5.- button- Press this button to enter
CONTRAST setting page directly.
6.MENU button- Press this button to enter
menu setting page.
7.POWER button- Press this button to
power ON/OFF the unit.
8.POWER indicator- When the unit is in
standby mode, the indicator glows red; and
in power ON mode, the indicator glows
green.
Page 5

MENU OPERATION
Press the MENU button to enter the menu setting page as shown below:
• Use the UP or DOWN button on the unit to select submenus and press the [MENU] button
to enter the submenu. (In this submenu page, you can press the UP or DOWN button to
select different submenu page as desired.)
• Press the [MENU] button again to enter next menu setting page you select. Press the UP
or DOWN button to select different items as desired. Press the [MENU] button to confirm,
then press + or - button to adjust the desired option.
• Press the [AUTO] button to return to a previous menu page.
1. PICTURE
2. COLOR
- Press UP or DOWN button to select
BRIGHTNESS, CONTRAST or GAMMA and
press [MENU] button to confirm, then press +
or - button to adjust.
- The BRIGHTNESS/CONTRAST can be
adjusted from 0-100.
- The GAMMA can be adjusted from -50 to 50.
- Press UP or DOWN button to select PRESET,
RED, GREEN or BLUE and press [MENU]
button to confirm, then press + or - to adjust.
- The RED/GREEN/BLUE can be adjusted from
0-100.
NOTE: The PRESET item is used to set the
screen color display in order to accord with
the RGB standard.
Page 6

3. TRACKING
4. SETUP
3.1 HORIZONTAL
- This item is used to move the screen display
to the left or right.
- The HORIZONTAL can be adjusted from 0-100.
3.2 VERTICAL
- This item is used to move the screen display
up or down.
- The VERTICAL can be ad justed from 0-100.
3.3 CLOCK/PHASE/SHARPNESS
- Press UP or DOWN button to select CLOCK,
PHASE or SHARPNESS and press [MENU] button to
confirm, then press + or - button to adjust.
- The CLOCK/PHASE can be adjusted from 0-100.
- The SHARPNESS can be adjusted from 0-10.
4.1 LANGUAGE
This item is used to set the OSD language. In this unit ,
you can set the language to English or other languages.
4.2 OSD POSITION
- This item is used to se t the OSD menu position on
the screen.
- Adjust the HORIZONTAL/VERTICAL item to move the
OSD menu to left or right / up or down.
- The HORIZONTAL/VERTICAL can be adjusted from 0-100.
4.3 WHITE BALANCE
- Set the white balance to NO or YES.
4.4 DCR (Dynamic Contrast Ratio)
- Set the DCR item to ON or OFF.
4.5 4:3 OR WIDE
- Set the screen display mode to 4:3/WIDE.
4.6 FACTORY RESET
- Used to reset monitor to factory settings.
(Excluding the OSD LANGUAGE.)
Page 7

MAINTENANCE
● Be sure to press POWER to set the monitor to standby mode and disconnect
the AC adaptor before maintaining the monitor.
• Wipe the monitor with a dry, soft cloth.
• If the surfaces are extremely dirty ,wipe clean with a cloth which has been dipped
in a weak soap-and-water solution and wrung out thoroughly, and then wipe again
with a dry cloth.
• Never use alcohol, benzene, thinner, cleaning fluid or other chemicals. And do not
use compressed air to remove dust.
SPECIFICATIONS
1. Display Device: 18.5 inch color TFT LED
2. Resolution: 1366 (H)*768 (V)
3. Dots Distance: 0.3(H) X 0.3(V)mm
4. Visible Range: 409.8(H) X230.4(V)mm
5. Power Source: AC adaptor (normal: DC 12V --- 1.5A)
6. Power Consumption: 18W
7. Operation Temperature : -5OC to +45OC.
8. Measurement: 457(L) X 324(W) X 43(D) mm
9. Weight: Approx. 2.3kg
Specifications are subject to change without notice.
ACCESSORIES
Instruction manual........................................................ ..............................................................1
15 pin VGA cable............................................................................ ...........................................1
AC adaptor............................................................ ......................................................................1
 Loading...