

Page 1
LOREX CLIENT 2.2
Integrated Remote
Agent Software
Instruction Manual
English Version 1.0
MODEL:
L15LD420 / L17LD420 Series
Copyright © 2008 LOREX Technology Inc.
www.lorexcctv.com
Page 2

Table of Contents
Table of Contents
System Requirements ............................................................................... 3
Lorex Integrated Remote Agent Software Installation .............................. 4
Integrated Remote Agent Software - Main Screen ................................... 6
1. IRS Setup .............................................................................................. 7
2. The H.264 Viewer ................................................................................. 9
3. Search ................................................................................................. 11
4. Backup ................................................................................................ 13
5. Player .................................................................................................. 15
6. Remote Setup ..................................................................................... 18
Appendix #1 - Setting up Remote Viewing ............................................. 22
What do you need? ................................................................................................................... 22
Network Setup / Remote Access Overview ............................................................................... 22
Network Checklist ...................................................................................................................... 23
IP & MAC Address ..................................................................................................................... 25
Network - Router Port Forwarding ............................................................................................. 26
Network - Setting Up Your DDNS Account ................................................................................ 27
DDNS SETUP ........................................................................................................................... 31
Appendix #2 - Remote Viewing with Internet Explorer ............................ 32
Web Player Interface Screen ..................................................................................................... 33
Please visit us on the web for the most current Manuals, Quick Start
Guides and Firmware. Additional Language Manuals are also available at:
2
http://www.lorexcctv.com
Page 3
System Requirements
System Requirements
The Lorex Client 2.2 software (included with the System) has the following installation
requirements.
Minimum System Requirements:
Operating System Windows XP Home Edition
Windows XP Professional
Windows Vista
Processor .Pentium 4 - 1.5 GHz Processor (or equivalent)
Memory 512 MB RAM (1GB Min. Recommended)
Hard Drive 50 MB - Installation space required
* Additional Hard Drive space required for recording.
Recorded file size will vary depending on recording
quality settings
Recommended System Requirements:
Operating System Windows XP Home Edition
Windows XP Professional
Windows Vista
Processor Pentium 4 / 3 GHz Processor (or equivalent)
Memory 1024 MB RAM
Hard Drive 50 MB - Installation space required
* Additional Hard Drive space required for recording.
Recorded file size will vary depending on recording
quality settings
Internet Requirements Requires a high speed internet connection (minimum
upload speed: 256Kb/s, download speed512Kb/s) and a
broadband router – not included.
Typical network remote viewing at 1-2 FPS (Frames Per
Second). Please check with your Internet Provider for your
current upload and download speeds - this may impact the
performance of the Audio and PTZ functions over the
Internet (WAN).
Please refer to the Lorex Client 2.2 Software User Guide included with your Observation System
for further details. Visit the Lorex support website at http://www.lorexcctv.com for information on
Windows Vista compatibility.
3
Page 4
Lorex Integrated Remote Agent Software Installation
Lorex Integrated Remote Agent Software Installation
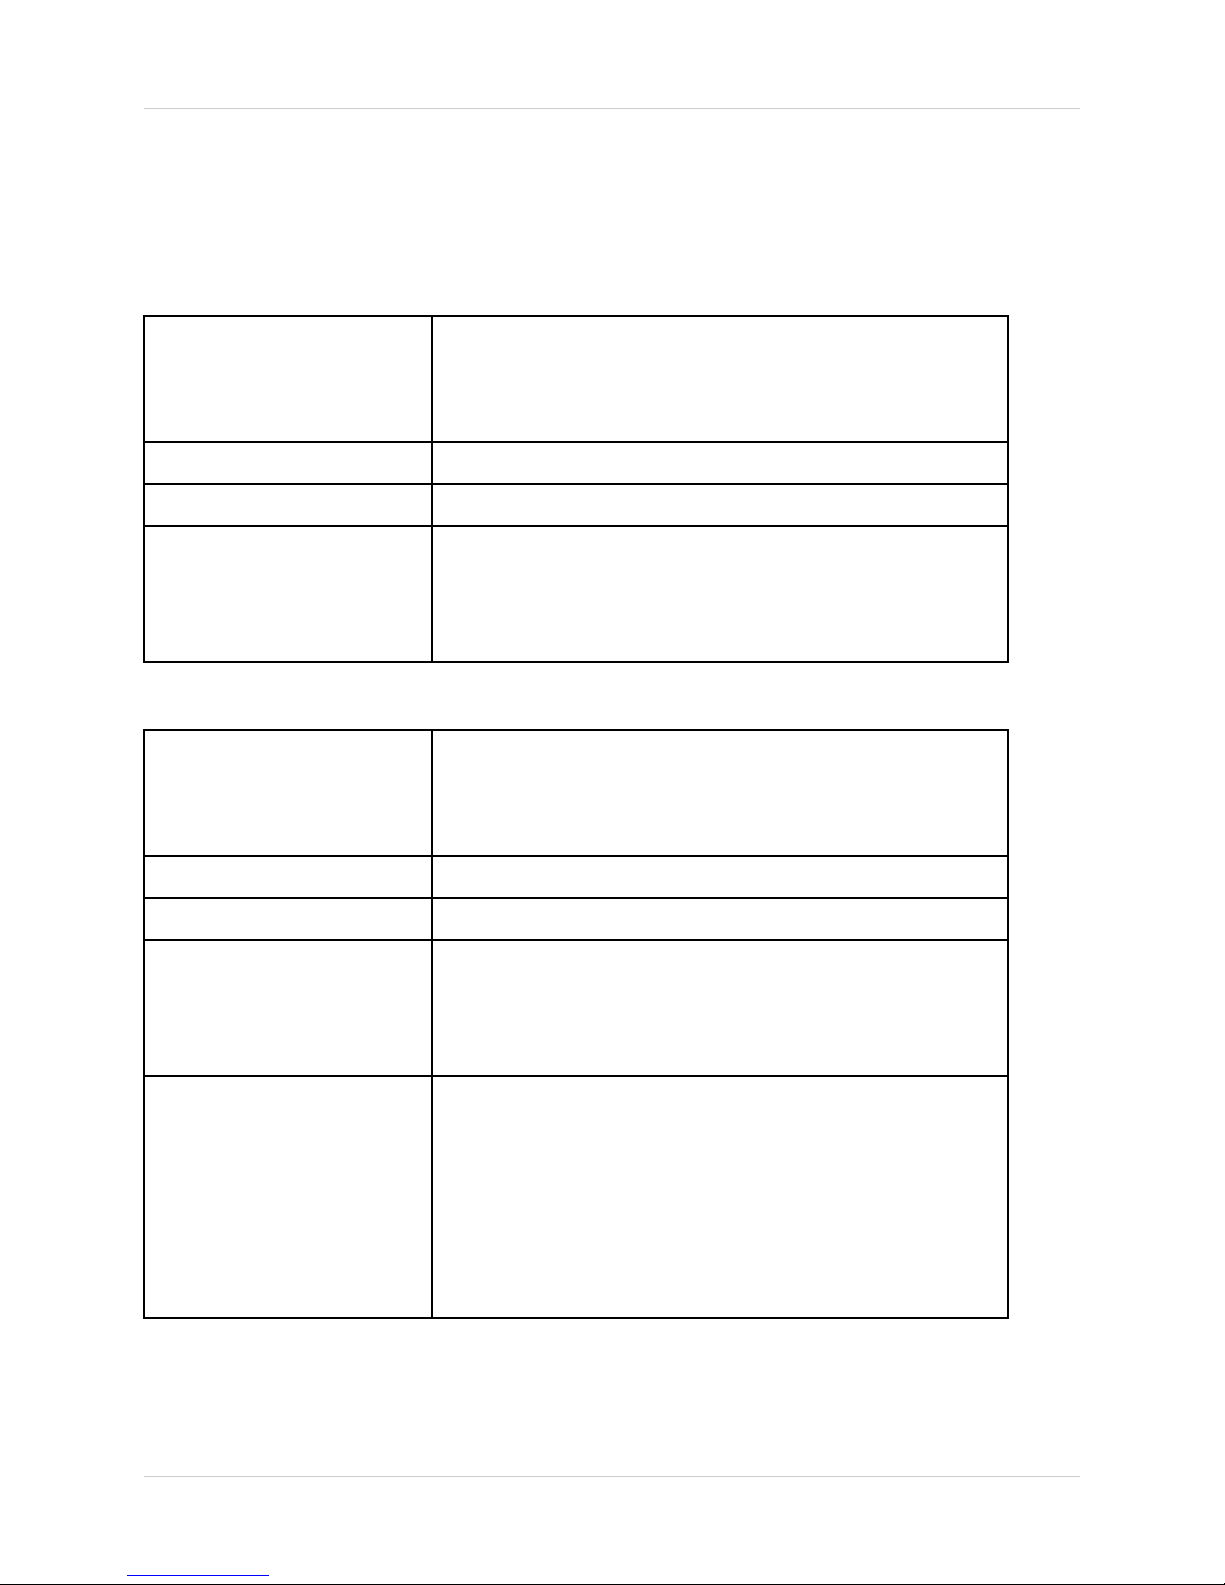
Place the Installation CD in the CD-ROM Drive of your Computer. Select the Install Wizard for
the Lorex Client 2.2 Software to begin.
1. Click the NEXT button on all dialogue windows to continue the Installation:
2. Press the Install Button to initialize the installation process.
NOTE: If the Installation Process does not automatically start, you will have to begin the
installation process manually:
• Double Click the MY COMPUTER icon on your Desktop
• Double Click the CD-ROM DRIVE (Drive Letter will vary depending on the number of drives
in your computer)
• Double Click the LOREXCLIENT.EXE file (may appear as LOREX CLIENT with no file
extension, depending on your system settings.
The Installation Process will begin.
4
Page 5
Lorex Integrated Remote Agent Software Installation
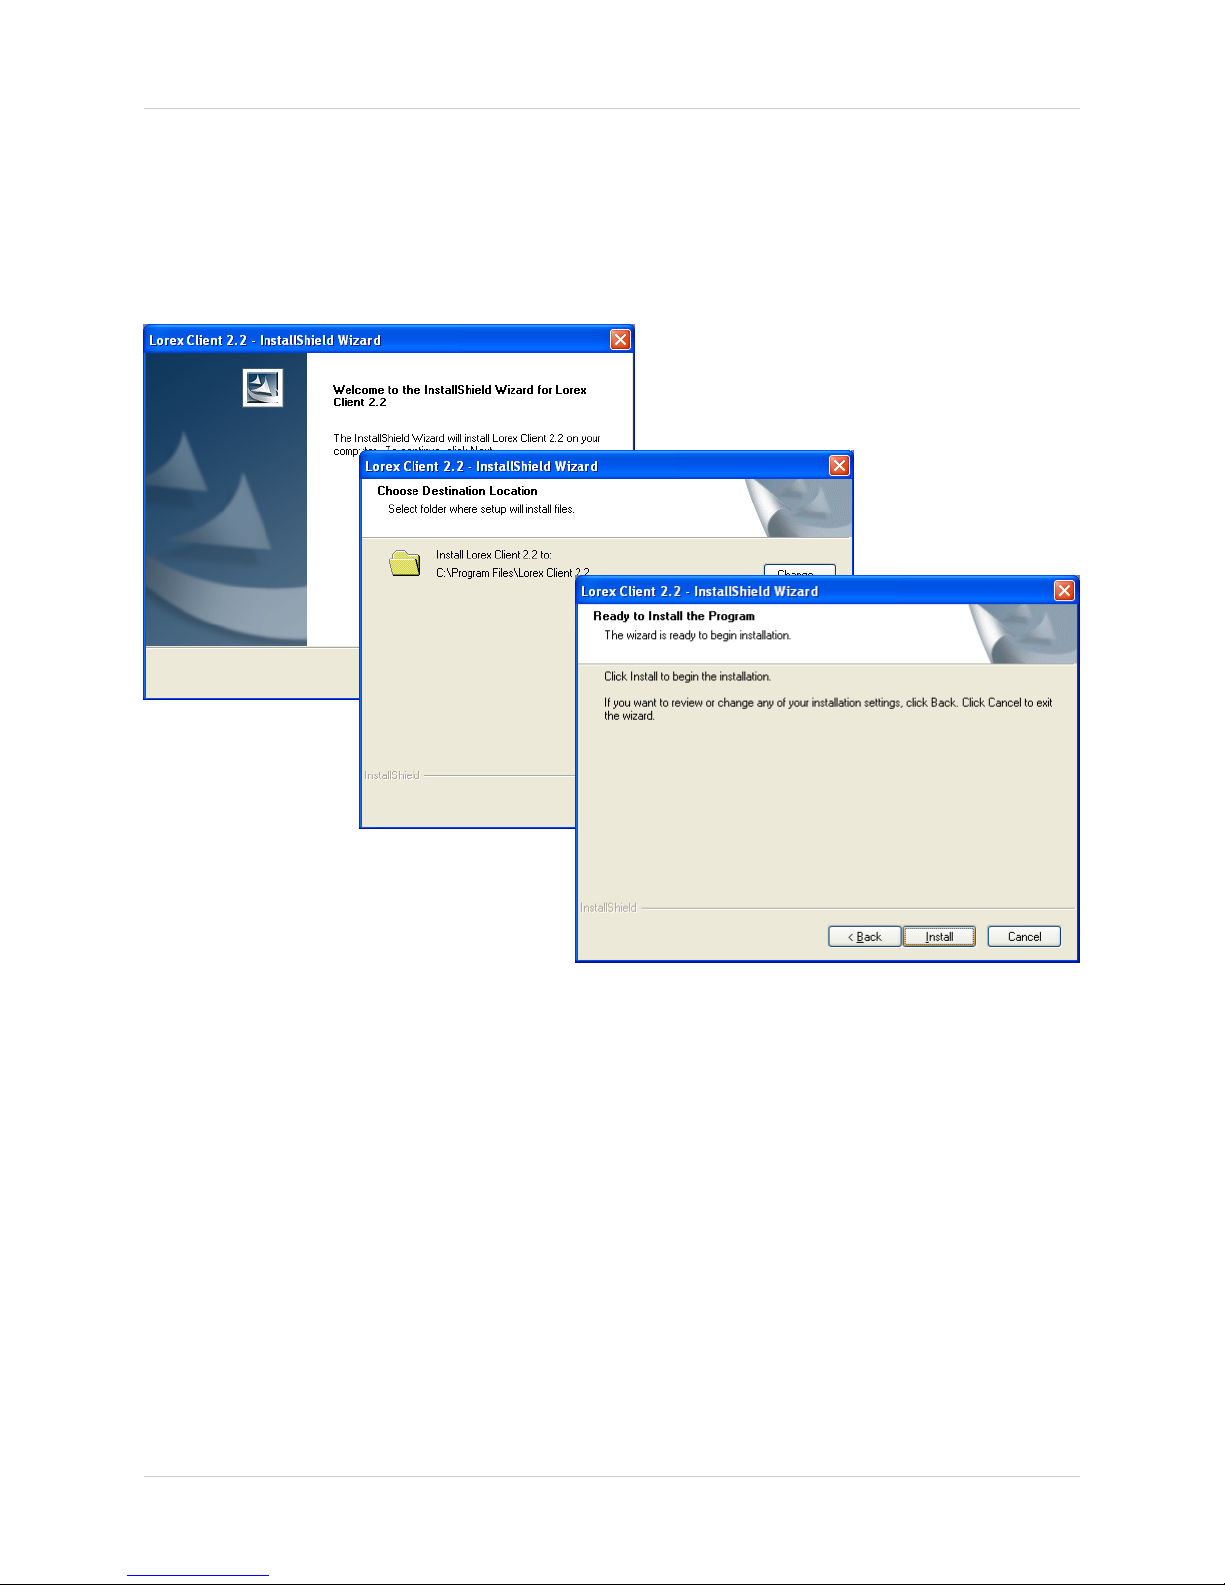
3. The installation process will continue. Once the install is complete, press the Finish button.
NOTE: Make sure to close all open programs and save any open files before rebooting the
system.
Program Shortcuts
• Start Menu - Programs - Lorex Client 2.2
z Lorex Internet Remote Software
• Desktop Shortcut for:
z Lorex Internet Remote Software
Lorex Client
2.2
5
Page 6

Integrated Remote Agent Software - Main Screen
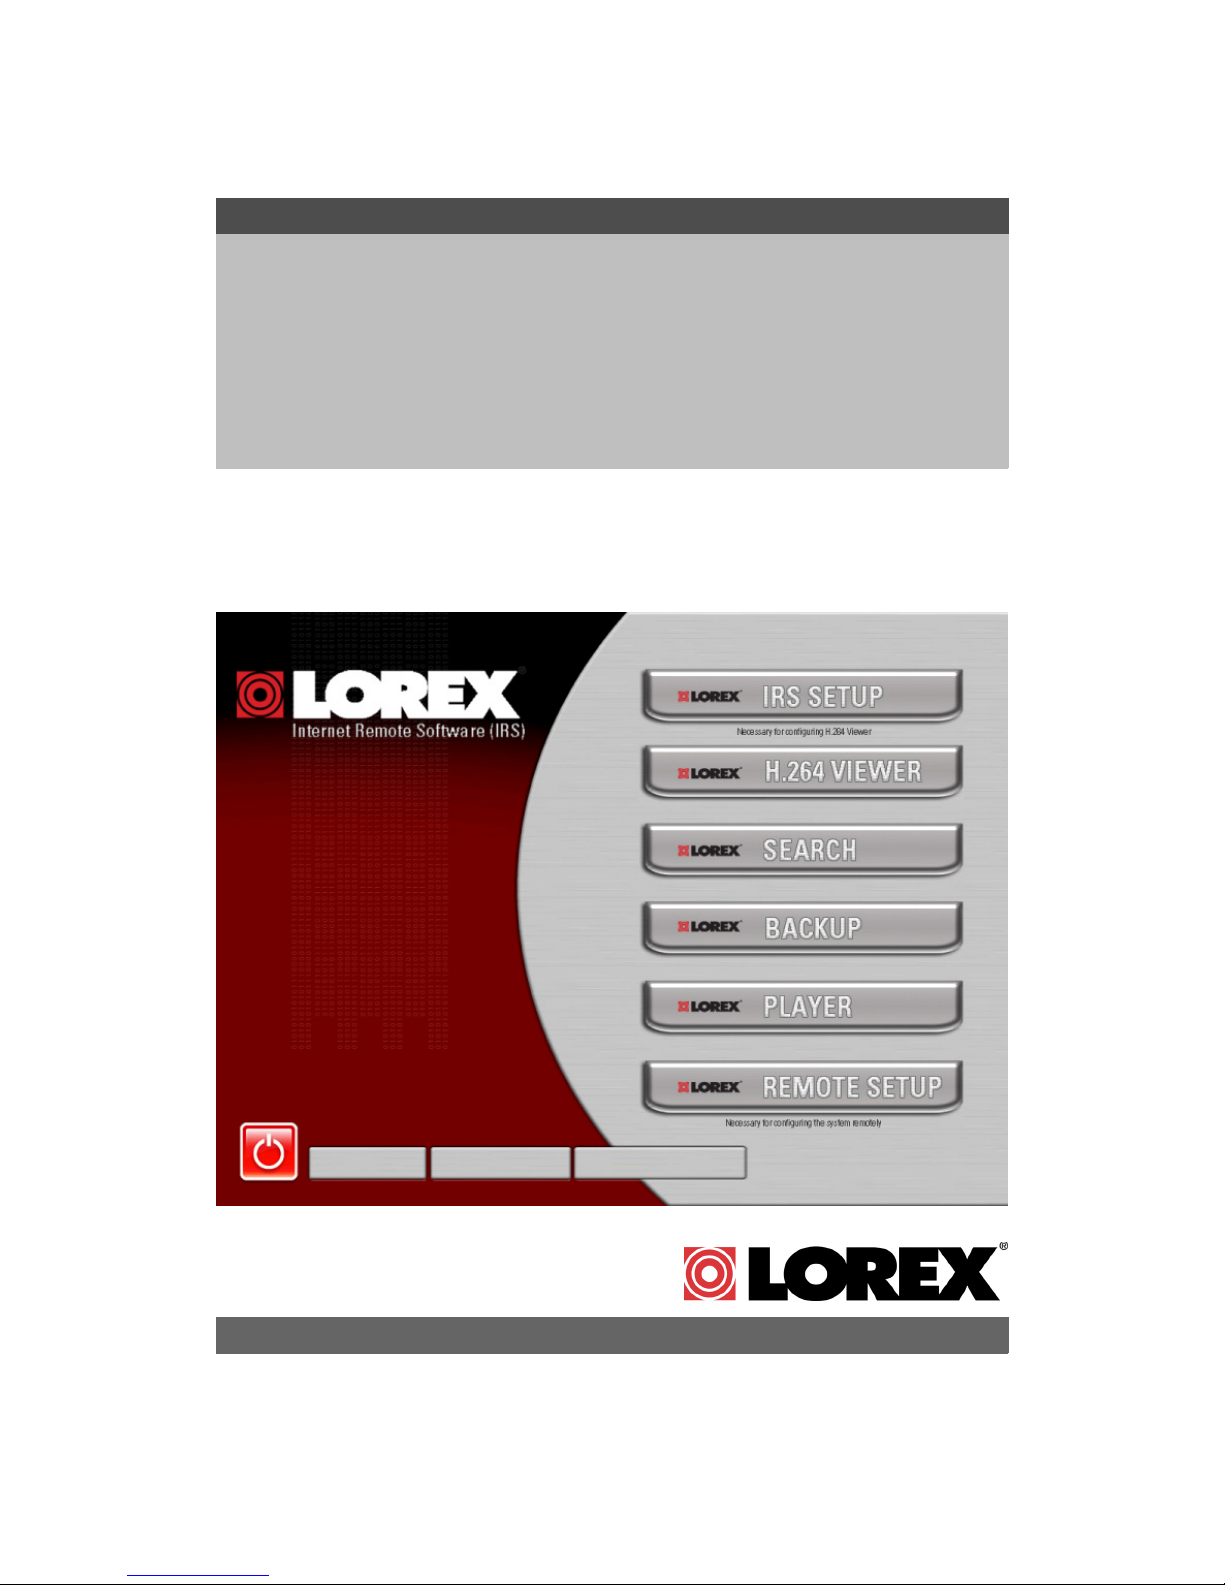
Integrated Remote Agent Software - Main Screen
The Lorex Client allows you to remotely connect to your system, and view live images.
1
2
3
4
5
6
7
1. IRS Setup 2. H.264 Viewer 3. Search
4. Backup 5. Player 6. Remote Setup
7. Exit
1. IRS Setup - Used to configure the System Remote Access Settings. A remote location must be
configured, and a connection made to the system prior to using the H.264 Viewer, Search,
Backup or Remote Setup options.
2. H.264 Viewer - Used to remotely connect and view video from the remote System using H.264
video compression.
3. Search - Used to search and playback recorded video from a remote location.
4. Backup - Used to backup data from a remote location to the local PC.
5. Player - Used to playback data that was backed up from the System (using a USB Memory
Stick) or backed up using the Backup Software.
6. Remote Setup - Configuration and setup for remote system configurations.
7. Exit - Exits the Integrated Remote Access program.
6
Page 7
1. IRS Setup
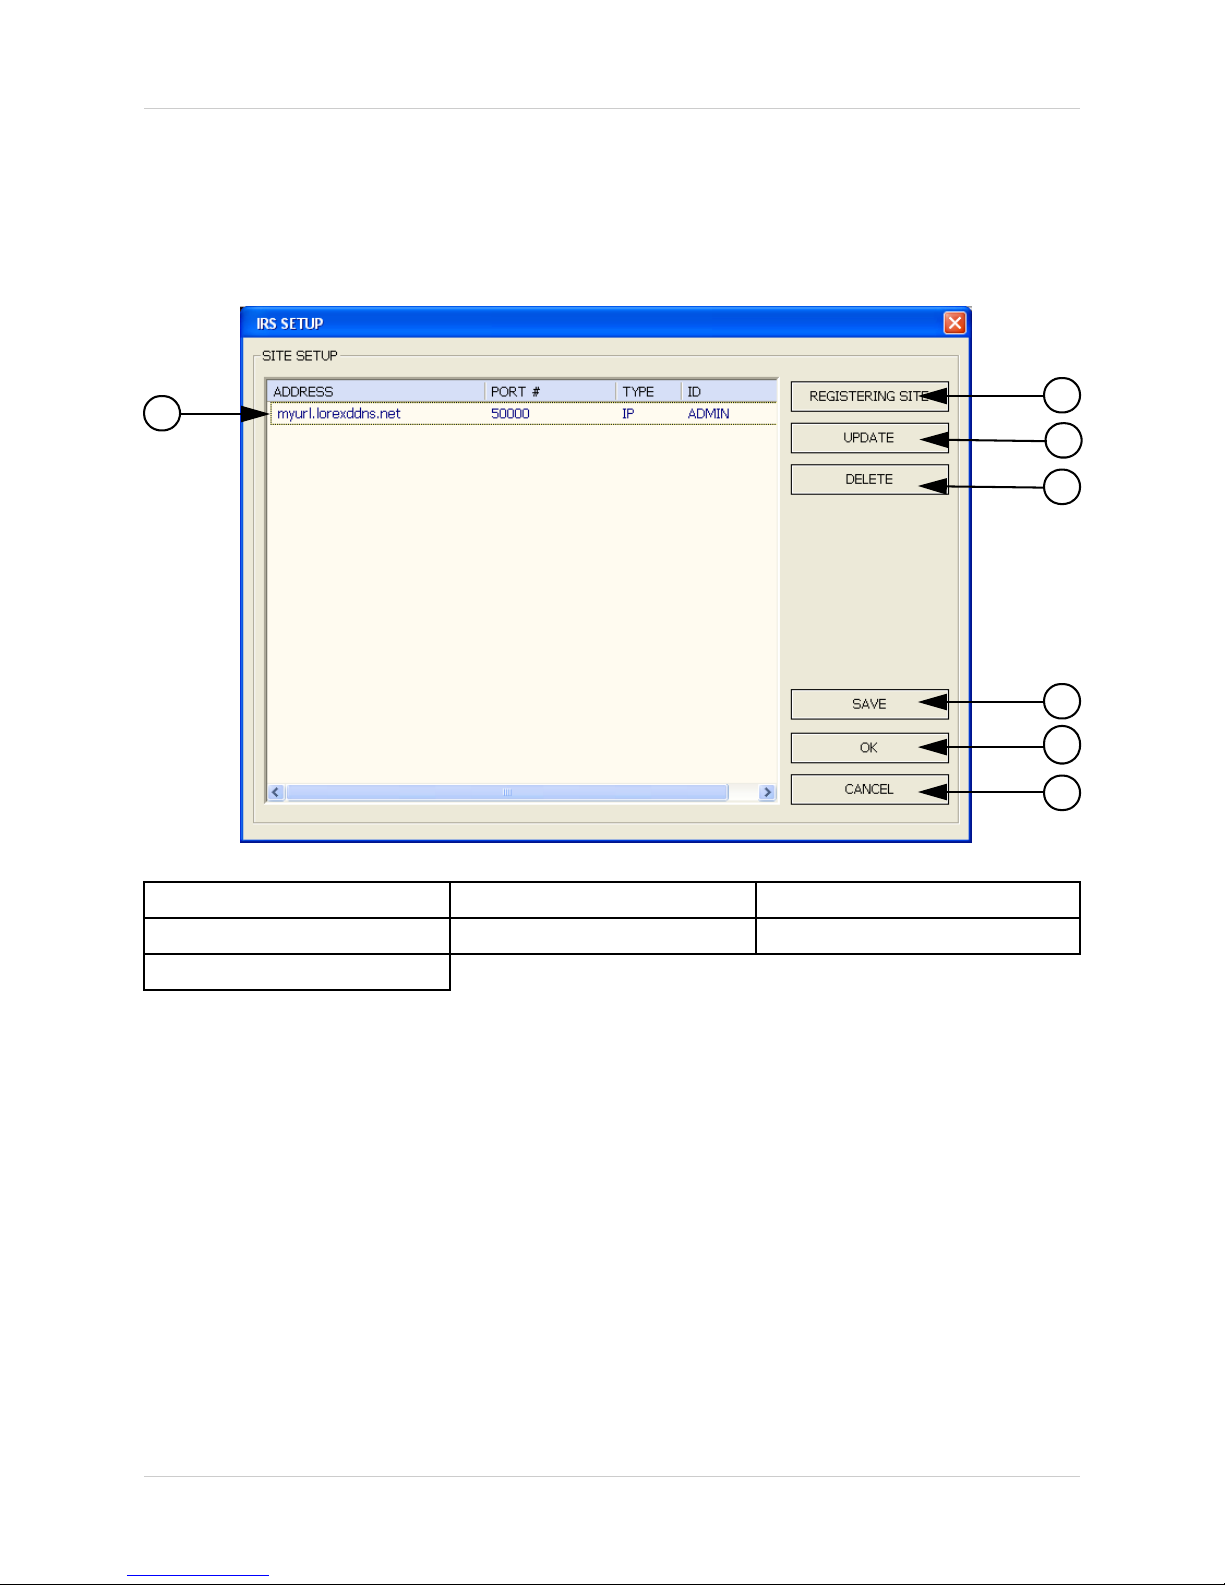
1. IRS Setup
The IRS Setup is Used to configure the System Remote Access Settings. A remote location must
be configured, and a connection made to the system prior to using the H.264 Viewer, Search,
Backup or Remote Setup options.
1
1. IP List 2. Registering Site 3. Update
4. Delete 5. Save 6. OK
7. Cancel
2
3
4
5
6
7
1. IP LIST - Lists the previously Registered Sites by System IP or DDNS Location.
2. REGISTERING SITE - Used to add new System Information to the list.
3. UPDATE - Used to make changes to existing site information. Highlight the desired site, and
click the Update button to modify.
4. DELETE - Used to delete System profiles.
5. SAVE - Saves changes to the selected IP address.
6. OK - Select a site from the list, and click OK to connect to the remote site.
7. CANCEL - Exits the IRS setup screen.
7
Page 8
1. IRS Setup
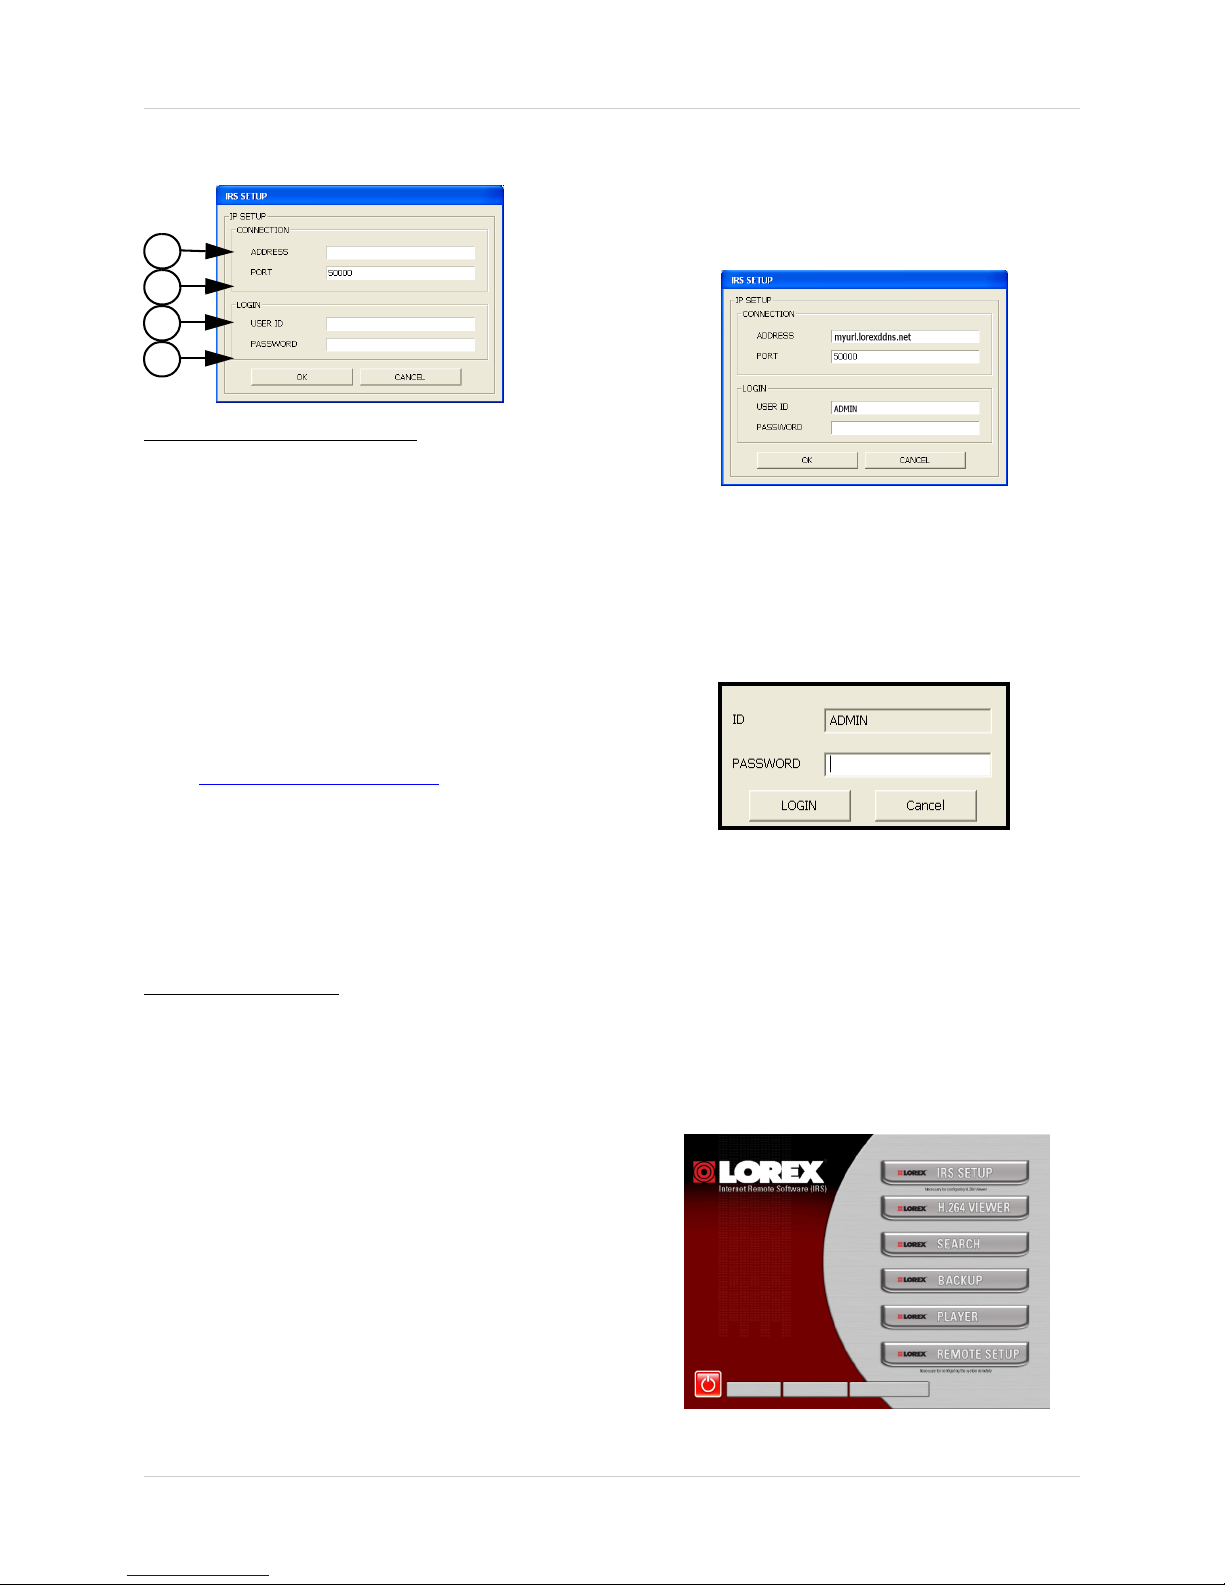
Registering a Site
1
2
3
4
IP SETUP / CONNECTION:
1. ADDRESS - Enter the IP address or
DDNS Address for the System:
• Internal IP Address - If using the
software within the same network, enter
the Internal IP Address (i.e.
192.168.1.104)
• External IP Address - If using the
software from a remote location, use
either the External IP Address (i.e.
72.45.122.30), or use the DDNS
Address.
• DDNS Address - Enter the URL
configured from
http://www.lorexddns.net
(i.e. myurl.lorexddns.net
Your completed screen should appear
similar to:
Connecting to the Remote System:
Select the System from the IP list on the
main IRS Screen. Click on the OK button to
connect to the Remote System.
2. PORT - The default port is 50000. The
only time the port number needs to be
changed, is if a new port has been assigned
on the System. Please refer to the Hardware
Manual for details.
IP SETUP / LOGIN:
3. USER ID - Enter the User ID for the
System (same as the System login):
• Default ID: ADMIN
• Other users can be configured on the
System for Remote Access. Please
refer to the hardware manual for User
setup.
4. PASSWORD - Enter the Password to
match the System User ID:
• Default ADMIN Password: <blank>
• Other users can be configured on the
System for Remote Access (One
ADMIN, One MANAGER and up to 8
USER accounts), for a total of 10 logins.
Note that if using multiple concurrent
connections, the performance will be
slower due to bandwidth constraints.
Enter the Password (the System ADMIN
password is blank by default), and click
LOGIN to connect.
After you successfully connect, the login
screen will disappear, and all the buttons in
the main screen will be activated.
8
Page 9

2. The H.264 Viewer
2. The H.264 Viewer
The H.264 viewer is used to remotely monitor the system using H.264 video compression. The
IRS Setup must be configured and connected prior to using the H.264 Viewer.
1
3
4
5
2
1. Main Screen View 2. Connect / Disconnect / Setup 3. Connection Information
4. Status Window 5. Screen Views 6. PTZ Controls
1. Main Screen Camera View - Displays the cameras in live view.
2. Connect / Disconnect / Setup - Used to connect or disconnect from a configured System.
Use the setup to configure the data transfer settings:
• Connect - Click the Connect Button to establish a connection to the Remote System (must
be configured in the IRS Setup first). The connection details appear in the Status Window (#4).
• Disconnect - Stops the connection to the Remote System.
• Setup - Opens the Data transfer setup window. The parameters will allow you to optimize
the image quality for your specific network bandwidth:
z Quality - Set the Image Quality from the Remote System to Normal, High or Highest.
z Frame Rate - Controls the DATA RATE from the remote system. Typically a higher
frame rate should result in a smoother image, however due to data compression and
bandwidth constraints with H.264 compression, it is recommended to set the frame
rate to 10~15 FPS for higher quality network viewing.
Set Values: 3, 5, 10, 15 & 30 FPS.
z Baudrate - Set the data transfer speed from the remote
system. Set Values: 500Kbps, 700Kbps, 850Kbps,
1Mbps or 1.5Mbps.
z Click the READ Button to retrieve system settings, and
press Write to save the System settings.
6
9
Page 10
2. The H.264 Viewer
1. Main Screen View 2. Connect / Disconnect / Setup 3. Connection Information
4. Status Window 5. Screen Views 6. PTZ Controls
3. Connection Information - The Connection Information will automatically be populated once it
has been entered into the IRS Setup (and a connection to the System has successfully been
established). This information can also be manually changed on this screen:
• IP: Enter the IP address of the System
• PORT: Enter the PORT for the system (default 50000)
• ID: Enter ID (default: ADMIN)
• PW: Enter the password (default: blank)
NOTE: To use the DDNS as a connection type, you must first enter the DDNS information into
the IRS Setup Program.
4. Status Window - Displays the current connection status and bit rate.
5. Screen Views - Changes the Screen Division to Single Channel view or 4-Channel Split
Screen View. Use the Channel Buttons 1~4 to switch to the corresponding camera.
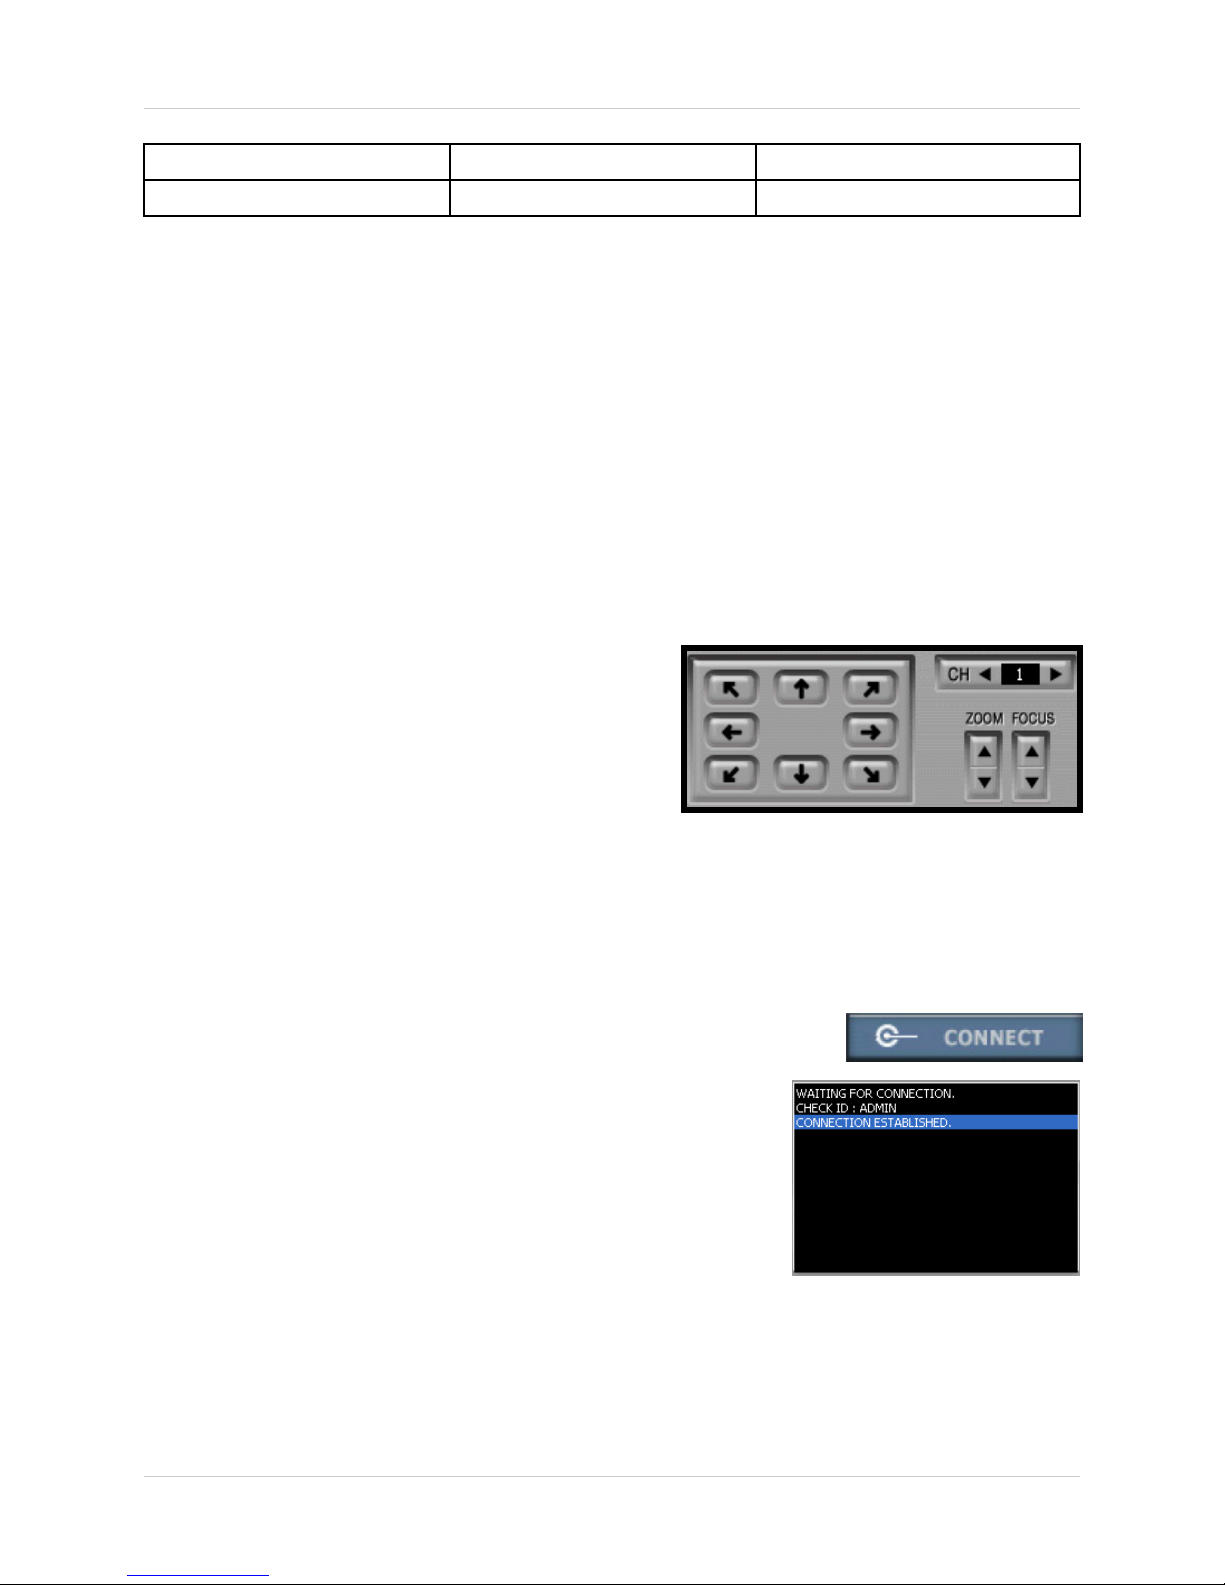
6. PTZ Controls - Use the PTZ Controls to change the
view on a PTZ Type Camera (if connected - PTZ
Cameras are not provided with the System).
Set the CH number to the PTZ Camera, then click the
arrow keys to change the viewing angle. Use the UP
and DOWN arrows to increase and decrease the
ZOOM and FOCUS.
To View Live Camera Images:
1. Click on the Connect button to access the Remote System.
2. The Connection Log will display a CONNECTION
ESTABLISHED message once the Remote System has been
accessed.
10
Page 11
3. Search
3. Search
The Search window is used to search through previously recorded data on the Remote System.
The IRS Setup must be configured and connected prior to using the Search Player.
3
1
4
5
6
2
7
8
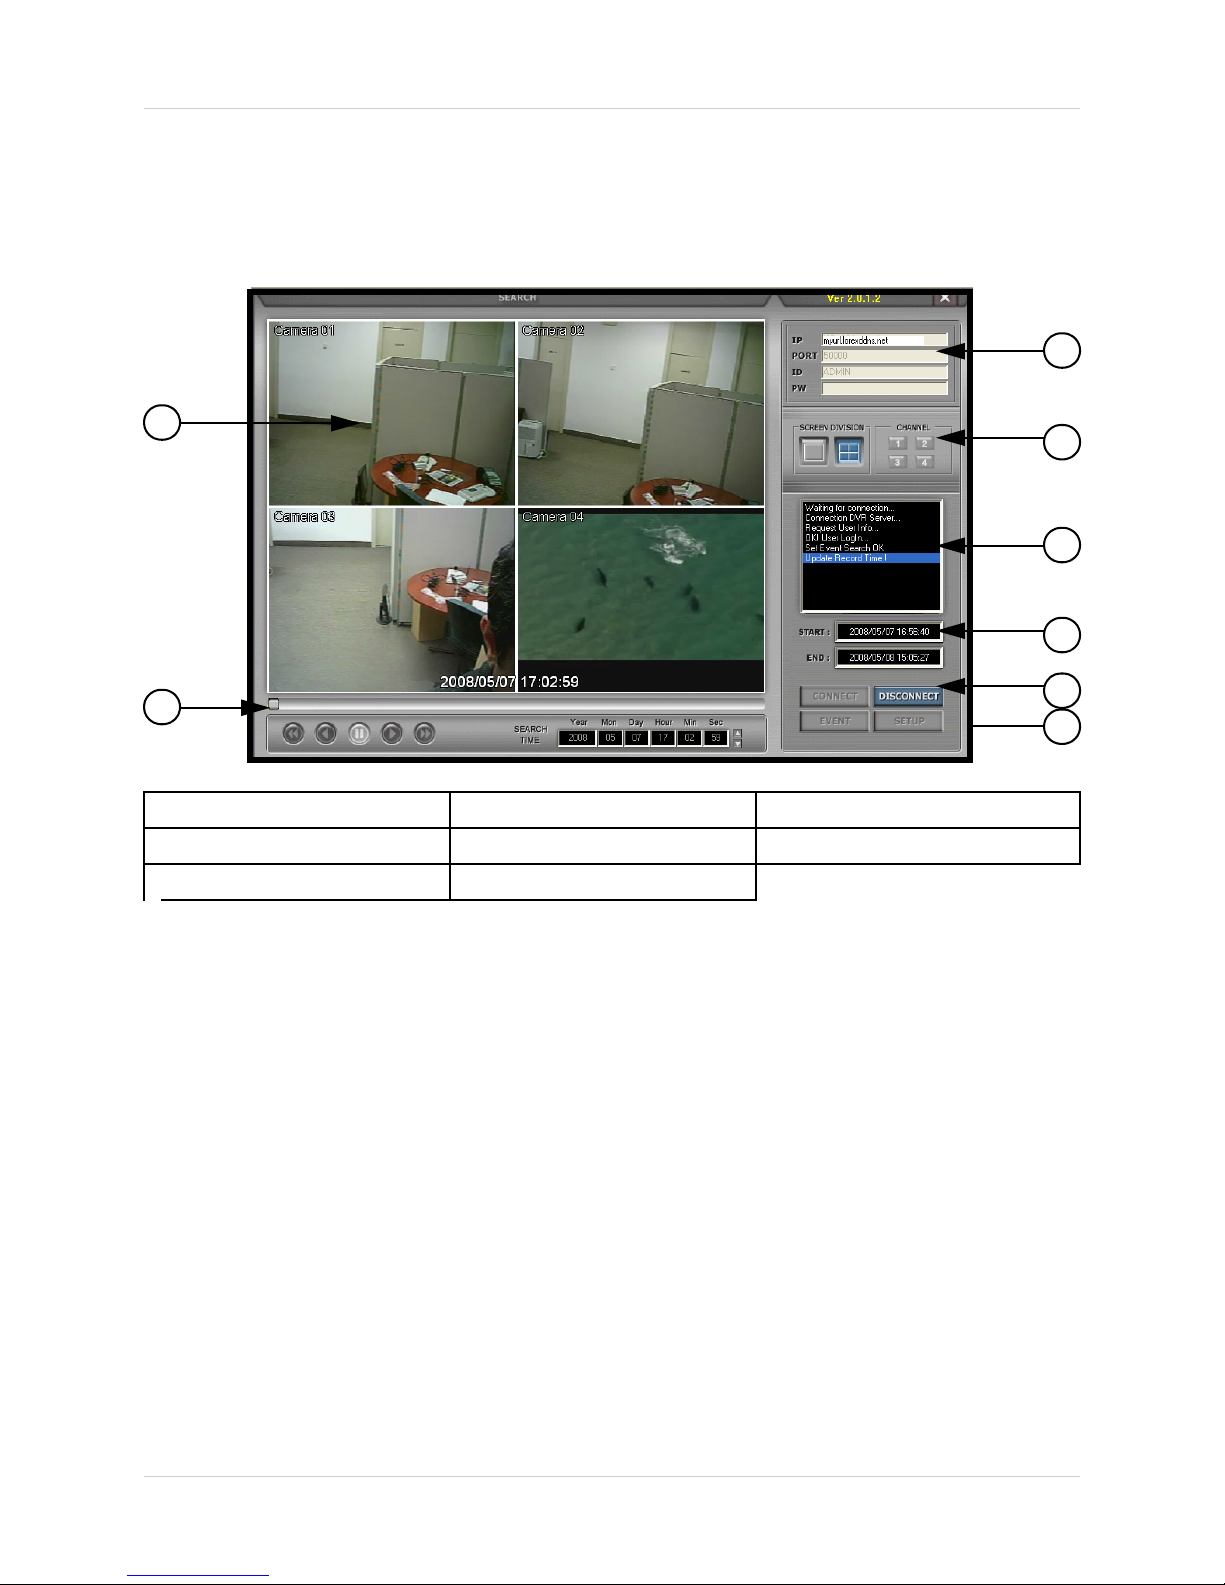
1. Main Screen View 2. Playback Controls
5. Status Window4. Screen Views
7. Control Buttons 8. Search Time
3. Connection Information
6. Start / End Time
1. Main Screen Camera View - Displays the cameras during video playback.
2. Playback Controls - The Playback controls become active once video has been loaded into
the Search window. Use the controls to Reverse Playback (fast), Reverse Playback (normal),
Stop/Pause, Play regular speed or fast forward.
3. Connection Information - The Connection Information will automatically be populated once it
has been entered into the IRS Setup (and a connection to the System has successfully been
established). This information can also be manually changed on this screen:
• IP: Enter the IP address of the System
• PORT: Enter the PORT for the system (default 50000)
• ID: Enter ID (default: ADMIN)
• PW: Enter the password (default: blank)
4. Screen Views - Changes the Screen Division to Single Channel view or 4-Channel Split
Screen View. Use the Channel Buttons 1~4 to switch to the corresponding camera.
5. Status Window - Displays the current connection status and bit rate.
6. Start / End Time - Displays the Start and End times of the available recording.
11
Page 12

3. Search
1. Main Screen View 2. Playback Controls 3. Connection Information
5. Status Window4. Screen Views 6. Start / End Time
7. Control Buttons 8. Search Time
7. Control Buttons - Used to connect or disconnect from a configured System, configure the
data transfer settings and display the list of searchable Events.
• Connect - Click the Connect Button to establish a connection to the Remote System (must
be configured in the IRS Setup first). The connection details appear in the Status Window (#4).
• Disconnect - Stops the connection to the Remote System.
• Event - Retrieves a list of Recorded Events from the System. Select an event to display the
corresponding video.
• Setup - Opens the Data transfer setup window. The
parameters will allow you to optimize the image quality
for your specific network bandwidth:
z Baudrate - Set the data transfer speed from
the remote system. Set Values: 500Kbps,
700Kbps, 850Kbps, 1Mbps or 1.5Mbps.
z Click the READ Button to retrieve system
settings, and press Write to save the
System settings.
8. Search Time - Enter the desired Start time for searching through previously recorded data.
Set the Search time by Year / Month / Day / Hour / Minute / Second. Once the desired date has
been set, click the PLAY Button to start the playback of the desired data.
To Search for Previously Recorded Video:
1. Click on the Connect button to access the Remote System.
2. The Connection Log will display a CONNECTION ESTABLISHED
message once the Remote System has been accessed.
3. To find data, click on either EVENT (to load the Event list), or set a
Time and Date using the bottom bar.
5. Press the PLAY/PAUSE button to start the playback.
NOTE: It may take a few minutes for video data to load.
12
Page 13

4. Backup
4. Backup
The Backup window is used to create a local backup of the System date to the PC. The IRS
Setup must be configured and connected prior to using the Backup Application.
1 3
4
2
1. Connection Information 2. Connection Setup 3. DVR Server Information
4. Backup Status 5. Setup / Close
1. Connection Information - Enter the System Connection information, including:
• IP Address: Enter the IP address or DDNS Address of the System (must be configured in
IRMS Setup, and a connection established).
• Network Port: Enter the port for the System (50000 by default).
• User ID: Enter “Admin” (or another user as configured in the Remote System).
• User Password: Enter Admin's password (blank by default)
• Save File Path: Set a path to save the backup file (This function is active only when the
connection is established)
• Start Backup Time: The start time of file backup (This function is only active under the
connection is established”)
• End Backup Time: The end time of file backup (This function is only active under the connection
is established”)
2. Connection Setup -
• Connect Test: Click to test the connection status. A success message should appear in the
Message Box (#4) when a connection is established.
• Lock / Unlock: Locks the System for Backup, and retrieves list. Click UNLOCK to stop.
• Set Backup Time: Set the start/end time, size and path of file backup.
• Start Backup: Active the backup function.
5
13
Page 14

4. Backup
1. Backup Information 2. Connection Setup 3. DVR Server Information
4. Backup Status 5. Setup / Close
3. DVR Server Information - Displays the information from the Remote System:
• Recorded Start Time: Displays the recorded start time.
• Recorded End Time: Displays the recorded end time.
• Update Button: Update the recorded time.
4. Backup Status -
• Message: Displays System messages, and displays the backup status.
• Receive Rate: Displays the percentage of the received backup image.
• Backup Rate: Displays the completed percentage of the backup image.
• Receive bps: Displays the bits per second (bps) of the received backup image.
• Save Size: Displays the size of the backup image.
5. Close - Pressing the Close button will exit the program, and return to the Main Window.
Backup Procedure
1. Select the “Connect Test” button to test the status of the System Connection.
2. Select the “Lock” button to get the Record start/End time from the System.
3. Select the “Set Backup Time” setting to configure the backup function
1
3
2
4
• Indicate the recorded start/end time
• Click [Find] to set the path for saving the backup file
• Set the file size of backup file (30~700MB)
• Set the start/end time of file backup
4. Click the “Apply” button to apply all settings
5. Select “Start Backup” to begin the backup process
NOTE: The User can cancel the backup at any time.
14
Page 15

5. Player
5. Player
The Player allows you to playback data on your PC which was previously retrieved from your
System, or backed up to USB Thumbdrive or removable hard drive. You do not need a
connection through the IRMS Setup to use this application.
1
2
1. Main Screen Camera View 2. Playback Position Bar 3. Delay Settings
4. Current Time Display 5. Playback Status 6. Screen Display
4
5
6
7
83
7. System / File Buttons
8. Audio / Playback Controls
1. Main Screen Camera View - Displays the cameras during video playback.
2. Playback Position Bar - Click and drag the bar to change the video playback time.
3. Delay Setting: Sets the Video Playback delay to 1, 2, 4, 8, 16 and 32x Speed (in seconds).
4. Current Time Display - Displays the time on the PC
5. Playback Status - Displays the Start and End time of the selected video backup file.
6. Screen Display - Changes the screen display to Single or Quad view. Select a camera number
to display the selected video channel onscreen.
15
Page 16

5. Player
1. Main Screen Camera View 2. Playback Position Bar 3. Delay Settings
4. Current Time Display 5. Playback Status 6. Screen Display
7. Control / File Buttons
8. Audio / Playback Functions
7. Control / FIle Buttons - Use the control buttons to Open a file, edit the image, save the video
to an AVI format, or close the program:
• OPEN: Opens the backup file.
• EDIT: Edits the backup image.
• AVI SAVE: Saves the backup file to an AVI file format.
• EXIT: Closes the Player program.
8. Audio / Playback Functions - Controls the audio and playback of a loaded video file:
• Audio Playback - Controls the audio playback:
z ON: Turns the playback of audio ON or OFF.
• Playback Controls:
Return to the beginning of the video.
Fast Reverses the playback.
Reverses the playback.
Pause the playback.
Play the Video.
Fast Forward the playback.
Go to the end of the Video Playback.
NOTE: To use the AVI File Save or Edit Tool features, the Player must be in FULL SCREEN
CAMERA VIEW MODE and not in QUAD View.
Saving an AVI File
1. Click to open the backup file
2. Click to select single channel.
3. Click to open the AVI SAVE function.
4. CHANNEL: Select a single channel
• FRAMERATE: Set the frame rate
• SIZE: Set the file size of AVI SAVE
• START: Start AVI SAVE
• STOP: Stop AVI SAVE
5. The AVI file path will be saved under C:\WEB_BACKUP
16
Page 17

Using the Edit Tool
Note: Select a single channel to use the Edit functions - this will not work in QUAD View.
1. CONTRAST
• Increase contrast.
• Decrease contrast.
2. BRIGHTNESS
• Increase brightness.
• Decrease brightness.
3. SHARPNESS
• Increase sharpness.
4. BLUR
• Increase softness.
5. Player
5. SAVE
• Saves video in JPEG file format to the folder where the player is installed
(C:\WEB_BACKUP).
6. PRINT
• Prints current still video image.
17
Page 18

6. Remote Setup
6. Remote Setup
The Remote Setup is used to change the settings on the Remote System. The IRS Setup must
be configured and connected prior to using the Remote Setup Application.
1
2
3
4
1.Configuration Display Window - Displays the System Settings (once a connection to the
Remote System has been established). Please refer to the Hardware Manual for specific System
Settings and Configurations.
2. Connection Information - The connection information is automatically populated once a
connection has been made with the IRMS Setup. This information can also be manually changed
on this screen.
3. Connect / Disconnect - Click to Connect to the Remote System. Once a connection has been
made, the Display Window will show the settings that can be changed on the System. Click the
Disconnect button to close the connection.
4. Close - Closes the window.
Configuration / Alarm:
Configure the Alarm IN options for each channel, corresponding to the Alarm Block.
• Channel Select: Choose a
Camera.
• Input: Set to Normally Open or
Normally Closed.
• Duration: Set the Alarm
Duration (in seconds)
Click the Update button to change
the Remote Settings.
18
Page 19

Configuration / Buzzer:
Configure the Buzzer options for the System.
• Key Tone: Turns the System
keypad beeping ON or OFF.
• Video Loss: Turns the buzzer
on when a Video Loss is
detected.
• Alarm Active: Turns the buzzer
on when an Alarm is detected.
• Motion Detection: Turns the
buzzer on when Motion is
detected.
Click the Update button to change the Remote Settings.
6. Remote Setup
Configuration / Interval:
Configures the timing intervals for several System functions.
Switching Interval Times:
• Sequence Screen: Sets the
time for each screen to be
displayed when in Sequence
mode.
• PIP Screen: Sets the time for
each screen to be displayed in
PIP Mode.
Event Record Time:
• Event Update: Determines the
amount of time between each
event being written to the
System log.
Click the Update button to change the Remote Settings.
19
Page 20

6. Remote Setup
Record / Record Configuration:
Configures the recording settings for all channels.
• Quality: Set the quality to
Normal, High or Highest.
• Framerate: Set the Frame Rate
to 1, 2, 3, 5, 7, 10, 15 or 30 FPS.
• Overwrite: Turns the Hard
Drive overwrite ON or OFF.
Click the Update button to change
the Remote Settings.
Record / Record Schedule:
Configures the schedule for recording on all channels. Click the ALARM, MOTION,
CONTINUOUS or NONE Buttons, then click the squares in the Time / Date grid to set.
Note: Alarm and Motion recording
types can be doubled on a square.
For example. click on Alarm, and
set the block for Sunday 00-02 - the
block will turn Turquoise. Click the
Motion option, then click the same
block (Sunday 00-02) - the block will
turn green indicating that both
Alarm and Motion are set.
Click the Update button to change
the Remote Settings.
20
Page 21

External / Audio:
Configures the audio settings for the System.
Audio Setup: Select a channel with
Audio:
• Input Volume: Set the Audio
Input volume for the Selected
channel.
• Output Volume: Set the output
volume for the System.
Click the Update button to change
the Remote Settings.
6. Remote Setup
External / Network
Configures the network date transfer settings for the System.
• Baudrate - Set the data transfer
speed from the remote system.
Set Values: 500Kbps, 700Kbps,
850Kbps, 1Mbps or 1.5Mbps.
Click the Update button to change
the Remote Settings.
21
Page 22

Appendix #1 - Setting up Remote Viewing
Appendix #1 - Setting up Remote Viewing
Setting up the Remote Viewing Feature requires several steps. Networking skills are required to
correctly configure the remote viewing functions.
What do you need?
• The LCD/DVR System.
• A PC with the installed with the Lorex Client 2.2 Integrated Remote Agent Software
• A Router (not provided with the system) and High Speed Cable or DSL Internet Connectivity
(for remote viewing outside your network)
Network Setup / Remote Access Overview
The System can be remotely controlled using your existing network and the Lorex Client 2.2 software or Internet Explorer.
1. Connect the System to the Router using the supplied Ethernet Cable. Power the System on.
The System must be connected to the router prior to powering on the system. This allows the
system to communicate on your network
SYSTEM
INTERNET
ROUTER
(Not Included)
2. Find the IP address of your System through the Menu System on the unit.
3. Enable PORT FORWARDING on your Router. Refer to the included Router Guide and Basics
of Remote Video Access Guide for further assistance with your specific network setup and
hardware.
PC
(Not Included)
4. Set up a web account at http://www.lorexddns.net
5. Setup the System DDNS.
6. Configure the software, using the information gathered on the following pages.
22
.
Page 23

Appendix #1 - Setting up Remote Viewing
Network Checklist
The following checklist is provided to assist you in confirming that all steps have been
successfully performed during Network Setup. Use this checklist in conjunction with the steps
outlined on the following pages.
1. I have the following:
• High Speed Internet
• A Router
• The Ethernet Cable provided with this system
• The System
• A PC with the Remote Access software installed
2. I have confirmed that my System is set to automatically complete my Network settings
(DHCP is set to ON):
• Press the SETUP button on the Front Panel -or- Press SETUP on the Remote -or- Right
Click on the screen and select the SETUP option.
• From the main menu, select the EXTERNAL DEVICE option. Select the TCPIP SETUP
Menu, then choose the IP SETUP Menu.
• Confirm that DHCP Mode is set to AUTOMATIC
3. I have turned off the System, and performed the following:
• Connected the Ethernet Cable to the back of the System
• Connected the other end of the Ethernet Cable to my Router
NOTE: Network Setup will not work if you do not have a router
4. I have found my System Information by navigating through the System Menus (MAIN
MENU / EXTERNAL DEVICE / TCPIP SETUP / IP SETUP):
• My IP Address is: ________________________________
• My MAC Address is: ______________________________
NOTE: If your IP address is showing as 127.0.0.1 or 0.0.0.0 please return to Step 1 and review
all menu settings. Check to make sure that your Ethernet cable is properly connected to your
Router and System.
23
Page 24

Appendix #1 - Setting up Remote Viewing
5. I have enabled PORT FORWARDING on my Router for:
• Port 80
• Port 50000
NOTE: Each Router is different, therefore the port forwarding settings will vary by model. Please
visit us on the web at http://www.lorexcctv.com/support
for assistance with several of the most
common router types. If your router is not listed, please refer to the manual that came with your
Router, or your Router manufacturer for assistance.
6. I have configured the DDNS for remote access to my system at http://www.lorexddns.net
and my configuration information is:
• Username: _______________________________
• Password: _______________________________
• Domain Name: ____________________________
7. I have configured my System to connect to the DDNS Server by completing my Network
settings:
• Press the SETUP button on the Front Panel -or- Press SETUP on the Remote -or- Right
Click on the screen and select the SETUP option.
• Select the EXTERNAL DEVICE option
• Select the TCPIP SETUP option
• Select the DDNS SETUP Menu.
• Set the DNS ENABLE option to ON, and complete the
following:
zDomain Name: Enter the name you set for the DDNS web
configuration.
zUser ID: Enter your user ID
zPassword: Enter your password
• Click the REGISTER Option to confirm the connection
details.
,
• A success message will appear. Reboot the System.
8. Configure the Remote Access Software:
• If you are connecting from within your network (i.e. The System and your PC are both
inside your house), you only need to enter the IP address of the System into the software
(i.e. 192.168.0.105)
• If you are connecting from outside your network (i.e. The System is at Home, and your
PC is at work), use the DDNS Domain Name to configure the software).
24
Page 25

IP & MAC Address
1. Access the Main Menu Setup screens, and
navigate to the SYSTEM MENU -
EXTERNAL DEVICE - TCP/IP SETUP - IP
SETUP option.
2. Record the MAC Address of your system.
This information is NECESSARY for the
DDNS Setup process. The MAC Address
is 12 characters with no spaces or dashes.
3. Confirm that the DHCP MODE is set to
AUTOMATIC. This will allow your system
to lease an IP ADDRESS from your router.
If the system is not set to AUTOMATIC,
change the setting and click IP DETECT the system will obtain an IP address.
4. The IP PORT is 50000 by default. The IP
Address, Gateway and Subnet are
assigned to your system by your router. If
the settings are not displayed, and the unit
is set to DHCP MODE: AUTOMATIC, you
may need to click IP DETECT - the system
will obtain an IP address.
Appendix #1 - Setting up Remote Viewing
5. Press ESC to exit.
NOTE: The system will lease networking
information from your Router. If you wish to
set your information manually, then set the
DHCP MODE to MANUAL. Please consult
your Hardware Manual for further Menu
options.
Finding Your External IP Address
You may use your External IP address to connect to your System. One of the fastest ways to find
this information is to use a 3rd Party website such as http://www.showmyip.com
Your IP address can also be found within your Router settings. Refer to your router user guide for
further details.
NOTE: Your External IP address may occasionally change, based on your specific Internet
Provider. A DDNS Service allows you to connect to your unit, regardless of an IP Address change
by providing you with a Dynamic Address (and connecting via your system specific MAC address).
25
Page 26

Appendix #1 - Setting up Remote Viewing
Network - Router Port Forwarding
You will need to enable port forwarding on your Router to allow for external communications with
your System for ports:
• TCP/IP PORT 50000
• WEB PORT 80
Computers, Systems, and other devices inside your network can only communicate directly with
each other within the internal network. Computers and systems outside your network cannot
directly communicate with these devices. When a system on the internal network needs to send
or receive information from a system outside the network (i.e. from the Internet), the information
is sent to the Router.
NETWORK EXAMPLE
Router
External IP
216.13.154.34
Router
Internal IP
192.168.0.1
Computer
Internal IP
192.168.0.2
System
Internal IP
192.168.0.3
Internet
Internal Network
When a computer on the Internet needs to send data to your internal network, it sends this data
to the external IP address of the Router. The Router then needs to decide where this data is to
be sent to. This is where setting up Port Forwarding becomes important.
Port Forwarding tells the router which device on the internal network to send the data to. When
you set up port forwarding on your Router, it takes the data from the external IP address:port
number and sends that data to an internal IP address:port number (i.e Router External IP
216.13.154.34:50000 to System Internal IP 192.168.0.3:50000).
The instructions found online in the Router Configuration Guide
forwarding configurations for a selection of different router models.
Visit our Consumer Guides Support
26
will assist you in the port
website at http://www.lorexcctv.com/support for details
Page 27

Appendix #1 - Setting up Remote Viewing
Network - Setting Up Your DDNS Account
Lorex offers a free DDNS service for use with your System. A DDNS account allows you to set up
a web site address that points back to your Local Network. The following outlines how to set up
your free DNS account.
1. Navigate to http://www.lorexddns.net
2. Select the Create Account option from the list on the left side
of the screen.
3. Complete the Account Information
fields with your personal information.
Complete the Warranty Information
with your purchase details.
4. Complete the System Information fields:
• Product License: Select your product model from the
Product License drop down menu
• <Product Code> - <MAC Address>: Locate the MAC
address of your (recorded while loading the System)
• URL Request: Choose a URL for your DDNS connection
(i.e. your name, your company or business name, or
anything of your choice.)
27
Page 28

Appendix #1 - Setting up Remote Viewing
NOTE: Make sure to write down your information BEFORE clicking on the Create New Account
link. This information is important for your System Setup.
User Name: _______________________________________________ *
Domain Name: _____________________________________________
Password: _________________________________________________
* Only the first part of the Domain Name is required for setup on the System.
If the full Domain sent is myurl.lorexddns.net, the unit only requires that only
myurl be entered.
5. Click the Create New Account link at the bottom of the form to submit your request.
6. Your Account information will be sent to you at the E-mail Address you used in Step 3.
DDNS Server Name:
Domain Name:
User ID:
Password:
LOREX
myurl
tomsmith1
(your password)
You will need this information for remote access to your System. Remember to record YOUR
information before clicking on the Create New Account link.
28
Page 29

Appendix #1 - Setting up Remote Viewing
There are two ways to find your DDNS Configuration information at a later date.
1. Review the Email sent to you by Lorex:
Dear A,
Thank you for activating your free Dynamic DNS account for your Lorex DVR Combo. Once you have set up your Lorex device
and configured your network, you will be able to view your video images from anywhere in the world using the URL shown at
the end of this message.
When you visit the Lorex web site at: https://secure.lorexddns.net/webapp
Your account name is: aa321
Your account password is: 1111
Your Lorex license number is: L15LD424-AAAAAAAAAAAA
You can visit this site to change your account information and to set up additional Lorex devices.
Set up the Lorex DVR Combo to use this service as follows:
On the monitor console (or from the remote control) press the set-up button. Select the 'DDNS Server' option under network.
Enter the following settings:
DDNS SERVER NAME: LOREX
DOMAIN NAME: myurl
USER ID: aa321
USER PASSWORD: [1111]
DDNS STATUS: -------
OK CANCEL
Press DDNS STATUS button and wait for the message 'SUCCESS'. If the message returns 'SUCCESS' press OK and press
the return button to exit the menu (when you do, the DDNS set up for the first time system will prompt you to save the changes
and restart the system).
Note: if you receive a failed message, please check the information that you have entered.
For more information please refer to the remote client manual.
*** Important ***
Please note that normal latencies in the update protocol and Internet propagation delays require you to wait between 5 and
15 minutes and sometimes even longer for your network URL to become fully available and operational over the Internet. This
is normal for the DDNS system. Attempting to use the URL within the first 5 minutes of registration may also prolong the URL
update time.
The URL for accessing your video is: holycats.lorexddns.net. When setting up the Lorex client software for remote access,
use this URL in place of the IP Address.
If you have decided to use the free Lorex Email Service (default option) for any system event notifications and alerts, you must
register with lorexddns.net and activate the DDNS option in the System's Set Up / Network menu. Alternatively, you can use
your own email service by disabling the default mail service and entering your personal mail server information in the System's
Set Up / Mail menu.
Thank you for choosing Lorex.
Sincerely,
Lorex Customer Support
NOTE: If you entered an incorrect Email address when setting up the DDNS, you will NOT
receive this email. To review the email, you must log into the DDNS Website.
29
Page 30

Appendix #1 - Setting up Remote Viewing
2. Log into the Lorex DDNS Website at http://www.lorexddns.net and enter your Username and
Password.
Click the ACTION button located on the console to display a copy of the Configuration email:
30
Page 31

DDNS SETUP
Once the DDNS settings have been configured
online, the information must be entered on the
Observation System to allow for remote connection
via the Lorex Client 2.2 Software (or through
Internet Explorer):
1. Access the Main Menu Setup screens, and
navigate to the SYSTEM MENU - EXTERNAL
DEVICE - TCP/IP SETUP - DDNS SETUP
option.
2. Set the DDNS ENABLE to ON.
3. Enter the following information:
• DOMAIN - Use the first part of your
Registered URL (i.e. If you used
myurl.lorexddns.net, only enter the myurl
portion).
• USER NAME - Enter the Username used on
the DDNS Website
Appendix #1 - Setting up Remote Viewing
• PASSWORD - Enter the password used on the DDNS Website
• REGISTER - Select the REGISTER link to allow the System to communicate with the
DDNS server, and register the information to the DDNS database.
NOTE: A SUCCESS TO REGISTER DVR INFO message will be displayed upon successful
completion.
4. Save the changes, and exit from the menu.
My Connection Information
Record your system specific information below for easy reference:
Internal IP Address (on the System): ___________________________________________
External IP Address*: ________________________________________________________
MAC Address (on the System): ________________________________________________
User Name (as set in the DDNS Website): ________________________________________
Password (as set in the DDNS Website): _________________________________________
DVR Name (as set in the DDNS Website): ________________________________________
31
Page 32

Appendix #2 - Remote Viewing with Internet Explorer
Appendix #2 - Remote Viewing with Internet Explorer
Video from the System van be viewed using the Internet Explorer interface (for remote viewing
and backup).
1. Open the Internet Explorer Browser (this is the only supported browser).
2. Enter your System address in the Address bar (i.e. http://myurl.lorexddns.net).
Note: The web interface may take a few minutes to load - please be patient!
3. The first time the Web Interface
loads, you will be required to download
the Internet Explorer Remote Web
software on the PC. Click the Warning
on the top of the window, and select
INSTALL.
4. A new window will open. Click the
INSTALL button to complete the setup
process.
NOTE: Many factors impact the performance of your web browser such as security settings,
popup blockers, firewall settings, routers, and other network conditions that are specific to the
end user. Lorex recommends using the included Lorex Client software.
32
Page 33

Appendix #2 - Remote Viewing with Internet Explorer
Web Player Interface Screen
The Web Player functions in the same way as the H.264 Viewer. Please refer to the H.264 Player
section of this manual for details.
3
1
4
5
2
1. Main Screen View 2. Connect / Disconnect / Setup 3. Connection Information
4. Status Window 5. Screen Views 6. PTZ Controls
6
1. Main Screen Camera View - Displays the cameras during video playback.
2. Connect / Disconnect / Setup - Used to connect or disconnect from a configured System.
Use the setup to configure the data transfer settings:
3. Connection Information - The Connection Information will automatically be populated once it
has been entered into the IRS Setup (and a connection to the System has successfully been
established). This information can also be manually changed on this screen:
4. Status Window - Displays the current connection status and bit rate.
5. Screen Views - Changes the Screen Division to Single Channel view or 4-Channel Split
Screen View. Use the Channel Buttons 1~4 to switch to the corresponding camera.
6. PTZ Controls - Use the PTZ Controls to change the view on a PTZ Type Camera (if
connected - PTZ Cameras are not provided with the System).
33
Page 34

It’s all on the web
Product Information
User Manuals
Quick Start Guides
Specification Sheets
Software Upgrades
Firmware Upgrades
VISIT
www.lorexcctv.com
LOREX Technology Inc.
www.lorexcctv.com
 Loading...