

Page 1
HD Wire-Free Security System
Quick Connection Guide
www.lorextechnology.com
STEP 1: Initial Setup
* Per camera in multi-camera packs
Package Contents
LHB800_QCG_EN_R1
To prepare the cameras and receiver:
Before you begin, you will need to prepare the wire-free cameras and
power packs.
HD Wire-Free Security Cameras
(Model Number: LWB3801)
Rechargeable
Power Pack*
Mounting Kit*
Power Pack
Adapter
USB Mouse
Ethernet Cable
DVR Power
Adapter
HDMI Cable
HD DVR
(Model Number: LHB806)
Camera Antenna*
STEP 3: Connecting with Lorex Secure
To connect with Lorex Secure:
1. Download and install the free Lorex Secure app from the
App Store or Google Play Store.
2. Tap the Lorex Secure icon to launch the app.
Connect to your system using the free Lorex Secure app for smartphones and
tablets (iOS and Android).
3. Tap SIGN UP. Enter your email address and password to create a new account.
4.
Need Help?
Visit us online for up-to-date software and complete instruction manuals.
Click on the Downloads tab
4
Visit lorextechnology.com
Search for the model number
of your product
Click on your product in the
search results
3
2
1
Tap
Security System
Tap
ADD DEVICE
5.
6. Scan the QR code on the back of your DVR using the camera
on your smartphone or tablet.
7. Enter your DVR’s user name (default: admin) and password
(default: 00000000). Tap DONE.
8. Enter a new, secure 8-15 character password. This password
will be used to connect to your system from now on.
Record your password below and store in a secure place:
1. Peel off the PLEASE REMOVE label covering the
contacts on each power pack. Insert the charged power
packs into each camera base. Push up until the power
pack ‘clicks’ firmly into place.
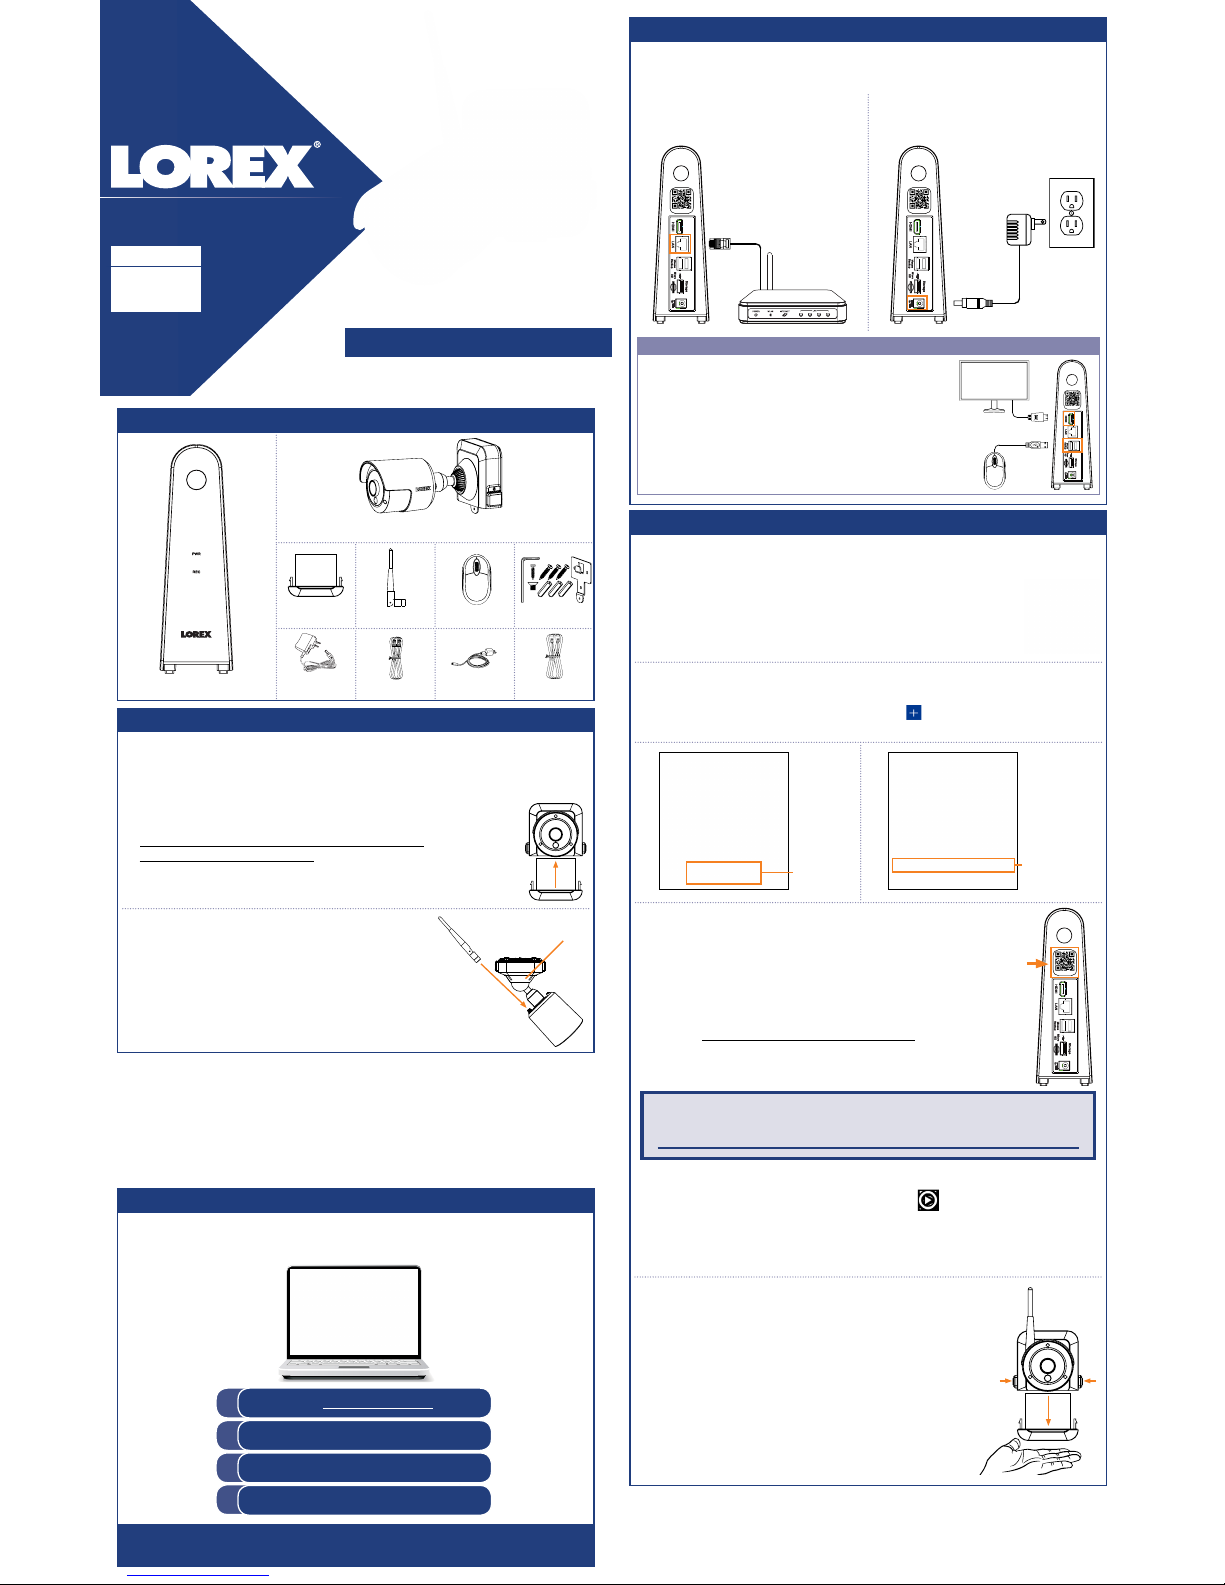
STEP 2: Setting Up the DVR
1. Connect the DVR to your router
using the included Ethernet cable.
2. Connect the included power adapter
to the DVR. Wait a few minutes for
the system to start up.
To set up the DVR:
Next, you must set up the DVR and connect it to your network.
OPTIONAL: Full DVR Setup
• This guide describes basic setup of the DVR only. This
installation is intended for users who wish to monitor their
system using the free Lorex Secure app on their smartphone
or tablet.
• You may choose to use the DVR interface to control your
wire-free security system. Connect the included USB mouse
to one of the USB ports labelled Mouse / Backup, and
connect a monitor using the included HDMI cable. See the
included Quick Reference Guide for details.
9. Your system will appear on the homescreen of the app. Tap each channel with
a camera connected then tap the play button (
) to stream live video.
10. Remove the power pack from each camera by pushing
both release buttons*, then pulling down on the power
pack.
NOTE: If this is not the first device on your account, log in using your email
address and password, then tap LOG IN. Tap
and then Security System.
Proceed to step 6.
Copyright © 2017 Lorex Corporation
As our products are subject to continuous improvement, Lorex reserves the right to modify product design,
specifications and prices, without notice and without incurring any obligation. E&OE. All rights reserved.
ATTENTION: Place your hand underneath the power
pack when removing to prevent it from falling.
**
2. Twist the adjustment ring near the camera base
counterclockwise to loosen and reposition each
camera as shown to the right.
Connect one of the
white antennas to each camera.
NOTE: Power packs come fully charged with no need for initial charging.
English Version 1.0
GUIDE
1 / 2
Adjustment ring
* Top view
*
NOTE: If you do not see video from one or more cameras, ensure you have
removed the PLEASE REMOVE label from the power pack. If the issue persists,
see the “Troubleshooting” section on the back of this document.
DEVICE ID: xxxxxxxxxxxxx
DEVICE ID: xxxxxxxxxxxxx
DEVICE ID: xxxxxxxxxxxxx
DEVICE ID: xxxxxxxxxxxxx
Page 2
Problem Solution
No picture / signal • Ensure the camera is connected to a compatible DVR. For full camera compatibility,
visit lorextechnology.com/compatibility.
• Ensure the power pack is properly inserted into the camera base.
• Ensure you have removed the PLEASE REMOVE label from the power pack.
• Connect the power adapter to your power pack to ensure the power pack is charged.
The LED indicator on the power pack glows green for full charge, red for less than full
charge.
• Remove obstructions between the DVR and camera. Materials such as brick, concrete
and wood can significantly impact the wireless signal strength.
• Try repositioning the camera, DVR, or both to improve the reception.
Battery life is too
short
• Ensure the camera is not pointing at a high-traffic area. Position the camera so it
only captures areas of interest with no high-traffic areas (e.g., a busy sidewalk or
roadway) visible in the image.
• Live video is being viewed too frequently. Viewing live video often will impact battery
performance.
• Battery life will vary based on temperature, settings and number of events.
Picture is dropping • Move the camera closer to the DVR.
• Try repositioning the camera, DVR, or both to improve the reception.
Picture is or has
become choppy
• The picture may become choppy when experiencing a lower frame rate (e.g., 6 frames
per second vs. a higher 15 frames per second). This may be related to signal strength
or the camera’s resolution.
• Ensure the camera resolution is set to 720p using the Lorex Secure app or the DVR.
• Move the camera closer to the DVR.
• Remove obstructions between the DVR and camera.
Camera is not
detecting motion
• Your camera may be too far away from the area of interest. Try to keep the camera
within 20ft (6.1m) of the area you want to monitor.
• Review the “Installation Tips” section to ensure your camera is installed in an optimal
location.
Picture is too bright • Ensure your camera isn’t pointed directly at a source of light (e.g., sun or spot light).
• Move your camera to a different location.
Night vision is not
working
• The night vision activates when light levels drop. The area may have too much light.
Picture is not clear • Check the camera lens for dirt, dust, spiderwebs. Clean the lens with a soft, clean
cloth.
Bright spot in video
when viewing at night
• Night vision reflects when pointing a camera through a window. Move the camera to
a different location.
Troubleshooting
LHB800_QCG_EN_R1
Available Accessories
Dimensions
7.2”
182mm
3.8”
96mm
6.1”
154mm
To install your cameras:
1. Set the mounting bracket in the desired mounting position.
Mark holes through the mounting bracket (shown as
orange X’s on the right).
2. Drill holes where marked for the mounting screws.
3. Insert the included mounting screws (×3) into
the 3 holes closest to the top of the mounting
bracket. Make sure all screws
are fastened tightly.
NOTES:
• Insert the included drywall anchors if you are
mounting the camera onto drywall.
• The hole at the bottom of the mounting bracket
will be used in step 5, once the camera is attached
to the mounting plate.
4. Lower the camera base onto the mounting
bracket so the tab in the mounting bracket
locks into the slot in the camera base.
ATTENTION:
This camera includes an Auto Mechanical IR Cut Filter. When the camera changes between Day/Night viewing
modes, an audible clicking noise may be heard from the camera. This clicking is normal, and indicates that the
camera filter is working.
STEP 4: Installing the Cameras
Follow the instructions below to secure the cameras. It is recommended that
you refer to the “Installation Tips” section to help you select good mounting
locations.
5. Insert the security screw through
the fastener on the camera base to secure
the camera to the mounting bracket.
Tighten using the included Allen key.
6. Insert the included power pack into the bottom
of the camera base. Push up until the power
pack ‘clicks’ into place.
The following accessories are available for purchase. Visit lorextechnology.com and
search for the model numbers below for details:
Installation Tips
• See images to the right for ideal setup. It is
recommended to place your camera at least 7ft (2.1m)
above the ground and angle it slightly downward toward
the monitoring area, excluding any busy areas
(e.g., sidewalks or roadways).
• Ensure the camera image is free of obstructions (i.e., tree
branches).
• Position the camera no more than 20ft (6.1m) away from
the area you wish to monitor.
• For best performance, position the camera so that
objects of interest will move from side-to-side across the
camera image, rather than moving towards or away from
the camera.
• Install the camera within range of the DVR (noted in the
camera’s specifications).
• This camera is weather resistant for outdoor use
(IP65 rated). Installation in a sheltered location is
recommended.
• Battery life will vary based on temperature, settings and
number of events.
The wire-free cameras use a Passive InfraRed (PIR) sensor to ensure video is only
recorded when motion is detected. Follow the tips below for more accurate motion
detection and to optimize battery life:
7. OPTIONAL: Lift up the rubber seal on the
right-side release button. Insert the locking
screw and tighten using the included Allen
key to secure the power pack in place.
8. Twist the adjustment ring near the camera base
counterclockwise to loosen and reposition the
camera. Hold the camera in the desired angle and
tighten the adjustment ring completely to secure
the camera in place.
Charging the Power Pack
Use the included power adapter to charge the power
pack. Connect the power adapter to the micro USB
port on the power pack. The LED indicator on the
power pack shows you the charging status (must be
plugged in).
LED Color Meaning
Green
Fully charged
Red
Currently charging
• ACC2CBATT: 2-cell accessory Power Pack
• ACC4CBATT: 4-cell accessory Power Pack PLUS
• LWB3801AC1: Wire-free add-on camera
• ACCPWRWF1: Extra power pack power adapter
Power Pack Charge Time
2-cell
Approx. 4 hours
4-cell
Approx. 8 hours
NOTE: You will need to loosen the locking screw to
remove the power pack in the future.
Pairing the Camera
Your cameras should be paired to the DVR and ready to use out of the package. If
a camera becomes unpaired, or if you have purchased a wire-free add-on camera
(max. 6 cameras per system), visit lorextechnology.com/pairing/wirefree for pairing
instructions.
7.1”
180mm
7.4 ”
187mm
2.4”
60mm
 Loading...