

Page 1

FOR SUPPORT AND INFORMATION,
VISIT WWW.LOREXTECHNOLOGY.COM
1 x Camcorder
1 x Surfing
Holder
1 x mini-USB
Cable
1 x Carrying Bag
1 x Head Strap
1 x Helmet Mount
1 x Lens Cap
1 x Wrist Strap
1 x Remote Control
Wrist Band
Contents
Copyright © 2012 Lorex Technologies Inc.
As our products are subject to continuous improvement, Lorex reserves the right to modify product
design, specifications and prices, without notice and without incurring any obligation. E&OE
All trademarks belong to their respective owners. No claim is made to the exclusive right to use the
trademarkslisted, other than the trademarks owned by Lorex Technology Inc.
WATERPROOF HIGH DEFINITION
VIDEO CAMCORDER
Quick Start Guide
English Version 1.0
LSC004
Safety
• Do not point the camera directly at the sun as this may
damage the camera.
• Make sure the side door locks into place to ensure that
water cannot get inside the camera.
• Do not submerge more than 16ft / 5m deep.
• Do not use in temperatures colder than –4°F / –20°C or
warmer than 104°F / 40°C.
• Do not disassemble the camera.
• Do not look at the laser or point it at people’s eyes.
Problem Solution
Camera fails to start •The camera battery is
discharged. Charge
the camera.
•The camera has
encountered an error.
Press the Reset button.
Camera does not
record; says “Card
Full”
•The microSD card is
full. Delete the files
saved on the microSD
card or insert a fresh
microSD card. Note
that if you are deleting
files from the microSD
card on a Mac, you
must empty the Trash to
delete.
Camera does not
record; says “No
Card”
•microSD card has
not been inserted. A
microSD card (not
included) is required
for recording.
Device is not
recognized by
computer
•If red LED is on,
camera is charging.
Press and hold the
power button to enter
USB drive mode.
•Mini-USB cable is
broken. Replace the
cable.
•USB port is broken. Try
a different USB port.
Can only see
Videos or Pictures in
Playback Mode
•Press the Picture button
to select either videos
or pictures.
Can not exit Playback
Mode
•Press the Video button
to exit.
Troubleshooting
Controls Overview
Power
Right
Play/
Pause
Left
Menu
Back
Top
Side
Picture
Video
microSD
Card Slot
mini-USB
Port
Reset
Button
mini-HDMI
Port
Indicator LED
Page 2
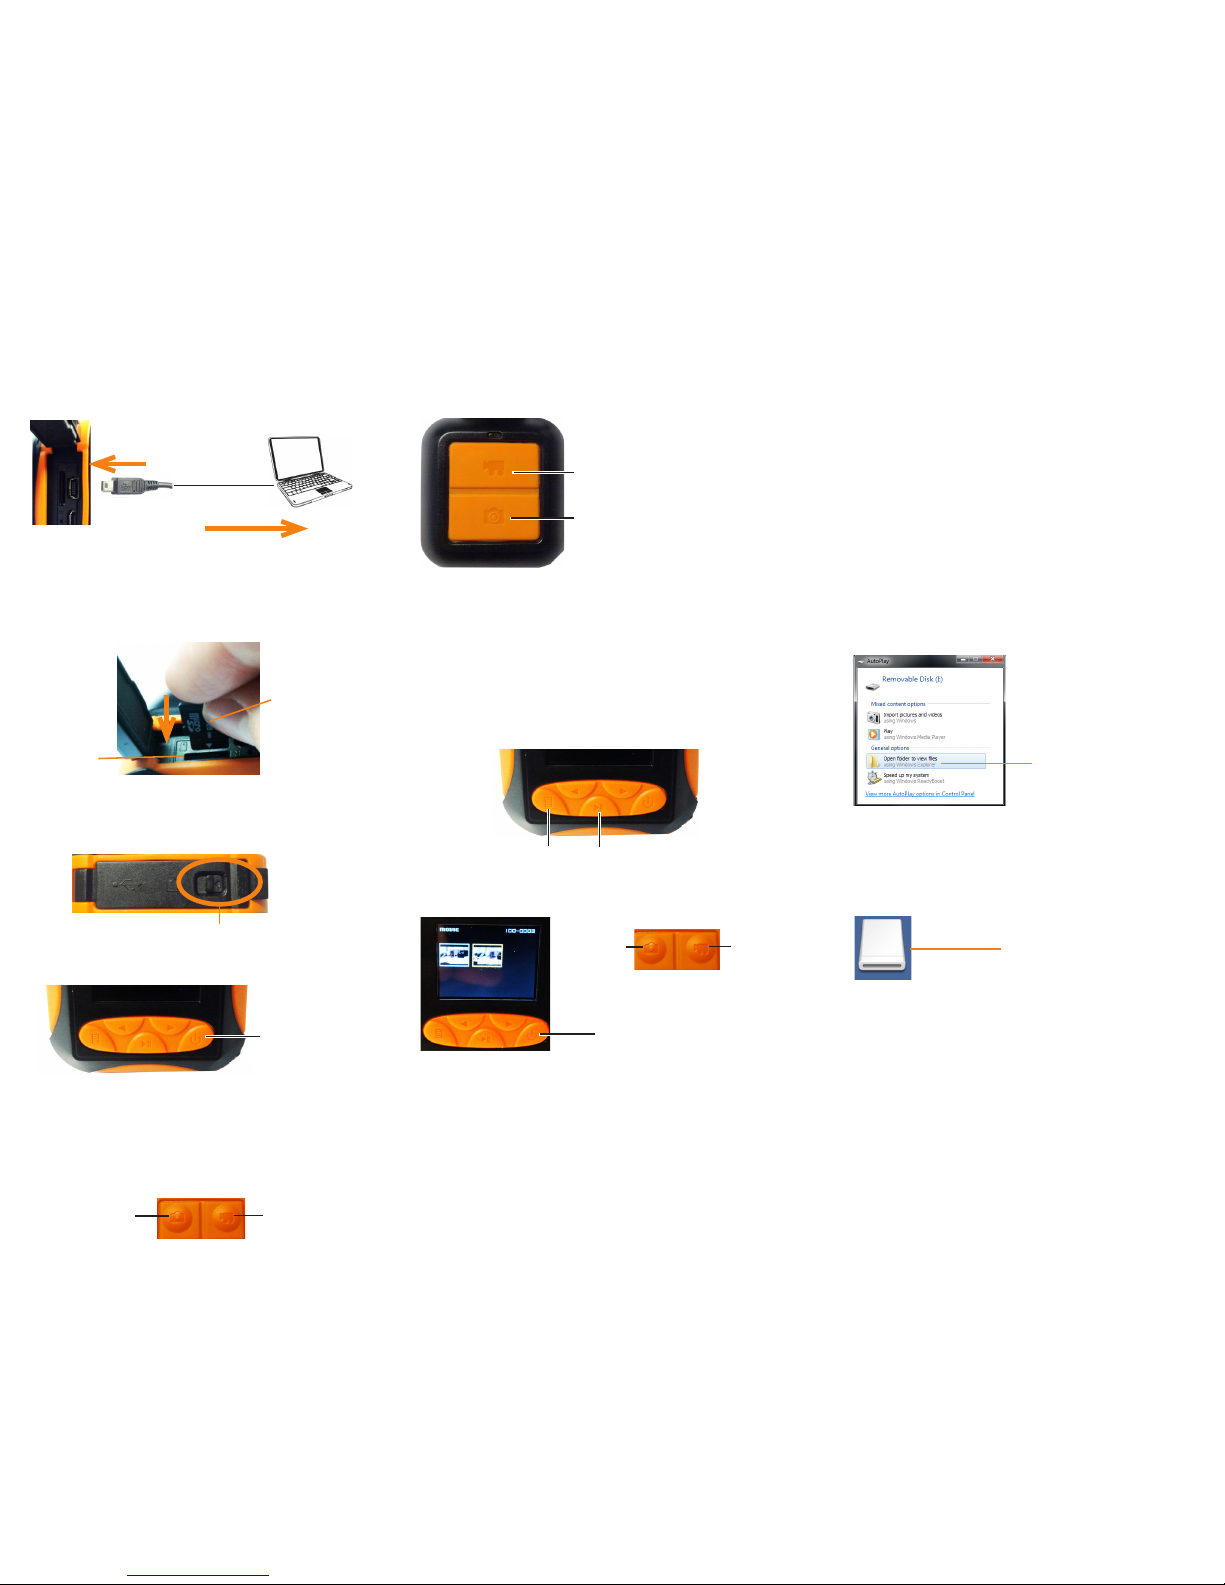
Getting Started
1. Open the side door.
2. Connect the mini-USB cable to the camera. Connect
the other end to your computer.
3. Charge the camera for 5 hours to fully charge.
4. Disconnect the USB cable from the camera and
insert a microSD card (not included) into the
camera and push it down until it clicks into place.
Camera
mini-USB Port
NOTE: The camera can support microSD cards up to a
maximum size of 32GB.
5. Close the side door of the camera. Make sure it
locks into place to ensure a waterproof seal.
microSD slot
microSD card
6. Press and hold the Power button to turn on the
camera.
Accessing/Saving Pictures and
Videos on your Computer
1. Connect the mini-USB cable to the camera
and connect the other end to your computer.
The computer will recognize the camera and
automatically install drivers.
2. Windows: An Autorun window appears. Click
Open folder to view files. If Autorun does
not appear, open Computer and double-click
Removable Disk.
NOTE: If the camera does not appear and the Indicator LED
is red, the camera is charging. Press and hold the Power
button to enter USB drive mode.
3. Double-click the DCIM folder then the 100MEDIA
folder to access your videos or pictures.
4. Double-click videos or pictures to open. Copy
videos or pictures to a folder on your computer to
save them to your hard drive.
NOTE: Your videos are saved in .mp4 format and
pictures are saved in .jpg.
Removable disk folder
Autorun window
Click Open folder to
view files
OR
Mac: Double-click the removable disk folder on the
Desktop.
System Requirements
• PC: Windows 7
• Mac: OS 10.5 or higher
• Minimum 10GB free hard drive space to save
recordings
Remote Control
Locked (arrow next to Press)
7. Press the Video button on the top of the camera
to start recording. Recording time appears at
the bottom of the screen. Press it again to stop
recording.
OR
Press the Picture button to take a picture.
Power button
Picture
Video
A remote control with a wrist strap is included for easier
control of the camera, especially while the camera is
mounted to a helmet or surf board.
Video button: press once to
start recording and again to
stop
Picture button: press
once to take a Picture
NOTE: When LCD screen is off, first press will turn on the
LCD screen but not start recording or take a picture.
Playback Mode
Use Playback Mode to view your pictures and videos
directly on the camera, and delete the ones you don’t want
to free space on your microSD card.
To access Playback:
1. Press 4; to open Playback Mode.
4;
Menu
2. Press 34 to select the video or picture you want to
view, and press the Picture button to change between
Videos and Pictures.
3. Press 4; to open a video or picture. Press again to
start playing a video.
4. Press Menu to close the currently selected video or
picture. Press the Video button to exit Playback
Mode.
To delete files:
1. In Playback Mode, press 34 to highlight the video or
picture you want to delete and press Menu.
2. Press 34 to select Yes and then press 4; to delete.
Press 34 to
select files
Select
pictures or
videos
Exit
Playback
Mode
 Loading...