

Page 1
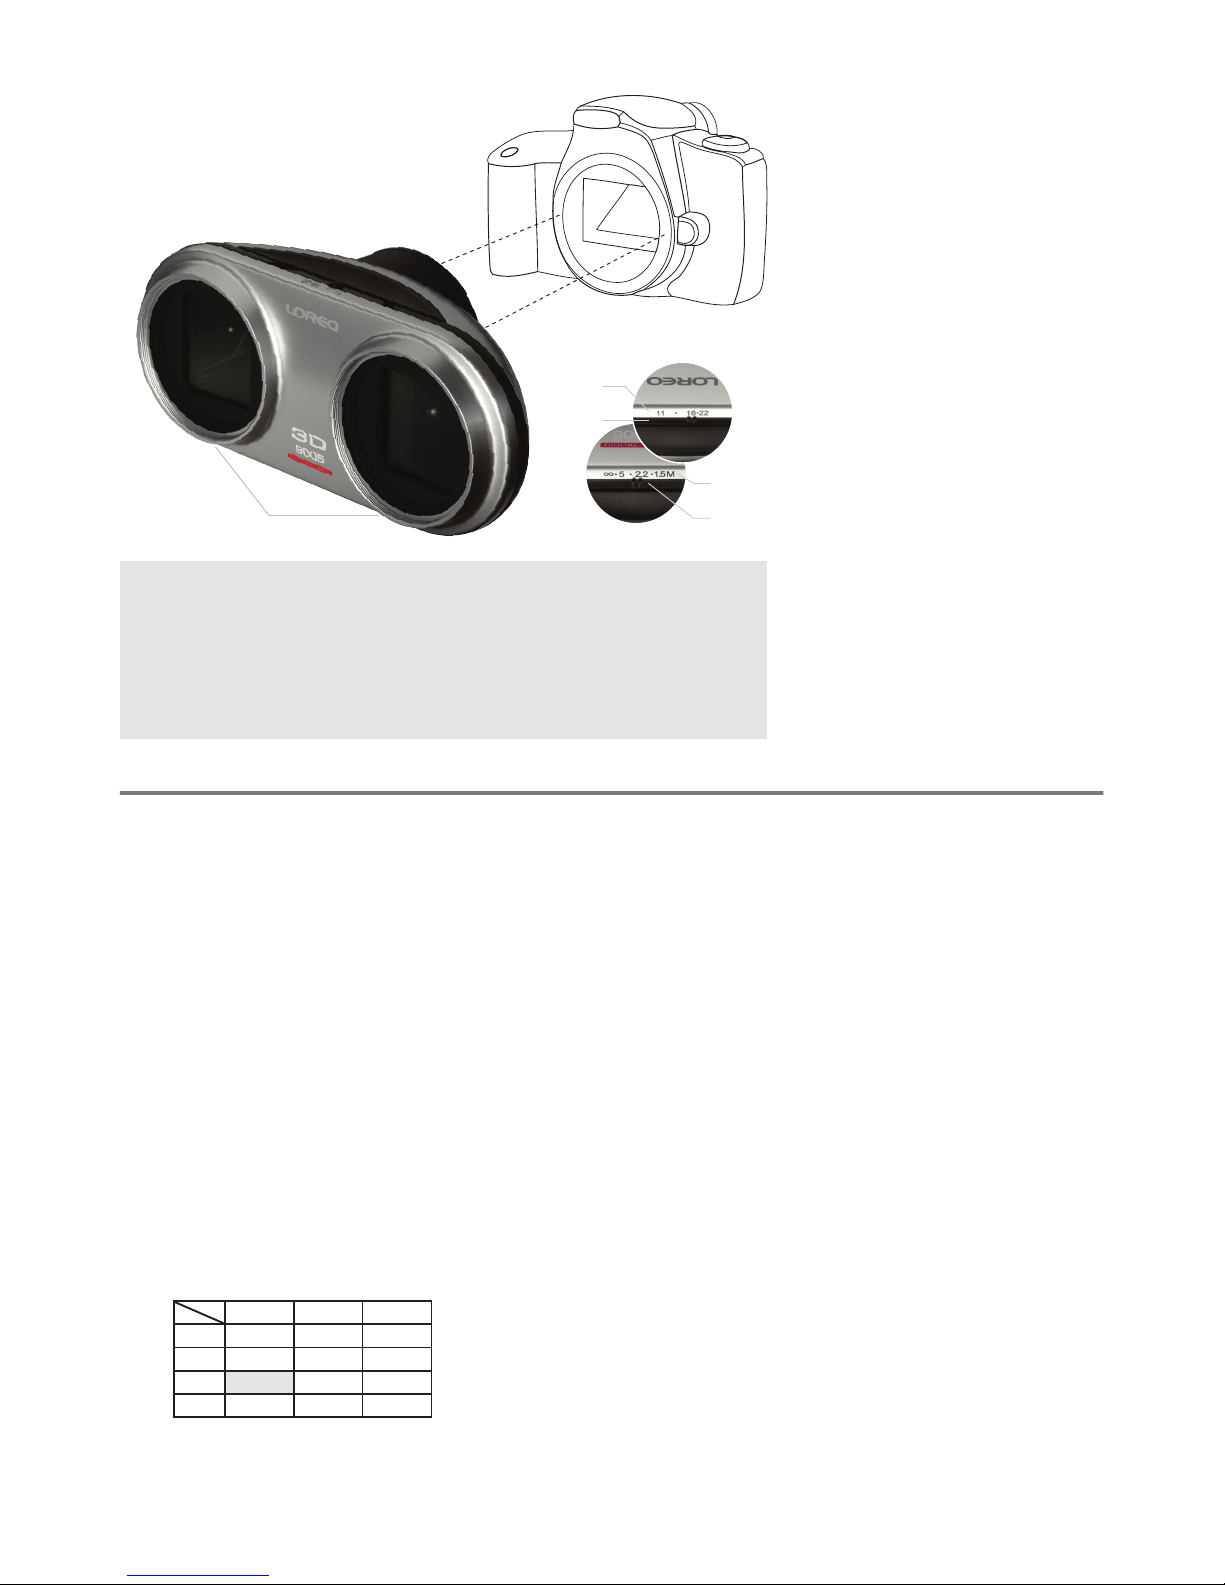
1. Line up the index mark on the
back of the 3D Lens in a Cap
9005 with the index mark on
the camera body and attach it
to the camera.
2. This lens is for use with sub-
frame Single Lens Reex
(SLR) cameras with the image
sensor format stated on the
box. Mostly, these will be
digital cameras. If used with a
full-frame camera, the surplus
image area will have to be
cropped off.
3. This is a manual lens. There
are no electronics. Turn off
auto-focusing before using the
lens. Aperture priority autoexposure should work. If not,
turn that off as well.
4. Usage: First select aperture
using the aperture slider. Three
click stop apertures (f11/f16/
f22) are provided. Set focus
from 1.5 m (5 ft.) to innity.
5. The 3D Lens in a Cap 9005
works with TTL ash, Aperture
Priority (AV) or Program (P)
mode exposure on many cameras. For manual control use a
light meter or exposure chart.
6. The 3D Lens in a Cap 9005
has no auto diaphragm, so
the viewnder image darkens
when f/22 is chosen. This allows the user to judge depth
of eld, and has no adverse
effect on the nal picture.
7. This depth of eld scale gives
an estimated distance range in
which all objects will be sharp
for a given aperture.
A
D
f/11 f/16 f/22
1.5m 1.2 - 2.5m 1.1 - 2.6m 1 - 3.5m
2.2m 1.5 - 4m 1.4 - 6m 1.2 - 10m
5m 2.8m - ∞ 2m - ∞ 1.7m - ∞
∞ 5m - ∞ 4m - ∞ 2.5m - ∞
D - Distance A - Aperture
If the lens is set to f/11 and
focused at 5m, depth of eld
will be 2.8m to innity, which is
the optimal pan-focus con-
guration for 9005 style 3D
photography.
8. Depth of eld is very useful
for stereo photography. High
image sensor sensitivity compensates for small aperture.
ISO 200-400 will give excellent
results. Loreo 3D lenses in the
right hands can take beautiful
3D photographs. Maximize the
potential of your Loreo 3D lens
by using a monopod and a
high quality modern DSLR.
9. Make sure the lens is aligned
with the camera on the horizontal. This can affect the vertical alignment of the 3D image
pair.
10. The two 58 mm threads on the
front can be used for mounting
lightweight lters, lens hoods,
wide angle lenses and tele
lenses. Attachments should be
selected and used with care so
as not to damage the thread.
Converter lenses should be
matched at purchase.
11. In selecting accessories for the
lens make sure that the maximum outer diameter does not
exceed 85 mm. The minimum
inner diameter should not be
less than 44mm for 4:3 format
9005 lenses.
For APS-C format, there are
very few tele converters with
a sufcient inner diameter to
avoid vignetting. Photos taken
with tele converters on APS-C
format 9005 lenses will most
likely need to be cropped afterwards.
Since the wide stereo base
of the 9005 is suitable for 3D
photography at mid-distance
(5m or more away), users can
multiply the tele effect simply
by cropping the image pair.
Tele converters can make it
more convenient, but are not
essential.
LOREO 3D Lens in a Cap 9005
APS-C format (Model 9005A)
Operating instructions
(please refer to your camera instruction
manual for changing your lens)
Specications
Model: LA9005A
Lens Type: 3D, parallel view, all manual, no electronics
Lens system: dual, 40 mm, f11-22, 2 elements, plastic polymer
composite
Stereo Base (pitch): 90mm
Sensor Format: ~ (22 - 24) x (14.5 - 16) mm APS-C subframe digital
SLR sensor - equivalent to 1.5-1.6x crop
Diaphragm: Twin Blade, f11, f16, f22 with click stops
Focus adjustment: Continuous focusing slider
Focusing range: 1.5m to innity.
Accessory lens: 58 mm lter thread. Maximum outer diameter 86 mm.
Ideal minimum rear lens diameter 44 mm. Suitable for wide angle and
tele converters. 52 mm accessories can be used with a stepping ring.
Special Features: Focus coupled Parallax Compensation. Parallax
feedback focus aid.
Function: Gives an APS-C format digital SLR camera 3D capabilities
using normal processing. Retains many of the features of an SLR cam-
era, such as through the lens viewing, auto exposure, TTL ash.
Digital SLR body mounts: Pentax K, Canon EOS, Nikon N, Minolta
AF, Sony Alpha, Samsung GX (Pentax K), Fuji Finepix S-series Pro (N).
Please also check the DSLR compatibility section.
Aperture
Scale
Aperture
Slider
58 mm Filter Threads
Focusing
Scale
Focusing
Slider
Page 2
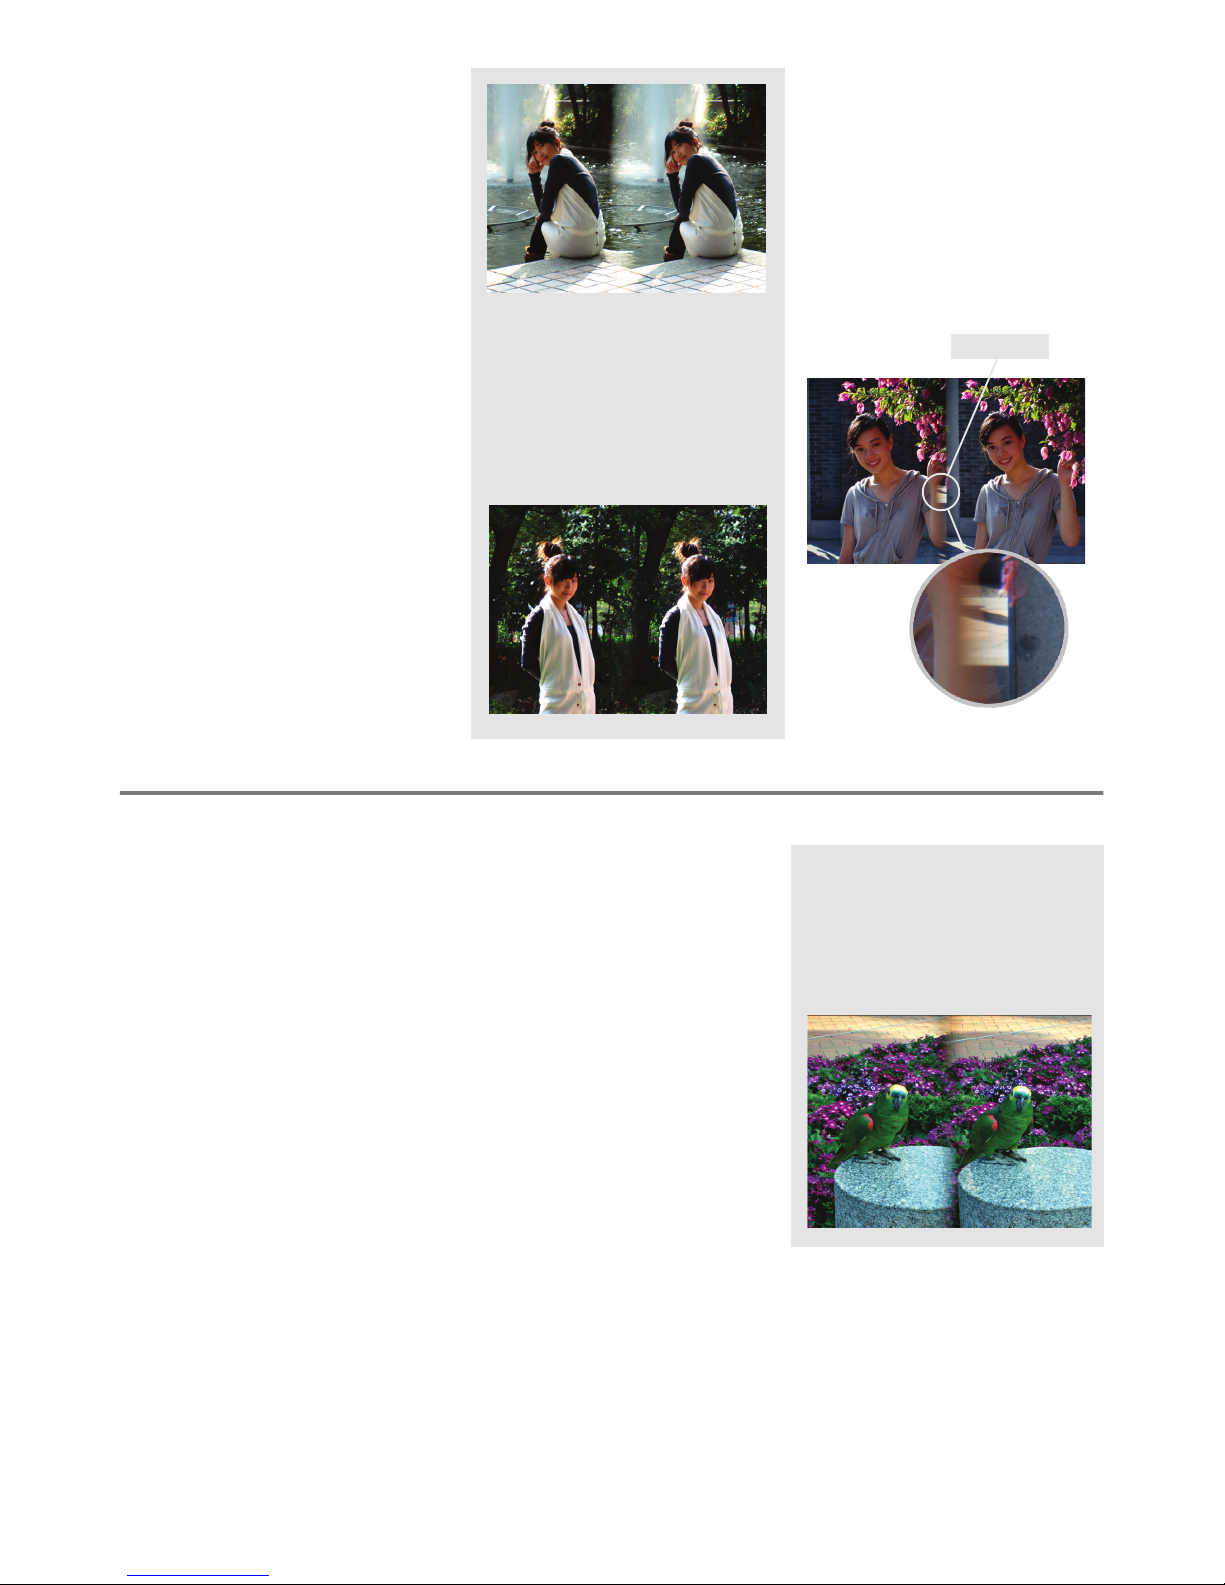
12. For 3D photographers, balance between left and and
right frame sizes is very important. With Loreo 3D lenses,
the perceived position of the
center line can sometimes be
misleading.
With an SLR camera, the pres-
ence of mirrors prevents the
partition between the image
pair being extended all the way
to the lm plane. As a result,
the center line can never be
clearly dened. There will
always be some overlap. Even
with mirrorless DSLR cameras,
in which the partition can be
set much closer to the lm
plane, there is still a gap.
For this reason, the 9005 3D
lens has been set up to produce images with an overlap
as opposed to a thick dark
band down the middle. The following two images were taken
with the same 3D Lens in a
Cap 9005 on the same DSLR
camera.
In the rst image (above), the
right hand frame seems to encroach upon the center line. In
the second image, the two sides
appear to be well balanced. Subject matter and lighting make all
the difference.
13. Internal reection will occasionally cause are, which is
visible in the viewnder. Some-
times a ghost image will appear. This can be avoided by
shifting the angle of the lens,
or shielding the side to avoid
light shining directly in. Hoods
can also be added using the
lter mounts in the front.
Ghost image
14. 3D images taken with this lens
are best viewed with Loreo
3D print and screen viewers.
Some people can freeview
3D images. The image pairs
have a high degree of correspondence, so feel free to
experiment with viewing methods which require symmetry
(anaglyphs).
15. Image pairs are not pitch-
adjusted for cropping as in lm
printing days. Some may nd
fusing 4R prints on a Deluxe
3D Viewer difcult. If so, use
3R prints. Viewing with the Lite
and Pixi Viewers should not be
a problem.
16. Different people have different eyesight, so you may have
to move the viewer closer or
further away from your eyes
for the stereo effect to appear.
17. Tips for taking dramatic 3D
pictures: As in conventional
photography, the subject will
usually be placed in the center
of the picture composition, and
exposure is best if the light
source is behind the photographer.
18. When taking pictures you can
point your camera slightly up
or down, but always keep it
horizontal. Never hold your
camera vertical, since you
would not be able to view the
pictures in 3D.
19. Avoid the subject being too
close to the lens (<1.5 m).
This leads to discomfort in
viewing. Avoid there being too
much empty space between
foreground and background
if closeup shots are taken of
a subject at 1.5m, the background should not be more
than 3 meters away.
The subject in this picture is the
parrot. It is too close to the lens,
so parallax compensation no
longer works. Note how the parrot does not appear in the same
relative position in each frame.
Page 3
20. A 3D camera or lens records
both the shape of things and
the depth of the scene. 3D
pictures should show foreground objects as well as the
background scene. When photographing a person, include
objects in front, and an interesting view behind.
21. Compose the picture with the
subject material away from the
edges. This will improve correspondence between the two
images.
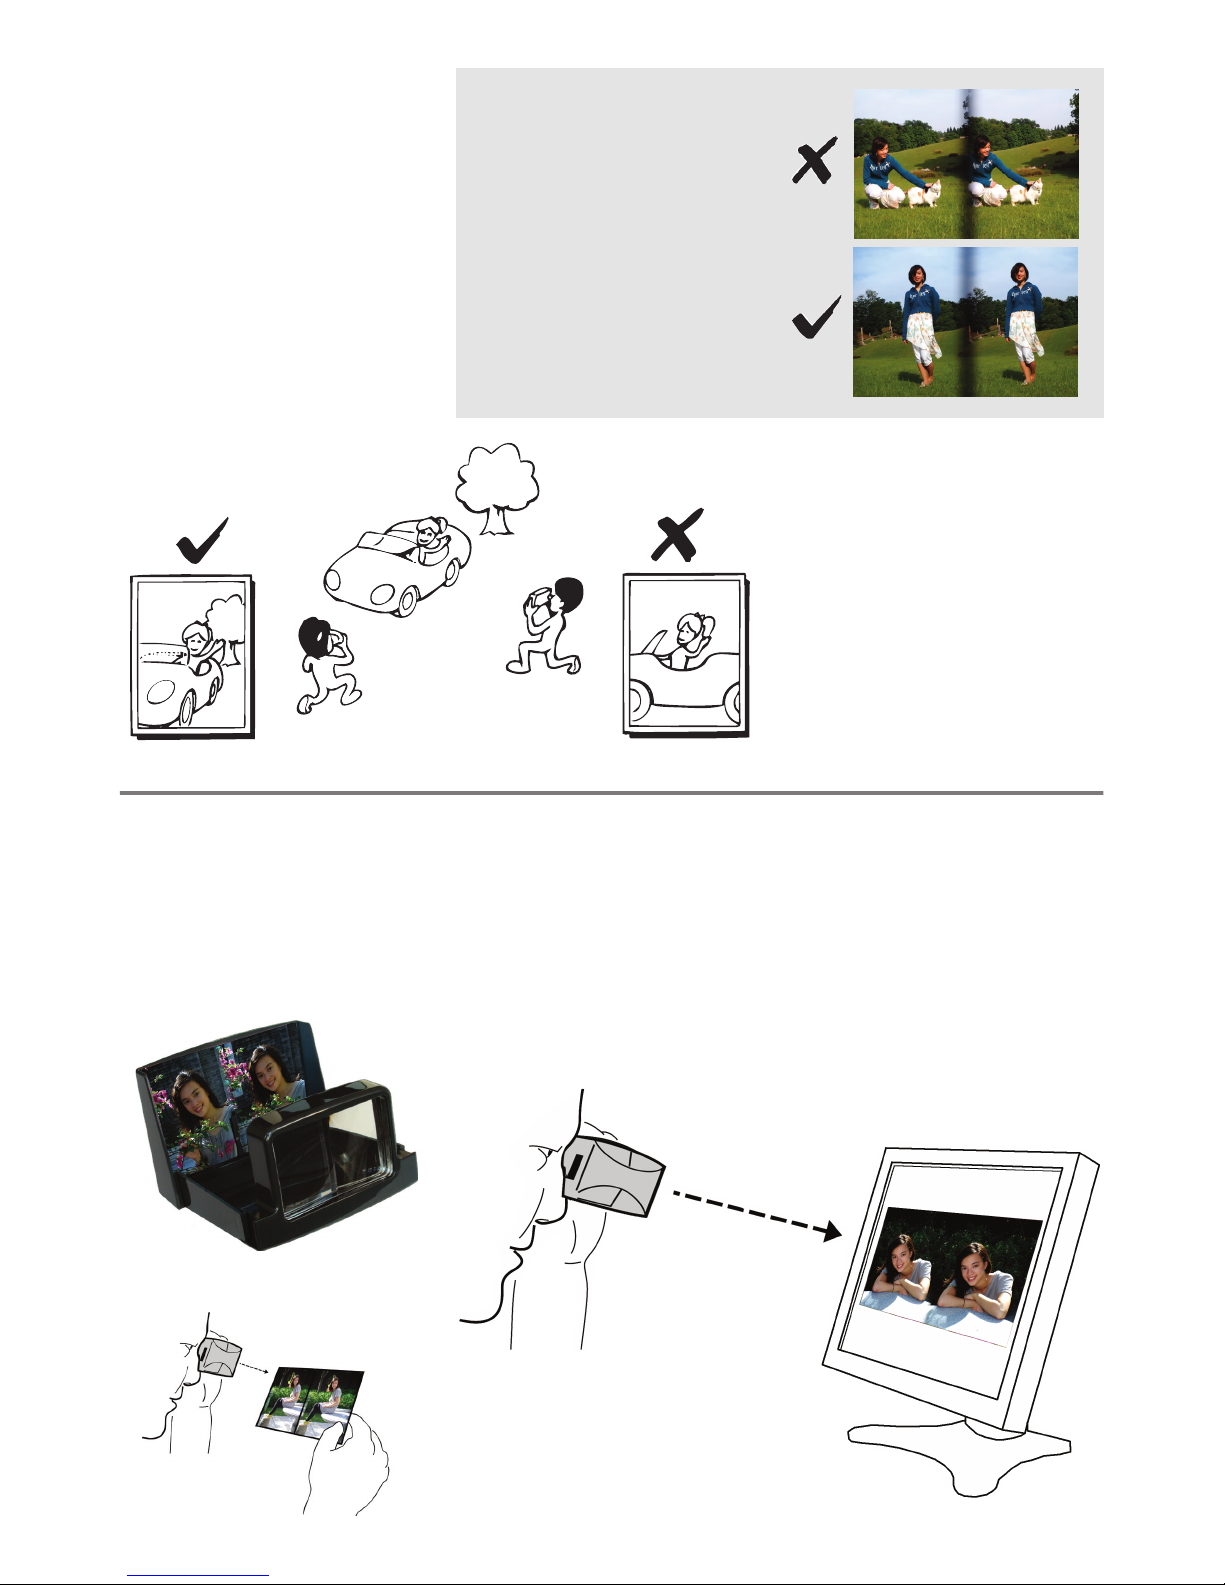
23. Viewing: Put a 3D picture in
the Deluxe 3D Viewer (bottom
left) and hold the eyepiece 6
inches from your eyes. It may
take a few seconds for your
eyes to adjust to the 3D image.
Loreo Deluxe 3D Viewer
24. Sharing: One of the great
joys of 3D photography is in
sharing images with friends
and family. Foldable, mailable
viewers such as the Lite 3D
Viewer (print viewing) and Pixi
3D Viewer (screen viewing)
are ideal for this purpose.
25. For best clarity when viewing
3D pictures avoid bright lights
reecting on the viewing lens
surface. Natural light falling on
the stereo print and not on the
viewing lens, will always give
the best stereo effect.
Loreo Pixi 3D ViewerLoreo Lite 3D Viewer
22. Printing: The 3D Lens in a Cap
9005 takes two side by side
pictures in each frame. The 3D
effect is viewable immediately
after processing. 3R and 4R
prints work best. Make normal
prints. Do not make half frame
photographs.
The rst picture on the right
would look better if the lens were
further back, and the young lady
and the cool cat were away from
the edges of both picture frames.
Most people compose an image
in a single frame of the image
pair. When doing this, take note
of what is happening on the
other side to make sure the subject is not cropped at the edge.
Page 4
Care and Troubleshooting
1. Slight rain or salt water splashes on
the lens body should be harmless.
Wipe with a clean cloth. A soiled lens
may be gently cleaned with lens tissue
moistened with lens cleaning uid.
Never put liquid lens cleaner directly
onto any lens. Do not wipe with dry tissue as it may scratch the lens surface.
2. Nikon digital SLR cameras may need
to be switched to manual mode before
they will function with a non-Nikon
lens. Minolta and Sony SLR cameras
need to have the shutter lock disabled.
Some Sony models have to function in
manual mode.
3. The 3D Lens in a Cap 9005 is a lens
with an unconventional shape. With
two lens converters attached, it will be
front heavy as well. Lightweight accessories are strongly recommended.
For example, wide angle converters
can range from 160g to 250g apiece.
Users should take care not to drop the
lens or bump it against anything while
it is attached to the camera. The shock
load can cause damage to the SLR
camera body and to the lens mount of
the 3D lens.
4. The 3D Lens in a Cap 9005 should be
detached from the camera when not in
use.
Digital SLR Compatibility (as of April 2012)
1. Canon EOS D30, D60, 10D-60D, 300D600D, 1000D, 1100D, 7D (EOS mount) Most Canon SLR cameras work with the
Loreo 3D lenses in auto-metering mode,
but exposure bias should be set to -1.5
or -2. The 300D has ash exposure bias
disabled, but it is known that people have
found ways to re-enable it.
2. Nikon D1, D1X, D1H, D2H, D2X, D100,
D200, D300, D2H, D40-D90, D3000D7000 (Nikon mount) - Nikon digital
SLRs work with Loreo 3D lenses in
manual mode. In most Nikon digital
SLRs, over-exposure is shown on the
LCD screen after a picture has been
taken. This function can be used in place
of auto-metering.
3. Pentax *ist D, *ist DS, DS2, DL, DL2,
K-x, K2000, K-7, K-m are compatible.
The K100D, K110D and K200D cannot
be tted with a 9005 due to the large
ash housing. The K10D and K20D are a
tight t. Most Pentax SLR cameras work
with Loreo Lens in a Cap products in
auto-metering mode.
4. Fuji Finepix S1 Pro, S2 Pro, S3 Pro, S5
Pro (Nikon mount)- Fuji digital SLRs work
with the Nikon mount Loreo 3D lenses in
manual mode.
5. Minolta Maxxum 5D, 7D (Minolta AF
mount) - require shutter lock to be
disabled. Minolta digital SLRs work with
Loreo 3D lenses in automatic metering
Parallax Compensation
1. The 3D Lens in a Cap 9005
has a focus coupled Parallax Compensation system.
When the lens is focused on
a subject at a given distance,
the point of convergence is
automatically adjusted within
the unit itself to suit the object
distance.
This works from 1.5m to
innity. The adjustment of the
relative positions of the image pair can be viewed in the
viewnder, or with Live View in
modern digital SLR cameras.
2. Once a user learns how to
use the lens, focusing can be
done by parallax compensation alone. When the subject
appears in the same relative
position in both the left and
right image in the viewnder, it
will automatically be in focus.
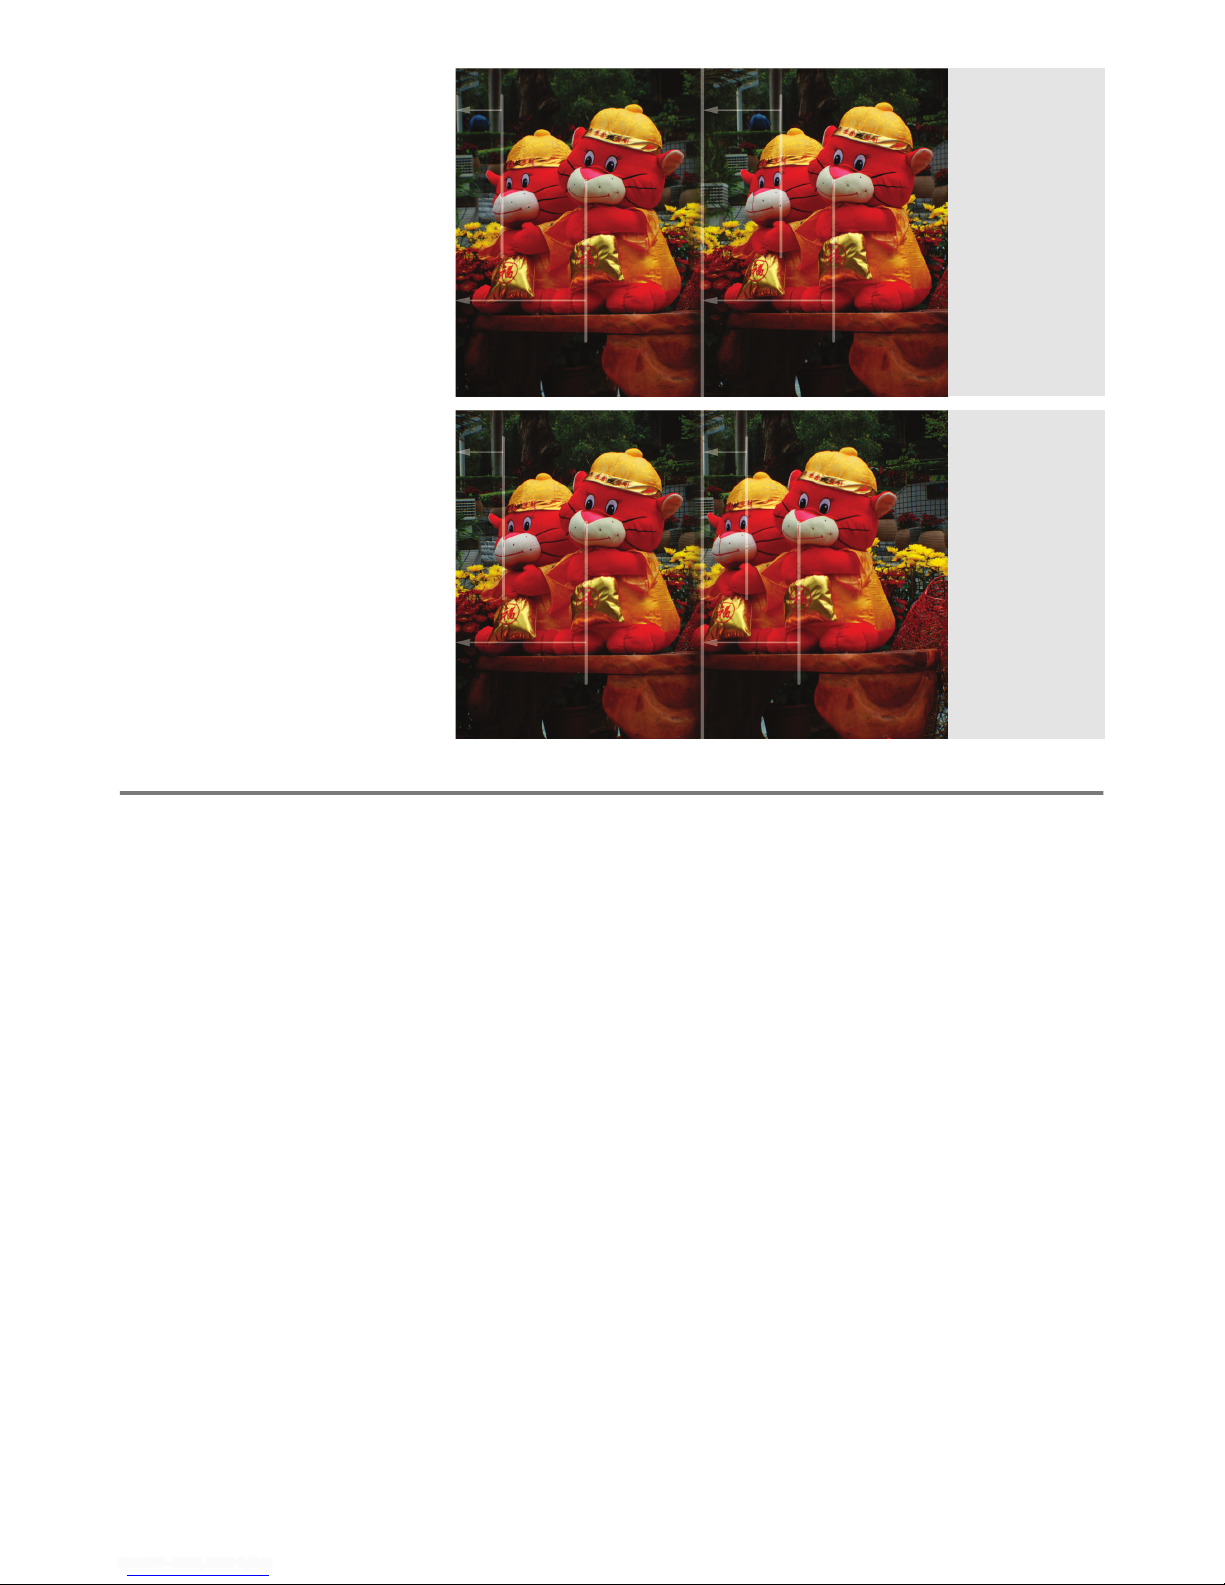
The distance from
the New Year Tiger’s
snout to the edge
of each frame is the
same. The lens is
now focused on the
New Year Tiger at
2.2m
Note the discrepancy
in the distance from
the grey tree trunk
in the background
to the edge of each
frame.
Note the distance
from the New Year
Tiger’s snout to the
center line. The
discrepancy between
the two images in the
pair indicates that the
lens is not focused
on the New Year
Tiger.
The distance from
the grey tree trunk
in the background
to the edge of each
frame is the same.
The lens is now
focused at innity.
mode. When set to “P”, the exposure
compensation needs to be set to -1.5
stops. When set to “A” (aperture control),
exposure compensation does not need to
change. The anti-shake feature improves
lighting conditions by 1-2 stops.
6. The Sony Alpha Lens mount is compatible with Minolta AF lenses. The Sony
Alpha DSLR-A100 and A700 (Sony/
Minolta AF mount) require the shutter
lock to be disabled. Loreo subframe 3D
Lenses are known to work with these
cameras. The Alpha A100 and A700 work
with Loreo lenses in automatic mode.
The anti-shake feature improves lighting
conditions by 1-2 stops.
The A200, A230, A300, A330, A350,
A500, A550, A850, A900 (Sony/Minolta AF mount) do not have a separate
feature to disable the shutter lock. The
camera has to be put into manual focus
mode (MF).
Note: The A850 and A900 are full frame
DSLR cameras.
7. Sony NEX 3, 5, 7 are compatible with all
Loreo lenses, using an E-mount adapter.
For example, a Sony E-mount to EOS
adapter can be used to attach an EOS
mount 3D Lens in a Cap 9005A to an
NEX. Third party mounts may have slight
rotational mis-alignment. “Release w/o
lens” must be enabled for the camera to
work without a Sony / Minolta AF lens.
This is similar to disabling the shutter
lock feature on Alpha series DSLRs.
Aperture priority auto exposure works.
Manual exposure works with live view.
Loreo Asia Ltd. * Rm. 7, 7/., New City Centre, 2, Lei Yue Mun Road, Kwun Tong, Kowloon, Hong Kong. Tel: (852) 27909085 * Fax: (852) 28685937 * E-mail: [email protected] * URL: www.loreo.com
20100705 - K10D, K20D tight t
 Loading...