

Page 1
Manual | LORENTZ PV Modules LB series 1 v090527
WIRING
All of the LORENTZ PV modules utilise a junction box. This
junction box, located on the back side of the module, is
weatherproof and is designed for standard wiring or conduit connections. For PV modules of 75 Wp and more cables are included.
Proper connection of the cables in the
junction box must be checked especially for modules with pre-assembled
cables as vibrations during transport
might loosen the wiring. Connectors must be used
with same type only to guarantee safe connection.
LORENTZ advises that all wiring and electrical connections
comply with National Electrical Codes. A cable clamp with
a minimum rating of IP65 must be used to maintain the
weatherproof integrity of the junction box. Bypass diodes
are preinstalled at factory.
To wire LORENTZ PV modules:
Determine the nominal system array voltage of your
system. Each panel is equivalent to a 12 VDC nominal
block for 12M/12P modules and 24 VDC nominal block
for 24M/24P modules. Standard array voltages 12, 24,
48 and 96 V are shown as examples in Figure 3.
The wire used to interconnect the solar modules may
be single or two conductors, from 2 mm² (AWG 14) up
to 6 mm (AWG 10) gauge stranded copper wire, in a
sunlight-resistant jacket UF cable that will not degrade
when exposed to the direct sunlight. The maximum
and minimum outer diameters of the cable that may
be used with the cable connector are 8 mm and 6 mm
respectively.
Route wires through the PG plugs and clamps refer to
installation example.
Gently hand-tighten the terminal screws with cross
tip (Phillips head) screwdriver. Do not over tighten to
avoid damages to the terminal.
The output wiring from the final module is generally
run to a separate array junction box. In commercial
system, this wiring from the array box to the next component (i.e. fuse box or charge regulator etc.) is generally run in conduit. The maximum electrical rating of an
acceptable series fuse is 6 to 12 A.
After checking that module wiring is correct, close all
the junction boxes and ensure a waterproof seal.
GROUNDING
Attach all module frames to an earth ground. Attach a
separate ground wire to one of the holes marked “ground”
on the module frame with a screw and bonding or external tooth washer. The racks must also be grounded unless
they are mechanically connected by nuts and bolts to the
grounded modules. The array frame shall be grounded in
accordance with NEC Art. 250.
BLOCKING DIODES
Blocking diodes are typically placed between the battery
and the PV module output to prevent battery discharge at
night. LORENTZ PV modules are made of mono- or polycrystalline cells with high electrical “back flow” resistance
to night-time battery discharging.
Photovoltaic (PV) Modules - LB Series
Installation Manual
WARNINGS
HAZARDOUS ELECTRICITY! CAN SHOCK, BURN, OR
CAUSE DEATH! AUTHORISED, QUALIFIED PERSONNEL ONLY! DO NOT TOUCH TERMINALS! GROUND
POSITIVE SIDE OF ARRAYS!
PV modules generate electricity when exposed to light.
Modules may be covered with an opaque material during
installation to avoid shocks or burns. Do not touch live terminals with bare hands, wear security gloves. Use insulated
tools for electrical connections.
PERMIT AND INSPECTION
Contact local authorities and determine the necessary permit, installation and inspection requirements in your area.
PV MODULES
LORENTZ PV modules consist of a series of electrically interconnected crystalline silicon solar cells, which are permanently laminated within a pottant and encapsulated
between a tempered glass cover plate and a back sheet.
The entire laminate is secured within an anodised aluminium frame for structural strength, easy installation, and
to protect the cells from the most severe environmental
conditions.
APPLICATIONS
LORENTZ PV modules are ideal to power a wide range of
electrical appliances in remote places far away from the
electricity grid, either with or without the use of storage
batteries, even under toughest climate conditions.
Typical applications are
water pumping,
water purification systems,
remote village lighting,
solar home systems (SHS),
street and camp lights,
traffic signals,
hospitals and medical facilities,
microwave/radio repeater stations,
battery charging,
telecommunication systems,
on-grid applications,
etc.
SITE SELECTION, TILT ANGLE
In most applications, the location of LORENTZ PV modules
should be chosen to provide maximum irradiation throughout the year. In the Northern hemisphere, the modules
should face south, and in the Southern hemisphere, the
modules should face north. Modules facing 30° away from
true South (or North) will lose approximately 10-15 % of
their power output. If the module faces 60° away from true
South (or North), the power loss will be 20-30 %.
The module tilt angle is measured between the solar modules and the ground (Figure 1). For installations where the
solar modules are attached to a permanent structure, the
solar modules should be tilted for optimum winter performance. If the system power production is adequate in
the winter, it will be satisfactory during the rest of the year.
Refer to Table 1 for the recommended module tilt angle at
your site.
Avoid trees, buildings or obstructions which could cast
shadows on the solar modules especially during the winter
months when the arc of the sun is lowest over the horizon.
Table 1: Recommended tilt angles for fixed systems
based on Winter Performance
site latitude fixed tilt angle
0° to 15° 15°
15° to 25° same as latitude
25° to 30° latitude + 5°
30° to 35° latitude +10°
35° to 40° latitude +15°
above 40° latitude +20°
INSTALLATION
Installation by qualified personnel only. Personnel must
know the appropriate safety procedures.
Sunlight shall not be concentrated on the module.
LORENTZ PV modules are quite rugged; nonetheless
the glass can be broken (and the module will no longer work properly) if it is dropped or hit by tools or other objects, or when the modules are stepped upon.
Module support structures that are to be used to sup-
port LORENTZ PV modules should be wind rated according to local conditions and approved for use by
the appropriate local and civil codes prior to installation.
Fixation
The frame of each module has four or eight mounting holes
to fix the modules to the supporting structure. Modules
must be fixed with at least four screws. Symmetric fixation
holes must be used. The four holes close to the corners of
the module are most often used for attachment. Refer to
drawing in the product information sheet for the position
of these holes.
For mounting holes of 6.6 mm (0.26 in) diameter use M6
screws; for holes of 8.5 mm (0.33 in) diameter or long holes
of 8.5×12 mm (0.33×0.47 in) use M8 screws. All stainless steel hardware (e.g. AISI 304) used for securing the
module frame should secured with an applied torque of
about 8 Nm (6 ft∙lb) for M6 or 20 Nm (15 ft∙lb) for M8.
In order to protect the electric connections from dampness and rain, the PV
module must be set up in such a way
that the notches of the junction box
are orientated downwards.
Clearance between the module frame
and the mounting surface may be required to prevent the junction box
from touching the surface, and to allow the circulation of cooling air around the back
of the module. If the modules are to be installed on
the roof or wall of a building, the standoff method
or the rack method is recommended.
The module frame is made of anodised
aluminium; therefore corrosion can oc-
cur if the module gets in contact with
another type of metal in a salt water
environment (electrolysis corrosion). To avoid this,
PVC or stainless steel washers can be placed between the solar module frame and support structure.
Page 2
Manual | LORENTZ PV Modules LB series 2 v090527
BYPASS DIODES
Partial shading of an individual module in a 12 V or higher
source circuit string (i.e. two or more modules connected
in series) can cause a reverse voltage across the shaded
module. Current is then forced through the shaded area by
the other modules. When a bypass diode is wired in parallel
with the series string, the forced current will flow through
the diode and bypass the shaded module, thereby minimizing module heating and array current losses.
Diodes that are used as bypass diodes must:
have a Rated Average Forward Current [IF(AV)] above
maximum system current at highest module operating
temperature.
have a Rated Repetitive Peak Reverse Voltage [VRRM]
above maximum system voltage at lowest module operating temperature.
BATTERY
When using the solar modules for charging batteries, the
battery must be installed in such way as ensures the performance of the system and the safety of its users. Follow
the battery manufacturer’s guidelines for installation, operation and maintenance recommendations. The battery
(or battery bank) should be kept from passing-by people
and animal traffic, protected from sunlight, rain, snow,
debris, and its location be well ventilated. Most batteries
generate hydrogen gas when charging, which can be explosive; in this case provide sufficient ventilation and do
not light matches or create sparks near the battery bank.
For outdoor installation, the battery should be placed in an
insulated and ventilated battery case thatis specifically designed for the purpose.
MAINTENANCE
Inspect all PV modules annually for safe electrical connections, sound mechanical connection and freedom from corrosion.
Normally the rainfall is sufficient to keep the module glass
surface clean. If dirt build-up becomes excessive, clean the
glass surface only with a soft cloth using mild detergent
and water. Remove fingerprints with standard glass cleaner.
Do not use harsh cleaning materials, such as scrapers, steel
wool, blades or other sharp instruments to clean the surface; this will void the warranty.
Use caution when cleaning the back
surface of the module to avoid pen-
etrating the PVF sheet.
Modules that are mounted flat (0° tilt angle)
should be cleaned more often, as they will not ”self-clean“
as effectively as modules mounted at a 15° tilt or greater.
Once a year, check the tightness of terminal screws and the
general condition of the wiring. Make sure that mounting
hardware is tight. Loose connections will result in a damaged module or array.
NOTES
The electrical characteristics are indicated values of
Pmax under standard test conditions (irradiance of
1,000 W/m2, AM 1.5 spectrum, and cell temperature
of 25° C).
Under certain conditions, a photovoltaic module is
likely to produce more current and/or voltage than
reported at standard test conditions. Accordingly, the
values of Isc and Voc marked on this module should
be multiplied by a factor of 1.25 when determining
component voltage ratings, conductor ampacities, fuse
sizes, and sizes of regulators which are connected to
the PV output.
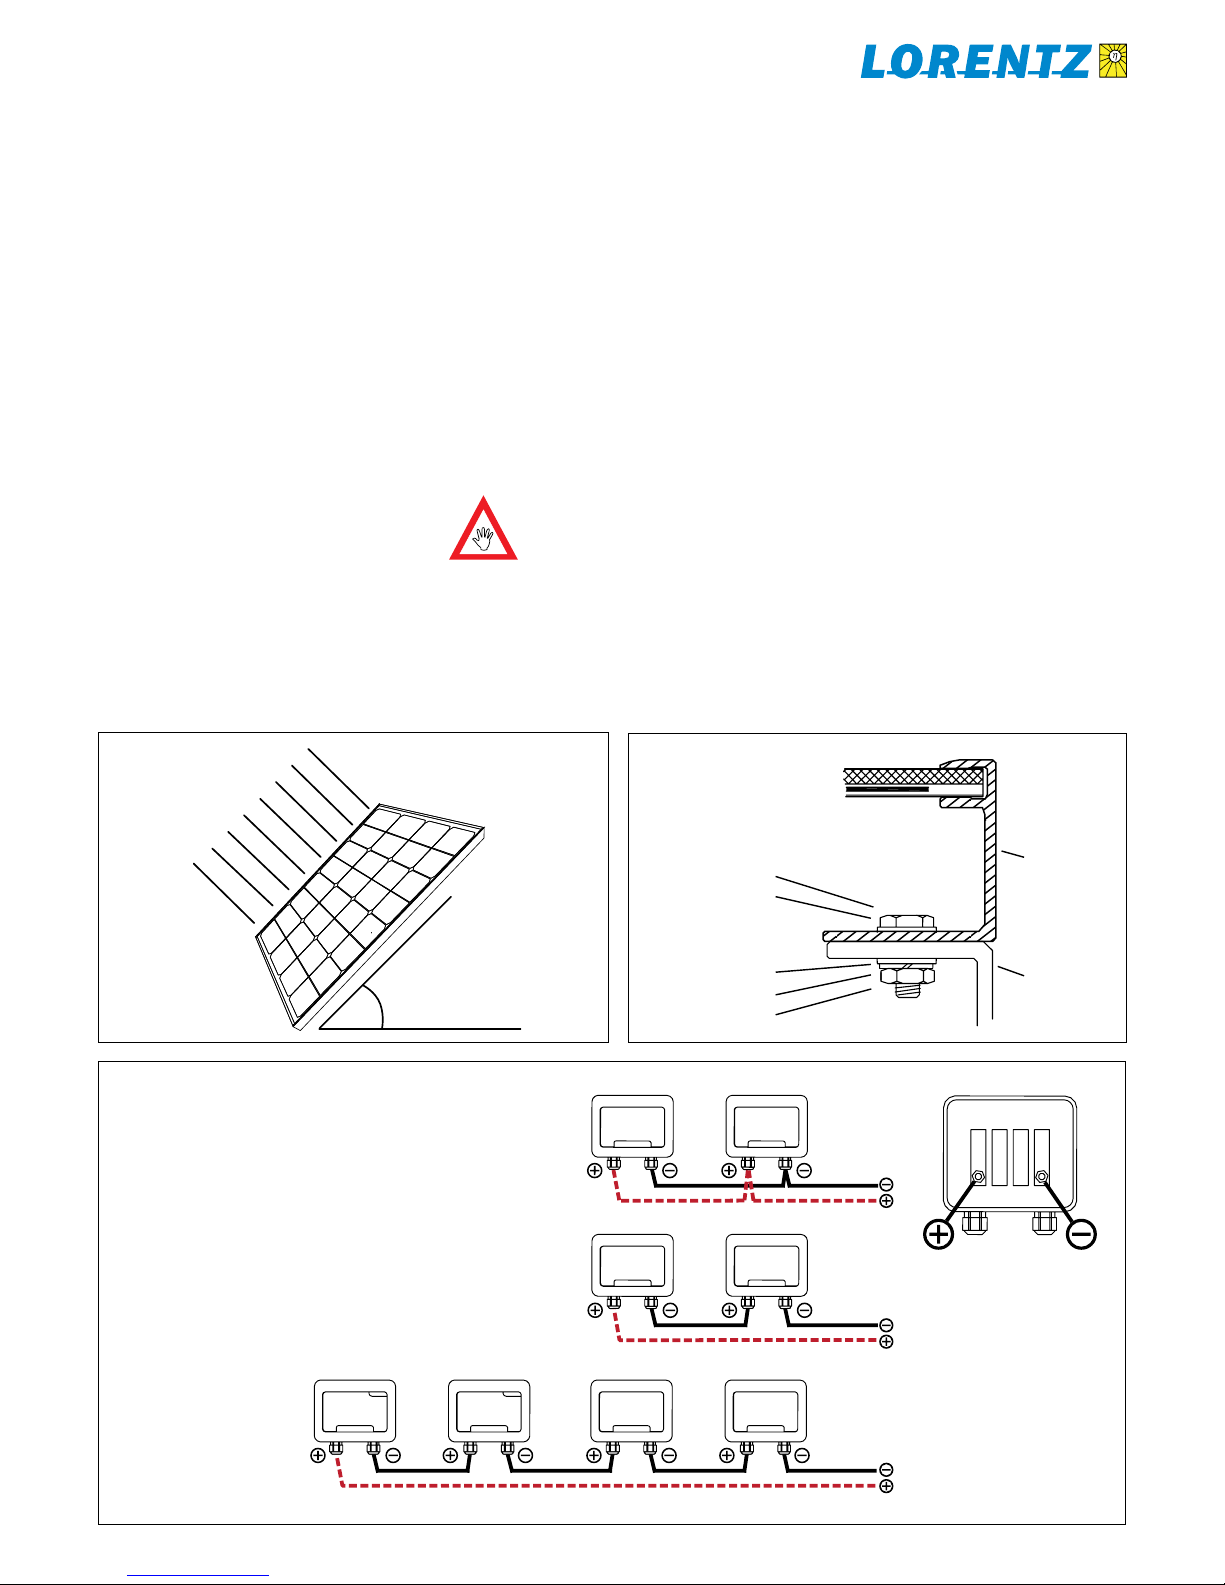
Figure 1
Tilt Angle
sunlight
module
tilt angle
Figure 2
Fixation with screws
M6/M8 screw
washer
washer
PV module
with
aluminium
frame
support
structure
spring washer
nut
Figure 3
Standard Wiring Examples
Figure 3a
12 V (Vmp ~ 17 V) parallel for 12M/12P modules
24 V (Vmp ~ 34 V) parallel for 24M/24P modules
Figure 3b
24 V (Vmp ~ 34 V) series for 12M/12P modules
48 V (Vmp ~ 68 V) series for 24M/24P modules
Figure 3c
48 V (Vmp ~ 68 V) series for 12M/12P modules
96 V (Vmp ~ 136 V) series for 24M/24P modules
red
red
red
black
junction box
black
black
Errors excepted and possible alterations without prior notice
BERNT LORENTZ GmbH & Co. KG | Kroegerskoppel 7, 24558 Henstedt-Ulzburg, Germany, Tel. +49 (0) 4193 7548 - 0, Fax - 29, www.lorentz.de
 Loading...