

Page 1

Page 2
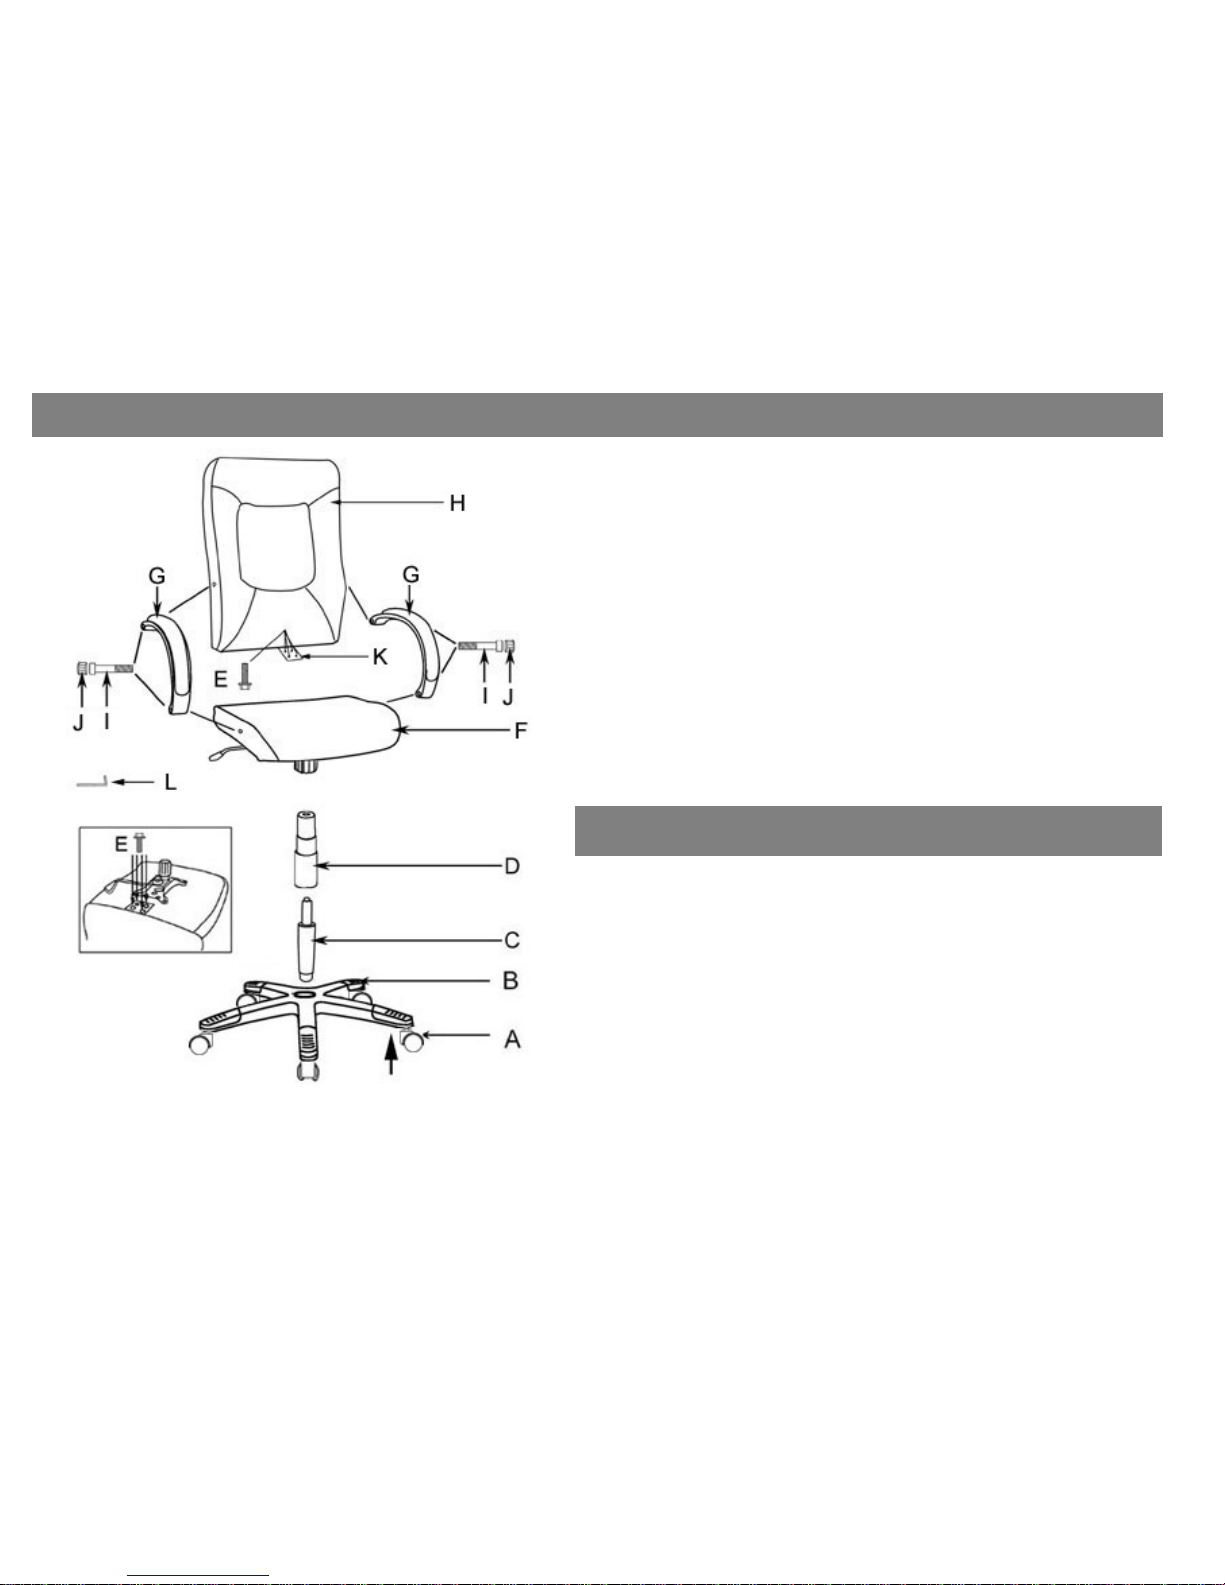
Model Number 60505
Assembly Instructions
Carefully unpack all parts and identify them with parts list before
attempting to assemble the chair.
IMPORTANT: DO NOT TIGHTEN BOLTS AND SCREWS FULLY UNTIL
YOU HAVE COMPLETED THE FINAL ASSEMBLY.
1. Put 5 CASTERS (A) into the holes on 5 STAR BASE (B).
2. Insert GAS LIFT (C) into the center hole top of 5 STAR BASE (B).
3. Insert BELLOW (D) over GAS LIFT (C).
4. Attach BACK CUSHION (H) to SEAT CUSHION (F) by positioning
BACK SUPPORT PLATE (K) with 4 SCREWS (E).
5. Attach both the left and the right ARMRESTS (G) to BACK CUSHION
(H) and SEAT CUSHION (F) by using 4 SCREWS (I) and 4 CAPS (J).
6. Insert the pre-assembled seat unit onto the gas lift to finish the
assembly.
7. Be sure that all the screws are fully tightened before using.
Parts List
Description Quantity
A. CASTERS
5
B. 5 STAR BASE
1
C. GAS LIFT
1
D. BELLOW
1
E. SCREWS (1/4” X 1”)
4
F. SEAT CUSHION
1
G. ARMRESTS (L&R)
2
H. BACK CUSHION
1
I. SCREWS (M 8 X 50MM)
4
J. CAPS
K. BACK SUPPORT PLATE
4
1
L. ALLEN KEY
2
Page 3

Instruction d’assemblage
Instrucciones de ensamble
Déballez soigneusement toutes les pièces et identifiez-les à l’aide de la
liste de matériel avant d’entreprendre l’assemblage de la chaise.
IMPORTANT : NE SERREZ PAS LES BOULONS ET LES VIS TANT
QUE VOUS N’AVEZ PAS COMPLÉTÉ L’ASSEMBLAGE FINAL.
Desempaque con cuidado todas las partes e identifíquelas con la lista
de partes antes de comenzar el ensamble.
IMPORTANTE: NO APRIETE LAS TUERCAS Y LOS TORNILLOS
HASTA QUE HAYA TERMINADO EL ENSAMBLE.
1. Mettez les 5 ROULETTES (A) dans les trous de la BASE ÉTOILÉE
À 5 POINTES (B).
2. Insérez le VÉRIN À GAZ (C) dans la partie supérieure du trou
central de la BASE ÉTOILÉE À 5 POINTES (B).
3. Insérez le MANCHON (D) par-dessus le VÉRIN À GAZ (C).
4. Attachez le COUSSIN DE DOSSIER (H) au COUSSIN DU SIÈGE
(F) en installant la PLAQUE DE SUPPORT DU DOSSIER (K) à
l’aide de 4 VIS (E).
5. Attachez les deux ACCOUDOIRS (G) de gauche et de droite au
COUSSIN DU DOSSIER (H) et au COUSSIN DU SIÈGE (F) en
utilisant 4 VIS (I) et 4 CAPUCHONS (J).
6. Insérez l’unité pré-assemblée du siège sur le vérin à gaz afin de
compléter l’assemblage.
7. Assurez-vous que toutes les vis sont parfaitement serrées avant
l’usage.
1. Introduzca las 5 RUEDAS (A) en los orificios de la BASE EN
ESTRELLA DE 5 PUNTAS (B).
2. Inserte el ELEVADOR DE GAS (C) en la parte superior del orificio del
centro de la BASE EN ESTRELLA DE 5 PUNTAS (B).
3. Inserte la PIEZA NEUMÁTICA (D) en el ELEVADOR DE GAS (C).
4. Una el COJÍN DEL RESPALDO (H) al COJÍN DEL ASIENTO (F) al
colocar LA PLACA POSTERIOR DEL ASIENTO (K) utilizando 4
TORNILLOS (E).
5. Una los DESCANSABRAZOS izquierdo y derecho (G) al COJÍN DEL
RESPALDO (H) y al COJÍN DEL ASIENTO (F) utilizando 4
TORNILLOS (I) y 4 TAPAS (J).
6. Inserte la unidad del asiento previamente ensamblada en el elevador
de gas para completar el ensamble
7. Asegúrese de que todos los tornillos estén bien apretados antes de
utilizar la silla
Liste de matériel
Description Quantité
Lista de partes
Descripción Cantidad
A. ROULETTES
5
A. RUEDAS
5
B. BASE ÉTOILÉE À 5 POINTES
1
B. BASE EN ESTRELLA DE 5 PUNTAS
1
C. VÉRIN À GAZ
1
C. ELEVADOR DE GAS
1
D. MANCHON
1
D. PIEZA NEUMÁTICA
1
E. VIS (1/4” X 1”)
4
E. TORNILLOS (1/4” X 1”)
4
F. COUSSIN DE SIÈGE
1
F. COJÍN DEL ASIENTO
1
G. ACCOUDOIRS (G&D)
2
G. DESCANSABRAZOS (I&D)
2
H. COUSSIN DE DOSSIER
1
H. COJÍN DEL RESPALDO
1
I. VIS (M 8 X 50MM)
4
I. TORNILLOS (M 8 X 50MM)
4
J. CAPUCHONS
K. PLAQUE DE SUPPORT DU DOSSIER
4
1
J. TAPAS
K. PLACA POSTERIOR DEL ASIENTO
4
1
L. CLÉ ALLEN
2
L. LLAVE ALLEN
2
 Loading...