

Lorell 59605, 16201, 59607, 16199, 34405 Assembly Instructions Manual
...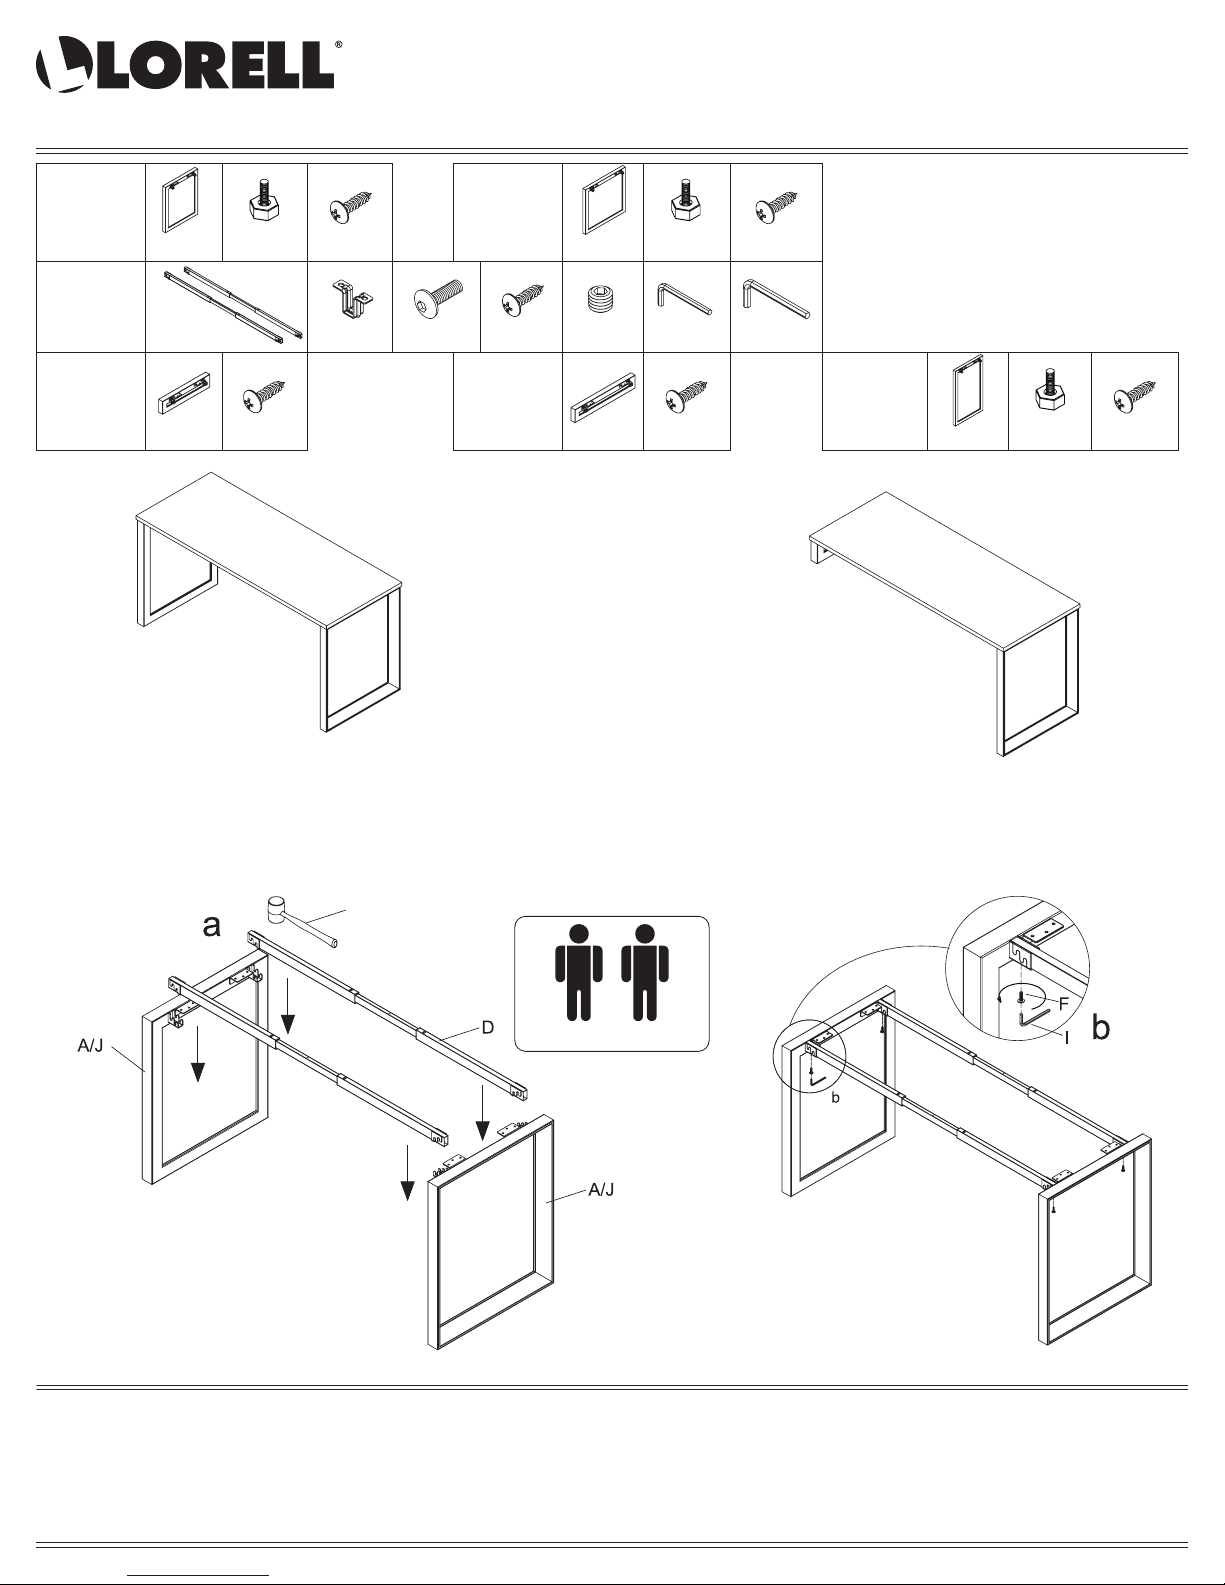
Assembly Instructions
Top Panel 59605/16202/16200/16201/59607/16199/34405/16198
Side Leg Frame-Full Length 16204/16205
Adjustable Cross Bar Set 16208
Side Leg Frame-Short Length 16206/16207
High Table Side Leg Frame 16209
LLR16204
Side Leg Frame
-Full Length (24”)
LLR16208
Adjustable Cross
Bar Set
LLR16206
Side Leg Frame
-Short Length (24”)
A
Frame-Full
1 PC
B
Adjustable Glide
D
Cross Bar Set
1 PR
K
Frame-Short
1 PC
C
Screw M4.8*22
6 + 2 extra PCS
STEP 1- STEP 5
2 PCS
C
LLR16205
Side Leg Frame
Screw M4.8*22
6 + 2 extra PCS
E C H
U Bracket
4 PCS
-Full Length (30”)
F G I
Screw M8*20
4 PCS
Screw M4.8*22
8 + 2 extra PCS
A B C
Frame-Full
1 PC
Screw M8*8
8 PCS
L C
LLR16207
Side Leg Frame
-Short Length (30”)
Frame-Short
1 PC
Adjustable Glide
2 PCS
Allen Wrench-4#
1 PC
Screw M4.8*22
6 + 2 extra PCS
Screw M4.8*22
6 + 2 extra PCS
Allen Wrench-5#
1 PC
High table Side
Leg Frame
STEP 6- STEP 12
LLR16209
A
Leg Frame
1 PC
B
Adjustable Glide
2 PCS
C
Screw M4.8*22
6 + 2 extra PCS
DESK-60W*24D:LLR59605/16202+LLR16204(2pcs)+LLR16208
DESK-72W*24D:LLR59607/16199+LLR16204(2pcs)+LLR16208
DESK-60W*30D:LLR16200/16201+LLR16205(2pcs)+LLR16208
DESK-72W*30D:LLR34405/16198+LLR16205(2pcs)+LLR16208
DESK-60W*24D(
DESK-72W*24D(
STEP 1
High Table):LLR59605/16202+LLR16209(2pcs)+LLR16208
High Table):LLR59607/16199+LLR16209(2pcs)+LLR16208
Rubber hammer
DESK-60W*24D:LLR59605/16202+LLR16204+LLR16206+LLR16208
DESK-72W*24D:LLR59607/16199+LLR16204+LLR16206+LLR16208
DESK-60W*30D:LLR16200/16201+LLR16205+LLR16207+LLR16208
DESK-72W*30D:LLR34405/16198+LLR16205+LLR16207+LLR16208
TWO PEOPLE ARE REQUIRED TO
ASSEMBLE AND MOVE THIS MODEL
STEP 2
IMPORTANT NOTE:
• Place all laminated parts on a clean and smooth surface such as a rug or carpet to avoid the parts from being scratched.
• Check to make sure that you have all parts and hardware.
• Remove all wrapping materials, including staples and packaging straps before you start to assemble.
• Do not tighten all screws/bolts until pieces are completely assembled.
• Keep all hardware parts out of children's reach.
• It is recommended for 2 persons to complete this assembly.
Assembly Instructions
Top Panel 59605/16202/16200/16201/59607/16199/34405/16198
Side Leg Frame-Full Length 16204/16205
Adjustable Cross Bar Set 16208
Side Leg Frame-Short Length 16206/16207
High Table Side Leg Frame 16209
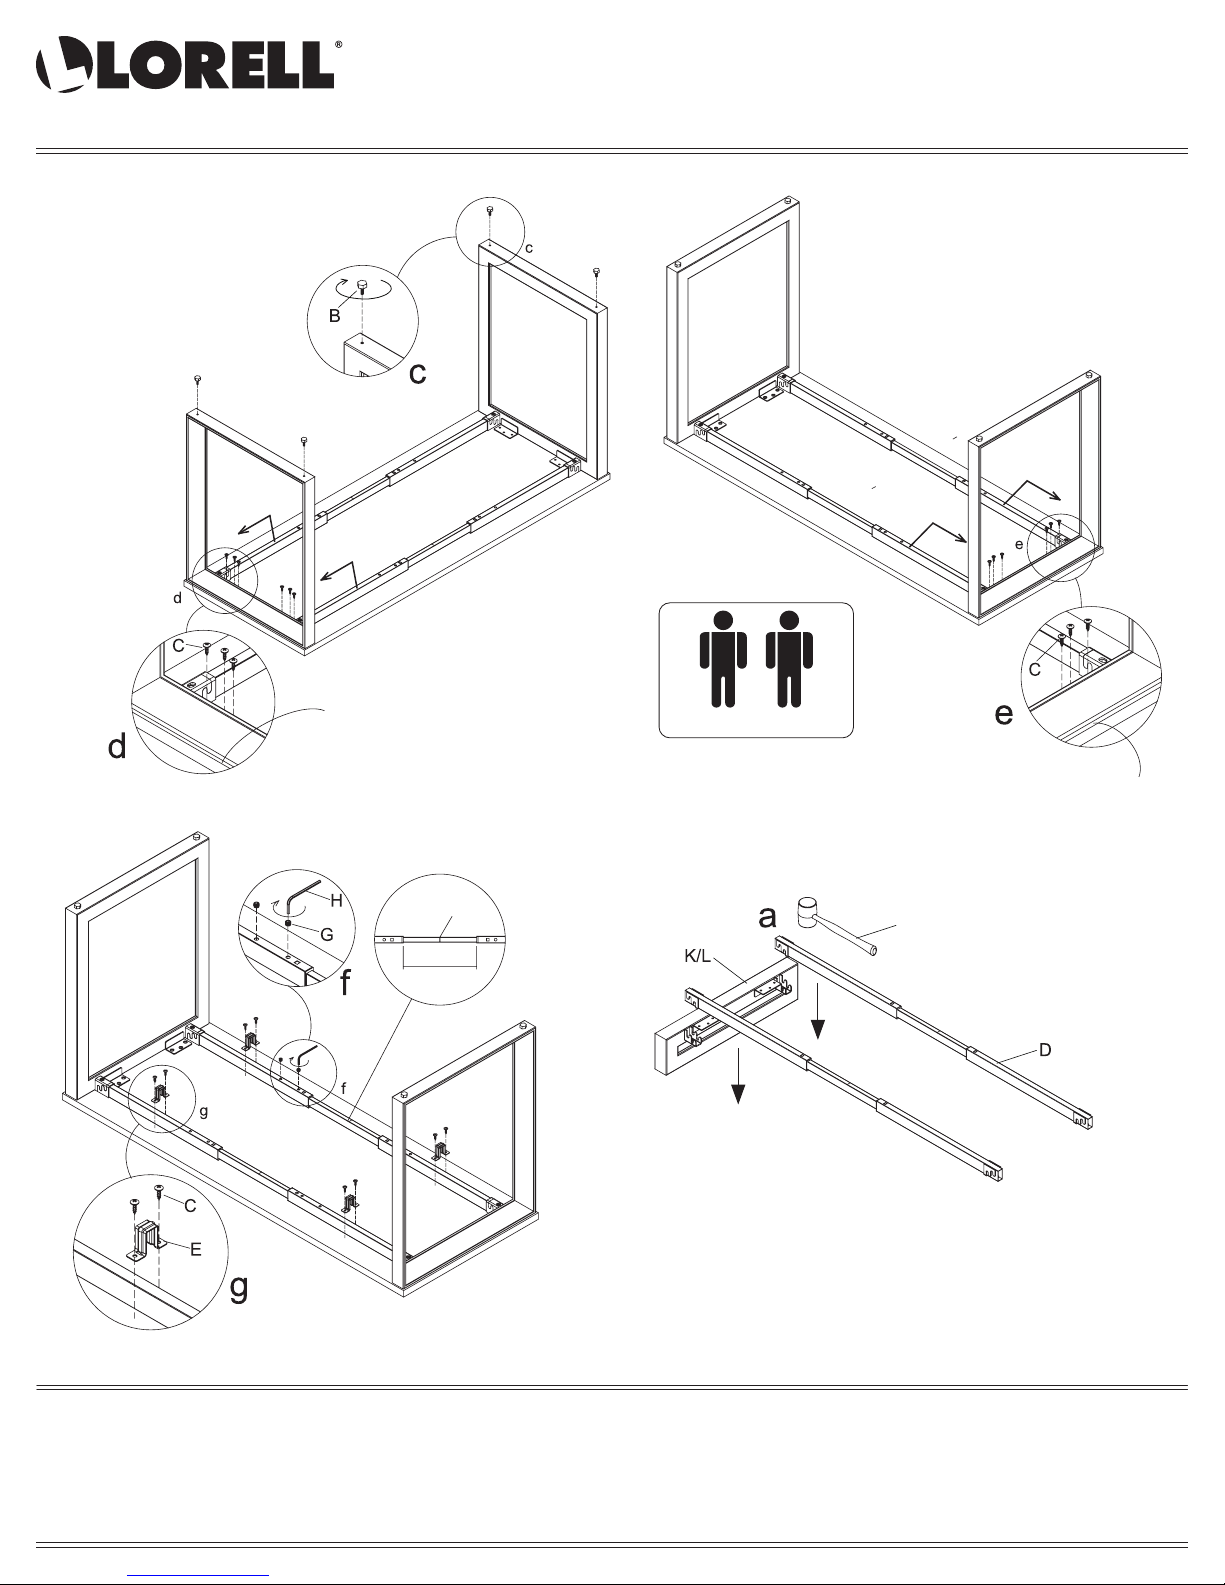
STEP 3
STEP 5
Only assemble one side leg using 6 pcs
screw “C”.
Suggest to keep the
distance of 5mm from metal
edge to panel edge.
Move the black mark to the center position,
then tighten the screw “G”.
STEP 4
TWO PEOPLE ARE REQUIRED TO
ASSEMBLE AND MOVE THIS MODEL
STEP 6
If the other leg does’nt align the edge of
the top panel,usually need one man make
this leg at the correct position,another man
tighten 6 pcs screw “C”.
Suggest to keep the
distance of 5mm from metal
edge to panel edge.
mark
distance
IMPORTANT NOTE:
• Place all laminated parts on a clean and smooth surface such as a rug or carpet to avoid the parts from being scratched.
• Check to make sure that you have all parts and hardware.
• Remove all wrapping materials, including staples and packaging straps before you start to assemble.
• Do not tighten all screws/bolts until pieces are completely assembled.
• Keep all hardware parts out of children's reach.
• It is recommended for 2 persons to complete this assembly.
Rubber hammer
Assembly Instructions
Top Panel 59605/16202/16200/16201/59607/16199/34405/16198
Side Leg Frame-Full Length 16204/16205
Adjustable Cross Bar Set 16208
Side Leg Frame-Short Length 16206/16207
High Table Side Leg Frame 16209
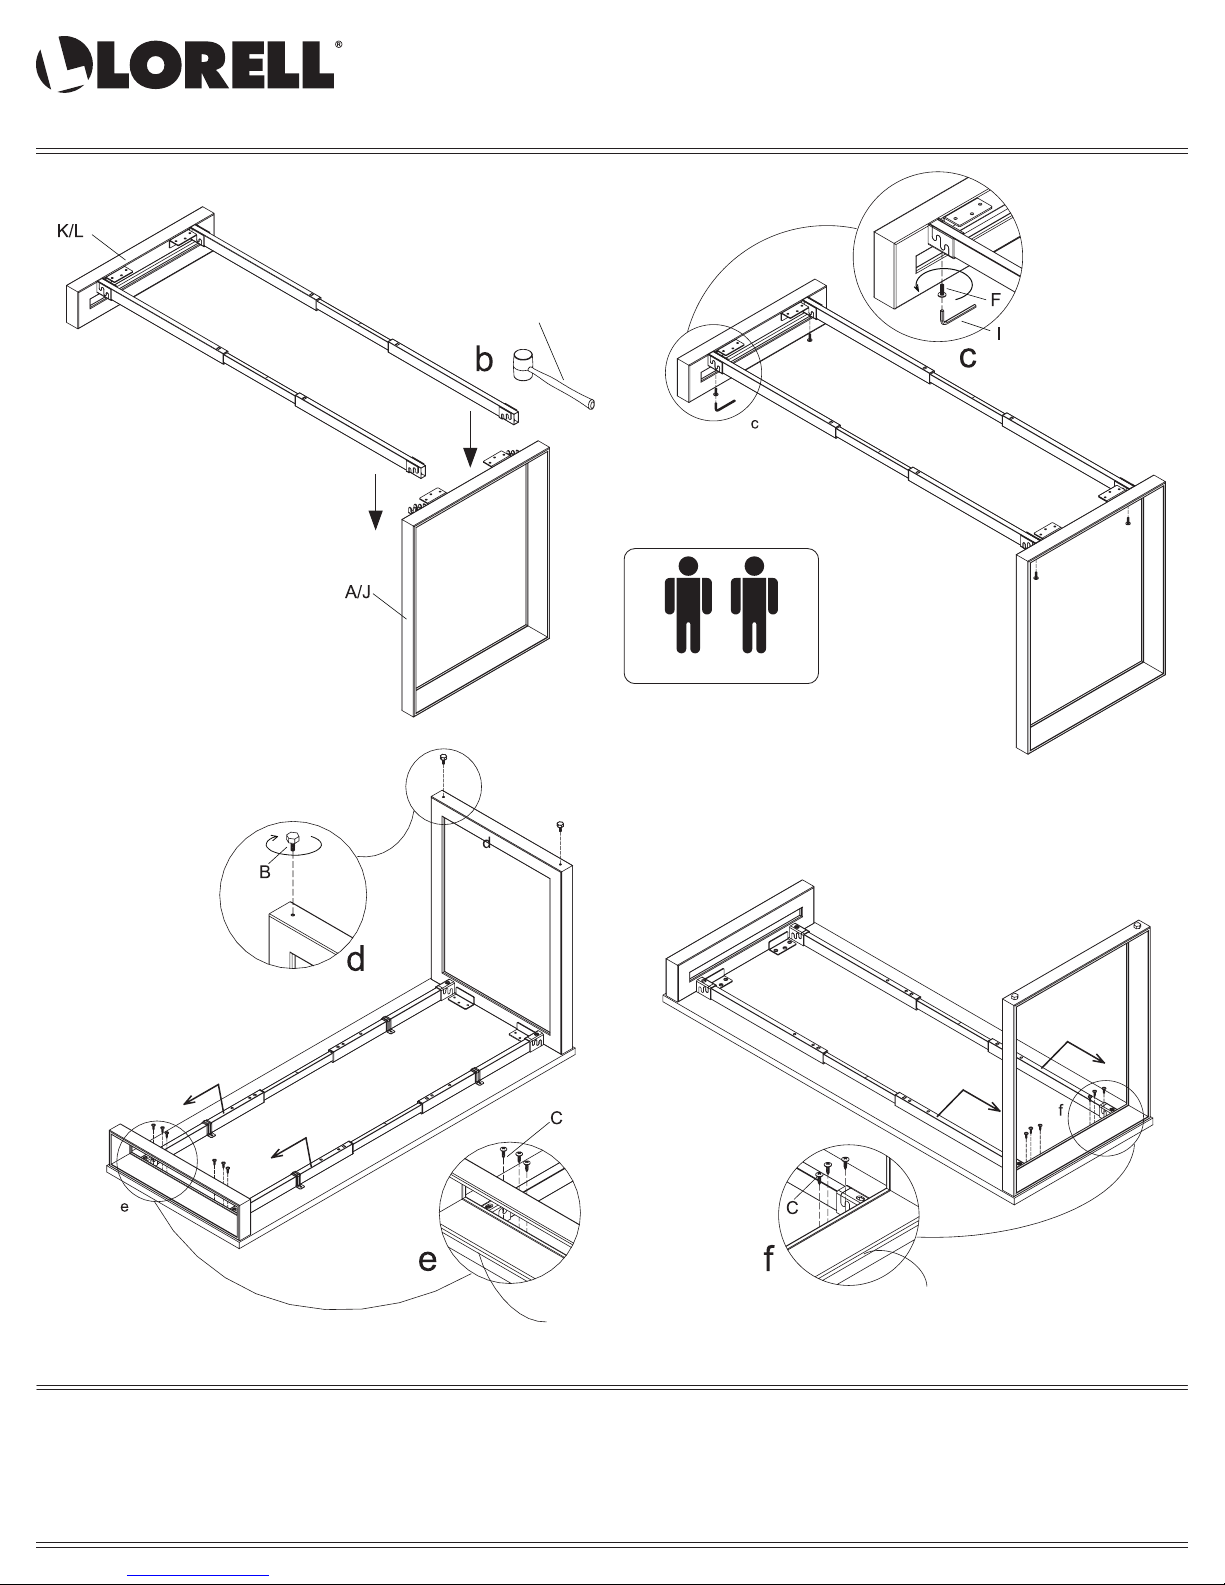
STEP 7
STEP 9
Only assemble one side leg using 6 pcs
screw “C”.
Rubber hammer
STEP 8
TWO PEOPLE ARE REQUIRED TO
ASSEMBLE AND MOVE THIS MODEL
STEP 10
If the other leg does’nt align the edge of
the top panel,usually need one man make
this leg at the correct position,another man
tighten 6 pcs screw “C”.
Suggest to keep the
distance of 5mm from metal
edge to panel edge.
IMPORTANT NOTE:
• Place all laminated parts on a clean and smooth surface such as a rug or carpet to avoid the parts from being scratched.
• Check to make sure that you have all parts and hardware.
• Remove all wrapping materials, including staples and packaging straps before you start to assemble.
• Do not tighten all screws/bolts until pieces are completely assembled.
• Keep all hardware parts out of children's reach.
• It is recommended for 2 persons to complete this assembly.
Suggest to keep the
distance of 5mm from metal
edge to panel edge.
Assembly Instructions
Top Panel 59605/16202/16200/16201/59607/16199/34405/16198
Side Leg Frame-Full Length 16204/16205
Adjustable Cross Bar Set 16208
Side Leg Frame-Short Length 16206/16207
High Table Side Leg Frame 16209
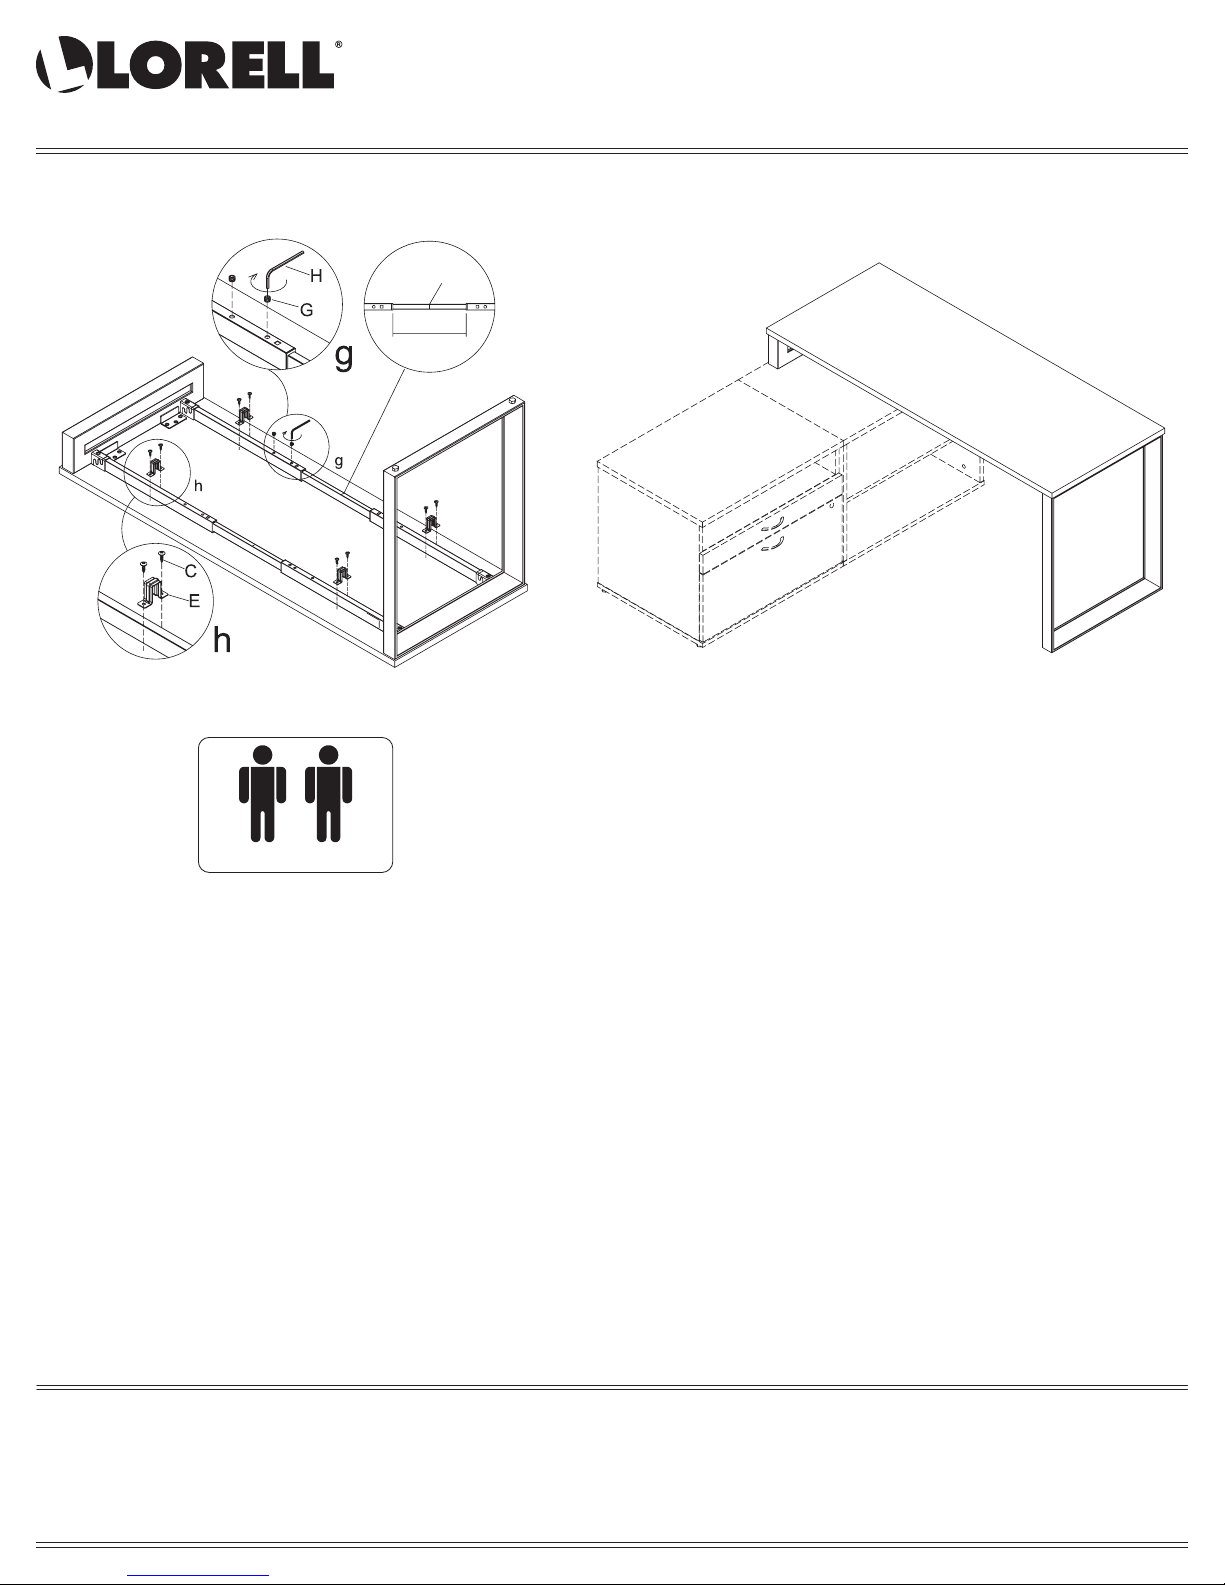
STEP 11 STEP 12
Move the black mark to the center position,
then tighten the screw “G”.
mark
distance
TWO PEOPLE ARE REQUIRED TO
ASSEMBLE AND MOVE THIS MODEL
IMPORTANT NOTE:
• Place all laminated parts on a clean and smooth surface such as a rug or carpet to avoid the parts from being scratched.
• Check to make sure that you have all parts and hardware.
• Remove all wrapping materials, including staples and packaging straps before you start to assemble.
• Do not tighten all screws/bolts until pieces are completely assembled.
• Keep all hardware parts out of children's reach.
• It is recommended for 2 persons to complete this assembly.
 Loading...