

Page 1
LORD QUICKSTARTGUIDE
®
V-Link®-200
Wireless 8 Channel Analog Input Sensor Node
The V- Link- 200 wireless sensor node features eight analog input channels
designed to accommodate a wide range of Wheatstone bridge and analog
sensors, including strain, load cell, torque, pressure, acceleration, vibration,
magnetic field, displacement, and geophones. There are four channels for singleended sensor measurement, four channels for differential sensor measurement,
and an on-board internal temperature sensor.
To acquire sensor data, the V- Link-200 is used with a LORD Sensing data
gateway such as the WSDA-101 or WSDA-1500 Base. V-Link-200 sensor nodes
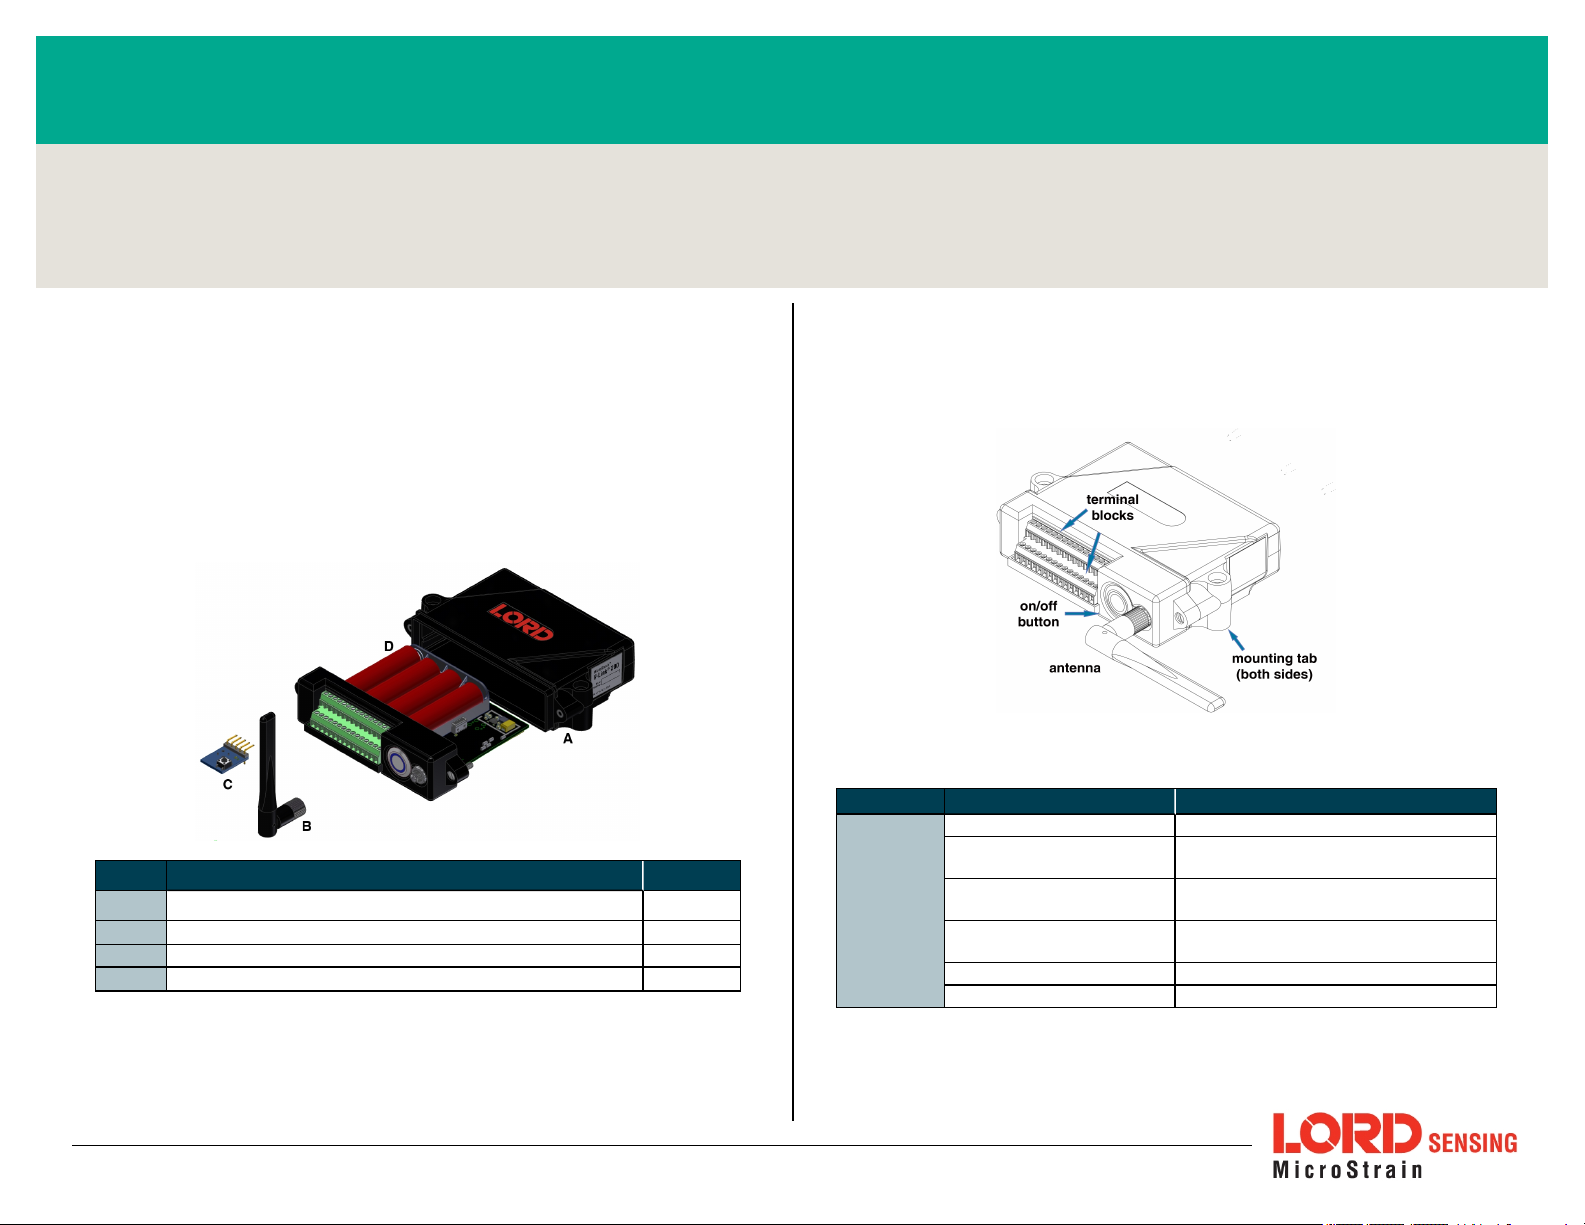
come with the following components.
Item Description Quantity
A V-Link-200 WirelessSensor Node
B Antenna withright angleadapter
C Node Tester Board 1
D
AA Lithium Batteries (3.6 V dc, 2.4 Ah) 4
Table 1 - V-Link-200 Components List
1
1
The LED indicators on the V-Link-200 include operational modes showing when
the node is booting up, idle and waiting for a command, sampling,
resynchronizing, or if there is an error. see Table 2 - below describing basic
indicator behavior.
Figure 1 - Interface and Indicators
Indicator Behavior Node Status
OFF Node isOFF
Device
status
indicator
Rapid green flashing
on start-up
1 (slow) green pulse per
second
1 green blink every 2
seconds
Blue LED during sampling Node isresynchronizing
Red LED Error or low battery
Table 2 - Indicator Behaviors
Node isbooting up
Node isidle and waiting for a command
Node issampling
Wireless Simplicity, Hardwired Reliability™
Page 2
V-Link-200 Wireless Sensor Node QuickStart Guide
SYSTEM OPERATION
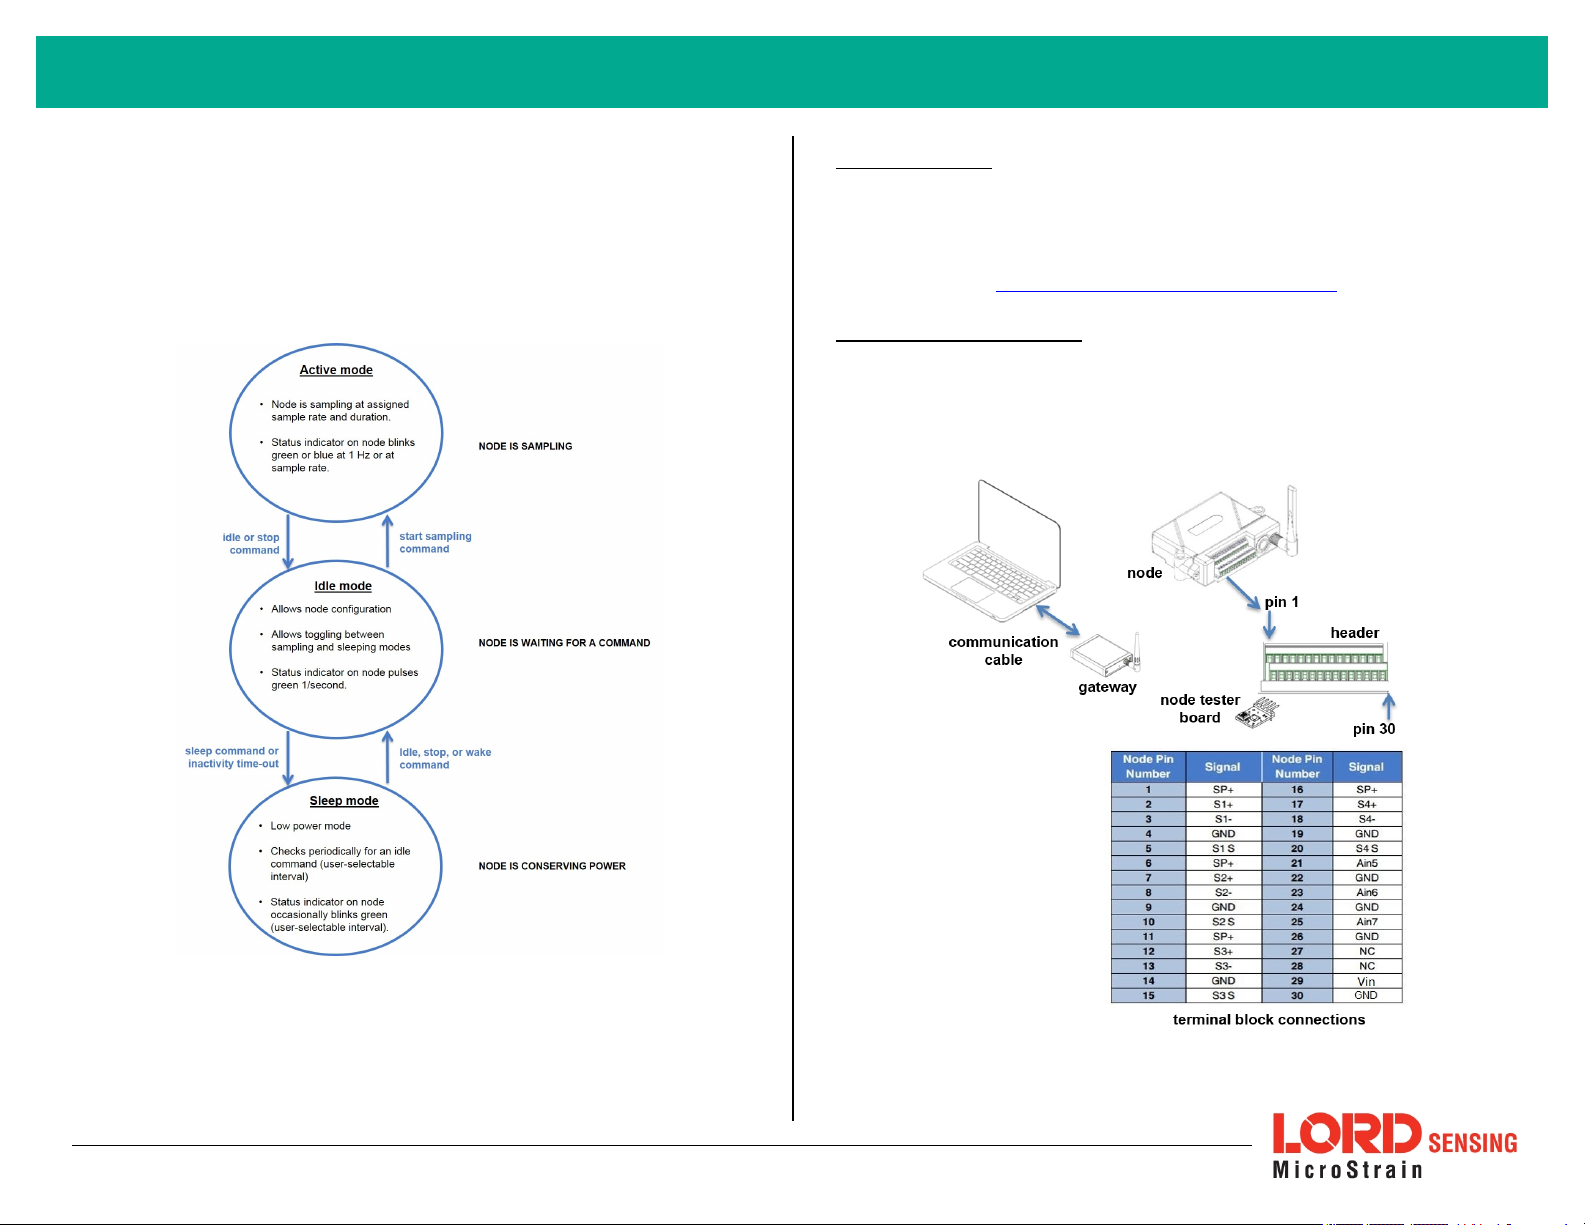
Sensor nodes have three operational modes:
node is sampling, it is in active mode. When sampling stops, the node is switched
into idle mode, which is used for configuring node settings, and allows toggling
between sampling and sleeping modes. The node will automatically go into the
ultra low-power sleep mode after a user- determined period of inactivity. The
node will not go into sleep mode while sampling.
active,sleep
, and
idle
. When the
1. Install Software
Install the SensorConnect software on the host computer before connecting any
hardware. The SensorConnect software is available on the LORD Sensing
website for free download:
http://www.microstrain.com/software/software
2. Make System Connections
To acquire sensor data, the V- Link-200 is used with a LORD Sensing data
gateway such as the WSDA-101-Base or WSDA-1500-LXRS.
Figure 2 - Node Operational Modes
2
Page 3
V-Link-200 Wireless Sensor Node QuickStart Guide
3. Establish Gateway Communication
The WSDA-101-Base USB gateway is used in this example. For information on
how to use other gateways, refer to the gateway or SensorConnect user manual.
Drivers for the USB gateways are included the SensorConnect software
installation. With the software installed, the USB gateway will be detected
automatically whenever the gateway is plugged in.
1. Power is applied to the gateway through the USB connection. Verify
the gateway status indicator is illuminated, showing the gateway is
connected and powered on.
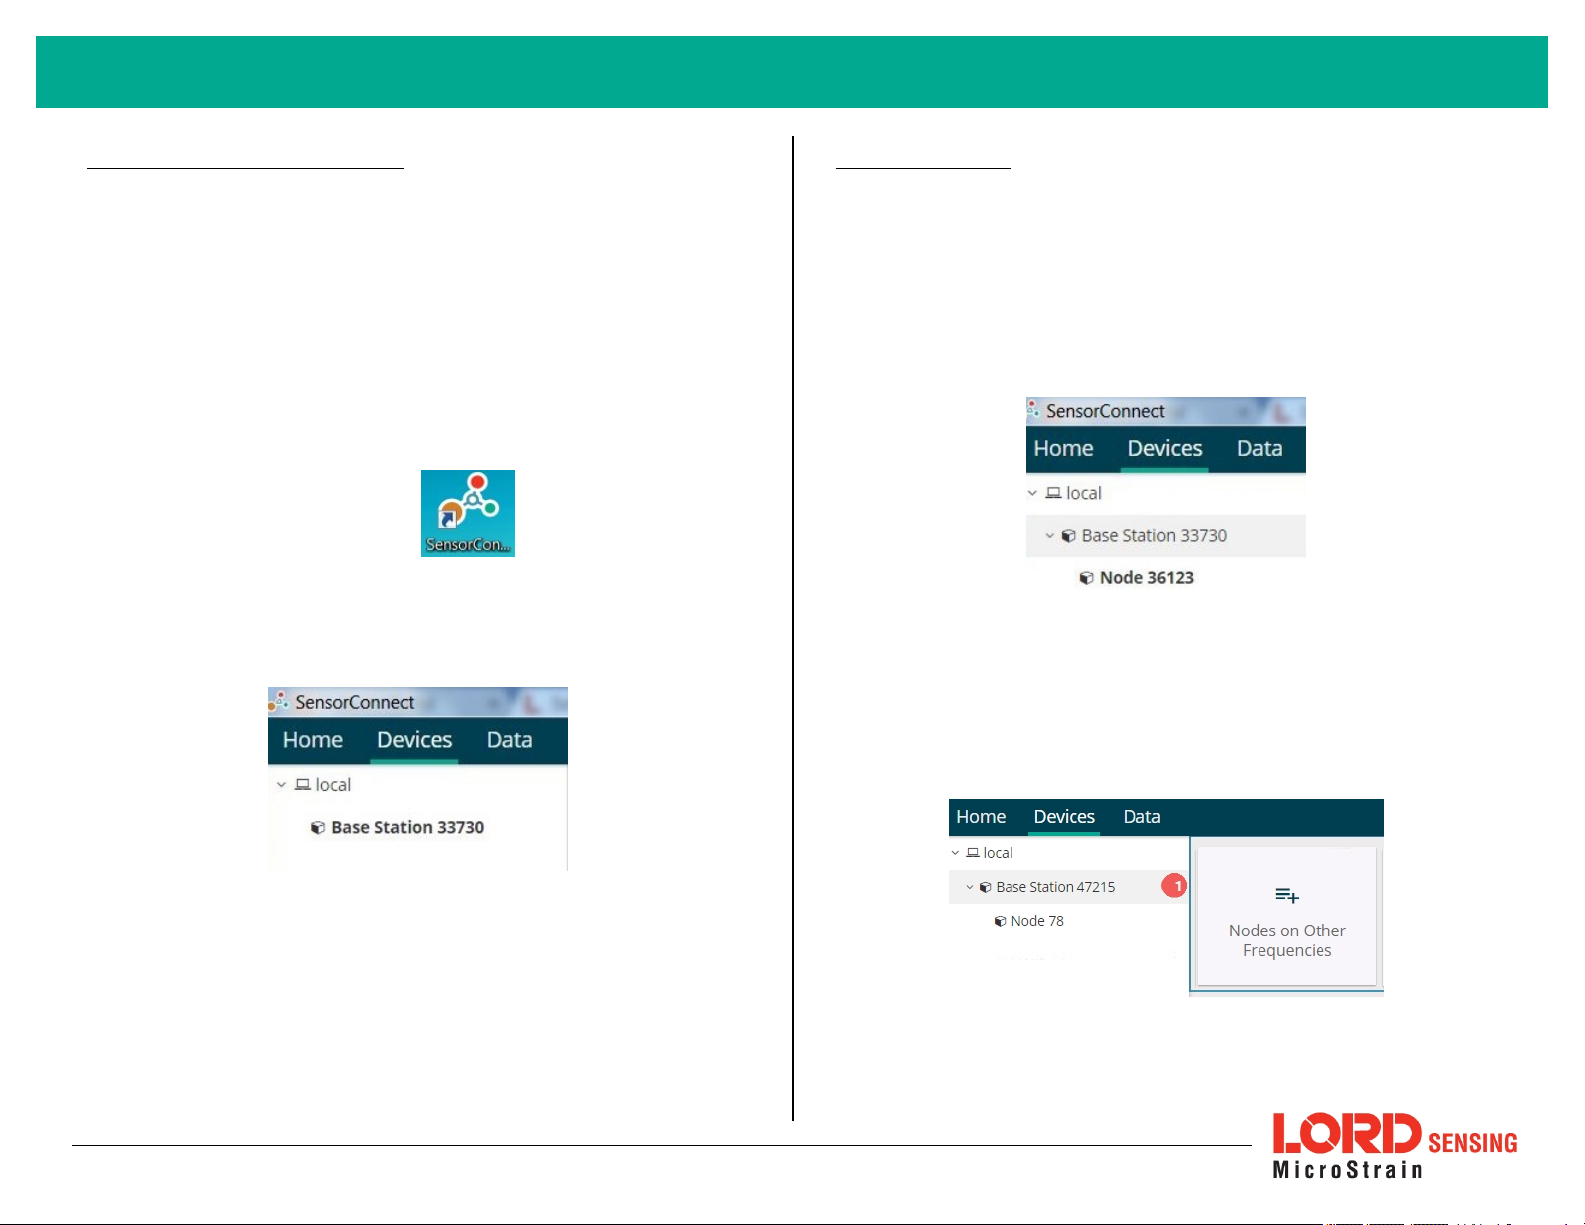
2. Open the SensorConnect software.
3. The gateway should appear in the Controller window automatically
with a communication port assignment. If the gateway is not
automatically discovered, verify the port is active on the host
computer, and then remove and re-insert the USB connector.
4. Connect to Nodes
The node can be connected with the automatic node discovery feature and by
manually entering the node address and then searching for it on the current
gateway communication frequency.
1. If the base and node are on the same operating frequency, the node
will populate below the Base Station listing when powering on the VLink-200.
Figure 4 - Automatic Node Discovery
2. If a red circle with a number appears next to Base Station, the node
is operating on a separate radio channel. Select the Base Station
and then select the Nodes on Other Frequencies tile.
Figure 3 - USB Gateway Communication
Figure 5 - Nodes On Other Frequencies
3
Page 4
V-Link-200 Wireless Sensor Node QuickStart Guide
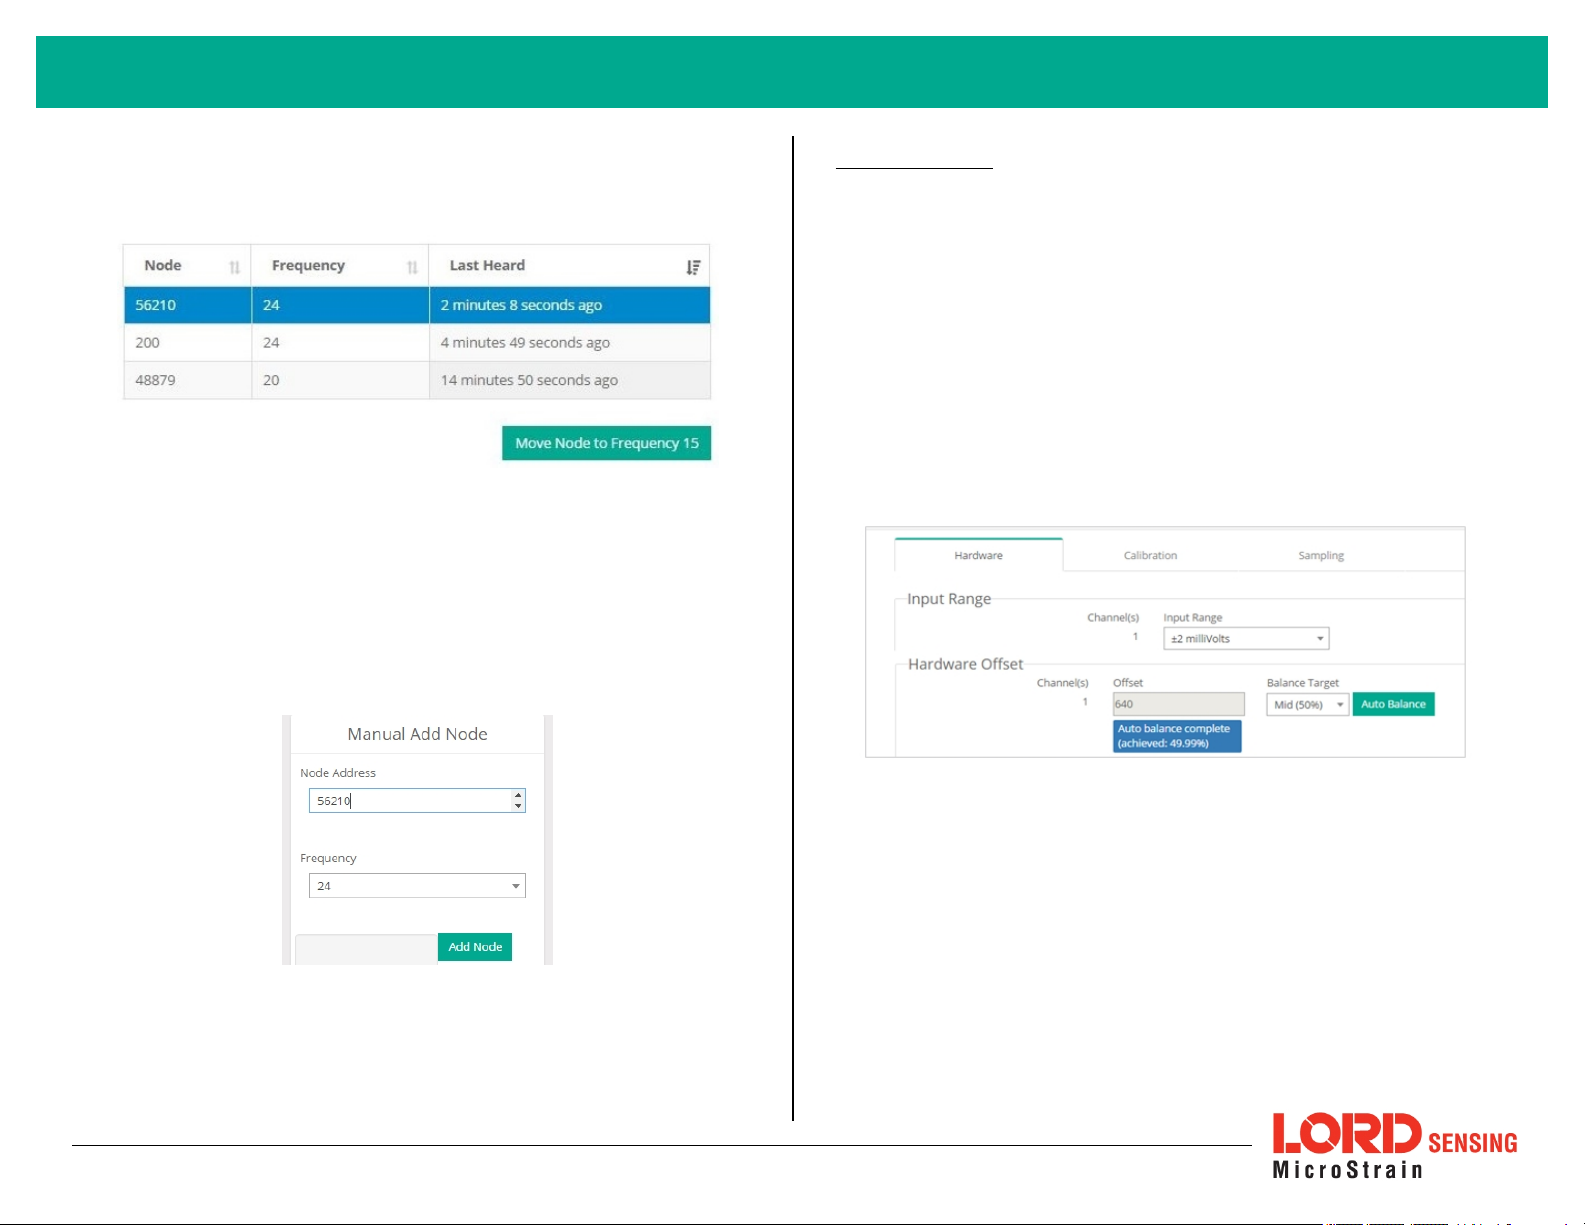
3. Highlight the new node being added. Select Move Node to
Frequency (#).
Figure 6 - Move Node
4. When manually entering the node address, select Manual Add
Node, enter Node Address, last known Frequency (factory default is
15), and select Add Node.
5. Configure Node
Node settings are stored to non-volatile memory and may be configured using
SensorConnect. For details related to node configuration, see Wireless Sensor
Configuration on page 1.
For this example the V-Link-200 tester board is on channel 1.
1. Select Hardware > Input Range for channel 1, select +/-2 mV from
the drop down menu.
2. Under Hardware Offset, select Balance Target for channel 1, select
Mid (50%) from the drop down menu.
3. Select Auto- Balance. When auto- balance is complete, a blue
information window will indicate the balance result.
Figure 8 - Auto-Balance
4. Select Calibration.
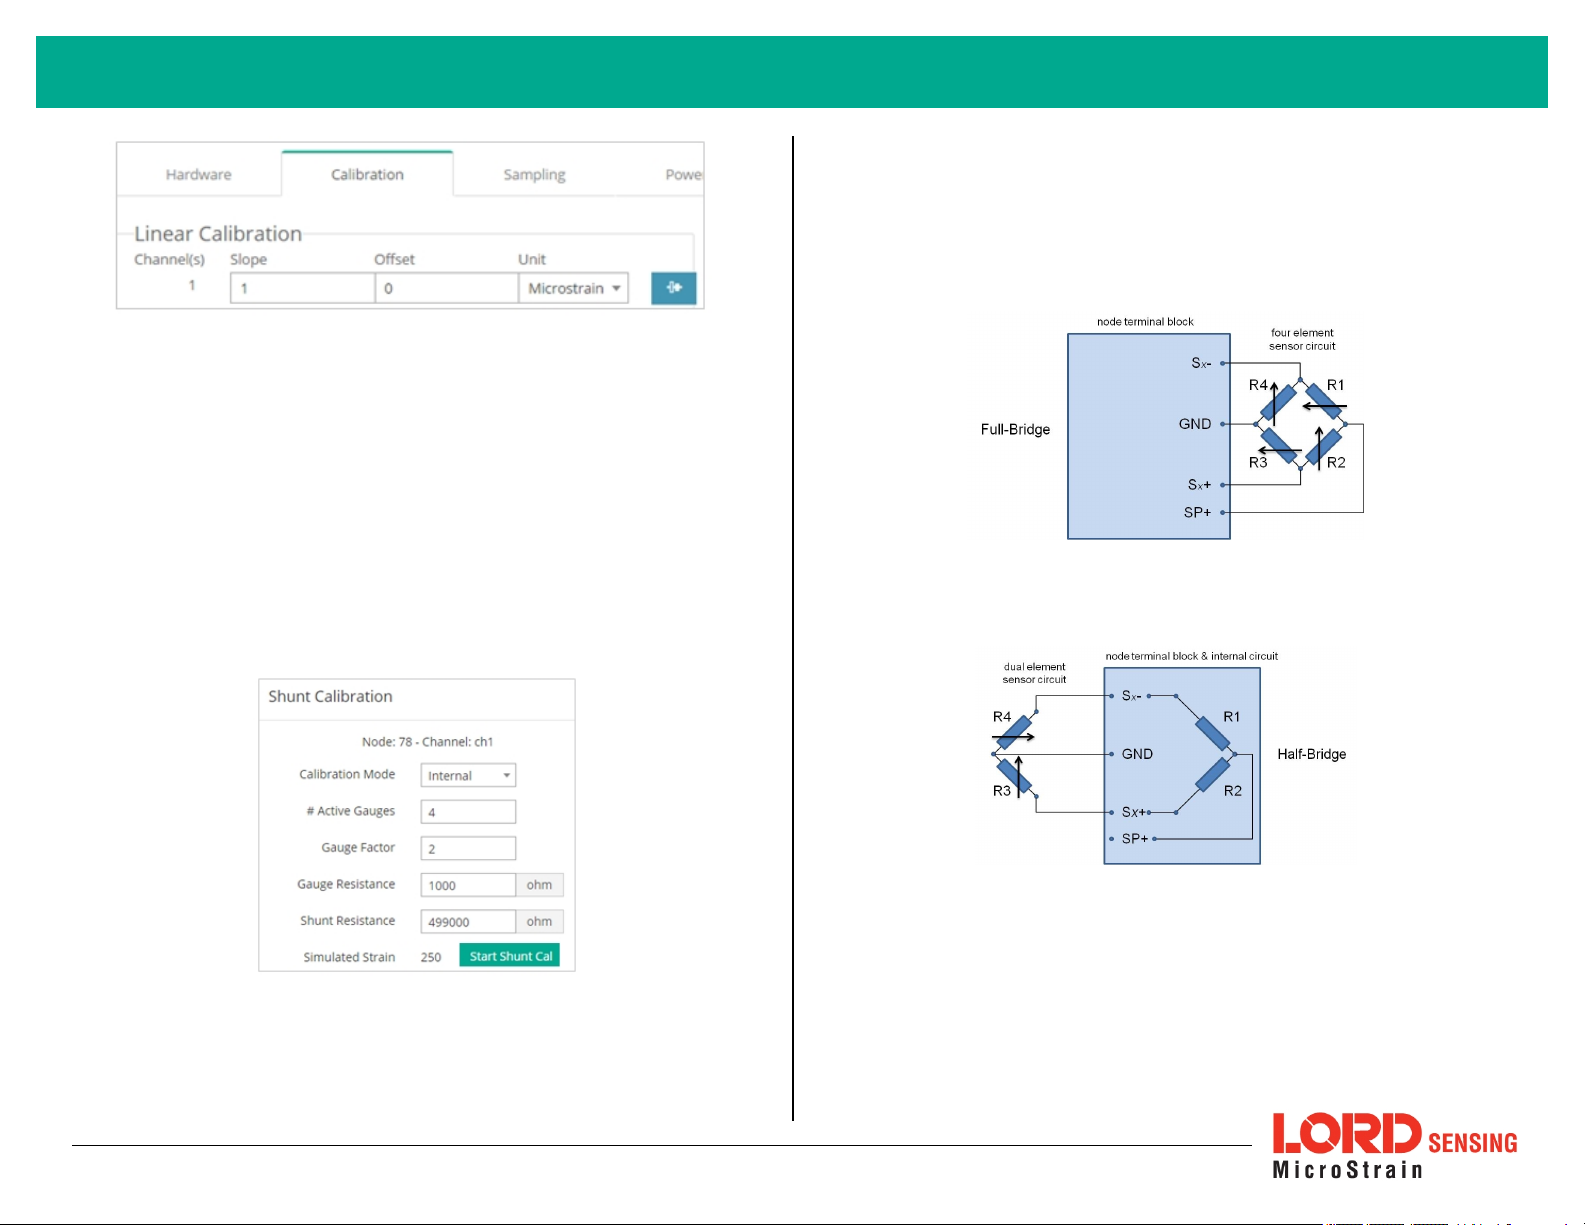
5. Select Microstrainfrom the Unit drop down menu, and select the
Shunt Cal button enabled on the right.
Figure 7 - Adding a Node by Address
4
Page 5
V-Link-200 Wireless Sensor Node QuickStart Guide
Figure 9 - Node Configuration Menu
6. Use the following settings:
a. Calibration Mode: Internal
b. Number of Active Gauges: 4
c. Gauge Factor: 2
d. Gauge Resistance: 1000
9. When the calibration is complete, the Wireless Node Configuration
window will appear.
10. Select Apply Configuration to write to node memory.
See below for wiring of other strain gauges.
e. Shunt Resistance: 499000
7. Select Start Shunt Cal for Slope and Offset calibrations.
8. Select Accept Calibration.
Figure 10 - Channel Settings
Figure 11 - Full-Bridge (Standard)
Figure 12 - Half-Bridge
5
Page 6
V-Link-200 Wireless Sensor Node QuickStart Guide
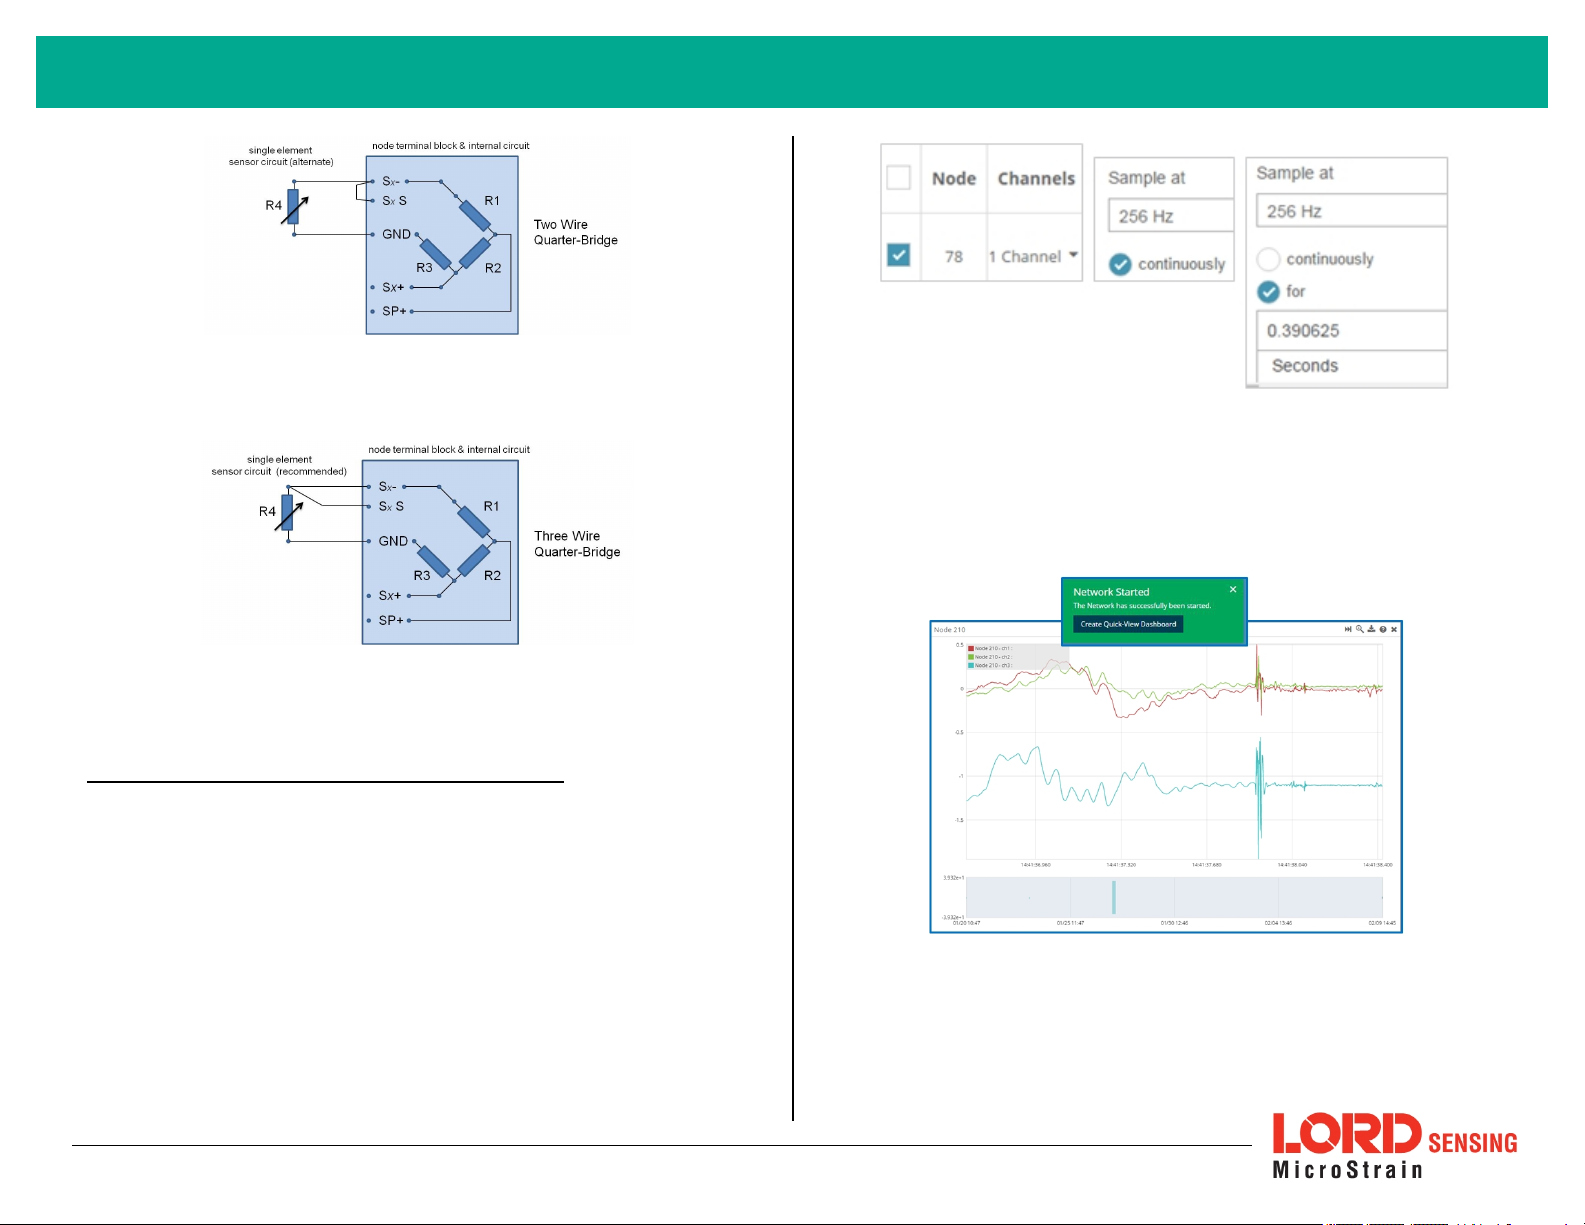
Figure 13 - Two Wire Quarter-Bridge *
Figure 15 - Sampling Setting
3. Select Apply and Start Network.
4. Select Create QuickView Dashboard in the pop up window immediately
to create a dashboard of the new data.
Figure 14 - Three Wire Quarter-Bridge *
* Requires optional on-board bridge completion
6. Configure Sampling Setting and Start Data Acquisition
1. Left click on the Base Station > Sampling, and indicate the nodes to be
sampled by checking the box to the left of each node.
2. Under Sampling, select Sample Rate from the drop down menu, select
Continuously to sample indefinitely, or For to set a limited time for
sample sets.
6
Figure 16 - Quick View Dashboard
Page 7
V-Link-200 Wireless Sensor Node QuickStart Guide
7. Replacing Batteries
1. Remove the screws on both sides of the face plate to open the V-Link-
200.
2. It is important to replace all four of the batteries at the same time,
observing the correct polarity orientation. The positive polarities are
indicated on the batteries and the node by a "+" symbol.
3. Reassemble.
Figure 17 - Replace Batteries
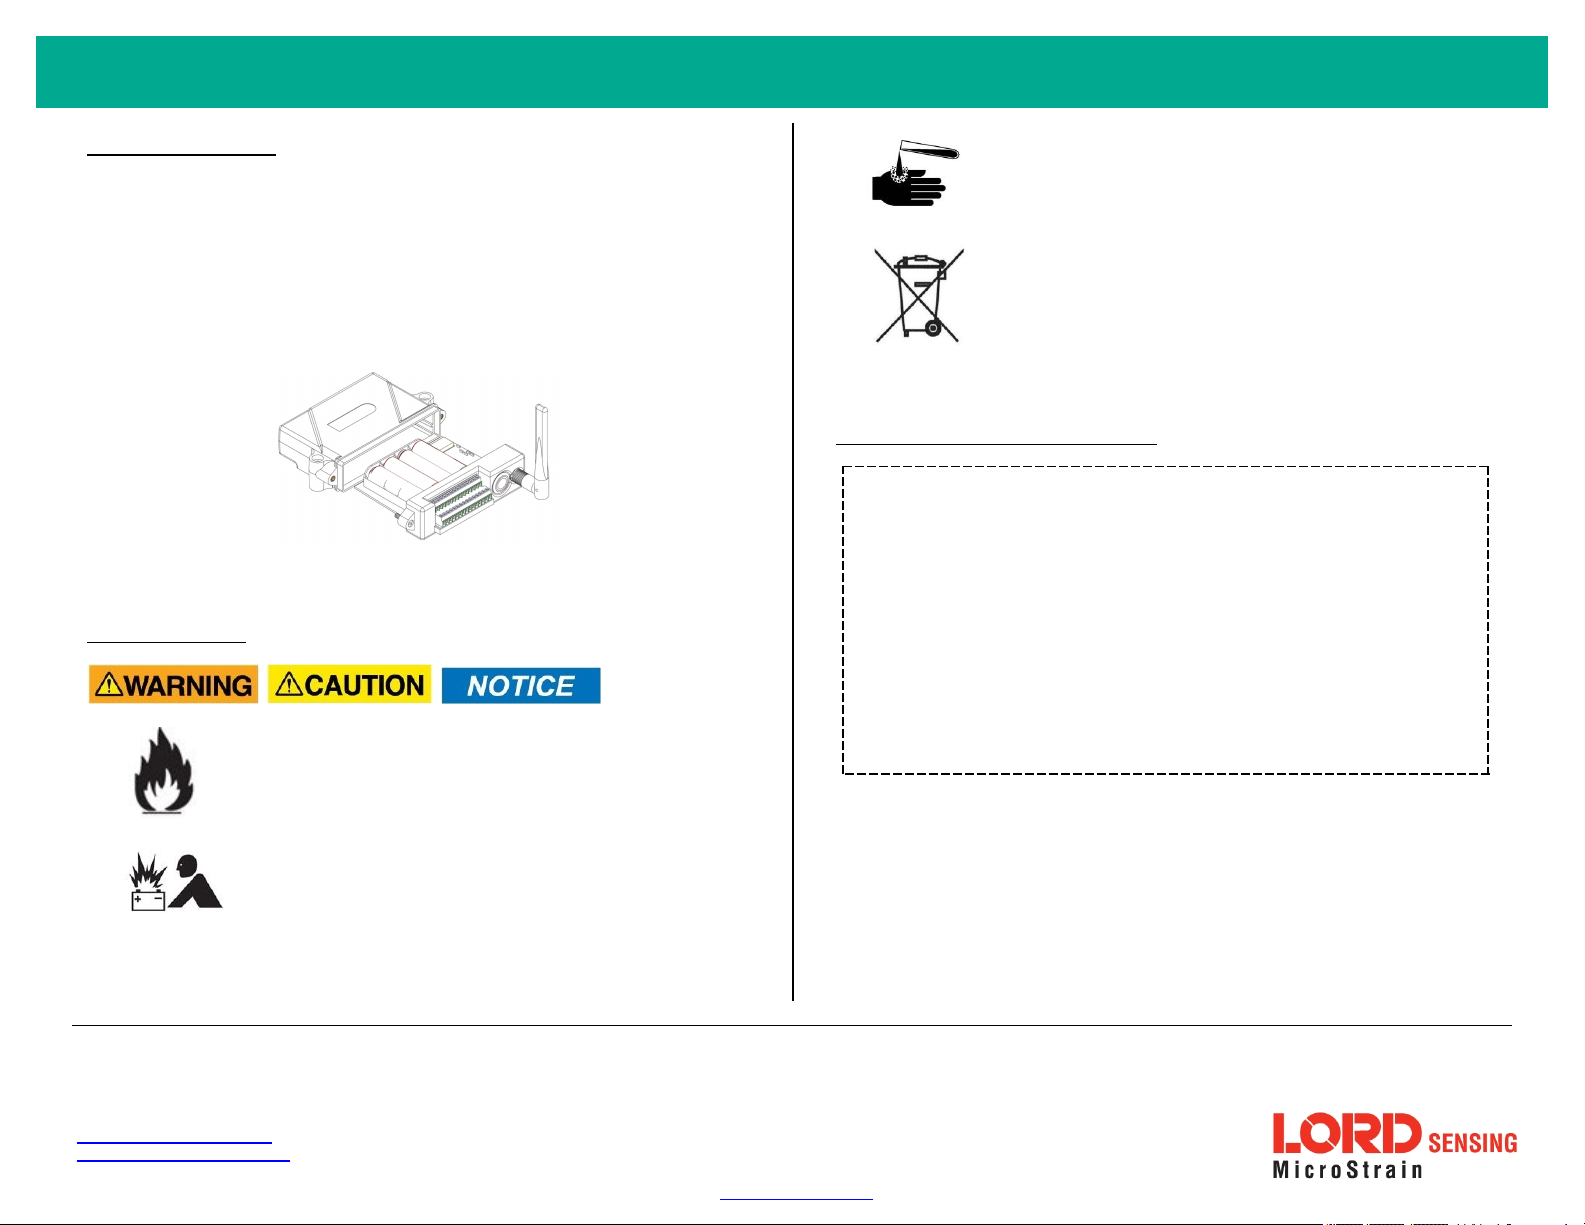
8. Battery Hazards
The V- Link -200 contains internal, non-rechargeable
lithium batteries . Lithium batteries are a fire and
explosion hazard. Do not store or operate the node at
temperatures above 212°F (100°C). Do not
disassemble, short circuit, crush, puncture, or otherwise
misuse the battery.
Lithium batteries contain toxic chemicals that are
harmful to humans and the environment. Disposal is
subject to federal and local laws. Do not discard the
battery or the node in the trash. Follow proper battery
disposal protocol, or contact LORD Sensing Technical
Support for information on extracting the battery or
returning the product for proper recycling and disposal.
9. Regulatory Compliance Information
FCC ID: XJQMSLINK0004
IC ID: 8505A-MSLINK0005
V-Link-200Wireless 8 Channel Analog Input SensorNode
This device complies with Part 15 of the United States FCC Rules, and Industry Canada’s licenseexempt RSSs. Operation is subject to the following two conditions: 1) This device may not cause
interference, and 2) This device must accept any interference, including interference that may cause
undesired operation of the device. Changes or modifications, including antenna changes not
expressly approved by LORD Corporationcould void theuser’s authority to operate the equipment.
Cet appareil est conforme à la Partie 15 des Règles de la FCC des États-Unis et aux RSSS exempts
de licence d'Industrie Canada. Le fonctionnement est soumis aux deux conditions suivantes: 1) Cet
appareil ne doit pas causer d'interférences et 2) Cet appareil doit accepter toute interférence, y
compris les interférences pouvant entraîner un fonctionnement indésirable de l'appareil. Les
changements ou modifications, y compris les changements d'antenne non expressément approuvés
par LORD Corporation, pourraient annuler l'autorisation de l'utilisateur d'utiliser l'équipement.
LORDCo rporation
Micro Strain®Sensing Systems
459 Hurricane Lane , Suite 102
Williston, VT 05495 USA
ph: 802-862-6629
Copyright © 2017 LORD Corporation
Document 8501-0073 Revision D. Subject tochangewithout notice.
www.microstrain.com
Page 8
V-Link-200 Wireless Sensor Node QuickStart Guide
10. Power Supply
The V-Link-200 Wireless Sensor Node canbe powered by an external source.
Apply only the input voltage range specified for the VLink-200. Connect to a power source that is near the
device, is accessible, and adheres to all national wiring
standards. Compliance with wiring standards is
assumed in the installation of the power source and
includes protection against excessive currents, short
circuits, and ground faults. Failure to do so could result
in personal injury and permanent damage to the
device.
LORDCo rporation
Micro Strain®Sensing Systems
459 Hurricane Lane , Suite 102
Williston, VT 05495 USA
ph: 802-862-6629
Copyright © 2017 LORD Corporation
Document 8501-0073 Revision D. Subject tochangewithout notice.
www.microstrain.com
 Loading...