

lopital 6200 4010, 6200 4015, 6200 4011, 6200 4016, 6200 4050 Instructions For Use Manual
...
Gebruikershandleiding
Instructions for use
Mode d’emploi
Benutzeranleitung
Stylex / Sirocco / Amfora / Vienna
Douchebrancard / Aankleedtafel
Shower stretcher / Dressing tables
Brancard de douche / Table d’habillage
Duschliege / Ankleideliege
Gebruikershandleiding
Stylex / Sirocco / Amfora / Vienna
6200 4010 / 6200 4015, 6200 4011 / 6200 4016, 6200 4050 / 6200 4055, 6200 5005 /
6200 5010, 6300 4030 / 6300 4035, 6300 4040 / 6300 4045 (Amfora)
6500 4021 / 6500 4026, 6500 4020 / 6500 4025, 6500 5015 / 6500 5020, 6500 4060 /
6500 4065, 6500 4070 / 6500 4075 (Vienna)
6100 2400, 6100 2401, 6100 2402, 6100 2403 (Sirocco)
6100 3070 (Stylex)
Douchebrancard / Aankleedtafel
6200 4010 / 6200 4015 Amfora
Douchebrancard Hydraulisch
6300 4030 / 6300 4035 Amfora
Douchebrancard muur
6500 4021 / 6500 4026 Vienna
Aankleedtafel Elektrisch
6500 4070 / 6500 4075 Vienna
Aankleedtafel muur
6200 4011 / 6200 4016 Amfora
Douchebrancard Elektrisch
6300 4040 / 6300 4045 Amfora
Douchebrancard met lekbak muur
6500 4020 / 6500 4025 Vienna
Aankleedtafel Hydraulisch
6500 5015 / 6500 5020 Vienna
Aankleedtafel muur hoog / laag
6200 4050 / 6200 4055 Amfora
Douchebrancard met lekbak verrijdbaar
6200 5005 / 6200 5010 Amfora
Douchebrancard muur hoog / laag
6500 4060 / 6500 4065 Vienna
Aankleedtafel verrijdbaar
6100 2400 / 6100 2401 / 6100 2402 /
6100 2403 Sirocco Douchebrancard
6100 3070 Stylex Douchebrancard RVS
Douchebrancard / Aankleedtafel | Gebruikershandleiding | 3
Français DeutschEnglish
Nederlands
Nederlands 3
English 31
Français 59
Deutsch 87
Belangrijk:
Lees deze instructies eerst goed door voordat u de douchebrancard / aankleedtafel in
gebruik neemt!
Datum ingebruikname . . . . . . . . . . . . . . . . . . . . . . . . . . . . . . . . . . . . . . . . . . . . . . . . . . . . .
Gebruiker . . . . . . . . . . . . . . . . . . . . . . . . . . . . . . . . . . . . . . . . . . . . . . . . . . . . . . . . . . . . . . .
Naam . . . . . . . . . . . . . . . . . . . . . . . . . . . . . . . . . . . . . . . . . . . . . . . . . . . . . . . . . . . . . . . . . .
Adres . . . . . . . . . . . . . . . . . . . . . . . . . . . . . . . . . . . . . . . . . . . . . . . . . . . . . . . . . . . . . . . . . .
Fabrikant
Lopital Nederland B.V.
Laarakkerweg 9
5061 JR Nederland
T (0031) 13 52 39 300
F (0031) 13 52 39 301
www.lopital.com
info@lopital.nl
Uitleg symbolen
Lees de gebruikershandleiding voor gebruik.
Gelijkspanning
24V DC.
Let op.
Applied parts.
Klasse 2 EMC.

4 | Gebruikershandleiding | Douchebrancard / Aankleedtafel
Inhoudsopgave
1. Introductie ....................................................................................................5
1.1. Inleiding ........................................................................................................5
1.2. Veiligheid ......................................................................................................6
1.3. Garantie ........................................................................................................8
2. Gebruik ......................................................................................................... 9
2.1. Ingebruikname .............................................................................................9
2.2. Werken met de douchebrancard / aankleedtafel .................................11
3. Bediening ...................................................................................................12
3.1. Wielblokkering (Bij verrijdbare varianten) ..............................................12
3.2. Zijhek ..........................................................................................................12
3.3. Omhoog / omlaag bewegen ...................................................................13
3.4. Waterafvoer (Alleen bij Stylex, Sirocco en Amfora met lekbak) ..........14
3.5. Verwisselen batterij (Alleen bij elektrisch verstelbare varianten) .......14
3.6. Opladen batterij (Alleen bij elektrisch verstelbare varianten) ...............15
4. Veiligheidsfuncties .....................................................................................16
4.1. Noodstop (Alleen bij elektrisch verstelbare varianten) .........................16
4.2. Nooddaal (Alleen bij elektrisch verstelbare varianten) .........................16
5. Reiniging en onderhoud ...........................................................................17
6. Transport en opslag ...................................................................................18
7. Verwijdering onderdelen ..........................................................................19
8. Technische gegevens ................................................................................19
8.1. Opbouw ......................................................................................................19
8.2. Aandrijving .................................................................................................21
8.3. Afmetingen ................................................................................................21
9. Checklist bij technische problemen .........................................................24
10. Relatie met andere ondersteuningen .....................................................25
11. Elektromagnetische compatibiliteit .........................................................26

Douchebrancard / Aankleedtafel | Gebruikershandleiding | 5
Français DeutschEnglish
Nederlands
1. Introductie
1.1. Inleiding
De douchebrancard / aankleedtafel is een hulpmiddel voor het ergonomisch verantwoord
verzorgen en wassen personen met beperking. Voor zowel de persoon met beperking als
de verzorger is het comfort optimaal.
Lopital levert douchebrancards en aankleedtafels in verschillende uitvoeringen. Namelijk
brancards / aankleedtafels die bevestigd zijn aan een muur, verrijdbare douchebrancards
/ aankleedtafels en douchebrancards / aankleedtafels die niet verrijdbaar zijn. Sommige
varianten zijn elektrisch of hydraulisch in hoogte verstelbaar.
De douchebrancard / aankleedtafel is multifunctioneel te gebruiken en sluit aan bij
het gebruik van andere hulpmiddelen zoals bedden, rol- en douchestoelen, tilliften en
glijmaterialen zoals de EasySlide. Dit zijn de essentiële functies van de douchebrancard /
aankleedtafel.
De gemiddelde technische levensduur van de douchebrancard / aankleedtafel is 10 jaar,
mits dagelijks en periodiek onderhoud volgens aangegeven onderhoudsschema wordt
uitgevoerd (Zie: Hoofdstuk 5 Reiniging en onderhoud).
De douchebrancard / aankleedtafel is een klasse 1 product met CE-marketing.
Deze markering is conform de richtlijn 93/42/EEG, respectievelijk de herziene richtlijn
2007/47/EG voor medische hulpmiddelen van 21 maart 2010. De douchebrancard /
aankleedtafel is getest op elektromagnetische straling volgens de norm 60601-1-2.
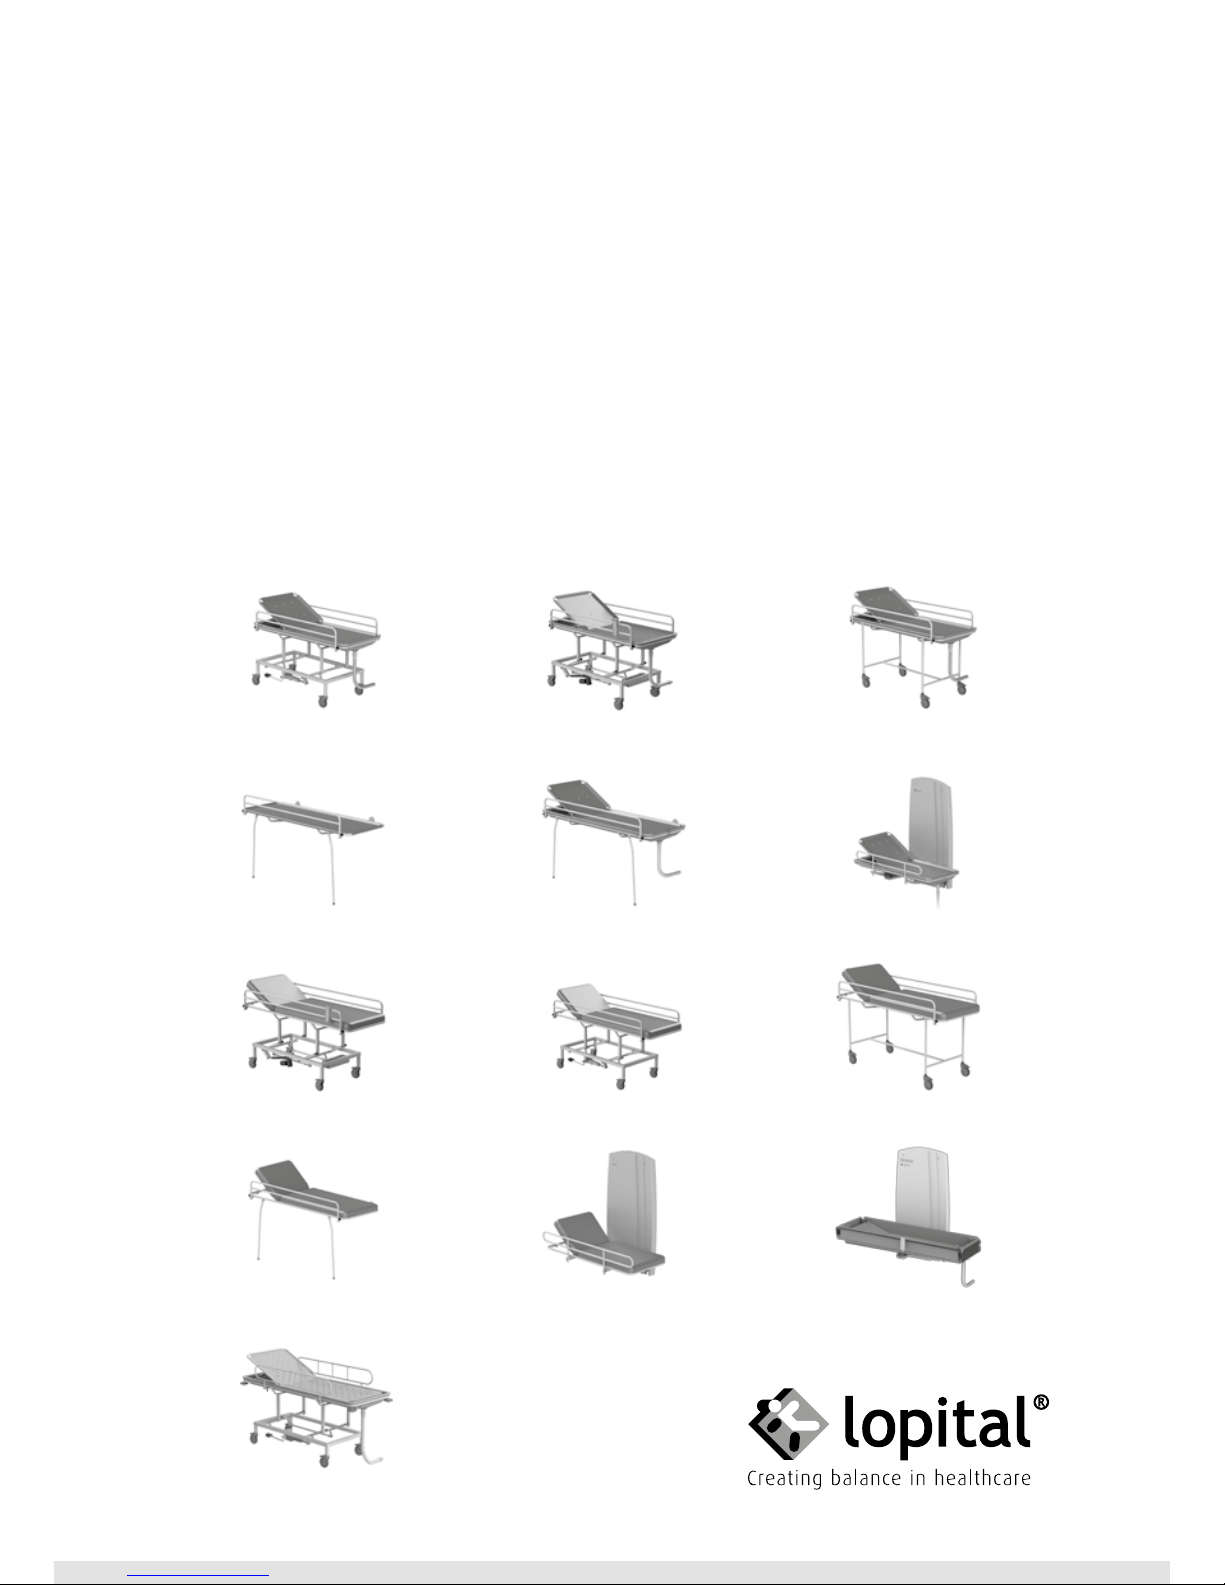
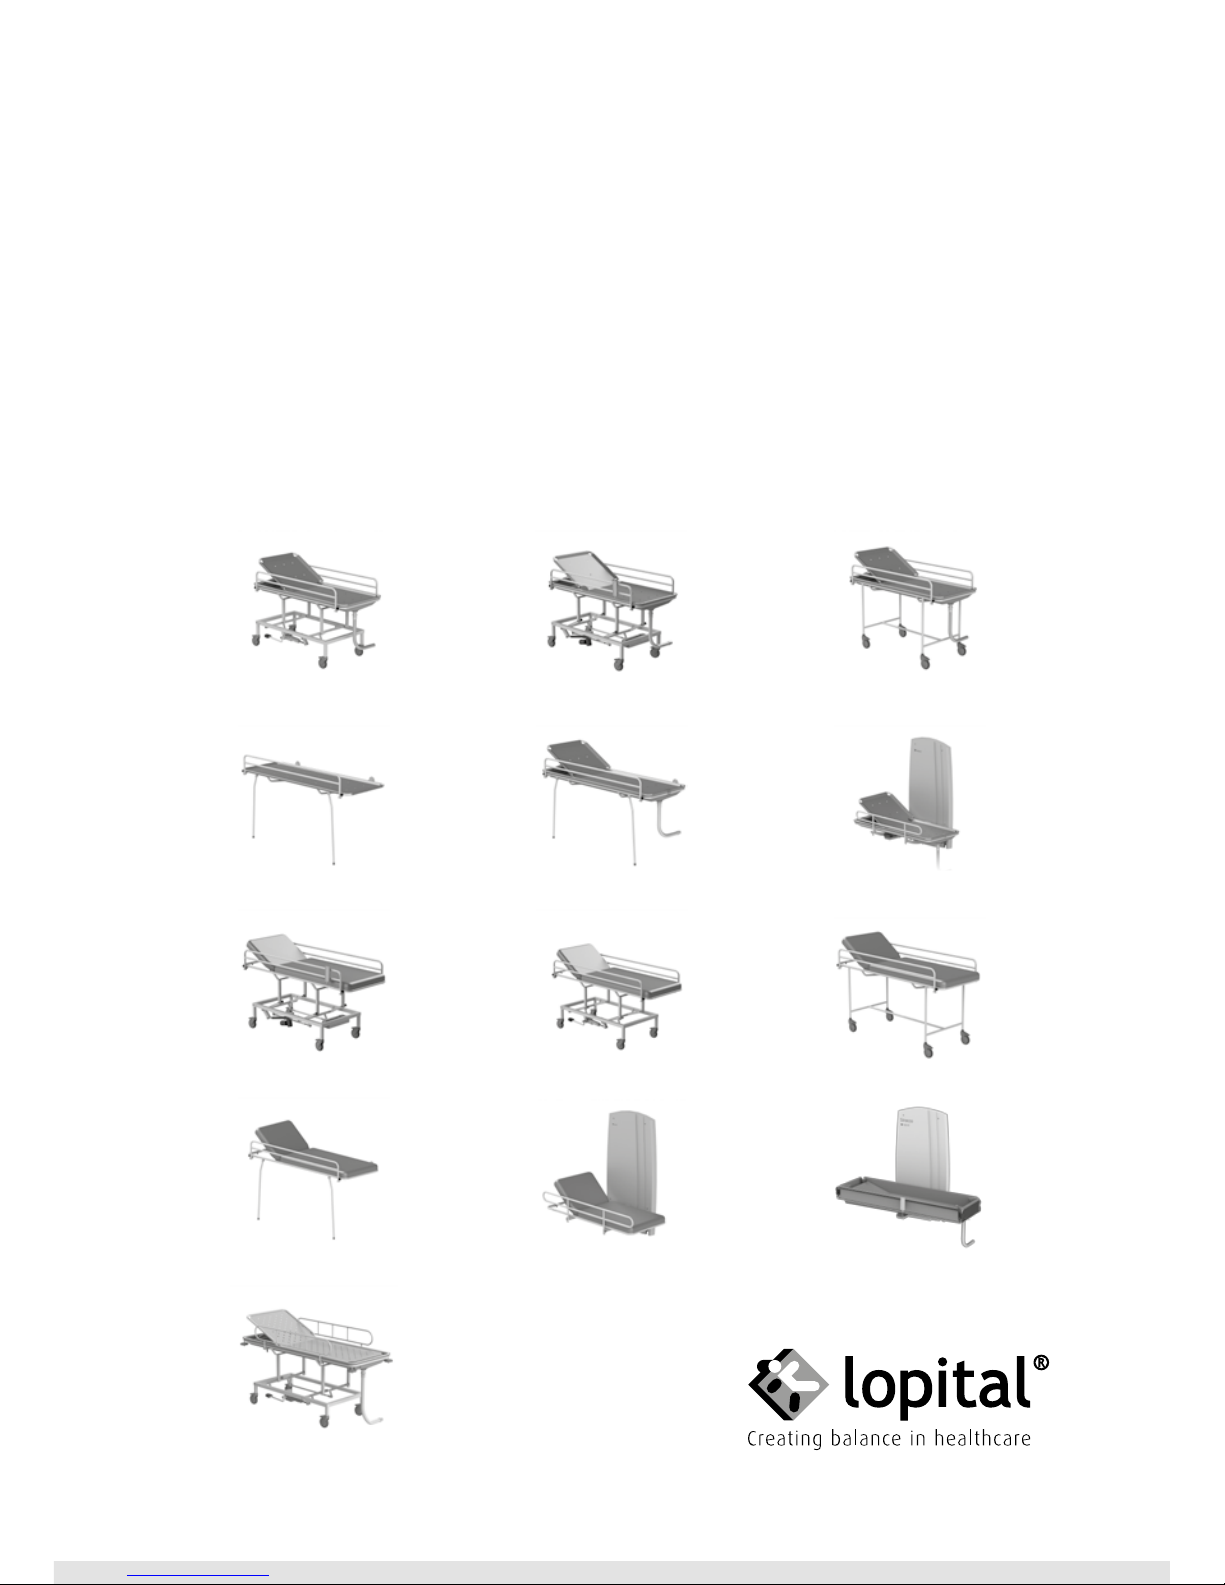
De Amfora is verkrijgbaar in de volgende varianten:
• 6200 4010 – Hydraulisch hoog / laag, ligvlak 160 cm.
• 6200 4015 – Hydraulisch hoog / laag, ligvlak 190 cm.
• 6200 4011 – Elektrisch hoog / laag, ligvlak 160 cm.
• 6200 4016 – Elektrisch hoog / laag, ligvlak 190 cm.
• 6200 4050 – Vaste hoogte, ligvlak 160 cm.
• 6200 4055 – Vaste hoogte, ligvlak 190 cm.
• 6200 5005 – Muurbevestiging, elektrisch hoog / laag, ligvlak 160 cm.
• 6200 5010 – Muurbevestiging, elektrisch hoog / laag, ligvlak 190 cm.
• 6300 4030 – Muurbevestiging, vaste hoogte, zonder lekbak, ligvlak 160 cm.
• 6300 4035 – Muurbevestiging, vaste hoogte, zonder lekbak, ligvlak 190 cm.
• 6300 4040 – Muurbevestiging, vaste hoogte, ligvlak 160 cm.
• 6300 4045 – Muurbevestiging, vaste hoogte, ligvlak 190 cm.
6 | Gebruikershandleiding | Douchebrancard / Aankleedtafel
De Vienna is verkrijgbaar in de volgende varianten:
• 6500 4020 – Hydraulisch hoog / laag, ligvlak 160 cm.
• 6500 4025 – Hydraulisch hoog / laag, ligvlak 190 cm.
• 6500 4021 – Elektrisch hoog / laag, ligvlak 160 cm.
• 6500 4026 – Elektrisch hoog / laag, ligvlak 190 cm.
• 6500 4060 – Vaste hoogte, ligvlak 160 cm.
• 6500 4065 – Vaste hoogte, ligvlak 190 cm.
• 6500 5015 – Muurbevestiging, elektrisch hoog / laag, ligvlak 160 cm.
• 6500 5020 – Muurbevestiging, elektrisch hoog / laag, ligvlak 190 cm.
• 6500 4070 – Muurbevestiging, vaste hoogte, ligvlak 160 cm.
• 6500 4075 – Muurbevestiging, vaste hoogte, ligvlak 190 cm.
De Sirocco is verkrijgbaar in de volgende varianten:
• 6100 2400 – Muurbevestiging links en in hoogte verstelbaar
• 6100 2401 – Muurbevestiging rechts en in hoogte verstelbaar
• 6100 2402 – Muurbevestiging links en vaste hoogte
• 6100 2403 – Muurbevestiging rechts en vaste hoogte
De Stylex is verkrijgbaar in de volgende variant:
• 6100 3070 – Standaard RVS
1.2. Veiligheid
Het niet naleven van onderstaande veiligheidspunten en de verdere
beschrijvingen in deze gebruikershandleiding kan leiden tot gevaarlijke situaties.
Lees deze daarom voor gebruik door.
Gebruik
Voor alle douchebrancards en aankleedtafels geldt:
• Het is niet toegestaan de douchebrancard / aankleedtafel te belasten met een gewicht
van meer dan 135 kg.
• Gebruik alleen originele, door Lopital geleverde onderdelen.
• Gebruik de douchebrancard / aankleedtafel in een schone en nette werkomgeving.
• Het werken met de douchebrancard / aankleedtafel is alleen toegestaan door daartoe
aantoonbaar bevoegde personen.
• Zwembadomstandigheden behoren niet tot ‘normale omstandigheden’ en zullen de
levensduur van bepaalde onderdelen verkorten.
• De douchebrancard / aankleedtafel dient te worden gebruikt / schoongemaakt met
water onder de 43 graden Celsius.

Douchebrancard / Aankleedtafel | Gebruikershandleiding | 7
Français DeutschEnglish
Nederlands
Voor alle verrijdbare douchebrancards en aankleedtafels geldt:
• Zorg ervoor dat bij cliëntentransfers de douchebrancard / aankleedtafel altijd op de
rem staat.
• Instrueer de persoon met beperking voordat u de douchebrancard / aankleedtafel
gaat bewegen.
• Rijd en manoeuvreer alleen met de douchebrancard / aankleedtafel in een lage positie.
• Tijdens het verrijden van de douchebrancard / aankleedtafel, de douchebrancard /
aankleedtafel niet omhoog- of omlaag bewegen.
• Rijd bij voorkeur altijd achterwaarts over obstakels.
• Het is niet toegestaan de douchebrancard / aankleedtafel te gebruiken voor het
verplaat sen van andere middelen dan een persoon.
Voor verstelbare douchebrancards en aankleedtafel geldt:
• Let op obstakels bij het omhoog- en omlaag bewegen.
Elektrisch verstelbaar:
• Het gebruik van onderdelen (laders, kabels, actuatoren, batterijen) die niet geleverd zijn
door Lopital, kunnen resulteren in emissietoename of verminderde immuniteit van
de douchebrancard / aankleedtafel.
• Laad de batterijen op in een goed geventileerde droge ruimte.
• Draagbare en mobiele RF communicatieapparatuur kan medische elektrische apparaten
beïnvloeden.
• Medische elektrische apparaten hebben speciale voorzorgsmaatregelen nodig met
betrekking tot EMC en moeten worden gebruikt volgens de in de gebruikershandleiding
beschreven EMC informatie.
• De douchebrancard / aankleedtafel zal niet gebruikt worden aangrenzend of gestapeld
met andere producten. Mocht het wel noodzakelijk zijn, dan zal er gekeken moeten
worden of de brancard ook in deze configuratie normaal functioneert.
Onderhoud
• Bij beschadigingen van de lader of snoer deze altijd vervangen. (Bij elektrisch verstelbare varianten)
• De douchebrancard / aankleedtafel dient minimaal 1 keer per jaar periodiek
geïnspecteerd en onderhouden te worden.
• Service en onderhoud aan de douchebrancard / aankleedtafel is alleen toegestaan door
daartoe door Lopital geautoriseerde personen.
• Het vervangen van constructieve delen van de douchebrancard / aankleedtafel is alleen
toegestaan door daartoe door Lopital geautoriseerde personen.
8 | Gebruikershandleiding | Douchebrancard / Aankleedtafel
• Indien er vervormingen zijn opgetreden aan de douchebrancard / aankleedtafel door
foutief gebruik, transport, een ongeluk of door ondeskundig onderhoud, dan mag deze
niet meer gebruikt worden en dient er contact opgenomen te worden met de leverancier.
In geval van storingen dient u contact op te nemen met Lopital of met uw lokale
leverancier. E-mail: service@lopital.nl
De douchebrancard / aankleedtafel dient uitsluitend te worden bediend door
voldoende geïnstrueerd en deskundig personeel welke bovendien over ervaring
beschikken om met de gebruikersdoelgroep te werken.
De douchebrancard / aankleedtafel dient te worden gebruikt in een klinische
omgeving.
Het aanbrengen van wijzigingen aan de constructie kan de veiligheid van de
douchebrancard / aankleedtafel aantasten. Bovendien vervallen hiermee de
aansprakelijkheid en garantievoorwaarden van Lopital. De douchebrancard /
aankleedtafel voldoet hierdoor niet meer aan de richtlijn voor medische
hulpmiddelen.
1.3. Garantie
Producten van Lopital worden 2 jaar gegarandeerd op constructie- en / of materiaalfouten.
Bij afwijkende termijnen staat de exacte garantieperiode vermeld op uw factuur welke
tevens dient als garantiebewijs.
Op onderdelen die aan slijtage onderhevig zijn (zoals batterijen, handbediening en kabels)
wordt geen garantie gegeven, tenzij sprake is van constructie- en / of materiaalfouten.
Douchebrancard / Aankleedtafel | Gebruikershandleiding | 9
Français DeutschEnglish
Nederlands
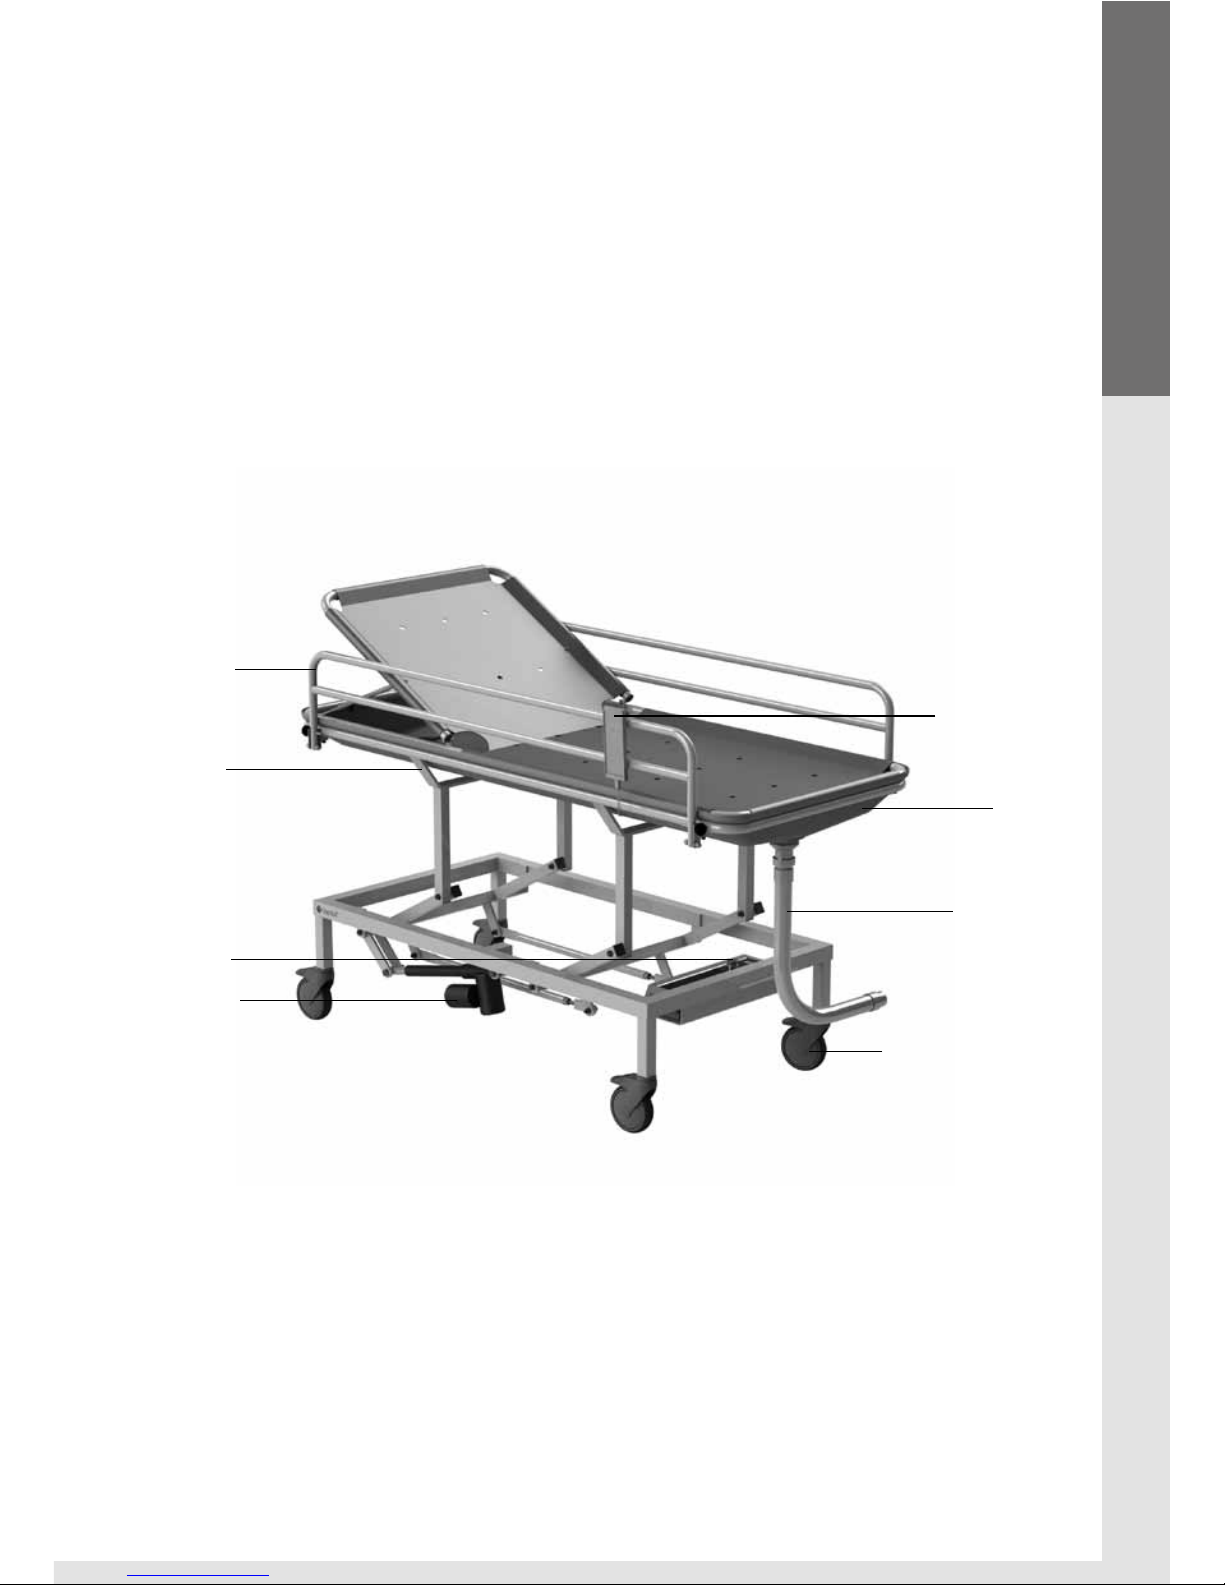
2. Gebruik
2.1. Ingebruikname
Voordat u de douchebrancard / aankleedtafel in gebruik neemt, controleert u of
onderstaande onderdelen aanwezig zijn. Deze onderdelen kunnen worden vervangen
bij schade door bevoegde personen. Deze onderdelen zijn de applied parts van de
douchebrancard / aankleedtafel. Deze onderdelen kunnen tijdens het gebruik van de
douchebrancard / aankleedtafel in contact komen met de gebruiker(s).
Handbediening
Lekbak
Afvoerslang
Zwenkwiel Ø 12,5 cm
Dubbel geremd
Neerklapbaar
zijhek
Frame
Batterij
Actuator
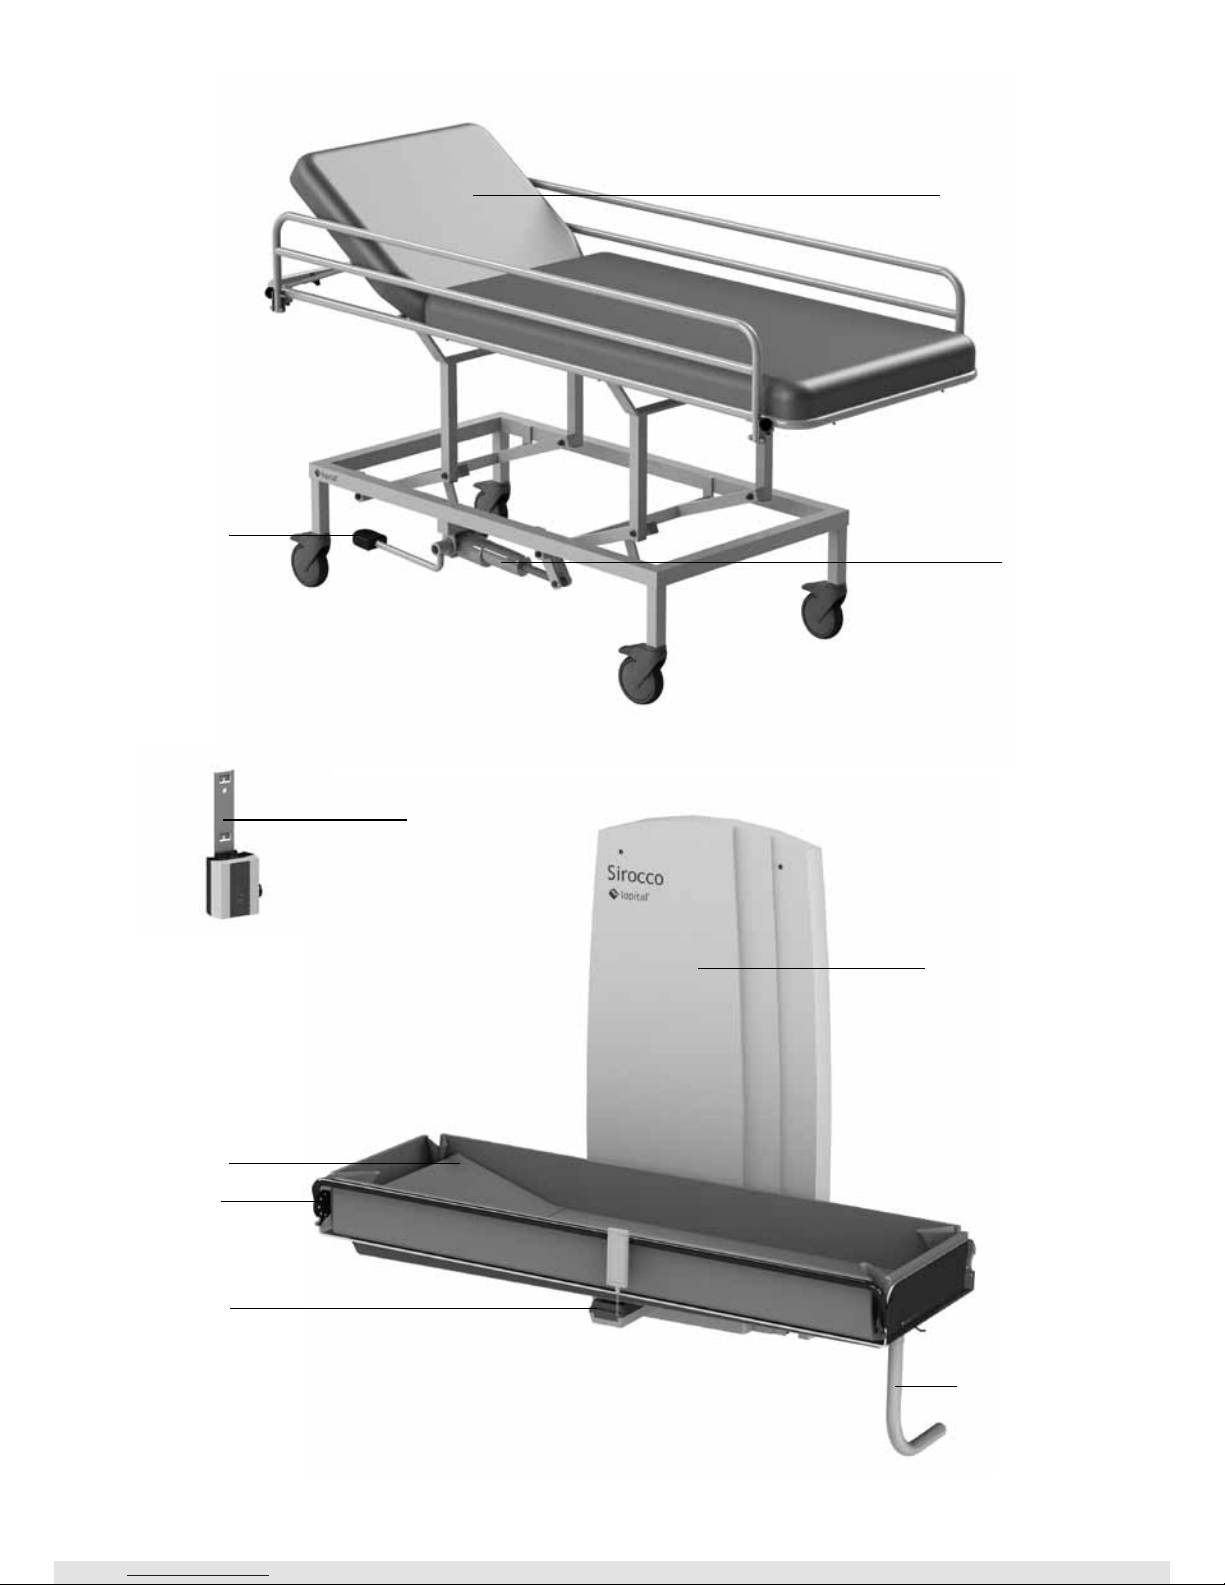
10 | Gebruikershandleiding | Douchebrancard / Aankleedtafel
Ligvlak Kussen
(2-delig)
Pomp
Afvoerslang
Pedaal
Matras
Muurbevestiging
Oplaadpunt
Zijhek
Batterij

Douchebrancard / Aankleedtafel | Gebruikershandleiding | 11
Français DeutschEnglish
Nederlands
2.2. Werken met de douchebrancard / aankleedtafel
Stap 1 (Alleen bij verrijdbare varianten)
Zet bij personentransfers de douchebrancard / aankleedtafel altijd op de rem
(Zie paragraaf 3.1. wielblokkering).
Transfer bij bed
Stap 2
Plaats de douchebrancard / aankleedtafel naast het bed met het hoofdeinde aan de
hoofdzijde van de persoon met beperking.
Stap 3
Laat het zijhek van de douchebrancard / aankleedtafel zakken (Zie paragraaf 3.2. Zijhek).
Stap 4 (Alleen bij verstelbare varianten)
Breng het ligvlak van de douchebrancard / aankleedtafel net boven het bedmatras en
klap het zijhek naar beneden (Bij verstelbare douchebrancard / aankleedtafel).
Stap 5
Schuif de douchebrancard / aankleedtafel tussen het hoofd- en voeteneinde, zodat deze
zo ver mogelijk over het bed heen steekt.
Stap 6 (Alleen bij verrijdbare varianten)
Blokkeer de wielen van de douchebrancard / aankleedtafel
(Zie paragraaf 3.1. Wielblokkering).
Stap 7
Ga aan het andere bedeinde staan en plaats de EasySlide tussen de persoon met
beperking en de douchebrancard / aankleedtafel.
Stap 8
Schuif de persoon met beperking met behulp van de EasySlide van het bed naar de
douchebrancard / aankleedtafel.
Stap 9 (Alleen bij verstelbare varianten)
Zet het ligvlak van de douchebrancard / aankleedtafel enkele centimeters hoger en sluit
het zijhek.
12 | Gebruikershandleiding | Douchebrancard / Aankleedtafel
Stap 10 (Alleen bij verrijdbare varianten)
Haal de wielen van de douchebrancard / aankleedtafel van de rem en haal de easy slide
weg (Zie paragraaf 3.1. Wielblokkering).
3. Bediening
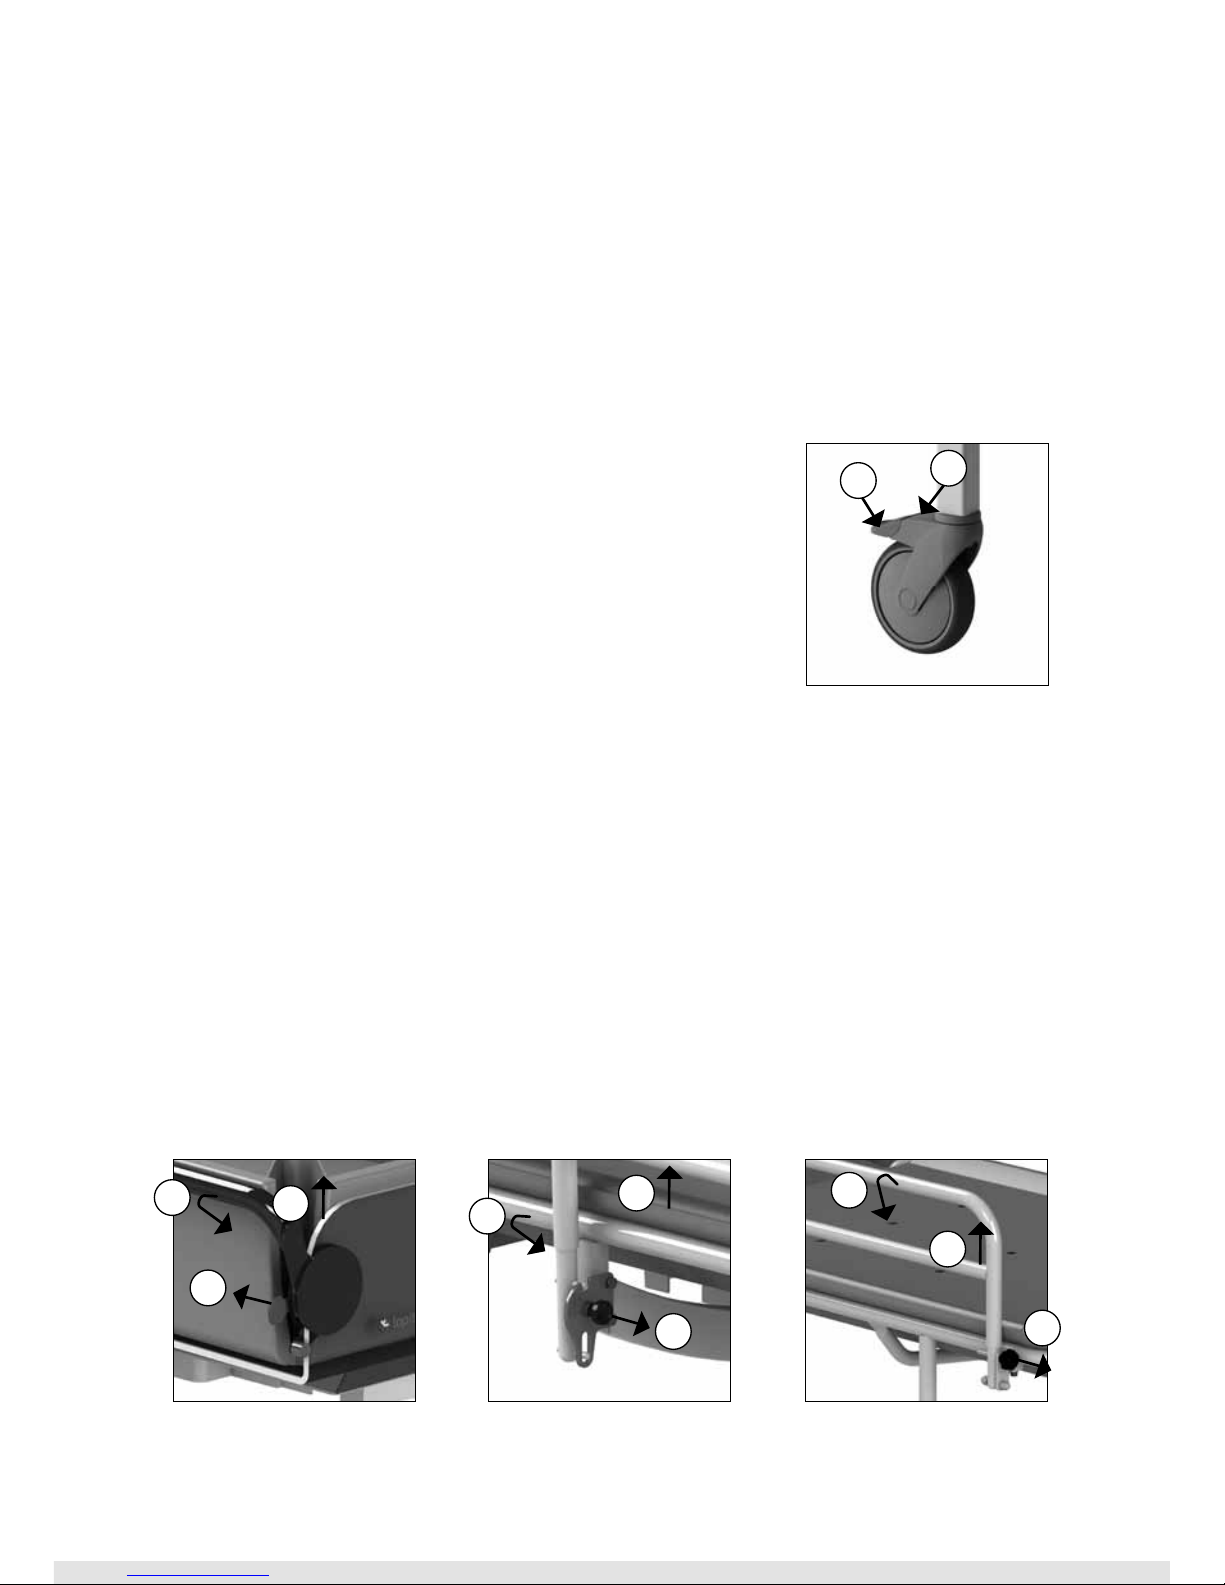
3.1. Wielblokkering
(Bij verrijdbare varianten)
• De douchebrancard / aankleedtafel kan op de rem worden
gezet door de blauwe lip (1) op het wiel, naar beneden te
trappen (Zie figuur 1).
• Om de douchebrancard / aankleedtafel van de rem te
halen moet dezelfde lip van het wiel omhoog bewogen
worden, door aan de bovenkant van de lip te trappen (2)
(Zie figuur 1).
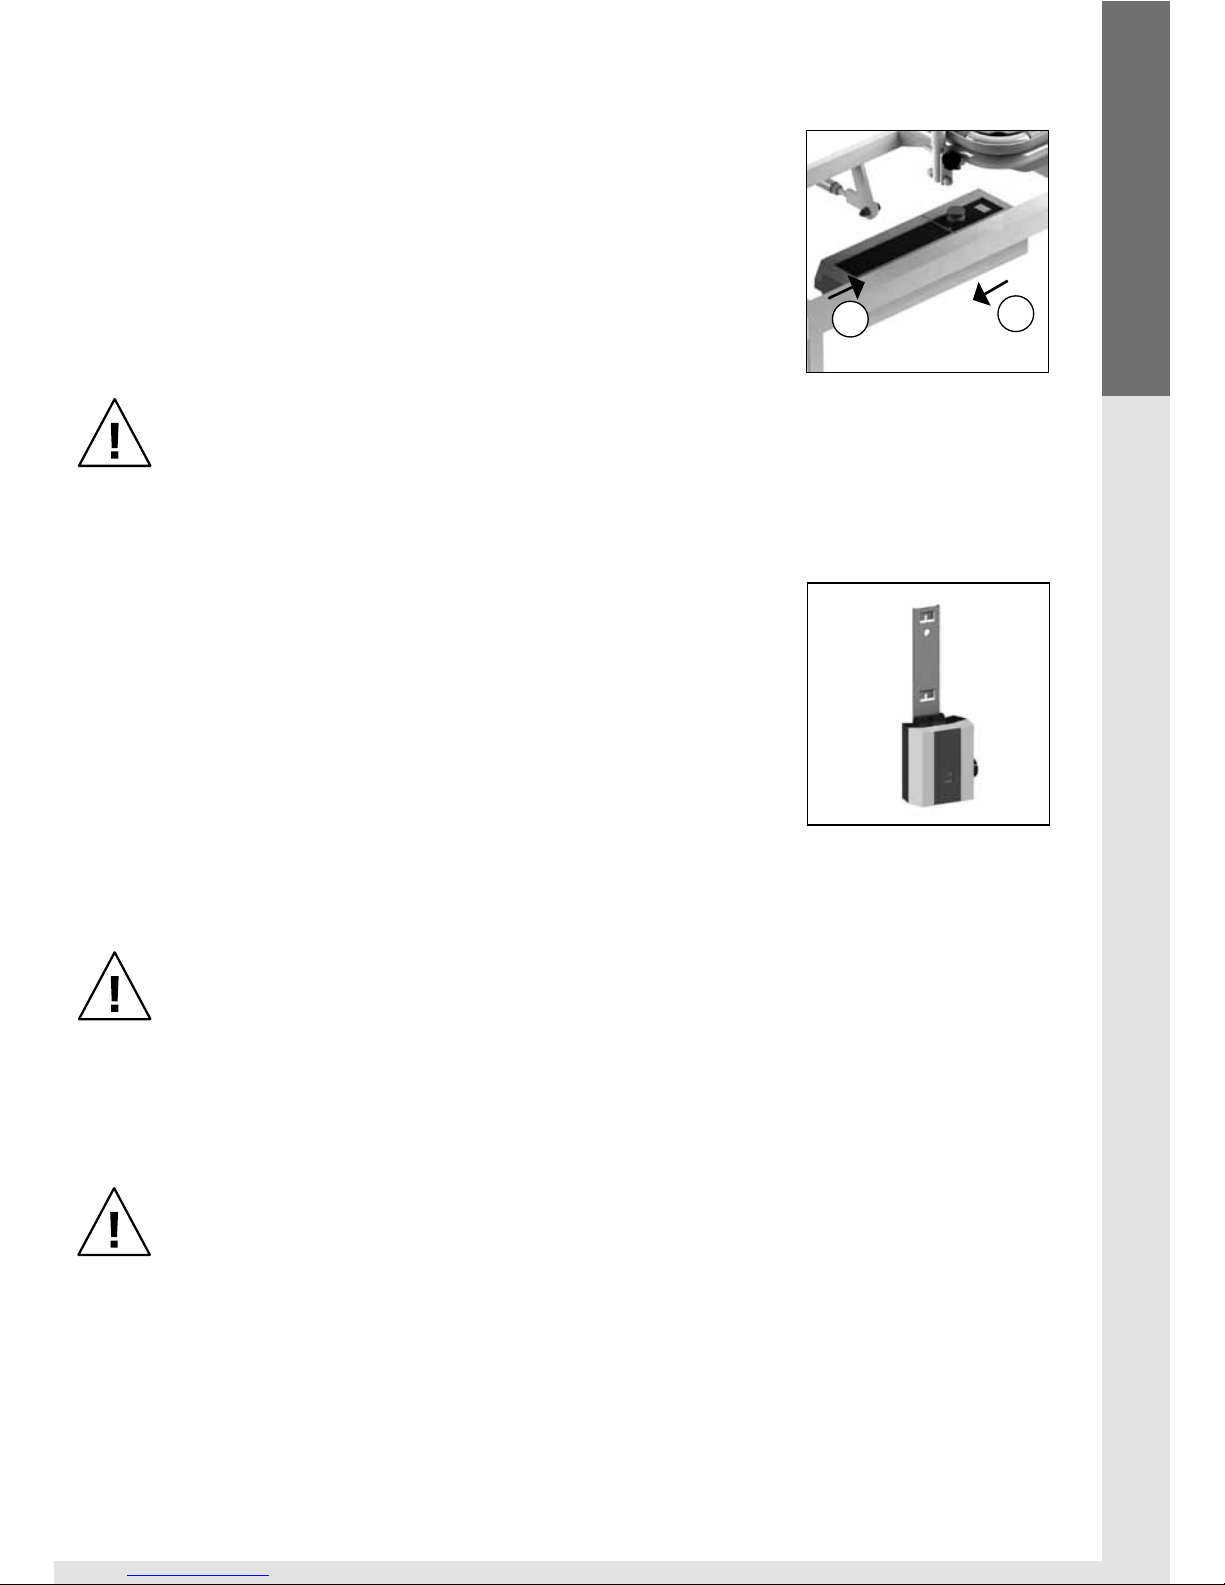
3.2. Zijhek
• De douchebrancard / aankleedtafel is voorzien van stalen scharnierende zijhekken.
Bij de Stylex zijn het RVS zijhekken.
• Het zijhek is uitgevoerd met een hekbeveiliging, zodat de persoon met beperking niet
zelfstandig het zijhek kan lichten.
• Voordat het zijhek omlaag geklapt kan worden, dient de hekbeveiliging ontgrendeld te
worden.
• Muurbrancard / aankleedtafel: Ontgrendel de beveiliging door het uitstekende lipje /
knop (1) met één hand naar buiten te trekken en met de andere hand het zijhek in het
midden op te lichten (Zie figuur 2 en 3).
Verrijdbare brancard / aankleedtafel: Ontgrendel de beveiliging door de bouten aan
beide kanten van het zijhek eruit te halen (1) (Zie figuur 4).
Figuur 1: Wielblokkering
1
2
Figuur 2: Zijhek Sirocco
Figuur 3: Zijhek Amfora/Vienna
muur
Figuur 4: Zijhek verrijdbare
brancards/aankleedtafels
1
1
1
2
2
2
3
3
3
Douchebrancard / Aankleedtafel | Gebruikershandleiding | 13
Français DeutschEnglish
Nederlands
• Draai het ontgrendelde zijhek naar buiten (3).
• Draai het zijhek weer naar boven om het zijhek op te klappen. Het zijhek vergrendelt bij
de verrijdbare douchebrancards / aankleedtafels door de bouten op de juiste plaats te
bevestigen. Bij de muurbrancards / aankleedtafels vergrendelt het zijhek automatisch.
• Sirocco: Zorg ervoor dat de hoekflappen naar binnen vallen zodat ze niet bekneld raken
in de vergrendeling van het hek.
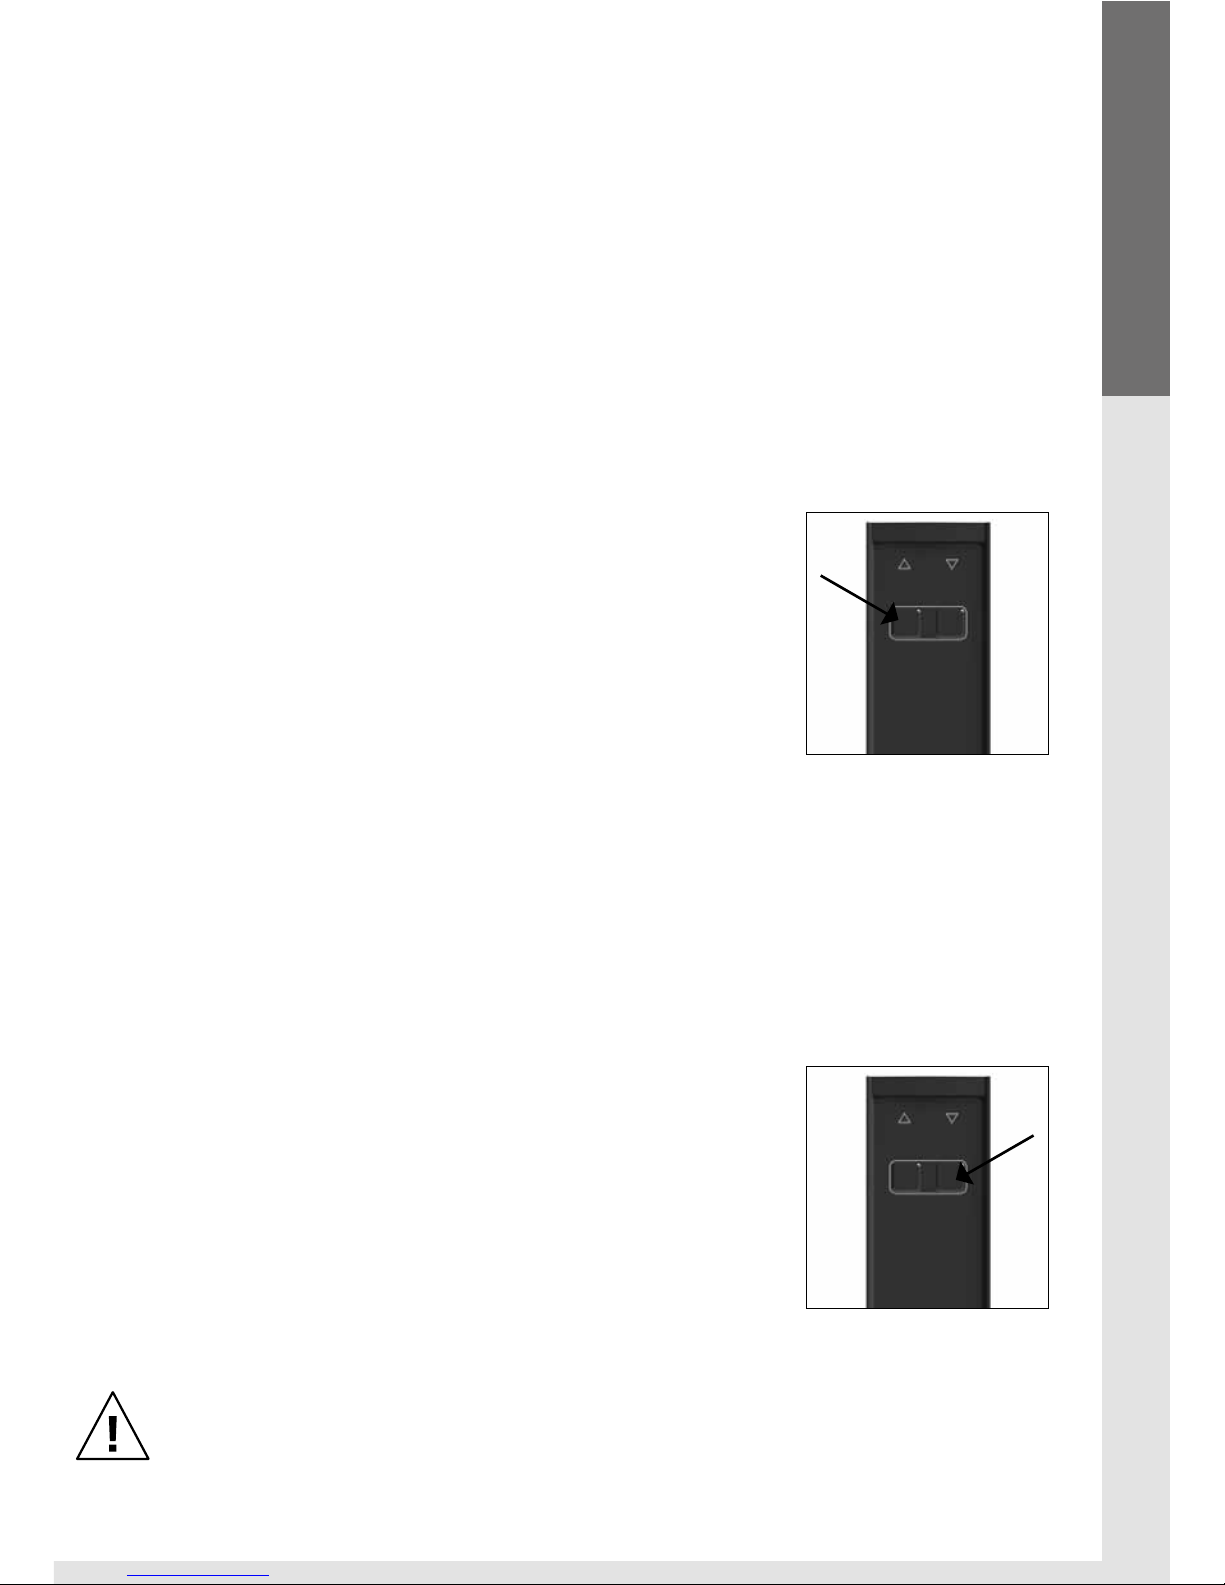
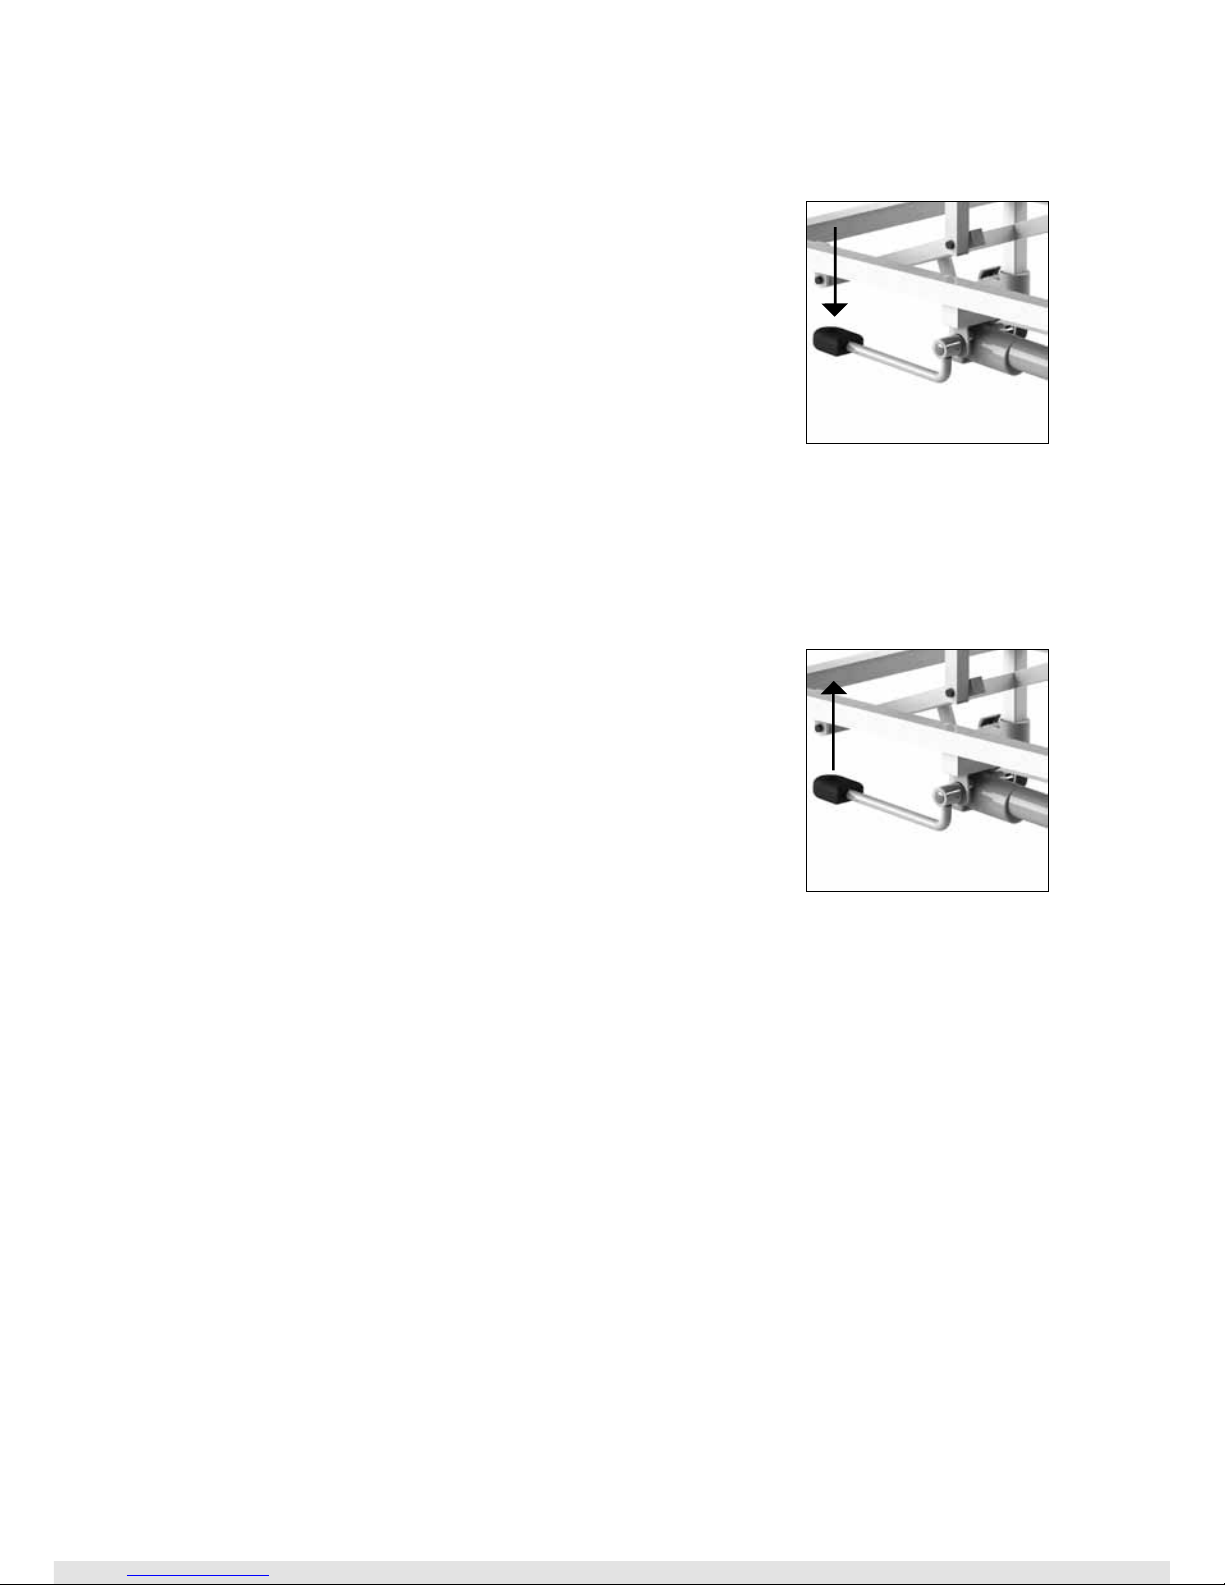
3.3. Omhoog / omlaag bewegen
Elektrisch verstelbare varianten
Omhoog bewegen
• Als de persoon met beperking op de douchebrancard /
aankleedtafel ligt, eerst de wielen op de rem zetten (indien
het een verrijdbare brancard / aankleedtafel is) en dan pas
de douchebrancard / aankleedtafel omhoog bewegen.
• De douchebrancard / aankleedtafel wordt omhoog bewogen door de bedieningsknop met de pijl omhoog in te
drukken. De douchebrancard zal dan gelijkmatig omhoog
bewegen (Zie figuur 5).
• U kunt de beweging op iedere gewenste hoogte laten stoppen door de knop los te
laten.
• Houd tijdens de omhooggaande beweging contact met de persoon met beperking.
• Wanneer de afstandsbediening niet gebruikt wordt kan deze aan een zijhek gehangen.
• Zorg ervoor dat het krulsnoer van de bediening niet bekneld raakt.
Omlaag bewegen
• De douchebrancard / aankleedtafel wordt omlaag bewogen
door de bedieningsknop met de pijl omlaag in te drukken.
De douchebrancard / aankleedtafel zal dan gelijkmatig
dalen (Zie figuur 6).
• U kunt de beweging op iedere gewenste hoogte laten
stoppen door de knop los te laten.
• Houd tijdens de omlaaggaande beweging contact met de
persoon met beperking.
Controleer voordat u de douchebrancard / aankleedtafel in hoogte gaat verplaatsen eerst of er geen personen of objecten zich onder de douchebrancard /
aankleedtafel bevinden.
Figuur 5: Omhoog bewegen
Figuur 6: Omlaag bewegen
14 | Gebruikershandleiding | Douchebrancard / Aankleedtafel
Hydraulisch verstelbare varianten
Omhoog bewegen
• Als de persoon met beperking op de douchebrancard ligt,
eerst de wielen op de rem zetten en dan pas de douchebrancard / aankleedtafel omhoog bewegen.
• De douchebrancard / aankleedtafel beweegt omhoog
door rustig en gelijkmatig het voetpedaal in te trappen
(Zie figuur 7).
• De verzorger gaat tijdens de trapbeweging met het
bovenlichaam in de lengterichting van de douchebrancard
/ aankleedtafel staan, zodat de verzorger het bovenlichaam niet kan verdraaien ten
opzichte van de voeten.
• Houd tijdens de omhooggaande beweging contact met de persoon met beperking.
Omlaag bewegen
• De douchebrancard / aankleedtafel wordt omlaag
bewogen door het voetpedaal naar boven te bewegen
(Zie figuur 8).
• De douchebrancard / aankleedtafel zakt onder invloed van
de zwaartekracht. De daalsnelheid is te doseren door het
pedaal licht ingedrukt te houden.
• Houd tijdens de omlaaggaande beweging contact met de
persoon met beperking
3.4. Waterafvoer
(Alleen bij Stylex, Sirocco en Amfora met lekbak)
• Via de afvoerslang wordt het water uit de douchebrancard naar een afvoer geleid.
• Haal hiervoor de slang van de haak en leid deze naar een zo laag mogelijk gelegen
afvoerpunt.
• Hang de slang tijdens transport altijd aan de haak, i.v.m. lekken en nadruppen.
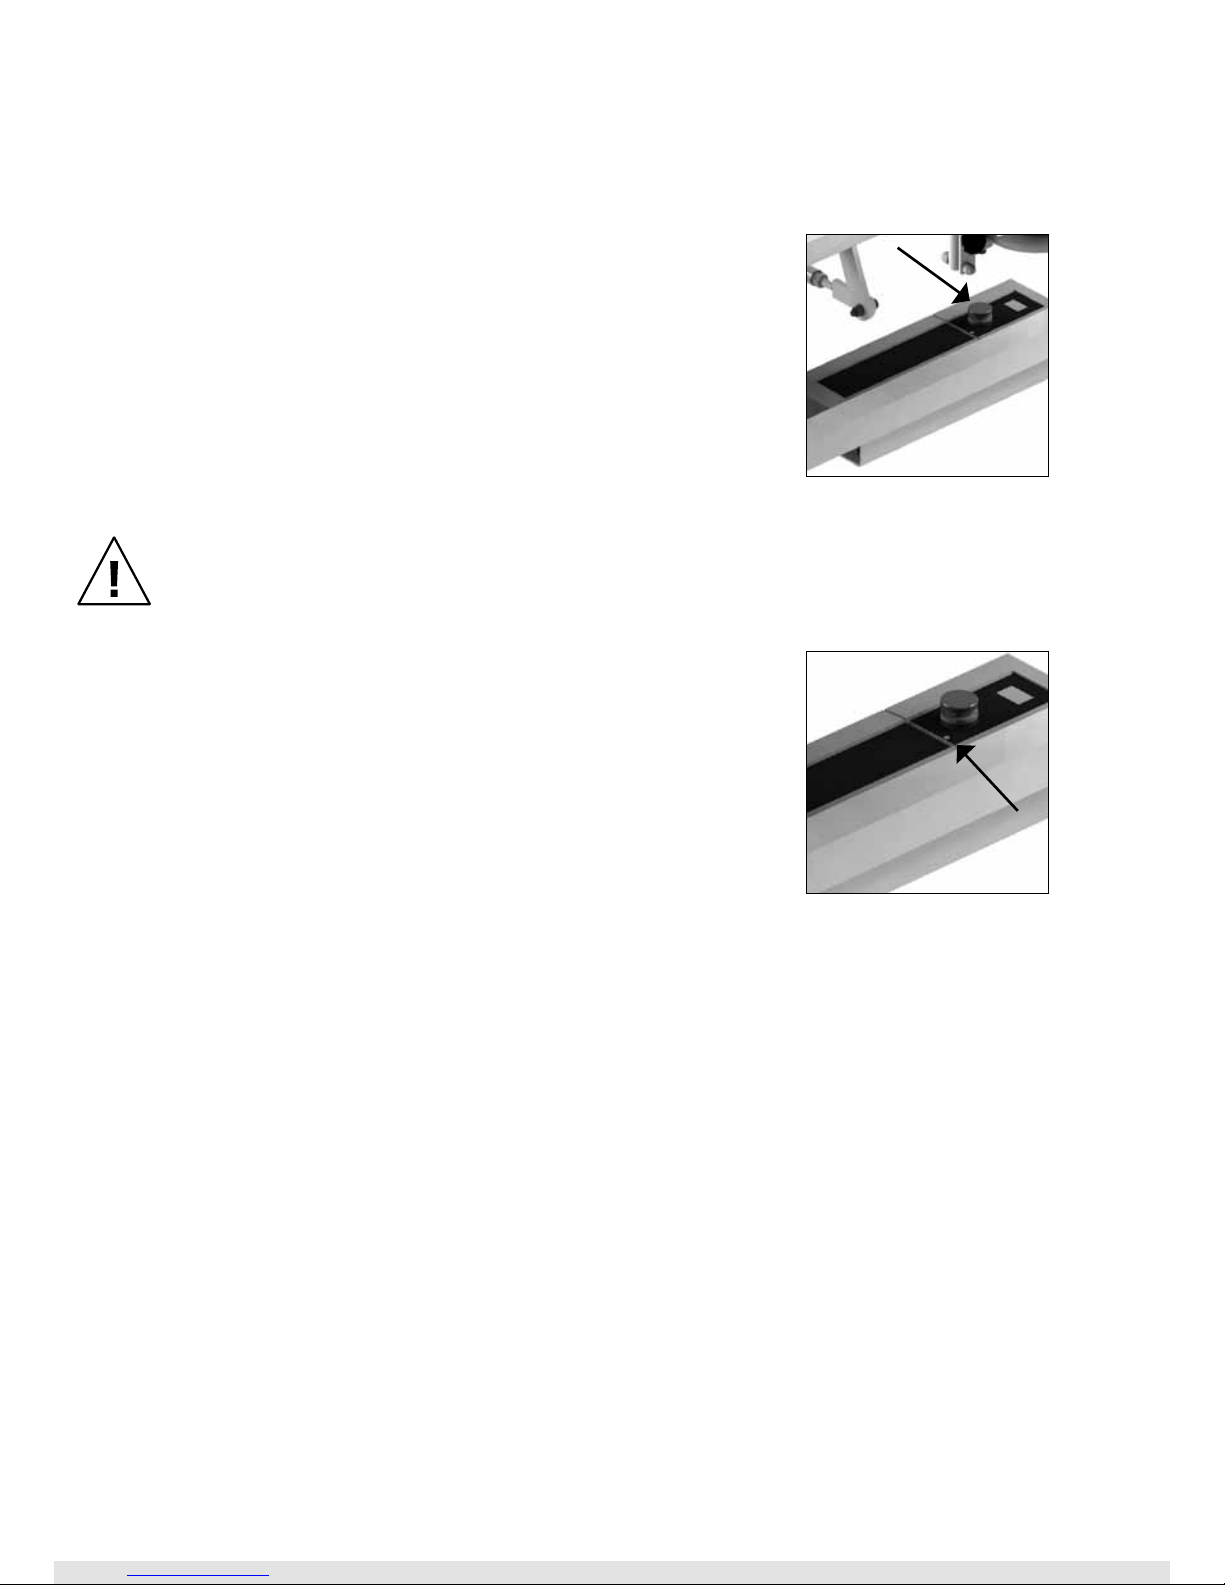
3.5. Verwisselen batterij
(Alleen bij elektrisch verstelbare varianten)
• Als er een akoestisch signaal te horen is dient de batterij verwisseld te worden.
• De batterij is bevestigd op het onderframe van de douchebrancard / aankleedtafel
tegen de besturingselektronica. Bij de muurbrancards / aankleedtafels is de batterij
bevestigd onder het ligvlak.
Figuur 7: Omhoog bewegen
Figuur 8: Omlaag bewegen
Douchebrancard / Aankleedtafel | Gebruikershandleiding | 15
Français DeutschEnglish
Nederlands
• Om de batterij te verwijderen dient met één hand de
ontgrendelingspal (1) op de batterij ontgrendeld te worden,
waarna de batterij naar rechts wordt geschoven (2)
(Zie figuur 9).
• Voor het plaatsen van de volgeladen batterij dient de batterij eerst tegen de behuizing van elektronica te worden
geplaatst om deze vervolgens in de houder te klikken.
Zorg ervoor dat de douchebrancard / aankleedtafel
altijd klaar is voor gebruik door een volgeladen reserve batterij gereed te hebben.
3.6. Opladen batterij
(Alleen bij elektrisch verstelbare varianten)
• Plaats de lege batterij op de batterijlader (Zie figuur 10).
• Een groene lamp geeft aan dat de batterijlader ingeschakeld is. Een oranje lamp geeft aan dat de batterij opgeladen
wordt. Deze lamp gaat uit als de batterij vol is.
• De geladen batterij kan op de batterijlader blijven staan
zonder dat er schade ontstaat.
• Om de batterij te verwijderen dient met één hand de ontgrendelingspal op de batterij ontgrendeld te worden terwijl
met de andere hand de batterij ondersteund wordt.
Gebruik alleen de batterijen die bij de douchebrancard / aankleedtafel zijn
geleverd. Laad batterijen die niet gebruikt worden om het half jaar op om
beschadiging te voorkomen. Door de batterij op te laden voordat deze helemaal
leeg is wordt de levensduur verlengd.
De oplader die gebruikt dient te worden voor de douchebrancard / aankleedtafel is de
‘Linak External charger CHJ2’.
Laad de batterijen op in een goed geventileerde droge ruimte.
Voor instructie video’s ga naar www.lopital.nl of kijk op www.youtube.com/user/LopitalNL
Figuur 9: Batterij
1
2
Figuur 10: Batterijlader
16 | Gebruikershandleiding | Douchebrancard / Aankleedtafel
4. Veiligheidsfuncties
4.1. Noodstop
(Alleen bij elektrisch verstelbare varianten)
In het midden van het onderstel bevindt zich de noodstop.
Bedien de noodstop bij een noodgeval waarbij direct de
stijgende of dalende beweging gestopt moet worden.
Nadat de noodstop is ingedrukt werkt geen enkele elektrische
bediening meer. Wanneer de situatie weer stabiel is, kan de
bediening weer hervat worden. Draai de noodstop een
kwartslag rechtsom, zodat deze weer ontgrendeld wordt.
Controleer eerst of het gevaar is geweken of het
probleem is verholpen, alvorens de noodstop te resetten.
4.2. Nooddaal
(Alleen bij elektrisch verstelbare varianten)
Als de bediening niet meer functioneert en de douchebrancard
/ aankleedtafel in een hoge positie staat kan de douchebrancard / aankleedtafel naar beneden worden gebracht door
middel van de nooddaalknop. De nooddaalknop is links naast
de noodstop te vinden (Zie figuur 12).
Controleer eerst of de noodknop niet is ingedrukt!
- Haal de stekker van de handbediening los.
- Druk de nooddaalknop in (links naast de noodstop).
De douchebrancard / aankleedtafel zakt nu naar de laagste positie (let op dat er zich
geen personen of objecten onder de brancard bevinden).
Haal de persoon met beperking uit de douchebrancard / aankleedtafel en gebruik de
douchebrancard / aankleedtafel niet meer totdat deze gerepareerd is. Zet de douchebrancard / aankleedtafel op een veilige plaats en geef aan dat de douchebrancard /
aankleedtafel defect is.
Neem contact op met de technische dienst of de service afdeling van Lopital.
E-mail: service@lopital.nl
Figuur 11: Noodstop
Figuur 12: Nooddaalknop

Douchebrancard / Aankleedtafel | Gebruikershandleiding | 17
Français DeutschEnglish
Nederlands
5. Reiniging en onderhoud
De douchebrancard / aankleedtafel dient na ieder gebruik gereinigd te worden met water
en normale huishoudelijke schoonmaakmiddelen. Verwijder de overtollige zeepresten.
Gebruik hiervoor geen schuurmiddel of andere agressieve oplosmiddelen (zoals chloor).
Uit praktische ervaringen is gebleken dat normale huishoudelijke schoonmaakmiddelen
met geringe hoeveelheid alcohol (max. 5%) hiervoor het meest geschikt zijn. Voor het
desinfecteren wordt (op basis van lange termijn testen) het middel Neoquat combi
®
aanbevolen. Voor optimaal en efficiënt reinigen van de matras en het ligvlak, kan de
matras opgetild en weggenomen worden. Maak de onderplaat waar de matras op ligt
droog.
Controleer regelmatig de wielen op haren en stof en verwijder deze waar nodig.
Onderhoud en reparatie aan de douchebrancard / aankleedtafel zijn alleen uit te voeren
door geautoriseerd personeel.
18 | Gebruikershandleiding | Douchebrancard / Aankleedtafel
Onderhoudsschema
Na ieder gebruik
• Douchebrancard / aankleedtafel reinigen met water en
normale huishoudelijke schoonmaakmiddelen.
Dagelijks
• Het matras / de bespanning reinigen en desinfecteren.
Wekelijks
• Frame reinigen.
• Wielen controleren op haren, stof en zeepresten en
verwijderen waar nodig.
• Controleren of de werking van de douchebrancard /
aankleedtafel nog goed is.
Jaarlijks
• Volgens de richtlijn medische hulpmiddelen moet een
douchebrancard / aankleedtafel volgens de richtlijnen van
de producent onderhouden worden. Bij voorkeur dient
dit te worden gedaan door Lopital of een ander daartoe
bevoegde instantie. Lopital biedt de mogelijkheid om de
douchebrancard / aankleedtafel 1 keer per jaar grondig
te laten inspecteren onderhouden, middels het Periodiek
Preventief Onderhoud.
Voor meer informatie over het onderhoudscontract kunt u
contact opnemen met Lopital (service@lopital.nl) of met
uw leverancier.
6. Transport en opslag
Tijdens transport en opslag moeten de omgevingscondities het liefst gematigd blijven.
Dit wil zeggen dat de temperatuur het best tussen de -40 en +55 graden Celsius kan zijn,
en dat de vochtigheidsgraad zo laag mogelijk dient te worden gehouden. Trillingen tijdens
transport moeten tot een minimum worden beperkt om schade aan scharnierverbindingen van de brancard te voorkomen.
Douchebrancard / Aankleedtafel | Gebruikershandleiding | 19
Français DeutschEnglish
Nederlands
7. Verwijdering onderdelen
Alle onderdelen die vervangen of verwijdert worden, kunnen terug worden gestuurd
naar Lopital BV. Ook is het mogelijk deze onderdelen aan de monteur aan te bieden voor
vernietiging. Wij zullen ervoor zorgen dat alle onderdelen op een milieuvriendelijke wijze
worden verwerkt.
Wanneer u zelf zorgt voor de vernietiging van het product, dient u er rekening mee te
houden dat batterijen en laders moeten worden afgevoerd als klein chemisch afval.
8. Technische gegevens
Deze douchebrancard / aankleedtafel behoort tot de categorie “BF”
Deze douchebrancard / aankleedtafel is een klasse 2 EMC product.
De douchebrancard / aankleedtafel is spatwater dicht, dit houdt in dat de douchebrancard / aankleedtafel onder de douche gezet kan worden. Dit wordt aangegeven met de
aanduiding IPX4.
8.1. Opbouw
Amfora & Vienna verrijdbaar:
Onderstel staal + 2-laags poedercoating
Bovenframe staal + 2-laags poedercoating
Zijhekken staal + 2-laags poedercoating
Scharnierpunten RVS + 2-laags poedercoating
Stylex:
Onderstel RVS + 2-laags poedercoating
Bovenframe RVS + 2-laags poedercoating
Zijhekken RVS + 2-laags poedercoating
Scharnierpunten RVS + 2-laags poedercoating

20 | Gebruikershandleiding | Douchebrancard / Aankleedtafel
Muurbrancards / aankleedtafels:
Frame Staal + 2-laags poedercoating
Zijhekken Staal + 2-laags poedercoating
Scharnierpunten RVS + 2-laags poedercoating
Verrijdbare brancards / aankleedtafels:
Wielen Ø 12,5 cm, dubbel blokkeerbaar
Bevestigingsmiddelen RVS + verzinkt staal
Eigen gewicht
Amfora
6200 4010/15 57 / 60 kg
6200 4011/16 60 / 60 kg
6200 4050/55 34 / 37 kg
6200 5005/10 85 / 85 kg
6300 4030/35 18 / 18 kg
6300 4040/45 20 / 20 kg
Vienna
6500 4020/25 53 / 56 kg
6500 4021/26 57 / 60 kg
6500 4060/65 35 / 37 kg
6500 5015/20 75 / 75 kg
6500 4070/75 23 / 23 kg
Sirocco
6100 2400 80 kg
6100 2401 80 kg
6100 2402 40 kg
6100 2403 40 kg
Stylex
6100 3070 50 kg
Maximale belasting
135 kg

Douchebrancard / Aankleedtafel | Gebruikershandleiding | 21
Français DeutschEnglish
Nederlands
8.2. Aandrijving
(Elektrische varianten)
Hoog-laag aandrijving Actuator 24 V DC
Controlbox 24 VDC, max. 250W
Batterij 24 V, max. 250 W
Batterijlader 230 V AC, aansluitwaarde 100 W, wandbevestiging
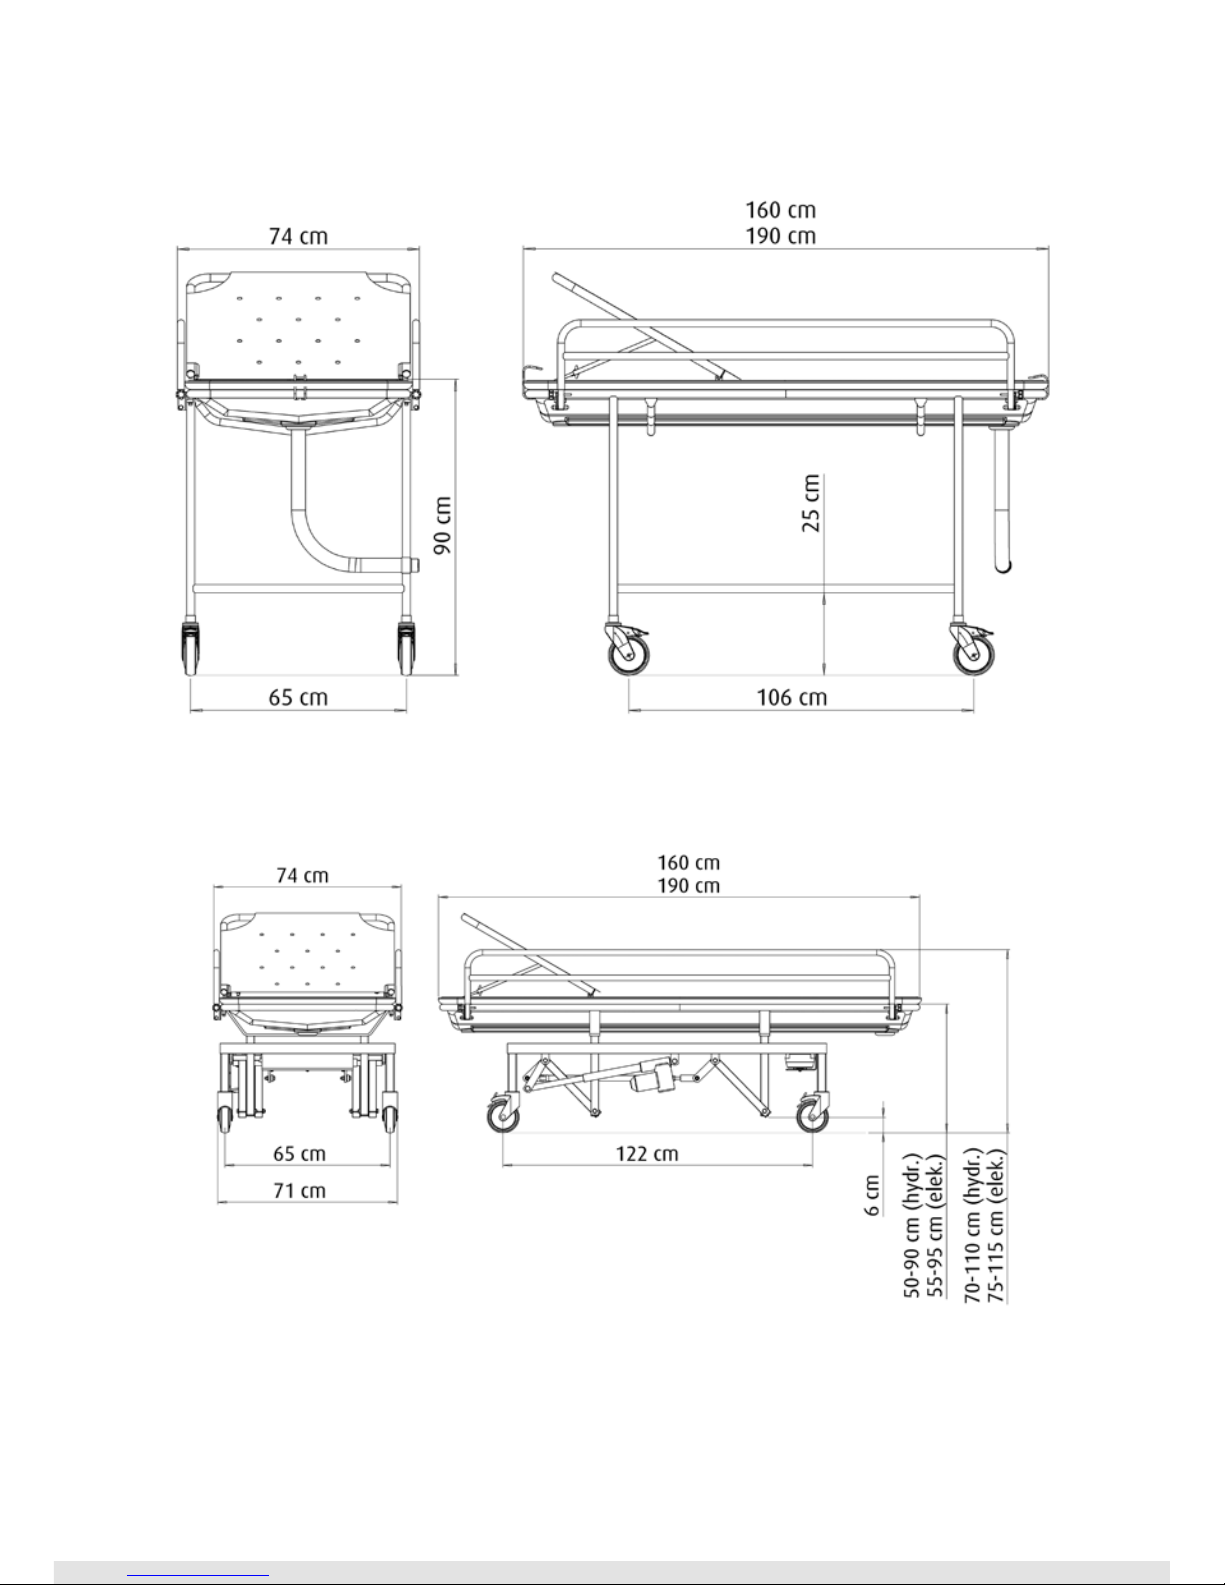
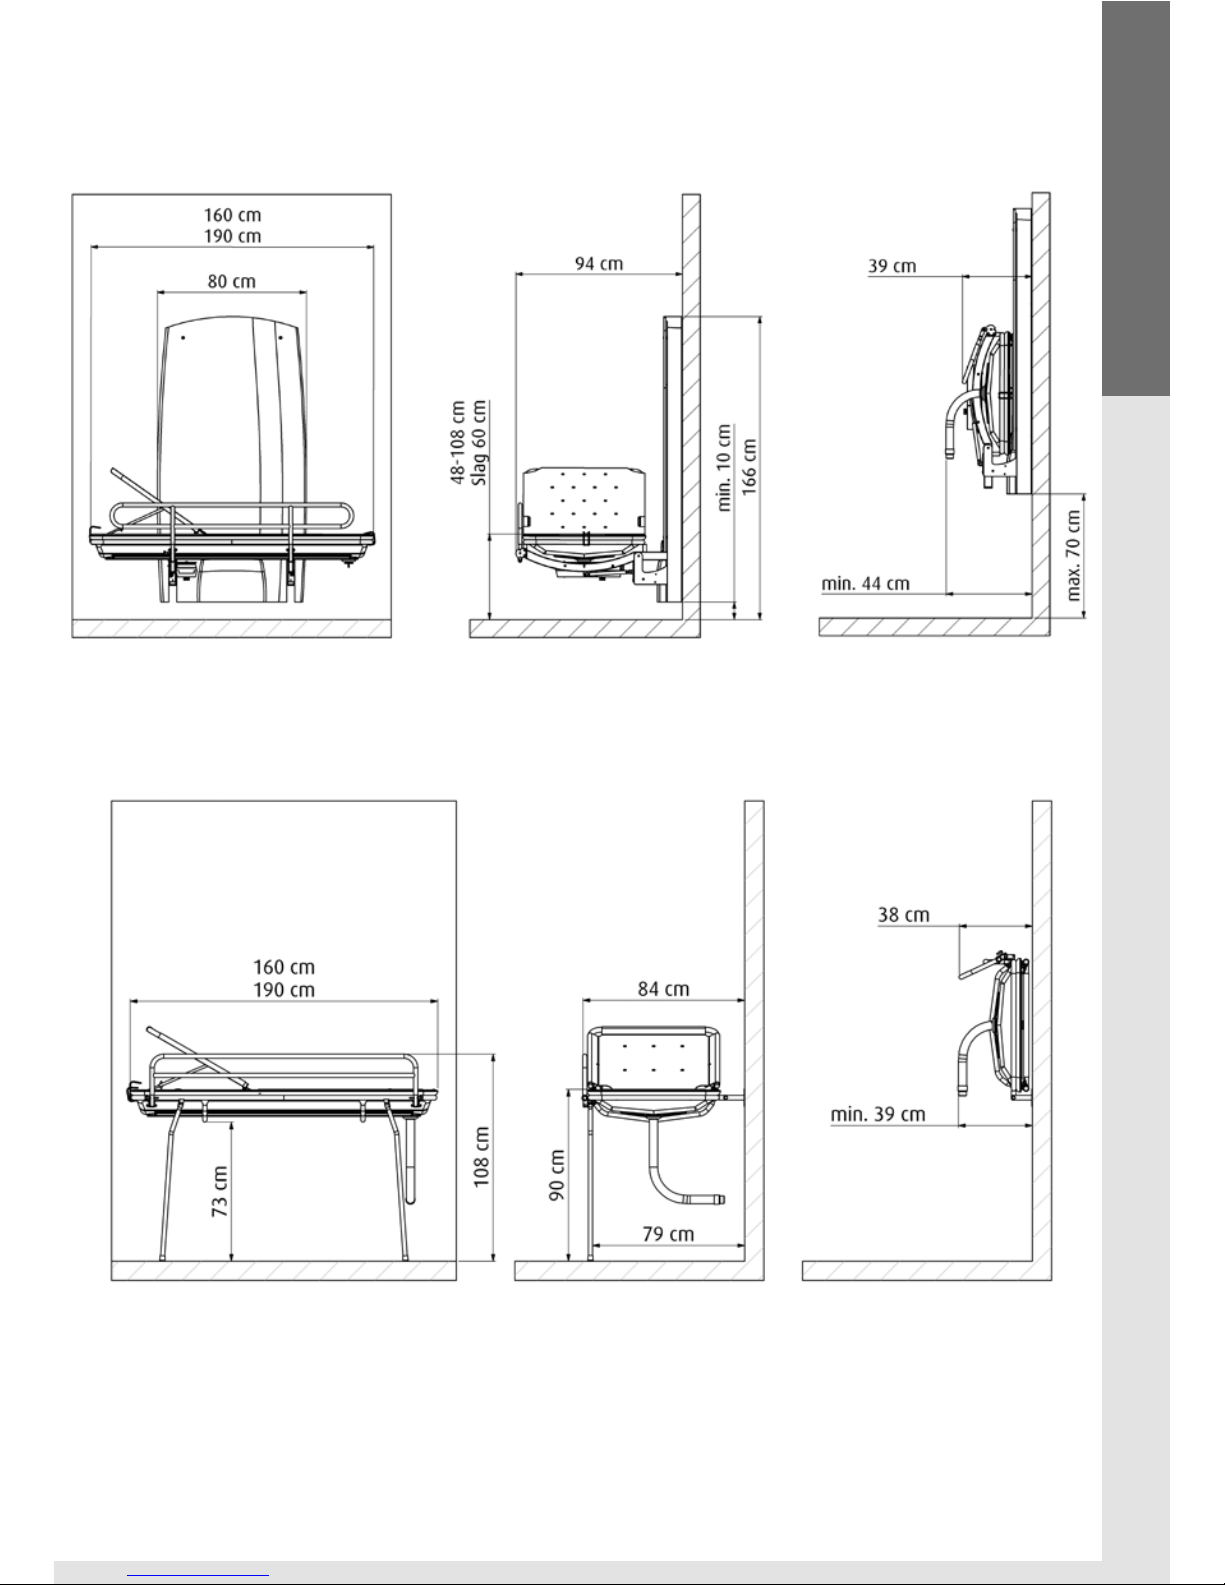
8.3. Afmetingen
Uitwendige maten
Amfora (l x b x h)
6200 4010/15 160 / 190 x 74 x 70 tot 110 cm
6200 4011/16 160 / 190 x 74 x 75 tot 115 cm
6200 4050/55 160 / 190 x 74 x 103 cm
6200 5005/10 160 / 190 x 93 x 43 tot 103 cm
6300 4030/35 160 / 190 x 85 x 108 cm
6300 4040/45 160 / 190 x 85 x 108 cm
Vienna (l x b x h)
6500 4020/25 160 / 190 x 74 x 68 tot 108 cm
6500 4021/26 160 / 190 x 74 x 71 tot 115 cm
6500 4060/65 160 / 190 x 74 x 68 tot 108 cm
6500 5015/20 160 / 190 x 85 x 43 tot 103 cm
6500 4070/75 160 / 190 x 85 x 110 cm
Sirocco (l x b x h)
6100 2400 200 x 81 x 43 tot 103 cm
6100 2401 200 x 81 x 43 tot 103 cm
6100 2402 200 x 81 cm
6100 2403 200 x 81 cm
Stylex (l x b x h)
6100 3070 – 194 x 72,5 x 75 tot 118 cm
Waterafvoerslang Inwendig Ø 4 cm
Wielbasis 120 cm
Spoorbreedte 65 cm
22 | Gebruikershandleiding | Douchebrancard / Aankleedtafel
Douchebrancard / Aankleedtafel | Gebruikershandleiding | 23
Français DeutschEnglish
Nederlands
24 | Gebruikershandleiding | Douchebrancard / Aankleedtafel
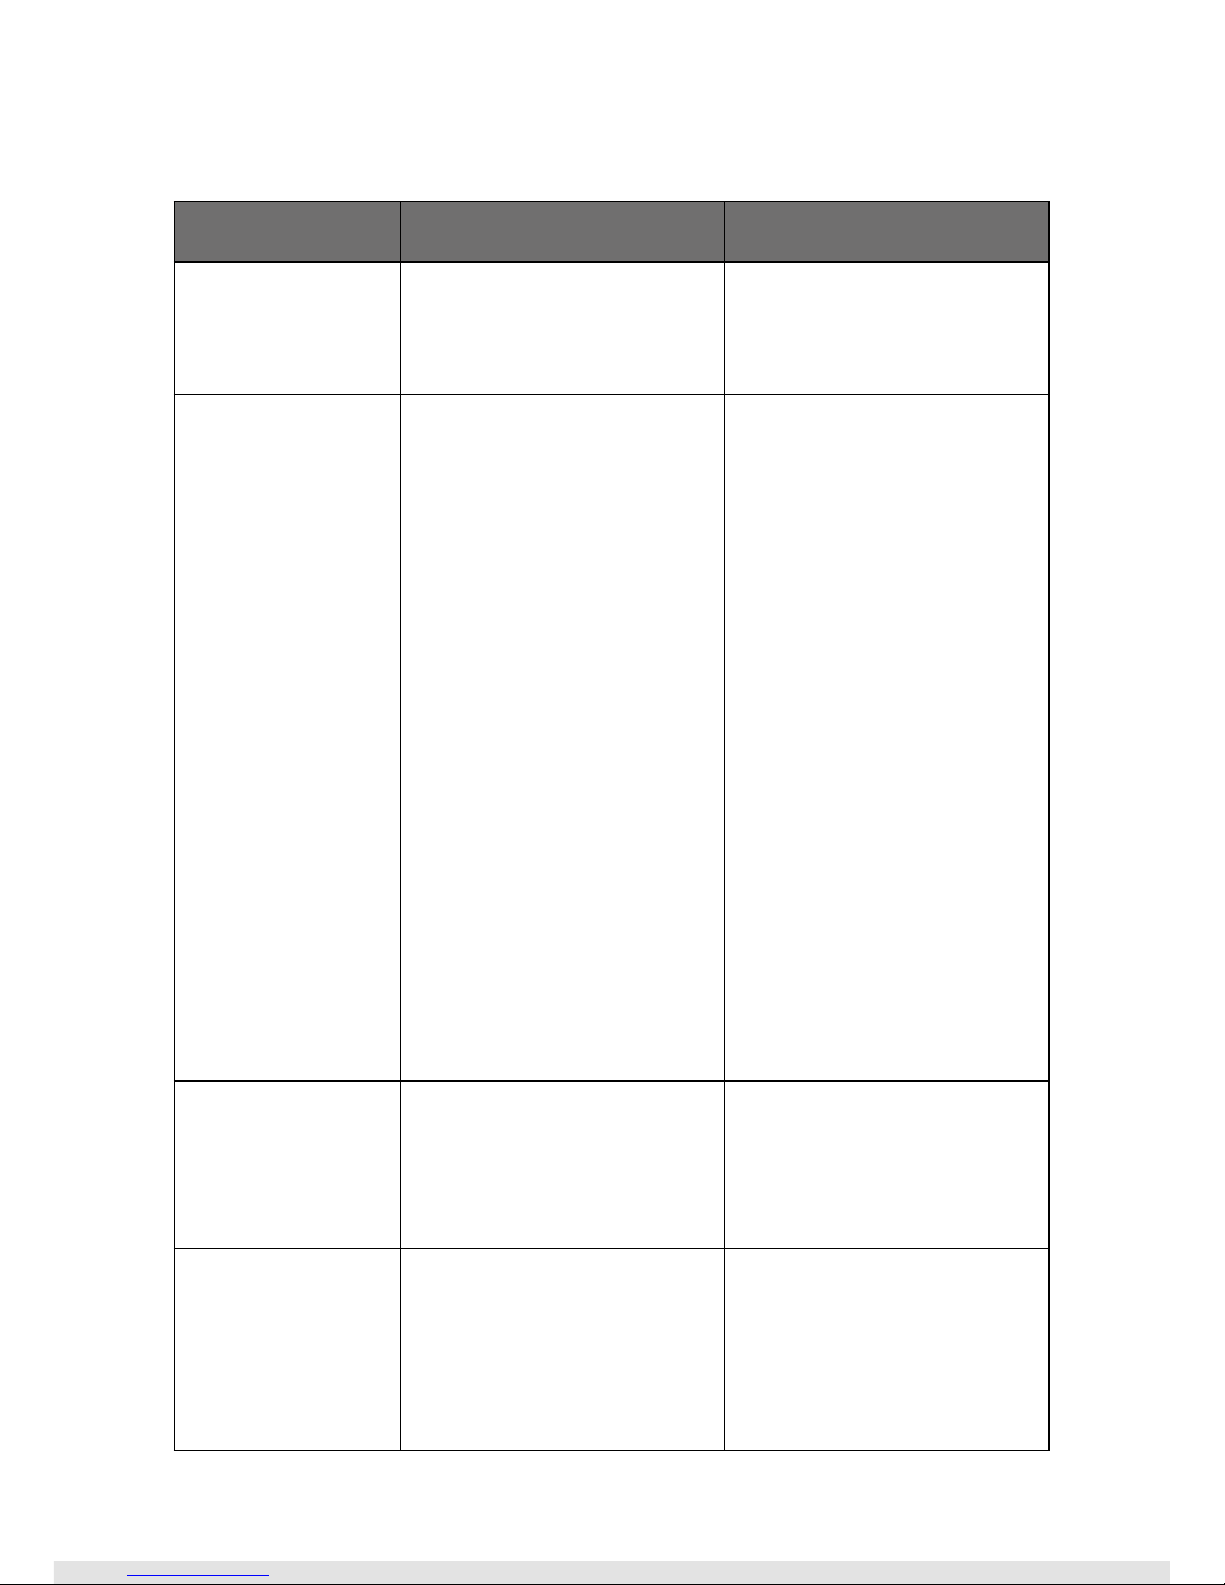
9. Checklist bij technische problemen
Probleem Oorzaak Oplossing
Douchebrancard /
aankleedtafel rijdt
moeilijk
Vuil en zeep tussen de wielen Wielen schoonmaken
Douchebrancard /
aankleedtafel gaat
niet omhoog of
omlaag
Verbinding tussen pomp en
pedaal is losgelopen
Pomp lekt / is defect
Noodstop bediend
Batterij leeg
Stekkers los
Handbediening werkt niet
Draai schroeven van
verbindingsstuk aan
Neem contact op met Lopital
Nederland B.V.
Noodstopknop kwartslag
rechtsom draaien
Batterij opladen / reserve
batterij plaatsen
Stekkers controleren (aan
zijkant controlbox)
Stekker controleren.
Neem contact op met Lopital
Nederland B.V.
Lampje van de
lader brandt niet
Lader is niet aangesloten
Lader defect
Lader aansluiten
Neem contact op met
Lopital Nederland B.V.
Douchebrancard
aankleedtafel
stopt
Noodstop bediend
Technische storing
Noodstopknop kwartslag
rechtsom draaien
Neem contact op met
Lopital Nederland B.V.

Douchebrancard / Aankleedtafel | Gebruikershandleiding | 25
Français DeutschEnglish
Nederlands
Voor alle overige storingen neemt u contact op met Lopital Nederland B.V.
Telefoon: +31 (0)13 5239300
Fax: +31 (0)13 5239301
E-mail: service@lopital.nl
10. Relatie met andere ondersteuningen
EasySlide
De EasySlide is een optimaal hulpmiddel voor de transfer van bed naar douchebrancard
/ aankleedtafel en vice versa. De fysieke belasting bij gebruik van de EasySlide en de
benodigde tijd is minimaal. De EasySlide is in bijna alle bed- en stoeltransfers van en
naar de douchebrancard / aankleedtafel goed bruikbaar.
Tillift
De verstelbare douchebrancards / aankleedtafels hebben vanaf een ligvlakhoogte van
50 cm (hydraulisch) en 55 cm (elektrisch) een onderrijdhoogte van 6 cm. De niet verstelbare douchebrancards / aankleedtafels hebben een ligvlakhoogte van 90 cm. De onderrijdhoogte van de vaste brancard / aankleedtafel is 25 cm.
Rolstoel
In de lagere standen van 48-55 cm van de verstelbare douchebrancard / aankleedtafel
is overschuiven mogelijk van douchebrancard / aankleedtafel naar rolstoel en vice versa.
Een ideaal hulpmiddel hierbij is het gebruik van de kleine EasySlide en eventueel een
schuifplank.
Bed
De douchebrancard / aankleedtafel wordt voornamelijk gebruikt om gebruikers liggend
te wassen. Gebruikers kunnen met behulp van de EasySlide in liggende positie vanuit
ieder (hoog of laag) bed op de douchebrancard / aankleedtafel overgeschoven
worden. De douchebrancard / aankleedtafel dient hiervoor op gelijke hoogte met
het bed gebracht te worden.
26 | Gebruikershandleiding | Douchebrancard / Aankleedtafel
11. Elektromagnetische compatibiliteit
(Voor de elektrische varianten)
Richtlijnen en verklaring van de fabricant – elektromagnetische emissies
De douchebrancard / aankleedtafel is bedoeld voor gebruik in de elektromagnetische omgeving die hieronder wordt gespecificeerd.
De klant of de gebruiker van de douchebrancard / aankleedtafel dient te garanderen dat het product in een dergelijke omgeving
wordt gebruikt.
Emissie test compliantie Elektromagnetische omgeving - Richtlijnen
RF emissies
CISPR11
Groep 1
De douchebrancard / aankleedtafel gebruikt alleen RF-energie voor
de interne functies. Zodoende zijn de RF-emissies van dit product zeer
laag en zullen ze vermoedelijk geen interferentie vertonen met nabije
elektronische apparatuur.
RF emissies
CISPR11
Klasse B
De douchebrancard / aankleedtafel is geschikt voor gebruik in alle
gebouwen, inclusief woningen en gebouwen die rechtstreeks zijn aangesloten op het openbare laagspanningsnetwerk in gebouwen die voor
woondoeleinden worden gebruikt.
Harmonische emissies
IEC 61000-3-2
Klasse A
Spanningsschommelingen / flikkerings emissies
IEC 61000-3-3
Compliant
Douchebrancard / Aankleedtafel | Gebruikershandleiding | 27
Français DeutschEnglish
Nederlands
Richtlijn en verklaring fabricant – elektromagnetische immuniteit
De douchebrancard / aankleedtafel is bedoeld voor gebruik in de elektromagnetische omgeving die hieronder wordt gespecificeerd.
De klant of de gebruiker van de douchebrancard / aankleedtafel dient te garanderen dat het apparaat in een dergelijke omgeving
wordt gebruikt.
Immuniteitstest IEC 60601-1-2
Test niveau
Compliantieniveau Elektromagnetische omgeving - Richtlijnen
Elektrostatische ontlading
(ESD)
IEC 61000-4-2
±6 kV contact
±8 kV atmosfeer
±6 kV contact
±8 kV atmosfeer
Vloeren moeten van hout, beton of keramische tegels
zijn. Als vloeren zijn bedekt met synthetisch materiaal,
moet de relatieve luchtvochtigheid minstens 30% zijn.
Elektrische sprongspanning/pieken
IEC 61000-4-4
Elektrische sprongspanning/pieken
IEC 61000-4-4
±2 kV voor voedingskabels
±1 kV voor ingangs-/
uitgangskabels
De kwaliteit van de netspanning moet gelijk zijn aan
die van een standaardomgeving in een winkelcentrum
of ziekenhuis.
Overspanning
IEC 61000-4-5
±1 kV lijn naar lijn
±2 kV lijn naar aarde
±1 kV lijn naar lijn
±2 kV lijn naar aarde
De kwaliteit van de netspanning moet gelijk zijn aan
die van een standaardomgeving in een winkelcentrum
of ziekenhuis.
Spanningsterugval, korte
stroomonderbrekingen
en schommelingen in de
spanning op de voedingskabels
IEC 61000-4-11
<5% Un
(>95% terugval in Un)
voor 0,5 cyclus
40% Un
(60 % terugval in Un)
voor 5 cyclus
70% Un
(30 % terugval in Un)
voor 25 cyclus
<5% Un
(>95% terugval in Un)
voor 5 seconden
<5% Un
(>95% terugval in Un)
voor 0,5 cyclus
40% Un
(60 % terugval in Un)
voor 5 cyclus
70% Un
(30 % terugval in Un)
voor 25 cyclus
<5% Un
(>95% terugval in Un)
voor 5 seconden
De kwaliteit van de netspanning moet gelijk zijn aan
die van een standaardomgeving in een winkelcentrum
of ziekenhuis. De douchebrancard / aankleedtafel is
voorzien van een batterij.
Netfrequentie (50/60 Hz)
Magnetische veld
IEC 61000-4-8
3 A/m 3 A/m Magnetische velden op basis van netfrequentie moeten
op niveaus worden gehouden die kenmerkend zijn voor
een gangbare locatie in een gangbare commerciële
omgeving of ziekenhuisomgeving.
OPMERKING Un is de netspanning (wisselspanning) voordat het testniveau wordt toegepast.
28 | Gebruikershandleiding | Douchebrancard / Aankleedtafel
Richtlijn en verklaring fabricant – elektromagnische immuniteit
De douchebrancard / aankleedtafel is bedoeld voor gebruik in de elektromagnetische omgeving die hieronder wordt gespecificeerd.
De klant of de gebruiker van de douchebrancard / aankleedtafel dient te garanderen dat het product in een dergelijke omgeving
wordt gebruikt.
Immuniteitstest IEC 60601-1-2
Testniveau
compliantieniveau Elektromagnetische omgeving - Richtlijnen
Geleide RF
IEC 61000-4-6
Uitgestraalde RF
IEC 61000-4-3
3 Vrms
150 kHz to 80 MHz
3 V/m
80 MHz to 2,5 GHz
3 V
3 V/m
Draagbare en mobiele RF-communicatieapparatuur mag niet dichter bij onderdelen van de douchebrancard / aankleedtafel, inclusief
kabels, worden gebruikt, dan de aanbevolen scheidingsafstand
die is berekend op basis van de vergelijking die geldt voor de
frequentie van de zender.
Aanbevolen scheidingsafstand
d =1,2 √P
d =1,2 √P 80 MHz to 800 MHz
d =2,4 √P 800 MHz to 2,5 GHz
Waar P het maximale nominale uitgangsvermogen van de zender
in Watt (W) is volgens de fabrikant van de zender en d de aanbevolen scheidingsafstand in meter (m).
De veldsterkten afkomstig van de vaste RF-zenders, zoals bepaald
met een elektromagnetisch onderzoek van de locatie,a dienen
lager te zijn dan het compliantieniveau per frequentiebereik.b
Interferentie kan voorkomen in de omgeving van apparatuur die is
voorzien van het volgende symbool:
OPMERKING 1 Bij 80 MHz and 800 MHz geldt het hoogste frequentiebereik.
OPMERKING 2 Deze richtlijnen gelden mogelijk niet in alle situaties. Elektromagnetische overdracht wordt beïnvloed door absorptie
door en weerkaatsing van structuren, objecten en personen.
a De veldsterkten voor vaste zenders, zoals basisstations voor radiotelefoons (mobiel / draadloos) en mobiele radio’s op land,
zenders van zendamateurs, radio-uitzendingen in AM en FM en tv-uitzendingen kunnen theoretisch niet nauwkeurig worden
voorspeld. Voor het evalueren van de elektromagnetische omgeving als gevolg van de aanwezigheid van vaste RF-zenders moet een
elektromagnetisch onderzoek op de locatie worden uitgevoerd. Als de gemeten veldsterkte op de locatie waarin de douchebrancard
/aankleedtafel wordt gebruikt, hoger is dan het relevante RF-compliantieniveau hierboven, moet de douchebrancard / aankleedtafel
worden geobserveerd om te controleren of het normaal functioneert. Als blijkt het product niet normaal functioneert, kunnen extra
maatregelen nodig zijn, zoals het anders richten of verplaatsen van de douchebrancard / aankleedtafel.
b In het frequentiebereik 150 kHz tot 80 MHz, moeten de veldsterkten lager zijn dan 3 V/m.
Douchebrancard / Aankleedtafel | Gebruikershandleiding | 29
Français DeutschEnglish
Nederlands
Aanbevolen scheidingsafstanden tussen draagbare en mobiele RF-communicatieapparatuur en de
douchebrancard / aankleedtafel.
De douchebrancard / aankleedtafel is bedoeld voor gebruik in een elektromagnetische omgeving waarin uitgestraalde RF-verstoringen onder controle zijn. De klant of de gebruiker van de douchebrancard / aankleedtafel kan elektromagnetische interferentie mede
voorkomen door een minimumafstand aan te houden tussen draagbare en mobiele RF-communicatieapparatuur (zenders) en de
douchebrancard / aankleedtafel volgens de onderstaande aanbevelingen, afhankelijk van het maximale uitgangsvermogen van de
communicatieapparatuur.
Maximale nominale uitgangsvermogen van zender
W
Scheidingsafstand afhankelijk van frequentie van de zender
m
150 kHz tot 80 MHz
d =1,2 √P
80 MHz tot 800 MHz
d =1,2 √P
800 MHz tot 2,5 GHz
d =2,4 √P
0,01 0,12 0,12 0,24
0,1 0,38 0,38 0,76
1 1,2 1,2 2,4
10 3,8 3,8 7,6
100 12 12 24
Voor zenders met een maximaal nominaal uitgangsvermogen dat hierboven niet wordt vermeld, kan de aanbevolen scheidings-
afstand d in meter (m) worden geschat aan de hand van de vergelijking die geldt voor de frequentie van de zender, waarbij P het
maximale nominale uitgangsvermogen van de zender in Watt (W) is volgens de fabrikant van de zender.
OPMERKING 1 Bij 80 MHz en 800 MHz geldt de scheidingsafstand voor het hoogste frequentiebereik.
OPMERKING 2 Deze richtlijnen gelden mogelijk niet in alle situaties. Elektromagnetische overdracht wordt beïnvloed door absorptie
door en weerkaatsing van structuren, objecten en personen.
Instructions for use
Stylex / Sirocco / Amfora / Vienna
6200 4010 / 6200 4015, 6200 4011 / 6200 4016, 6200 4050 / 6200 4055, 6200 5005 /
6200 5010, 6300 4030 / 6300 4035, 6300 4040 / 6300 4045 (Amfora)
6500 4021 / 6500 4026, 6500 4020 / 6500 4025, 6500 5015 / 6500 5020, 6500 4060 /
6500 4065, 6500 4070 / 6500 4075 (Vienna)
6100 2400, 6100 2401, 6100 2402, 6100 2403 (Sirocco)
6100 3070 (Stylex)
Shower stretcher / Dressing table
6200 4010 / 6200 4015 Amfora
Shower stretcher Hydraulic
6300 4030 / 6300 4035 Amfora
Shower stretcher wall mounted
6500 4021 / 6500 4026 Vienna
Dressing table Electric
6500 4070 / 6500 4075 Vienna
Dressing table wall mounted
6200 4011 / 6200 4016 Amfora
Shower stretcher Electric
6300 4040 / 6300 4045 Amfora
Shower stretcher with drip tray wall
mounted
6500 4020 / 6500 4025 Vienna
Dressing table Hydraulic
6500 5015/ 6500 5020 Vienna
Dressing table wall mounted high / low
6200 4050 / 6200 4055 Amfora
Shower stretcher with drip tray mobile
6200 5005 / 6200 5010 Amfora
Shower stretcher wall mounted high
/ low
6500 4060 / 6500 4065 Vienna
Dressing table mobile
6100 2400 / 6100 2401 / 6100 2402/
6100 2403 Sirocco Shower stretcher
6100 3070 Stylex Shower stretcher
Stainless Steel

Shower stretcher / Dressing table | Instructions for use | 31
Français DeutschEnglish
Nederlands
Important:
Read these instructions carefully before using the Shower stretcher / Dressing table!
Date first used . . . . . . . . . . . . . . . . . . . . . . . . . . . . . . . . . . . . . . . . . . . . . . . . . . . . . . . . . . .
User . . . . . . . . . . . . . . . . . . . . . . . . . . . . . . . . . . . . . . . . . . . . . . . . . . . . . . . . . . . . . . . . . . .
Name . . . . . . . . . . . . . . . . . . . . . . . . . . . . . . . . . . . . . . . . . . . . . . . . . . . . . . . . . . . . . . . . . .
Address . . . . . . . . . . . . . . . . . . . . . . . . . . . . . . . . . . . . . . . . . . . . . . . . . . . . . . . . . . . . . . . .
Manufacturer
Lopital Nederland B.V.
Laarakkerweg 9
5061 JR The Netherlands
T (0031) 13 52 39 300
F (0031) 13 52 39 301
www.lopital.com
info@lopital.nl
Notes on symbols
Read the user instructions
before use.
Direct current
24V DC.
Note.
Applied parts.
Class 2 EMC.

32 | Instructions for use | Shower stretcher / Dressing table
Contents
1. Introduction ................................................................................................33
1.1. Introduction ................................................................................................33
1.2. Safety ..........................................................................................................34
1.3. Warranty .....................................................................................................36
2. Use ..............................................................................................................37
2.1. First use ......................................................................................................37
2.2. Working with the shower stretcher / dressing table ............................39
3. Operation ....................................................................................................40
3.1. Wheel blocking (only on mobile variant) ...............................................40
3.2. Side bars .....................................................................................................40
3.3. Moving upwards / downwards ...............................................................41
3.4. Water drainage (only for Stylex, Sirocco and Amfora with drip tray) . . 42
3.5. Changing batteries (only relates to electrical adjustable versions) .....42
3.6. Charging batteries (only relates to electrical adjustable versions) ......43
4. Safety functions .........................................................................................44
4.1. Emergency stop button
(only relates to electrical adjustable versions) ......................................44
4.2. Emergency lowering button
(only relates to electrical adjustable versions) ......................................44
5. Cleaning and maintenance .......................................................................45
6. Storage and transport ...............................................................................46
7. Removal of parts .......................................................................................47
8. Technical Specifications .............................................................................47
8.1. Structure .....................................................................................................47
8.2. Drive............................................................................................................48
8.3. Dimensions ................................................................................................49
9. Checklist for technical problems ..............................................................52
10. Relationship with other supports .............................................................53
11. Electromagnetic compatibility ..................................................................54

Shower stretcher / Dressing table | Instructions for use | 33
Français DeutschEnglish
Nederlands
1. Introduction
1.1. Introduction
The shower stretcher / dressing table is a medical device for caring for and washing
less able persons in an ergonomically responsible manner. Comfort is the primary
consideration for both the less able person and the carer.
Lopital supplies various versions of its shower stretchers and dressing tables. The range
includes stretchers / dressing tables that are secured to a wall, mobile shower stretchers
/ dressing tables and shower stretchers / dressing tables that are non-mobile. The height
of some variants is electrically or hydraulically adjustable.
The shower stretcher / dressing table is multi-functional in use and corresponds to the
use of other devices such as beds, wheelchairs and shower chairs, hoisting equipment
and sliders such as the EasySlide. These are the essential functions of a shower stretcher /
dressing table.
The average technical life of the shower stretcher / dressing table is 10 years, assuming it
is cleaned daily and regularly maintained according to the maintenance schedule supplied
(See: Chapter 5 Cleaning and Maintenance).
The shower stretcher / dressing table is a class 1 product with CE-marking. This marking
corresponds with directive 93/42/EC and the revised directive 2007/47/EC
for medical devices of 21 March 2010. The shower stretcher / dressing table has been
tested for electromagnetic radiation according to norm 60601-1-2.
The Amfora is available in the following versions:
• 6200 4010 – Hydraulic high / low, lying surface 160 cm / 63 inch.
• 6200 4015 – Hydraulic high / low, lying surface 190 cm / 74.8 inch.
• 6200 4011 – Electric high / low, lying surface 160 cm / 63 inch.
• 6200 4016 – Electric high / low, lying surface 190 cm / 74.8 inch.
• 6200 4050 – Fixed height, lying surface 160 cm / 63 inch.
• 6200 4055 – Fixed height, lying surface 190 cm / 74.8 inch.
• 6200 5005 – Wall mounted, electric high / low, lying surface 160 cm / 63 inch.
• 6200 5010 – Wall mounted, electric high / low, lying surface 190 cm / 74.8 inch.
• 6300 4030 – Wall mounted, fixed height, no drip tray, lying surface 160 cm / 63 inch.
• 6300 4035 – Wall mounted, fixed height, no drip tray, lying surface 190 cm / 74.8 inch.
• 6300 4040 – Wall mounted, fixed height, lying surface 160 cm / 63 inch.
• 6300 4045 – Wall mounted, fixed height, lying surface 190 cm / 74.8 inch.

34 | Instructions for use | Shower stretcher / Dressing table
The Vienna is available in the following versions:
• 6500 4020 – Hydraulic high / low, lying surface 160 cm / 63 inch.
• 6500 4025 – Hydraulic high / low, lying surface 190 cm / 74.8 inch.
• 6500 4021 – Electric high / low, lying surface 160 cm / 63 inch.
• 6500 4026 – Electric high / low, lying surface 190 cm / 74.8 inch.
• 6500 4060 – Fixed height, lying surface 160 cm / 63 inch.
• 6500 4065 – Fixed height, lying surface 190 cm / 74.8 inch.
• 6500 5015 – Wall mounted, electric high / low, lying surface 160 cm / 63 inch.
• 6500 5020 – Wall mounted, electric high / low, lying surface 190 cm / 74.8 inch.
• 6500 4070 – Wall mounted, fixed height, lying surface 160 cm / 63 inch.
• 6500 4075 – Wall mounted, fixed height, lying surface 190 cm / 74.8 inch.
The Sirocco is available in the following versions:
• 6100 2400 – Wall mounted left and height adjustable
• 6100 2401 – Wall mounted right and height adjustable
• 6100 2402 – Wall mounted left and fixed height
• 6100 2403 – Wall mounted right and fixed height
The Stylex is available in the following versions:
• 6100 3070 – Standard stainless steel
1.2. Safety
A failure to comply with the following safety points and the further definitions in
this user manual could lead to hazardous situations. Please read carefully before
use.
Use
The following applies to all shower stretchers and dressing tables:
• It is not permitted to load the shower stretcher / dressing table with more weight than
135 kg / 297.6 lbs.
• Only use original parts, supplied by Lopital.
• Use the shower stretcher / dressing table in a clean and tidy working environment.
• Only verifiably authorised personnel is allowed to work with the shower stretcher /
dressing table.
• Swimming pool locations are not considered to be ‘normal conditions’ and will
substantially shorten the lifespan of certain components.
• The shower stretcher / dressing table must be used/cleaned using water that is below
43 degrees Celsius (109 degrees Fahrenheit).

Shower stretcher / Dressing table | Instructions for use | 35
Français DeutschEnglish
Nederlands
The following applies to all mobile shower stretchers and dressing tables:
• Make sure that the shower stretcher / dressing table brake is applied before
transferring clients.
• Notify the less able person before moving the shower stretcher / dressing table.
• Only relocate and move the shower stretcher / dressing table in the lower position.
• When moving the shower stretcher / dressing table, do not adjust upwards or
downwards.
• Always try to move backwards over obstacles (rather than forwards).
• The shower stretcher / dressing table may not be used to transport loads other than
people.
The following applies to all adjustable shower stretchers and dressing tables:
• Be aware of obstacles when moving upwards and downwards.
Electric adjustable:
• The use of components (ladders, cables, actuators, batteries, etc.) that have not been
supplied by Lopital may result in increased emissions or decreased immunity of the
shower stretcher / dressing table.
• Charge batteries in a well-ventilated, dry space.
• Portable and mobile RF communication equipment can affect medical devices.
• Medical electrical devices involve special EMC precautions and must be used as per the
EMC information outlined in the instructions for use.
• The shower stretcher / dressing table must not be used adjacent to or stacked on other
products. However, should that be necessitated, it must be checked whether the
stretcher functions normally in this configuration too.
Maintenance
• If the charger or cable become damaged, they must be replaced. (For electric adjust-
able versions)
• The shower stretcher / dressing table must be inspected and serviced at least once
a year.
• Servicing and maintenance of the shower stretcher / dressing table may only be carried
out by persons authorised by Lopital.
• Constructive components of the shower stretcher / dressing table may only be replaced
by suitably authorised Lopital personnel.
• If erroneous use, transport, an accident or improper maintenance leads to deforma-
tion of the shower stretcher / dressing table, it may no longer be used and you must
contact the supplier.

36 | Instructions for use | Shower stretcher / Dressing table
In the event of breakdowns, you must contact Lopital or your local supplier.
E-mail: service@lopital.nl
The shower stretcher / dressing table must only be operated by persons who
have been sufficiently trained and expert personnel who have experience
working with the target group.
The shower stretcher / dressing table must be used in a clinical setting.
Making changes to the construction could affect the safety of the shower
stretcher / dressing table. This will also lead to Lopital’s liability and warranty
conditions being invalidated. As a result, the shower stretcher / dressing table
will no longer comply with the guidelines for medical devices.
1.3. Warranty
Lopital products are guaranteed for 2 years with respect to construction and / or material
faults. In the event of varying warranty terms, the exact period will be indicated on your
invoice; this also serves as the warranty itself.
Components that are subject to wear and tear (such as batteries, hand controls and cables)
will not fall under warranty unless there are clear construction and / or material faults.

Shower stretcher / Dressing table | Instructions for use | 37
Français DeutschEnglish
Nederlands
2. Use
2.1. First use
Before you use the shower stretcher / dressing table, you must check to ensure the
following components are present. These components can be replaced by authorised
individuals in the event of damage. These components are the applied parts of the shower
stretcher / dressing table. These components may come into contact with the user(s) while
the shower stretcher / dressing table is in use.
Manual control
Drip tray
Outlet hose
Swivel wheel
Ø 12.5 cm / 4.9 inch
Double-braking
Collapsible
side bar
Frame
Battery
Actuator

38 | Instructions for use | Shower stretcher / Dressing table
Bed cushion
(2-part)
Pump
Outlet hose
Pedal
Mattress
Wall mount
Charging point
Side-bars
Battery

Shower stretcher / Dressing table | Instructions for use | 39
Français DeutschEnglish
Nederlands
2.2. Working with the shower stretcher / dressing table
Step 1 (only on mobile variants)
Always apply the brake on the shower stretcher / dressing table when transferring
patients. (See paragraph 3.1. wheel blocking).
Transfer to bed
Step 2
Place the shower stretcher / dressing table alongside the bed with the head-end aligned
with the head-side of the less able person.
Step 3
Lower the side bar on the shower stretcher / dressing table (See paragraph 3.2 Side-bars).
Step 4 (only on adjustable variants)
Move the bed base on the shower stretcher / dressing table to just above the bed mattress
and collapse the side-bars downwards (on adjustable shower stretchers / dressing tables).
Step 5
Slide the shower stretcher / dressing table between the head and foot-end so that it
protrudes as far as possible over the bed.
Step 6 (only on mobile variants)
Block the wheels on the shower stretcher / dressing table. (See paragraph 3.1. Wheel
blocking).
Step 7
Go to the other end of the bed and place the EasySlide between the less able person and
the shower stretcher / dressing table.
Step 8
Use the EasySlide to slide the person from the bed to the shower stretcher / dressing table.
Step 9 (only on adjustable variants)
Raise the horizontal surface of the shower stretcher / dressing table a few centimetres
and close the side-bars.
Step 10 (only on mobile variants)
Take the brake off the shower stretcher / dressing table and remove the easy-slide
(See paragraph 3.1. Wheel blocking).

40 | Instructions for use | Shower stretcher / Dressing table
3. Operation
3.1. Wheel blocking
(Only on mobile variant)
• The brake can be applied on the shower stretcher / dressing table by pushing the blue
lip (1) on the wheel downwards (See figure 1).
• In order to take the shower stretcher / dressing table off the brake, the same lip on the
wheel must be moved upwards by tapping the upper side of the lip (2) (See figure 1).
3.2. Side bars
• The shower stretcher / dressing table is equipped with
steel, hinged side bars. The side bars are made of stainless
steel on the Stylex.
• The side-bar is equipped with safeguards so that the less
able person cannot raise the side-bars himself.
• Before the side-bar is collapsed downwards, the safeguard
must be unlocked.
• Wall mounted stretcher / dressing table: Unlock the
safeguard by using one hand to pull the protruding lip /
button (1) outwards and raising the side-bar with your
other hand. (See Figures 2 and 3).
Mobile stretcher / dressing table: Unlock the safeguard by removing the bolts on both
sides of the side bar (1) (See figure 4).
• Turn the unlocked side bar outwards (3).
• Move the side-bar upwards in order to lock it in place again. The side bar is locked on
the mobile shower stretcher / dressing table by securing the bolts in the appropriate
position. With the wall stretchers / dressing tables, the side bar locks automatically.
• Sirocco: Make sure that the corner flaps fall inwards so that they do not get jammed in
the side-bar locks.
Figure 1: Wheel blocking
1
2
Figure 2: Side bar Sirocco
Figure 3: Side bar Amfora /
Vienna wall mounted
Figure 4: Side bar mobile
stretchers / dressing tables
1
1
1
2
2
2
3
3
3

Shower stretcher / Dressing table | Instructions for use | 41
Français DeutschEnglish
Nederlands
3.3. Moving upwards / downwards
Electric adjustable versions
Moving upwards
• If the less able person is lying on the shower stretcher /
dressing table, first put the brake on the wheels (if it is
a mobile stretcher / dressing table) and then move the
stretcher upwards.
• Move the shower stretcher / dressing table upwards by
pressing the button that
shows an 'up' arrow. The shower stretcher will then
immediately move upwards
(See figure 5).
• You can stop the movement whenever you like by taking your finger off the button.
• During the upward movement, maintain contact with the less able person.
• If the remote control is not being used, it can be hung on the side-bar.
• Ensure that the curly cable on the operating device does not get jammed.
Moving downwards
• Move the shower stretcher / dressing table downwards by
pressing the button that shows a 'down' arrow. The shower
stretcher will then immediately move downwards
(See figure 6).
• You can stop the movement whenever you like by taking
your finger off the button.
• During the downward movement, maintain contact with
the less able person.
Before moving the shower stretcher / dressing table upwards, check to ensure
there are no persons or objects in the vicinity of the device.
Figure 5: Moving upwards
Figure 6: Moving downwards

42 | Instructions for use | Shower stretcher / Dressing table
Hydraulic adjustable versions
Moving upwards
• If the less able person is lying on the shower stretcher, first
put the brake on the wheels and then move the shower
stretcher / dressing table upwards.
• The shower stretcher / dressing table moves gently and
evenly upwards as a result of tapping the foot-pedal
(See figure 7).
• During use of the pedal, the carer will stand by the long
edge of the shower stretcher / dressing table so that the
carer cannot twist their upper body away from their feet.
• During the upward movement, maintain contact with the less able person.
Moving downwards
• The shower stretcher / dressing table moves downwards as
a result of pushing the foot pedal downwards
(See figure 8).
• The shower stretcher / dressing table lowers under the
influence of gravity. The lowering speed can be modified by
keeping the pedal gently depressed.
• During the downward movement, maintain contact with
the less able person.
3.4. Water drainage
(Only for Stylex, Sirocco and Amfora with drip tray)
• Water is drained away from the shower stretcher via a drainage hose.
• Take the hose off the hook and direct it to a drainage point that is as low as possible.
• During transport, always hang the hose on the hook otherwise it may leak and drip.
3.5. Changing batteries
(only relates to electrical adjustable versions)
• If you hear an audible signal, the battery must be changed.
• The battery is housed on the sub-frame of the shower stretcher / dressing table,
against the operating electronics. The battery is located under the bed on wall mounted
stretchers / dressing tables.
Figure 7: Moving upwards
Figure 8: Moving downwards

Shower stretcher / Dressing table | Instructions for use | 43
Français DeutschEnglish
Nederlands
• In order to remove the battery, use one hand to unlock the
catch (1) on the battery, then slide the battery to the right
(2). (See figure 9).
• To install the fully charged battery, it must first be
positioned next to the electronic housing and then clicked
into the holder.
Make sure that the shower stretcher / dressing table is
always ready for use by having a fully charged reserve
battery on standby.
3.6. Charging batteries
(only relates to electrical adjustable versions)
• Place the empty battery on the battery charger
(See figure 10).
• A green light indicates that the battery charger is switched
on. An orange light indicates that the battery must be
charged. This light goes off if the battery is full.
• The charged battery can remain on the battery charger
without being damaged.
• In order to remove the battery, use one hand to unlock the
catch on the battery and the other to support the battery
itself.
Only use batteries that are supplied with the shower stretcher / dressing table.
Charge batteries that are not used, once every six months to avoid damage.
Charging the batteries before they are completely empty will extend their
lifespan.
The charger that must be used for the shower stretcher / dressing table is the
‘Linak External charger CHJ2’.
Charge batteries in a well-ventilated, dry space.
For instruction videos go to www.lopital.com or www.youtube.com/user/LopitalNL
Figure 9: Battery
1
2
Figure 10: Battery charger

44 | Instructions for use | Shower stretcher / Dressing table
4. Safety functions
4.1. Emergency stop button
(only relates to electrical adjustable versions)
In the centre of the undercarriage, there is an emergency stop
button. Operate this button in an emergency; if the upward
or downward movement must be stopped immediately. After
the emergency stop has been pressed, all electrical operation
will cease to function. Operation may be continued once the
situation is stable again. Turn the emergency stop a quarter
turn to unlock it again.
First check to ensure the hazard has been removed
or the problem resolved, before resetting the emergency stop.
4.2. Emergency lowering button
(only relates to electrical adjustable versions)
If the controls stop working and the shower stretcher /
dressing table is in a raised position, it can be lowered using
the emergency lowering button. This button is located to the
left of the emergency stop button (See figure 12).
First check to ensure that the emergency button has not been
pressed!
- Remove the plug from the manual control.
- Press the emergency lower button (to the left of the emergency stop).
The shower stretcher / dressing table will now return to the lowest position (make sure
no persons or objects are under the stretcher).
Take the less able person from the shower stretcher / dressing table and make sure the
device is not used until it has been repaired. Place the shower stretcher / dressing table
in a safe place and indicate that it is out of order.
Contact the technical service or Lopital’s service department.
E-mail: service@lopital.nl
Figure 11: Emergency stop
Figure 12: Emergency lowering
button

Shower stretcher / Dressing table | Instructions for use | 45
Français DeutschEnglish
Nederlands
5. Cleaning and maintenance
The shower stretcher / dressing table must be cleaned after every use, with water and
regular household cleaning agents. Remove excess soap residues. Do not use any abrasive
or other aggressive cleaning products (e.g. chlorine bleach). Practical experience has
shown that regular household cleaning agents with limited alcohol content (max. 5%)
are most suitable for this purpose. The product Neoquat combi
®
is recommended for
disinfection purposes (on the basis of long-term testing). For the best and most efficient
cleaning of the mattress and the bed base, the mattress can be lifted up and removed.
Dry the plate on which the mattress lies.
Check the wheels regularly for hairs and dust and remove when necessary. Maintenance
and repairs to the shower stretcher / dressing table may only be carried out by authorised
personnel.

46 | Instructions for use | Shower stretcher / Dressing table
Maintenance schedule
After every use
• The shower stretcher / dressing table can be cleaned with
water and regular household cleaning products.
Daily
• Clean and disinfect mattress / harness.
Weekly
• Clean frame.
• Check wheels for hairs, dust and soap residues and remove if
necessary.
• Check that the shower stretcher / dressing table is still
working correctly.
Annually
• According to the guidelines for medical devices, a shower
stretcher / dressing table must be maintained in line with
the manufacturer’s instructions. This process will preferably
be carried out by Lopital or another authorised body. Lopital
offers the option of having the shower stretcher / dressing
table thoroughly inspected and serviced once a year via
Periodic Preventative Maintenance.
For more information about the maintenance contract,
please contact Lopital (service@lopital.nl) or speak to your
supplier.
6. Storage and transport
During transport and storage, the ambient conditions must remain moderate. In other
words, the temperature should remain between -40 and +55 degrees Celsius (-40 to
130 degrees Fahrenheit) and humidity levels should be kept as low as possible. Vibration
during transport must be kept to a minimum in order to avoid damaging the hinged
mechanisms on the stretcher.

Shower stretcher / Dressing table | Instructions for use | 47
Français DeutschEnglish
Nederlands
7. Removal of parts
All parts that are replaced or removed can be sent back to Lopital BV. You may also offer
the parts to the engineer for destruction. We will ensure that all parts are processed in an
environmentally-friendly manner.
If you take care of disposal of the product yourself, you must take account of the fact that
batteries and chargers must be disposed of as small chemical waste.
8. Technical Specifications
This shower stretcher / dressing table belongs to category ‘BF’.
This shower stretcher / dressing table is a class 2 EMC product
The shower stretcher / dressing table is splash-proof; this means that it can be used
under the shower. This is indicated with instruction IPX4.
8.1. Structure
Amfora & Vienna mobile:
Subframe steel + 2-layer powder coating
Upper frame steel + 2-layer powder coating
Side bars steel + 2-layer powder coating
HInges stainless steel + 2-layer powder coating
Stylex:
Subframe stainless steel + 2-layer powder coating
Upper frame stainless steel + 2-layer powder coating
Side bars stainless steel + 2-layer powder coating
Hinges stainless steel + 2-layer powder coating
Wall mounted stretcher / dressing table:
Frame steel + 2-layer powder coating
Side bars steel + 2-layer powder coating
Hinges stainless steel + 2-layer powder coating

48 | Instructions for use | Shower stretcher / Dressing table
Mobile stretcher / dressing table:
Wheels Ø 12.5 cm / 4.9 inch, double blocking
Attachment equipment stainless steel + galvanised steel
Weight
Amfora
6200 4010/15 57 / 60 kg 125.7 / 132.3 lbs
6200 4011/16 60 / 60 kg 132.3 / 132.3 lbs
6200 4050/55 34 / 37 kg 75 / 81.6 lbs
6200 5005/10 85 / 85 kg 187.4 / 187.4 lbs
6300 4030/35 18 / 18 kg 39.7 / 39.7 lbs
6300 4040/45 20 / 20 kg 44.1 / 44.1 lbs
Vienna
6500 4020/25 53 / 56 kg 116.9 / 123.5 lbs
6500 4021/26 57 / 60 kg 125.7 / 132.3 lbs
6500 4060/65 35 / 37 kg 77.2 / 81.6 lbs
6500 5015/20 75 / 75 kg 44.1 / 44.1 lbs
6500 4070/75 23 / 23 kg 50.7 / 50.7 lbs
Sirocco
6100 2400 80 kg 176.4 lbs
6100 2401 80 kg 176.4 lbs
6100 2402 40 kg 88.2 lbs
6100 2403 40 kg 88.2 lbs
Stylex
6100 3070 50 kg 110.2 lbs
Maximum load
135 kg / 297.6 lbs
8.2. Drive
(Electric variants)
High-low drive Actuator 24 V DC
Control box 24 VDC, max. 250W
Battery 24 V, max. 250 W
Battery charger 230 V AC, connection value 100 W, wall-mounted

Shower stretcher / Dressing table | Instructions for use | 49
Français DeutschEnglish
Nederlands
8.3. Dimensions
External dimensions
Amfora (l x w x h)
6200 4010/15 160 / 190 x 74 x 70 to 110 cm 63 / 74.8 x 29.1 x 27.6 to 43.3 inch
6200 4011/16 160 / 190 x 74 x 75 to 115 cm 63 / 74.8 x 29.1 x 29.5 to 45.3 inch
6200 4050/55 160 / 190 x 74 x 103 cm 63 / 74.8 x 29.1 x 40.6 inch
6200 5005/10 160 / 190 x 93 x 43 to 103 cm 63 / 74.8 x 36.6 x 16.9 to 40.6 inch
6300 4030/35 160 / 190 x 85 x 108 cm 63 / 74.8 x 36.6 x 42.5 inch
6300 4040/45 160 / 190 x 85 x 108 cm 63 / 74.8 x 36.6 x 42.5 inch
Vienna (l x w x h)
6500 4020/25 160 / 190 x 74 x 68 to 108 cm 63 / 74.8 x 29.1 x 26.8 to 42.5 inch
6500 4021/26 160 / 190 x 74 x 71 to 115 cm 63 / 74.8 x 29.1 x 28 to 45.3 inch
6500 4060/65 160 / 190 x 74 x 68 to 108 cm 63 / 74.8 x 29.1 x 26.8 to 42.5 inch
6500 5015/20 160 / 190 x 85 x 43 to 103 cm 63 / 74.8 x 33.5 x 16.9 to 40.6 inch
6500 4070/75 160 / 190 x 85 x 110 cm 63 / 74.8 x 33.5 x 43.3 inch
Sirocco (l x w x h)
6100 2400 200 x 81 x 43 to 103 cm 78.7 x 31.9 x 16.9 to 40.6 inch
6100 2401 200 x 81 x 43 to 103 cm 78.7 x 31.9 x 16.9 to 40.6 inch
6100 2402 200 x 81 cm 78.7 x 31.9 inch
6100 2403 200 x 81 cm 78.7 x 31.9 inch
Stylex (l x w x h)
6100 3070 – 194 x 72,5 x 75 tot 118 cm 764 x 28.3 x 29.5 tot 46.5 inch
Water drainage hose Internal Ø 4 cm / 1.6 inch
Wheel base 120 cm / 47.2 inch
Track width 65 cm / 25.6 inch

50 | Instructions for use | Shower stretcher / Dressing table

Shower stretcher / Dressing table | Instructions for use | 51
Français DeutschEnglish
Nederlands

52 | Instructions for use | Shower stretcher / Dressing table
9. Checklist for technical problems
Problem Cause Solution
Shower stretcher
/ dressing table is
hard to move
Dirt and soap between wheels Clean wheels
Shower stretcher
/ dressing table
does not move
upwards or
downwards
Connection between pump
and pedal has become disconnected
Pump leaking or broken
Emergency stop button used
Battery empty
Plugs removed
Manual controls not working
Tighten screws on connector
Contact Lopital Nederland B.V.
Turn emergency button 90
degrees to the right
Charge battery / install reserve
battery
Check plugs (to side of control
box)
Check plugs
Contact Lopital Nederland B.V.
Light on the
charger does not
come on
Charger is not plugged in
Charger is not working
Connect charger
Contact Lopital Nederland B.V.
Shower stretcher
dressing table
stops
Emergency stop button used
Technical issue
Turn emergency button 90
degrees to the right
Contact Lopital Nederland B.V.

Shower stretcher / Dressing table | Instructions for use | 53
Français DeutschEnglish
Nederlands
For all other issues please contact Lopital Nederland B.V.
Telephone: +31 (0)13 - 5239300
Fax: +31 (0)13 - 5239301
E-mail: service@lopital.nl
10. Relationship with other supports
EasySlide
The EasySlide is the ideal device for transferring from bed to shower stretcher / dressing
table and vice versa. The physical burden and time required when using the EasySlide is
minimal. The EasySlide is suitable for most bed and chair transfers from and to the shower
stretcher / dressing table.
Hoist
The adjustable shower stretchers / changing tables are between 50 cm / 19.7 inches in
height (hydraulic) and 55 cm / 21.7 inches (electrical) with an underneath docking of
6 cm / 2.4 inches. The non-adjustable shower stretchers / changing tables are 90 cm /
35.4 inch in height. The underneath docking of the fixed stretcher / changing table is
25 cm / 9.8 inches.
Wheelchair
In lower settings of 48-55 cm / 18.9-21.7 inch, patients can be transferred from the
adjustable shower stretcher / dressing table to wheelchair and vice versa. An ideal device
to be used during this operation is the small EasySlide (and possibly a sliding board).
Bed
The shower stretcher / dressing table is primarily used to wash users while they are
lying down. Users can be moved, using the EasySlide, from any (high or low) bed to the
shower stretcher / dressing table in a lying position. The shower stretcher / dressing
table must be brought to the same height as the bed to carry out this process.

54 | Instructions for use | Shower stretcher / Dressing table
11. Electromagnetic compatibility
(For electric variants)
Guidance and Manufacturer’s declaration-electromagnetic emissions
The shower stretcher / dressing table is intended for use in the electromagnetic environment specified below. The customer or the
user of the shower stretcher / dressing table should assure that it is used in the following environment:
Emissions Test Compliance Electromagnetic Environment - guidance
RF emissions
CISPR11
Group 1
The shower stretcher / dressing table uses RF energy only for its internal
function. Therefore, its RF emissions are very low and are not likely to cause any
interference in nearby electronic equipment.
RF emissions
CISPR11
Class B
The shower stretcher / dressing table is suitable for use in all establishments,
including domestic establishments and those directly connected to the public
low-voltage power supply network that supplies buildings used for domestic
purposes.
Harmonic emissions
IEC 61000-3-2
Class A
Voltage Fluctuations/
Flicker emissions
IEC 61000-3-3
Complies

Shower stretcher / Dressing table | Instructions for use | 55
Français DeutschEnglish
Nederlands
Guidance and Manufacturer’s declaration-electromagnetic immunity
The shower stretcher / dressing table is intended for use in the electromagnetic environment specified below. The customer or the
user of the shower stretcher / dressing table should assure that it is used in the following environment:
Immunity Test IEC 60601-1-2 Test
Level
Compliance Level Electromagnetic Environment - guidance
Electrostatic discharge
(ESD)
IEC 61000-4-2
±6 kV contact
±8 kV air
±6 kV contact
±8 kV air
Floors should be made of wood, concrete, or ceramic
tile. If floors are covered with synthetic material, the
relative humidity should be at least 30%.
Electrical fast transient/
burst
IEC 61000-4-4
±2 kV for power
supply lines
±2 kV for power
supply lines
Mains power quality should be that of a typical
commercial or hospital environment.
Surge
IEC 61000-4-5
±1 kV line(s) to line(s)
±2 kV line to earth
±1 kV line(s) to line(s)
±2 kV line to earth
Mains power quality should be that of a typical
commercial or hospital environment.
Voltage dips, short
interruptions, and voltage
variations on power
supply input lines
IEC 61000-4-11
<5% Un
(>95% drop in Un) for
0,5 cycle
40% Un
(60% drop in Un) for
5 cycles
70% Un
(30% drop in Un) for
25 cycles
<5% Un
(>95% drop in Un) for
5 seconds
<5% Un
(>95% drop in Un) for
0.5 cycle
40% Un
(60% drop in Un) for
5 cycles
70% Un
(30% drop in Un) for
25 cycles
<5% Un
(>95% drop in Un) for
5 seconds
Mains power quality should be that of a typical
commercial or hospital environment. The shower
stretcher / dressing table is equipped with a battery.
Power frequency (50/60
Hz) magnetic field
IEC 61000-4-8
3 A/m 3 A/m Power frequency magnetic fields should be at levels
characteristic of a typical location in a typical
commercial or hospital environment.
NOTE Un is the a.c. mains voltage prior to application of the test level

56 | Instructions for use | Shower stretcher / Dressing table
Guidance and Manufacturer’s declaration-electromagnetic immunity
The shower stretcher / dressing table is intended for use in the electromagnetic environment specified below. The customer or the
user of the shower stretcher / dressing table should assure that it is used in the following environment:
Immunity Test IEC 60601-1-2 Test
Level
Compliance Level Electromagnetic Environment - guidance
RF Common mode/
Conducted Susceptibility
IEC 61000-4-6
Radiated RF Electromagnetic Field
IEC 61000-4-3
3 Vrms
150 kHz to 80 MHz
3 V/m
80 MHz to 2,5 GHz
3 V
3 V/m
Portable and mobile RF communications equipment
should be used no closer to any part of the shower
stretcher / dressing table, including cables than the
recommended separation distance calculated from
the equation applicable to the frequency of the
transmitter.
Recommended separation distance
d =1,2 √P
d =1,2 √P 80 MHz to 800 MHz
d =2,4 √P 800 MHz to 2,5 GHz
Where P is the maximum output power rating
of the transmitter in watts (W) according to the
transmitter manufacturer and d is the recommended
separation distance in meters (m).
Field strengths from fixed RF transmitters, as
determined by an electromagnetic site survey,a should
be less than the compliance level in each frequency
range.b
Interference may occur in the vicinity of equipment
marked with the following symbol:
NOTE 1 At 80 MHz and 800 MHz, the higher frequency range applies.
NOTE 2 These guidelines may not apply in all situations. Electromagnetic propagation is affected by absorption and reflection from
structures, objects and people.
a Field strengths from fixed transmitters, such as base stations for radio (cellular/cordless) telephones and land mobile
radios, amateur radio, AM and FM radio broadcast and TV broadcast cannot be predicted theoretically with accuracy. To assess the
electromagnetic environment due to fixed RF transmitters, an electromagnetic site survey should be considered. If the measured
field strength in the location in which the shower stretcher / dressing table is used exceeds the applicable RF compliance level
above, the shower stretcher / dressing table should be observed to verify normal operation. If abnormal performance is observed,
additional measures may be necessary, such as re-orienting or relocating the shower stretcher / dressing table.
b Over the frequency range 150 kHz to 80 MHz, field strengths should be less than 3 V/m.

Shower stretcher / Dressing table | Instructions for use | 57
Français DeutschEnglish
Nederlands
Recommended separation distance between
portable and mobile RF communications equipment and the shower stretcher / dressing table
The shower stretcher / dressing table is intended for use in the electromagnetic environment in which radiated RF disturbances
are controlled. The customer or the user of the shower stretcher / dressing table can help prevent electromagnetic interference
by maintaining a minimum distance between portable and mobile RF communications equipment (transmitters) and the shower
stretcher / dressing table as recommended below, according to the maximum output power of the communications equipment.
Rated maximum output power of transmitter
W
Separation distance according to frequency of transmitter
m
150 kHz to 80 MHz
d =1,2 √P
80 MHz to 800 MHz
d =1,2 √P
800 MHz to 2,5 GHz
d =2,4 √P
0,01 0,12 0,12 0,24
0,1 0,38 0,38 0,76
1 1,2 1,2 2,4
10 3,8 3,8 7,6
100 12 12 24
For transmitters rated at a maximum output power not listed above, the recommended separation distance d in meters (m) can be
estimated using the equation applicable to the frequency of the transmitter, where P is the maximum output power rating of the
transmitter in watt (W) according to the transmitter manufacturer.
NOTE 1 At 80 MHz and 800 MHz, the separation distance for the higher frequency range applies.
NOTE 2 These guidelines may not apply in all situations. Electromagnetic propagation is affected by absorption and reflection from
structures, objects and people.

Mode d'emploi
Stylex / Sirocco / Amfora / Vienna
6200 4010 / 6200 4015, 6200 4011 / 6200 4016, 6200 4050 / 6200 4055, 6200 5005 /
6200 5010, 6300 4030 / 6300 4035, 6300 4040 / 6300 4045 (Amfora)
6500 4021 / 6500 4026, 6500 4020 / 6500 4025, 6500 5015 / 6500 5020, 6500 4060 /
6500 4065, 6500 4070 / 6500 4075 (Vienna)
6100 2400, 6100 2401, 6100 2402, 6100 2403 (Sirocco)
6100 3070 (Stylex)
Brancard de douche / Table d'habillage
6200 4010 / 6200 4015 Amfora
Brancard de douche Hydraulique
6300 4030 / 6300 4035 Amfora
Brancard de douche fixation au mur
6500 4021 / 6500 4026 Vienna
Table d'habillage Électrique
6500 4070 / 6500 4075 Vienna
Table d'habillage fixation au mur
6200 4011 / 6200 4016 Amfora
Brancard de douche Électrique
6300 4040 / 6300 4045 Amfora
Brancard de douche avec bac collecteur
fixation au mur
6500 4020 / 6500 4025 Vienna
Table d'habillage Hydraulique
6500 5015 / 6500 5020 Vienna
Table d'habillage fixation au mur à
hauteur variable
6200 4050 / 6200 4055 Amfora
Brancard de douche avec bac collecteur
mobile
6200 5005 / 6200 5010 Amfora
Brancard de douche fixation au mur à
hauteur variable
6500 4060 / 6500 4065 Vienna
Table d'habillage mobile
6100 2400 / 6100 2401 / 6100 2402 /
6100 2403 Sirocco Brancard de douche
6100 3070 Stylex Brancard de douche
en inox

Brancard de douche / Table d’habillage | Mode d’emploi | 59
Français DeutschEnglish
Nederlands
Important :
Parcourez attentivement ces instructions avant de mettre le brancard de douche / la table
d'habillage en service !
Date de mise en service . . . . . . . . . . . . . . . . . . . . . . . . . . . . . . . . . . . . . . . . . . . . . . . . . . . .
Utilisateur . . . . . . . . . . . . . . . . . . . . . . . . . . . . . . . . . . . . . . . . . . . . . . . . . . . . . . . . . . . . . . .
Nom . . . . . . . . . . . . . . . . . . . . . . . . . . . . . . . . . . . . . . . . . . . . . . . . . . . . . . . . . . . . . . . . . . .
Adresse . . . . . . . . . . . . . . . . . . . . . . . . . . . . . . . . . . . . . . . . . . . . . . . . . . . . . . . . . . . . . . . .
Fabricant
Lopital Nederland B.V.
Laarakkerweg 9
5061 JR Pays-Bas
T (0031) 13 52 39 300
F (0031) 13 52 39 301
www.lopital.com
info@lopital.nl
Explication des symboles
Parcourez le mode
d'emploi avant utilisation.
Tension continue
24V CC
Attention.
Parties en contact avec le
patient.
Classe 2 EMC.

60 | Mode d’emploi | Brancard de douche / Table d’habillage
Table des matières
1. Introduction ................................................................................................61
1.1. Introduction ................................................................................................61
1.2. Sécurité .......................................................................................................62
1.3. Garantie ......................................................................................................64
2. Utilisation....................................................................................................65
2.1. Mise en service ..........................................................................................65
2.2. Travailler avec le brancard de douche / la table d'habillage ...............67
3. Commande .................................................................................................68
3.1. Blocage des roues (pour versions mobiles) ...........................................68
3.2. Barrière latérale .........................................................................................68
3.3. Monter / descendre ..................................................................................69
3.4. Evacuation d'eau
(uniquement pour Stylex, Sirocco et Amfora avec bac collecteur) ......71
3.5. Changement de batterie
(uniquement pour les versions à réglage électrique) ...........................71
3.6. Chargement de la batterie
(uniquement pour les versions à réglage électrique) ............................71
4. Fonctions de sécurité ................................................................................72
4.1. Arrêt d'urgence
(uniquement pour les versions à réglage électrique) ...........................72
4.2. Descente d'urgence
(uniquement pour les versions à réglage électrique) ...........................72
5. Nettoyage et entretien .............................................................................73
6. Transport et entreposage .........................................................................74
7. Enlèvement de composants .....................................................................75
8. Caractéristiques techniques ......................................................................75
8.1. Construction ...............................................................................................75
8.2. Entraînement .............................................................................................77
8.3. Dimensions ................................................................................................77
9. Liste de contrôle en cas de problèmes techniques ...............................80
10. Compatibilité avec d'autres outils de soins ............................................81
11. Compatibilité électromagnétique ............................................................82

Brancard de douche / Table d’habillage | Mode d’emploi | 61
Français DeutschEnglish
Nederlands
1. Introduction
1.1. Introduction
Le brancard de douche / la table d'habillage est un équipement ergonomique pour
soigner et faire la toilette de personnes à mobilité réduite. Le confort est optimal, tant
pour la personne à mobilité réduite que pour le soignant.
Lopital livre des brancards de douche et des tables d'habillage dans plusieurs versions.
A savoir des brancards / tables d'habillage à fixation murale, des brancards de douche /
tables d'habillage mobiles et des brancards de douche / tables d'habillage non mobiles.
Certaines versions sont dotées d'un réglage électrique ou hydraulique de la hauteur.
L'utilisation du brancard de douche / de la table d'habillage est polyvalente et s’associe
aux autres accessoires, tels que les lits, les chaises roulantes et de douche, les lèvepersonnes et matériels de transfert, comme EasySlide. Il s'agit des fonctions essentielles
du brancard de douche / de la table d'habillage.
La durée de vie technique moyenne de douche / la table d'habillage est de 10 ans,
moyennant un entretien quotidien et périodique selon le plan d'entretien indiqué
(Cf. Chapitre 5 Nettoyage et entretien).
Le brancard de douche / la table d’habillage est un produit de classe 1 avec marquage CE.
Ce marquage est conforme à la directive 93/42/CEE, ou plus précisément la directive
amendée 2007/47/CE du 21 mars 2010 relative au matériel médical. Le brancard de
douche / la table d'habillage a été testé au rayonnement électromagnétique selon
la norme 60601-1-2.
L'Amfora est disponible dans les versions suivantes :
• 6200 4010 – Hydraulique hauteur variable, plateau 160 cm.
• 6200 4015 – Hydraulique hauteur variable, plateau 190 cm.
• 6200 4011 – Electrique hauteur variable, plateau 160 cm.
• 6200 4016 – Electrique hauteur variable, plateau 190 cm.
• 6200 4050 – Hauteur fixe, plateau 160 cm.
• 6200 4055 – Hauteur fixe, plateau 190 cm.
• 6200 5005 – Fixation murale, électrique hauteur variable, plateau 160 cm.
• 6200 5010 – Fixation murale, électrique hauteur variable, plateau 190 cm.
• 6300 4030 – Fixation murale, hauteur fixe, sans bac d'égouttage, plateau 160 cm.
• 6300 4035 – Fixation murale, hauteur fixe, sans bac d'égouttage, plateau 190 cm.
• 6300 4040 – Fixation murale, hauteur fixe, plateau 160 cm.
• 6300 4045 – Fixation murale, hauteur fixe, plateau 190 cm.

62 | Mode d’emploi | Brancard de douche / Table d’habillage
La Vienna est disponible dans les versions suivantes :
• 6500 4020 – Hydraulique hauteur variable, plateau 160 cm.
• 6500 4025 – Hydraulique hauteur variable, plateau 190 cm.
• 6500 4021 – Hydraulique hauteur variable, plateau 160 cm.
• 6500 4026 – Electrique hauteur variable, plateau 190 cm.
• 6500 4060 – Hauteur fixe, plateau 160 cm.
• 6500 4065 – Hauteur fixe, plateau 190 cm.
• 6500 5015 – Fixation murale, électrique hauteur variable, plateau 160 cm.
• 6500 5020 – Fixation murale, électrique hauteur variable, plateau 190 cm.
• 6500 4070 – Fixation murale, hauteur fixe, plateau 160 cm.
• 6500 4075 – Fixation murale, hauteur fixe, plateau 190 cm.
Le Sirocco est disponible dans les versions suivantes :
• 6100 2400 – Fixation murale gauche et à hauteur réglable
• 6100 2401 – Fixation murale droite et à hauteur réglable
• 6100 2402 – Fixation murale gauche et à hauteur fixe
• 6100 2403 – Fixation murale droite et à hauteur fixe
Le Stylex est disponible dans la version suivante :
• 6100 3070 – Standard en inox
1.2. Sécurité
Le non respect des points de sécurité ci-dessous et des autres descriptions dans
ce mode d'emploi peut entraîner des situations dangereuses. Par conséquent,
parcourez-le avant utilisation.
Utilisation
Les règles suivantes s'appliquent à tous les brancards de douche et tables d'habillage :
• Il est interdit de charger le brancard de douche / la table d'habillage avec un poids
de plus de 135 kg.
• Utilisez uniquement des pièces d'origine fournies par Lopital.
• Utilisez le brancard de douche / la table d’habillage dans un environnement de travail
propre et ordonné
• Seul le personnel dont l’autorisation est vérifiable peut travailler avec le brancard de
douche / la table d'habillage.
• Les piscines ne font pas partie de ce qu’il est convenu d’appeler un ‘environnement nor-
mal’ et certains composants du dispositif pourront voir leur durée de vie utile raccourcie.
• Le brancard de douche / la table d'habillage ne doit pas être utilisé / nettoyé à une
température d’eau supérieure à 43 degrés Celsius.

Brancard de douche / Table d’habillage | Mode d’emploi | 63
Français DeutschEnglish
Nederlands
Les règles suivantes s'appliquent à tous les brancards de douche et tables d'habillage
mobiles :
• Vérifiez toujours que le frein soit actionné avant de procéder au transfert du client.
• Avant de déplacer le brancard de douche / la table d'habillage, donnez des instructions
à la personne à mobilité réduite.
• Ne déplacez et ne manœuvrez le brancard de douche / la table d'habillage qu'en
position basse.
• Pendant le déplacement du brancard de douche / de la table d'habillage, ne montez ou
ne descendez pas le brancard de douche / la table d'habillage.
• Franchissez de préférence toujours les obstacles à reculons.
• Il n'est pas permis d'utiliser le brancard de douche / la table d'habillage pour déplacer
autre chose qu'une personne.
Les règles suivantes s'appliquent aux brancards de douche et tables d'habillage réglables :
• Faites attention aux obstacles en montant et en descendant.
Réglage électrique :
• L’utilisation de composants (chargeurs, câbles, mécanismes d’actionnement, batteries)
qui n’ont pas été fournis par Lopital, peut produire une augmentation d’émission ou une
baisse d’immunité du brancard de douche / de la table d'habillage.
• Rechargez les batteries dans une pièce sèche et bien ventilée.
• Les appareils de communication RF portables et mobiles peuvent avoir une incidence sur
le fonctionnement des appareils médicaux électriques.
• Des appareils médicaux électriques sont soumis à des précautions spécifiques relatives à
la CEM et doivent être utilisés selon les informations CEM décrites dans le mode d’emploi.
• Le brancard de douche / la table d'habillage ne sera pas utilisé à proximité ou empilé sur
d’autres produits. S’il n’est pas possible de faire autrement, il faudra vérifier si le brancard
fonctionne également normalement dans cette configuration.
Entretien
• Remplacez toujours le chargeur ou le cordon s’il est endommagé. (Uniquement pour
des versions à réglage électrique)
• Le brancard de douche / la table d'habillage doit passer une inspection et un
entretien périodiques au moins 1 fois par an.
• Seul le personnel autorisé de Lopital est habilité à effectuer le service après-vente et
l’entretien du brancard de douche / de la table d'habillage.
• Seul le personnel autorisé de Lopital est habilité à effectuer le remplacement des pièces
structurelles du brancard de douche / de la table d'habillage.

64 | Mode d’emploi | Brancard de douche / Table d’habillage
• En cas de déformation du brancard de douche / la table d’habillage suite à une
utilisation inappropriée, à un transport, un accident ou une mauvaise maintenance,
cessez toute utilisation et contactez le fournisseur.
En cas de panne, veuillez contacter Lopital ou votre fournisseur local.
E-mail : service@lopital.nl
Le brancard de douche / la table d'habillage ne doit être opéré que par du personnel compétent, dûment formé et qui aura une expérience de travail préalable
avec le groupe-cible d’utilisateurs.
Le brancard de douche / la table d'habillage a été conçu pour être utilisé dans un
environnement clinique.
Toute altération apportée à la structure du brancard de douche / de la table
d'habillage est susceptible d’altérer sa sécurité. De plus, cela annulera les
conditions de garantie et la responsabilité de Lopital. De ce fait, le brancard
de douche / la table d'habillage ne répondra plus aux critères de la directive
sur les dispositifs médicaux.
1.3. Garantie
Les produits Lopital sont garantis 2 ans contre les défauts de construction et de matériel.
Pour d'autres délais, la période de garantie exacte est reprise sur votre facture, laquelle fait
office de certificat de garantie.
Les composants qui sont soumis à une usure (tels que : batteries, commandes manuelles ou
câbles) ne sont couverts par aucune garantie, si ce n’est contre les défauts de construction
ou de matériel.

Brancard de douche / Table d’habillage | Mode d’emploi | 65
Français DeutschEnglish
Nederlands
2. Utilisation
2.1. Mise en service
Avant de mettre le brancard de douche / la table d'habillage en service, contrôlez si les
composants ci-dessous sont présents. Ces composants, s’ils présentent un défaut, peuvent
être remplacés par du personnel compétent. Ces composants sont des parties du brancard de
douche / de la table d'habillage qui sont en contact physique avec le client. Ces composants
sont susceptibles d’entrer en contact avec celui-ci lorsque le brancard de douche / la table
d'habillage est utilisé.
Commande
manuelle
Bac collecteur
Tuyau d'évacuation
Roue pivotante
Ø 12,5 cm
a double freinage
Barrière
latérale
rabattable
vers le bas
Cadre
Batterie
Mécanisme
d'actionnement

66 | Mode d’emploi | Brancard de douche / Table d’habillage
Plateau Oreiller (en
2 parties)
Pompe
Tuyau d'évacuation
Pédale
Matelas
Fixation murale
Borne de
chargement
Barrière
latérale
Batterie

Brancard de douche / Table d’habillage | Mode d’emploi | 67
Français DeutschEnglish
Nederlands
2.2. Travailler avec le brancard de douche / la table d'habillage
Etape 1 (uniquement pour les versions mobiles)
En cas de transfert de personnes, veillez à toujours actionner le frein du brancard de
douche / de la table d'habillage (Cf. paragraphe 3.1. Blocage des roues).
Transfert à partir d'un lit
Etape 2
Placez le brancard de douche / la table d'habillage contre le lit, dans la même orientation
tête / pied que la personne à mobilité réduite.
Etape 3
Abaissez la barrière latérale du brancard de douche / de la table d'habillage
(Cf. paragraphe 3.2. Barrière latérale).
Etape 4 (uniquement pour les versions réglables)
Remontez le plateau du brancard Luxal un peu au-dessus du matelas du lit et rabattez
la barrière latérale vers le bas (avec un brancard de douche / une table d'habillage
réglable).
Etape 5
Ajustez par glissement le brancard de douche / la table d'habillage entre tête et pied de
manière à surplomber le lit le plus possible.
Etape 6 (uniquement pour les versions mobiles)
Bloquez les roues du brancard de douche / de la table d'habillage.
(Cf. paragraphe 3.1. Blocage des roues).
Etape 7
Placez-vous à l’autre extrémité du lit et disposez l’EasySlide entre la personne à mobilité
réduite et le brancard de douche / la table d'habillage.
Etape 8
Faites glisser la personne à mobilité réduite du lit au brancard de douche / à la table
d'habillage en vous aidant de l’EasySlide.

68 | Mode d’emploi | Brancard de douche / Table d’habillage
Etape 9 (uniquement pour les versions réglables)
Remontez le plateau du brancard de douche / de la table d'habillage de quelques
centimètres et refermez la barrière latérale.
Etape 10 (uniquement pour les versions mobiles)
Déverrouillez les freins des roues du brancard de douche / de la table d'habillage et
retirez l’EasySlide (Cf. paragraphe 3.1. Blocage des roues).
3. Commande
3.1. Blocage des roues
(pour versions mobiles)
• Le frein peut être actionné sur le brancard de douche / la
table d'habillage en appuyant avec le pied sur la languette
bleue (1) sur la roue (Cf. figure 1).
• Le frein peut être déverrouillé sur le brancard de
douche / la table d'habillage en relevant la même
languette, en appuyant avec le pied sur le dessus de
la languette (2) (Cf. figure 1).
3.2. Barrière latérale
• Le brancard de douche / la table d'habillage est doté de barrières latérales articulées
en acier. Sur le Stylex, il s'agit de barrières latérales en inox.
• La barrière latérale est équipée d’une sécurité qui empêche la personne à mobilité
réduite de soulever seule barrière latérale.
• La sécurité doit être déverrouillée avant de pouvoir rabattre la barrière latérale en
position basse.
Figure 1 : Blocage des roues
1
2
Figure 2 : Barrière latérale
Sirocco
Figure 3 : Barrière latérale
Amfora / Vienna au mur
Figure 4 : Barrière latérale
brancards / tables d'habillage
mobiles
1
1
1
2
2
2
3
3
3

Brancard de douche / Table d’habillage | Mode d’emploi | 69
Français DeutschEnglish
Nederlands
• Brancard / table d'habillage au mur : déverrouillez la sécurité en tirant d'une main sur
la languette / le bouton (1) qui dépasse et en soulevant la barrière latérale au centre
de l'autre main (Cf. figures 2 et 3).
Brancard / table d'habillage mobile : déverrouillez la protection en retirant les boulons
situés de part et d'autre de la barrière latérale (1) (Cf. figure 4).
• Tournez la barrière latérale déverrouillée vers l'extérieur (3).
• Tournez la barrière latérale à nouveau vers le haut pour la rabattre. Sur les brancards de
douche / tables d'habillage mobiles, la barrière latérale peut être verrouillée en fixant
les boulons aux endroits prévus à cet effet. Sur les brancards / tables d'habillage au
mur, la barrière latérale se verrouille automatiquement.
• Sirocco : assurez-vous que les coins du matelas se remettent en place vers l’intérieur
afin d’éviter qu’ils se retrouvent coincés dans le système de verrouillage de la barrière
latérale.
3.3. Monter / descendre
Versions à réglage électrique
Monter
• Lorsque la personne à mobilité réduite se trouve sur le
brancard de douche / la table d'habillage, verrouillez le
frein des roues (s'il s'agit d'un brancard / d'une table
d'habillage mobile) avant de remonter le brancard de
douche / la table d'habillage.
• Pour remonter le brancard de douche / la table d'habillage,
enfoncez la touche de commande qui montre une flèche
pointée vers le haut. Le brancard de douche commence
alors à remonter doucement (Cf. figure 5).
• Lorsque le brancard arrive à la hauteur souhaitée, relâchez le bouton.
• Pendant que le brancard remonte, soyez attentif à la sécurité de la personne à mobilité
réduite.
• Lorsque vous n’utilisez pas la télécommande, suspendez-la à une barrière latérale.
• Assurez-vous que le cordon spiralé de la commande ne se retrouve pas coincé.
Figure 5 : Monter

70 | Mode d’emploi | Brancard de douche / Table d’habillage
Descendre
• Pour abaisser le brancard de douche / la table d'habillage,
enfoncez la touche de commande montrant une flèche
pointée vers le bas. Le brancard de douche / la table
d'habillage commence alors à descendre doucement
(Cf. figure 6).
• Lorsque le brancard arrive à la hauteur souhaitée, relâchez
le bouton.
• Pendant que le brancard descend, soyez attentif à la
sécurité de la personne à mobilité réduite.
Avant de régler la hauteur du brancard de douche / de la table d'habillage,
vérifiez qu’aucune personne ou objet ne se trouvent sous celui-ci.
Versions à réglage hydraulique
Monter
• Lorsque la personne à mobilité réduite se trouve sur le
brancard de douche, verrouillez le frein des roues avant de
remonter le brancard de douche / la table d'habillage.
• Le brancard de douche / la table d'habillage monte en
appuyant doucement et uniformément sur la pédale
(Cf. figure 7).
•
Pendant le mouvement progressif, le soignant met son buste
dans le sens de la longueur du brancard de douche / de la
table d'habillage, de manière à ne pas pouvoir tourner le
buste par rapport aux pieds.
• Pendant que le brancard remonte, soyez attentif à la sécurité de la personne à mobilité
réduite.
Descendre
• Le brancard de douche / la table d'habillage descend
en relevant la pédale (Cf. figure 8).
• Le brancard de douche / la table d'habillage descend sous
l'effet de la pesanteur. La vitesse de rotation peut être
réglée en maintenant la pédale légèrement enfoncée.
• Pendant que le brancard descend, soyez attentif à la sécurité de la personne à mobilité réduite.
Figure 7 : Monter
Figure 8 : Descendre
Figure 6 : Descendre

Brancard de douche / Table d’habillage | Mode d’emploi | 71
Français DeutschEnglish
Nederlands
3.4. Evacuation d'eau
(uniquement pour Stylex, Sirocco et Amfora avec bac collecteur)
• L’eau du brancard de douche est évacuée par le tuyau prévu à cet effet.
• Décrochez le tuyau de son support et raccordez-le au point d’évacuation le plus bas
possible.
• Pendant le transport, suspendez toujours le tuyau à son support pour empêcher que de
l’eau ne coule sur le sol.
3.5. Changement de batterie
(Uniquement pour les versions à réglage électrique)
• Un signal sonore est émis pour signaler qu’il faut changer
de batterie.
• La batterie est fixée au cadre inférieur du brancard de
douche / de la table d'habillage, à côté du système de gestion électronique. Sur les brancards / tables d'habillage au
mur, la batterie est fixée sous le plateau.
• Pour retirer la batterie, déverrouillez d’une main la sûreté
de la batterie (1) et faites ensuite glisser la batterie vers la
droite (2) (Cf. figure 9).
• Pour placer une nouvelle batterie complètement chargée, celle-ci doit d’abord être
placée contre le boîtier électronique pour être ensuite cliquée sur son support.
Pour que le brancard de douche / la table d'habillage soit en permanence opérationnel, veillez à avoir sous la main une batterie de rechange complètement
chargée.
3.6. Chargement de la batterie
(Uniquement pour les versions à réglage électrique)
• Placez la batterie déchargée sur le chargeur (Cf. figure 10).
• Un témoin vert indique que le chargeur est branché. Un
témoin orange indique que
la batterie est en cours de chargement. Ce témoin s'éteint
lorsque la batterie est rechargée.
• Une fois que la batterie est rechargée, elle peut sans risque
être laissée dans le chargeur.
• Pour retirer la batterie, déverrouillez d’une main la sûreté
de la batterie et retenez la batterie de l’autre main.
Figure 9 : Batterie
1
2
Figure 10 : Chargeur de batterie

72 | Mode d’emploi | Brancard de douche / Table d’habillage
N’utilisez que les batteries qui ont été fournies avec le brancard de douche / la
table d'habillage. Les batteries inutilisées doivent être rechargées au moins tous
les six mois pour rester en bon état. Prolongez la durée de vie des batteries en les
rechargeant avant qu’elles ne soient complètement déchargées.
Le chargeur à utiliser avec le brancard de douche / la table d'habillage est le
‘Linak External charger CHJ2’.
Rechargez les batteries dans une pièce sèche et bien ventilée.
Regardez nos tutoriels vidéo sur www.lopital.fr ou sur www.youtube.com/user/LopitalNL
4. Fonctions de sécurité
4.1. Arrêt d'urgence
(Uniquement pour les versions à réglage électrique)
L'arrêt d'urgence se trouve au centre du cadre inférieur.
Actionnez l’arrêt d’urgence en cas d’urgence lorsqu’il faut
arrêter immédiatement le mouvement montant ou descendant. Lorsque l’arrêt d’urgence a été enfoncé, plus aucune
commande électrique ne fonctionne. Lorsque la situation est
redevenue stable, la commande peut être rétablie. Pour
déverrouiller l’arrêt d’urgence, il suffit de tourner le bouton
d'un quart de tour à droite.
Assurez-vous que le danger soit écarté ou que le problème soit résolu
avant de rétablir le fonctionnement de l'arrêt d'urgence.
4.2. Descente d'urgence
(Uniquement pour les versions à réglage électrique)
En cas d’arrêt de fonctionnement de la commande, si le brancard de douche / la table d'habillage est en position haute,
il peut être descendu en actionnant le bouton de descente
d’urgence. Le bouton de descente d'urgence se trouve à
gauche de l'arrêt d'urgence (Cf. figure 12).
Figure 11 : Arrêt d’urgence
Figure 12 : Bouton de descente
d'urgence

Brancard de douche / Table d’habillage | Mode d’emploi | 73
Français DeutschEnglish
Nederlands
Contrôlez d’abord si le bouton d’arrêt d'urgence n'est pas enfoncé !
- Retirez la fiche de la commande manuelle.
- Enfoncez le bouton d'arrêt d'urgence (à gauche de l'arrêt d'urgence).
Le brancard de douche / la table d'habillage redescend alors dans la position la plus basse
(vérifiez auparavant qu’aucune personne ou objet ne se trouve sous le brancard).
Faites sortir la personne à mobilité réduite du brancard de douche / de la table d'habillage et ne l’utilisez plus jusqu’à ce qu’il ait fait l’objet d’une réparation. Rangez le brancard
de douche / la table d'habillage en lieu sûr et signalez la panne.
Contactez le service technique ou le service après-vente de Lopital.
E-mail : service@lopital.nl
5. Nettoyage et entretien
Le brancard de douche / la table d'habillage doit être nettoyé à l’eau avec un produit
d’entretien ménager courant après chaque utilisation. Éliminez les traces de savon.
N’utilisez pas d’accessoires abrasifs ou de produits solvants agressifs à cet effet (tels que
du chlore). Des expériences pratiques ont montré que des produits ménagers courants
contenant une petite quantité d’alcool (max. 5%) sont les plus appropriés à cet effet.
Pour désinfecter (selon des tests de longue durée), le Neoquat combi
®
est recommandé.
La meilleure manière de nettoyer le matelas et le plateau est de retirer le matelas et de
sécher le plateau du sommier.
Vérifiez régulièrement si les roues sont exemptes de cheveux, de traces de savon ou
de poussières et nettoyez-les le cas échéant. L'entretien et la réparation du brancard de
douche / de la table d'habillage ne doivent être effectués que par du personnel autorisé.

74 | Mode d’emploi | Brancard de douche / Table d’habillage
Plan d'entretien
Après chaque
utilisation
• Nettoyer le brancard à l’eau avec des produits d’entretien
ménager normaux.
Chaque jour
• Nettoyer et désinfecter le matelas / le revêtement.
Chaque semaine
• Nettoyer le cadre.
• Vérifier si les roues sont exemptes de cheveux, de traces de
savon ou de poussières et les nettoyer le cas échéant.
• Contrôler le bon fonctionnement du brancard de douche / de
la table d'habillage.
Chaque année
• Conformément à la directive sur les dispositifs médicaux,
un brancard de douche / une table d'habillage doit être
entretenu selon les instructions du fabricant. Cela sera de
préférence effectué par Lopital ou par une autre entreprise
habilitée à cet effet. Lopital offre la possibilité de faire
inspecter et entretenir le brancard de douche / la table
d'habillage exhaustivement 1 fois par an, en suivant
l’entretien préventif périodique.
Pour recevoir de plus amples informations sur le contrat
d’entretien, adressez-vous à Lopital (service@lopital.nl) ou à
votre fournisseur.
6. Transport et entreposage
Lors du transport ou pendant l’entreposage, on évitera d’exposer l’équipement à des
conditions extrêmes. Cela signifie que la température doit être comprise entre -40 et
+55 degrés Celsius et que le taux d’humidité doit être le plus bas possible. Les vibrations
pendant le transport doivent être limitées autant que possible pour éviter d’endommager
les articulations du brancard.

Brancard de douche / Table d’habillage | Mode d’emploi | 75
Français DeutschEnglish
Nederlands
7. Enlèvement de composants
Tous les composants qui sont remplacés ou enlevés peuvent être retournés à Lopital BV.
Il est également possible de proposer ces composants au monteur, lequel se chargera de
leur élimination. Nous veillerons à ce que tous les composants soient retraités de manière
respectueuse de l’environnement.
Si vous décidez de vous charger vous-même de l’élimination du produit, rappelez-vous
que les batteries et les chargeurs doivent être mis en décharge comme petit déchet
chimique.
8. Caractéristiques techniques
Ce brancard de douche / cette table d'habillage fait partie de la
catégorie “BF”
Ce brancard de douche / cette table d'habillage est un produit de
classe 2 EMC.
Le brancard de douche / la table d'habillage est étanche aux projections d’eau, de sorte
qu'il peut être utilisé sous la douche. Cela est signalé par l’indication IPX4.
8.1. Construction
Amfora et Vienna mobiles :
Cadre inférieur acier + 2 couches de revêtement par poudre
Cadre supérieur acier + 2 couches de revêtement par poudre
Barrières latérales acier + 2 couches de revêtement par poudre
Articulations inox + 2 couches de revêtement par poudre
Stylex :
Cadre inférieur inox + 2 couches de revêtement par poudre
Cadre supérieur inox + 2 couches de revêtement par poudre
Barrières latérales inox + 2 couches de revêtement par poudre
Articulations inox + 2 couches de revêtement par poudre

76 | Mode d’emploi | Brancard de douche / Table d’habillage
Brancards / tables d'habillage au mur :
Cadre acier + 2 couches de revêtement par poudre
Barrières latérales acier + 2 couches de revêtement par poudre
Articulations inox + 2 couches de revêtement par poudre
Brancards / tables d'habillage mobiles :
Roues Ø 12,5 cm, à double blocage
Fixations Inox + acier galvanisé
Poids net
Amfora
6200 4010/15 57 / 60 kg
6200 4011/16 60 / 60 kg
6200 4050/55 34 / 37 kg
6200 5005/10 85 / 85 kg
6300 4030/35 18 / 18 kg
6300 4040/45 20 / 20 kg
Vienna
6500 4020/25 53 / 56 kg
6500 4021/26 57 / 60 kg
6500 4060/65 35 / 37 kg
6500 5015/20 75 / 75 kg
6500 4070/75 23 / 23 kg
Sirocco
6100 2400 80 kg
6100 2401 80 kg
6100 2402 40 kg
6100 2403 40 kg
Stylex
6100 3070 50 kg
Charge maximale
135 kg

Brancard de douche / Table d’habillage | Mode d’emploi | 77
Français DeutschEnglish
Nederlands
8.2. Entraînement
(versions électriques)
Entraînement haut / bas Mécanisme d'actionnement 24 V CC
Boîtier de contrôle 24 V CC, max. 250W
Batterie 24 V, max. 250 W
Chargeur de batterie 230 V CA, puissance de raccordement 100 W, fixation murale
8.3. Dimensions
Dimensions extérieures
Amfora (longueur x largeur x hauteur)
6200 4010/15 160 / 190 x 74 x 70 à 110 cm
6200 4011/16 160 / 190 x 74 x 75 à 115 cm
6200 4050/55 160 / 190 x 74 x 103 cm
6200 5005/10 160 / 190 x 93 x 43 à 103 cm
6300 4030/35 160 / 190 x 85 x 108 cm
6300 4040/45 160 / 190 x 85 x 108 cm
Vienna (longueur x largeur x hauteur)
6500 4020/25 160 / 190 x 74 x 68 à 108 cm
6500 4021/26 160 / 190 x 74 x 71 à 115 cm
6500 4060/65 160 / 190 x 74 x 68 à 108 cm
6500 5015/20 160 / 190 x 85 x 43 à 103 cm
6500 4070/75 160 / 190 x 85 x 110 cm
Sirocco (longueur x largeur x hauteur)
6100 2400 200 x 81 x 43 à 103 cm
6100 2401 200 x 81 x 43 à 103 cm
6100 2402 200 x 81 cm
6100 2403 200 x 81 cm
Stylex (longueur x largeur x hauteur)
6100 3070 194 x 72,5 x 75 à 118 cm
Tuyau d’évacuation d’eau
Diamètre intérieur Ø 4 cm
Empattement 120 cm
Ecartement des roues 65 cm

78 | Mode d’emploi | Brancard de douche / Table d’habillage

Brancard de douche / Table d’habillage | Mode d’emploi | 79
Français DeutschEnglish
Nederlands

80 | Mode d’emploi | Brancard de douche / Table d’habillage
9. Liste de contrôle en cas de problèmes techniques
Problème Cause Solution
Difficulté de roulage du brancard
de douche / de la
table d'habillage
Saletés et savon entre les
roues
Nettoyez les roues
Le brancard de
douche / la table
d'habillage ne
monte ou ne
descend pas
La connexion entre la pompe
et la pédale s'est détachée
La pompe fuit / est défectueuse
Arrêt d'urgence actionné
Batterie déchargée
Fiches déconnectées
La commande manuelle ne
fonctionne pas
Serrez les vis du raccord
Prenez contact avec Lopital
Nederland B.V.
Tournez l’arrêt d’urgence d’un
quart de tour à droite
Chargez la batterie / placez
une batterie
de rechange
Contrôlez les fiches (sur le côté
du boîtier de contrôle)
Contrôlez la fiche.
Prenez contact avec Lopital
Nederland B.V.
Le témoin du
chargeur ne
s'allume pas
Le chargeur n'est pas branché
Le chargeur est défectueux
Branchez le chargeur
Prenez contact avec
Lopital Nederland B.V.
Le brancard de
douche /la table
d'habillage cesse
de fonctionner
Arrêt d'urgence actionné
Panne technique
Tournez l’arrêt d’urgence d’un
quart de tour à droite
Prenez contact avec
Lopital Nederland B.V.

Brancard de douche / Table d’habillage | Mode d’emploi | 81
Français DeutschEnglish
Nederlands
Pour toutes les autres pannes, prenez contact avec Lopital Nederland B.V.
Téléphone : +31 (0)13 5239300
Fax : +31 (0)13 5239301
E-mail : service@lopital.nl
10. Compatibilité avec d'autres outils de soins
EasySlide
L’EasySlide est un moyen très pratique d’effectuer les transferts du lit au brancard de
douche / à la table d'habillage et vice-versa L’effort physique requis en utilisant l’EasySlide et le temps nécessaire sont réduits au minimum. L’EasySlide est compatible avec la
quasi totalité des transferts en lit ou en chaise de et vers le brancard de douche / la table
d'habillage.
Lève-personne
Les brancards de douche / tables d’habillage réglables ont une garde au sol de 6 cm à
partir d’une hauteur de sommier de 50 cm (hydraulique) et de 55 cm (électrique). Les
brancards de douche / tables d’habillage non réglables ont une hauteur de sommier de
90 cm. La garde au sol du brancard / de la table d’habillage fixes est de 25 cm.
Chaise roulante
Dans la position basse de 48-55 cm du brancard de douche / de la table d'habillage
réglables, une personne peut aisément glisser du brancard de douche / de la table
d'habillage vers une chaise roulante et vice-versa. On utilisera idéalement le petit
EasySlide et éventuellement une planche de glissement.
Lit
Le brancard de douche / la table d'habillage est principalement utilisé pour effectuer la
toilette de personnes à mobilité réduite en position couchée. Ces personnes peuvent être
transférées par glissement en position couchée l’aide d’un EasySlide à partir de n’importe
quel lit (haut ou bas) sur le brancard de douche / la table d'habillage. Pour cela, le
brancard de douche / la table d'habillage doit être mis à la même hauteur que le lit.

82 | Mode d’emploi | Brancard de douche / Table d’habillage
11. Compatibilité électromagnétique
(Pour les versions électriques)
Guidance and Manufacturer’s declaration-electromagnetic emissions
The shower stretcher / dressing table is intended for use in the electromagnetic environment specified below. The customer or the
user of the shower stretcher / dressing table should assure that it is used in the following environment:
Emissions Test Compliance Electromagnetic Environment - guidance
RF emissions
CISPR11
Group 1
The shower stretcher / dressing table uses RF energy only for its internal
function. Therefore, its RF emissions are very low and are not likely to cause any
interference in nearby electronic equipment.
RF emissions
CISPR11
Class B
The shower stretcher / dressing table is suitable for use in all establishments,
including domestic establishments and those directly connected to the public
low-voltage power supply network that supplies buildings used for domestic
purposes.
Harmonic emissions
IEC 61000-3-2
Class A
Voltage Fluctuations/
Flicker emissions
IEC 61000-3-3
Complies

Brancard de douche / Table d’habillage | Mode d’emploi | 83
Français DeutschEnglish
Nederlands
Guidance and Manufacturer’s declaration-electromagnetic immunity
The shower stretcher / dressing table is intended for use in the electromagnetic environment specified below. The customer or the
user of the shower stretcher / dressing table should assure that it is used in the following environment:
Immunity Test IEC 60601-1-2 Test
Level
Compliance Level Electromagnetic Environment - guidance
Electrostatic discharge
(ESD)
IEC 61000-4-2
±6 kV contact
±8 kV air
±6 kV contact
±8 kV air
Floors should be made of wood, concrete, or ceramic
tile. If floors are covered with synthetic material, the
relative humidity should be at least 30%.
Electrical fast transient/
burst
IEC 61000-4-4
±2 kV for power
supply lines
±2 kV for power
supply lines
Mains power quality should be that of a typical
commercial or hospital environment.
Surge
IEC 61000-4-5
±1 kV line(s) to line(s)
±2 kV line to earth
±1 kV line(s) to line(s)
±2 kV line to earth
Mains power quality should be that of a typical
commercial or hospital environment.
Voltage dips, short
interruptions, and voltage
variations on power
supply input lines
IEC 61000-4-11
<5% Un
(>95% drop in Un) for
0,5 cycle
40% Un
(60% drop in Un) for
5 cycles
70% Un
(30% drop in Un) for
25 cycles
<5% Un
(>95% drop in Un) for
5 seconds
<5% Un
(>95% drop in Un) for
0.5 cycle
40% Un
(60% drop in Un) for
5 cycles
70% Un
(30% drop in Un) for
25 cycles
<5% Un
(>95% drop in Un) for
5 seconds
Mains power quality should be that of a typical
commercial or hospital environment. The shower
stretcher / dressing table is equipped with a battery.
Power frequency (50/60
Hz) magnetic field
IEC 61000-4-8
3 A/m 3 A/m Power frequency magnetic fields should be at levels
characteristic of a typical location in a typical
commercial or hospital environment.
NOTE Un is the a.c. mains voltage prior to application of the test level

84 | Mode d’emploi | Brancard de douche / Table d’habillage
Guidance and Manufacturer’s declaration-electromagnetic immunity
The shower stretcher / dressing table is intended for use in the electromagnetic environment specified below. The customer or the
user of the shower stretcher / dressing table should assure that it is used in the following environment:
Immunity Test IEC 60601-1-2 Test
Level
Compliance Level Electromagnetic Environment - guidance
RF Common mode/
Conducted Susceptibility
IEC 61000-4-6
Radiated RF Electromagnetic Field
IEC 61000-4-3
3 Vrms
150 kHz to 80 MHz
3 V/m
80 MHz to 2,5 GHz
3 V
3 V/m
Portable and mobile RF communications equipment
should be used no closer to any part of the shower
stretcher / dressing table, including cables than the
recommended separation distance calculated from
the equation applicable to the frequency of the
transmitter.
Recommended separation distance
d =1,2 √P
d =1,2 √P 80 MHz to 800 MHz
d =2,4 √P 800 MHz to 2,5 GHz
Where P is the maximum output power rating
of the transmitter in watts (W) according to the
transmitter manufacturer and d is the recommended
separation distance in meters (m).
Field strengths from fixed RF transmitters, as
determined by an electromagnetic site survey,a should
be less than the compliance level in each frequency
range.b
Interference may occur in the vicinity of equipment
marked with the following symbol:
NOTE 1 At 80 MHz and 800 MHz, the higher frequency range applies.
NOTE 2 These guidelines may not apply in all situations. Electromagnetic propagation is affected by absorption and reflection from
structures, objects and people.
a Field strengths from fixed transmitters, such as base stations for radio (cellular/cordless) telephones and land mobile
radios, amateur radio, AM and FM radio broadcast and TV broadcast cannot be predicted theoretically with accuracy. To assess the
electromagnetic environment due to fixed RF transmitters, an electromagnetic site survey should be considered. If the measured
field strength in the location in which the shower stretcher / dressing table is used exceeds the applicable RF compliance level
above, the shower stretcher / dressing table should be observed to verify normal operation. If abnormal performance is observed,
additional measures may be necessary, such as re-orienting or relocating the shower stretcher / dressing table.
b Over the frequency range 150 kHz to 80 MHz, field strengths should be less than 3 V/m.

Brancard de douche / Table d’habillage | Mode d’emploi | 85
Français DeutschEnglish
Nederlands
Recommended separation distance between
portable and mobile RF communications equipment and the shower stretcher / dressing table
The shower stretcher / dressing table is intended for use in the electromagnetic environment in which radiated RF disturbances
are controlled. The customer or the user of the shower stretcher / dressing table can help prevent electromagnetic interference
by maintaining a minimum distance between portable and mobile RF communications equipment (transmitters) and the shower
stretcher / dressing table as recommended below, according to the maximum output power of the communications equipment.
Rated maximum output power of transmitter
W
Separation distance according to frequency of transmitter
m
150 kHz to 80 MHz
d =1,2 √P
80 MHz to 800 MHz
d =1,2 √P
800 MHz to 2,5 GHz
d =2,4 √P
0,01 0,12 0,12 0,24
0,1 0,38 0,38 0,76
1 1,2 1,2 2,4
10 3,8 3,8 7,6
100 12 12 24
For transmitters rated at a maximum output power not listed above, the recommended separation distance d in meters (m) can be
estimated using the equation applicable to the frequency of the transmitter, where P is the maximum output power rating of the
transmitter in watt (W) according to the transmitter manufacturer.
NOTE 1 At 80 MHz and 800 MHz, the separation distance for the higher frequency range applies.
NOTE 2 These guidelines may not apply in all situations. Electromagnetic propagation is affected by absorption and reflection from
structures, objects and people.

Benutzeranleitung
Stylex / Sirocco / Amfora / Vienna
6200 4010 / 6200 4015, 6200 4011 / 6200 4016, 6200 4050 / 6200 4055, 6200 5005 /
6200 5010, 6300 4030 / 6300 4035, 6300 4040 / 6300 4045 (Amfora)
6500 4021 / 6500 4026, 6500 4020 / 6500 4025, 6500 5015 / 6500 5020, 6500 4060 /
6500 4065, 6500 4070 / 6500 4075 (Vienna)
6100 2400, 6100 2401, 6100 2402, 6100 2403 (Sirocco)
6100 3070 (Stylex)
Duschliege / Ankleideliege
6200 4010 / 6200 4015 Amfora
Duschliege hydraulisch
6300 4030 / 6300 4035 Amfora
Duschliege Wand
6500 4021 / 6500 4026 Vienna
Ankleideliege elektrisch
6500 4070 / 6500 4075 Vienna
Ankleideliege Wand
6200 4011 / 6200 4016 Amfora
Duschliege elektrisch
6300 4040 / 6300 4045 Amfora
Duschliege mit Ablaufrinne, Wand
6500 4020 / 6500 4025 Vienna
Ankleideliege hydraulisch
6500 5015/ 6500 5020 Vienna
Ankleideliege Wand höhenverstellbar
6200 4050 / 6200 4055 Amfora
Duschliege mit Ablaufrinne, rollbar
6200 5005 / 6200 5010 Amfora
Duschliege Wand höhenverstellbar
6500 4060 / 6500 4065 Vienna
Ankleideliege, rollbar
6100 2400 / 6100 2401 / 6100 2402
/ 6100 2403 Sirocco Duschliege Wand
höhenverstellbar
6100 3070 Stylex Duschliege RVS

Duschliege / Ankleideliege | Benutzeranleitung | 87
Français DeutschEnglish
Nederlands
Wichtig:
Lesen Sie diese Anweisungen vor der Anwendung der Duschliege / Ankleideliege
sorgfältig durch!
Datum der Inbetriebnahme . . . . . . . . . . . . . . . . . . . . . . . . . . . . . . . . . . . . . . . . . . . . . . . . .
Benutzer . . . . . . . . . . . . . . . . . . . . . . . . . . . . . . . . . . . . . . . . . . . . . . . . . . . . . . . . . . . . . . . .
Name . . . . . . . . . . . . . . . . . . . . . . . . . . . . . . . . . . . . . . . . . . . . . . . . . . . . . . . . . . . . . . . . . .
Adresse . . . . . . . . . . . . . . . . . . . . . . . . . . . . . . . . . . . . . . . . . . . . . . . . . . . . . . . . . . . . . . . .
Hersteller
Lopital Nederland B.V.
Laarakkerweg 9
5061 JR Niederlande
T +31 (0)13 5239300
F +31 (0)13 5239301
www.lopital.de
info@lopital.nl
Erläuterung der Symbole
Lesen Sie die Benutzeranleitung
vor dem Gebrauch.
Gleichspannung
24V Gleichstrom.
Achtung.
Eingesetzte Teile.
Klasse 2 EMC.

88 | Benutzeranleitung | Duschliege / Ankleideliege
Inhaltsverzeichnis
1. Einleitung ....................................................................................................89
1.1. Einleitung ..................................................................................................89
1.2. Sicherheit....................................................................................................90
1.3. Garantie ......................................................................................................92
2. Gebrauch ....................................................................................................93
2.1. Inbetriebnahme .........................................................................................93
2.2. Arbeiten mit der Dusch- / Ankleideliege ...............................................95
3. Bedienung ..................................................................................................96
3.1. Rollenblockierung (Bei fahrbaren Varianten) .........................................96
3.2. Seitengitter .................................................................................................96
3.3. Anheben / Absenken ...............................................................................97
3.4. Wasserableitung
(Nur bei Stylex, Sirocco und Amfora mit Tropfschale) ...........................98
3.5. Batterie auswechseln (Nur bei elektrisch verstellbaren Varianten).....99
3.6. Batterie aufladen (Nur bei elektrisch verstellbaren Varianten) ............99
4. Sicherheitsfunktionen..............................................................................100
4.1. Not-Stopp (Nur bei elektrisch verstellbaren Varianten) ......................100
4.2. Notabsenkung (Nur bei elektrisch verstellbaren Varianten)...............100
5. Reinigung und Wartung ..........................................................................101
6. Transport und Aufbewahrung .................................................................102
7. Entfernen von Komponenten .................................................................103
8. Technische Daten.....................................................................................103
8.1. Aufbau ......................................................................................................103
8.2. Antrieb ......................................................................................................105
8.3. Abmessungen ..........................................................................................105
9. Checkliste bei technischen Problemen..................................................108
10. Kombination mit anderen Hilfsmitteln ..................................................109
11. Elektromagnetische Kompatibilität ........................................................110

Duschliege / Ankleideliege | Benutzeranleitung | 89
Français DeutschEnglish
Nederlands
1. Einleitung
1.1. Einleitung
Die Dusch- / Ankleideliege ist ein Hilfsmittel für die ergonomisch verantwortungsvolle
Pflege und das Waschen von Klienten. Sowohl für den Klienten als auch für den Pfleger
bietet die Liege optimalen Komfort.
Lopital bietet Duschliegen und Ankleideliegen in verschiedenen Varianten an: Liegen /
Ankleideliegen, die an einer Wand befestigt werden, fahrbare Dusch- / Ankleideliegen
und Dusch- / Ankleideliegen ohne Rollen. Bei manchen Varianten ist die Höhe
elektronisch oder hydraulisch verstellbar.
Die Dusch- / Ankleideliege ist multifunktional zu gebrauchen und ist zu anderen
Hilfsmitteln, wie Betten, Roll- und Duschstühlen, Hebemitteln und Gleitmaterialien,
z. B. dem EasySlide, kompatibel. Das sind die essenziellen Funktionen der Dusch- /
Ankleideliege.
Die durchschnittliche technische Lebensdauer des Dusch- / Ankleideliege beträgt 10
Jahre, insofern die tägliche und regelmäßige Wartung entsprechend dem angegebenen
Wartungsplan ausgeführt wird (Siehe: Kapitel 5 Reinigung und Wartung).
Die Dusch- / Ankleideliege ist ein Hilfsmittel mit CE-Kennzeichnung. Diese Kennzeichnung
ist konform der Richtlinie 93/42/EEG bzw. der aktualisierten Richtlinie 2007/47/EG für
medizinische Hilfsmittel vom 21. März 2010. Die Dusch- / Ankleideliege wurde nach
Norm 60601-1-2 auf elektromagnetische Strahlung getestet.
Das Modell Amfora ist in den folgenden Varianten lieferbar:
• 6200 4010 – Hydraulisch höhenverstellbar, Liegefläche 160 cm.
• 6200 4015 – Hydraulisch höhenverstellbar, Liegefläche 190 cm.
• 6200 4011 – Elektrisch höhenverstellbar, Liegefläche 160 cm.
• 6200 4016 – Elektrisch höhenverstellbar, Liegefläche 190 cm.
• 6200 4050 – Feste Höhe, Liegefläche 160 cm.
• 6200 4055 – Feste Höhe, Liegefläche 190 cm.
•
6200 5005 – Wandbefestigung, elektrisch höhenverstellbar, Liegefläche 160 cm
.
•
6200 5010 – Wandbefestigung, elektrisch höhenverstellbar, Liegefläche 190 cm
.
•
6300 4030 – Wandbefestigung, feste Höhe, ohne Ablaufrinne, Liegefläche 160 cm
.
• 6300 4035 – Wandbefestigung, feste Höhe, ohne Ablaufrinne, Liegefläche 190 cm
.
• 6300 4040 – Wandbefestigung, feste Höhe, Liegefläche 160 cm.
• 6300 4045 – Wandbefestigung, feste Höhe, Liegefläche 190 cm.

90 | Benutzeranleitung | Duschliege / Ankleideliege
Das Modell Vienna ist in den folgenden Varianten lieferbar:
• 6500 4020 – Hydraulisch höhenverstellbar, Liegefläche 160 cm
.
• 6500 4025 – Hydraulisch höhenverstellbar, Liegefläche 190 cm
.
• 6500 4021 – Elektrisch höhenverstellbar, Liegefläche 160 cm
.
• 6500 4026 – Elektrisch höhenverstellbar, Liegefläche 190 cm
.
• 6500 4060 – Feste Höhe, Liegefläche 160 cm
.
• 6500 4065 – Feste Höhe, Liegefläche 190 cm
.
• 6500 5015 – Wandbefestigung, elektrisch höhenverstellbar, Liegefläche 160 cm
.
• 6500 5020 – Wandbefestigung, elektrisch höhenverstellbar, Liegefläche 190 cm.
• 6500 4070 – Wandbefestigung, feste Höhe, Liegefläche 160 cm
.
• 6500 4075 – Wandbefestigung, feste Höhe, Liegefläche 190 cm
.
Das Modell Sirocco ist in den folgenden Varianten lieferbar:
• 6100 2400 – Wandbefestigung links und höhenverstellbar
• 6100 2401 – Wandbefestigung rechts und höhenverstellbar
• 6100 2402 – Wandbefestigung links und feste Höhe
• 6100 2403 – Wandbefestigung rechts und feste Höhe
Das Modell Stylex ist in der folgenden Variante lieferbar:
• 6100 3070 – Standard RVS
1.2. Sicherheit
Die Nichtbefolgung der untenstehenden Sicherheitsanweisungen und der
weiteren Beschreibungen aus dieser Benutzeranleitung kann gefährliche
Situationen verursachen. Lesen Sie diese vor Gebrauch daher sorgfältig durch.
Gebrauch
Für alle Dusch- / Ankleideliegen gilt:
• Es ist nicht zulässig, die Dusch- / Ankleideliege mit einem Gewicht von über 135 kg
zu belasten.
• Verwenden Sie nur originale, von Lopital gelieferte Ersatzteile.
• Verwenden Sie die Dusch- / Ankleideliege in einer sauberen und aufgeräumten
Arbeitsumgebung.
• Das Arbeiten mit dem Dusch- / Ankleideliege ist nur dazu nachweislich befugten
Personen gestattet.
• Schwimmbadörtlichkeiten gehören nicht zu „normalen Umständen“ und verkürzen die
Lebenszeit bestimmter Komponenten.
• Die Dusch- / Ankleideliege darf nur mit einer Wassertemperatur von maximal 43 grad
Celsius gebraucht / gereinigt werden.

Duschliege / Ankleideliege | Benutzeranleitung | 91
Français DeutschEnglish
Nederlands
Für alle rollbaren Dusch- / Ankleideliegen gilt:
• Achten Sie darauf, dass sich die Dusch- / Ankleideliege beim Kliententransfer immer im
arretierten Zustand befindet.
• Informieren Sie den Klienten, bevor Sie die Dusch- / Ankleideliege bewegen.
• Fahren und manövrieren Sie die Dusch- / Ankleideliege nur in einer tiefen Position.
• Während des Transports die Dusch- / Ankleideliege nicht nach oben oder unten
bewegen.
• Fahren Sie vorzugsweise immer rückwärts über Hindernisse.
• Die Dusch- / Ankleideliege darf nur zur Beförderung von Personen benutzt werden.
Für höhenverstellbare Dusch- / Ankleideliegen gilt:
• Achten Sie auf Hindernisse beim Anheben und Absenken.
Elektrisch verstellbar:
• Der Gebrauch von Unterteilen (Ladegeräten, Kabel, Aktuatoren, Batterien), die nicht von
Lopital geliefert wurden, kann einen Emissionsanstieg oder eine reduzierte Immunität
der Dusch- / Ankleideliege verursachen.
• Laden Sie die Batterien in einem gut belüfteten, trockenen Raum auf.
• Tragbare und mobile RF-Kommunikationsgeräte können medizinische, elektrische Geräte
beeinflussen.
• Medizinische elektrische Geräte bedürfen besonderer Vorsichtsmaßnahmen bezüglich
der EMV und müssen entsprechend den in der Benutzeranleitung beschriebenen EMVInformationen benutzt werden.
• Die Dusch- / Ankleideliege wird nicht in unmittelbarer Nähe zu oder gestapelt mit
anderen Hilfsmitteln benutzt. Sollte dies jedoch erforderlich sein, dann ist zu prüfen,
ob die Liege auch in dieser Konfiguration normal funktioniert.
Wartung
• Bei Beschädigungen des Ladegeräts oder des Kabels diese immer austauschen. (Bei
elektrisch verstellbaren Varianten)
• Die Dusch- / Ankleideliege muss regelmäßig, mindestens 1 Mal pro Jahr geprüft und
gewartet werden.
• Service und Wartung der Dusch- / Ankleideliege sind nur durch von Lopital autorisierten
Personen gestattet.
• Der Austausch von Bauteilen der Dusch- / Ankleideliege ist nur durch von Lopital
autorisierten Personen gestattet.
•
Wenn am Dusch- / Ankleideliege durch fehlerhafte Verwendung, Transport, Unfall oder
unsachgemäße Wartung Verformungen auftreten, sollte dieser nicht mehr verwendet und
Kontakt zum Lieferanten aufgenommen werden.

92 | Benutzeranleitung | Duschliege / Ankleideliege
Bei Störungen wenden Sie sich bitte an Lopital oder an Ihren örtlichen
Lieferanten. E-Mail: service@lopital.nl
Die Dusch- / Ankleideliege darf ausschließlich von ausreichend angewiesenem
und fachkundigem Personal bedient werden, das darüber hinaus über Erfahrung
im Umgang mit der Benutzerzielgruppe verfügt.
Die Dusch- / Ankleideliege muss in einer klinischen Umgebung benutzt werden.
Das Anbringen von Änderungen an der Konstruktion kann die Sicherheit der
Dusch- / Ankleideliege beeinträchtigen. Außerdem verfallen dadurch die
Haftungs- und Garantiebedingungen von Lopital. Die Dusch- / Ankleideliege
entspricht dadurch nicht mehr der Richtlinie für medizinische Hilfsmittel.
1.3. Garantie
Auf Hilfsmittel von Lopital wird eine 2-jährige Garantie in Bezug auf Konstruktions- und /
oder Materialfehler gewährt. Bei abweichenden Fristen ist die exakte Garantiezeit auf Ihrer
Rechnung angegeben, die zugleich als Garantiebeleg gilt.
Auf Ersatzteile, die verschlissen werden können (wie Batterien, Handbedienung und
Kabel), wird keine Garantie gewährt, insofern es sich nicht um Konstruktions- und / oder
Materialfehler handelt.

Duschliege / Ankleideliege | Benutzeranleitung | 93
Français DeutschEnglish
Nederlands
2. Gebrauch
2.1. Inbetriebnahme
Bevor Sie die Dusch- / Ankleideliege in Gebrauch nehmen, kontrollieren Sie, ob die
nachstehenden Teile vorhanden sind. Diese Komponenten können bei Beschädigung von
befugten Personen ausgetauscht werden. Diese Komponenten sind die eingesetzten Teile
der Dusch- / Ankleideliege. Diese Komponenten können beim Gebrauch der Dusch- /
Ankleideliege mit dem / den Benutzer(n) in Kontakt kommen.
Handbedienung
Tropfschale
Ableitungsschlauch
Schwenkrolle
Ø 12,5 cm
Doppelt arretiert
Klappbares
Seitengitter
Gestell
Batterie
Aktor

94 | Benutzeranleitung | Duschliege / Ankleideliege
Liegekissen
(2-teilig)
Pumpe
Ableitungsschlauch
Pedal
Matratze
Wandbefestigung
Ladestation
Seitengitter
Batterie

Duschliege / Ankleideliege | Benutzeranleitung | 95
Français DeutschEnglish
Nederlands
2.2. Arbeiten mit der Dusch- / Ankleideliege
Schritt 1 (Nur bei fahrbaren Varianten)
Arretieren Sie beim Personentransfer immer die Bremse der Dusch- / Ankleideliege
(Siehe Kapitel 3.1. Rollenblockierung).
Transfer aus dem Bett
Schritt 2
Platzieren Sie die Dusch- / Ankleideliege neben dem Bett mit dem Kopfende an der
Kopfseite des Klienten.
Schritt 3
Klappen Sie das Seitengitter der Dusch- / Ankleideliege herunter (Siehe Kapitel 3.2.
Seitengitter).
Schritt 4 (Nur bei höhenverstellbaren Varianten)
Bringen Sie die Liegefläche der Dusch- / Ankleideliege knapp über die Bettmatratze und
klappen Sie das Seitengitter herunter (Bei höhenverstellbaren Dusch- / Ankleideliegen).
Schritt 5
Schieben Sie die Dusch- / Ankleideliege zwischen das Kopf- und Fußende, sodass diese so
weit wie möglich über das Bett hinausragt.
Schritt 6 (Nur bei fahrbaren Varianten)
Blockieren Sie die Bremsen der Dusch- / Ankleideliege (Siehe Kapitel 3.1. Rollenblockierung).
Schritt 7
Stellen Sie sich an das andere Ende des Bettes und platzieren Sie den EasySlide zwischen
dem Klienten und der Dusch- / Ankleideliege.
Schritt 8
Schieben Sie den Klienten mithilfe des EasySlides vom Bett zur Dusch- / Ankleideliege.
Schritt 9 (Nur bei höhenverstellbaren Varianten)
Heben Sie die Liegefläche der Dusch- / Ankleideliege einige Zentimeter an und schließen
Sie das Seitengitter.
Schritt 10 (Nur bei fahrbaren Varianten)
Lösen Sie die Bremsen der Rollen und entfernen Sie den EasySlide (Siehe Kapitel 3.1.
Rollenblockierung).

96 | Benutzeranleitung | Duschliege / Ankleideliege
3. Bedienung
3.1. Rollenblockierung
(Bei fahrbaren Varianten)
Die Dusch- / Ankleideliege kann arretiert werden, indem die
blaue Lippe (1) an der Rolle nach unten gedrückt wird (Siehe
Abbildung 1).
Um die Bremse der Dusch- / Ankleideliege zu lösen, muss
dieselbe Lippe von der Rolle entfernt werden, indem mit dem
Fuß die Oberseite der Lippe (2) nach unten gedrückt wird
(Siehe Abbildung 1).
3.2. Seitengitter
• Die Dusch- / Ankleideliege ist mit klappbaren Seitengittern aus Stahl versehen. Beim
Modell Stylex sind die Seitengitter aus Edelstahl.
• Das Seitengitter ist mit einem Gitterschutz versehen, damit der Klient das Seitengitter
nicht selbstständig anheben kann.
• Bevor das Seitengitter nach unten geklappt werden kann, muss der Gitterschutz am
Kopfende entriegelt werden.
• Dusch- / Ankleideliege mit Wandbefestigung: Entriegeln Sie die Sicherung, indem Sie
überstehende Lippe bzw. den Knopf (1) mit einer Hand nach außen ziehen und mit der
anderen Hand das Seitengitter in der Mitte anheben. (Siehe Abbildungen 2 und 3).
Fahrbare Dusch- / Ankleideliege: Entriegeln Sie die Sicherung, indem Sie die Stifte an
beiden Seiten des Seitengitters herausziehen (1) (Siehe Abbildung 4).
• Drehen Sie das entriegelte Seitengitter nach außen (3).
Abbildung 1: Rollenblockierung
1
2
Abbildung 2: Seitengitter Sirocco
Abbildung 3: Seitengitter Amfora / Vienna Wand
Abbildung 4: Seitengitter fahrbare Dusch- / Ankleideliegen
1
1
1
2
2
2
3
3
3

Duschliege / Ankleideliege | Benutzeranleitung | 97
Français DeutschEnglish
Nederlands
• Drehen Sie das Seitengitter wieder nach oben, um es hochzuklappen. Das Seitengitter
wird bei den fahrbaren Dusch- / Ankleideliegen verriegelt, indem die Stifte wieder
an die entsprechende Stelle gesteckt werden. Bei den Dusch- / Ankleideliegen mit
Wandbefestigung verriegelt sich das Seitengitter automatisch.
• Sirocco: Achten Sie darauf, dass die Eckstücke nicht nach innen fallen, damit diese nicht
in der Verriegelung des Seitengitters eingeklemmt werden.
3.3. Anheben / Absenken
Elektrisch verstellbare Varianten
Anheben
• Wenn der Klient auf der Dusch- / Ankleideliege liegt, erst
die Rollen arretieren (wenn es eine fahrbare Dusch- /
Ankleideliege ist) und dann die Dusch- / Ankleideliege
nach oben bewegen.
• Die Dusch- / Ankleideliege wird nach oben bewegt, indem
der Bedienungsknopf mit dem nach oben weisenden Pfeil
gedrückt wird. Die Liege bewegt sich dann gleichmäßig
nach oben (Siehe Abbildung 5).
• Sie können die Bewegung auf jeder gewünschten Höhe
stoppen, indem Sie den Knopf loslassen.
• Halten Sie während der Aufwärtsbewegung Kontakt zum Klienten.
• Wenn die Fernbedienung nicht gebraucht wird, kann diese an einem Seitengitter
aufgehängt werden.
• Achten Sie darauf, dass das gekräuselte Kabel der Bedienung nicht eingeklemmt wird.
Absenken
• Die Dusch- / Ankleideliege wird nach unten bewegt, indem
der Bedienungsknopf mit dem nach unten weisenden Pfeil
gedrückt wird. Die Liege senkt sich dann gleichmäßig ab
(Siehe Abbildung 6).
• Sie können die Bewegung auf jeder gewünschten Höhe
stoppen, indem Sie den Knopf loslassen.
• Halten Sie während der Abwärtsbewegung Kontakt zum
Klienten.
Abbildung 5: Anheben
Abbildung 6: Absenken

98 | Benutzeranleitung | Duschliege / Ankleideliege
Kontrollieren Sie, bevor Sie die Höhe der Dusch- / Ankleideliege verstellen, dass
sich keine Personen oder Objekte unter der Dusch- / Ankleideliege befinden.
Hydraulisch verstellbare Varianten
Anheben
• Wenn der Klient auf der Duschliege liegt, erst die Rollen
arretieren und dann die Duschliege nach oben bewegen.
• Die Dusch- / Ankleideliege bewegt sich durch ruhiges und
gleichmäßiges Drücken des Fußpedals nach oben (Siehe
Abbildung 7).
• Während der Trittbewegung stellt sich der Pfleger mit dem
Oberkörper in Längsrichtung der Dusch- / Ankleideliege,
sodass er den Oberkörper nicht verdrehen kann.
• Halten Sie während der Aufwärtsbewegung Kontakt zum
Klienten.
Absenken
• Die Dusch- / Ankleideliege wird nach unten
bewegt, indem das Fußpedal nach oben bewegt wird
(Siehe Abbildung 8).
• Die Dusch- / Ankleideliege senkt sich unter Einwirkung der
Schwerkraft. Die Senkgeschwindigkeit lässt sich dosieren,
wenn das Pedal leicht gedrückt gehalten wird.
• Halten Sie während der Abwärtsbewegung Kontakt zum
Klienten.
3.4. Wasserableitung
(Nur bei Stylex, Sirocco und Amfora mit Tropfschale)
• Über den Ableitungsschlauch wird das Wasser aus der Duschliege direkt zu einem
Abfluss geführt.
• Nehmen Sie dazu den Schlauch vom Haken und führen Sie diesen an einen so niedrig
wie möglich gelegenen Abflusspunkt.
• Hängen Sie den Schlauch während des Transports immer an den Haken (er kann tropfen
oder lecken).
Abbildung 7: Anheben
Abbildung 8: Absenken

Duschliege / Ankleideliege | Benutzeranleitung | 99
Français DeutschEnglish
Nederlands
3.5. Batterie auswechseln
(Nur bei elektrisch verstellbaren Varianten)
• Wenn ein akustisches Signal zu hören ist, muss die Batterie
ausgewechselt werden.
• Die Batterie ist unter dem Kopfende der Dusch- /
Ankleideliege an der Steuerungselektronik befestigt. Bei
Dusch- / Ankleideliegen mit Wandbefestigung ist die
Batterie unter der Liegefläche befestigt.
• Um die Batterie zu entfernen, wird mit einer Hand der
Entriegelungshebel (1) an der Batterie entriegelt und die
Batterie nach rechts geschoben (2) (Siehe Abbildung 9).
• Für das Einlegen der aufgeladenen Batterie muss die Batterie zuerst gegen das Gehäuse
der Elektronik gedrückt werden, um diese anschließend im Halter festklicken zu lassen.
Achten Sie darauf, dass die Dusch- / Ankleideliege immer betriebsbereit ist,
indem Sie immer eine voll aufgeladene Batterie zur Verfügung haben.
3.6. Batterie aufladen
(Nur bei elektrisch verstellbaren Varianten)
• Platzieren Sie die leere Batterie auf dem Ladegerät
(Siehe Abbildung 10).
• Eine grüne Lampe zeigt an, dass das Ladegerät
eingeschaltet ist. Eine orange Lampe zeigt an, dass die
Batterie aufgeladen wird. Diese Lampe erlischt, wenn die
Batterie voll ist.
• Die geladene Batterie kann auf dem Ladegerät verbleiben,
ohne dass Schäden entstehen.
• Um die Batterie zu entfernen, muss der Entriegelungshebel an der Batterie mit einer
Hand entriegelt werden, während die Batterie mit der anderen Hand gehalten wird.
Verwenden Sie nur die zur Dusch- / Ankleideliege mitgelieferten Batterien.
Laden Sie Batterien, die nicht gebraucht werden, jedes halbe Jahr auf, um eine
Beschädigung zu vermeiden. Wenn Sie die Batterie aufladen, bevor sie ganz leer
ist, verlängern Sie die Lebenszeit.
Das für die Dusch- / Ankleideliege zu verwendende Ladegerät ist der
„Linak External charger CHJ2“.
Abbildung 9: Batterie
1
2
Abbildung 10: Ladegerät

100 | Benutzeranleitung | Duschliege / Ankleideliege
Laden Sie die Batterien in einem gut belüfteten, trockenen Raum auf.
Um Instruktionsvideos anzusehen, gehen Sie auf www.lopital.de oder informieren Sie sich
auf www.youtube.com/user/LopitalNL
4. Sicherheitsfunktionen
4.1. Not-Stopp
(Nur bei elektrisch verstellbaren Varianten)
In der Mitte des Untergestells befindet sich der Not-Stopp.
Bedienen Sie den Not-Stopp in einem Notfall, bei dem die
anhebende oder absenkende Bewegung direkt gestoppt
werden muss. Nachdem der Not-Stopp eingedrückt wurde,
funktioniert die elektrische Bedienung nicht mehr Wenn die
Situation wieder stabil ist, kann die Bedienung fortgesetzt
werden. Drehen Sie den Not-Stopp eine Vierteldrehung nach
rechts, sodass dieser wieder entsperrt wird.
Kontrollieren Sie zuerst, ob die Gefahr vorbei ist oder das
Problem behoben wurde, bevor Sie den Not-Stopp resetten.
4.2. Notabsenkung
(Nur bei elektrisch verstellbaren Varianten)
Wenn die Bedienung nicht mehr funktioniert und die Dusch- /
Ankleideliege in einer hohen Position steht, kann sie mithilfe
des Notabsenkknopfs nach unten bewegt werden. Der
Notabsenkknopf befindet sich links neben dem Not-Stopp.
(Siehe Abbildung 12).
Kontrollieren Sie zuerst, ob der Notknopf eingedrückt ist!
- Entfernen Sie den Stecker von der Handbedienung.
- Drücken Sie den Notabsenkknopf ein.
Die Dusch- / Ankleideliege senkt sich jetzt auf die niedrigste Position (achten Sie darauf,
dass sich keine Personen oder Objekte unter der Liege befinden).
Abbildung 11: Not-Stopp
Abbildung 12: Notabsenkknopf
 Loading...