

Page 1
Rectangle Counter Height Table
Page 1 of 3
Examine all packaging material for small parts that may have come loose during shipment. Periodic checks are recommended to insure that all components are
in proper posion, ght and free from damage. Keep this assembly instrucon for future reference. Adult assembly is required.
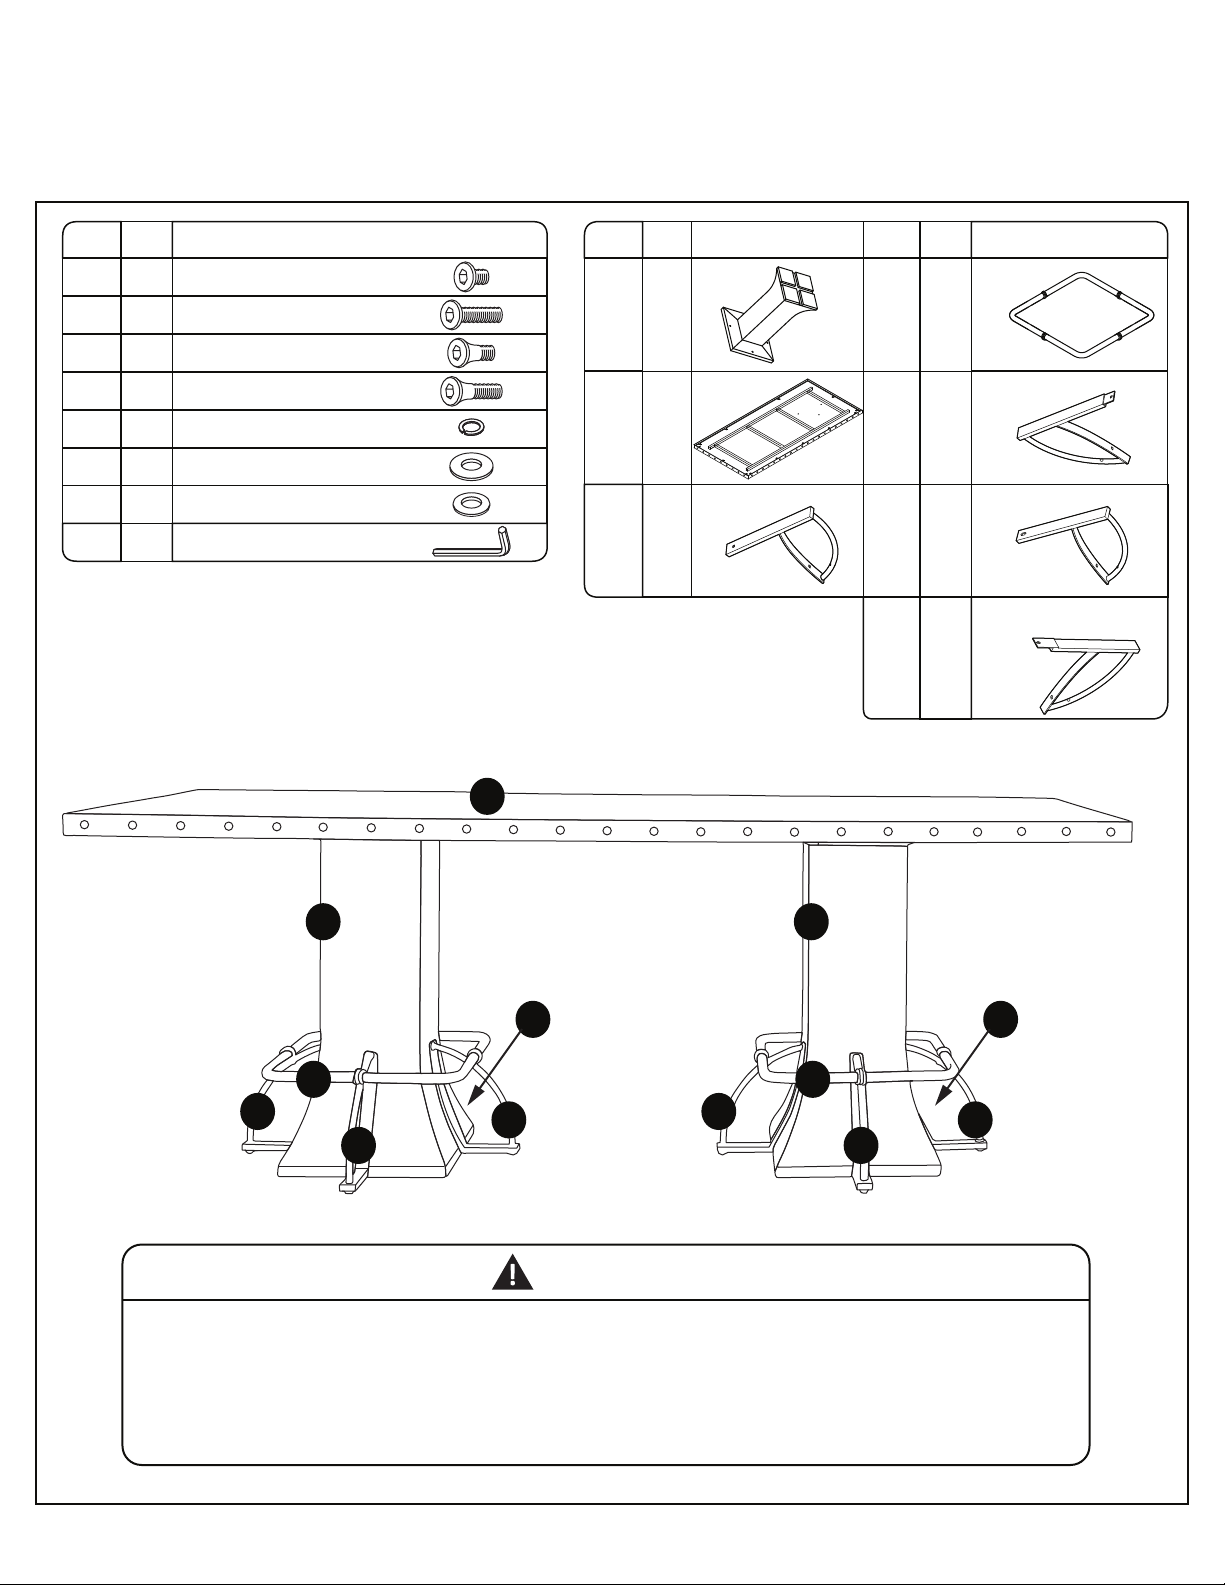
QTYCODE HARDWARE
1
2
3
4
5
6
7
8
4
1/4” x 12 Allen Bolts
8
1/4” x 30 Allen Bolts
8
1/4” x 18 Sunk Bolts
8
1/4” x 30 Sunk Bolts
12
Φ6.5*1.5 Spring Washers
8
Φ20*Φ6.5*2.0 Flat Washers
4
Φ16*Φ6.5*1.5 Flat Washers
1
4*4 Allen Wrench
C
QTYCODE COMPONENTSCOMPONENTS
2A
1C D Leg Panels 1Top 2
2E F Leg Panels 3Leg Panels 2 2
CODE
B Foot RestsBases
G Leg Panels 42
QTY
2
A A
D D
B B
F F
G G
E E
WARNING
• Do not let any sharp objects touch or rub the surface of the product.
• When assembling, do not let children play around the working area.
• Please confirm all parts are correct before starng the assembly process.
• Do not ghten all bolts and screws completely unl the enre unit has been assembled and set up.
• Be careful if using power tools as they can over ghten screws and strip threads.
CARE & MAINTENANCE: The touch of a so cloth is all the maintenance the finish will ever need. Please do not use harsh or abrasive cleaners for polishing, as they may
cause damage to the finish. Periodic checks are recommended to make sure that all hardware is securely ghtened.
Page 2
Rectangle Counter Height Table
Page 2 of 2
FIGURE 1
B
A
DOWN
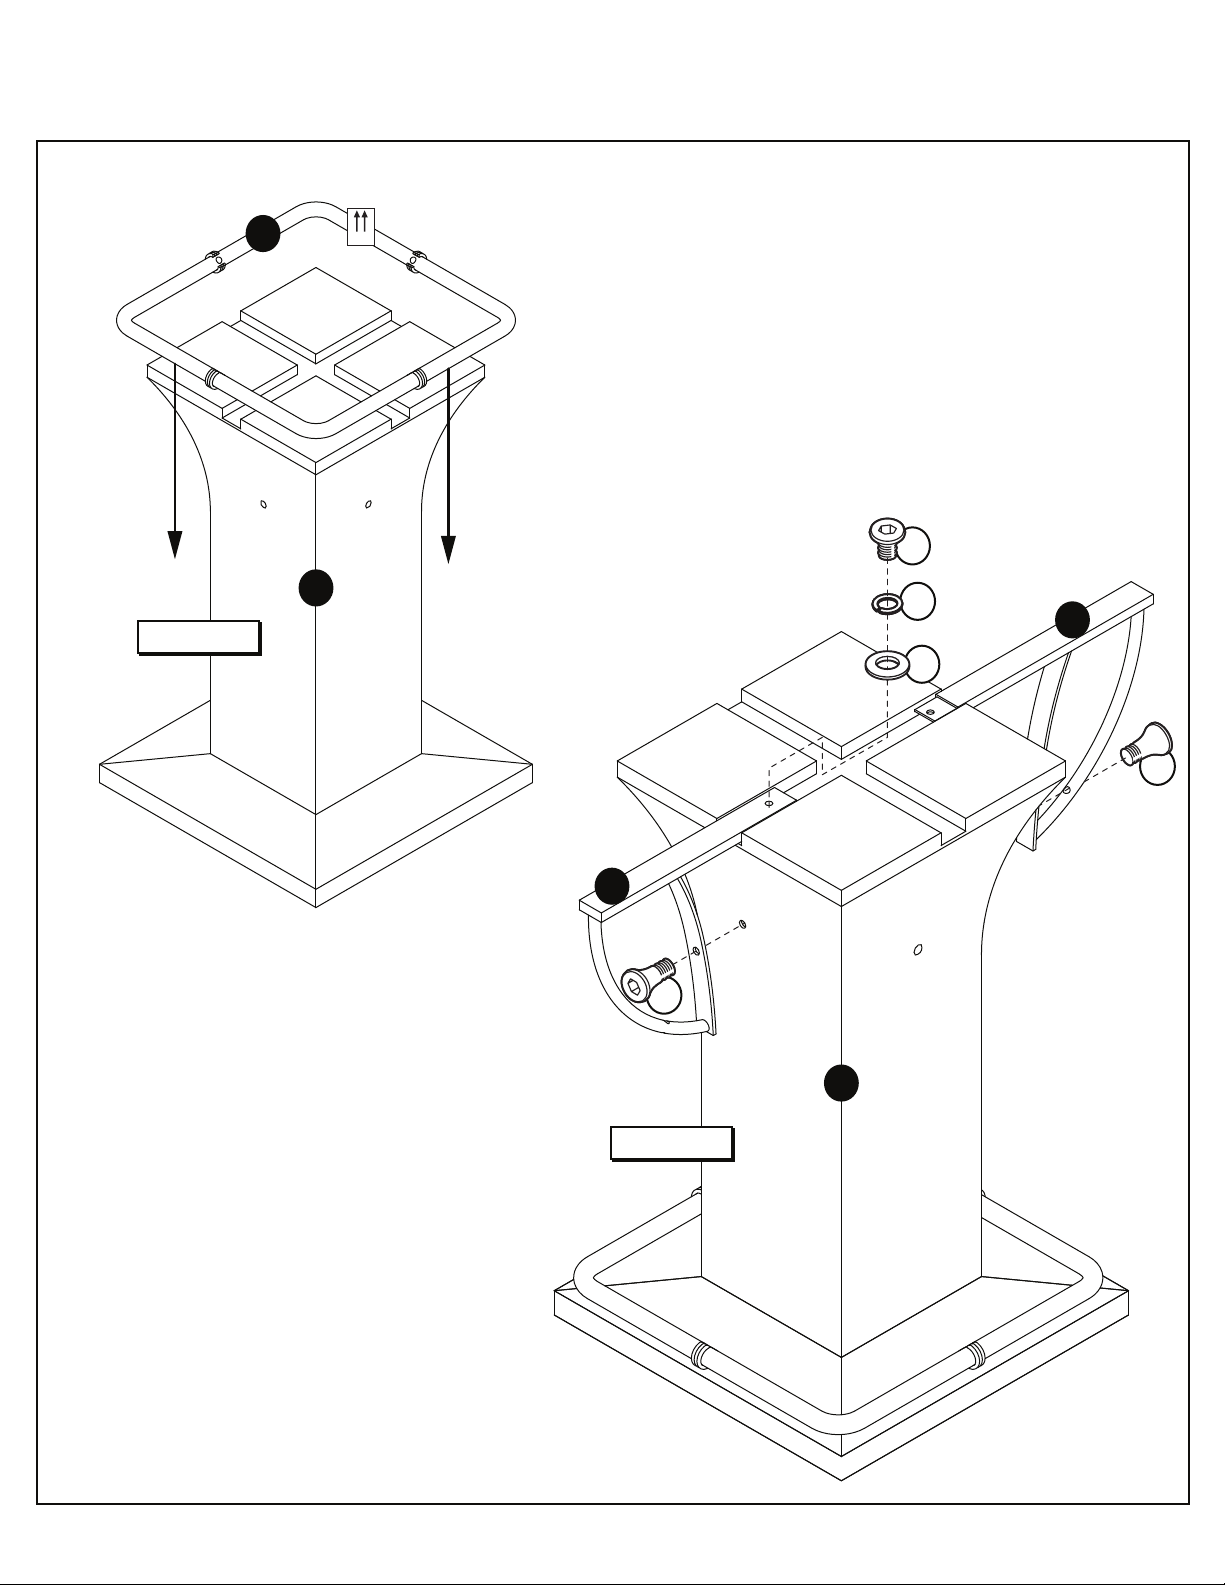
STEP 1 - Figure 1
Begin assembly by seng Bases (A) upside down
on a clean smooth surface. Turn Foot Rest (B)
upside down and slide down on to each Base (A).
1
5
D
7
3
STEP 2 - Figure 2
For each Base (A), slide in Leg Panel 1 (D) and
then Leg Panel 2 (E) over the top and then line
up the holes and secure with 1 Allen Bolt (1), 1
Spring Washer (5) and 1 Flat Washer (7) from
the top and 1 Sunk Bolt (3) from each side.
E
3
A
FIGURE 2
CARE & MAINTENANCE: The touch of a so cloth is all the maintenance the finish will ever need. Please do not use harsh or abrasive cleaners for polishing, as they may
cause damage to the finish. Periodic checks are recommended to make sure that all hardware is securely ghtened.
Page 3
Rectangle Counter Height Table
Page 2 of 2
1
5
FIGURE 4
FIGURE 3
D
3
A
7
D
3
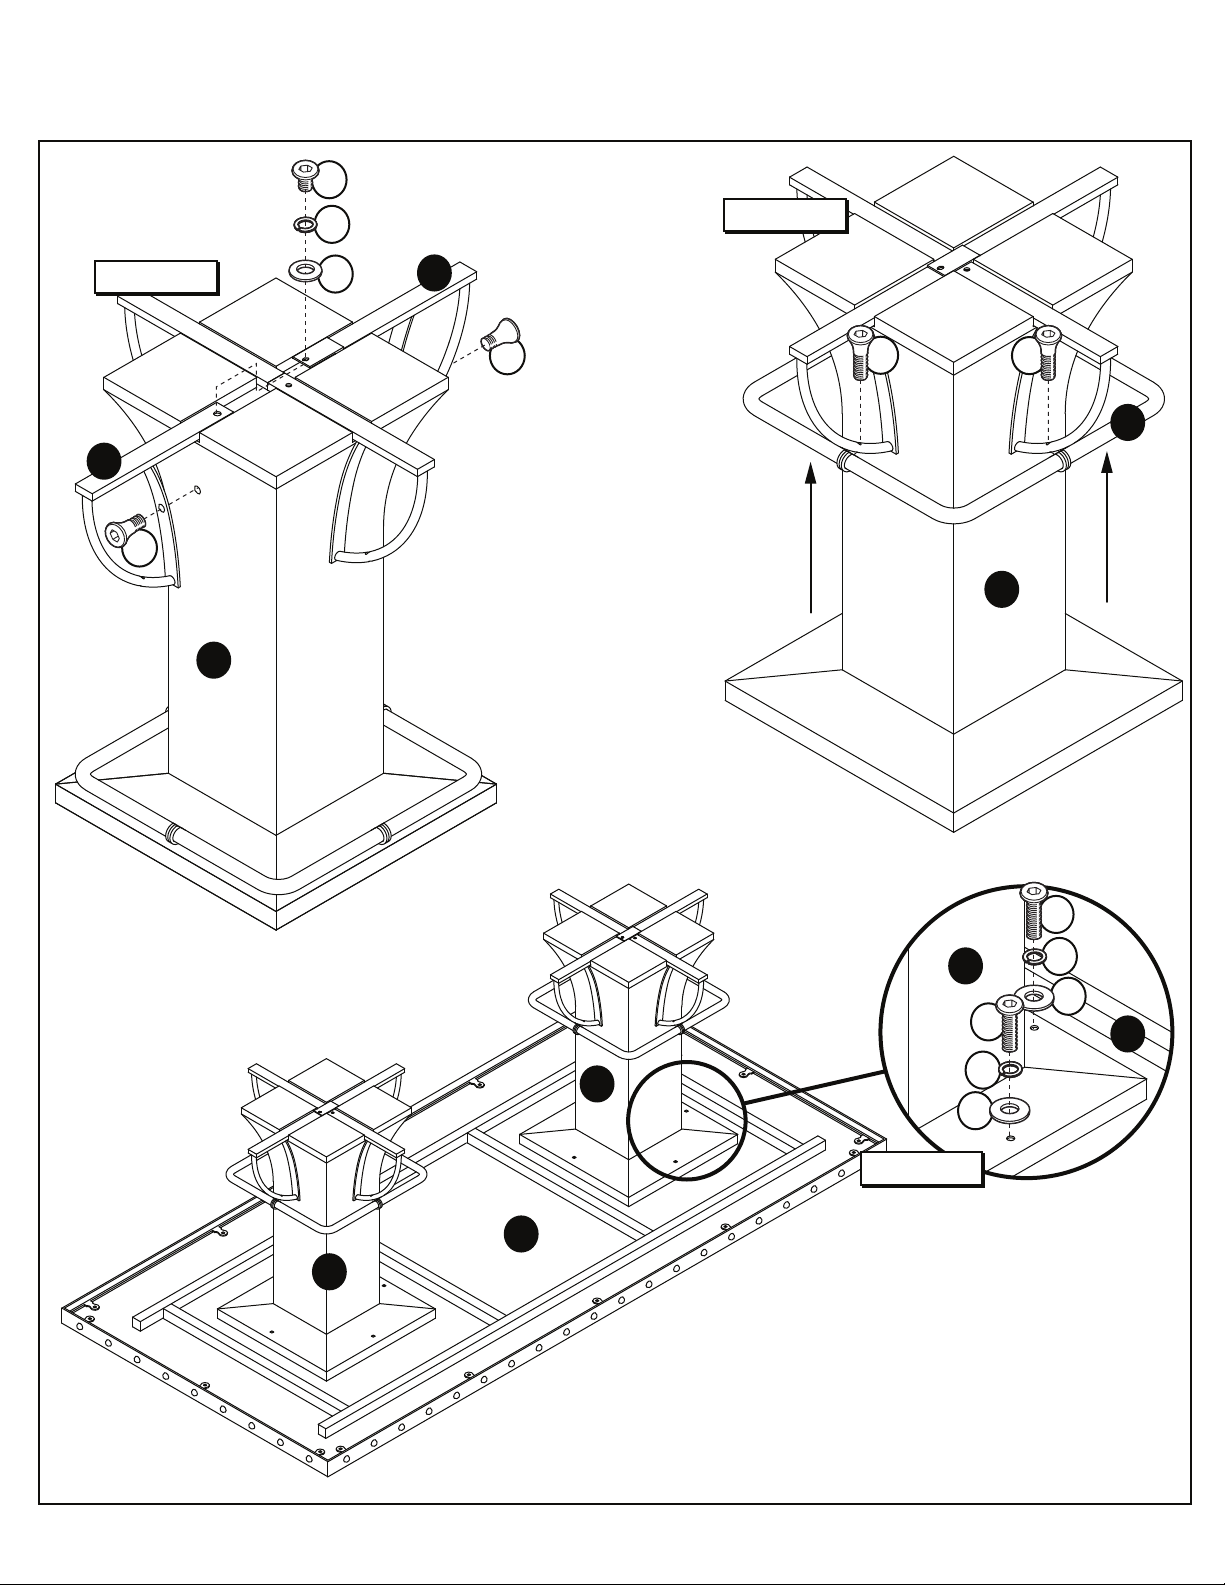
STEP 3 - Figure 3
Slide in remaining 2 Leg Panels (D)
from opposite sides unl they line
up and secure with 1 Allen Bolt (1),
1 Spring Washer (5) and 1 Flat
Washer (7) from the top and 1 Sunk
Bolt (3) from each side.
4
4
B
A
STEP 4 - Figure 4
Raise Foot Rest (B) up to Leg
Panels (D) and secure using 1
Sunk Bolt (4) per side.
A
C
A
2
A
5
6
2
C
5
6
FIGURE 5
STEP 5 - Figure 5
Set Top (C) upside down on a clean smooth
surface. Line up holes of Bases (A) and Top (C)
then secure each with 4 Allen Bolts (2), 4
Spring Washers (5) and 4 Flat Washers (6).
Tighten all bolts with Allen Wrench (8) provided.
CARE & MAINTENANCE: The touch of a so cloth is all the maintenance the finish will ever need. Please do not use harsh or abrasive cleaners for polishing, as they may
cause damage to the finish. Periodic checks are recommended to make sure that all hardware is securely ghtened.
 Loading...