

Page 1
Patio Chair : INSTRUCTIONS
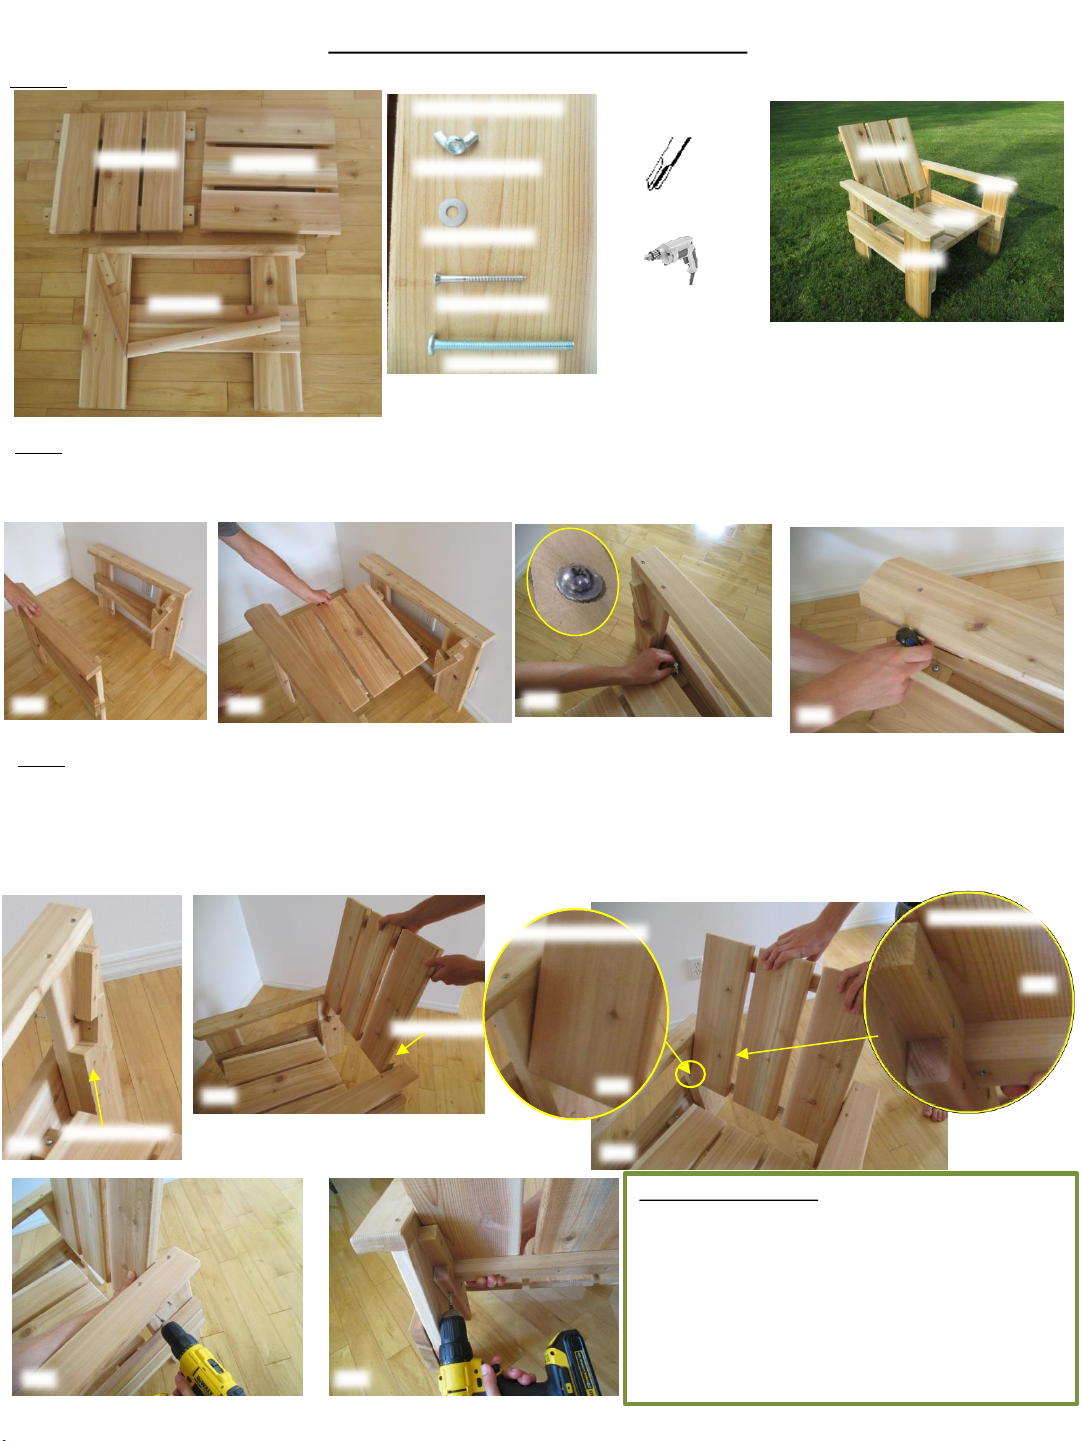
Step 1: Locate the different components. Get the right tools.
HARDWARE KIT
Tools (Not included.)
Seat: x1
Leg: x2
Back: x1
Wing Nuts: x4
Washers: x8
2” Screws: x6
#1 Phillips head
Screwdriver
Powered tool
(Suggested)
Back
Leg
Seat
Leg
Help is available.
3” Bolts: x4
MAKE SURE TO READ EACH STEPS IN FULL AND LOOK AT THE PICTURES BEFORE STARTING TO ASSEMBLE
Step 2: Attach the Seat to the 2 Legs. The Seat is the component with the wide cleats and pre-drilled holes. Stand the 2 Legs (pic. 2.1) and
position the seat over the leg supports making sure to align the pre-drilled holes on the Seat with the pre-drilled holes on the Legs (pic.2.2). It
is easier to have one of the Legs to lean against a wall until the 4 bolts are dropped into position (pic.2.1). Secure using the bolts, washers and
wing nuts. Make sure that there is a washer on both sides of the boards and that the wing nut is installed under the seat (pic. 2.3, 2.4).
3.1
2.1 2.2
2.3
2.4
Please call
Step 3: Attach the Back to the 2 Legs. Properly orient the Back by having the cleat the closest to the edge of the Back boards facing down
(pic.3.2). Slide the Back between the 2 Legs all the way down until it is flushed with the front of the Leg Bracket and sit all the way back against
the back portion of the Leg Bracket (pic.3.3). Make sure that the Back leans properly inside the Leg Bracket on both sides before you start
3.3
screwing it together (pic.3.4 & 3.5). Keeping the Back in position and using the pre-drilled holes install the first two screws as per pic.3.6. It is
critical to maintain proper alignment and positioning between the Back and the Legs in order for the screws to hit their proper location on
the side of the Back. Repeat for the other side. Make sure to go slow and steady and keep good alignment while installing the screws in
order to prevent stripping the screw head. Install the last 2 screws coming from the back of the chair as per pic.3.7.
View from the back
3.5
3.1
Leg Bracket
3.2
Lower Cleat
View from the front
3.4
3.3
3.3
Wider Opening Option: If the chair feels a little too tight
for your liking you can unscrew the 2 armrests, flip them
over and install the left armrest on the right side and the
left armrest on the right side. In other words you just flip
them (the top becomes the bottom) and you switch them
position (the left becomes the right). If you follow this
process properly the holes will all lined up perfectly and
that would give you about 1” of additional clearance
3.6 3.7
between the two armrests. Do not hesitate to call us
with any questions that you may have.
 Loading...