

Page 1
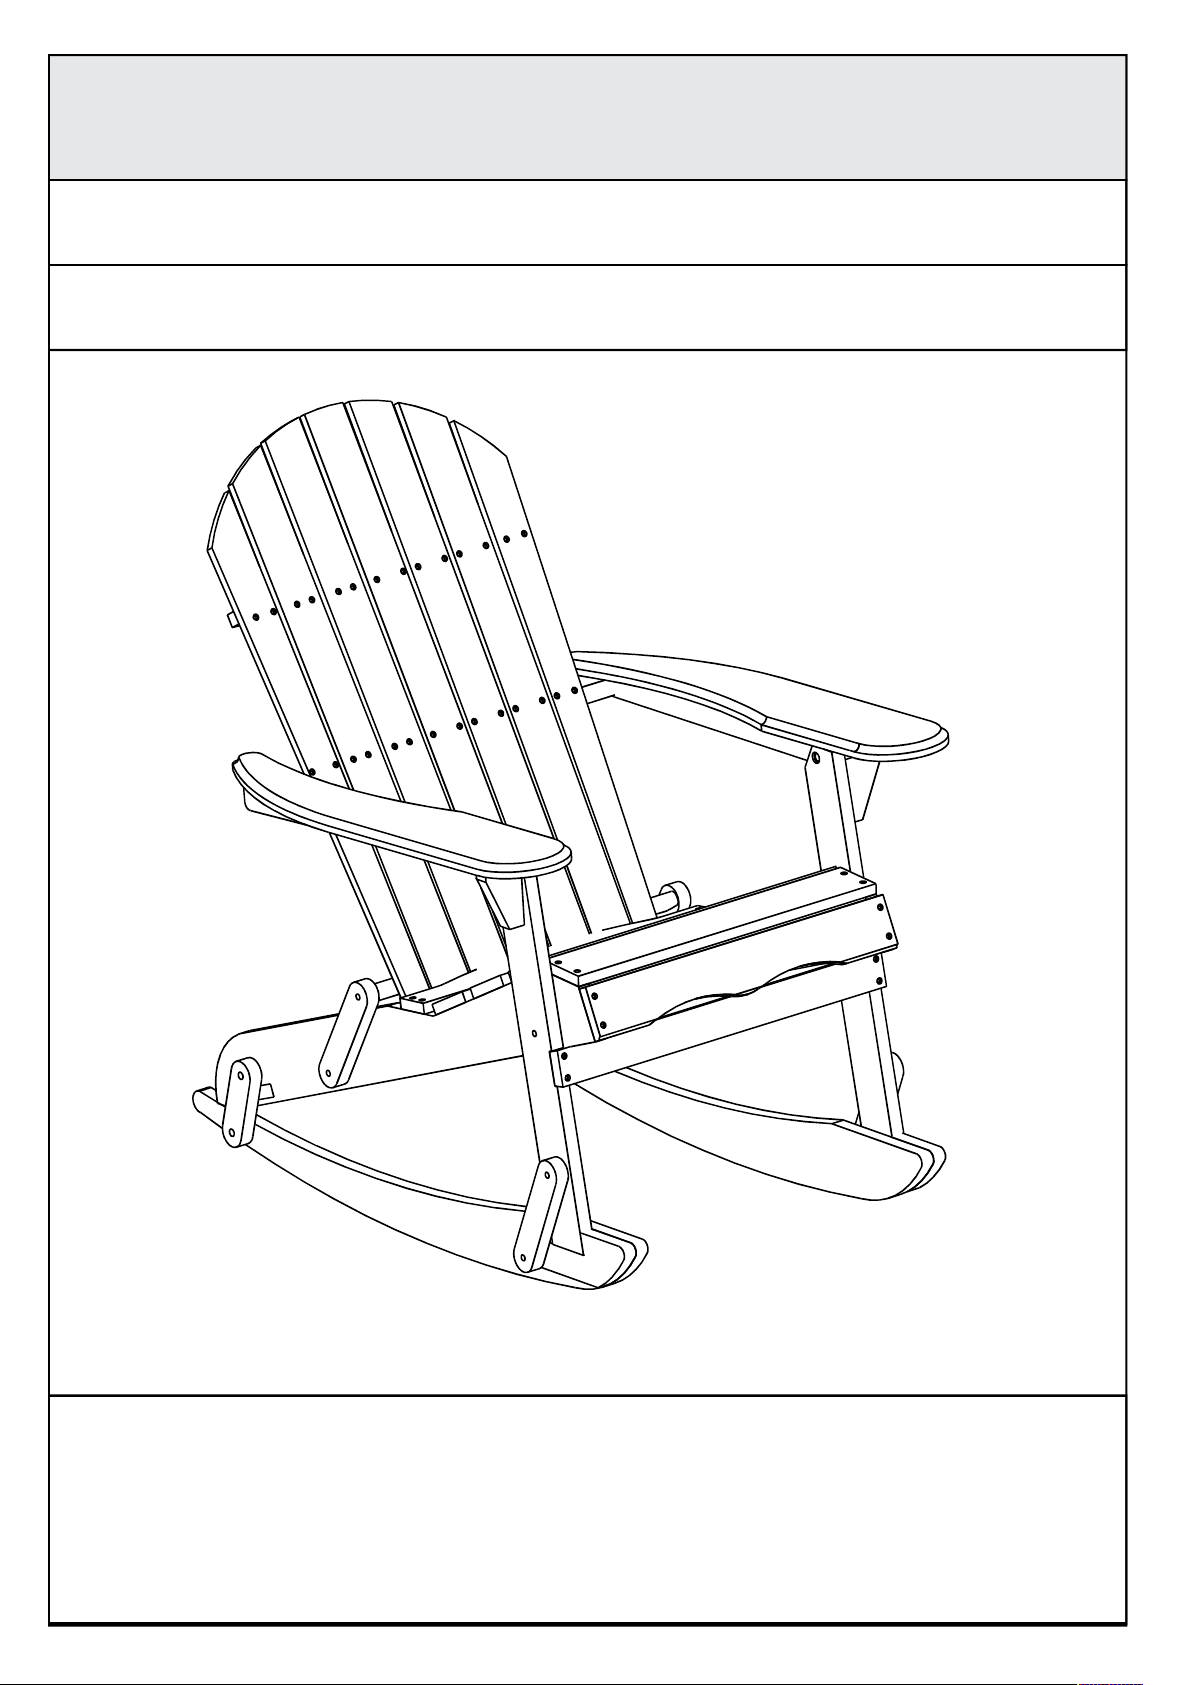
Assembly Instructions
Caution: You must read this before you proceed
ROCKING ADIRONDACK
CAUTION: This Rocking Adirondack is NOT a TOY.
Keep your child/ children at bay during the assemble process.
For moving the Rocking Adirondack and to prevent damage to
the Rocking Adirondack, two adults are needed to execute this
action
Page 1 OF 7
Page 2
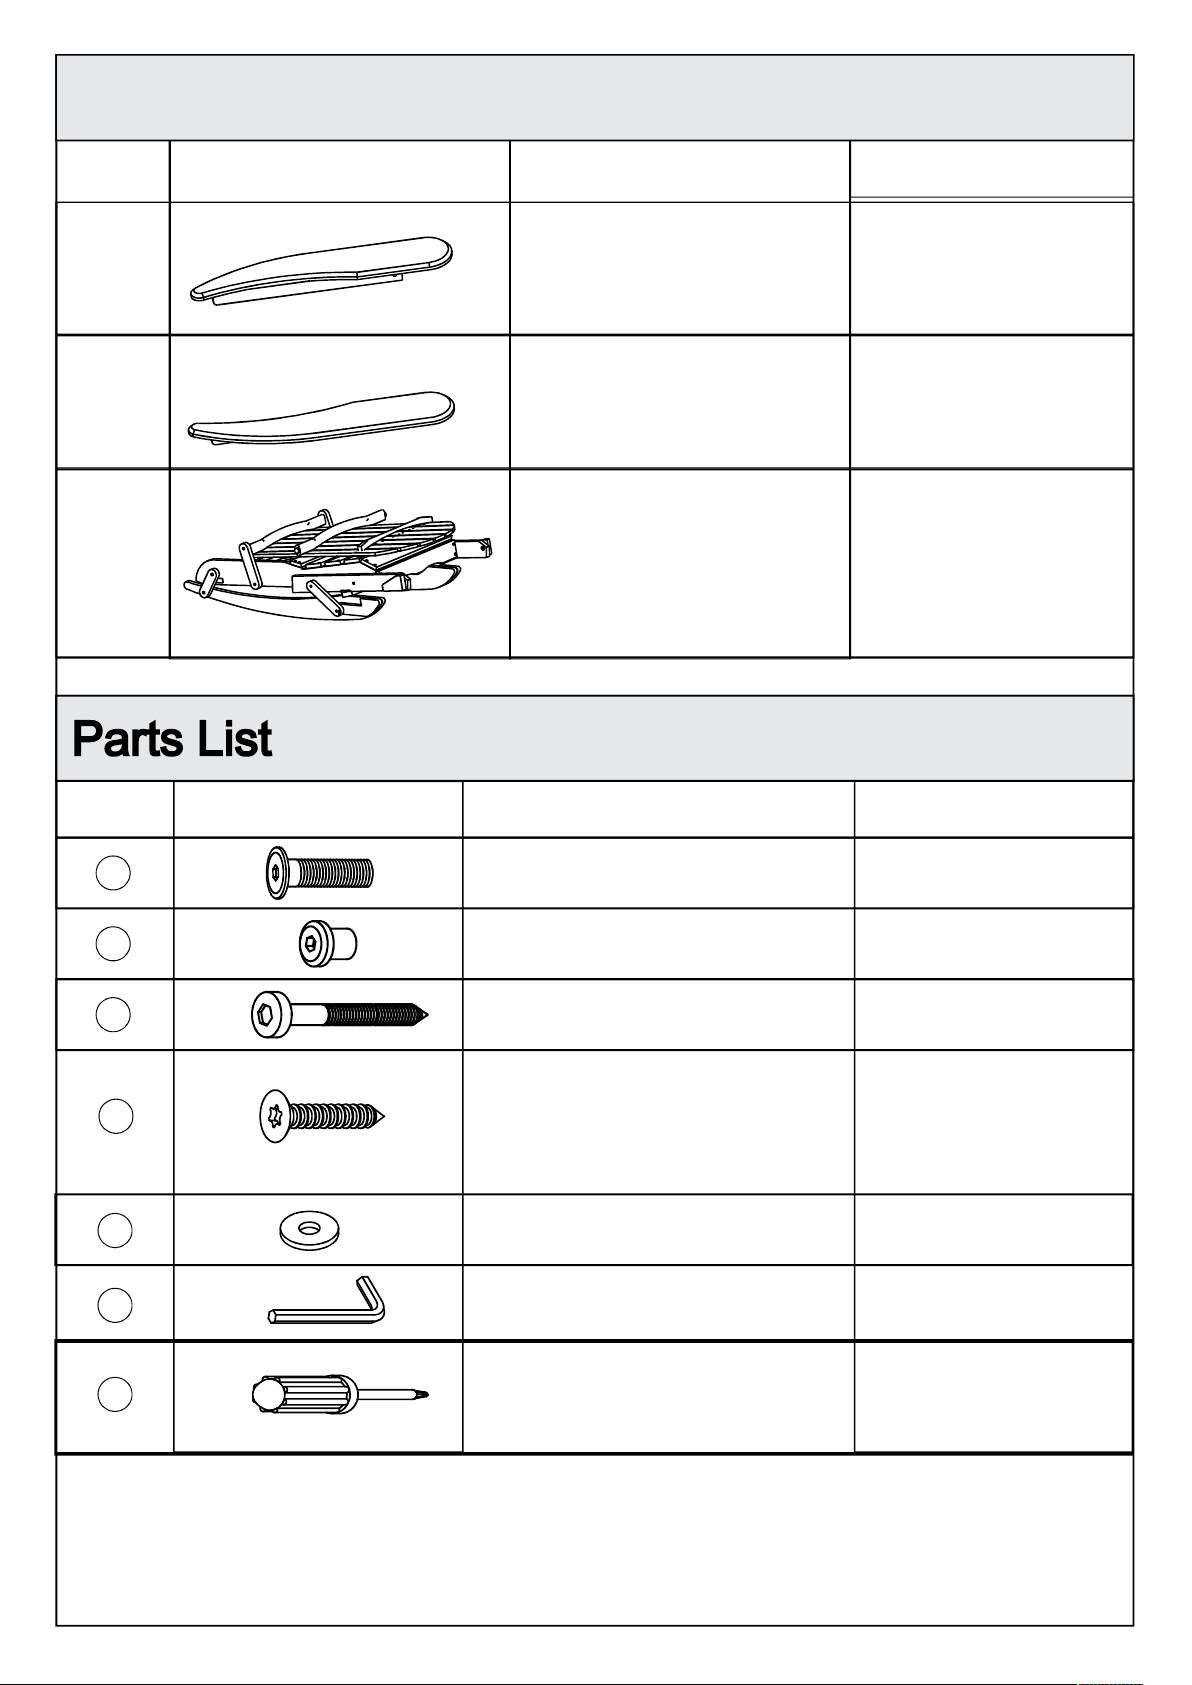
Parts List
Label Picture
A
B
Right Armrest 1
Left Armrest
Description
Foldable Seat And
C 1
Backrest
QTY
1
Label Picture
1
2
3
4
5
6
Description
Bolt ( M8x35 ) mm
Sleeve Nut ( M8x15 )mm
Long Screw ( M7x70 )mm
Screw ( M x )
4 30mm
(Use with screwdriver)
Plastic Washer
Allen Key
QTY
3
3
3
5
3
2
7
Screwdriver (Not provided)
1
Page 2 OF 7
Page 3
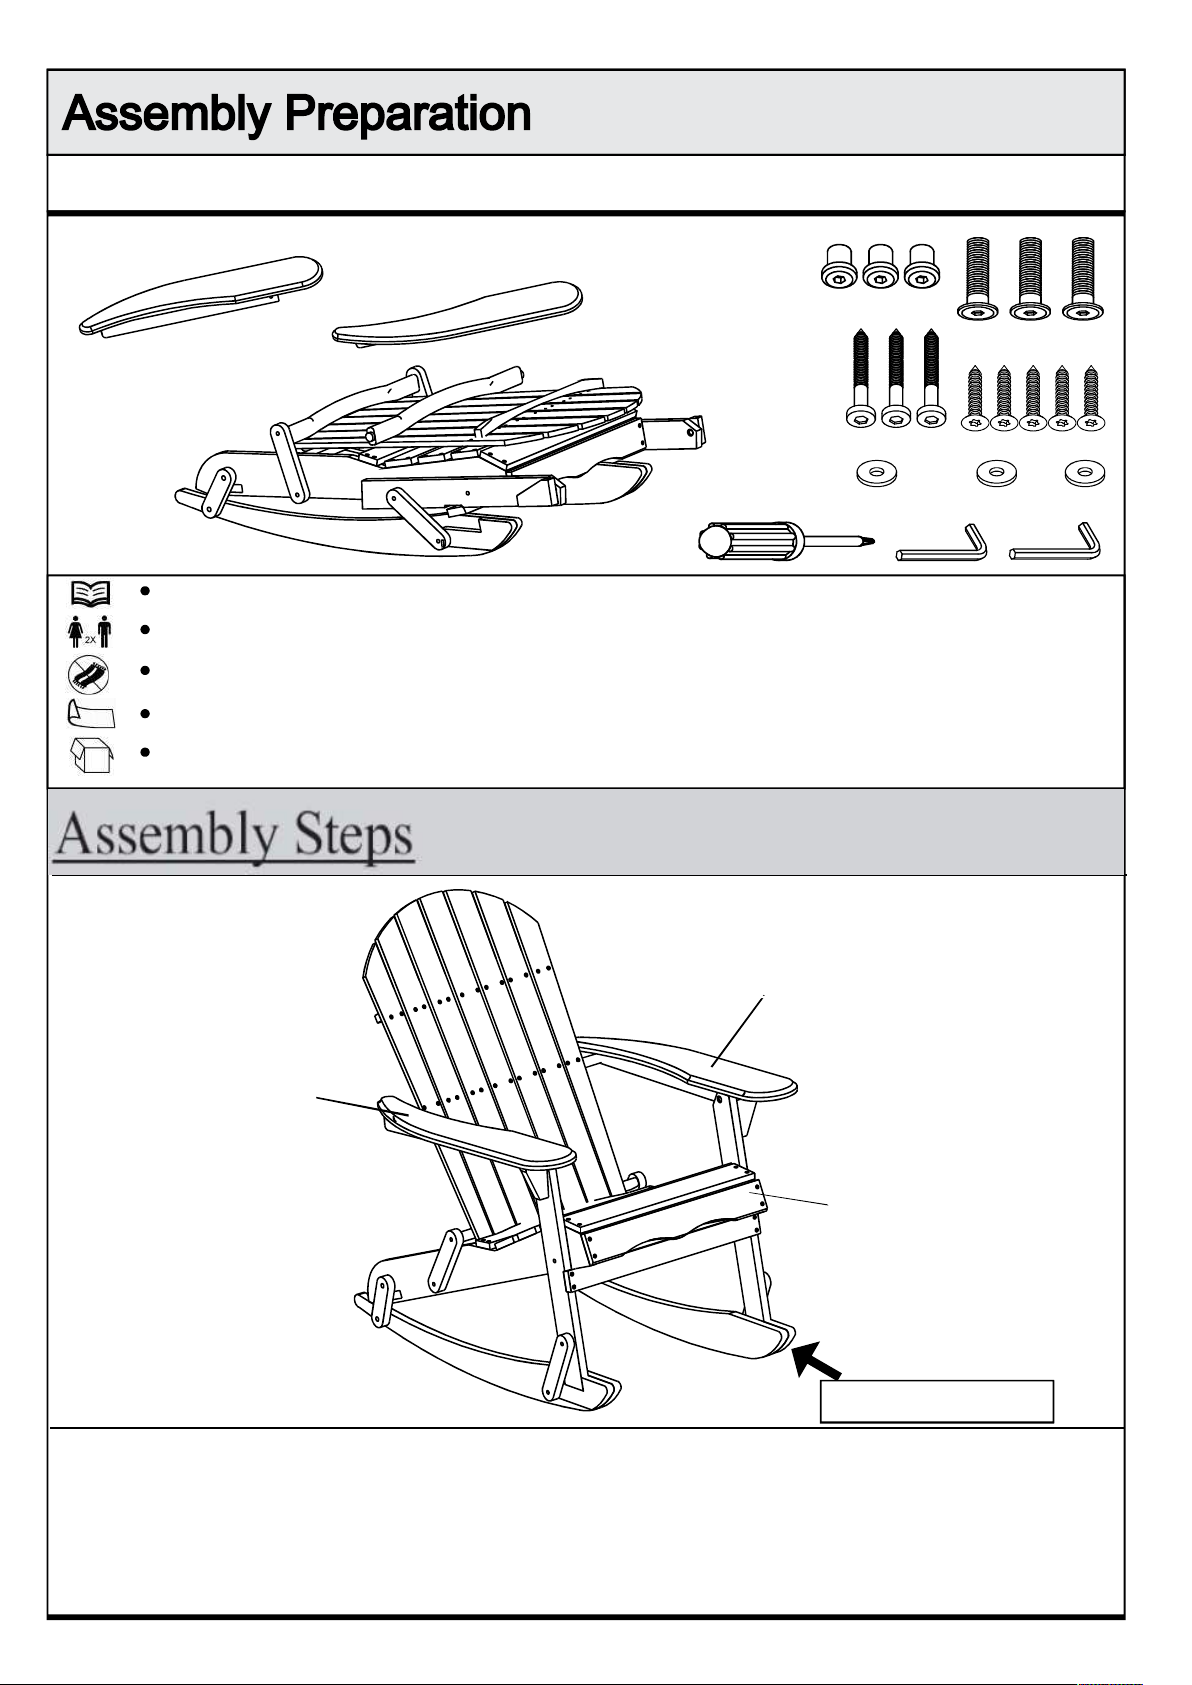
Before Beginning Assembly:
Read instructions, cover to cover-
Have 2 adults on hand for assembly-
Do not assemble on flooring or carpet-
Assemble on a clean non-marring surface (packing foam)-
Save all packaging until finished-
OVERVIEW
Right A Armrest ( )
Left BArmrest ( )
Foldable Seat And
Backrest (C)
FRONT FACING
This Rocking Adirondack has multiple parts and may require up to 30
minutes to assemble. To give you an overview of the Rocking Adirondack
parts, the above picture is to help you put the various parts into
perspective. Please read through the instructions below to familiarise
yourself with the parts and steps before assembly.
Page OF 3 7
Page 4
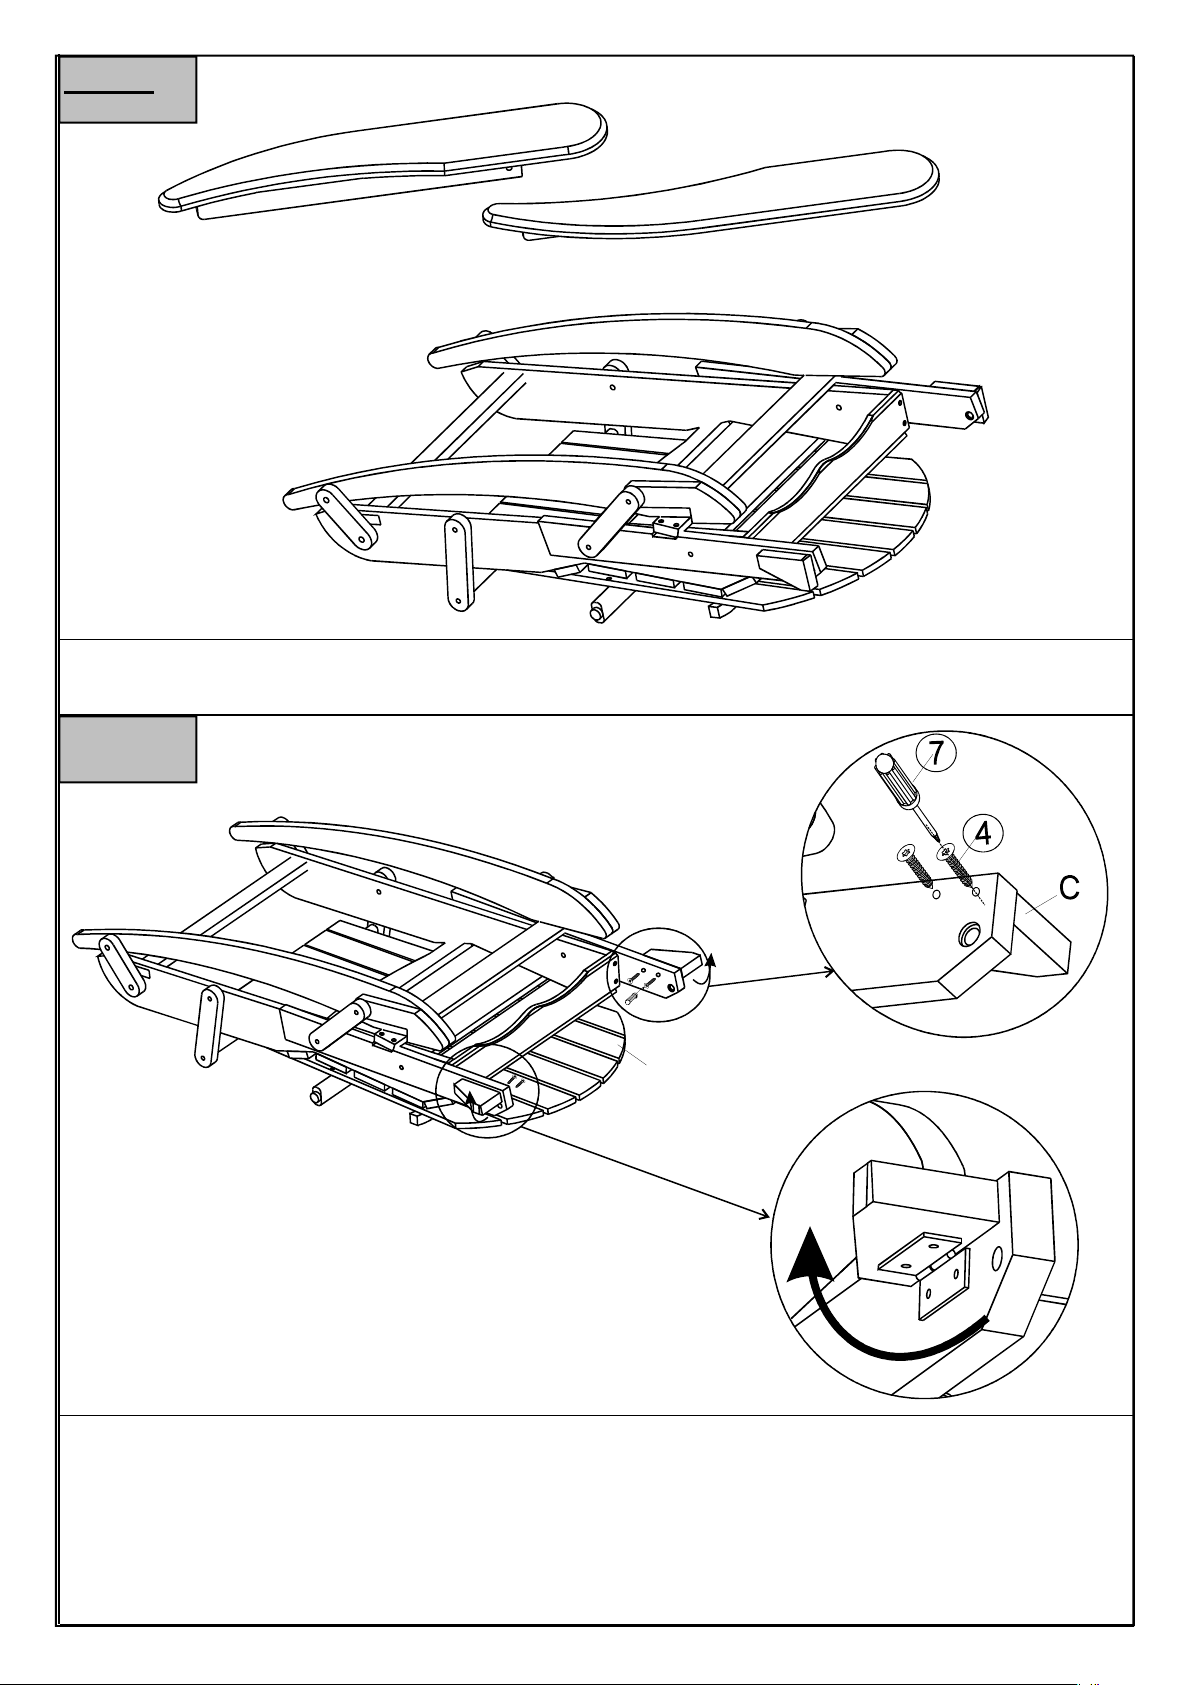
Step 1
Unpack and place all parts on a clean, non-marring surface.
Step 2
step 2.2
C
step 2.1
Step 2.1: Open Left and Right Support Corners as indicated with the arrow.
Step 2.2: Using 2 Screw (④)and Screwdriver ( attach Right Leg to Right
⑦)
Support Corner.
Repeat the same process with the Left Leg and Left Support Corner
Page OF 4 7
Page 5
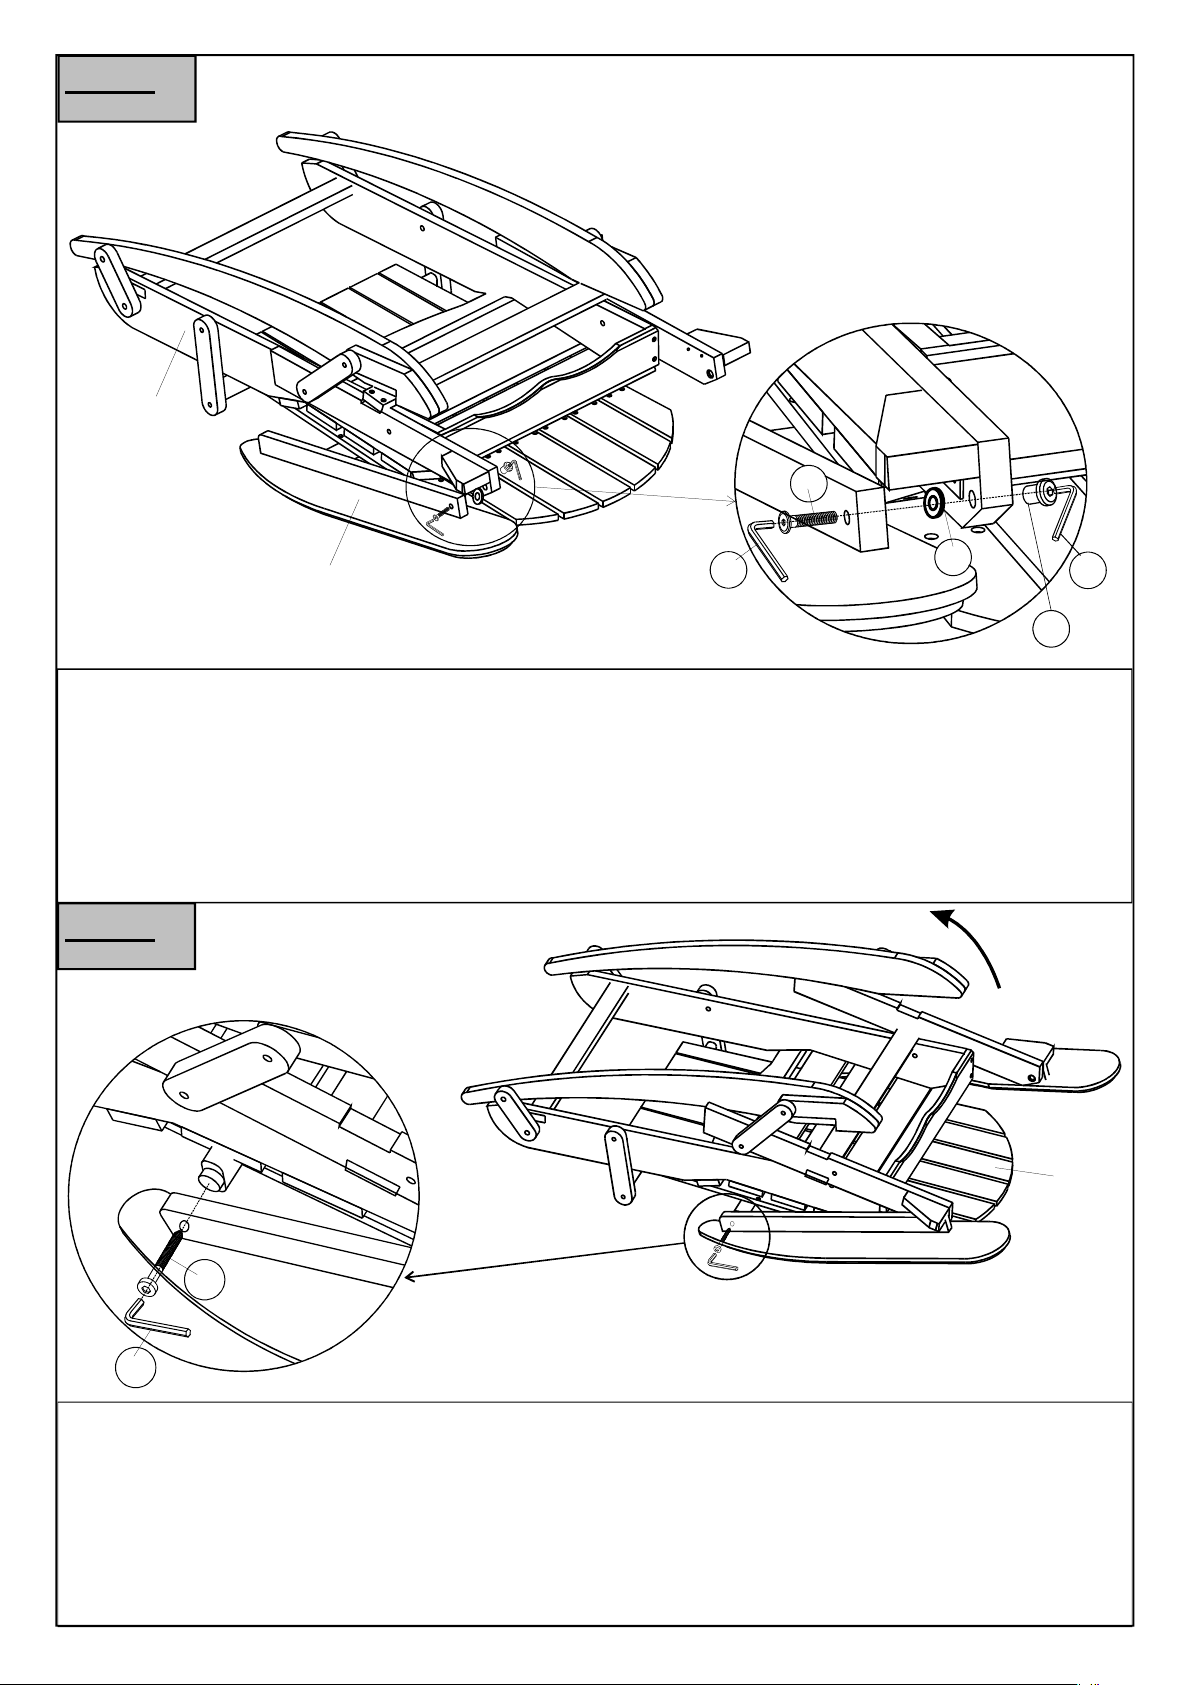
Step 3
C
1
A
Attach Right Armrest (A) to Foldable Seat and Backrest ( C) using Bolt
(①),Sleeve Nut ( Plastic Washer ( and 2 Allen Key (
Repeat the same process with the Left Armrest (B).
Do not fully tighten Bolts.
Note:
Step 4
Plastic Washer ( should be placed between Leg and Armrest.
②), ⑤) ⑥)
⑤)
6
A
C
5
6
2
C
C
3
A
6
Open Seat and Backrest (C ) as indicated with the arrow.
Put tenon of Backrest Support into the hole of Right Armrest (A)Secure
Secure Right Armrest (A) to Seat and Backrest (C) using Long Screw ③,
Allen Key
Repeat the same process with the Left Armrest (B).
⑥.
Page OF 5 7
A
B
Page 6
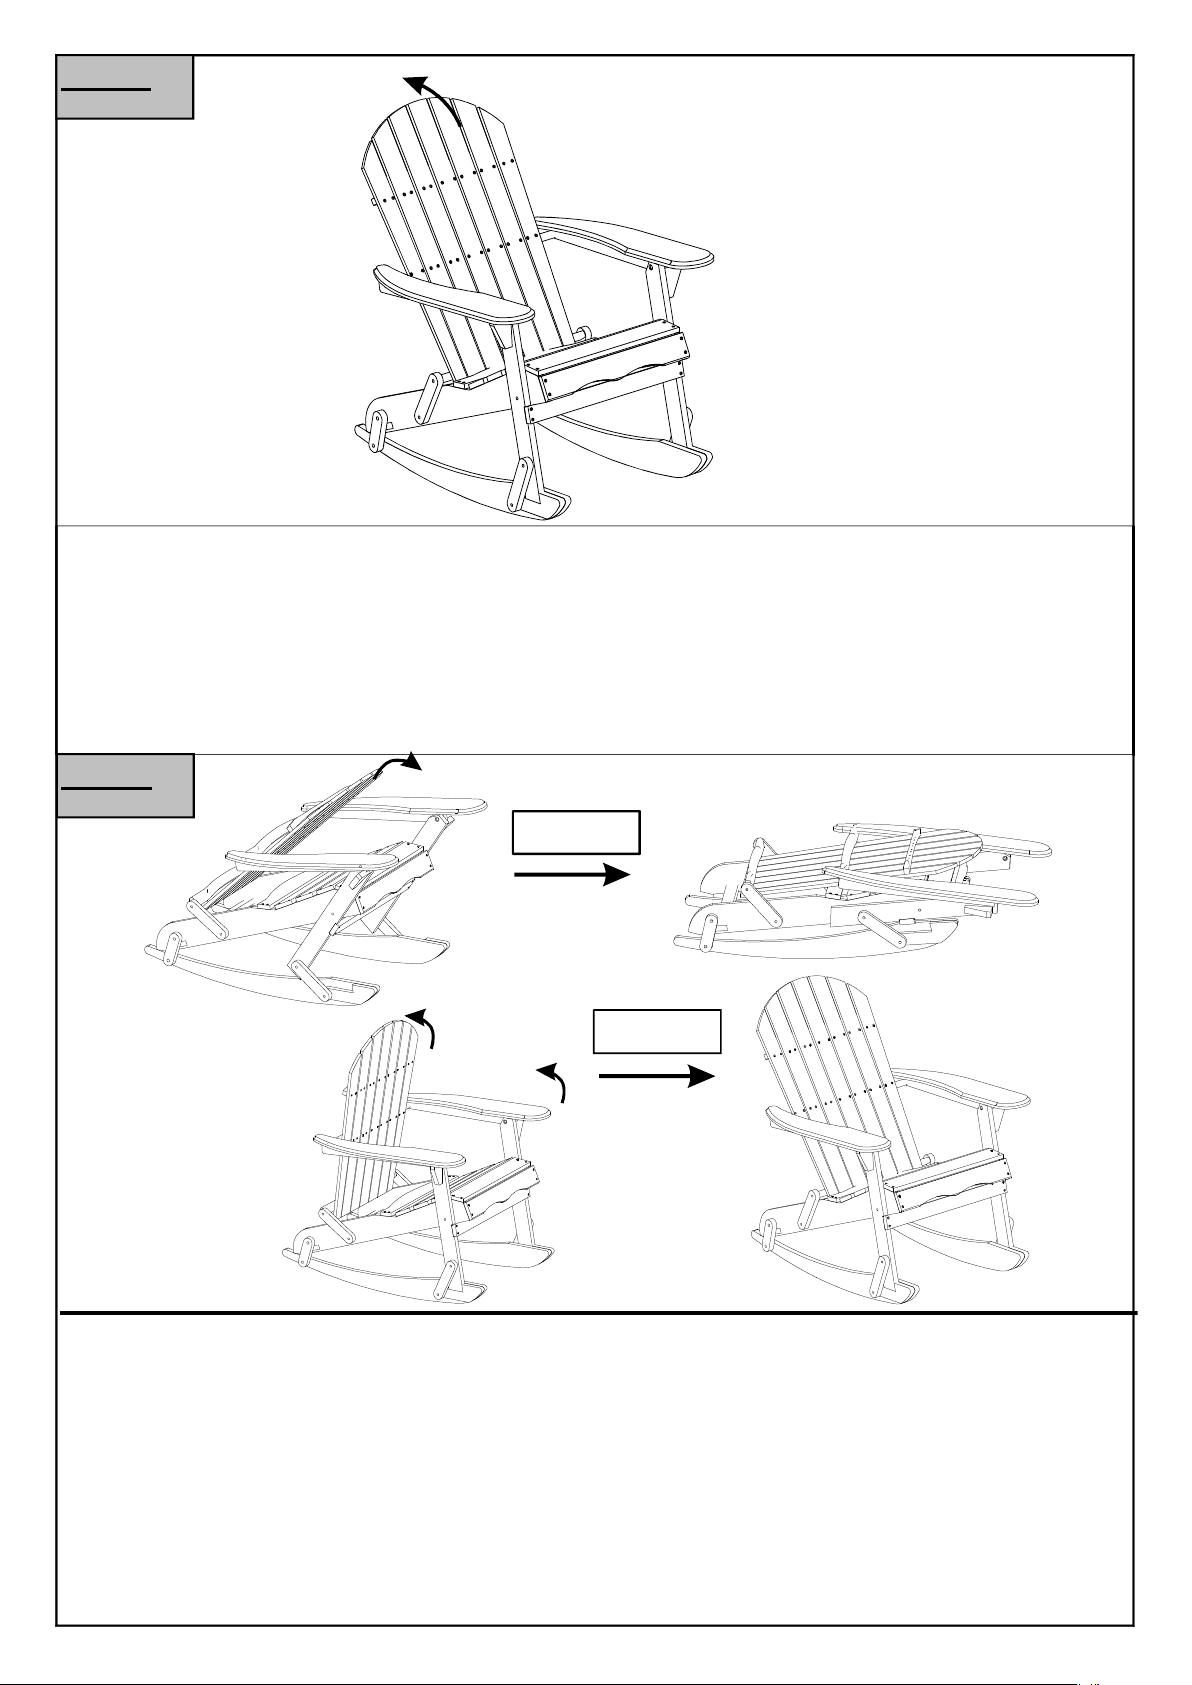
Step 5
C
Turn over Rocking Adirondack and open Backrest as indicated with the
arrow.
In a sequential manner, tighten all Bolts and Screws at all joints until fully
locked into position
Your Rocking Adirondack is ready for use.
This Rocking Adirondack can only be used on a flat, level surface.
Step 6
To Fold
To Open
This Rocking Adirondack can be folded shut.
To fold this Rocking Adirondack, raise up Backrest and fold Seat with Leg
Frame as indicated by the arrows, by hand, until the Rocking Adirondack
folds shut
To open this Rocking Adirondack, open Backrest and Seat as indicated by
the arrows, by hand until the Adirondack folds out and locks into position.
Note: This Rocking Adirondack is slightly heavy, do exercise caution to
avoid injury.
Page OF 6 7
Page 7
Page OF 7 7
 Loading...