

Page 1
1
Operating manual
a Look Solutions product
TINY
F07
Page 2

2
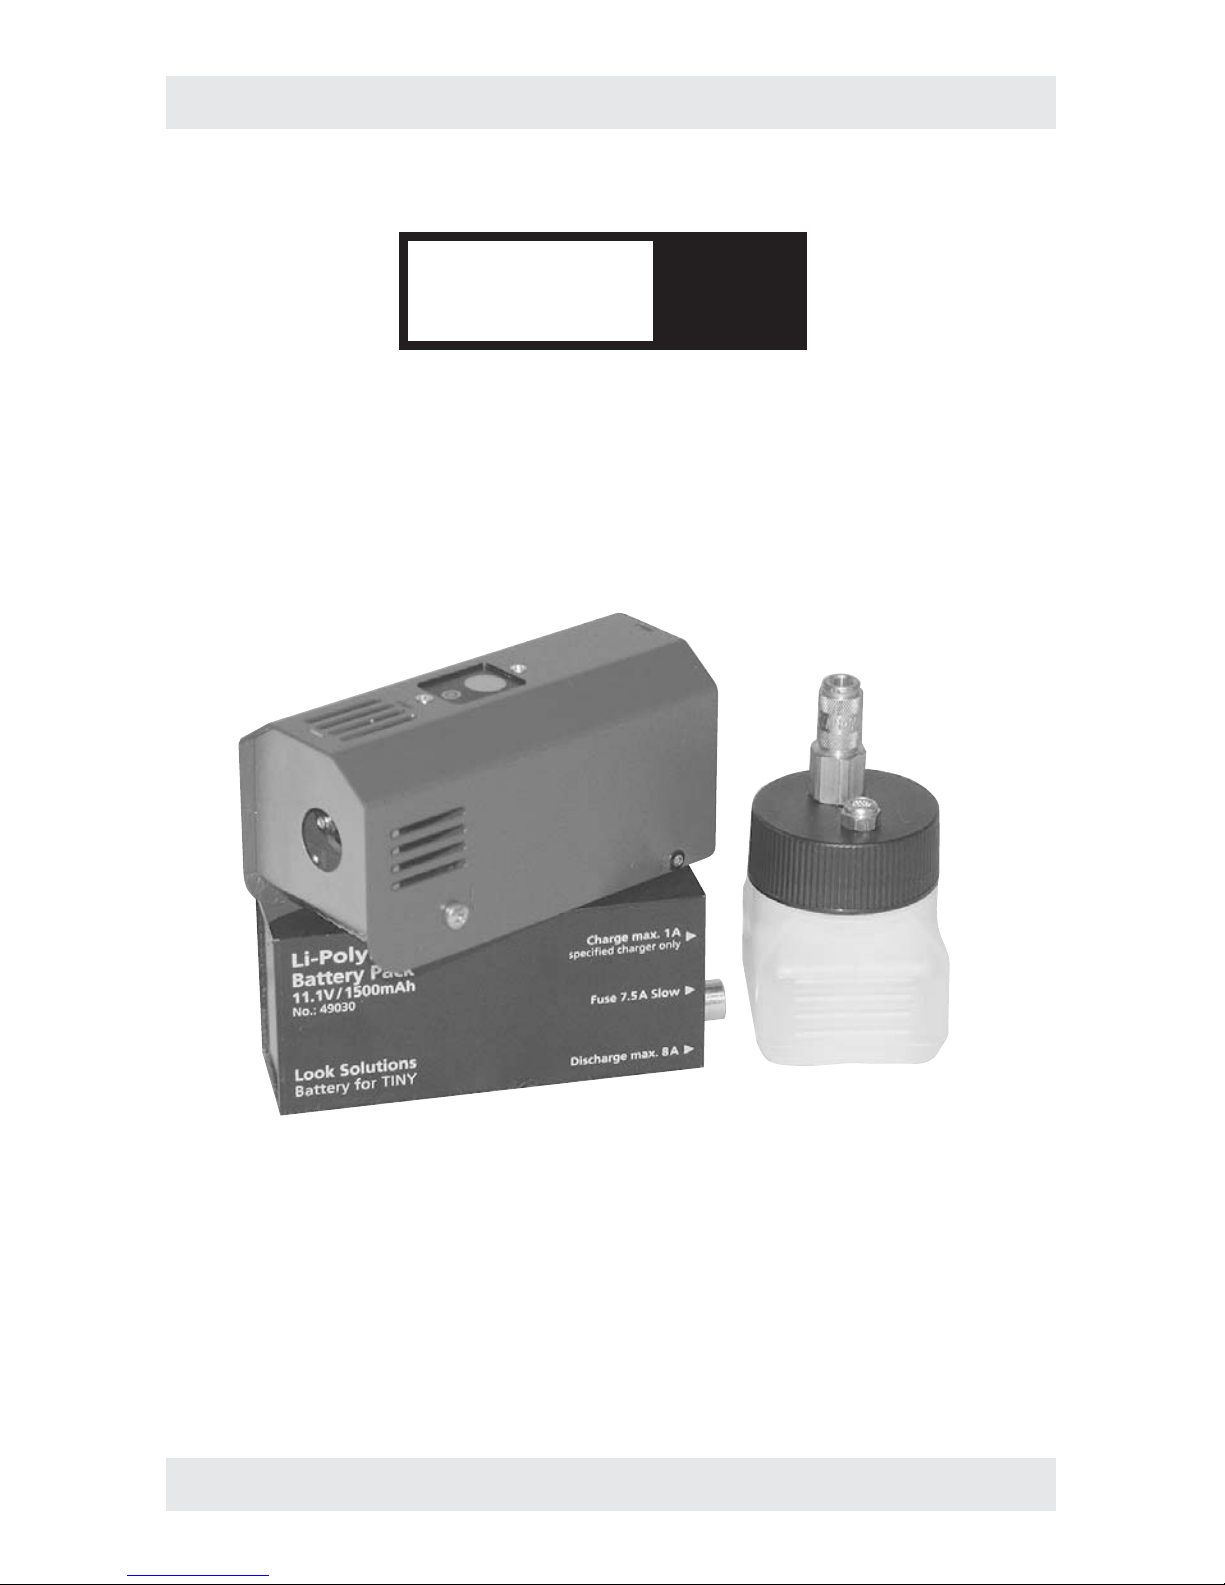
Set of Equipment supplied
–1 Tiny F07
–1 Powercord with push-pull plugs
–1 control panel with cable
–1 rechargeable battery-pack 11.1V
–1 charger
–1 fluid tank (50 milliliters) with quick connector and air valve
–1 bottle of fluid (250 milliliter)
When the order includes a radio remote, the following items are supplied
additionally:
–1 receiver with stereo jack
–1 radio remote
–1 manual „Radio remote control“
Please check whether all ordered products are supplied.
Page 3

3
Contents
1. Procedure of the Tiny-Fogger 4
2. Safety Instructions 5
3. Descriptions of the parts 6
4. Fluid 8
4.1 General
5. Operating the Tiny F07 8
5.1 Selecting the Location 8
5.2 Mounting the Tiny F07 8
5.3 Starting-up the Tiny F07 9
5.4 Programming of a fixed fogging time 9
5.4.1 Programming the fogging time 9
5.4.2 Delete a fixed fogging time 10
5.5 Status Display of the battery 10
5.6 Wiring of connectors 10
6. The rechargeable Battery 11
6.1 General 11
6.2 Capacity and life time 11
6.3 Operating and Storing 11
6.4 Charging the battery-pack 11
6.5 Fuse 12
6.6 Safety Instructions 12
6.7 Technical Data 12
7. The Charger 13
7.1 General 13
7.2 Operating the Charger 13
7.3 General Notes 13
7.4 Technical Data 13
8. Service and Maintenance 14
8.1 Changing the Vaporizer 14
8.1.1 Removal of the Vaporizer 14
8.1.2 Installation of the Vaporizer 14
8.1.3 Calibrating the Vaporizer 15
8.2 The machine does not work perfectly 16
8.2.1 Status and error display 16
8.2.2 The new vaporizer cannot be calibrated 17
8.3 Care and Maintenance 17
9. Technical Data 18
10. Warranty Conditions 19
Page 4

4
1. Procedure of the Tiny F07
The Tiny F07 is a battery-operated, microprocessor-controlled mini fog generator.
It is based (as most fog generators) on the vaporizer principle, i.e. a glycol fluid is
evaporated and condenses into fog when leaving the fog nozzle. However, the
Tiny F07 only heats when fog is actually produced.
Due to the Sleep-mode the Tiny F07 uses only 15 mA in idle status and consequently it may remain connected to the the battery for several hours with no
discharging to speak of. Therefore the standby time is approx. 250 hours with a
fully charged battery.
When emitting fog a strong current of 5 to 6 A runs with peak levels of 12 to 13
A.
The following sequence produces fog:
a) Warming up (1 second, without pumping fluid).
b) The pump runs
c) Post-run mode (15 seconds to vaporize the fluid remaining in the vaporizer).
In the post-run mode the fogging process can be started via the start button in
the lid or via the start button on the cable remote or radio remote.
Page 5

5
2. Safety instructions
A fog machine is not a toy!
•Very hot steam escapes from the nozzle. Danger of getting burnt.
• Occasionally very hot droplets of fluid may escape when in operation.
Thus never aim at persons directly and keep a minimum distance of 3 m to the
nozzle.
• Never touch the nozzle when in operation. Danger of getting burnt.
• The location for the machine must be non-flammable, non-combustible and
not sensitive to heat. It has to be twice as big as the machine.
• Keep a minimum distance of 60 cm to all flammable, combustible objects and
objects sensitive to heat.
• Glycol is alcohol and burns with a slightly bluish, almost invisible flame. Never
point the fog at strong sources of ignition like fire or pyrotechnic effects.
• Never open the machine and leave the machine unattended when connected
to a power supply.
• The visibility has to be more than 2 m in rooms where people walk around.
• Only use the supplied TINY-FLUID. Different types of fluid do not generate the
fog you require and destroy your fog generator.
• Do not swallow the fog fluid. Keep it away from children. In case of eye contact,
rinse with a lot of water. Consult a doctor should you have accidentally
swallowed some fluid.
• Spilled fluid or splashed fluid droplets can cause slip hazard. Mop up the fluid
and dispose of it according to regulations. TINY-FLUID is completely watersoluble and biodegradable.
• Fog may activate smoke detectors.
Artificially-made fog can be produced in many different ways. The method
used here to produce fog, with a device which works according to the vaporizer
principle, is the most harmless one.
No case has so far been reported in which a sound human being has been
harmed because of using our device to produce artificial fog. However, this can
only be guaranteed if the professional fog generators are used accordingly, i.e.
at the correct vaporization temperatures as well as with the correctly mixed fog
fluid.
We, however, recommend: People with health problems or problems of the
respiratory tract or with an inclination for allergies should avoid any contact
with artificially-made fog.
Page 6
6
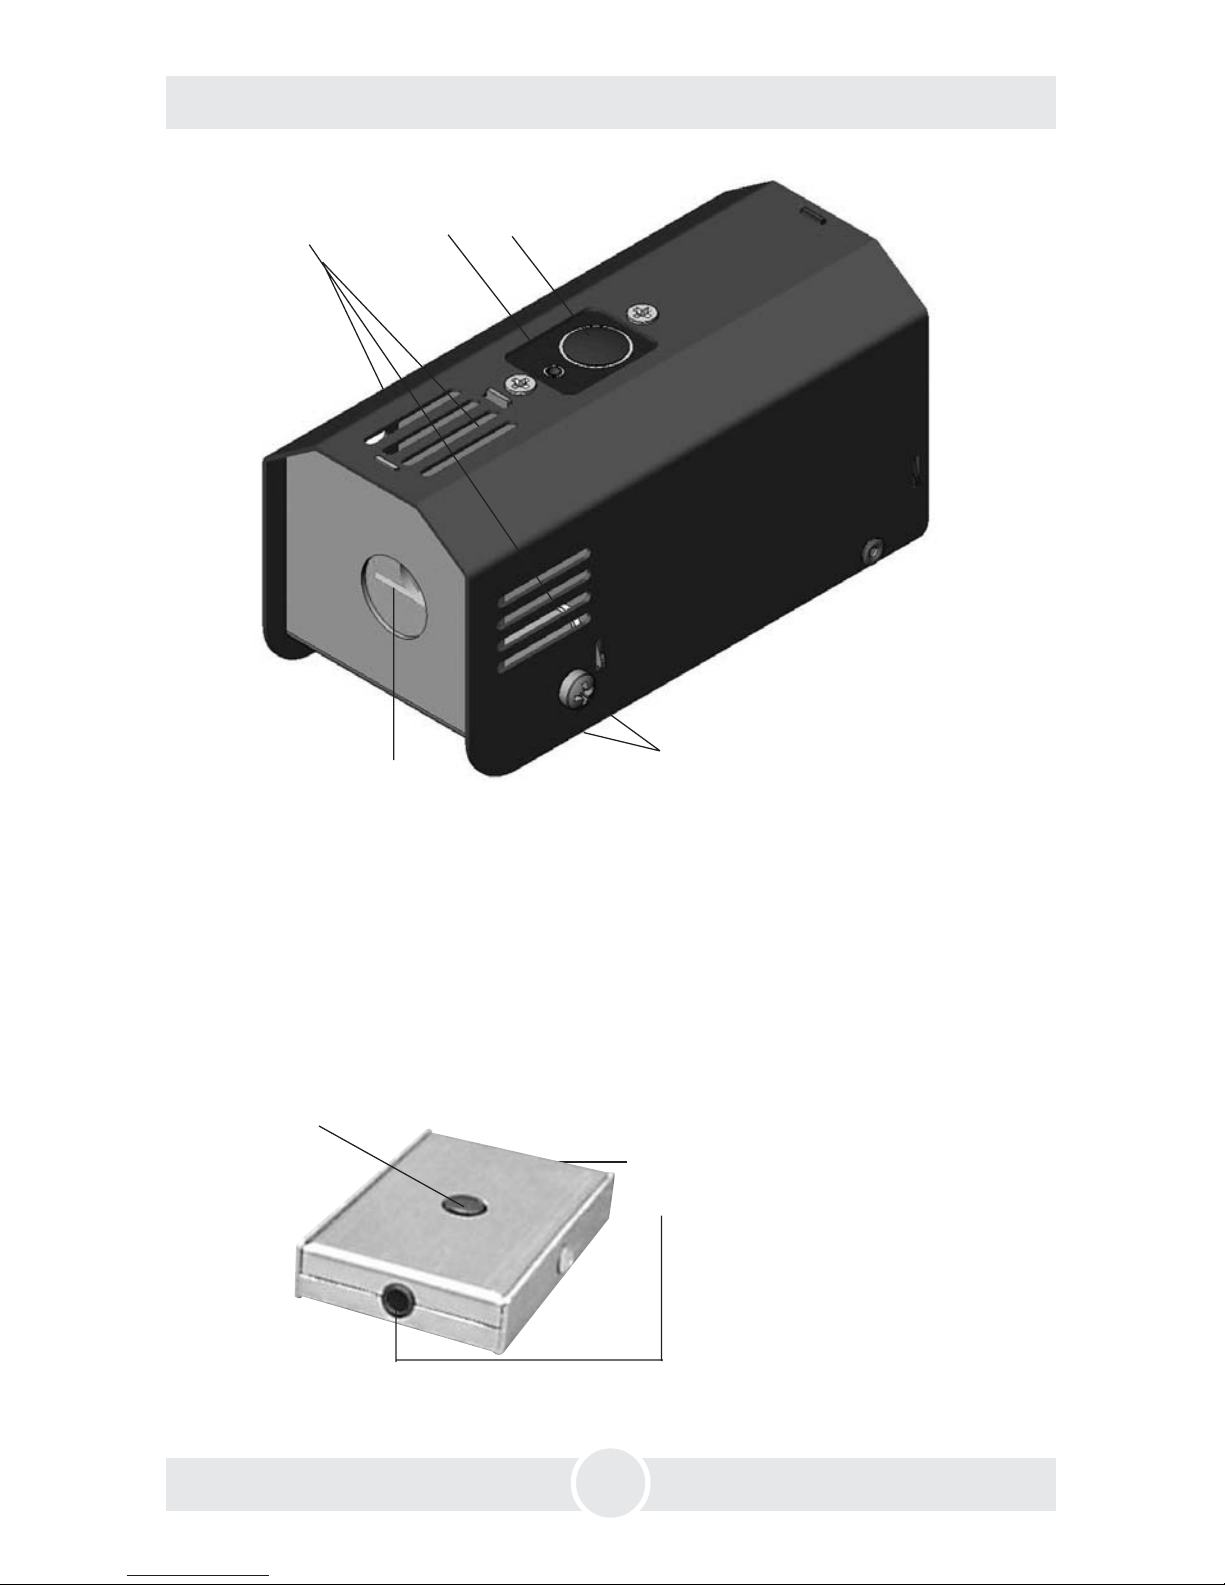
3. Description of the parts
· Start button
· Sockets for control panel
and radio remote
1: · Air slots
2: · Fog nozzle
3: · Screws to unscrew the
stainless steel hood
1
2
3
4: · Start button
5: · Yellow LED
45
Page 7
7
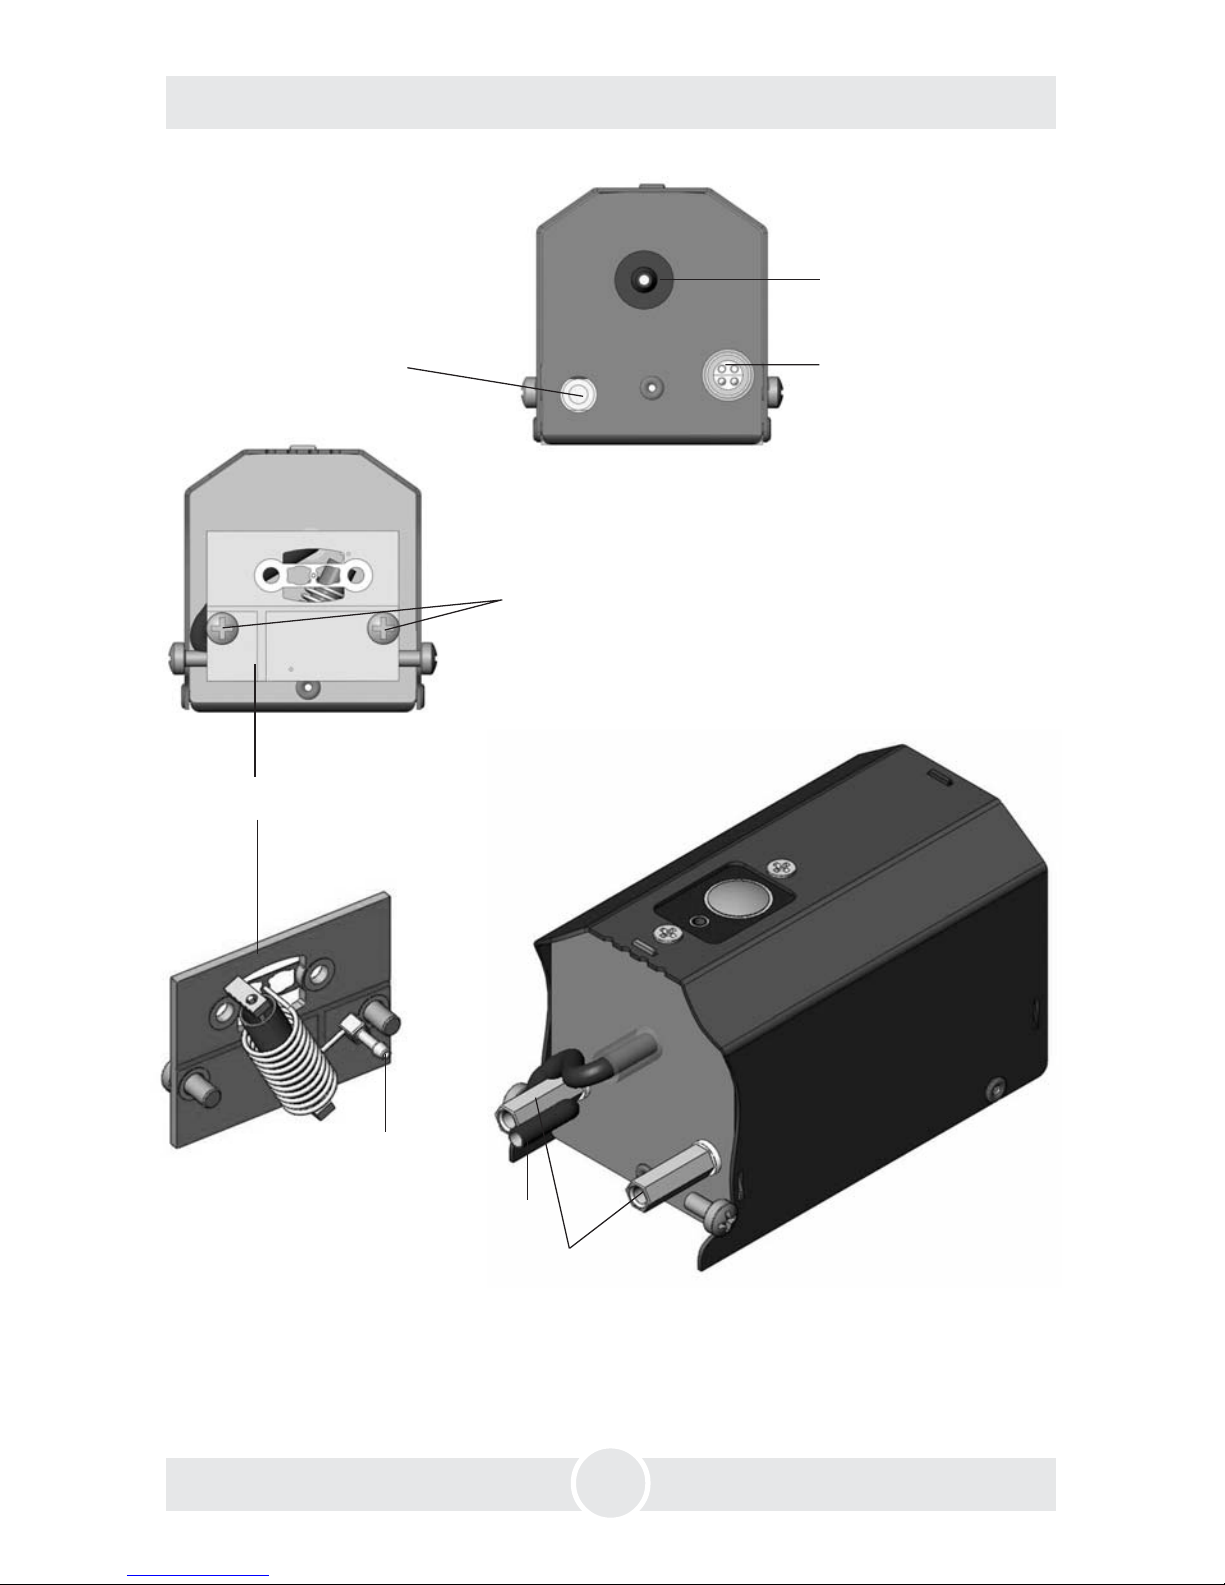
3. Description of the parts
· Socket for
connecting
the battery
cable
· Connecting pins for
vaporizer
7: · Vaporizer
8: · Fluid tube
9: · Tubing spout
· Connector for
fluid tube
6: · Screws for connecting the vaporizer to
the connecting pins
10:
7
8
9
10
· Socket for connecting
the cable of the control
panel or the receiver of
the radio remote
Page 8

8
5.1 Selecting the Location
The location for the Tiny F07 must
• be dry
• guarantee sufficient air supply
• have sufficient distance (at least 60 cm) from inflammable materials
• have very little vibration
• have an ambient operating temperature between 5° C and 45° C
• have a relative air humidity of less than 80%.
5.2 Mounting the Tiny F07
If the Tiny F07 is to be built in props or similar, make sure that a fog-free air
supply is guaranteed. Too high a fog concentration can condense inside the
machine and can result in damages caused by moisture.
When installing the Tiny F07 make sure that
• no fog is passed back into the fog generator,
• no condensed fluid runs into the apparatus,
• the air vents [1] are not covered or concealed,
• no objects jut out into the fog nozzle [2]. This may destroy the vaporizer.
5. Operating the Tiny F07
4. Fluid
The Tiny F07 is built to be used with original Look TINY-FLUID. Use of other
liquids will clog the vaporizer and void the warranty.
Please do not use Tiny-fluid if it looks blue or green. This can clog the vaporizer!
Note: If the Tiny F07 will not be in use for a long period, please empty the fluid
tank and pour the fluid back into the original fluid bottle despatched with the
unit.
4.1 General
Page 9

9
5. Operating the Tiny F07
5.3 Starting up
a) Pour the TINY-FLUID into the fluid bottle and firmly lock the bottle. Plug the
connecting spout of the fluid tubing into the quick connector of the fluid
bottle (audible click).
Check the cleanness of the connecting spout, so that no dirt (fluff etc.) can be
sucked in by the pump. Even the smallest impurity immediately leads to clogging of the machine.
b) Connect the machine and the battery-pack to the delivered cable, using the
right sockets.
c) Press the start button in the lid of the machine [4]. After approx. 1 second the
unit generates fog according to the fogging time preset by the factory.
If you would like to control the machine via the cable remote or radio remote,
connect the delivered cable for the remote or the receiver of the radio remote
to the machine. You can start the fogging process by pressing the start button
at the cable remote or radio remote.
Caution: Do not put anything into the fog nozzle. This may destroy the vaporizer
and it then has to be changed (see point 8.1)
Sleep-mode: After approx. 1 minute the Tiny F07 automatically switch to the
Sleep-mode. The yellow LED [5] does not light anymore. The machine can be
activated at any time by pressing the start button at the lid, the cable remote
or the radio remote.
5.4 Programming a fixed fogging time
For some applications it will be useful to program in a fixed fog amount, which
can be easily reproduced later.
The shortest fog time is pre-programmed. If a new fog time is programmed,
the pre-programmed fog time will be deleted.
a) Connect the battery-pack and the cable remote to the machine.
b) Press and hold the start button in the machines lid [4]. If the requested fog-
ging time is reached, press the start button at the cable remote shortly to
confirm the fogging period. Now the fogging time is saved and the start button
in the machines lid [4] can be released.
5.4.1 Programming the fogging time
Page 10

10
5.6 Wiring of Connectors
Mini-Stereo jack plug:
Sleeve = Ground, Ring = switch on/off, Tip = 12 V DC (+) output
The microprocessor save the fogging time and this programmed fogging time
now can be recalled by pressing the start button on the cable remote or at the
transmitter of the radio remote (option) shortly as long as no new fogging period
has been programmed in.
The programmed fogging time cannot be recalled by pressing the start button
in the machines lid [4]. If the start button in the lid is pressed, the Tiny F07 will
produce fog as long as the button is hold down, no matter whether a fogging
time has been programmed in.
5. Operating the Tiny F07
The programmed fogging time can be deleted in two ways:
1) Press the start button in the machines lid [4] shortly and press the start button
on the cable remote for confirmation. The programmed fogging time is now
deleted.
2) Disconnect the machine from the battery-pack, press and hold the start button
on the cable remote and connect the machine to the battery-pack. The
programmed fogging time is now deleted.
The Tiny F07 now produces fog as long as the start button in the machines lid
[4], on the cable remote or at the transmitter of the radio remote will be pressed
and hold.
5.4.2 Delete a programmed fogging time
5.5 Battery Status Display
The yellow LED [5] at the Tiny F07 indicates (among other things (see point
8.2)) how strong/efficient the battery still is and/or when it must be recharged.
1) LED flashes slowly:
Battery capacity of 15% – 100%, the battery is fully operational
2) LED flashes fast:
Battery capacity below 15% – the battery should be changed and/or charged.
3) LED lights up permanently:
the battery is flat
Page 11

11
6. The Battery
6.4 Charging the Battery-pack
For charging the battery please use the supplied automatic charger. A discharged
battery can be charged within 1.5 hours.
As long as the battery charges, the yellow charge-LED will light. If the battery is
fully charged, the yellow LED expires.
Disconnect the battery-pack from the Tiny F07 after each use and recharge it,
at the latest if the yellow control-LED in the machines lid [5] flashes fast.
Avoid completely discharge (control-LED does not shine anymore) because this
will cause irreversible damage to the battery-pack.
The supplied battery is a maintenance-free 11.1V Lithium-Polymer-battery. It
can be used in every position.
The connection to the Tiny F07 is established by a powercord with a push-pullplug.
The connection to the charger is established by a low volt plug at the charger.
6.2 Capacity and Lifetime
The battery has a capacity of 1.5 Ah and is supplied in a 50% charged status.
Charge the battery before using it the first time with the supplied charger.
Please note the operating instructions of the charger (see point 7.1).
A fully-charged battery can generate more than 100 fog emissions of 4-5
seconds. The permanent fogging time amounts to 10 minutes.
The battery will lose its capacity with increasing working time and will be wear
out after approximately two or three years.
6.3 Operating and Storing
Lithium-Polymer-batteries are modern energy suppliers with huge capacity, small
dimensions and light weight. Due to its high energy seal and the used materials
these batteries are known as not completely harmless. Therefore please read the
safety instructions carefully!
Optimal storage of the fully loaded battery at 15°C and an air humidity of 45 -
85%. If the battery should not be in use for a longer period it should be recharged
regularly (approx. after six months).
6.1 General
Page 12

12
6. The Battery
6.5 Fuse
– Keep away from children
– Do not heat up over 60°C (for example by sun exposure) or expose to fire
– Keep away from wet
– Do not short-circuit
– Do not dismantle or deform
– Do not use defektive or deformed battery-packs
Batteries can leak if not used correctly or be damaged.
In some extreme cases danger of:
– Fire
– Explosion
– Smoke- and gas exposure
In this case, please note:
– If there is no suitable extinguishing way, let the battery burn down and avoid
breathing the absorbs
– To extinguish the fire use sand or a fire extinguisher filled with powder
– Never use water to put out the fire. Danger of explosion!
– If the electrolyte comes in contact with skin or eyes, immediately rinse with
water or consult a doctor.
6.7 Technical Data
Model Lithium-Polymer-battery
Output voltage 11.1 V
Capacity 1500 mAh
Temperature range 10° C to 40° C
Fuse 7.5 A Miniblade, Art. No. 40177
Dimensions 10.5 x 4.5 x 3.0 cm
Weight 160 g
Lithium-Polymer-batteries must only be recharged and stored on fireproofed
and not inflammable subsoils! The battery must not be recharged unsupervised.
The ambient operating temperature while charging should be between 10°C
and 40°C.
To avoid too high emitting current, the battery-pack is equipped with a 7.5 A
Miniblade-fuse. This fuse has to be replaced if once released.
6.6 Safety Regulations
Page 13

13
7. The Charger
7.1 General
The supplied charger is an automatic charger for Lithium-Polymer-batteries.
Due to the modern technic and the changeable plugs/adaptors it can be used
worldwide.
7.3 General Notes
– Connect the charger to a power socket (100-240 V~/50Hz–60Hz).
The green Power-LED lights when the charger gets power.
– Connect the output line of the charger with the battery-pack to be charged.
The yellow Charge-LED lights as long as the battery-pack is not fully charged.
If the battery-pack is fully charged, the yellow Charge-LED will expire.
– Disconnect charger and battery-pack.
7.2 Operating
– If the yellow Charge-LED does not light up after connecting it to the battery,
this may have the following reasons:
– The battery-pack is already fully charged
– The plug of the charger is not correctly/fully connected to the socket at the
battery-pack
– The charger does not get power (green LED does not light)
– If the yellow Charge-LED does not expire even after 1.5 hours, the battery-pack
might be damaged and should not be used anymore.
– Cover the charger against heat and wet.
– Use the charger exclusively for charging the Tiny F07 and Tiny C07 battery.
Model Automatic charger for Lithium-Polymer-batteries
Input voltage 100 - 240 VAC, 50/60 Hz
Capacity 19.5 VA
Output voltage 11.1 VDC / 700 mA
Charging end voltage 12.6 V
Display green Power-LED: Power
yellow Charge-LED: Battery in charge
Dimensions 11.8 x 6.3 x 5.0 cm
Adaptors are available for Europe, UK, US and Australia.
7.3 Technical Data
Page 14

14
8. Service and Maintenance
8.1 Changing the Vaporizer
The micro vaporizer especially developed for the Tiny F07 has a limited working
life. Depending on application duration, the fogging output will reduce after a
while and the vaporizer has to be changed.
8.1.1 Removal of the Vaporizer
a) Separate the Tiny F07 from the battery-pack
b) Unscrew the two screws [3] with a suitable screwdriver to release the stainless
steel hood
c) Remove the stainless steel hood
d) Unscrew the two screws [6] at the vaporizer with a suitable screwdriver
e) Slide out the vaporizer [7] forwards
f) Remove the black fluid tube [8] from tubing spout [9] of the vaporizer. In case
the tubing does not come off, you can pull it down with a pair of pliers or a
similar tool.
g) Clean the interior of the unit with an absorbant, fluff-free cloth.
8.1.2 Installation of the Vaporizer
a) Plug the black fluid tube [8] onto tubing spout [9] of the new vaporizer
b) Fix the new vaporizer to the connecting pins [10] with the two screws [6]
c) Check the connections and make sure that the fluid tubing is not twisted or
bent
d) Fix the stainless steel hood with the two screws [3] at the machines cover.
Ensure that the hood engage into the corresponding guide groove of the lid
part.
Page 15

15
8. Service and Maintenance
8.1.3 Calibrating the Vaporizer
Since all vaporizers have different electrical qualities, the Tiny F07 must be
calibrated after every exchange of the vaporizer.
IMPORTANT: During the calibration process the vaporizer temperature must be
at 20° C. Never start fogging before the calibrating process. Too cold or too warm
units must first adapt to the room temperature (20° C).
a) Press the start button in the machines lid [4].
b) Connect the battery-pack to the machine simultaneously.
The calibrating process now starts automatically. The yellow LED [5] flashes six
times with a short pause after the second and the fourth flash to confirm the
calibration.
c) The calibration process is now complete.
Page 16

16
8. Service and Maintenance
8.2 The machine does not work perfectly
– the battery is discharged (yellow charge indicator (LED) [5] lights up perma-
nently, the pump automatically cuts off) => charge the battery
– the fluid tank or the fluid tubing is empty or the connecting spout of the fluid
tubing is not correctly plugged into the quick connector on the fluid tank
=> refill the fluid tank, check to see that the tubing plug is properly fitted to
the quick connector
– the vaporizer is clogged or broken => change the vaporizer (see point 8.1)
8.2.1 There will be no fog, if…
8.2.2 Status and error display
The yellow LED [5]…
– flashes once
Battery status display: if the LED flashes slowly, the battery is well charged, if
the LED flashes quickly the battery has to be recharged.
– flashes twice in a row
Vaporizer is broken: change the vaporizer as described in point 8.1.
Important: The new vaporizer must be calibrated!
– flashes three or four times in a row
Pump error: Please call your local dealer.
– flashes five times in a row
Vaporizer cannot be calibrated: Try once again to calibrate the vaporizer as
explained in point 8.1. If this should not help, the vaporizer is broken and
cannot be used.
– lights permanently
The battery is completely discharged: Disconnect the Tiny F07 from the batterypack and recharge the battery.
Page 17

17
8. Service and Maintenance
8.3 Care and Maintenance
To ensure perfect performance of the Tiny F07, you should consider the following
notes:
– Make sure the fluid bottle as well as the connecting spout and the quick
connector are clean and free from small bits of dirt.
– Clean the unit from time to time, especially if you use it in a built-in state/
condition. Unscrew the unit with a suitable screwdriver (No. 1 Phillips) and
wipe it out carefully using a dry, fluff-free cloth.
– Should the vaporizer become clogged, please change it in the way as described
in section 8.1.
– If the Tiny F07 isn‘t in use for a longer time, please take care that the fluid
tube is emptied. It could be that some fluid drops come out of the nozzle and
the surrounding gets wet and greasy.
– The battery should be charged before storing.
a) Disconnect the machine from the battery-pack.
b) Remove the new vaporizer as explained in point 8.1.1.
c) Connect the Tiny F07 to the battery-pack and press the start button in the
machines lid [4] once.
d) Disconnect the Tiny F07 from the battery-pack.
e) Install the new vaporizer again and calibrate it as explained in point 8.1.3.
8.2.3 The new vaporizer cannot be calibrated
(no confirmation of the process by the LED)
Page 18

18
Procedure Vaporizing fog generator
Power requirement 70 Watt
Voltage 12 V battery
Warm up time < 1 sec
Fluid tank capacity 50 ml
Fluid consumption 2.3 ml/min. at continuous output
Fogging time programmable
Continuous output with battery 10 min.
Temperature control Microprocessor
Control cable remote
radio remote (option)
Dimensions (L x W x H) 10.6 x 4.9 x 5.0 cm
Weight TINY approx. 310 g
Manufactured for
Look Solutions - Fog machines made in Germany
9. Technical Data
Page 19

19
10. Warranty conditions
For the miniature fog machine Tiny F07 Look‘ guarantee is:
1. Free of charge, subject to the following conditions (No. 2 - 6) we will repair any defect or
fault in the unit if it is caused by a proven factory fault and has been advised immediately
after appearance and within 24 month of delivery to the end user. Insignificant deviations
of the regular production quality does not guarantee replacement rights, nor do faults
or defects caused by water, wrong fog fluid, by generally abnormal environment
conditions or Force Majeure.
2. Guarantee Service will be done in the following way: Faulty parts will be repaired or
replaced (our choice) with correct parts. Faulty units have to be brought to us or our
service centres or to be sent to us or our service centres at customer‘s expense. The
invoice and/or receipt showing the purchase date and the serial number has to come
with the faulty unit, otherwise this will not be guarantee service. Replaced parts become
our property.
3. The micro vaporizer is a wearing part with limited lifetime. No warranty can be given on
this part.
4. The customer loses all rights for guarantee services, if any repairs or adjustments are
done to the units by unauthorized persons and/or if spare parts are used which are not
approved by us. The right of guarantee service is also lost if fluids other than the original
„TINY-FOGGER FLUID“ have been used or if units are sent to us with full fluid bottles.
Also non compliance with the instructions in this manual or mistakes by incorrect handling/
treating of the machine will lead to a loss of guarantee and also any faults and damages
caused by undue force.
5. Any freight costs arrising in connection with the guarantee services have to be born by
the customer.
6. Guarantee services do not cause an extension of the guarantee time or the start of a
new guarantee time. The warranty for replaced parts ends with the guarantee time of
the whole unit.
7. If a defect/fault can not be repaired by us in a satisfactory time, we will, within 6 months
after sale of the unit, on choice of the customer, either:
• replace the whole unit for free or
• refund the lesser value or
• take back the whole unit and refund the purchase price, but not more than the usual
market price at the time of the refund.
8. Further claims, especially for damages, losses etc. outside the unit are excluded.
Other guarantee regulations may be valid outside Germany. Please check with your dealer!
If you should send the unit for service, do not forget to remove any liquid from the fluid
bottle.
Page 20

20
a Look Solutions product
 Loading...