

Page 1

1111 / 18
User Manual
Table Top Mini Bar Water Dispenser
GR310MB
Please read this manual carefully before using!
Page 2

2222 / 18
Content
1. Functional module configuration table Page 3
2. Brief Instruction of Machine Page 4-5
2.1 Outlook Instruction
2.2 Control Panel Instruction
3. Technical Parameter Page 6
4. Electrical Schematic Page 7
5. Installation Page 8-9
5.1 In General
5.2 Connecting With Water Supply
5.3 Connect with Waste Water Discharge
5.4 Connect with Overflow discharge
6. Operation Page 9-10
6.1 Attentions before Using
6.2 Connect to Power Supply
7. Different Functional Systems Page 10-11
7.1 Filtration System
7.2 Hot Water System
7.3 Cold Water System
7.4 Sterilization System
8. Common Operation Page11-12
(1) Get Hot Water
(2) Get Cold Water
(3) Get One Cup of Mixed Water
(4) Extra Hot Function
9. Maintenance and replacement Page 12-16
9.1 Filter Replacement
9.2 Clean the Tanks
9.3 Clean the Dust Cover
9.4 Clean Machine
10. Precautions Page 17
11. Trouble Shootings Page 18
Page 3
3333 / 18
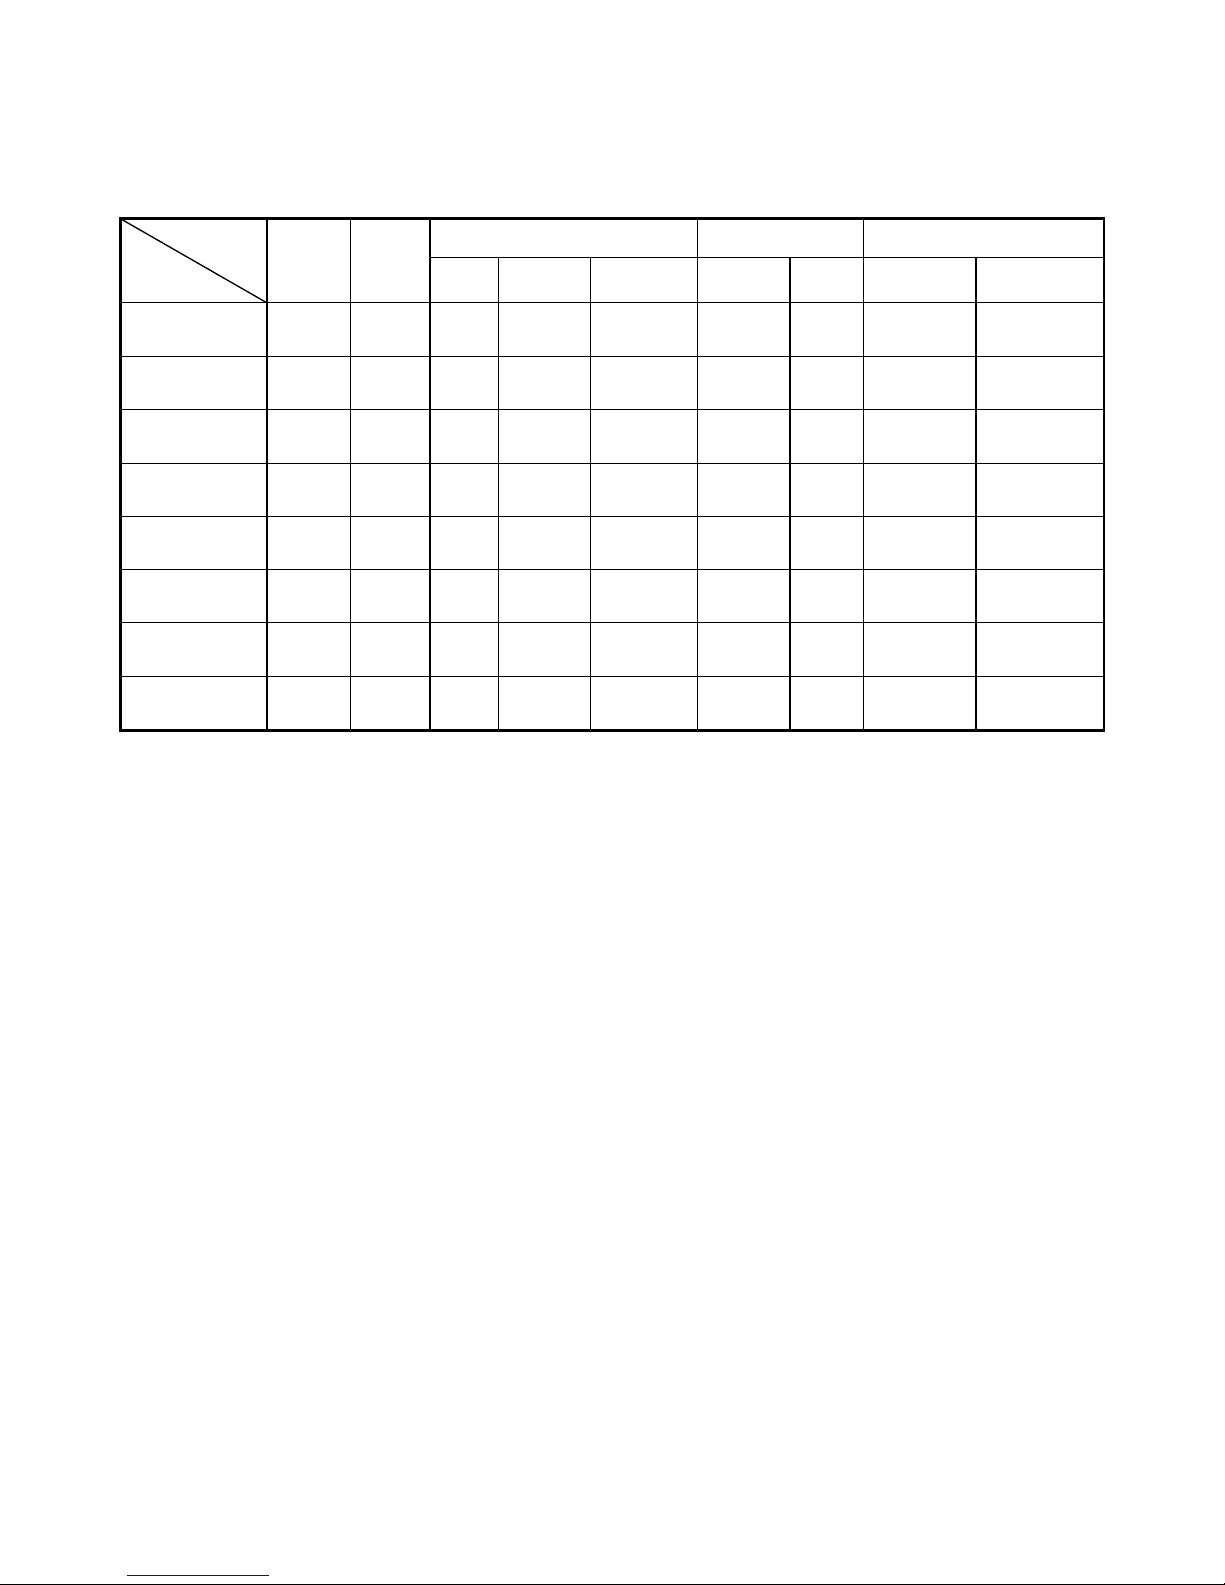
1. Functional module configuration table
Module
Model
Hot
Water
Cold
Water
Filtration System
Sterilization
Controlling System
ACF ACF+UF ACF+ RO Ozone UV Electronic Mechanical
Option 1
◎◎◎◎ ◎◎◎◎ ◎◎◎◎
◎◎◎◎
◎◎◎◎
Option 2
◎◎◎◎ ◎◎◎◎
◎◎◎◎
◎◎◎◎
◎◎◎◎
Option 3
◎◎◎◎ ◎◎◎◎
◎◎◎◎ ◎◎◎◎
◎◎◎◎
Option 4
◎◎◎◎ ◎◎◎◎ ◎◎◎◎
◎◎◎◎
◎◎◎◎
Option 5
◎◎◎◎ ◎◎◎◎
◎◎◎◎
◎◎◎◎
Option 6
◎◎◎◎
◎◎◎◎
◎◎◎◎
◎◎◎◎
Option 7
◎◎◎◎
◎◎◎◎ ◎◎◎◎
◎◎◎◎
Option 8
◎◎◎◎ ◎◎◎◎
◎◎◎◎
◎◎◎◎
◎◎◎◎
Note: This model have different functional options, when you see this user manual
please check which option your machine belongs to.
Page 4

4444 / 18
2. Brief Instruction Of Machine
2.1 Outlook Instruction
1. Control Panel 10. Cooling Switch
2. Indicator Light 11. Heating Switch
3. Water Outlet 12. Maintenance cover
4. Front Panel 13. Vent
5. Drip Tray Cover 14. Water Inlet Connector
6. Side Panel 15. Waste Water Drain Connector (RO version)
7. Drip Tray 16. Overflow Outlet
8. Decorative Panel 17. Power Cord
9. O3 Switch 18. Fuseholder
Page 5
5555 / 18
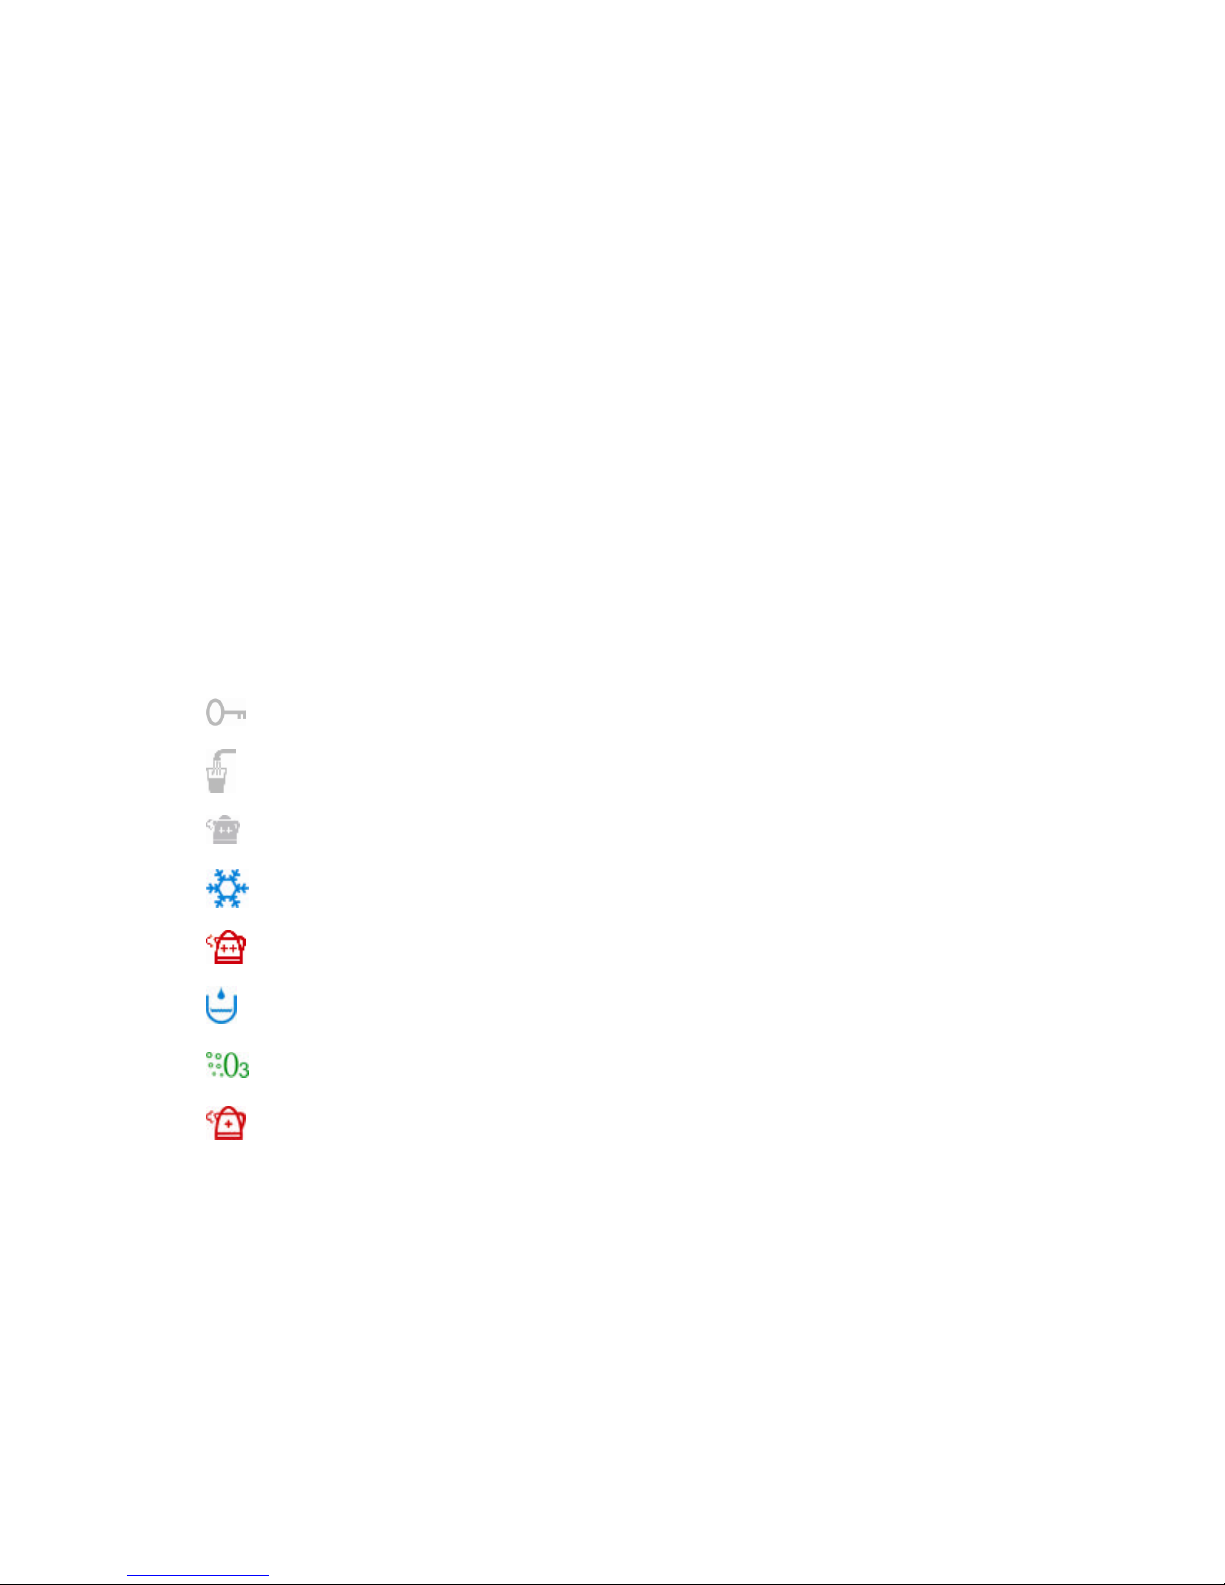
2.2 Control Panel Instruction
1. ………… Child Lock
2. …………Water Button (Cold Water Button)
3. …………Extra Hot Button
4. …………Cooling Icon
5. …………Extra Heating Icon
6. …………Water Making Icon
7. ………… Ozone Icon
8. …………Heating Icon
Page 6
6666 / 18
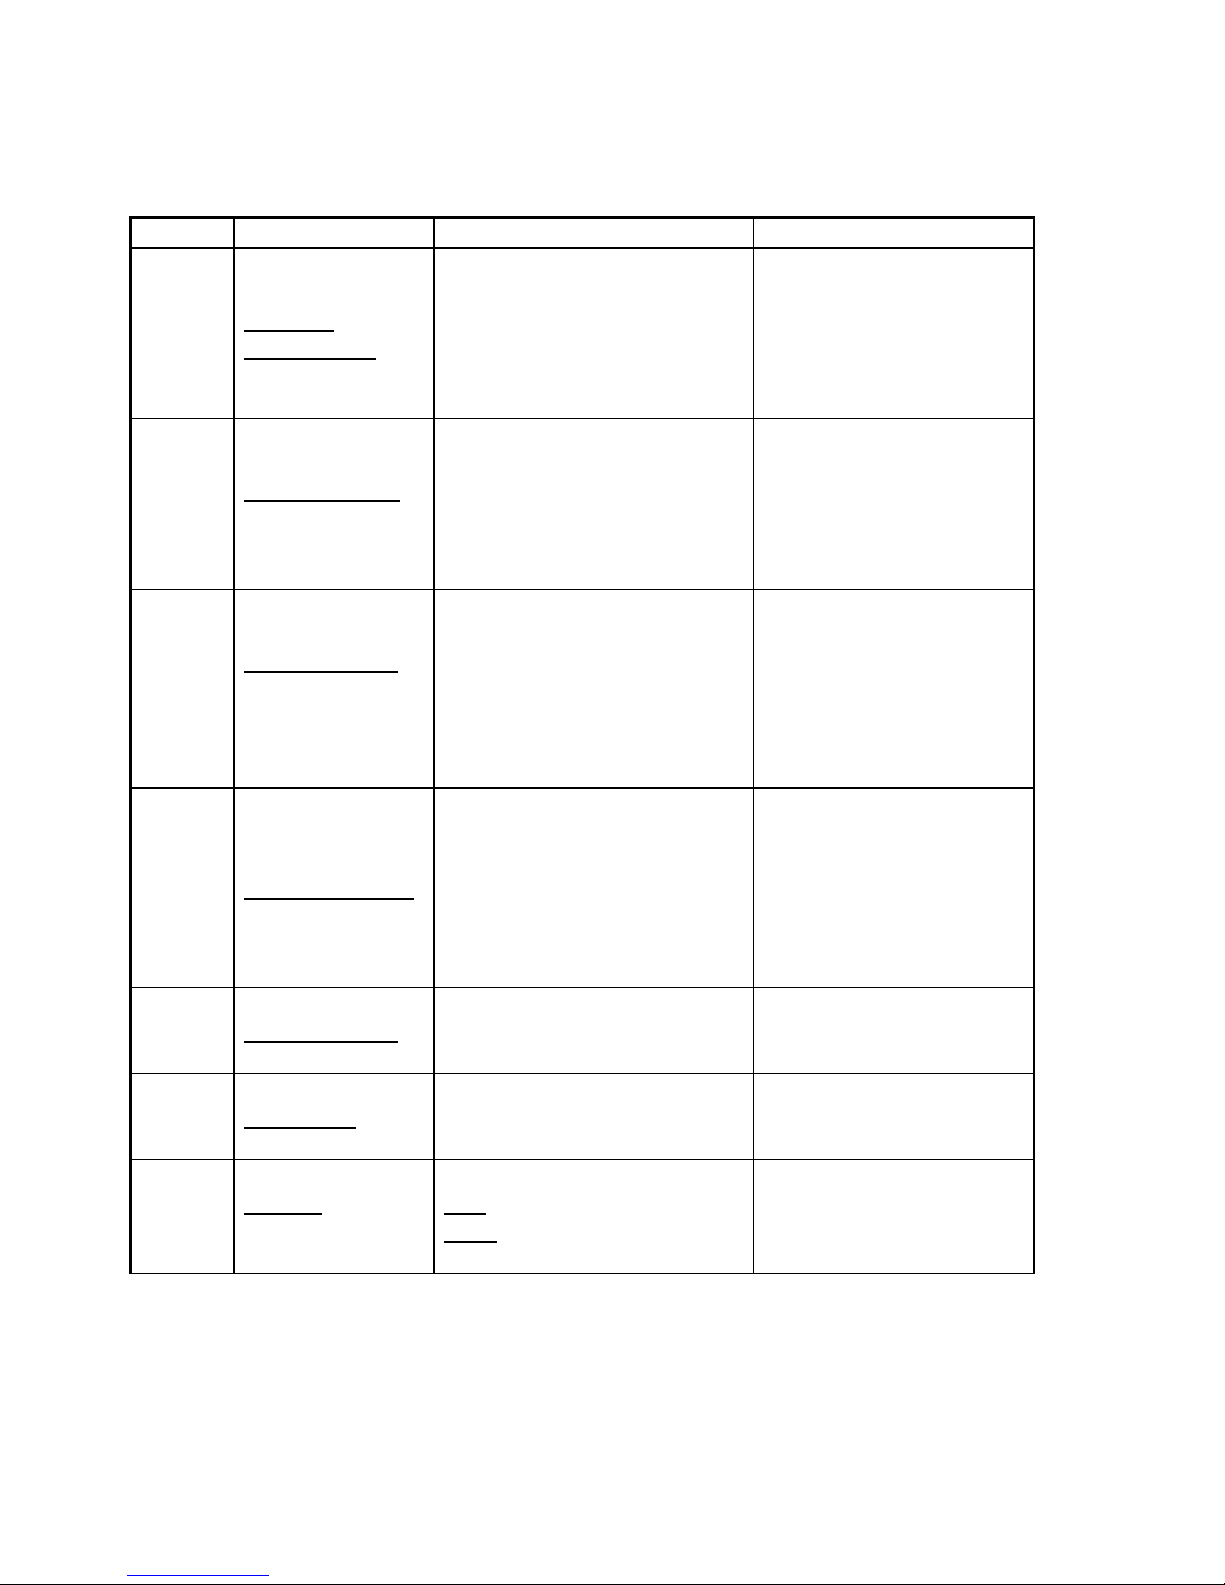
3. Technical Parameter
Note:
(1). The machine have different options, please check “Functional module configuration table”
(2). You may not be informed should there are some changes on technical parameter.
No. Items
Specification
Parameter
1
Electrical
Performance
Rated Voltage
Rated Frequency
Rated General Power
Rated General Current
220 V AC
50 Hz
1000 W
5.8A
2
Heating System
Hot Tank Volume
Heating Power
Heating Capacity
Hot Water Temp.
1.8L
900 W
10L/h
≧90℃
3
Cooling System
Cold Tank Volume
Cooling Power
Rated Cooling Current
Cooling Capacity
Cold Water Temp.
1.8L
95 W
0.8A
3L/h
≦10℃
4
Filtration System
Pre-Filter
ACF Filter
UF Filter
RO Filter
Ozone System
0.5-1 micron
0.5 micron
0.5 micron
50G
0.5 micron
5
Water Pressure
Min- Max
0.1MPa—0.6MPa
6
Dimension
W X H X D
320X375X400mm
7
Weight
N.W.
G.W.
14 Kgs
17kgs
Page 7
7777 / 18
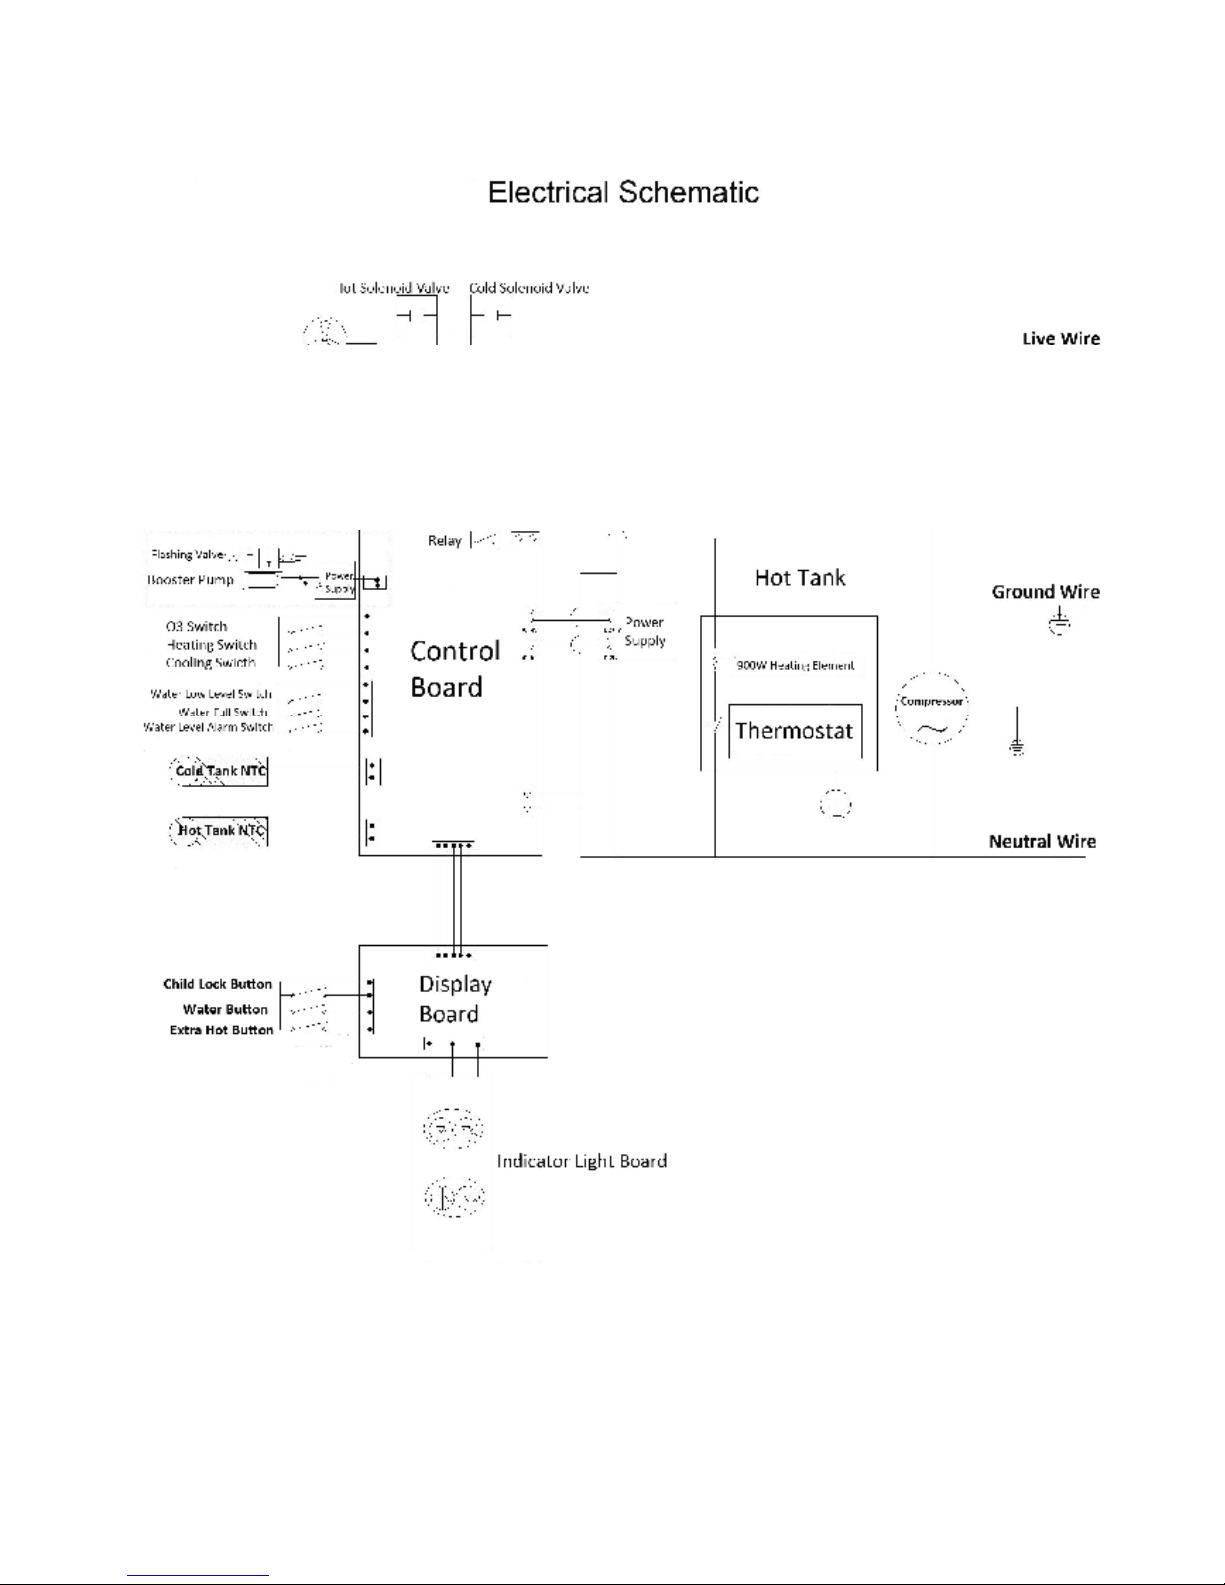
4. Electrical Schematic
Remark: You may not be informed should there are some changes on technical parameter.
Page 8
8888 / 18
5. Installation
5.1 In General
This machine is only suitable for indoor use and must be installed in a cool, ventilated, stable
surface, away from hot objects. Leave at least 10cm (4’’) space at the back of the machine and
leave enough space for machine at the right and left side. We suggest that the installation take
by professional people.
5.2 Connect With Water Supply
Please install the machine near the water supply (not more than 3 meters far, water pressure
between 0.2 – 0.6MPa). Before installation, please check if all the accessories are all there. (a
three-way ball valve, elbow quick connector, PE pipe )
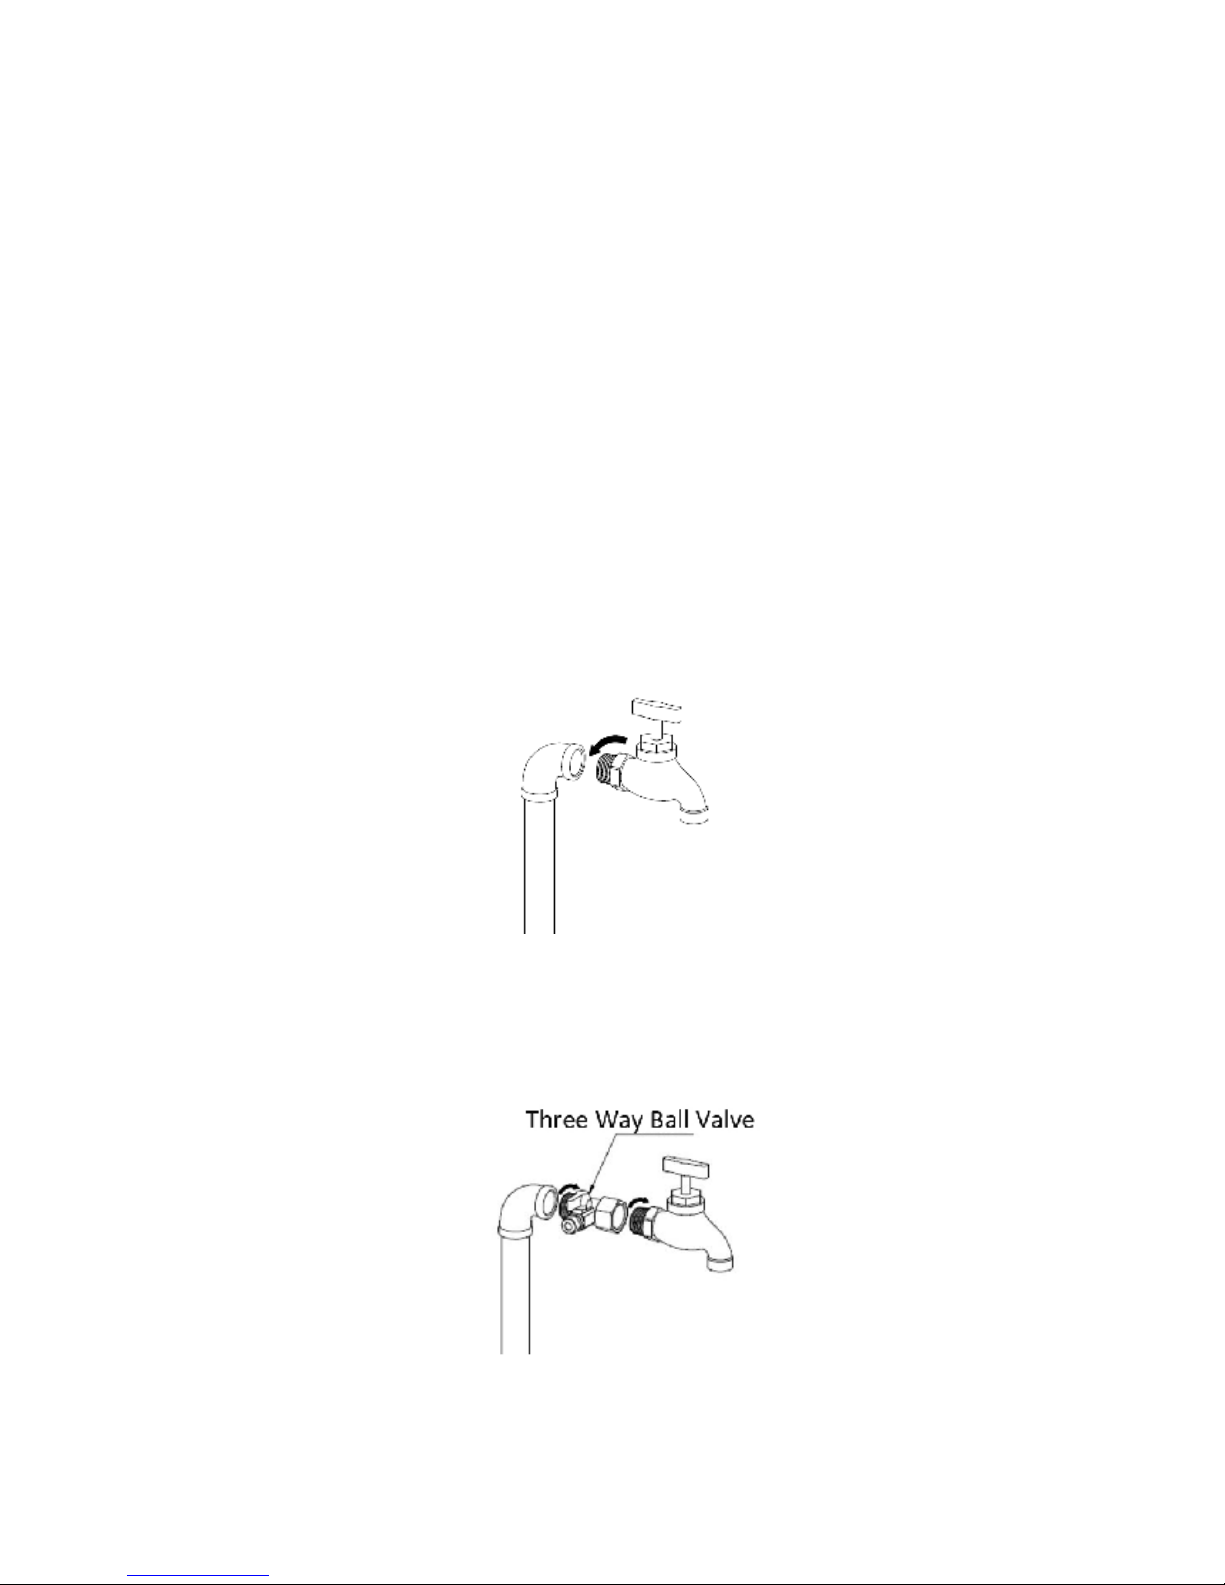
5.2.1. Please shut off the water supply, and take off the faucet by turning counterclockwise, see
picture 1.
Picture 1
5.2.2. Please wrap the three-way ball valve with tap (special tap for water sealing). Then install it
with water supply pipe in one side, and with faucet on the other side, make sure it seals well.
Then connect the three-way ball valve with PE pipe, see picture 2.
Picture 2
5.2.3. Connect the other side of PE pipe with the water inlet connector of machine. Firstly take off
the buckle and cap of connectors. See A-1 and A-2 in Picture 3. (Note when take off the cap, you
need to press the buckle) Insert PE pipe into water inlet connector, then install the buckle. See
Page 9

9999 / 18
A-2 in Picture 3.
Picture 3
5.3 Connect with Waste Water Discharge (RO Version)
Connect the one side of PE pipe with waste water drain connector and another side into the
floor drain or other reliable container. (Please refer the Picture 3)
For RO version, during making the pure water, machine also produces waste water. The waste
water must discharge into floor drain. Please check the drain pipe regularly. If the drain pipe is
blocked, the waste water will back flow into the machine, pollute the water and may also
damage the machine.
Note: This clause is only apply to the machine with RO system inside. If you machine doesn’t
have RO system, please ignore this clause.
5.4 Connect with Overflow Discharge.
Please refer to the Picture 3, use a PE pipe, one side connect with the overflow outlet and
another side with a sink or container.
Note: The connection with a overflow discharge is a safety measurement for the machine.
Usually there is no overflow water out. But if you found there is , please contact with service
people to deal with correspondingly.
6. Operation
6.1. Attentions before using
• Check the connectors of water supply and valves, to make sure these connects seal well.
• Check if the heating switch is in switch off position, if not, please turn it off. When the
Page 10

10
1010
10 / 18
heating switch is on, and there no water in hot tank, the heating element will be burnt.
• Check if the cooling switch is in switch off position, if not, please turn it off.
• Check if the socket this machine use is well grounded, make sure the socket is work properly.
(Note: this machine has high-power heating system, it must use three holes socket that can
load at least 10A current.)
6.2. Connect to Water and Electricity Supply
Open the three way ball valve, machine connect with water supply.
Put the plug of machine into a three pin socket, machine connects with electricity supply.
7. Different Functional Systems.
7.1. Filtration System
7.1.1. ACF Filtration system / UF Filtration System
After connected with electricity supply, all the icons on the display panel shin for one
second, the indicator light ( see outlook instruction) become blue, the machine enter
working mode. Machine will detect there no water in tank and automatically enter
making water mode. The water making icon lights on, at the same time the water fill
into hot and cold tank, when all the tanks are full, the water making icon lights off. The
making water process finishes.
Note: This clause only applies to the machine with ACF filtration system or UF filtration
system.
7.1.2. RO Filtration System
After connected with electricity supply, all the icons on the display panel shin for one
second, the indicator light ( see outlook instruction) become blue, the machine enter
working mode. Machine will detect there no water in tank and RO system enter flashing
mode. After flash for 18 seconds, machine enter water making mode and the water
making icon lights on. At the same time the water fill into hot and cold tank, when all the
tanks are full, the water making icon lights off. The making water process finishes.
Note: This clause only applies to the machine with RO filtration system.
7.2. Hot Water System
After filling water process is finished, you can choose to turn on hot water function. Turn
on the heating switch at the back of machine, the heating icon lights on. And the heating
system is working, when the heating icon lights off, the heating process finishes.
Note: This clause only applies to the machine with heating system.
7.3. Cold Water System
After filling water process is finished, you can choose to turn on cold water function. Turn
on the cooling switch at the back of machine, the cooling icon lights on. And the cooling
system is working, when the cooling icon lights off, the cooling process finishes.
Page 11
11
1111
11 / 18
Note: This clause only applies to the machine with cooling system.
7.4. Sterilization System
7.4.1 Ozone System
Forced sterilization: After filling water process is finished, push ozone switch at the back
of machine, machine entering sterilizing mode. The ozone icon lights on, 3 minutes later
the process stopping, and the zone icon will shin for 10minutes then light off. During the
sterilizing process, you can push ozone button again to stop the process. ( Note: During
the sterilizing process, including the 10 minutes of zone icon shinning, you can not get
water)
Auto sterilization: Every time when the machine enters energy saving mode, machine
also automatically enter auto sterilization mode, the ozone works 20 seconds then the
process stops. And 12 hours later, machine will auto sterilize for 20 seconds. During the
auto sterilization process, you can push the ozone button to stop the process.
Note: This clause only applies to the machine with ozone system.
7.4.2 UV System
When getting cold water, the UV system automatically work. The UV icon lights on,
after getting cold water, the UV system still works for 1 minute, then stop, the UV icon
lights off. When there is no cold water consumption for 4 hours, the UV system
automatically work for 1 minute.
Note: The UV icon is
.
In the machine that has UV system inside, the UV icon is
instead of Ozone Icon. This clause only applies machine with UV system inside.
8. Common Operation
8.1 Get Hot Water
8.1.1. Get One Cup of Hot Water
Push child lock button , the indicator light on the faucet becomes red, then push
water button getting 200ml hot water. During getting one cup of hot water, the
heating icon shins, if you want less than 200ml, push water button or other buttons to
stop.
8.1.2. Get hot water in different quantity
Push child lock button , the indicator light on the faucet becomes red, then push
water button
for 3 seconds to get hot water, at the same time the heating icon
shin on a frequency of 2 Hz, push water button (or any other button) to stop
Page 12
12
1212
12 / 18
getting hot water.(if doesn’t push any buttons, 1 minutes later machine stop hot water
outlet automatically )
Note: This clause only applies to the machine with heating system.
8.2 Get Cold Water
8.2.1. Get One Cup of Cold Water
Push water button to get 200ml cold water. During getting one cup of cold water,
the cooling icon shins, if you want less than 200ml, push water button or other buttons to
stop.
8.2.2. Get hot water in different quantity
Push water button for 3 seconds to get cold water, at the same time the cooling
icon shin on a frequency of 2 Hz, push water button (or any other button) to stop
getting hot water.(if doesn’t push any buttons, 1 minutes later machine stop cold water
outlet automatically )
8.3 Get Mixed Water
Push the extra hot button, then push the water button for 3 seconds to get 200ml mixed
water
8.4 Extra Hot Function
Push extra hot button for 3 seconds, the extra heating process is activated, the extra heating
icon lights on. When the hot water temperature reaches 98 degree centigrade, the extra
heating process finish, the extra heating icon lights off. You can get hot water as clause (8.1)
explained.
9 Maintenance and replacement
9.1 Filter Replacement
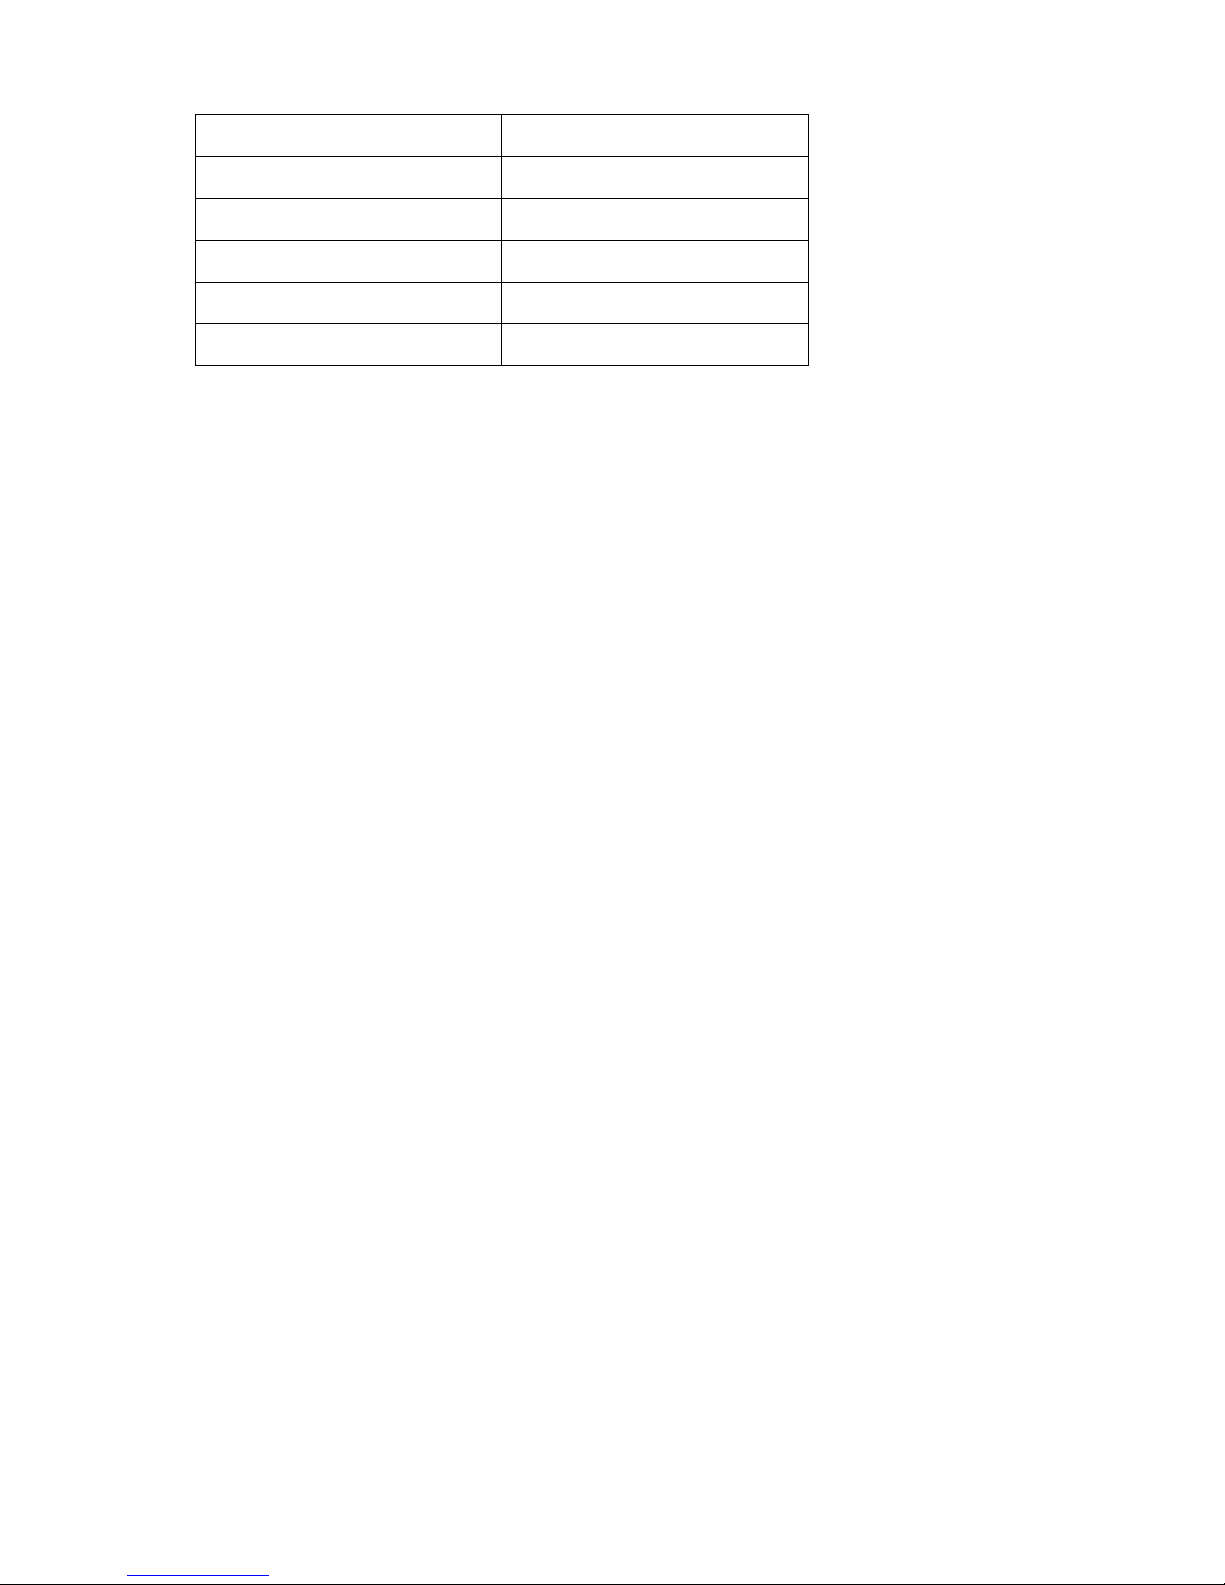
9.1.1.
Replace Period
Page 13
13
1313
13 / 18
Note: the replacement period recommended in the above table is for general water condition, it
is just for reference only. The actual change period will be different according to different
water condition.
9.1.2.
Taking Off and Install of Decorative Panel
Take off decorative panel. Use your finger to hook Notch, and then pull up decorative panel .
Install of decorative panel. Insert the front buckle of decorative panel into the front panel,
then press the decorative panel.
Picture 4
9.1.3.
How to replace filter
After remove the decorative panel you will see, there are one or two filter in machine. Turn the
filter handle counterclockwise to take off filter. And put the filter into filter base and turn filter
handle clockwise to install filter.
Filter Replacement
Pre-Filter
To clean every 3 to 6 month
ACF Filter
Change every 6 month
Compound Filter
change every 6 to 12 month
RO Filter change every 12 to 18 month
UF Filter change every 12 to 18 month
Page 14
14
1414
14 / 18
Picture 5
Open— Turn the filter out (Counter clockwise)
Close—Install filter (clockwise)
Picture 6
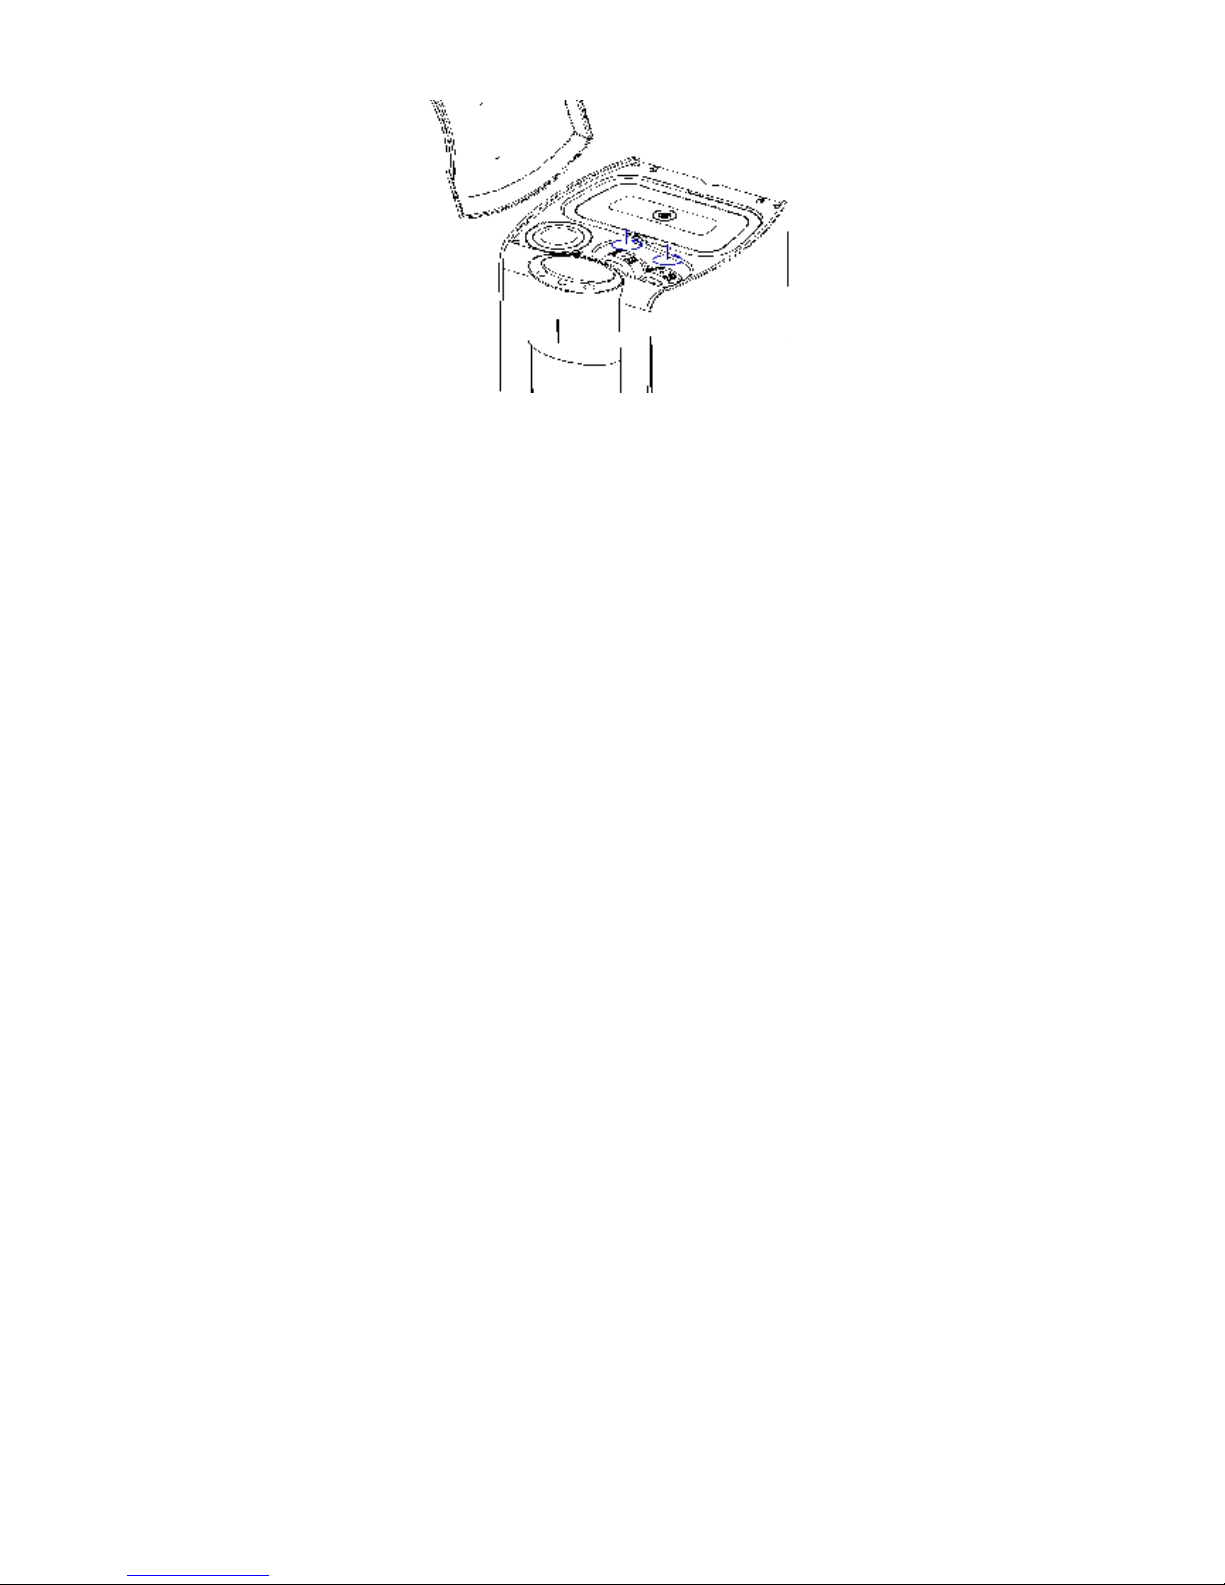
9.1.4. How to replace UV
After remove the decorative panel you can see on the top there is UV installed. (see picture
4) . Please do accordingly as following to replace UV.
Taking off UV(Open). Please find the “UV replace tool ” on the accessory bag. Insert UV
Replace Tool into UV hole, push out the buckle in the hole, as the same time, turn the UV
counter clockwise to take off UV. See picture 7.
Install UV(Close). Hold UV and insert UV into cold tank. Then turn UV clockwise, and
when you feel the buckle auto blocked, the UV installation finishes. See picture 7.
Picture 7
Note: This clause only applies to the machine with UV system.
9.1.5.
How to change Ozone generator
Page 15
15
1515
15 / 18
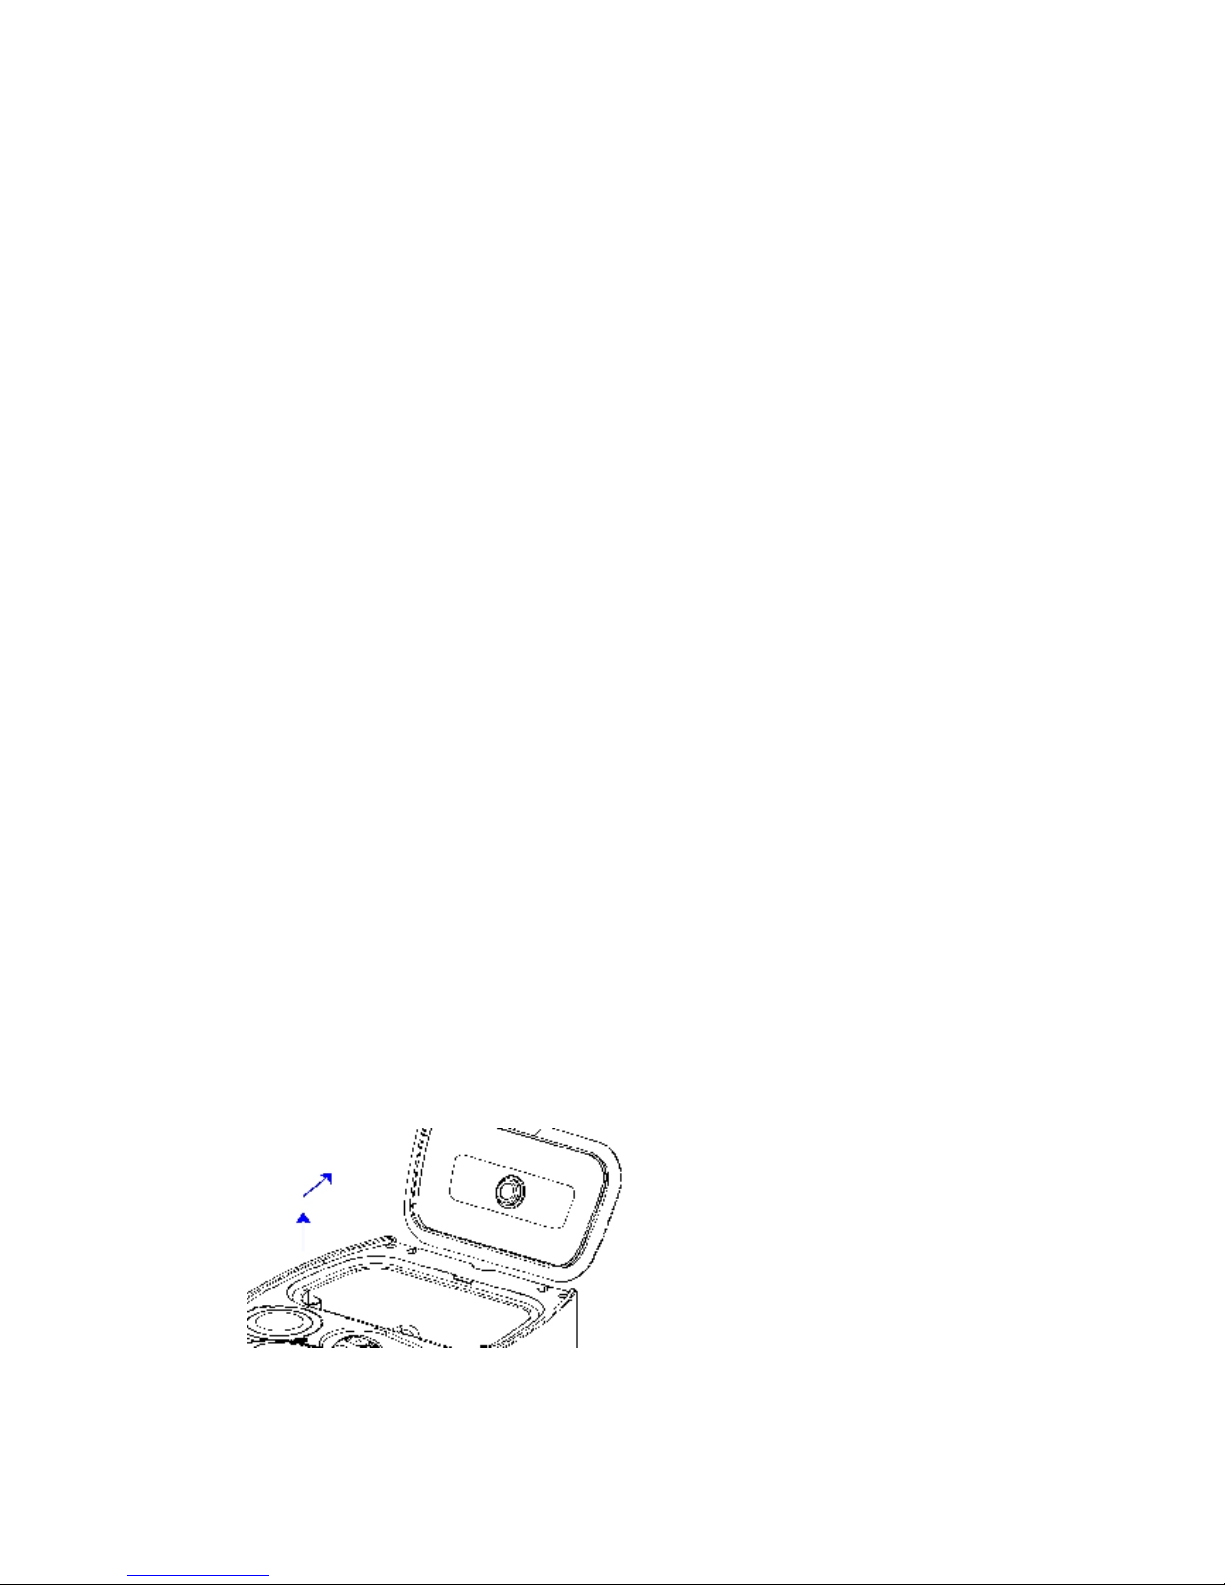
The ozone generator is installed at the bottom of the machine (See picture 8). Cause the
replacement of ozone generator leads to install of electrical parts, we suggest the
replacement of ozone will be taken by professional service people. It is described in detail
here.
Picture 8
9.2. Clean Tanks
If machine not be used for a long time, it needs to clean the hot and cold tank to make sure
the water is fresh.
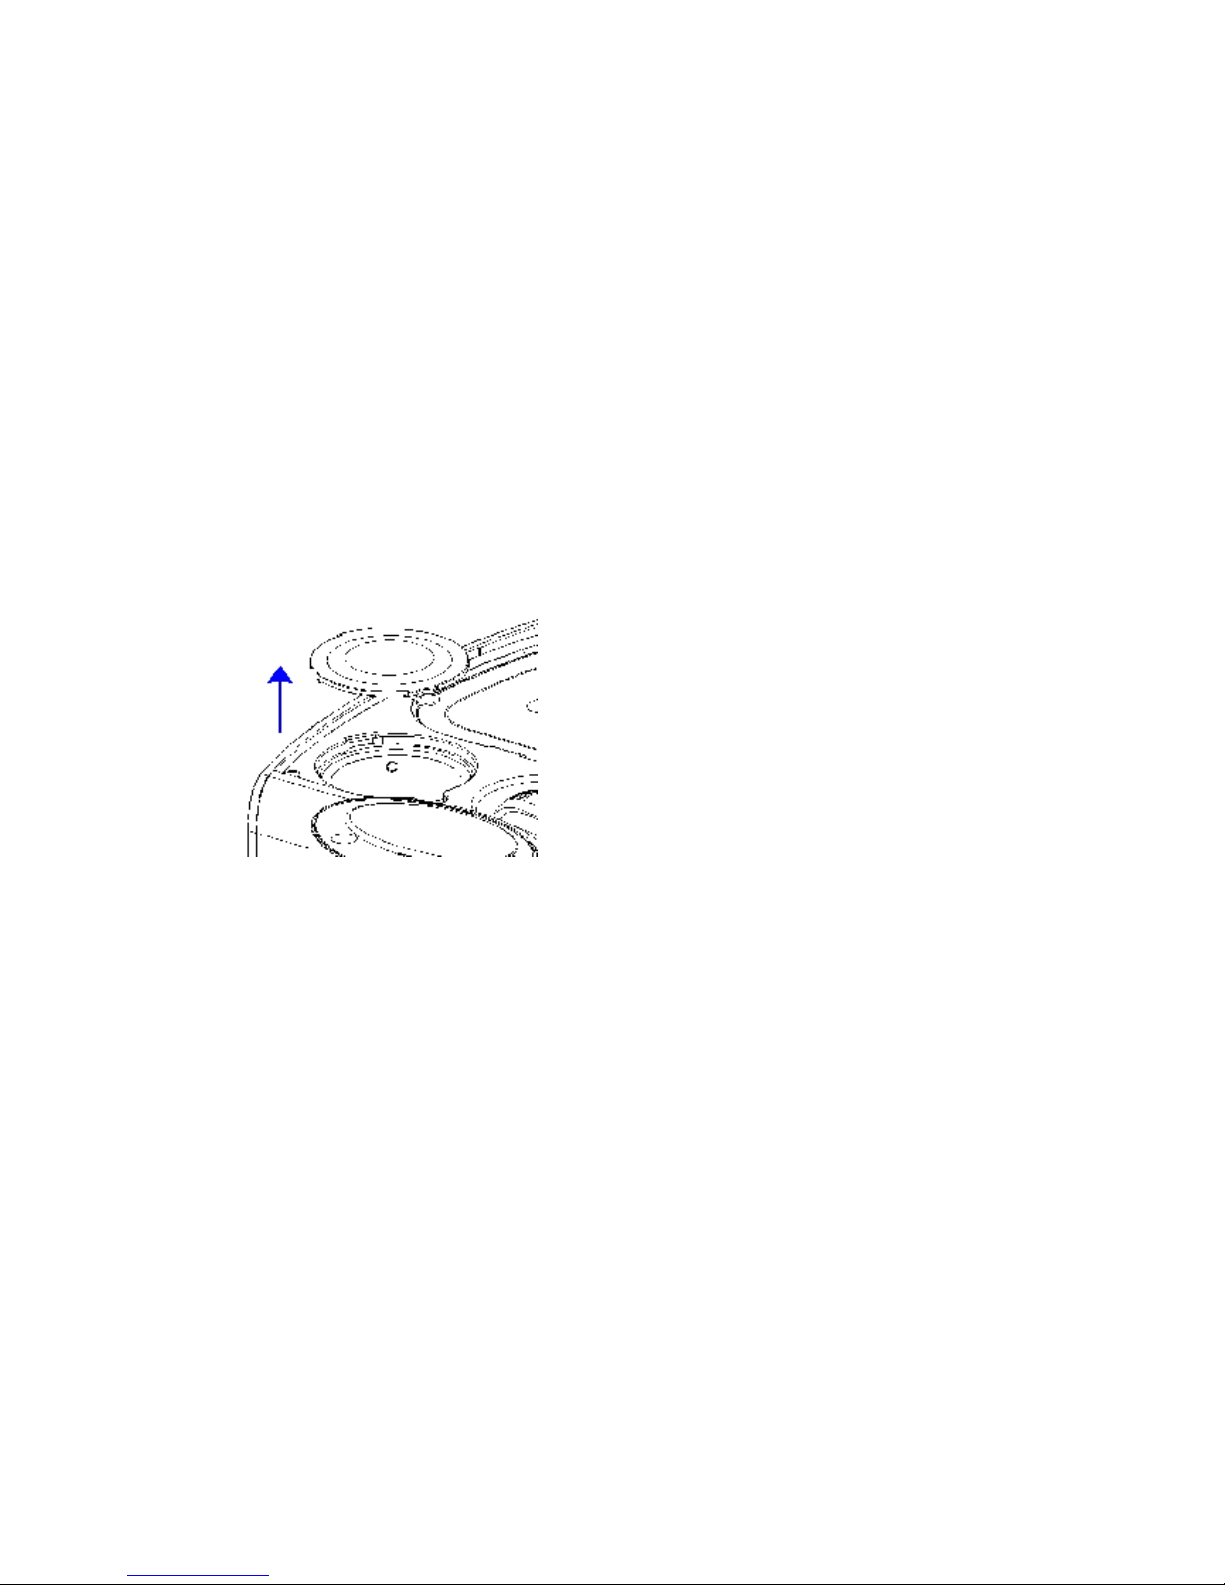
9.2.1. Clean Water Tank
First please turn off the water supply and electricity supply. Remove the decorative panel,
you will see the water tank cover (check Picture 4). Open the water tank cover, add clean
water in tank and use soft cloth to clean tank. After finished cleaning, take off the water tank
drain stopper at the bottom of machine. When drain out all the water, put the stopper in
place. The cleaning process of water tank finished.
Picture 9
9.2.2. Clean Hot Tank
Note: When you want to clean hot tank, please turn off the heating switch. Wait until the
water coming from the hot tank become cool, then start to clean.
Page 16
16
1616
16 / 18
First please turn off the water supply and electricity supply. Remove the decorative panel,
you will see the hot tank cover (check Picture 4). Use tool to open the hot tank cover, then
put clean water into hot tank. Use soft cloth or soft brush to clean the hot tank. After that,
take off the hot tank drain stopper at the bottom of machine. When drain out all the water,
put the stopper in place. The cleaning process of hot water tank finished. Please clean the
unit with soft cloth dipped in warm water or neutral detergent. To clean the display panel
and decorative panel, please use soft dry cloth.
Do not use rough detergents, concentrated washing liquid, solvent or anything that may
scratch the machine materials (such as steel wool, steel balls, etc.).
Attention: If it connects with power supply when you cleaning the machine, make sure not
make the back of machine damp.
Note: If you find there are scales in hot tank, you can put 5% citric acid into tank to clean
the scales. Move machine out of table for around 20cm, hook the dust cover by hand and
pull it out.
Picture 10
9.3. Clea n th e Dust Cover
Move machine out of table for around 20cm, hook the dust cover by hand and pull it out. Use
close or brush to clean the dust on it, then put it back.
Note: To clean the dust cover regularly can help machine to keep good ventilation
performance, making sure each functional modules can work efficiently.
9.4. Clea n Machine
Please clean the unit with soft cloth dipped in warm water or neutral detergent. To clean the
display panel and decorative panel, please use soft dry cloth. Do not use rough detergents,
concentrated washing liquid, solvent or anything that may scratch the machine materials (such
as steel wool, steel balls, etc.).
Attention: If it connects with power supply when you cleaning the machine, make sure not
make the back of machine damp.
Page 17

17
1717
17 / 18
10. Precautions
◎The machine is only for indoor use, please do not put under direct sunlight. Do not put
flammable material beside the machine. Do not put valuable appliance beside machine to
prevent being damp. Do not sink machine into water.
◎This machine adopts the 230VAC or 120vac voltage , need to use with a 10A fuse socket.
Please use safety and reliable electrical devices during the operation and repairing.
◎When use the machine for the first time (or after cleaning), please turn on heating switch
after make sure there is water come out of faucet to prevent making any damage of machine.
◎The machine is safety and reliable, there may a few drops after getting water, it is a normal
phenomenon. Because there is no valve between tank and faucet and the water tank is not a
pressure tank.
◎The machine can make hot water with high temperature, children are forbidden to use
machine without accompanied by adults.
◎The machine is forbidden to be used by disabilities or children, unless supervised or guided
by responsible persons.
◎The maintenance and service of machine must be taken by professional person, the
manufacturer and distributor will not undertake any direct or indirect loss caused by improper
use or neglect of responsibility.
◎For safety, if you will not use machine for a long time (such as on a holiday or long trip),
please cut off the water supply and power supply of the machine. Please get and drain 10-15L
water after turn on the machine again.
Please contact with your local dealer to get detailed explanation of operations and
precautions.
Warning: The machine must use three -pin socket with a good grounding line and leakage
protection switch!
Page 18
18
1818
18 / 18
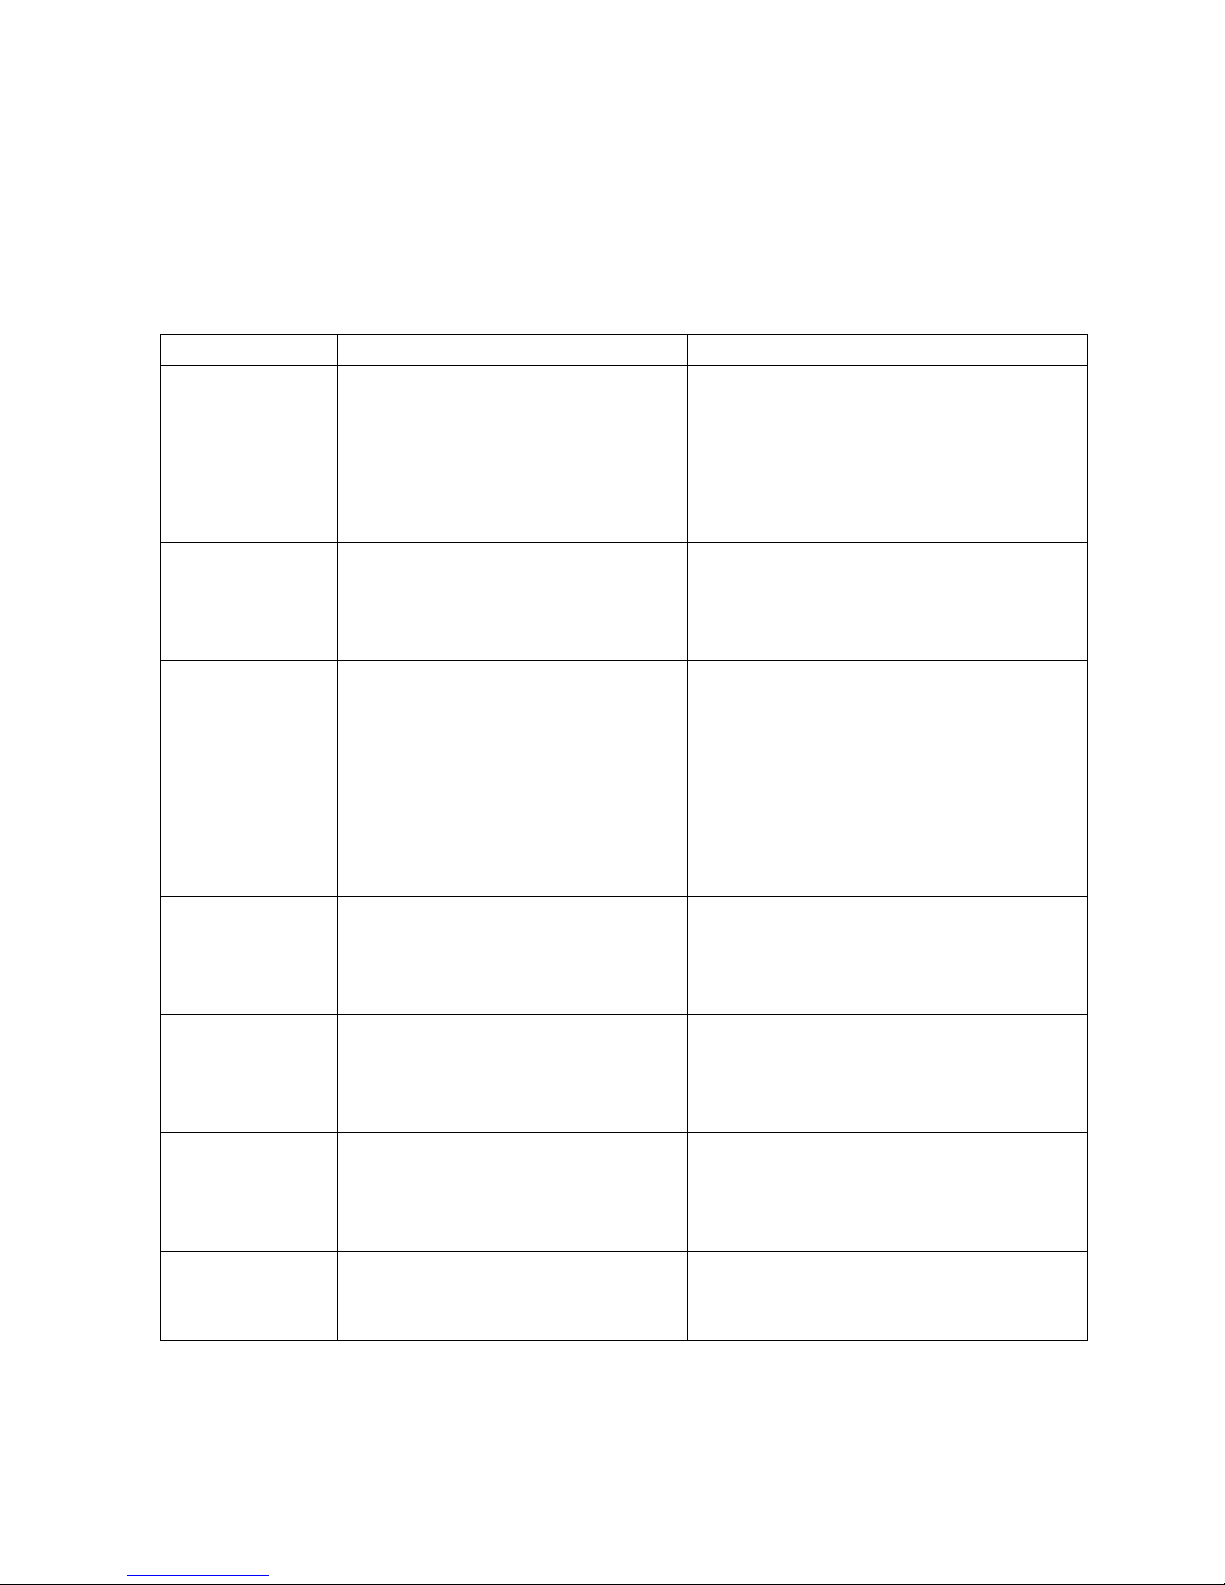
11. Trouble Shootings
If you find machine not work properly, please check the list blow, and then decide if
you need to find professional person to repair.
Failure Possible Reason Settlement
No water comes
out
•haven’t connect to power supply
•Power socket failure
•Water inlet valve shut off
•water pipe is blocked or the water
pressure is too low
•Check if machine has connected to power
supply
•Check if the power socket is working properly.
•Check if the inlet valve is open
•Check the water supply .
No hot water
•Didn’t turn on the heating system
•Consumption of hot water is too much
•Thermostat on the hot tank shut off
•Turn on heating switch
•Check it 10 minutes later
•Press thermostat again to reset.
No cold water
•Didn’t turn on the cooling system
•Consumption of cold water is too much
•Did not get cold water for a long time,
there are ice in the cold tank Didn’t
turn on the cooling system
•Consumption of cold water is too much
•Didn’t get cold water for a long time,
there are ice in the cold tank
•Turn on cooling switch
•Check it 30 minutes later
•Turn off the power supply, start the machine
again after 2 hours.
Leakage
•Drip tray is full
•Water leakage inside of the machine
•Empty the drip tray
•Shut off the power supply and water supply,
then contact with our service staff.
Smell in the water
•New machine
•Machine is not used for a long time
•Filters are out of date
•Get and drain 10-15L water
•Get and drain 10-15L water
•Contact with our service staff to change filter.
Electricity leakage
•Machine is not earthed well
•Power cord damage
•Must use reliable three pin socket.
•Install an additional electricity leakage
protector.
•Please contact with our service staff
Display or push
buttons are no
reaction
•Hardware failure
•System crashes
•Contact with our service staff to repair.
•Shut off the power supply for 1-2 minutes,
then turn on the machine again.
Note: If you find that the machines have quality problems, please contact the nearest authorized service
department came to repair or call the dealer to repair. Please not disassemble machine yourself, our
company will not undertake any responsible for the damage and incident result from it.
 Loading...