

Page 1
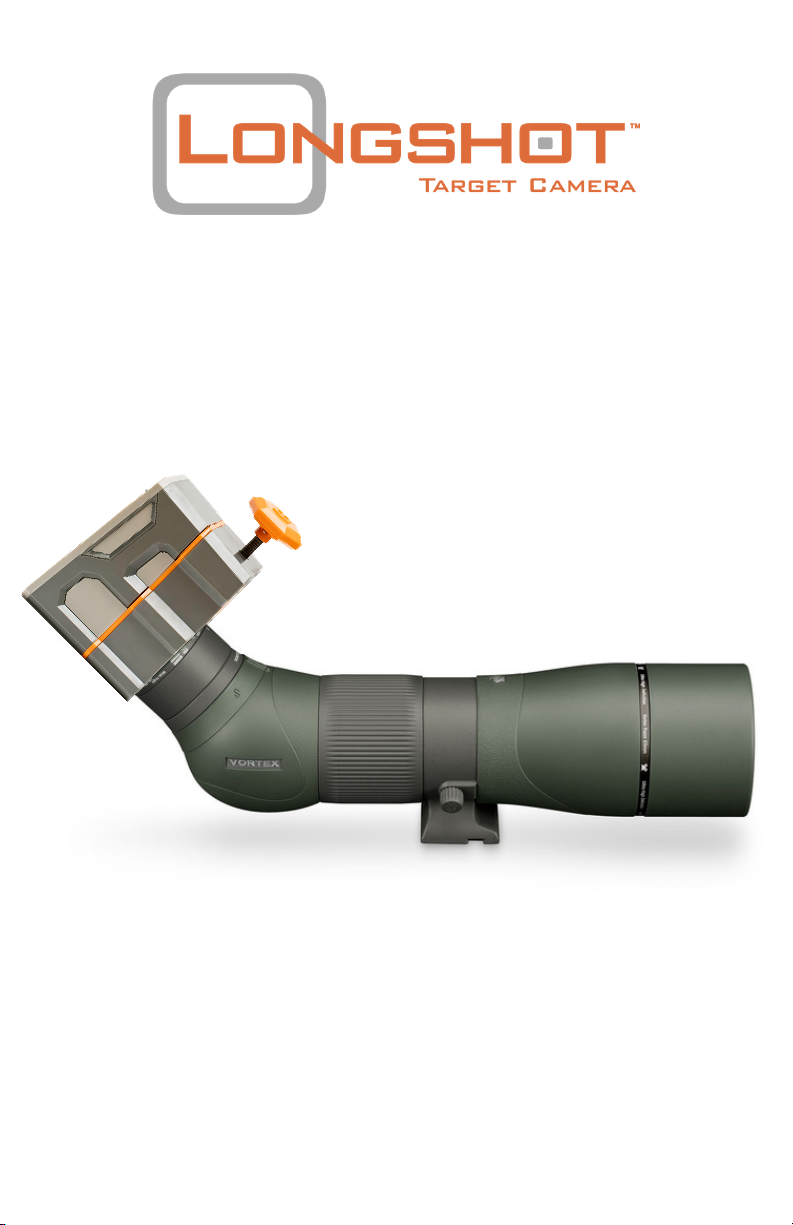
THE HAWK
SPOTTING SCOPE CAMERA
USER MANUAL
1835 CR 130, Pearland, TX | 1.281.205.8134
[email protected] | longshotcameras.com
Page 2
At LONGSHOT, our goal is to treat you as we would
like to be treated and to treat you as we imagine
Christ might treat you. It's that reason that drives us
to makes the best target cameras available and to
provide the best customer service that we can. In
constructing this manual, we've done our best to
address any questions or concerns that you may
have, but we're human too and... we may have
missed something; so, if you have any questions or
concerns that aren't addressed in the manual or you
just prefer to talk to someone, don't hesitate to
reach out to us.
Sincerely,
Clay Rhoden
Founder
2 8 1-2 0 5-8 1 3 4
W W W.L O N G S H O T C A M E R A S.C O M
Page 3
TABLE OF
CONTENTS
0 1
COMPONENTS &
FEATURES
0 7
APP
FEATURES
0 2
SETUP &
USE
1 3
WARRANTY &
gUARANTEE
0 6
APP
BASICS
1 6
FAQ'S
Page 4
COMPONENTS
&
FEATURES
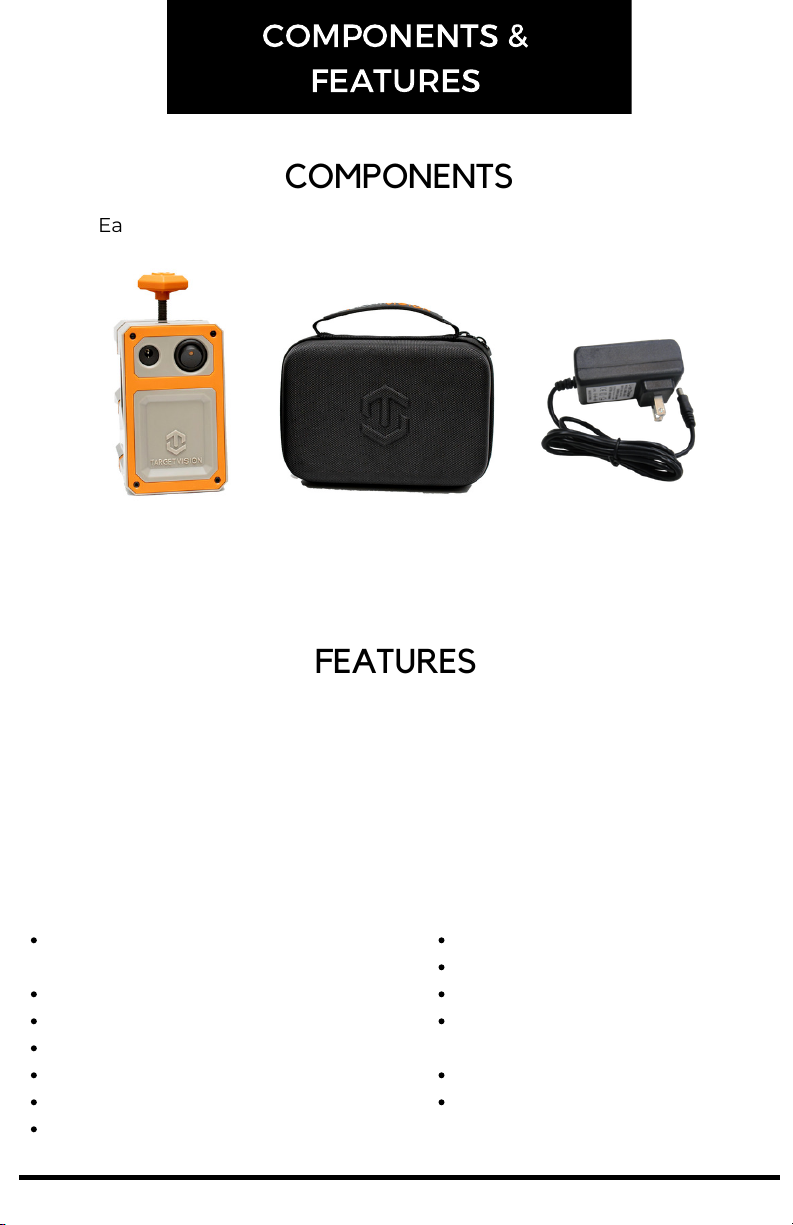
COMPONENTS
Each HAWK system comes with the following components:
HAWK Spotting
Scope Camera
Soft Carrying
Case
Charger
FEATURES
TheHawk spotting scope camera is the next evolution of digiscoping, it
turns any spotting scopeinto a smart scope in just minutes. Simply slide
the hawk over the eyepiece of the spotting scope and open the
TARGETVISION app on your smartphone or tablet to view the camera
feed and unlock all of the app features (track and number shots, save
photos, review sessions, record video and stills).Seeing your shot has
never been easier.
Fits eyepieces between 38mm and
56mm
Live HD video (1920 x 1080)
App-Based software (iOS & Android)
Quick and easy setup
7+ hour runtime
Lightweight, portable, and compact
2-year warranty
Drop-resistant
Weather-resistant
No cell or WiFi service required
Batteries: rechargeable
Lithium-Ion
Band: WiFi 2.4GHz
Weight: 1 lb
Page 1 V 2.0
Page 5
SETUP
&
USE
INSPECTION
Please inspect your HAWK system before use to ensure that all
components listed on page 2 are present. Prior to first use, you should
fully charge the system.
CHARGING
Use only the included charging adapter to charge the system. The
included adapter is rated for power input of 100V - 240V and power
output of 12.6V DC at 800mA. The adapter is intelligent and will stop
charging the system once the battery is fully charged. Your Longshot
system should be turned off while charging. Please allow up to 4 hours
for the camera to fully charge.
Charger LED Color
Green
Red
Default state - plugged into the wall and not yet plugged
1.
into a camera system
Fully Charged
2.
Charging1.
Charge Status
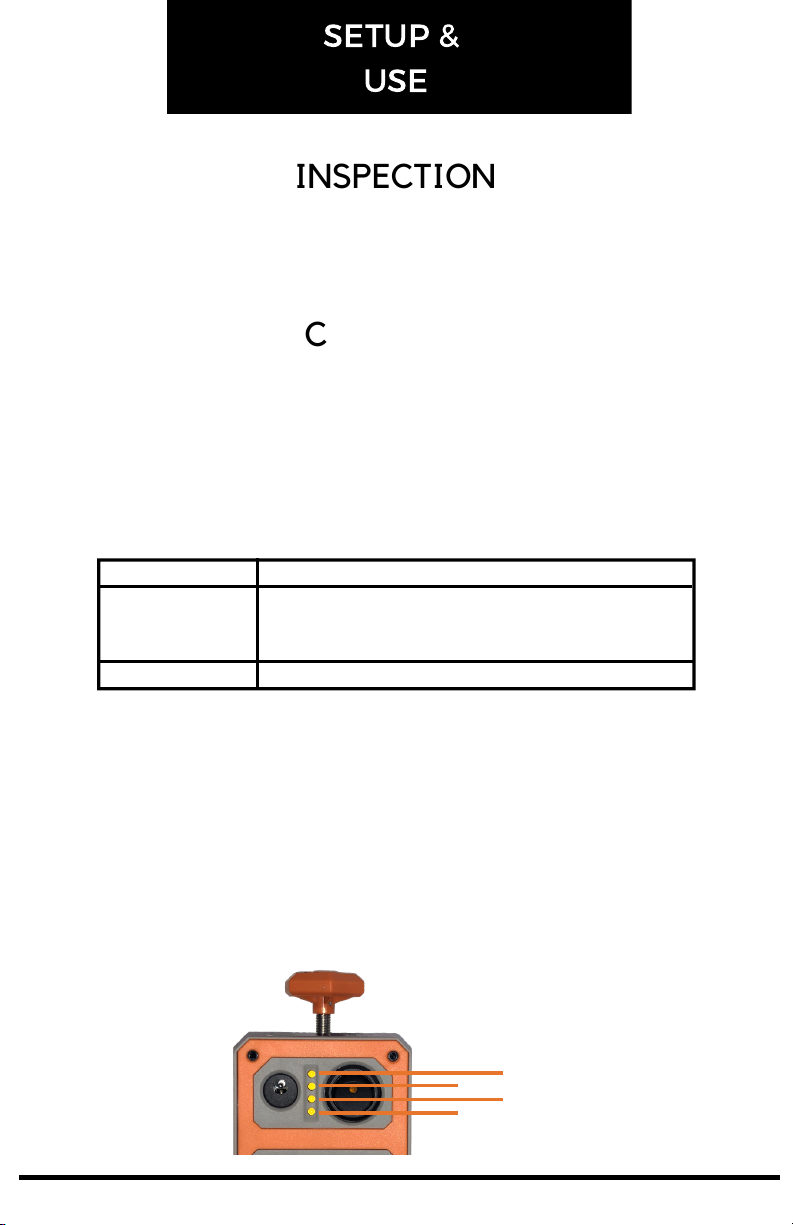
BATTERY LEVEL INDICATOR
Between the charging port and power switch of the HAWK there are 4
LED's that indicate the battery's charge level. Each LED represents 25%
of the battery life. When the battery level becomes too low for the
system to operate, the LED's will flash and the system will turn off. You
may also notice a slight delay from the time you flip the power switch
until the time the lights come on, this is a result of the circuitry within
the battery level indicator board and is standard operation.
100%
75%
50%
25%
Page 2
V 2.0
Page 6
SETUP
&
USE
MOUNTING
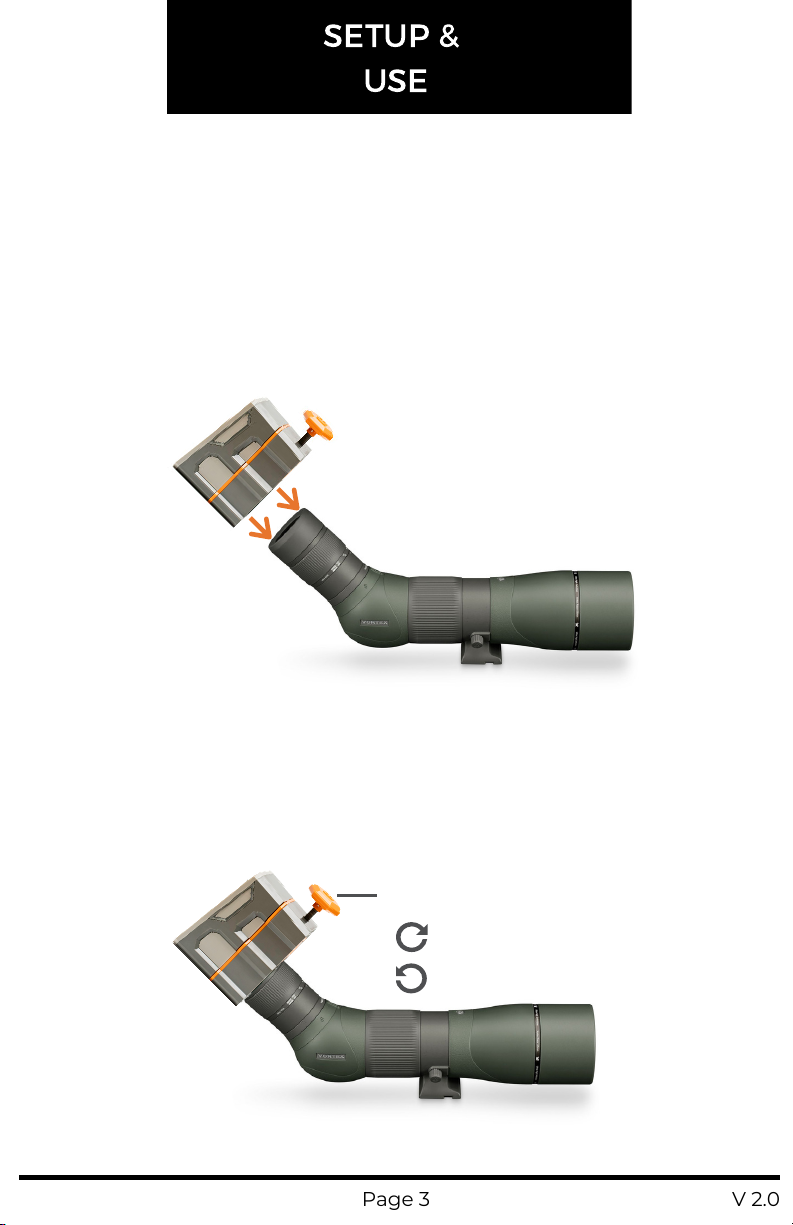
Toproperly mount your camera to your spotting scope:
1. Slide the camera's universal mounting assembly over the eyepiece
of your scope until the camera makes contact with the rear of the
eyepiece. The camera has a spacer built in to account for most eye
relief setups; however, the camera may need to be setup a little
further off the eyepiece depending on your particular scope.
2. Turn the mounting knob clockwise to tighten the camera onto
your eyepiece. As you tighten the mount, it will self center the
camera on the eyepiece.
Mounting Knob
to tighten
to loosen
Page 3 V 2.0
Page 7
SETUP
&
USE
CONNECTION
Before connecting to your camera, it is recommended to download the
TARGETVISION application from your device's app store.
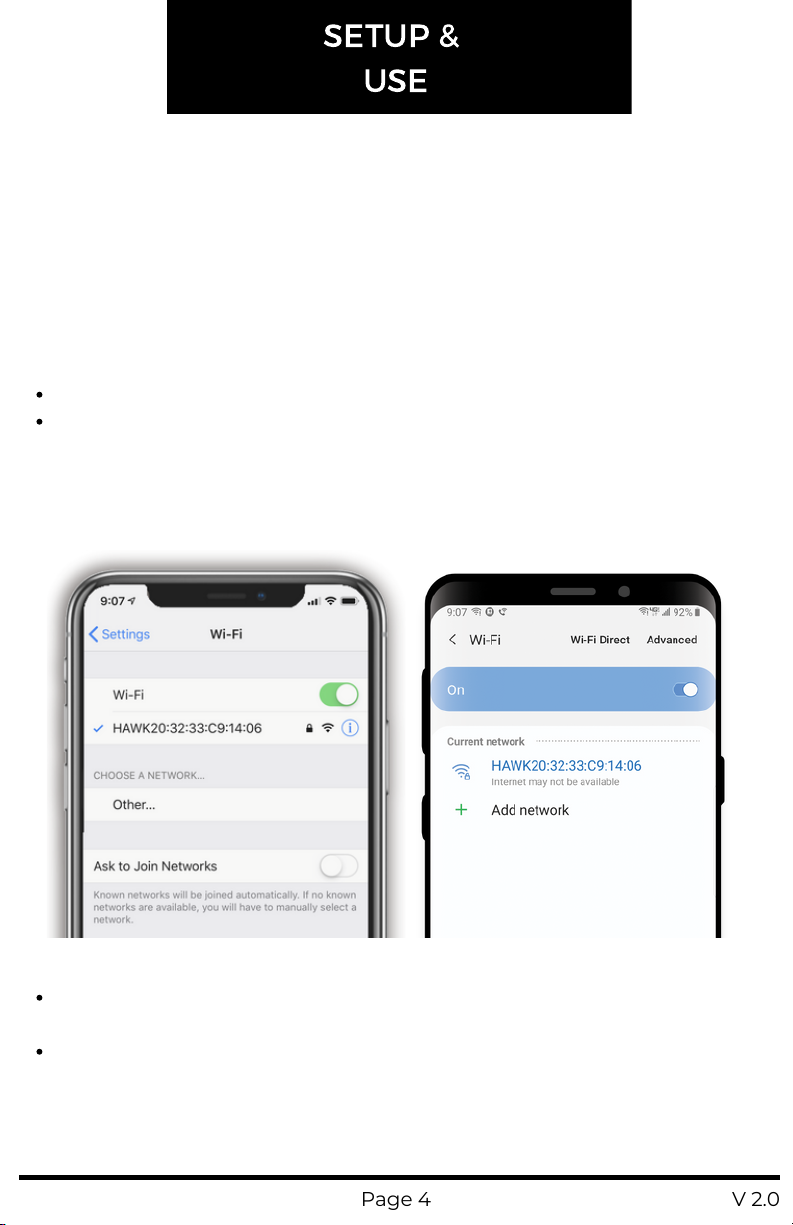
Connecting to your HAWK is as simple as connecting to a WiFinetwork.
Simply turn the camera on, go into the WiFi settings of your device,
locate and connect to the camera's network:
SSID: HAWKXX:XX:XX:XX:XX:XX
Password: longshot
Once you have established a connection, open the TARGETVISION
application on your device and use the live video feed to adjust the
position and focus of your spotting scope.
Please note:Once connected to the WiFi network
Apple devices may warn that there is "no internet connection"
available
Android devices may warn that "internet may not be available"
This is normal and nothing to be concerned about. There is not internet
available when you are connected to your camera's network. Please
proceed by opening the Targetvision app and you should see a camera
feed.
Page 4 V 2.0
Page 8
SETUP
&
USE
ADJUSTMENT
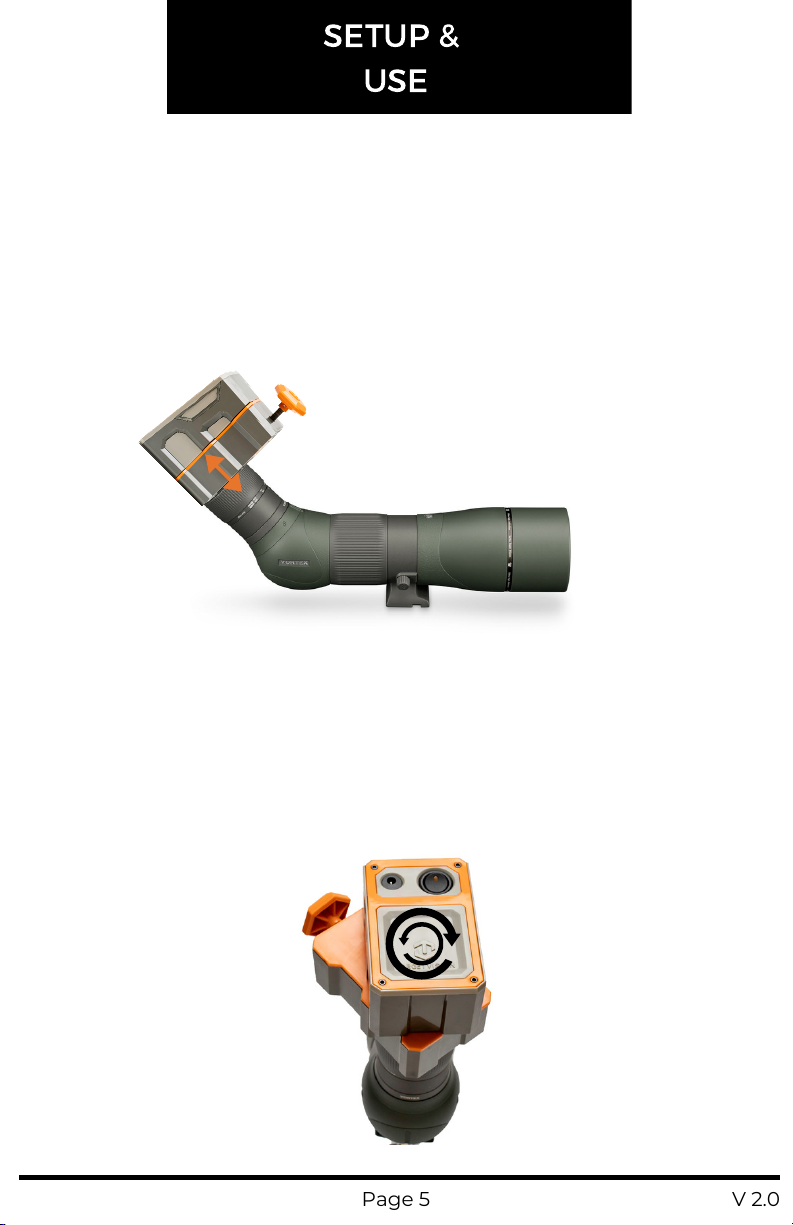
Eye Relief:Depending on your scope, you may need to adjust the
cameras mounting position to compensate for eye relief and get the
best picture possible. In some cases, if the camera is too close to the
eyepiece, the center of the image can appear washed out. The best
solution to this is to simply mount the camera further away from the
eyepiece.
Zoom:Most spotting scopes require you to rotate the eyepiece to adjust
the magnification of the scope. If this is the situation in your case, you
can rotate the eyepiece without having to re-mount the HAWK. Once
you are done adjusting the eyepiece, simply rotate the back half of the
system to upright the camera view. The camera will remain centered
on the eyepiece throughout the process.
Page 5 V 2.0
Page 9
APP
BASICS
DOWNLOAD
The TARGETVISION app is a free app that is only available for iOS and
Android devices. To download the app, please navigate to your device's
app store (the App Store for iOS and the Play Store for Android), search
for TARGETVISION (all one word), and choose install. Once the app has
been installed, you will need to connect to your HAWK's WiFi network to
see the video feed.
Apple App Store Google Play Store TARGETVISION
App
TARGETVISION App is only compatible with:
Android version 5.1 or higher | iOS version 8.0 or higher
APP OVERVIEW
The TARGETVISION App allows you to see and interact with your target
like never before. The app has a clean and simple user interface that
maximizes the utility of your device's screen by showing the camera
feed across the entire screen and keeping buttons unobtrusive yet
accessible with our most popular features only a tap away. More
advanced features are stored within the options menu while settings,
support, and media files can be found within the main menu.
Due to the nature of the iOS and Android operating systems, our
software must be developed independently to work properly on each
platform, essentially doubling our software development time and cost.
Currently, we must implement significant user interface and/or feature
updates on one platform at a time. This fact has lead to a difference in
the user interface and feature set of our iOS and Android apps, which
you will see reflected further in the guide below.
Please keep in mind that software development is a very costly and
time consuming process. We appreciate your patience and feedback as
we continue to improve.
Page 6 V 2.0
Page 10
APP
FEATURES
iOS BUTTONS & LAYOUT
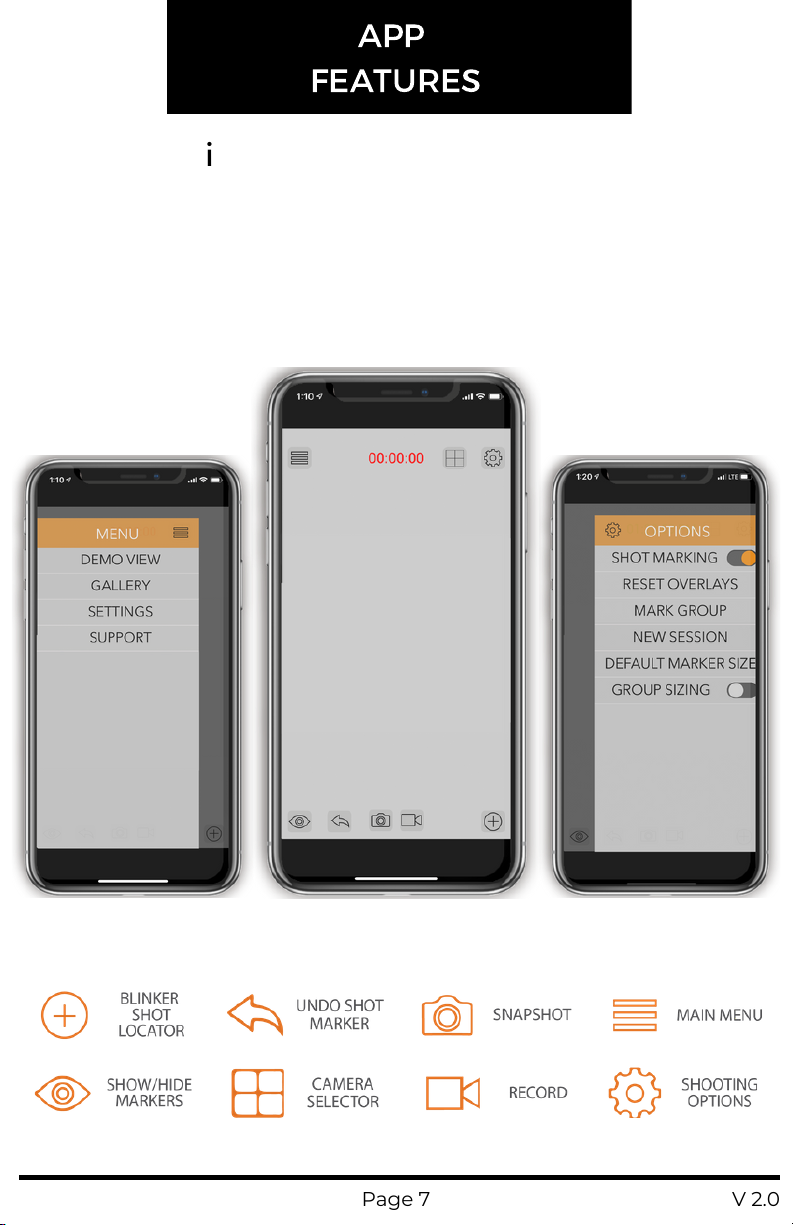
The TARGETVISION iOS app is simple and easy to use with the most
used features only a tap away. The screen shots below show the three
main screens, the home screen, main menu, and shooting options
menu. Please reference the icon guide below the screenshots for an
explanation of the home screen icons and continue reading for more
details on how each feature works.
MAIN MENU HOME SCREEN
Page 7 V 2.0
SHOOTING
OPTIONS
Page 11
APP
FEATURES
ANDROID BUTTONS & LAYOUT
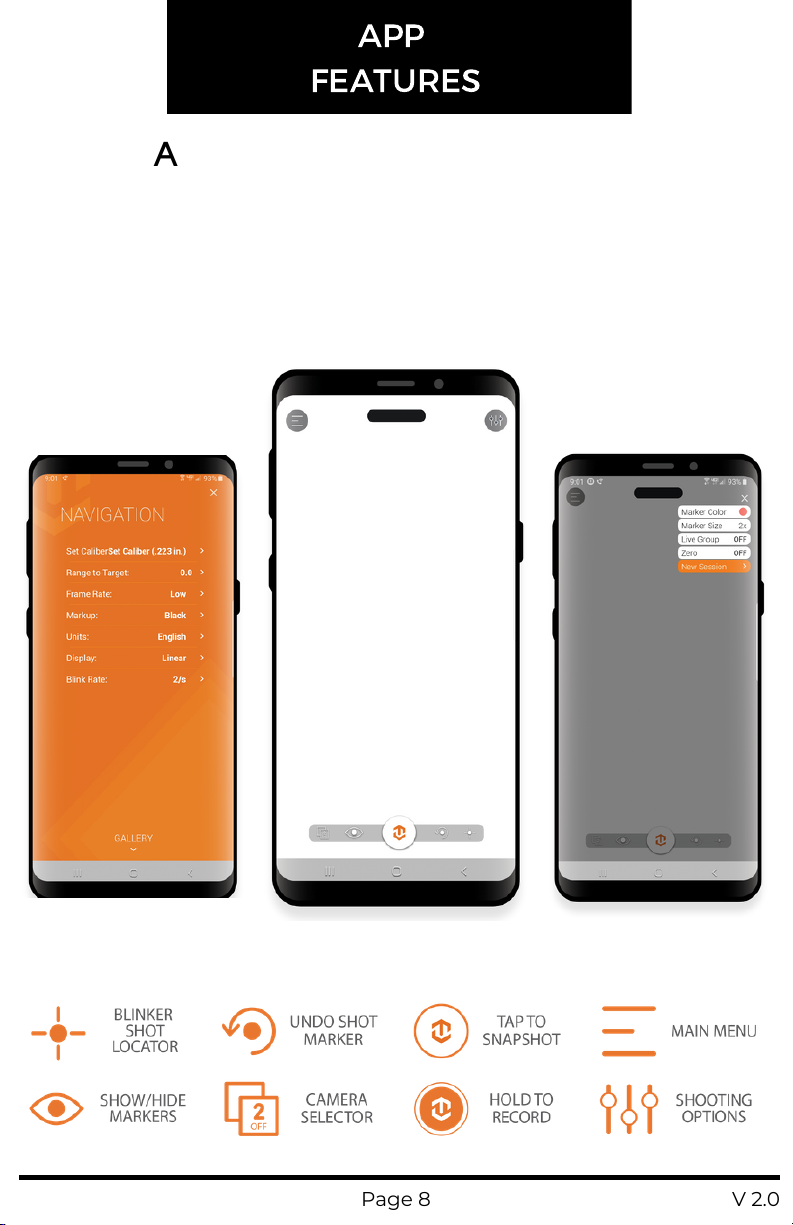
The TARGETVISION Android app is simple and easy to use with the most
used features only a tap away. The screen shots below show the three
main screens, the home screen, main menu, and shooting options
menu. Please reference the icon guide below the screenshots for an
explanation of the home screen icons and continue reading for more
details on how each feature works.
MAIN MENU HOME SCREEN
Page 8 V 2.0
SHOOTING
OPTIONS
Page 12
APP
FEATURES
BLINKER SHOT LOCATOR
With the Blinker Shot Locator feature, it's quick and easy to find your
your newest bullet hole. Simply touch the shot locator icon and your
most recent bullet hole will start blinking, making it a breeze to find.
For the feature to work correctly, you must tap the shot locator button
after each shot you take. This is because the feature takes a snapshot of
your target each time you tap the button and then alternates between
the last two images of your target to blink your last shot. If you don't tap
the button after each shot then you will likely begin to see multiple
holes flashing, because the software is just comparing the most recent
snapshot to a snapshot of the target the last time you pushed the
button.
SHOT MARKING
Shot Marking is one of the core features of the TARGETVISION app. It
allows you to keep track of your shots by simply tapping on them as
they appear. As you tap, the app will place a semi-transparent marker
over the image and will auto number the markers as well. You can
adjust the marker size and color via the options menu as well as mark
groups of shots different colors. Shot markers cannot be moved once
they have been placed but you can undo shot markers with the undo
button or remove all markers currently on the screen with the "Reset
Overlays" button in the options menu (currently only available on iOS).
MARKER SIZE
The Marker size option allows you to roughly match the size of the shot
marker to the size of your bullet hole. Once you select a marker size,
that selection is saved as the default marker size until you change it
again.
Page 9 V 2.0
Page 13
APP
FEATURES
MARKER COLOR/MARKING GROUPS
Changing the marker colors and marking groups are done differently
on iOS and Android. The biggest difference between the two is that iOS
retroactively marks groups while Android proactively marks them.
iOS
There are two different ways to change the marker colors. The first will
change the default marker color and the second will change the marker
color of your previous string of shot markers.
Default Marker Color:This setting can be found under MAIN MENU >
SETTINGS > DEFAULT MARKER COLOR. The default marker color you
choose will be saved until you go in to change it again.
Mark Group: The mark group feature is intended to help you mark prior
strings of shots to track your groups or to keep track of different
shooters. Once you choose a color from the mark group menu, your
prior string of shot markers will all turn that color. New shot markings
placed after marking a group will be in the default color.
ANDROID
Navigate to the SHOOTING OPTIONS MENU > MARKER COLOR. Once
you select a marker color, all shot markers will be that color until you
choose a new color. To mark a group, be sure to change the color prior
to starting a new group.
IMAGE CAPTURE
Taking a snapshot in the TARGETVISION app is simple; however, it is
done differently on iOS and Android.
iOS:Tap the camera icon to take a snapshot. A prompt will appear
after tapping the icon confirming that the image has been captured
Android:Tap the TV icon at the bottom center of the screen. The
snapshot will open in another window for your review with a prompt
to save or dismiss the snapshot.
All snapshots will be stored within the app's gallery. To move the image
to the gallery on your device, you must go into the gallery and export
the image from the sharing menu.
Page 10 V 2.0
Page 14
APP
FEATURES
VIDEO CAPTURE
Capturing video in the TARGETVISION app is simple; however, it is done
differently on iOS and Android
iOS:Simply tap the video camera icon to start and stop recording.
While recording, a timer will appear at the bottom of the screen
showing the duration of the recording.
Android: Simply tap and hold the TV icon at the bottom center of the
screen until it turns orange. To stop recording, just tap the icon
again. After you stop the recording, a prompt will appear asking if you
want to save or dismiss the recording.
All recordings will be stored within the app's gallery. To move the video
to the gallery on your device, you must go into the gallery and export
the image from the sharing menu.
*When you record video on iOS, it is just a video recording without
audio; on android, it is a video recording but the app also records audio
via your device's microphone.
SESSIONS
Sessions are used to store pictures, video, and data about a particular
shooting session together in an album. After starting a new session, all
snapshots and recordings made will be stored together in an album
within the gallery. After ending a session, new snapshots and
recordings will no longer be associated with an album and will be stored
in their respective locations within the gallery.
GALLERY
The Gallery can be found within the main menu of the app. The Gallery
organizes images and videos under separate tabs and you can store
images and videos in an album if you prefer. If you took pictures or
recorded video after creating a new session, those images and video
can be found in an album with the session name that you created.
Page 11 V 2.0
Page 15
APP
FEATURES
LIVE GROUP
The Live Group feature actively calculates your group size with each
new shot marker that you place. For the feature to work correctly, you
must know the distance between two set points on your target and
input that information into the app when you turn live group mode on.
It isrecommended that you use two corners of your target as reference
points for this measurement and input. After inputting a reference
distance, the app will begin to calculate the distance between your two
furthest shots from each group.
ZERO MODE
Zero Mode helps you to zero your optic by calculating the correction
needed to move your point of impact to your point of aim. For this
feature to work correctly, you must provide the app with a reference
distance (just like in Live Group mode), your point of aim, caliber, and
distance to the target. After the initial setup, as you mark your impacts,
the app can tell you what correction to make in MOA, Mils, or inches,
depending on which Display option you have selected in the main
menu.
*This feature is currently only available on Android
ADDITIONAL RESOURCES
Additionaldetails on features along with detailed screenshots and
videos can be found under the support tab on our website,
www.longshotcameras.com.
Page 12 V 2.0
Page 16
WARRANTY
&
GUARANTEE
STANDARD 2-YR
MANUFACTURER WARRANTY
Each LONGSHOT camera and accessory is manufactured with the
strictest production standards and goes through vigorous quality
control procedures before it is shipped out. To give LONGSHOT owners
an assurance for their investments, all LONGSHOT cameras and
accessories are shipped with a standard 2-year manufacturer’s warranty
against defects in materials or workmanship. Additional protection is
available through our Bulletproof Warranty program.
Please review the warranty terms and conditions below for more details.
2-YR BULLETPROOF WARRANTY
Available to all LONGHSOT camera owners, Bulletproof Warranties are
offered to those seeking a peace of mind for their investments. Through
the expanded Bulletproof Warranty, LONGSHOT owners can be rest
assured that their beloved systems will be fully protected from errant
shots while down range for 2-years.
Bulletproof Warranties must be purchased within 48 hours of the
receipt of the camera system to be protected. If you purchase the
bulletproof warranty separately from the camera system to be
protected, we reserve the right to ask for proof of working condition of
your camera system before issuing the warranty.
Each Bulletproof Warranty protects only one camera. If you purchased a
multi-camera system, you will need to purchase one warranty for each
camera. If you purchase fewer warranties than cameras they will apply
in order of the camera numbers (1 warranty applies to camera 1, 2
warranties will apply to cameras 1 and 2, etc.).
* LONGHSOT reserves the right to modify and update the terms and
conditions for its standard 2- year manufacturer’s warranty and
bulletproof warranty program (herein referred to as Warranty
Programs). The terms and conditions outlined below are effective as of
January 1, 2017.
Page 13 V 2.0
Page 17
WARRANTY
&
GUARANTEE
FILING WARRANTY CLAIM
LONGSHOT fully understands that the nature of warranty claims can be
a hassle for our customers and leaves them without a camera or
accessory for the duration of the claim. Most of the time, issues can be
resolved by reaching out to our Product Specialists. Our team of experts
is here to assist with any challenges you may be facing with your
cameras or accessories and help you overcome it. If the issue cannot be
resolved, the LONGSHOT Product Specialist will initiate the warranty
claim and walk you through the process..
WARRANTY TERMS & CONDITIONS
Warranty Programs only apply to units purchased from LONGSHOT
and its authorized re-sellers and distributors. For units purchased
outside of the authorized network, please contact the respective
vendor for warranty work. Note: LONGHSOT and its authorized
service centers also provide service and repair. Please contact us for
more detail.
Warranty Programs are valid for the original purchaser of LONGHSOT
products and cannot be transferred. The product must be purchased
brand new with original invoice and serial number (if applicable).
Warranty claims will be serviced through the repair or replacement of
the defective part. LONGHSOT shall determine, at its sole discretion,
the method of servicing that will be applied to the claim.
The duration of the standard 2-year warranty begins on the date of
the original purchase. The duration of the 2-year Bulletproof warranty
also begins on the date of the original purchase of the protected
camera system. Parts that are replaced under the Warranty
Programs also fall under its original warranty duration and do not
restart.
For quality control purposes, LONGSHOT reserves the right to request
return on defective parts in exchange for new parts.
*Warranty claims must go through LONGHSOT before servicing can
be performed. Any RMA received, as a warranty claim without
approval from LONGSHOT shall be denied, no exceptions.
Page 14 V 2.0
Page 18
WARRANTY
&
GUARANTEE
CAUSES THAT VOID WARRANTY
Damage caused by accidents, submerging in water, acts of nature or
negligence.
Tampering of the serial number and/or removal of identification
stickers and/or fasteners.
Product failure as a result of installing aftermarket components.
Unit(s) or part(s) received that is in working condition and not
defective. LONGHSOT reserves the right to collect service or return
shipping charges at the expense of the customer.
SHIPPING
The customer is responsible for shipping or delivery of the unit(s) or
part(s) to LONGHSOT designated service location.
LONGSHOT will choose the shipping method back to the customer
and incur any shipping charges.
Please notify our RMA department for shipping to an address other
than what was on the original invoice. Additional documents are
required as proof of address change.
LONGHSOT is not liable for damages caused by the shipping provider
during transit back to our customer.
INTERNATIONAL WARRANTY CLAIM
Any customer filing a Warranty Claim outside the United States or
Canada is responsible for ALL shipping charges, both inbound to our
designated service location and outbound return shipping back to the
customer. All other warranty terms and conditions remain the same as
stated above.
STRAIGHT SHOOTER GUARANTEE
If your LONGSHOT™ target camera does not align better on the target,
provide you with high image resolution or give you the promised
connectivity from camera to monitor, we’ll buy it back, no questions
asked.
*Buy-back guarantee is valid for 30 days after receipt of the product
Page 15 V 2.0
Page 19
FAQ
FAQ
How do I know if the battery is charged and how long does it last?
There is a LED light on the charger that shows the charge status,
green means it's charged and red means it's charging. More details
about charging and charge status can be found on Page 3
What do I do if the image is crooked, sideways, or upside down?
The camera is designed to rotate behind the eyepiece so you can get
the image to be level and upright. More details can be found on Page 6.
How many people can view the camera feed?
The system has the ability to support up to 10 connections at once;
however, it is recommended to only have 1 or 2 people viewing the
same camera feed at once because performance can be severely
hindered as more people connect. High frame rate mode (which is
currently only available on Android) is required to support multiple
viewers at once.
Do I need WiFi or cellular service to use the camera?
No. All you need is a smart device that can log onto a WiFi network. The
camera system creates its own WiFi network that you will be able to log
onto to view the camera feed. More details on Page 5.
My device says, "No Internet Connection". What do I do?
Don't worry, this is correct. Your device will say "No Internet
Connection" because the camera system is not connected to the
internet. The camera system creates its own WiFi network for the sole
purpose of transmitting the video feed from the camera. More details
on Page 5.
The center of the picture is washed out. What do I do?
Depending on your scope, the center of the image may appear washed
out. This is the result of the camera's default eye relief setting not
matching the eye relief of your particular scope. To fix this issue, simply
move the camera further back on the eyepiece until the image is no
longer washed out. More details on Page 6.
Page 16 V 2.0
Page 20
LOVE IT? HATE IT?
LET US KNOW
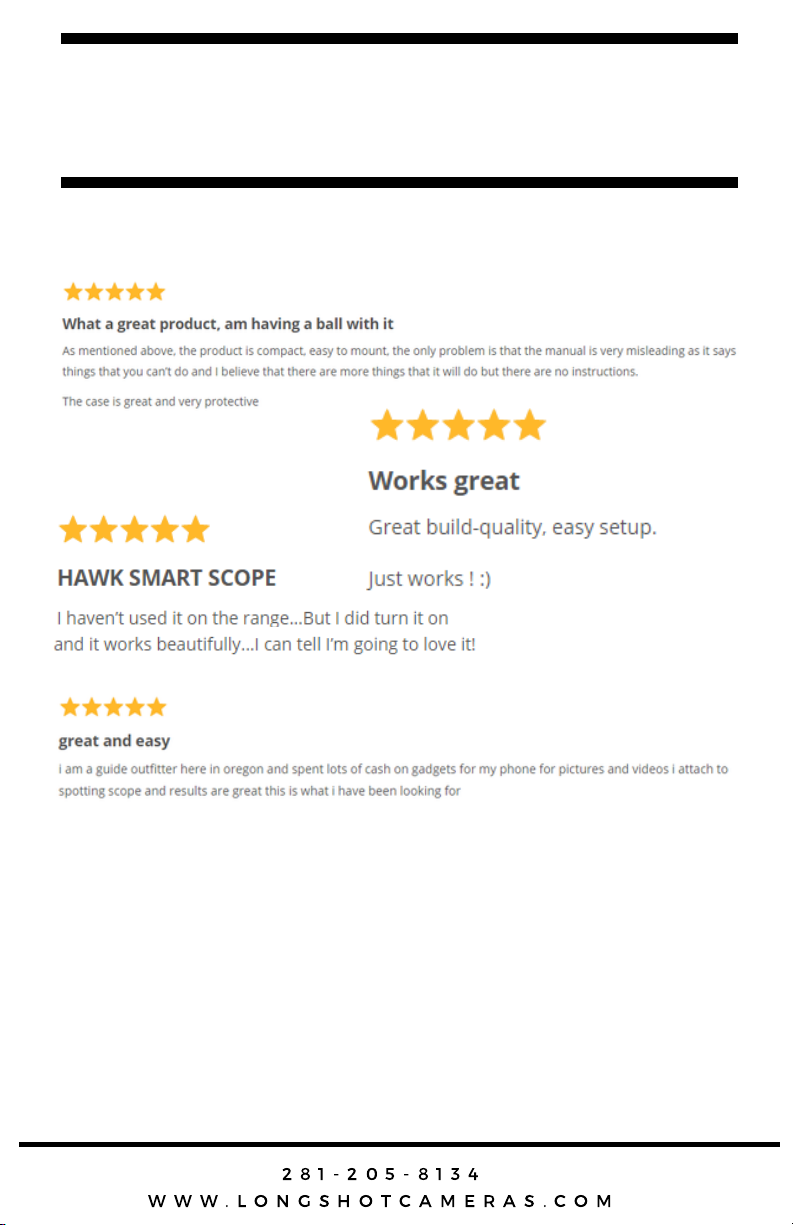
We love reviews and so do our customers. Please take a moment to
leave a review on our website and share your feedback. We use your
feedback to develop new products.
If for any reason, you are not fully satisfied with your new LONGSHOT
product, please reach out to us prior to leaving a review so that we can
attempt to resolve the issue. We want to make it right.
2 8 1-2 0 5-8 1 3 4
W W W.L O N G S H O T C A M E R A S.C O M
 Loading...