

Page 1
SUMMARY
International guarantee 50-53
Recommendations 54-55
Tolerances 56
Pictogramms 57
Rubber strap 58
Folding clasp 59
Certificate of authenticity 60
Water-resistance /
Screw-in crown and push-pieces 61
Adjusting the time (General information) 62-63
Table of equivalents 64-65
You can downloadaPDFversion of the instructions for
use from our website www.longines.com
Summary
Self-winding watches
L599 – L601, L607 66
L636 67
L602, L693 68
L635 – 24 Time zones 69-70
L704 – 24 Hours 71
L633 – Diver 72
L633 – Diver Date 73
L600 – Phases of the Moon 74-75
Table of lunar month
14, L699 – The Lindbergh Hour Angle
L6
Watch 77-78
L699 – Weems Second-Setting Watch 79
L697, L698–3X / 4X Retrograde
s 76
Chronographs
General information (tachometric scale, etc.) 83
Quartz chronographs
L538, L541 84-86
Self-winding chronographs
L650, L651, L652, L667, L674 87-88
L683, L688, L696, L705 89-90
L683 – Instrument pour Cavalier 91-92
L678 – Phases of the Moon 93-94
L686 – 24 Hours 95-96
80-82
49
Page 2

LIMITED TWO-YEARS WARRANTY (USA)
LONGINES is delighted that you should have chosen a
model from our prestigious collection. The little technical marvel you now own will serve you faithfully for many
years. The most advanced techniques were used during its manufacture, and it underwent stringent controls
before it was released for sale.
®
Your LONGINES
watch is warranted by LonginesWatch
Co. Francillon Ltd* FOR A PERIOD OF TWENTY-FOUR
(24) MONTHS FROM THE DATE OF PURCH
the
terms and conditions of this warranty.
ASE under
The international LONGINES warranty covers material
and manufacturing defects existingatthe timeof delivery
of the purchased LONGINES watch (“defects”).Thewarranty only comes into force if the warranty certificate is
dated, fully and correctly completed and stamped by an
official LONGINES dealer (“valid warranty certificate”).
During the warranty period and by presenting the valid
warranty certificate, yo
de
fect repaired free of charge. In the event that repairs
u will have the right to have any
are improper to restore the normal conditions of use of
your LONGINES watch, Longines Watch Co. Francillon
Ltd guarantees its replacement by a LONGINES watch
of identical or similar characteristics.The warranty for the
replacement watch ends twenty-four (24) months after
the date of purchase of the replaced watch.
This manufacturer’s warranty does not cover:
the life of the battery;
normal wear and tear and aging (e.g. scratched crys-
tal; alteration of the colour and/or material of non metallic straps andchains,such as leather, textile,rubber; peeling of the plating);
any damage on any part of the watch resulting from abnormal/abusive use, lack of care, negligence, accidents
(knocks, dents, crushing, brokencrystal, etc.), incorrect
use of the watch and non-observance of the use directions providedby LonginesWatch Co. FrancillonLtd;
he LONGINES watch handled by non-authorized per-
t
so
ns (e.g. for battery replacement, services or repairs)
or which has been altered in its originalcondition beyond
Longines Watch Co. Francillon Ltd’s control.
ALL APPLICABLE IMPLIED WARRANTIES, INCLUDING
THE IMPLIEDWARRANTY OF MERCHANTABILITY AND
OF FITNESS FOR A PARTICULAR PURPOSE GIVEN TO
YOU BY LAW ARE HEREBY LIMITEDIN DURATIONTO
THE DURATION OF THIS WARRANTY. UNDER NO
CIRCUMSTANCES WILL LONGINES WATCH CO.
CILLON LTD BE LIABLE FOR ANY INDIRECT OR
FRAN
CONSEQ
UENTIAL DAMAGES OF ANY KIND.
Some states do not allow limitations on how long implied
warranties last, or exclusions or limitations of incidental or consequential damages, so exclusions or limitations mentioned may not apply to you. This warranty
gives you specific legal rights and you may also have
other rights which may vary from state to state.
50 Limited two-years warranty (USA)
Page 3

LONGINES WATCH CO. FRANCILLON LTD’S OBLIGATION IS STRICTLY LIMITED TO REPAIR OR REPLACEMENT AS EXPRESSLY STATED IN THIS LIMITED WARRANTY. YOUR OFFICIAL LONGINES DEALER
CARRIES SOLE RESPONSIBILITY FOR ANY OTHER
GUARANTEES.
The LonginesWatch Co. FrancillonLtd’s customer service ensures the perfect working order of your LONGINES
watch. If your watch needs maintenance, rely on an official LONGINES dealer or an authorized LONGI
S
ervice Center as set forth in the enclosed list: they can
NES
guarantee service according to Longines Watch Co.
Francillon Ltd’s standards.
* Longines Watch Co. Francillon Ltd,
CH-2610 Saint-Imier, Switzerland.
©2002 Longines Watch Co. Francillon Ltd.
All rights reserved.
LIMITED TWO-YEARS WARRANTY (USA)
LONGINES®is a registered trademark.
51Limited two-years warranty (USA)
Page 4

INTERNATIONAL GUARANTEE
LONGINES is delighted that you should have chosen a
model from our prestigious collection. The little technical marvel you now own will serve you faithfully for many
years. The most advanced techniques were used during its manufacture, and it underwent stringent controls
before it was released for sale.
®
Your LONGINES
watch is warranted by LonginesWatch
Co. Francillon Ltd* for a period of twenty-four (24)months
from the date of purchase unde
ti
ons of this warranty.
r the terms and condi-
The international LONGINES warranty covers material
and manufacturing defects existingatthe timeof delivery
of the purchased LONGINES watch (“defects”).Thewarranty only comes into force if the warranty certificate is
dated, fully and correctly completed and stamped by an
official LONGINES dealer (“valid warranty certificate”).
During the warranty period and by presenting the valid
warranty certificate, you will h
de
fect repaired free of charge. In the event that repairs
ave the right to have any
are improper to restore the normal conditions of use of
your LONGINES watch, Longines Watch Co. Francillon
Ltd guarantees its replacement by a LONGINES watch
of identical or similar characteristics.The warranty for the
replacement watch ends twenty-four (24) months after
the date of purchase of the replaced watch.
This manufacturer’s warranty does not cover:
the life of the battery;
normal wear and tear and aging (e.g. scratched crys-
t
al; alteration of the colour and/or material of non metallic straps andchains,such as leather, textile, rubber; peeling of the plating);
any damage on any part of the watch resulting from abnormal/abusive use, lack of care, negligence, accidents
(knocks, dents, crushing, brokencrystal, etc.), incorrect
use of the watch and non-observance of the use directions providedby LonginesWatch Co. FrancillonLtd;
t or consequential damages of any kind resulting
indirec
frome.g.the use,the non-functioning, the defects or the
ina
ccuracy of the LONGINES watch;
the LONGINES watch handled by non-authorized persons (e.g. for battery replacement, services or repairs)
or which has been altered in its originalcondition beyond
Longines Watch Co. Francillon Ltd’s control.
Any further claim against Longines Watch Co.
Francillon Ltd e.g. for damages additional to the above
described warrant
y is expressly excluded, except
mandatory statutory rights the purchaser may have
against
the manufacturer.
52 International guarantee
Page 5

The above manufacturer’s warranty is:
independent of any warranty that may be provided by
the seller, for which he carries sole responsibility;
does not affect the purchaser’s rights against the seller nor any other mandatory statutoryrights thepurchaser
may have against the seller.
The LonginesWatch Co. FrancillonLtd’s customer service ensures the perfect maintenance of your LONGINES
watch. If your watch needs attention, rely on an off
icial
LONGINES dealer or an authorized LONGINES Service
Center as set forth in the enclosed list: they can
rantee service according to Longines Watch Co.
gua
Francillon Ltd’s standards.
* Longines Watch Co. Francillon Ltd,
CH-2610 Saint-Imier, Switzerland.
INTERNATIONAL GUARANTEE
LONGINES®is a registered trademark.
53International guarantee
Page 6
RECOMMENDATIONS
Like any micromechanical precision instrument, your
LONGINES watch should be checked at least every two
years.
If you have a self-winding watch, it has a power-reserve
of around two days. If necessary it can be wound manually.
If you have a quartz watch the electrical power is supplied by a battery. After 12 to 18 months of use (with the
exception of watches with lithium batteries) the voltage
in the battery may drop suddenlyand cause your watch
to stop. Som
on. The seconds hand will start to jump every 4 sec-
ti
e models have a battery end-of-life func-
onds. If this happens we recommend that you replace
the battery immediately, because once the battery
runs down totally it may damage your watch.
Collection and treatment of end of life quartz watches*
This symbol indicates that this product
should not be disposed with household
waste. It has to be returned to a local authorized collection system. By following this
procedure you
will contribute to the protection of the environment and human health. The recycling
of the materials will help to conserve natural resources.
*valid in the EU member states and in any countries with corresponding legislation.
Replacing the battery
We recommend that you contact an approved
LONGINES service centre or authorised LONGINES retailer, as they are equipped with the tools and apparatus required to carry out the work and the necessary
checks in a profession
uld be replaced immediately in order to reduce the
sho
al manner. A worn-out battery
risk of leakage and consequent damage to the movement.
Battery type
Button-type zinc-silver oxide primary battery cell
54 International guarantee / Recommendations
Page 7

SPECIAL RECOMMENDATIONS
Recommandations
What can I do to ensure that my LONGINES watch
functions perfectly for many years?
Magnetic fields: avoid putting your watch on a loud-
speaker or on a refrigerator because thesemachines create magnetic fields that may damage it.
Salt-water: always rinse your watch in fresh water after
swimming in the sea.
Shocks: avoid subjecting your watch to any shocks, including sudden changes in temperature.
Screw-in crown:always make sure you have screwed the
crown in ful
mechanism.
Push-in crown: always push the crown back intothe neutral position to avoid any humidity getting into the
mechanism.
Cleaning: use a tooth-brush and soapy water to clean
metal braceletsand water-resistant casesanda softcloth
to dry off afterwards.
Chemical products:avoid all direct contact with solvents,
detergents, perfume, cosmetics, etc. which may damage the bracelet or strap, the case or t
emperatures: avoid exposing your watchto extremetem-
T
peratures (over 60°C or 140° F and under 0°C or 32°F)
and to sudden fluctuations in temperature.
Water-resistance: we cannot guarantee that your watch
will be permanently water-resistant. The seal may be affected by wear or by an accidental shock to the crown.
As recommended in our service instructions, you
shouldhavethewater-resistant seals of your watch tested once a year by an approved LONGINES agen
ly to avoid any humidity getting into the
he seals.
t.
Chronographpush-pieces: do not adjust the push-pieces
r water as this may allow humidity to get into the
unde
mechanism.
Occasional winding: if your watch has not been worn for
44 hours or more, wind it manually with the crown in position 1.
How often should my watch be serviced?
Like any other precision instrument a watch should be
serviced regularlytoensure that it runsperfectly. We cannot say how often you should have your watch serviced
as this depends on the model, t
l
ive and how you look after the watch yourself.As a rule,
a watchshouldbeserviced every 4 or 5 years,depending
on the conditions in which it is worn.
he climate where you
Where should I go to get my watch serviced or for a
new battery?
We recommend that you go to an approved LONGINES
agent or retailer. They are the only people who have the
necessary tools and apparatus to work on your watch
and to carry out the necessary checks to a professional level. Moreover, only specialists ca
meets the stringent quality standards set by
work
LONGINES.
n guaranteethat their
55International guarantee / Special recommendations
Page 8

TOLERANCES
Mechanical movements
The precision of a mechanical movement varies depending on the wearer’s habits. The majority of
LONGINES watches have a precision of between -15
and +15 seconds per day.
Quartz movements
The ambient temperature affects the precision of a quartz
movement, which will be between -0.3 and +0.5 seconds per day.
56 Tolerances
Page 9
PICTOGRAMMS
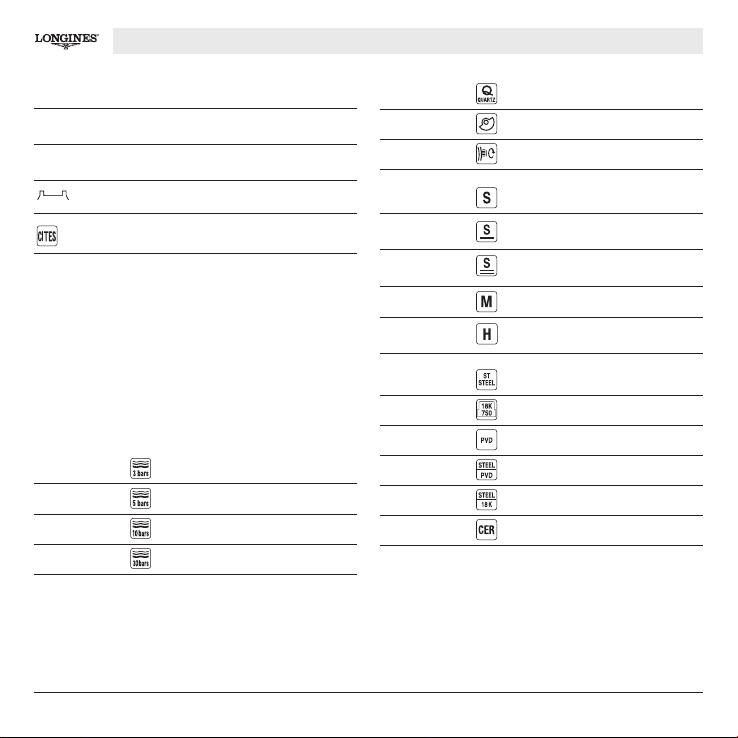
Cal. Calibre
Ref. Reference
E.O.L. Battery end-of-life
Distance of horns
Convention on International Trade in EndangeredSpecies
of Wild Fauna and Flora
Waterresistance
*The values given in meters for the water-resistance are
equivalent to the degree of superpressure applied under the ISO
2281 norm.
Water-resistant to 3 bars / 30 m *
Water-resistant to 5 bars / 50 m *
Water-resistant to 10 bars / 100 m *
Water-resistant to 30 bars / 300 m*
Movement Quartz
Self-winding
Manually wound
Glass Sapphire glass
Sapphire glass with one layer
of anti-reflection coating on the inside
Sapphire glass with several layers
of anti-reflection coating on the inside
Mineral
PMMA HT
(Polymethyl methacrylate)
Case material Steel
18-carat gold
PVD
Steel/PVD
Steel/18-carat gold
Ceramic
57Pictogramms
Page 10
RUBBER STRAP
• Excellent resistance to water and wear
• Superb mechanical properties
• Very good resistance to aggressive and extreme
environments
• Incomparable suppleness and softness to the touch
• Hi-tech product
• Top-range quality
• Hand-finished
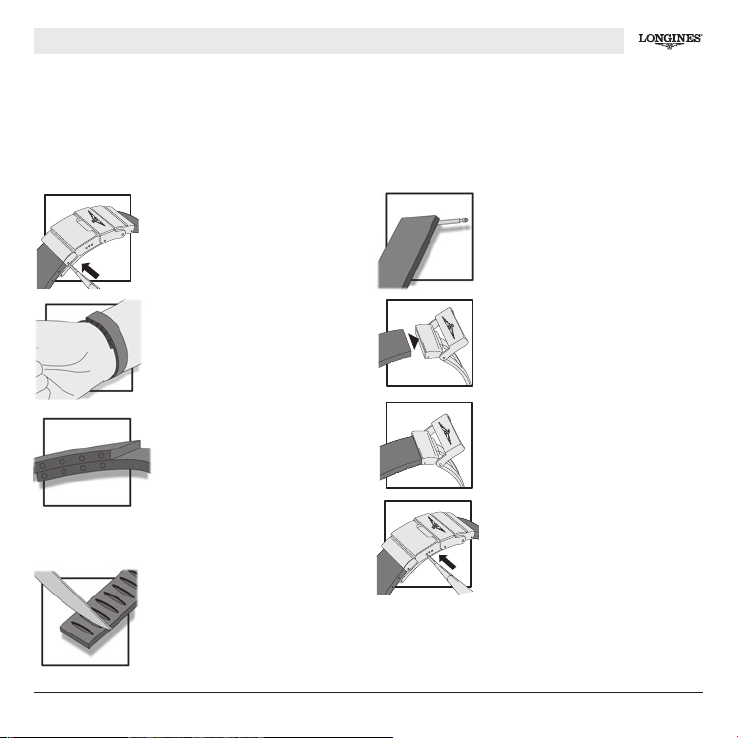
We recommend that, if necessary, you have the length of your strap adjusted by a Longines agent.
햲
Detach the two covers over the
lasp by pressing on the bars.
c
햳
Measure the circumference of
your wrist by wrapping the strap
round it. Half the number of holes
thatoverlapindicates the length that
suits your wrist.
Example:
half resulting in an evennumber:8 overlapping holes, half of 8 is
4, remove 2 holes on each section.
Half resulting in a odd number: 14
overlapping holes, half of 14 is 7, remove 4 holes on the section of the
strap at 12 o’clock and 3 holes on
the section at 6 o’clock.
햴
Cut along the c
gra
duations.
orresponding
햵
Reinsert the bars in the two
sections of the strap.
햶
Attach the sections to the clasp
so that the graduations are on the
inside, i.e. against your skin, insert
the bars in the holes closest to the
centre of the clasp.
햷
Try your watch on.
햸
For the final adjustment, move
the bar to one of the holes in the
clasp.
If the strap is too long, you can remove another hole.
We recommend that you wash your rubber strap regularly with soap and water,especially on
the inside.
58
Rubber strap
Page 11
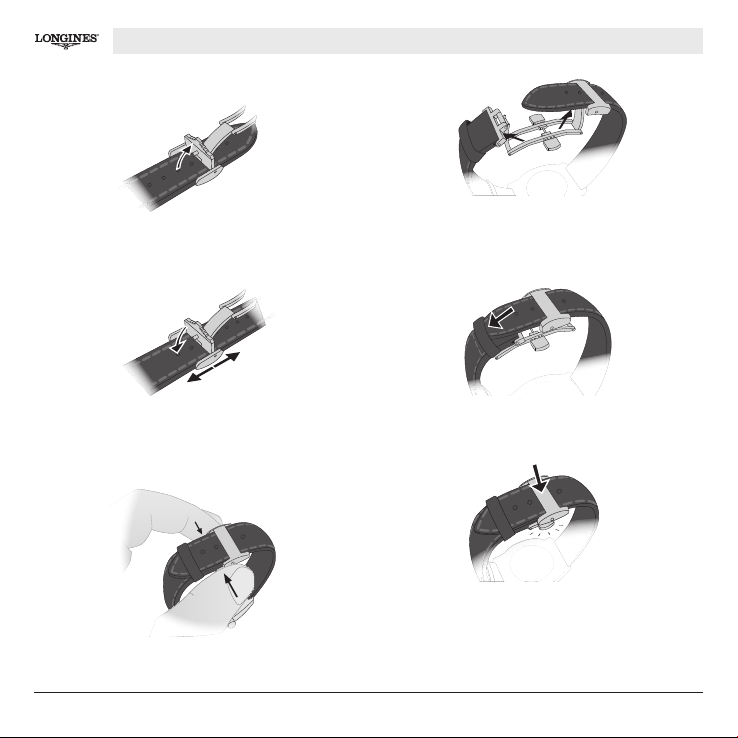
Adjusting the clasp
햲
Release the adjustingmechanism by removing the pin
from the hole in the long section of the strap.
FOLDING CLASP
햵
Open the clasp to enlarge the bracelet and remove
the watch from your wrist.
Closing the clasp
햳
Slide the mechanism along this long section and then
fix it by reinserting the pin in the desired hole.
Opening the clasp
햴
To open the clasp press in the push-pieces on either
side simultaneously.
햶
Put the bracelet on your wrist and slide the long sec-
tion through the small fixed buckle.
햷
lose the folding clasp until it clicks into place. If nec-
C
essary, slide the long section through the small mobile
buckle.
59Folding clasp
Page 12
CERTIFICATE OF AUTHENTICITY
Longines bows to the paragon of beauty: the diamond
This certificate of authenticity guarantees the quality of
each precious stone selected by Longines’ specialists.
The cut: Longinesdiamonds are cut in the traditional brilliant style.
The purity: the degree of purity of a Longines diamond
is VVS (very verysmall inclusions).This means that it may
includeminute imperfections which are hardly visible under tenfold magnification.
olour: the colourof the diamondsusedby Longines
The c
is Top Wesse
The weight: the weight of a diamond is measured in
carats, one carat being equal to one fifth of a gram.
lton.
60 Certificate of authenticity
Page 13
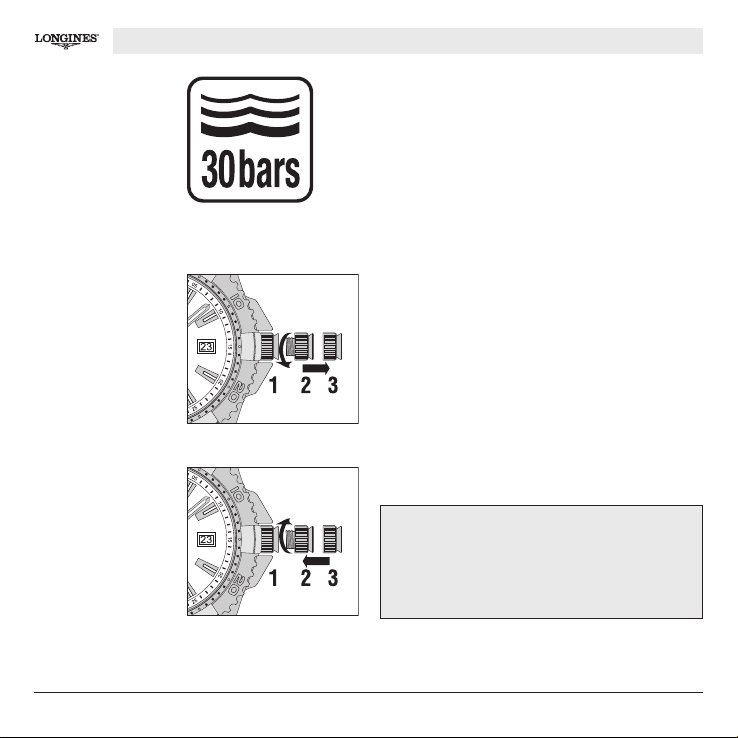
WATER-RESISTANCE / CROWN AND SCREW-IN PUSH-PIECES
Precautions regarding water-resistance
If your watch is water-resistant it is essential thattheseals
be checked each year before the bathing season because, without your realising it, they might have been
damaged as the result of a shock.
If the case has to be opened for any reason the seals
for the glass and the case-back as well as the crown
(and/or push-pieces)must be checked and,if necessary,
replaced.
Screw-in crown and push-pieces
햲
Certain Longines models have a screw-in crown which
has to be unscrewed before each adjustment by turning it anti-clockwise (fig. 햲).
After use, return the crown to position 2, then push in
and screw in firmly in position 1 to ensure that the seal
with the case is water-resistant (fig. 햳).
THE SAME APPLIES FOR THE SCREW-IN PUSH-PIECES
햳
IMPORTANT! Youshould alwayspush the crown (and/or
the push-pieces) right in and screw in firmly to ensure
a water-resistantsealwiththecase. The crown(and/or
push-pieces) should never be adjusted if the watch is
in a humid atmosphere.
61Water-resistance / Crown and screw-in push-pieces
Page 14
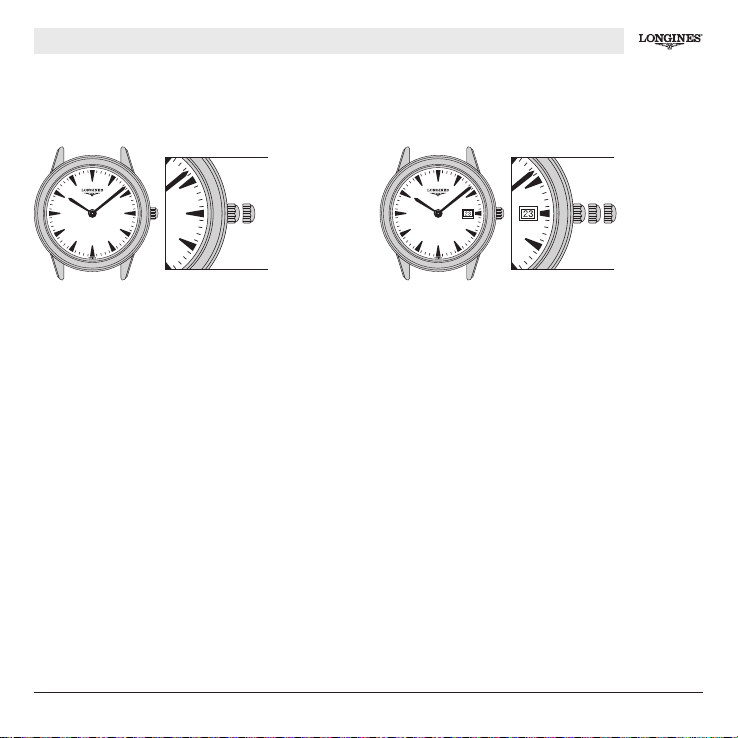
ADJUSTING THE TIME – GENERAL INFORMATION
MODEL WITH HOUR AND MINUTE HANDS
2-position crown
12
Adjusting the time
Pull the crown right out to position 2. Adjust the hands
by turning the crown in either direction. Push the
crown back in to position 1.
MODEL WITH HOUR AND MINUTE HANDS AND DATE
3-position crown
123
Adjusting the time
Pull the crown right out to position 3. Adjust the hands
by turning the crown in either direction. Push the
crown back in to position 1.
Quick date adjustment
Pull the crown out to the intermediate position 2. Adjust
the date by turning the crown in either direction. Push
the crown back in to position 1.
62 Adjusting the time – General information
Page 15
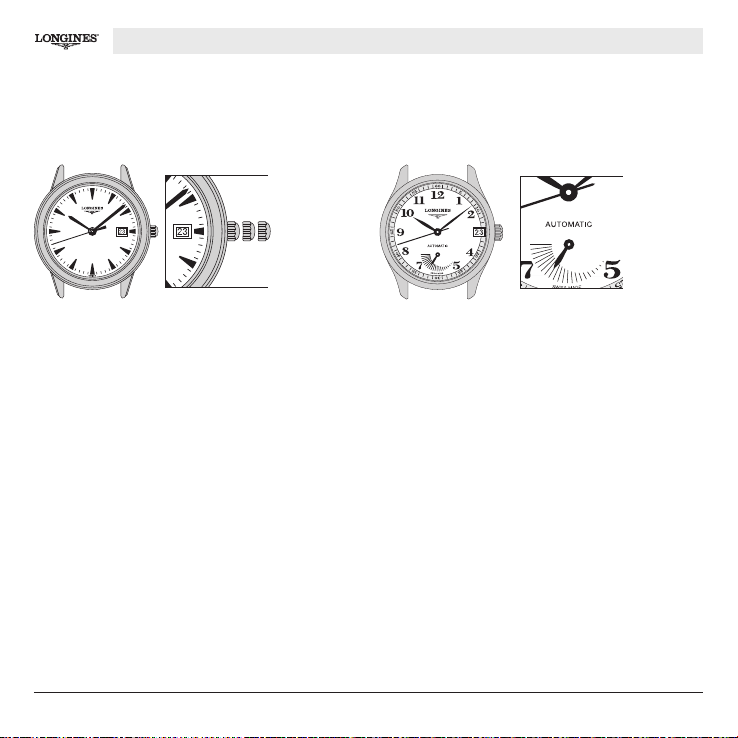
MODEL WITH HOUR, MINUTE AND SECONDS HANDS
AND DATE
3-position crown
123
ADJUSTING THE TIME – GENERAL INFORMATION
Adjusting the time and stop seconds
Pull the crown right out to position3. The seconds hand
will now stop. Adjust the time by turning the crown in
either direction. Synchronise your watch with a time signal (telephone, radio, TV) and then push the crown back
in to position 1. The seconds hand will jump again exactly one second later (logical function of adjusting the
time),which means that your watch will now be perfectly
sy
nchronised with the time signal.
Quick date adjustment
Pull the crown out to the intermediate position 2. Adjust
the date by turning the crown in either direction. Push
the crown back in to position 1.
Power-reserve indicator
Certain watches havea power-reserve indicator (calibres
L602, L693, L697).
If the watch is worn rarelyor not at all, the hand will gradually shift anti-clockwise. When it indicates that the
power-reserve is below 1/4, the watch should either be
wound
or worn to avoid it stopping.
When the watch is wound the power-reserve indicator
will shift clockwise.
63Adjusting the time – General information
Page 16
TABLE OF EQUIVALENTS
The reference number of your watch is engraved on the case-back.
Ref. Calibre Collection Page
L1.641. L650 Conquest Heritage 87
L2.156. L652 Longines evidenza 87
L2.503. L600 The Longines Master Collection 74
L2.601. L614 The Lindbergh Hour Angle Watch 77
L2.629. L651 The Longines Master Collection 87
L2.631. L635 The Longines Master Collection 69
L2.643. L650 Longines evidenza 87
L2.648. L607 The Longines Master Collection 66
L2.666. L693 The Longines Master Collection 68
L2.669. L651 The Longines Master Collection 87
L2.670. L599 Longines evidenza 66
L2.671. L600 Longines evidenza 74
L2.672. L602 Longines evidenza 68
L2.673. L678 The Longines Master Collection 93
L2.676. L601 The Longines Master Collection 66
L2.678. L699 The Lindbergh Hour Angle Watch 77
L2.688. L678 Longines evidenza 93
L2.693. L696 The Longines Master Collection 89
L2.701. L674 Longines evidenza 87
L2.708. L602 The Longines Master Collection 68
L2.713. L699 The Longines Weems Second-Setting Watch 79
L2.714. L697 The Longines Master Collection 80
L2.715. L698 The Longines Master Collection 80
L2.716. L697 The Longines Master Collection 80
L2.717. L698 The Longines Master Collection 80
L2.718. L704 The Longines Master Collection 71
L2.730. L705 Longines Lindbergh’s Atlantic Voyage Watch 89
L2.733. L688 The Longines Column-Wheel Chronograph 89
L2.741. L667 The Longines Weems Chronograph 87
L2.742. L688 The Longines Column-Wheel Chronograph 89
64 Table of equivalents
Page 17
TABLE OF EQUIVALENTS
Ref. Calibre Collection Page
L2.743. L688 The Longines Column-Wheel Sports Chronograph 89
L2.744. L688 The Longines Column-Wheel Sports Chronograph 89
L2.745. L683 Longines Heritage 1951 89
L2.747. L674 Longines Heritage 1954 87
L3.279. L538 Conquest 84
L3.635. L683 GrandeVitesse-Instrument pour Cavalier 91
L3.636. L667 GrandeVitesse 87
L3.637. L686 GrandeVitesse 95
L3.643. L541 HydroConquest 84
L3.644. L667 HydroConquest 87
L3.651. L667 HydroConquest 87
L3.660. L541 Conquest 84
L3.661. L667 Conquest 87
L3.662. L667 Conquest 87
L3.665. L696 HydroConquest 89
L3.666. L705 Longines Admiral 89
L3.667. L705 Longines Admiral 89
L3.668. L704 Longines Admiral 71
L3.669. L704 Longines Admiral 71
L3.670. L686 Longines Admiral 95
L3.672. L541 HydroConquest 84
L3.673. L667 HydroConquest 87
L3.674. L633-Diver The Longines Legend Diver Watch 72
L3.678. L667 Conquest 87
L4.756. L651 Flagship Heritage 87
L4.792. L678 Flagship Heritage 93
L4.796. L683 Flagship Heritage 89
L4.797. L698 Heritage Retrograde 80
L4.799. L636 Flagship 67
L5.656. L538 Longines DolceVita 84
L5.680. L538 Longines DolceVita 84
L5.687. L538 Longines DolceVita 84
65Table of equivalents
Page 18
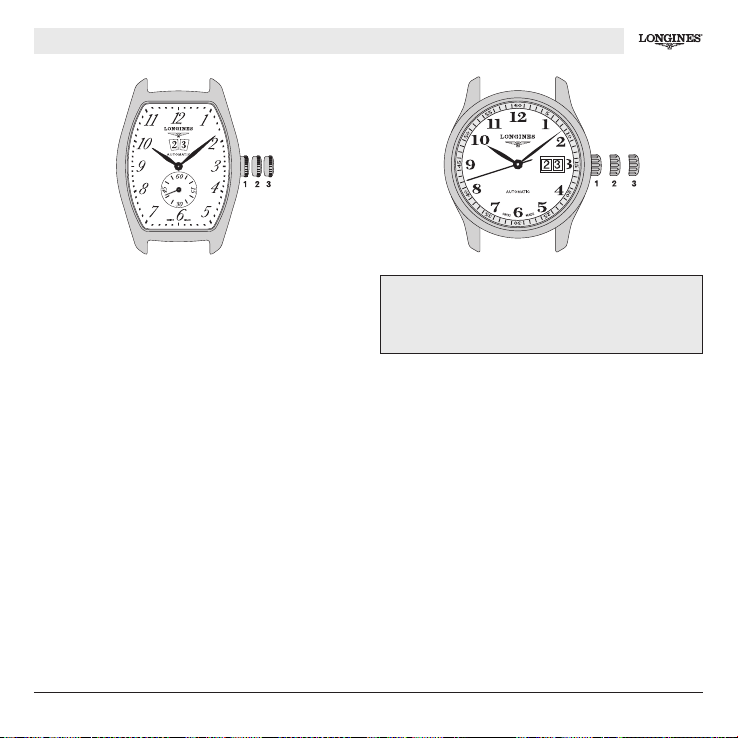
L599 – L601, L607
L599 -L601 L607
Show the hours, minutes, seconds and date.
3-position crown
Winding
(crown pushed right in)
The natural movements of your wrist will automatically
wind your Longines watch, which has a power-reserve
of 42 hours.It is onlynecessary to wind your watchmanually if it has not been worn for several days.
IMPORTANT!The date should never be adjustedbetween
9 p.m. and 3 a.m. as doing so may damage the
mechanism.
Adjusting the time and stop seconds
Pull the crown right out to position3. The seconds hand
will now stop. Adjust the time by turning the crown in
either direction. Synchro
nal (telephone, radio, TV) and then push the crown back
in to
position 1.
nise your watch with a time sig-
Quick date adjustment
Pull the crown out to the intermediate position 2. Turn
the crown backwards until the desired date is shown,
then push the crown back in to position 1. It will be
necessary to adjust the date at the end of each month
with less than 31 days.
66 Self-winding watches
Page 19
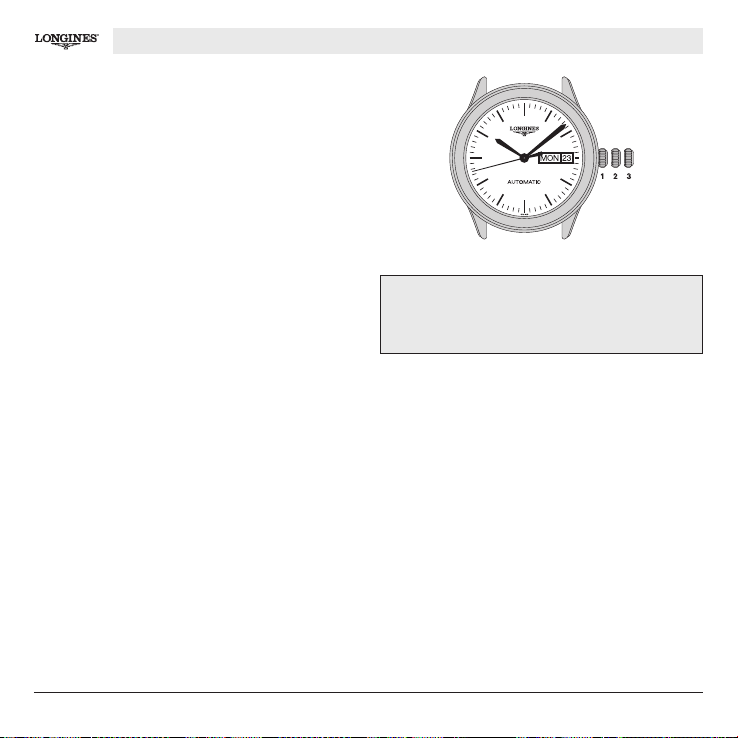
Shows the hours, minutes, seconds, date and day.
3-position crown
Winding
(crown pushed right in)
The natural movements of your wrist will automatically
wind your Longines watch, which has a power-reserve
of 38 hours.It is onlynecessary to wind your watchmanually if it has not been worn for several days.
L636
L636
IMPORTANT!The date should not be adjusted between
9 p.m. and 3 a.m. as doing so may damage the
mechanism.
Adjusting the time and stop seconds
Pull the crown right out to position3. The seconds hand
will now stop. Adjust the time by turning the crown in
either direction. Sy
nchronise your watch with a time signal (telephone, radio, TV) and then push the crown back
in to
position 1.
Adjusting the date and the day
Pull the crown out to the intermediate position 2, turn
it forwards to adjust the date, backwards to change the
day, and then push it back in again to position 1. It is
necessary to adjust the date after each month with less
than 31 days.
Self-winding watches
67
Page 20
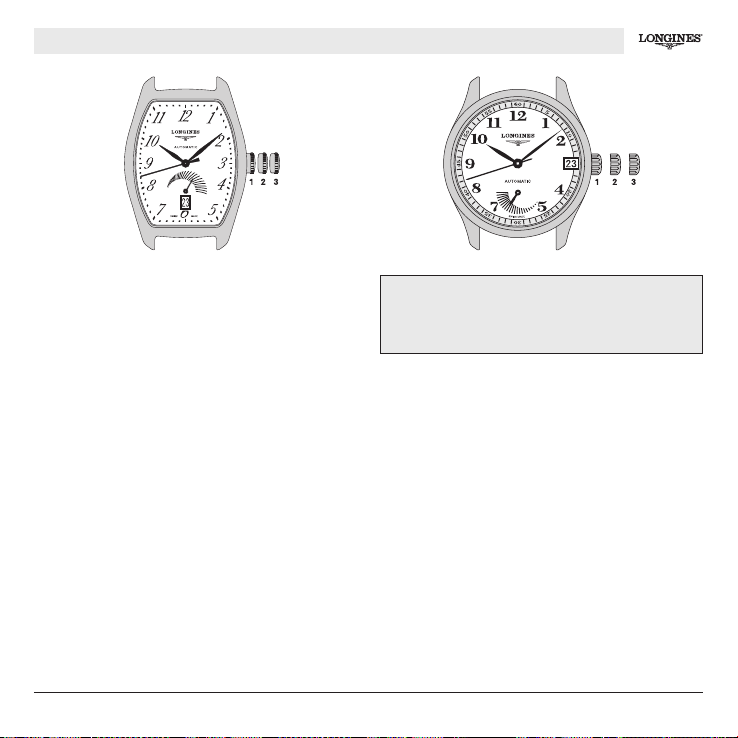
L602, L693
L602 L693
Show the hours, minutes, seconds and date, as well as
the power-reserve.
3-position crown
Winding
(crown pushed right in)
The natural movements of your wrist will automatically
wind your Longines watch, which has a power-reserve
of 42hours. It is only necessary to wind your watchmanually if it has not been worn for several days.
The power-reserve indicator moves automatically when
your watch is wound manually or automatically.
IMPORTANT!The date should not be adjusted between
9 p.m. and 3 a.m. as doing so may damage the
mechanism.
Adjusting the time and stop seconds
Pull the crown right out to position3. The seconds hand
will now stop. Adjust the time by turning the crown in
either direction. Synchronise your watch with a time signal (telephone, radio, TV) and then push the crown back
in to position 1.
Quick date adjustment
Pull the crown out to the intermediate position 2. Turn
the crown backwards (L602) or forwards (L693) until the
desired date is shown, then push the crown back in to
position 1. It will be necessary to adjust the date at the
end of each month with less than 31 days.
68 Self-winding watches
Page 21
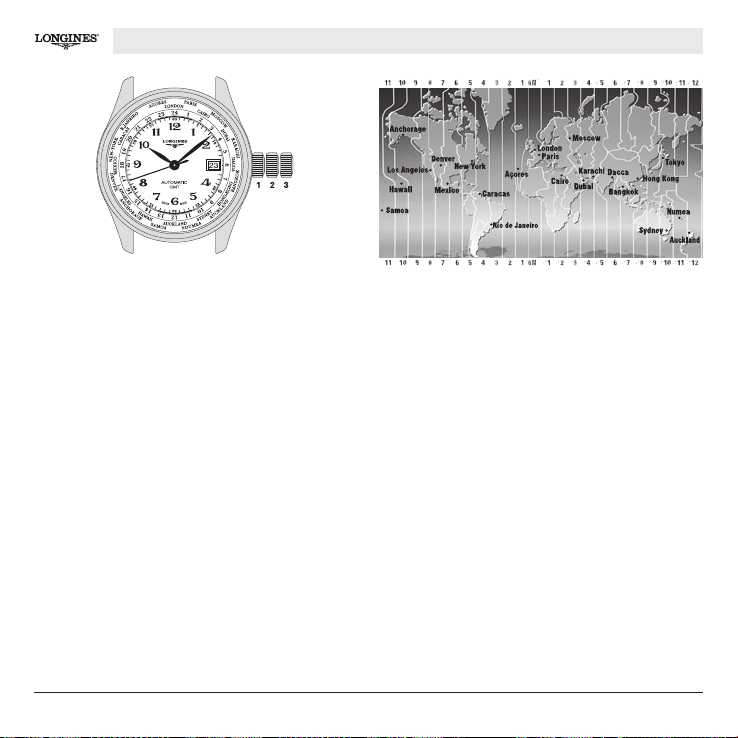
L635
Shows the hours, minutes, seconds and date, as well
as the time in the 24 time zone where there is a reference point (Longines patent no. 02266/92-3).
3-position crown
Winding
(crown pushed right in)
The natural movements of your wrist will automatically
wind your Longines watch, which has a power-reserve
of 42hours. It is only necessary to wind your watchmanually if it has not been worn for several days.
Adjusting the time zone and the date
Pull the crown out to the intermediate position 2. Turn
the crown forwards or backwards to adjust the hourhand
in the corresponding direction by successive jumps of
one hour, which will not affect the minute or seconds
hands.
L635 – 24 TIME ZONE
When the hour hand passes midnight, the date will
change automatically, indicating either the next day or
the day before, depending on the direction you turn the
crown. It is necessary to adjust the date at the end of
eachmonth withless than 31 days. Pushthecrown back
to position 1.
in
Adjusting the time and stop seconds
Pull the crown right out to position3. The seconds hand
will now stop. Adjust the time by turning the crown in
either direction. When the crown is turned the 24-hour
disc also turns. Synchronise your watch with a time signal (telephone, radio, TV) and then push the crown back
in to position 1.
69Self-winding watches
Page 22
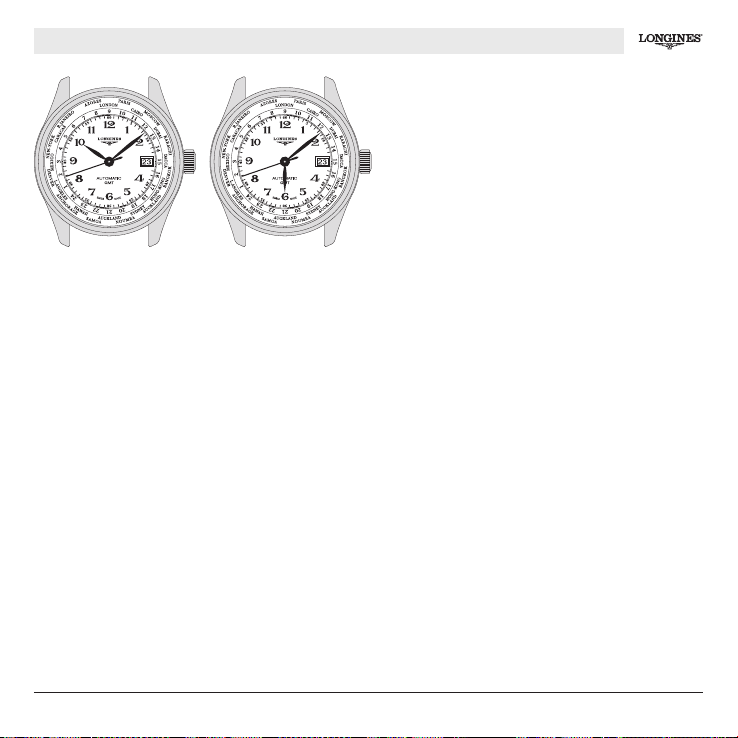
L635 – 24 TIME ZONE
How to use your Longines
24 Time zone watch
Pull the crown right out to position3. The seconds hand
will now stop.
Turn the crown in either direction so that your local time
(winter time) is displayed on the 24-hour disc opposite
the town in the time zone where you are.
Push the crown back in to the intermediate position 2
and adjust the hour hand to local time, checking that the
date jumps at midnight. Push the crown back in to position 1.
Your watch now shows univer
di
sc and local time by the hands.
Example : 23 February, Paris, GMT (London) is at
12 o’clock, the hands show 10 hours and 8 minutesand
on the disc the 10 is opposite Paris.
70 Self-winding watches
sal time on the 24-hour
How to use when travelling
Pull the crown out to the intermediate position 2. Adjust
the hourhand to correspond to the time zone of the town
where you are (see table of towns).Push the crown back
in.
Certain countries have summer time; to adjust your
watch, carry out the same procedure.
ple: 23 February, Tokyo, GMT (London) is at 12
Exam
o’clock, the hands show 18 hours and 8 minutes and
on the disc the 10 is opposite Paris: this means that it
is 10.08 a.m. in Paris.
Page 23
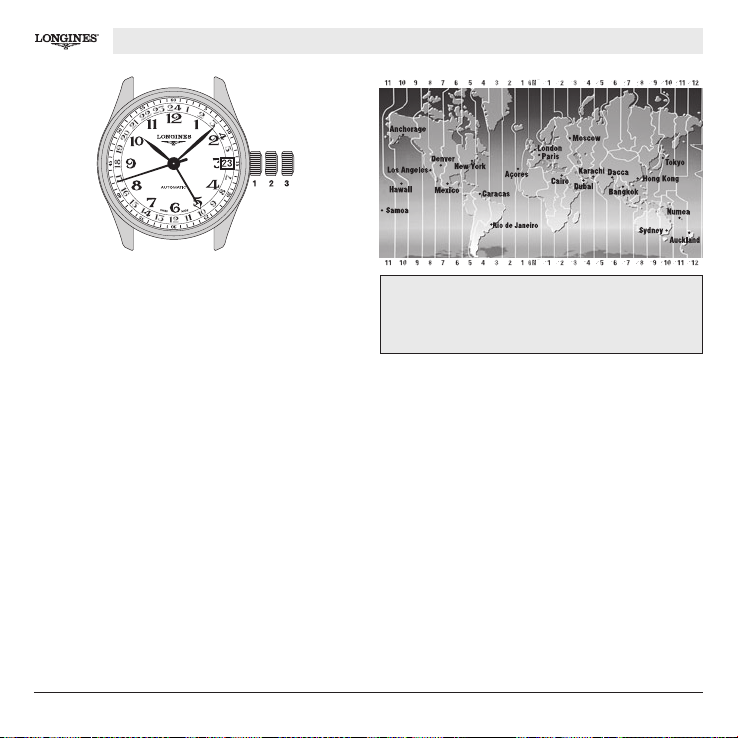
L704
Shows the hours, minutes, seconds and date, as well
as a second time zone.
3-position crown
Winding
(crown pushed right in)
The natural movements of your wrist will automatically
wind your Longines watch, which has a power-reserve
of 46 hours.It is onlynecessary to wind your watchmanually if it has not been worn for several days.
Adjusting the time and stop seconds
Pull the crown right out to position3. The seconds hand
will now stop. Adjust the time by turning the crown in
ther direction. Synchronise your watch with a time sig-
ei
nal (telephone, radio, TV) and then push the crown back
in to
position 1.
L704 – 24 HOURS
IMPORTANT!The date should not be adjusted between
9 p.m. and 3 a.m. as doing so may damage the
mechanism.
Quick date adjustment
Pull the crown out to the intermediate position 2. Turn
the crown forwards until the desired date is shown, then
push the crown back in to position 1. It will be necessary
to adjust the dateattheendofeach monthwith lessthan
31 days.
Adjusting the time in a second time zone
(24-hour hand) when travelling
Pull the crown out to the intermediate position 2. Adjust
the 24-hour hand to correspond to the time zone where
you arebyturning thecrown backwards. Pushthe crown
back in to position 1.
71Self-winding watches
Page 24
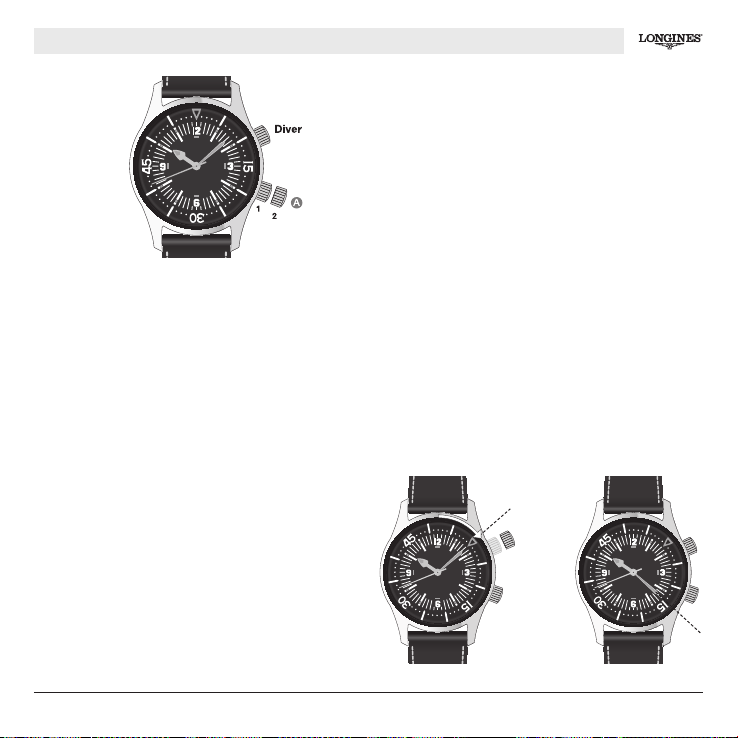
L633 – DIVER
L633 – Diver 햲
Shows the hours, minutes and seconds and also enables
the user to check his or her diving time.
Your Longines Legend Diver Watch has 2 crowns, A and
Diver, which can be used for specific functions (fig. 햲).
Crown A: 2 positions
Winding
(crown pushed right in)
The natural movements of your wrist will automatically
wind your Longines watch, which has a power-reserve
of 42 hours.It is onlynecessary to wind your watchmanually if it has not been worn for several days.
Adjusting the time and stop seconds
Unscrew crown A and pull it out to position 2. The seconds hand will now stop. Adjust the time by turning the
crown in either direction. Synchronise your watch with
a time signal (telephone, radio, TV) and then push the
crown A back in to position 1, and screw in firmly.
Diver screw-in crown
Verifying your diving time
Unscrew the Diver crown. When you start diving turn the
rotating bidirectional ring to adjust the needle to the
minute hand. Push t
sc
rew in firmly (fig. 햳).
Youcan read off your diving time from the minute hand
on the graduations of the rotating bidirectional ring(fig.햴).
The example shows: 15 minutes diving time.
he crown back in again and then
햴햳
72 Self-winding watches
Page 25
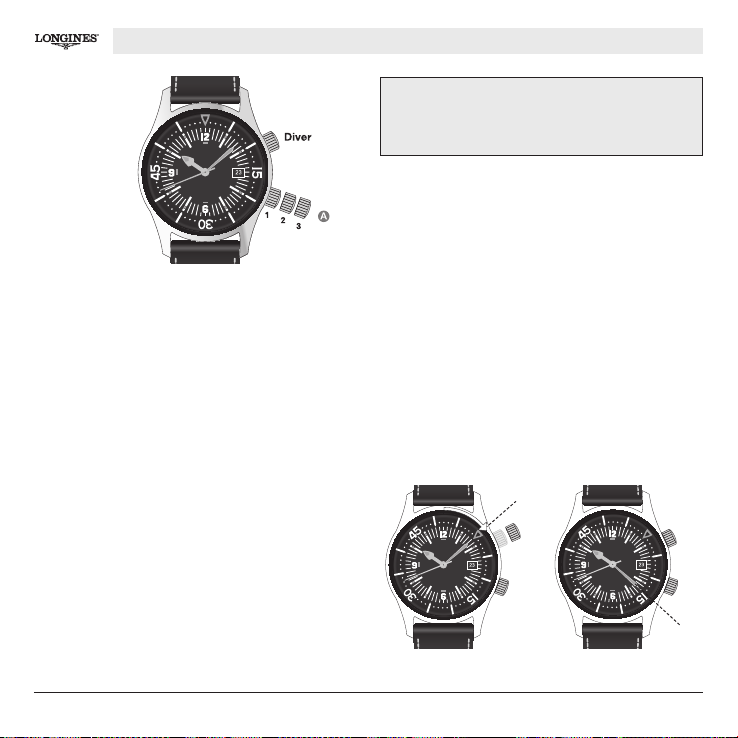
L633 – DIVER DATE
햲
L633 – Diver Date
Shows the hours, minutes, seconds and date, and also
enables the wearer to check his or her diving time.
Your Longines Legend Diver Watch has 2 crowns, A and
Diver, which can be used for specific functions (fig. 햲).
Crown A: 3 positions
Winding
(pushed right in)
The natural movements of your wrist will automatically
wind your Longines watch, which has a power-reserve
of 42 hours. It is only necessary to wind it manually if the
watch is not worn for several days.
Adjusting the time and stop seconds
Unscrew crown A and pull it right out to position 3. The
seconds hand will now stop. Adjust the time by turning
the crown in either direction. Using a time signal (telephone,radio, TV), set the hands and push crown A back
in to position 1 and then screw in firmly.
IMPORTANT!The date should never be adjustedbetween
9 p.m. and 3 a.m. as doing so may damage the
mechanism.
Adjusting the date
Unscrew crown A and pull it out to the intermediate position 2. Turn it forwards until it shows the desired date.
Push crown A back in to position 1 and screw in firmly.
Diver screw-in crown
Verifying your diving time
Unscrew the Diver crown. When you start diving turn the
rotating bidirectional ring to adjust the needle to the
minute hand. Push the crown back in again and then
screw in firmly (fig. 햳).
Youcan read off your diving time from the minute hand
on the graduations of the rotating bidirectional ring(fig.햴).
The example shows: 15 minutes diving time.
햳햴
73Self-winding watches
Page 26
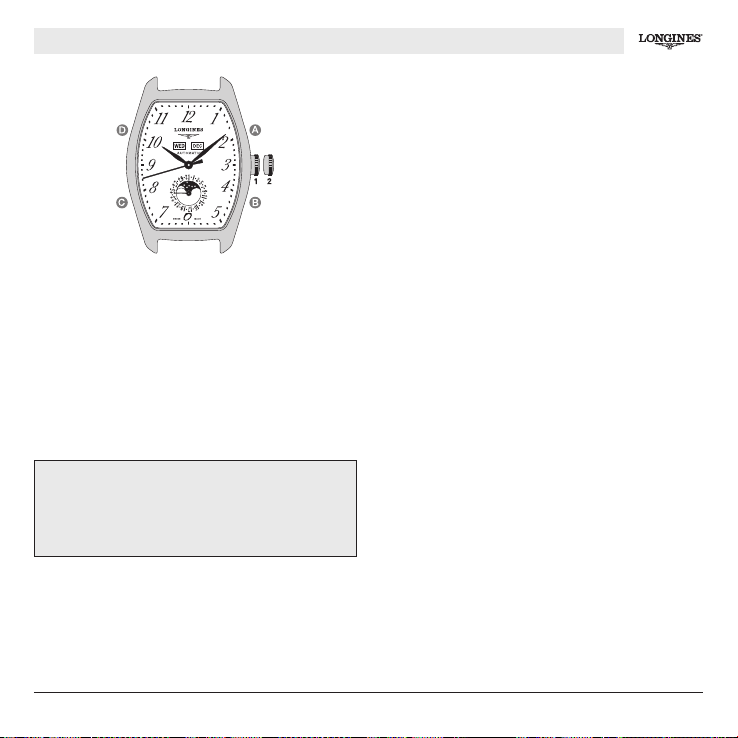
L600 – PHASES OF THE MOON
L600
Shows the hours, minutes, seconds, date, day, month
and the phases of the Moon.
2-position crown
Winding
(crown pushed right in)
The natural movements of your wrist will automatically
wind your Longines watch, which has a power-reserve
of 42 hours.It is onlynecessary to wind your watchmanually if it has not been worn for several days.
IMPORTANT! Avoidadjustingyourwatch between 9 p.m.
and 3 a.m. as well as adjusting the phases of the Moon
using the push-piece for that purpose between 3 p.m.
and 5 p.m. as doing so may damage the mechanism.
Adjusting the time and stop seconds
Pull the crown right out to position2. The seconds hand
will now stop. Adjust the time by turning the crown in
ither direction. Synchroniseyour watch with a time sig-
e
nal (telephone, radio, TV) and then push the crown back
in to position 1.
Adjusting the 31-day date hand
The push-piece B for adjusting the date is situated at
4 o’clock. Using the soft-pointed instrument providedby
Longines, press the push-piece B until the date hand is
positioned on the desired date. It is necessary to adjust
the date at the end of each month withless than31 days.
Adjusting the month
The push-piece A for adjusting the month is situated at
2 o’clock. Using the soft-pointed instrument provided
by Longines, press the push-piece A until the desired
month is displayed.
74 Self-winding watches
Page 27

Adjusting the day
The push-piece D for adjusting the day is situated at 10
o’clock. Using the soft-pointed instrument, press the
push-piece D to obtain the exact day.
Adjusting the phases of the Moon
The push-piece C for adjusting the phases of the
Moon is situated at 8 o’clock. Using the soft-pointed instrument provided by Longines, press the push-piece
until a full Moon appears in the centre of the phases of
the Moon aperture. Determine the date of th
oon from a calendar that contains such information*.
M
Press the push-piece again once for each day since the
last full Moon.
*See Table of lunar months on page 76
e last full
L600 – PHASES OF THE MOON
75Self-winding watches
Page 28
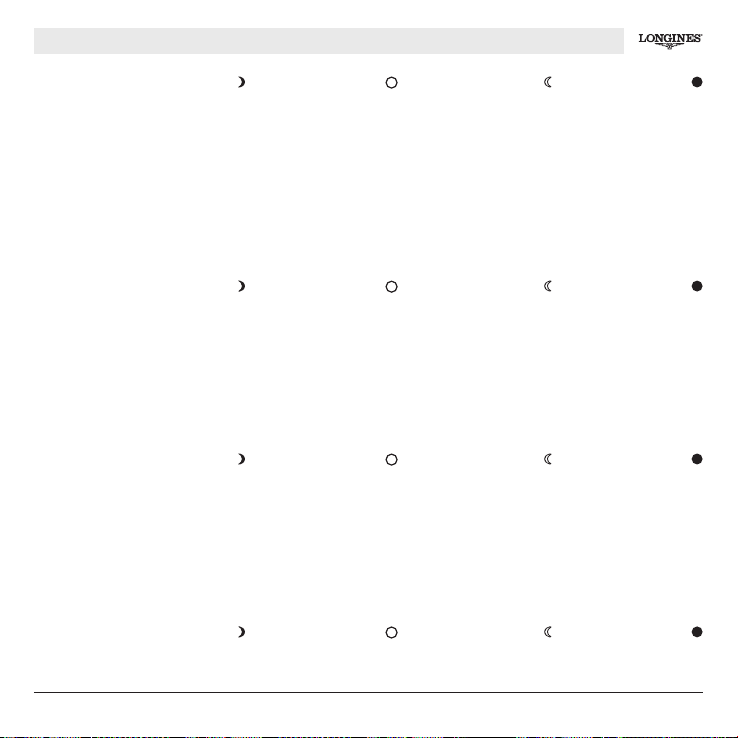
L600, L678 – PHASES OF THE MOON TABLE OF LUNAR MONTHS
First quarter
24 December 2009
2010
23 January
22 February
23 March
21 April
20 May
19 June
18 July
16 August
15 September
14 October
13 November
13 December
12 January
2011
11 February
12 March
11 April
10 May
9 June
8 July
6 August
4 September
4 October
2 November
2 December
1 January
2012
31 January
1 March
30 March
29 April
28 May
27 June
26 July
24 August
22 September
22 October
20 November
20 December
2013
18 January
17 February
Full moon
31 December 2009
30 January
28 February
30 March
28 April
27 May
26 June
26 Jul
y
24 August
23 September
23 October
21 November
21 December
19 January
18 February
19 March
18 April
17 May
15 June
15 July
13 August
12 September
12 October
10 November
10 December
9 January
7 February
8 March
6 April
6 May
4 June
3 July
2 August
31 August
30 September
29 October
28 November
28 December
27 January
25 February
Last quarter
7 January 2010
5 February
7 March
6 April
6 May
4 June
4 July
3 August
1 September
1 October
30 October
28 November
28 December
26 January
24 February
26 March
25 Apri
l
24 May
23 June
23 July
21 August
20 September
20 October
18 November
18 December
16 January
14 February
15 March
13 April
12 May
11 June
11 July
9 August
8 September
8 October
7 November
6 December
5 January 2013
3 February
4 March
New moon
15 January 2010
14 February
15 March
14 April
14 May
12 June
11 July
10 August
8 September
7 October
6 November
5 December
4 January 2011
3 February
4 March
3 April
3 May
1 June
1 July
30 July
29 August
27 September
26 October
25 November
24 December
2
3 January
21 February
22 March
21 April
20 May
19 June
19 July
17 August
16 September
15 October
13 November
13 December
11 January 2013
10 February
11 March
76 Table of lunar months
Page 29
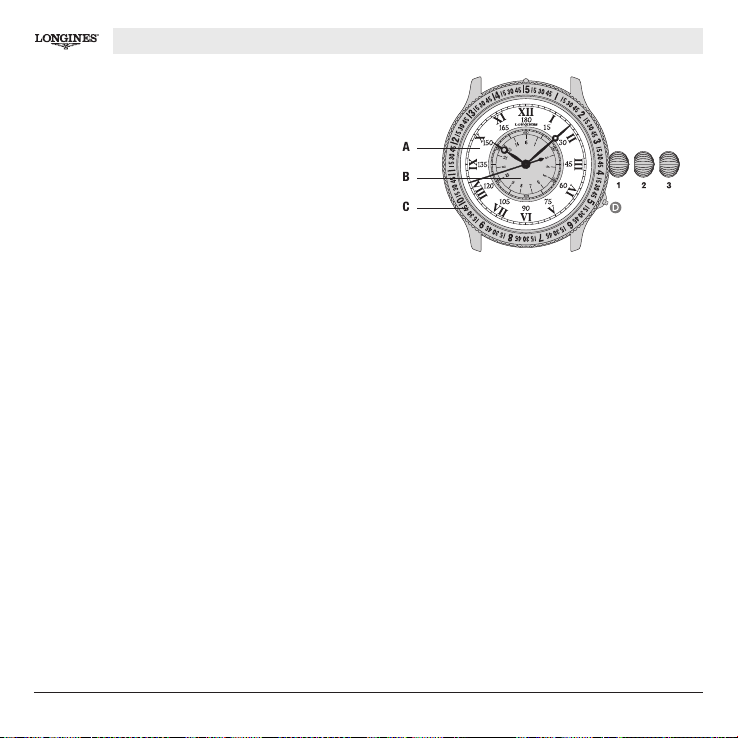
The original LindberghHour Angle Watchwas designed
by CharlesLindbergh as a navigationalaid for pilots. Used
with a sextant and a nautical almanac, this watch enables the wearer to quickly determine the hour angle from
Greenwich, in other words his or her longitude.
Thanks to its ingenious combination of dials, this timepiece differs from an ordinary watch in three ways:
A The indications on the dial aredesigned in such a way
that they show simultaneously the time (in h
s and seconds) and the hour angle (in degrees and
ute
minutes of arc).
B The rotating central dial showstheseconds and it can
be turned using the crown in order to synchronise the
watch with a time signal.
C The bezel can be rotated to correct the equation of
time (which varies from one day to the next).
ours, min-
3-position crown
Winding
(crown pushed right in)
The natural movements of your wrist will automatically
wind your Longines watch, which has a power-reserve
of 42 hours.
u
a
It is only necessary to wind the watch man-
lly if it has not been worn for several days.
Adjusting the time and stop seconds
Pull the crown right out to position3. The seconds hand
will now stop. Adjust the time by turning the crown in
either direction. Synchronise the watch with a time signal (telephone, radio, TV) and then push the crown back
in to position 1.
L614, L699 – THE LINDBERGH HOUR ANGLE WATCH
L614, L699
Synchronising the watch with a time signal
In the intermediate position 2, the crown can be used
to turn the centraldial (in either direction). Pull the crown
to the intermediate position 2 and turn the central
out
dial so that the seconds hand points to the “60/15” position on the last pip of the time signal. Push the crown
back in to position 1.
Push-piece D at 4 o’clock
This is for opening the case back, thus revealing the
movement through a protective sapphire glass.
The space/time dial and how it works
The design of the whole of The Lindbergh Hour Angle
Watch takes into accountthefactthattheEarth revolves
ough 360° in 24 hours, through 180° in 12 hours,
thr
through 15° in 1 hour and through15’ of arc in 1 minute.
77Self-winding watches
Page 30
L614, L699 – THE LINDBERGH HOUR ANGLE WATCH
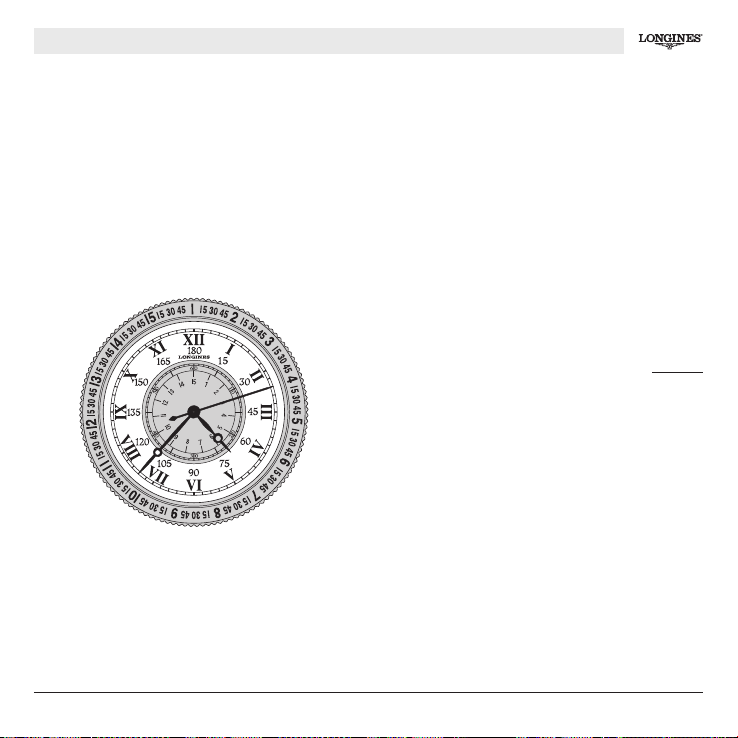
Consequently:
The hour hand indicates 15° per hour. One complete cir-
cle of the dial (12 hours) is equivalent to 180°.
The minute hand indicates 1° per 4’, in other words 15°
per hour.Each of the 15° is subdivided into four sectors
of 15’ of arc. All these indications are engraved on the
rotating bezel.
One complete circle of the centre seconds is equivalent
to 15’ of arc. The rotating central dial is divided into 60’’
and 15’ of arc.
How to use your Lindbergh Hour Angle Watch
Having synchronised your watch with a time signal. As
an example when you check it your watch shows
4 hours, 37 minutes and 12 seconds. The equation of
time for the day in question is minus 4 minutes and
50 seconds.
Therefore move the marker situated at “15” on the bezel
4 graduations to the left. These graduations represent
the minutes engraved around the case.
Your data are as follows:
Seconds hand (centre dial) 3’
Minute hand (bezel) 10° 15’
Hour hand (main dial) 6
As you have only turnedthebezel by 4 minutes, you still have to take into account the
50 seconds (the equation of time being
4 minutes and 50 seconds for the day in
question).
On the central dial, the 50 is opposite 12½ ./. 12½’
Greenwich hour angle of the sun
(your longitude) 70° 5½’
0°
78 Self-winding watches
Page 31
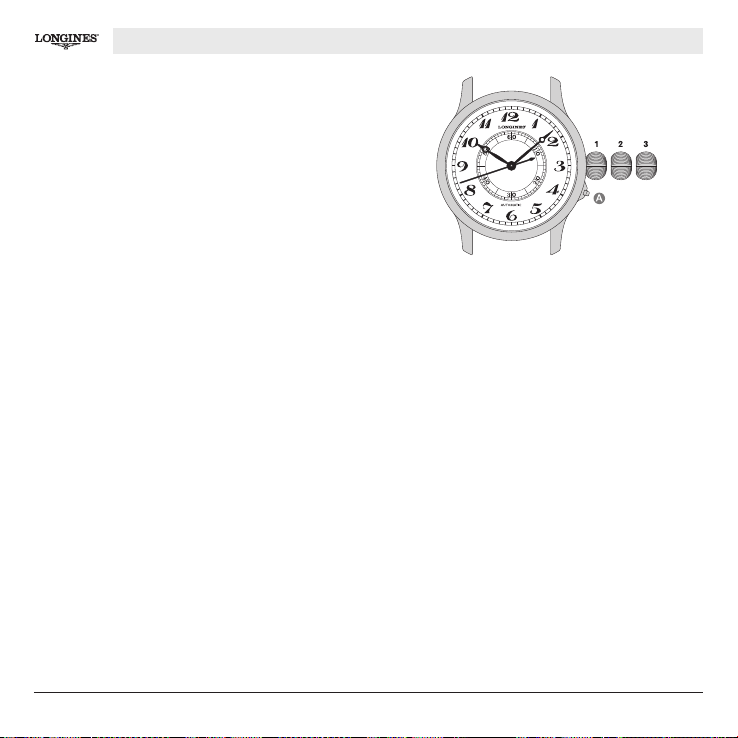
Shows the hours, minutes and seconds. The central rotating dial indicates the seconds; it can be adjusted to
synchronise the watch witha timesignalusing thecrown,
without affecting the seconds, minutes and hours.
3-position crown
Winding
(crown pushed right in)
The natural movements of your wrist will automatically
wind your Longines watch, which has a power-reserve
of 42 hours. It is only necessary to wind the watch man
u
lly if it has not been worn for several days.
a
Adjusting the time and stop seconds
Pull the crown right out to position3. The seconds hand
will now stop. Adjust the time by turning the crown in
either direction. Synchronise your watch with a time signal (telephone, radio, TV) and then push the crown back
in to position 1.
L699 – THE LONGINES WEEMS SECOND-SETTING WATCH
L699-Weems
Synchronising the watch with a time signal
In the intermediate position 2, the crown can be used
to turn the centraldial (in either direction). Pull the crown
out to the intermediate position 2 a
dial so that the seconds hand points to the “60” position on the last pip of the time signal. Push the crown
back in to position 1.
nd turn the central
Push-piece A at 4 o’clock
-
This is for opening the case back thus revealing the
movement through a protective sapphire glass.
79Self-winding watches
Page 32
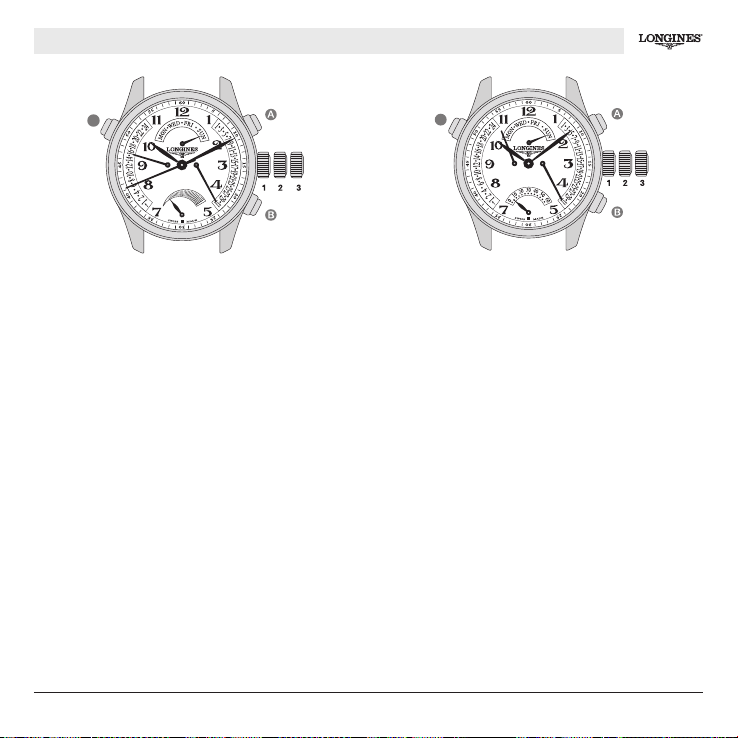
L697, L698 – 3X / 4X RETROGRADE
C
L697
L697 Shows the hours, minutes, seconds and powerreserve with a retrograde display of the day, date and
time in a second time zone.
L698Shows the hours and minutes and has a retrograde
seconds aperture, day, date and second time zone.
3-position crown
The crown can be used not only to adjust the hour,
minute and seconds hands but also interdependently the
day, date and time in a second time zone.
Winding (crown pushed right in)
The natural movements of your wrist will automatically
ind your Longines watch, which has a power-reserve
w
of 46 hours.It is onlynecessary to wind your watchmanually if it has not been worn for several days.
The power-reserve indicator (L697) will shift automaticallywhenthewatch is wound manuallyor by the movements of your wrist.
C
L698
Adjusting the time and stop seconds
Pull the crown right out to position3. The seconds hand
will now stop. Adjust the time by turning it in either direction.Sy
nchroniseyour watch with a time signal (telephone, radio,TV) and then push the crown back in. This
adjustment willalso affect the time in a secondtime zone,
as well as the
day and date each time the hand passes midnight, the adjustment being effected when the
crownis pushedback in to position 1. The day, date and
24-hour time zone indicators are excluded from the retrograde sectors when the crown is pulled out to position 3.
Quick time adjustment
Pull the crown out to the intermediate position 2. Turn
it in either direction. The hour hand will jump forwards
by 1 hour at a time without affecting the minute or seconds hands. Then push the crown back in to position 1.
This adjustment will also affect the day and date each
time the hand passes midnight, the adjustment being
effected when the crown is pushed back in to position 1.
80 Self-winding watches
Page 33
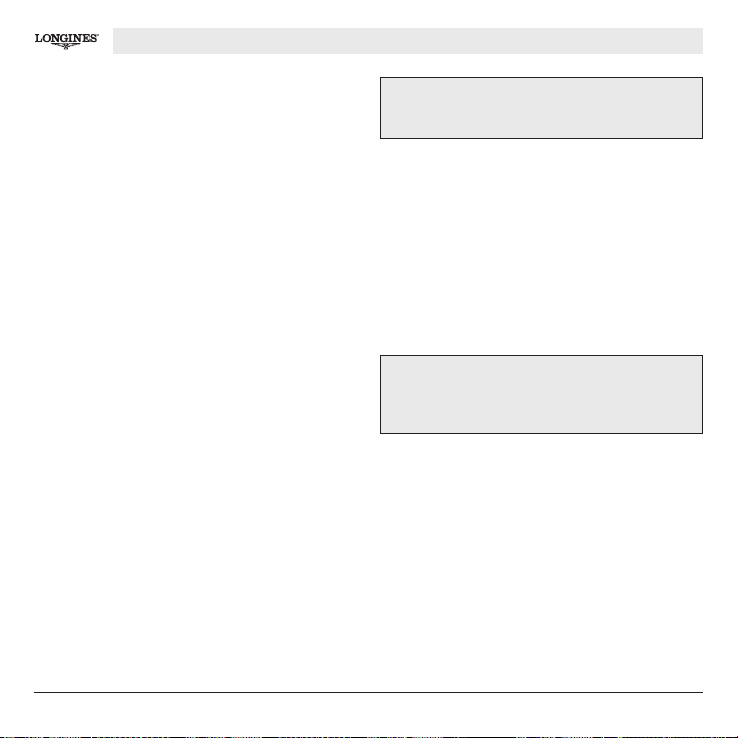
L697, L698 – 3X / 4X RETROGRADE
The day, date and 24-hour time zone indicators are excluded from the retrograde sectors when the crown is
pulled out to position 2.
Adjusting the time (a.m./p.m.)
The dial is divided into 12 hours. The date and the day
of the week change only once every24 hours(each time
the hour hand completes two circles of the dial).
In order to ensure that the date and day change at midnight, please follow the instructions below before
changing the date and the
ote the day of the week indicated on the dial.
N
Pull the crown out to position 2 (Quick time adjustment)
and turn it clockwise until the hour hand has completed one circle.
Push the crown back in to position 1 (Winding).
Check that the day of the week has changed.
If so, the watch will now indicate morning (a.m.). If the
watch indicates morning but it is in fact afternoon pull
the crown out to position 2 (Quick time adjustment) and
turn it until the hour hand has comple
If, however, the day of the week has not changed, the
watchwill indicate afternoon (p.m.). If the watchindicates
afternoon but it is in fact morning pull the crown out to
position 2 (Quick timeadjustment) and turn it until the hour
hand has completed one circle.
Push the crown back in to position 1 (Winding).
day of the week.
ted one circle.
IMPORTANT! You will not see any changes on the dial
when using the crown in positions 2 and 3.
24-hour indicator: if you do not wish to use the Second
time zone function you can convert it into a 24-hour in-
dicator. This will enable you to avoid this ste
tur
e. See under: Synchronising the time in a second time
zone / 24-hour indicator.
p in the fu-
The functions of the 3 push-pieces
The 3 push-pieces can be used when the crown is in
any position.
IMPORTANT! Do not change the date or use the pushpieces A (for the day) or B (for the date) between 9 p.m.
and 3 a.m. as doing so may damage the mechanism.
Adjusting the day of the week
Press push-piece A to adjust the day of the week.
Adjusting the date
Press push-piece B to adjust the date.
81Self-winding watches
Page 34
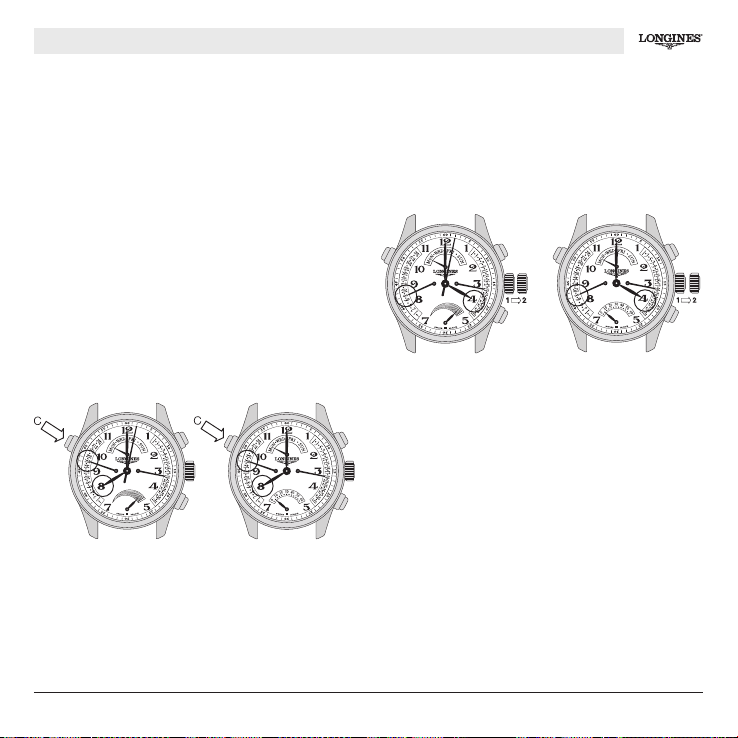
L697, L698 – 3X / 4X RETROGRADE
Adjusting the time in the second time zone
(24-hour hand)
IMPORTANT: push-piece C mustbe unscrewed before use
by turning anti-clockwise. After use screw in firmly to ensure that the seal with the case remains water-resistant.
Presspush-pieceC to adjust the time in the second time
zone by successive steps of 1 hour, which will not affect the minute and seconds hands.
Example: you are on Geneva time (home) and it is 8 a.m.
You know that there is an
itzerland and Japan.
Sw
8-hour difference between
Optiona: you leave yourwatch on Geneva time and date.
You press push-piece C to adjust the time in the second
time zone so that the 24-hour hand is on 16 (4 p.m.
Japanese time).
L697 L698
Option b: you travel to Japan and want your watch to
show Japanese time and date. You adjust the time by
turning the crown (in position 2) clockwise so that the
24-hour hand is on the 4 (4 p.m. Japanese time). Then
push the crown back in. The time shown in the seco
ti
me zone will stay at 8 a.m. (Geneva time: home).
L697 L698
Synchronising the time in the second time zone /
the 24-hour hand
To synchronise the time in the second time zone with the
actual time where you are,usepush-piece C. If the watch
stops you will immediately see from the time in the second time zone whether your watch is showing morning
(a.m.) or afternoon (p.m.).
Please note that if you use the Quicktime adjustmentfunc-
tion (crown in position 2), the synchronisation will be i
rrupted.
te
Screw in push-piece C firmly to ensure that the seal with
the case remains water-resistant.
nd
n-
82 Self-winding watches
Page 35
CHRONOGRAPHS – GENERAL INFORMATION
The chronograph
The chronograph is an instrument for measuring short
periods of time. It is used mainly in sport but also in aviation or for scientific experiments, for example.
IMPORTANT!The time should not be adjusted while the
chronograph function is being used.
Column Wheel
The column-wheel movement is reputed for the feeling
of crisp efficiency its handling provides. In particular, the
instant responsiveness of its pushpieces adds to the
pleasure of using the chronograph.
Split-seconds function
In a chronograph with a split-seconds function, a second hand is superimposed over the trotteuse. When intermediate times are read off, only the split-seconds hand
stops. When the push-piece is pressed again, it catches up with the trotteuse.
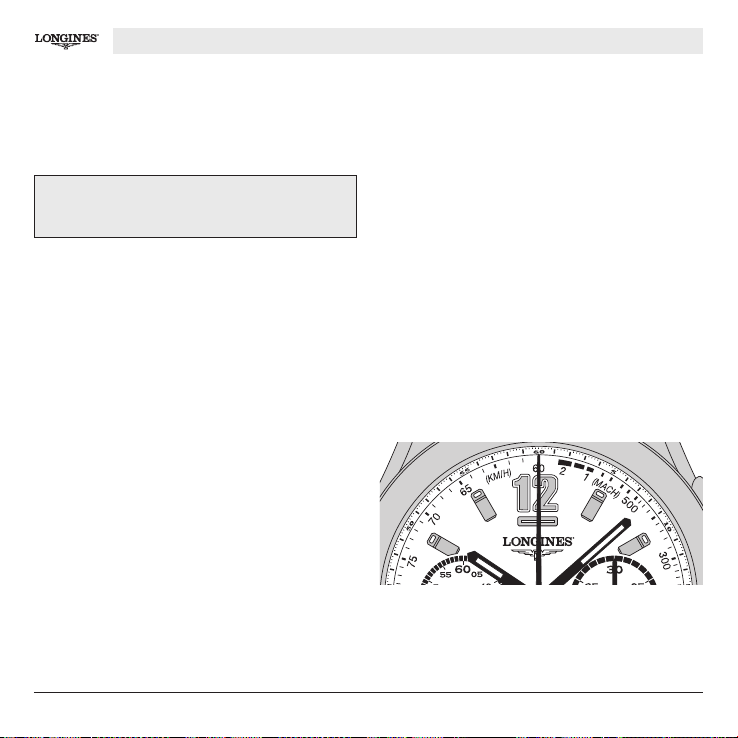
Tac hometric scale
The tachometric scale is a series of graduations on the
dial or the bezel of the chronograph that enable the user
to determine mean speedsonthebasis of an observation
time of less than 60 seconds.
Measure the time needed to cover 1 kilometre (or 1 mile).
The position of the seconds hand when it stops indicates
the mean speed. If it takes 30 seconds to cover 1 km
(or 1 mile), the scale will indicate a mean speed of
120 kph (or 120 mph).
83Chronographs – General information
Page 36
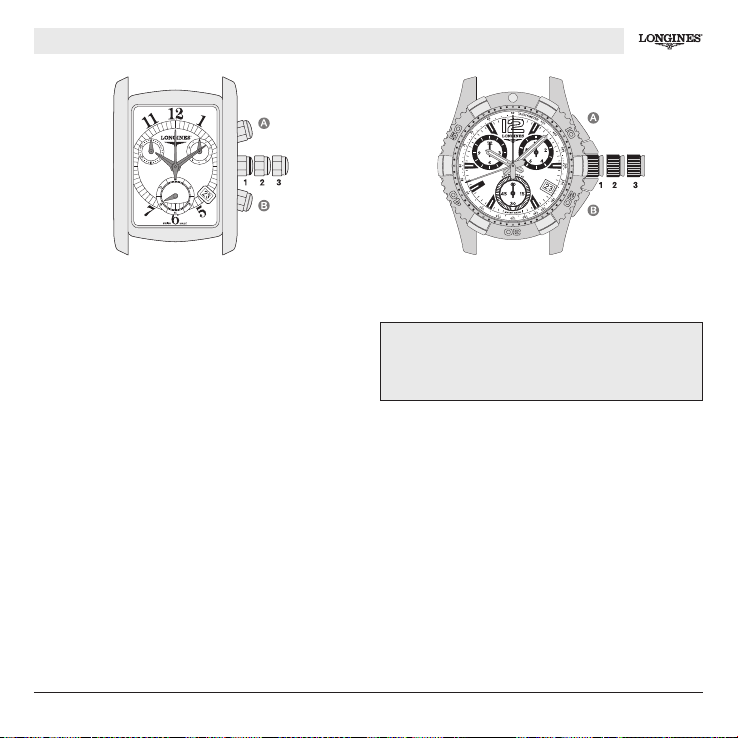
L538, L541
L538 L541
Longines’ quartz chronographs fitted with calibre L538
or L541 showthehours, minutes, seconds and the date.
As far as concerns the chronograph functions, these
models can be used to time events that last up to 30
minutes (cal. L538) or 12 hours (cal. L541), and show
the results to a 1/10th of a second.
desired date appears. The date changes at midnight.
Push the crown back in to position 1.
IMPORTANT! Do not leave the crown in the intermediate position 2 for longer than 20 minutes as this may
affect the time function.
3-position crown
Adjusting the time and stop seconds
In order to synchronise your watch with a time signal (radio,telephone, etc.), pull the crown rightouttoposition3,
when the small seconds is on the 60, then push the
c
rown back in again to position 1 on the time signal. The
date will change every time the hour hand passes midnight.
Changing the time zone and the date
Pullthe crownout to the intermediateposition 2. The hour
hand can be moved in either direction without affecting
the minute and seconds hands. Turn the crown until the
84 Quartz chronographs
CHRONOGRAPH FUNCTIONS
Standard Start-Stop function
Add Rally function (partial times)
Split (intermediate times)
Standard Start-Stop function
Used for timing a single event:
Press push-piece A to start the chronograph.
Press push-piece A to stop the chronograph.
Press push-piece B to return to zero.
Page 37
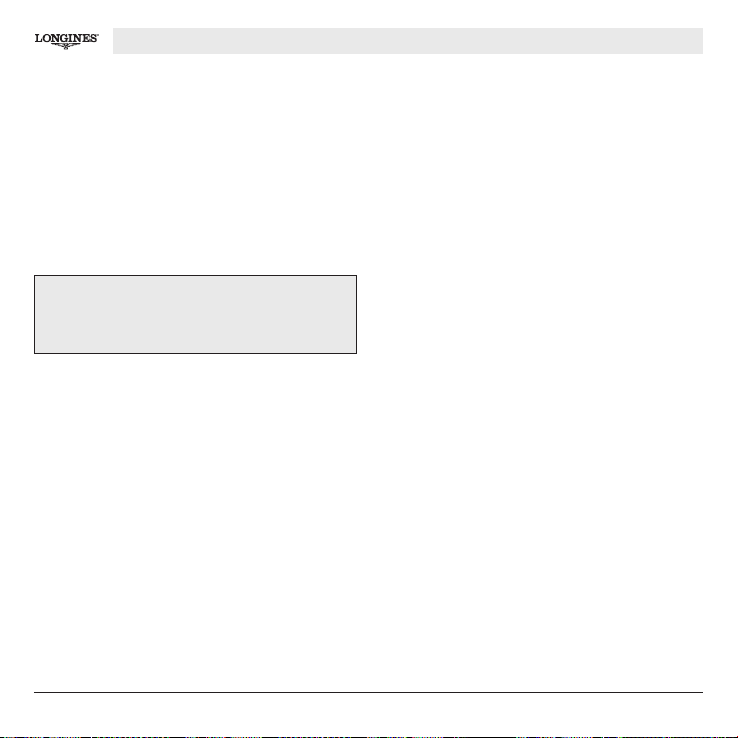
L538, L541
IMPORTANT! Pressing on push-pieces A and B for more
than a second will cause the hands to move forward
rapidly.
Add Rally function (partial times)
Used for measuring successive events but not the intervals between them. Each result is automatically
added to the preceding one. To time the different stages
of a car rally, for example:
At the start of the first stage, press push-piece A to start
the chronograph.
At the end of the first stage, press push-piece A again
and the chronograph will stop.
Repeat this procedure for each stage of the rally.
At the end of the final stage the
total time of the rally, in other words, the accumu-
the
lated time for all the stages.
Press push-piece B to return to zero.
chronograph will show
Split function (intermediate times)
This function is used to time one single event. Intermediate times are accumulated throughout the event.
IMPORTANT! While the watch displaysan intermediate time
the chronograph function will still be timing the event.
Press push-piece A at the start of the event you wish to
time, for example
Pr
ess push-piece B to see the first intermediate time.
Press push-piece B again and the chronograph hands
will jump to the correct time since the start of the race.
Repeat this procedure, pressing push-piece B once to
see the second intermediatetimeand againto make the
chronograph hands jump to the current time.
a walking race.
85Quartz chronographs
Page 38
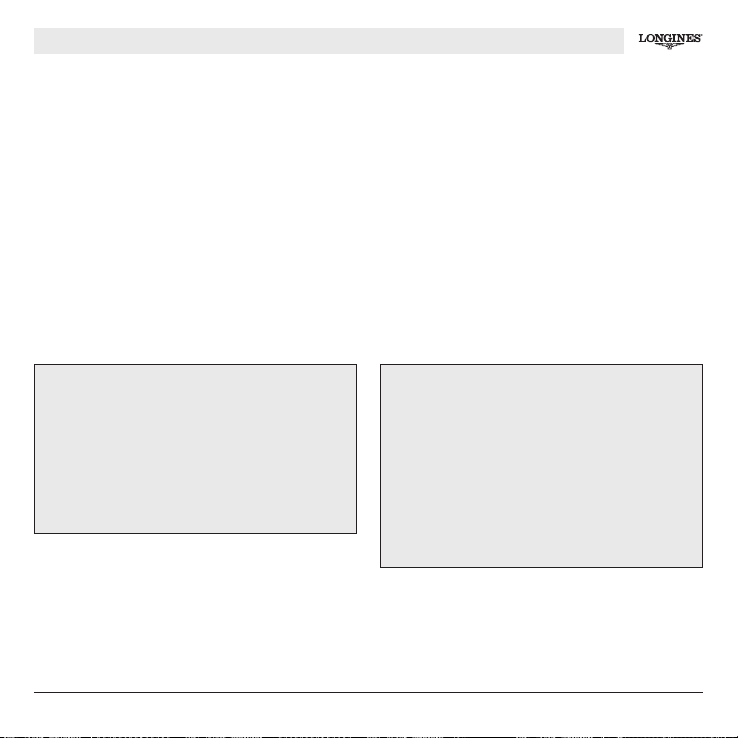
L538, L541
At the end of the race, press push-piece A to see the
total time for the race.
Press push-piece B to return to zero.
NB: the split function/intermediate times can also be used
to record consecutively the times of various competitors
as they finish a race.
Return to zero
If for any reason the chronograph hands to not return
exactly to zero, take the following action:
L538
Chronograph 30-minute counter:
With the crown in position 2, press push-piece A.
Chronograph 60-second counter:
With the crown in position 3, press push-piece A.
Chronograph 1/10th of a second counter:
With the crown in position 3, press push-piece B.
Tachometric scale
See page 83
86 Quartz chronographs
At the end of the race, press push-piece A to see the
total time for the race.
Press push-piece B to
NB: the split function/intermediate times can alsobe used
to record consecutively the times of various competitors
as they finish a race.
return to zero.
Return to zero
If for any reason the chronograph hands to not return
exactly to zero, take the following action:
L541
Chronograph 12-hour counter:
With the crown in position 2, press push-piece A.
Chronograph 60-minute counter:
With the crown in position 2, press push-piece B.
Chronograph 60-second counter:
With the crown in position 3, press push-piece A.
Chronograph 1/10th of a second counter:
With the crown in position 3, press push-piece B.
Page 39
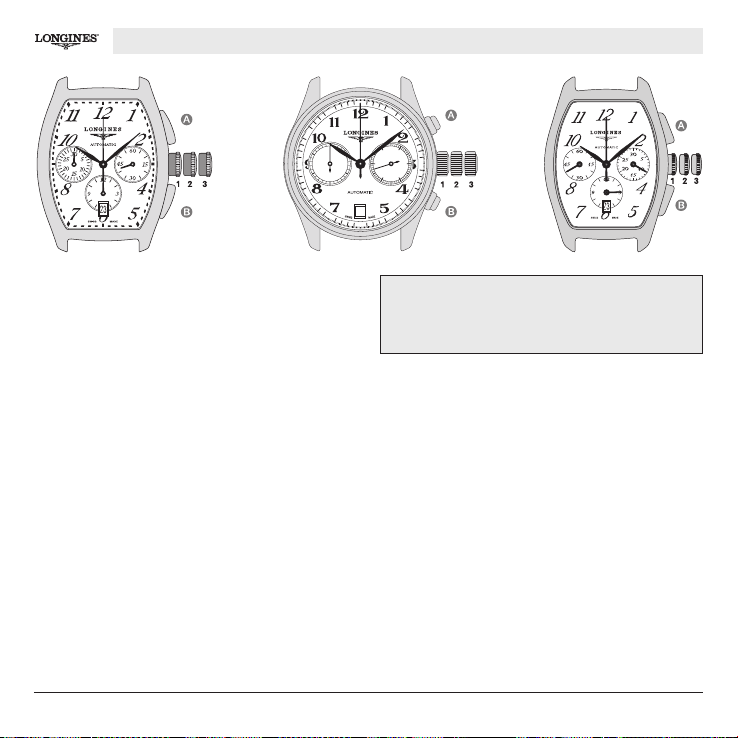
55
50
30
5
25
45
20
15
40
35
Showthe hours,minutes, seconds, date, and day(L674).
Can be used to time events that last up to 30 minutes
(cal. L651) or 12 hours (cal. L650, L652, L667, L674),
the results being shown to 1/5th of a second.
L650, L651, L652, L667, L674
60
5
10
60
10
50
15
40
10
20
30
20
23
25
30
L651L650
IMPORTANT!The date should never be adjusted between
8 p.m. and 3 a.m. as doing so may damage the
mechanism.
L652
3-position crown
Winding
(crown pushed right in)
The natural movements of your wrist will automatically
wind your Longines chronograph, which has a powerreserve of 42 hours. It is only necessary to wind it manually if your chronograph is not
worn for several days.
Adjusting the time and stop seconds
Pull the crown right out to position 3, the counter hand
(small seconds) will stop. Adjust the time by turning the
crown in either direction. When the time shown is synchronised with a time signal (telephone, radio, TV), push
the crown right in to position 1 again.
Quick date adjustment (L650, L651, L652)
Pull the crown out to the intermediate position 2, turn
it backwards to adjust the date and then push it back
in again
to position 1.
It is necessary to adjust the date
after each month with less than 31 days.
Quick date adjustment (L667)
Pull the crown out to the intermediate position 2, turn
it forwards to adjust the date and then push it back in
againto position 1. It is necessary to adjustthedateafter
each month with less than 31 days.
Adjusting the date and the day (L674)
Pull the crown out to the intermediate position 2, turn
it forwards to adjust the date, backwards to change the
87Self-winding chronographs
Page 40
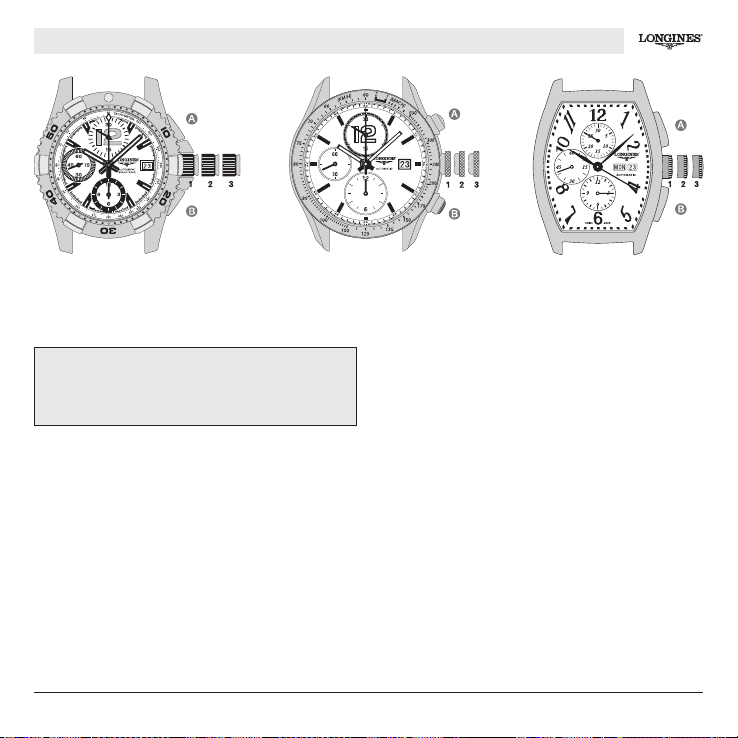
L650, L651, L652, L667, L674
day, and then push it back in again to position 1. It is
necessary to adjust the date after each month with less
than 31 days.
IMPORTANT! Calibres L650, L651,L652: the time should
not be adjusted while the chronograph function is being used.
CHRONOGRAPH FUNCTIONS
Standard Start-Stop function
Add Rally function (partial times)
Standard Start-Stop function
Used for timing a single event:
Press push-piece A to start the chronograph.
Press push-piece A to stop the chronograph.
Press push-piece B to return to zero.
L674L667 (GrandeVitesse)L667 (HydroConquest)
Add Rally function (partial times)
Used for measuring successive events but not the intervals between them. Each result is automatically
added to the preceding one. To time the different stages
of a car rally, for example:
At the start of the first stage, press push-piece A to start
the chronograph.
At the end of the first stage, press push-piece A again
and the chronograph will stop.
Repeat this procedure for each stage of the rally. At the
end of the final stage the chronograph will show the total time of the rally,in other
fo
r all the stages.
Press push-piece B to return to zero.
Tachometric scale
See page 83
words,theaccumulated time
88 Self-winding chronographs
Page 41
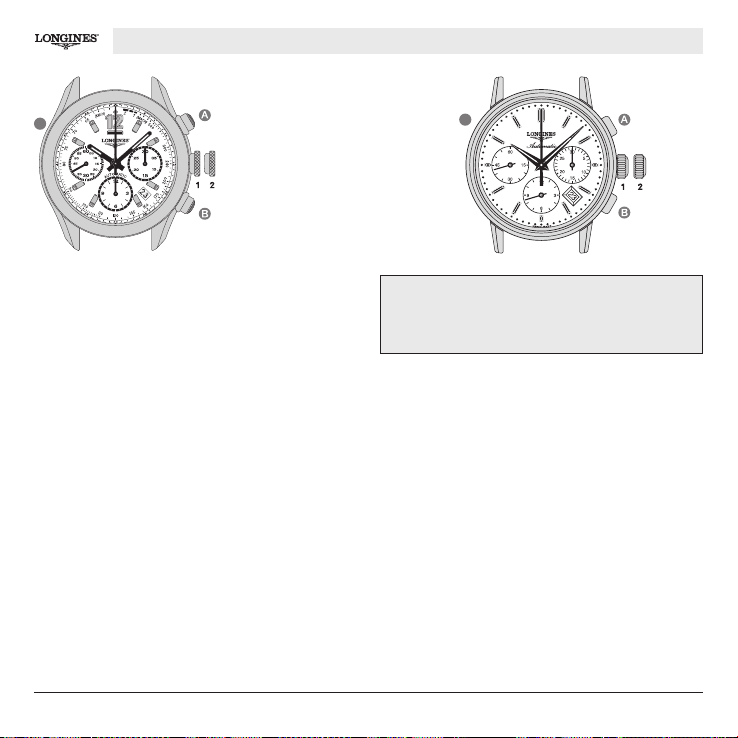
L683, L688 – COLUMN WHEEL, L696, L705
C
L683
Show the hours, minutes, seconds, and the date. Can
be used to time events that last up to 30 minutes
(cal.L705) or 12 hours (cal. L683, L688, L696), the results being shown to 1/5th of a second.
2-position crown
Winding
(crown pushed right in)
The natural movements of your wrist will automatically
wind your Longines chronograph, which has a powerreserve of 46 hours (54 hoursforcal. L688).Itis onlynecessary to wind your watch manuall
fo
r several days.
y if it has not be worn
Adjusting the time and stop seconds
Pull the crown right out to position 2, which will stop the
counter hand (small seconds). Adjust the time by turning the crown in either direction. Synchronise the watch
with a time signal (telephone, radio, TV) and push the
crown back in again to position 1.
C
L688 (Column Wheel)
IMPORTANT!The date should not be adjusted between
9 p.m. and 3 a.m. as doing so may damage the
mechanism.
Quick date adjustment
Push-pieceC for adjusting the date is at 10 o’clock. Using the soft-pointed instrument provided by Longines,
press the pu
sh-piece to obtain the exact date. It is necessary to adjust the date at the end of each month with
less
than 31 days.
CHRONOGRAPH FUNCTIONS
Standard Start-Stop function
Add Rally function (partial times)
Standard Start-Stop function
Used for timing a single event:
Press push-piece A to start the chronograph.
Press push-piece A to stop the chronograph.
Press push-piece B to return to zero.
89Self-winding chronographs
Page 42
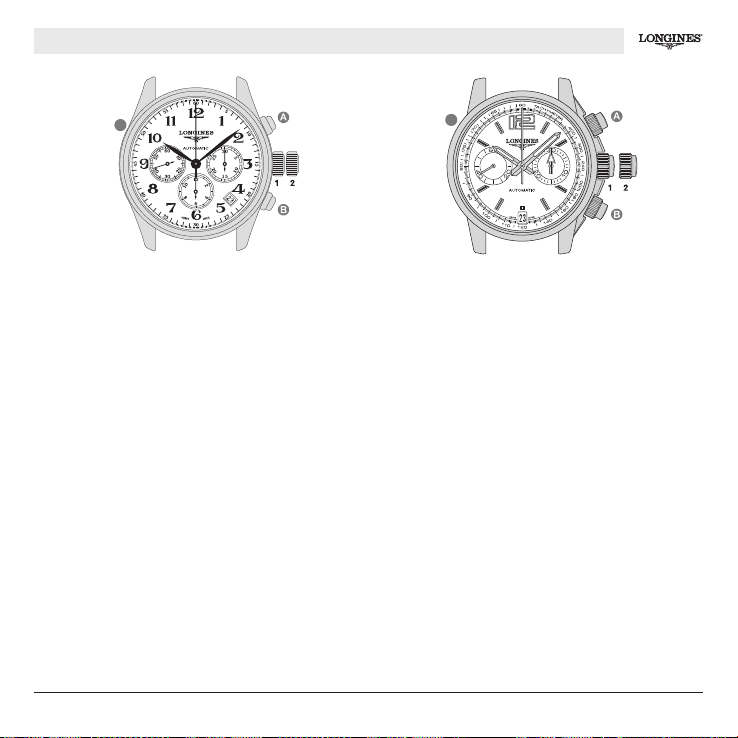
L683, L688 – COLUMN WHEEL, L696, L705
C
L696
Add Rally function (partial times)
Used to measure successive events but not the intervals between them. Each time is added to the preceding one. To time different stages of a car rally, proceed
as follows:
At the start of the first stage, press push-piece A to start
the chronograph.
At the end of the first stage, press push-piece A again
to stop the chronograph.
Repeat for each stage of the rally. At the end of the final stage the chronogra
o
ther words the accumulated time for all the stages.
ph will display the total time, in
Press push-piece B to return to zero.
Tachometric scale
See page 83
C
L705
90 Self-winding chronographs
Page 43
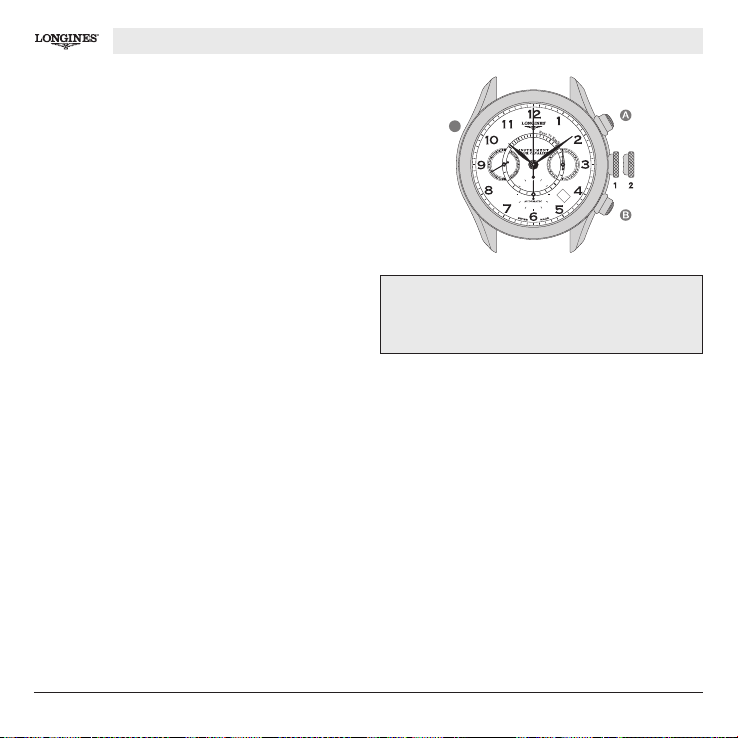
L683 – INSTRUMENT POUR CAVALIER
Shows the hours, minutes, seconds and the date. Can
be used to time events lasting up to 12 hours and displays the results to 1/5th of a second.
2-position crown
Winding
(crown pushed right in)
The natural movements of your wrist will automatically
wind your Longines chronograph, which has a powerreserve of
46 hours. It is only necessary to wind your
watch manually if it has not been worn for several days.
Adjusting the time and stop seconds
Pull the crown right out to position 2, which will stop the
counter hand (small seconds). Adjust the time by turning the crown in either direction. Synchronise the watch
with a time signal (telephone, radio, TV) and push the
crown back in to position 1.
Self-winding chronographs
C
65
60
60
70
55
05
10
50
15
45
20
35
40
35
25
30
12
40
93
6
55
30
65
5
25
10
20
44
15
23
L683 CAVALIER
IMPORTANT! The date should not be adjusted between
9 p.m. and 3 a.m. as doing so may damage the
mechanism.
Quick date adjustment
Push-piece C for adjusting the date is at 10 o’clock. Using the soft-pointed instrument provided by Longines,
press the push-piece to obtain the exact date.
CHRONOGRAPH FUNCTIONS
Standard Start-Stop function
Add Rally function (partial times)
Standard Start-Stop function
Used for timing a single event:
Press push-piece A to start the chronograph.
Press push-piece A to stop the chronograph.
Press push-piece B to return to zero.
91
Page 44
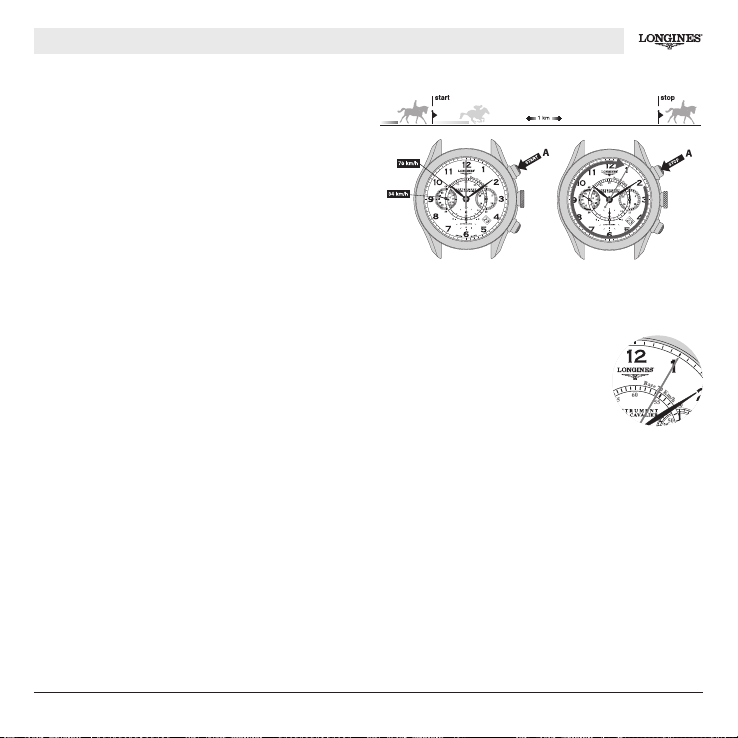
L683 – INSTRUMENT POUR CAVALIER
Add Rally function (partial times)
Used for measuring successive events but not the intervals between them. Each result is automatically
added to the preceding one. To time the different stages
of a car rally, for example:
At the start of the first stage, press push-piece A to start
the chronograph.
At the end of the first stage, press push-piece A again
and the chronograph will stop.
Repeat this procedure for each stage of the rally. At the
end of the final stage the chronograph will show the total time of the rally, in other words, the accumulated time
for all the stages.
Press push-piece B to return to zero.
Tachometric scale
See page 83
Tachometric scale for riders
햲햳
This scale comprises graduations on the dial of your
chronograph. It can only be used to measure speeds of
between 34 kph and 70 kph over a time period of at least
50 seconds.
Measure the time required to cover
1 km. The position of the seconds
hand upon completion of the 1 km
indicates the mean speed.
Start: press push-piece A when the horse passes a given
marker (fig.햲).
Stop: press push-piece A again when the horse passes
the second marker placed 1 km from the first one(fig.햳).
Speed: in this example, the horse has taken 65 seconds
to cover one kilometre, with an averge speed of around
55 kph.
92 Self-winding chronographs
Page 45
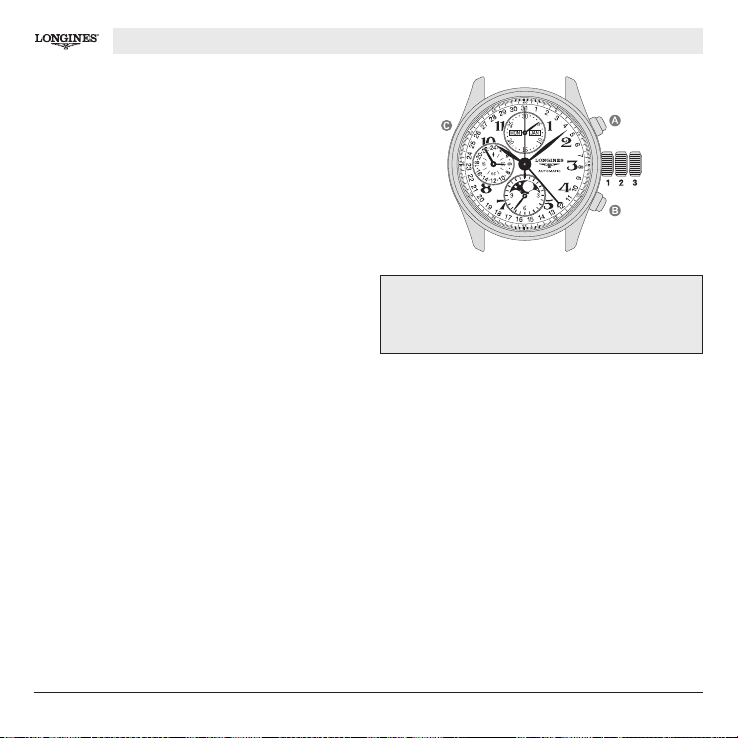
Shows the hours, minutes, seconds, day, month, date
and phases of the Moon. Can be used to time events
lasting up to 12 hours, showing the result to 1/5th of a
second.
L678 – PHASES OF THE MOON
L678
IMPORTANT! Thedateandthe phases of the Moon should
not beadjusted between 7p.m. and 6 a.m.asdoing so
may damage the mechanism.
3-position crown
Winding
(crown pushed right in)
The natural movements of your wrist will automatically
wind your Longines chronograph, which has a powerreserve of
watch manually if it has not been worn for several days.
42 hours. It is only necessary to wind your
Adjusting the time and stop seconds
Pull the crown right out to position 3. The counter hand
(small seconds) will now stop. Adjust the time by turning the crown in either direction. Synchronise the watch
with a time signal (telephone, radio, TV) and push the
crown back in to position 1.
Self-winding chronographs
Quick adjustment of the date and month
Pull the crown right out to position 2 and turn it backwards to adjust the date and month. Then push it back
in to position 1. It is necessary to adjust the date at the
end of each month with less than 31 days.
Adjusting the phases of the Moon
Pull the crown out to the intermediate position 2 and turn
it forwards to adjust the phase of the Moon, which you
can check in the table of lunar months*. Then push the
crown back in to position 1.
Adjusting the day of the week
Push-piece C for adjusting the day of the week is situated at 10 o’clock. Using the soft-pointed instrument provided by Longines, press the push-piece to obtain the
exact day.
93
Page 46

L678 – PHASES OF THE MOON
CHRONOGRAPH FUNCTIONS
Standard Start-Stop function
Add Rally function (partial times)
Repeat for each stage of the rally. At the end of the final
stage the chronograph will show the total time taken, in
other words the accumulated time for all the stages.
Press push-piece B to return to zero.
Standard Start-Stop function
Timing a single event:
Press push-piece A to start the chronograph.
Press push-piece A again to stop the chronograph.
Press push-piece B to return to zero.
*See table of lunar months on page 76
Add Rally function (partial times)
For timing successive events but not the intervals between them. Each result will be automatically added to
the preceding one. To time different stages of a car rally,
proceed as follows:
At the start of the first stage, press push-piece A and the
chronograph will start.
At the end of the first stage, press push-piece A again
and the chronograph will stop.
94 Self-winding chronographs
Page 47
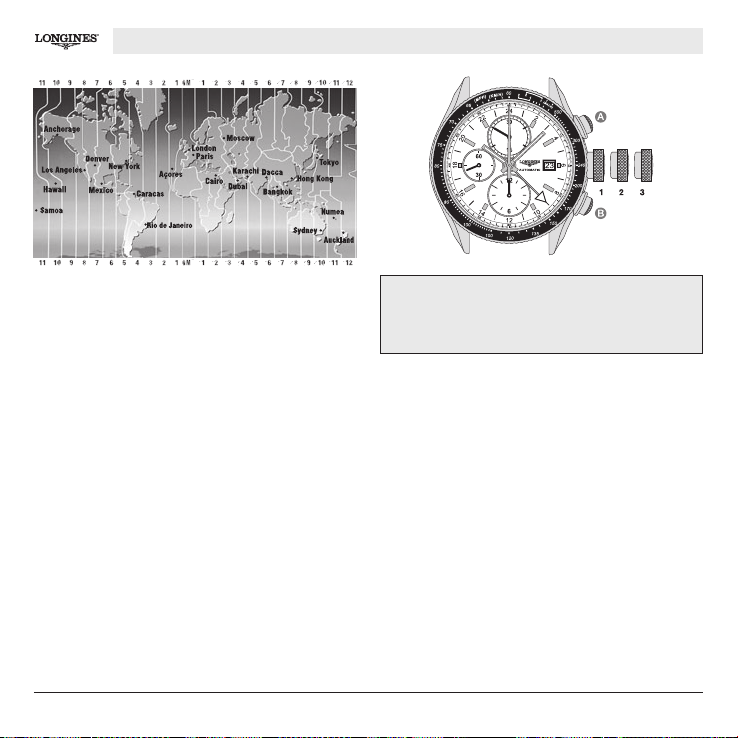
Shows the hours, minutes, seconds and date, as well
as a second time zone.
The chronograph functions enable the user to time events
lasting up to 12 hours and display the results to 1/5th
of a second.
3-position crown
Winding
(crown pushed right in)
The natural movements of your wrist will automatically
wind your Longines chronograph, which has a powe r-
46 hours. It is only necessary to wind the watch
reserve of
manually if it has not been worn for several days.
Adjusting the time and stop seconds
Pull the crown right out to position 3, which will stop the
small seconds on the dial. Adjust the time by turning the
crown in either direction. Synchronise your watch with
a time signal (telephone, radio, TV) and push the crown
back in again to position 1.
L686 – 24 HOURS
L686
IMPORTANT! The date should not be adjusted between
9 p.m. and 3 a.m. as doing so may damage the
mechanism.
Quick date adjustment
Pull the crown out to the intermediate position 2, turn
it forwards to the desired date an d then push it back in
again to position 1. It is necessary to adjust the date at
the end of each month with less than 31 days.
Adjusting the time in a second time zone when travelling (24 hour hand)
Pull the crown out to the intermediate position 2. Tu rn
it backwards to reverse the second time zone hand by
successive 1-hour steps, which will not affect the
minute and seconds hands.
Adjust the 24-hour hand according to the time zone of
your pre sent location. Push the crown back in to position 1 after each adjustment.
Self-winding chronographs
95
Page 48
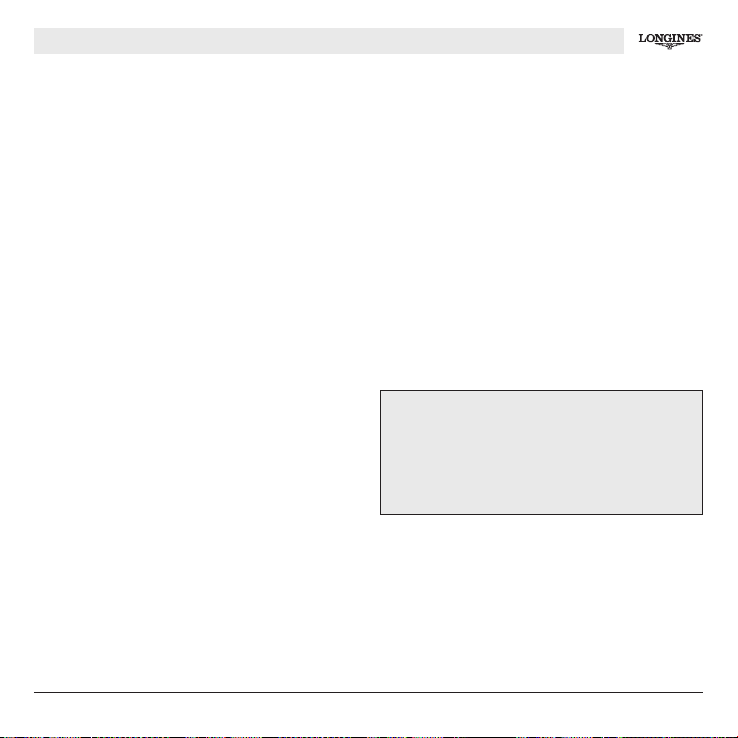
L686 – 24 HOURS
CHRONOGRAPH FUNCTIONS
Standard Start-Stop function
Add Rally function (partial times)
Standard Start-Stop function
Used for timing a single event:
Press push-piece A to start the chronograph.
Press push-piece A to stop the chronograph.
Press push-piece B to return to zero.
Add Rally function (partial times)
Used for measuring successive events but not the intervals between them. Each result is automatically
added to the preceding one. To time the different stages
of a car rally, for example:
At the start of the first stage, press push-piece A to start
the chronograph.
At the end of the first stage, press push-piece A again
and the chronograph will stop.
96 Self-winding chronographs
Repeat this procedure for each stage of the rally. At the
end of the final stage the chronograph will show the total time of the rally, in other words, the accumulated time
for all the stages.
Press push-piece B to return to zero.
Instructions for use when travelling
Pull the crown out to the intermediate position 2. Adjust the 24-hour hand according to the time zone of your
present location by turning the crown backwards.
Push the crown back in again.
 Loading...