

Longevity ForceCut LP-100, ForceCut LP-60D, ForceCut LP-80, ForceCut LP-50, ForceCut LP-40 Operating Manual
...Page 1

Operating Manual
for
Series
LP-40/50/60D
and
LP-70/80/100
Plasma Cutters
Page 2

LP-40/50/60D & LP-100 Plasma Cutters
Table of Contents
Warranty ....................................................................1
Shipping Damage ....................................................1
In Warranty Service ....................................................2
Out-of-Warranty Service ........................................2
Introduction ................................................................3
Warning ................................................................4
Safety Tips ................................................................5
Specifications and Ratings ........................................6
Installation ................................................................7
Quick-Start Tips for All Machines ............................7
Making Machine Connections ............................8
Connecting the Power Cord Plug ............................8
Connecting Cables to the Machine ............................9
Connecting Air Supply to the Machine ................9
Assembly of the Plasma Cutter Torch Consumables ....9-13
Operation ...............................................................13-14
Cutting Guideline Table ………………………...14
Cutting Methods ...................................................14-15
Real Time Arc-Curve Delay .......................................15-16
Routine Maintenance ...................................................16
Troubleshooting ...................................................17
www.longevity-inc.com i
Page 3

ForceCut™ Series Plasma Cutters
W
arranty
Plasma Cutters, Welders, and Multi-Purpose Welders (Coverage for Parts and Labor
from the purchase date) Check the latest warranty at www.longevity-inc.com
In the event of product failure or malfunction, the purchaser/recipient must contact
LONGEVITY™ GLOBAL, INC. to obtain an RMA (“return or missing”) number
and a location of a designated repair facility. The welder, plasma cutter, multipurpose unit or any other welding related equipment comes with warranty on all
internal components. The torch, cables, power cord, clamps, air regulator, argon
regulator, hoses, case, paint, and consumables are not covered under warranty.
Packages that are not pre-approved for return, and that do not have an RMA number
will be refused and returned to the purchaser/recipient at the purchaser’s/recipient’s
own cost. The product must be returned in its original packaging, with all
accompanying components. Repair or replacement of the defective product will be
at our option. The repaired/replaced product will then be returned to the purchaser.
LONGEVITY™ Global, Inc. will cover the return and replacement shipping charges
(both ways) for domestic customers located in the lower 48 states who have units in
need of warranty within and only for the first 30 days from the purchase date. After
the 30 days from the purchase date, the “purchaser” shall be responsible for all
shipping and handling costs of returning (both ways) the defective/faulty products
for repair or replacement. Customer located outside the United States or in Alaska,
Hawaii or Puerto Rico will have to pay shipping and handling charges both ways
from the purchase date. We are not responsible for lost returns. The labor coverage
only applies if the unit is serviced at our facility or one of our authorized dealers. We
will not reimburse the labor if your wish to have a third-party or unauthorized repair
technicians work on the product.
Shipping Damage
Your machine is insured against shipping damage. When you receive your machine,
inspect the outer packaging for damage. Point out any damage to the delivery driver,
and immediately contact our customer service department by phone or email to
report the damage. Keep all packing materials and containers in case machine must
be returned. We will initiate a claim with the shipping company to cover damage or
loss. Claims usually take from two to four weeks to resolve. We are not responsible
for damage or loss resulting from improper handling or shipping damage.
www.longevity-inc.com 1
Page 4

ForceCut™ Series Plasma Cutters
In Warranty Service
Customers, who own machines that are in warranty and require service, should
contact our Warranty Department by email at [email protected] to obtain a
return authorization code. When doing so, please provide the following information:
Order No.: _________________________________
Serial No: _________________________________
Date of Purchase: ____________________________
Warranty Period: ____________________________
Unit Tested Prior to Shipment By: _____LONGEVITY____
Out-of-Warranty Service
Customers, who own machines that are out of warranty and require service, should
contact us for an estimate.
www.longevity-inc.com 2
Page 5

ForceCut™ Series Plasma Cutters
Introduction
The LONGEVITY™ ForceCut™ series plasma cutters offer a revolutionary new
approach to plasma cutting technology. LONGEVITY™ plasma cutters use the
newest technology available in the welding industry with the help of Toshiba internal
components and the newest IGBT technology. By producing the units with inverter
technology, we are able to produce smaller and more efficient units. During the
manufacturing process, we kept the maintenance and repair in mind by enabling the
internal components of the machine to be a simply plug and operate circuitry
enabling all mother boards to be simply replaced and swapped out. The ForceCut™
series plasma cutters use special safety-redundant circuitry with built in
auto-protection and self-adjusting circuitry to keep the machine running at a safe
threshold. This helps protect the machine from over-voltage, power spikes, tip
blowouts and shorting
ForceCut™ series plasma cutter. We are proud of our achievements
in the welding industry, we are thankful you have chosen to use the
Longevity™ ForceCut™ series plasma cutters.
. We hope you enjoy your Longevity™
We recommend you join the Longevity Welding Community at
www.freeweldingforum.com or www.longevity-inc.com/forum to
earn free prizes for sharing your skills, advice on welding, posting
your projects, etc…
Our forums are designed to have the customers communicate with
each other and learn from each other. The forum is free and will be
the best spot for you to learn welding while meeting some
professional welders as well as enthusiasts.
www.longevity-inc.com 3
Page 6

ForceCut™ Series Plasma Cutters
Warning
Welding and plasma cutting may be dangerous to the operator and to bystanders, if the
equipment is not operated properly. Welding or cutting must be performed in accordance
with all relevant safety regulations. Carefully read and understand this instruction manual
before installing and operating this equipment.
Changing function modes during welding may damage
equipment.
Before welding, disconnect the electrode-holder cable
from the equipment.
A circuit breaker is required to prevent electrical
overload of the equipment.
Only high quality welding tools should be used.
Electric Shock can be fatal.
Ensure that ground cable is connected in accordance with
applicable safety codes.
Never touch electrodes, wires, or circuit components with
bare hands. Wear dry welding gloves when welding.
The operator must be insulated from the work piece.
Smoke and gas can be harmful to health.
Ensure that the working area is well ventilated.
Avoid breathing smoke and gas generated during the
welding process.
Arc-light emission can be harmful to eyes and skin.
Always wear a welding helmet, anti-radiation glass, and
work clothes while welding.
Ensure that people in or near the working area are
protected.
Welding splash is a fire hazard.
Keep flammable material away from the work place.
Keep a fire extinguisher nearby, and have all personnel
trained in it’s use.
Surface noise generated while welding or cutting can be
harmful to hearing.
In the event of a machine fault.
Refer to this instruction manual.
If the fault cannot be determined, contact your local
dealer or supplier for assistance.
www.longevity-inc.com 4
Page 7

ForceCut™ Series Plasma Cutters
Safety Tips
Consider the following tips to ensure safe operation of your welding/cutting
equipment:
Ensure that this welding equipment is installed in an area free of corrosive
chemical gases, flammable gases or materials, and explosive chemicals.
The area should contain little dust, and have a humidity of no more than 80%.
Operate the welding equipment in an area sheltered from direct sunlight and
precipitation. Work area temperature should be maintained at -10C to +40C;
If, because of an overload, the machine suddenly stops, and it is necessary to
restart it, leave the internal fan operating to lower the inside temperature.
Always wear protective clothing and a welding mask to protect your skin.
Wear safety goggles designed to darken the arc generated by your machine.
Wear suitable noise protection to protect your hearing.
Ensure that machine is grounded through the power cord or on the machine case.
Never operate the machine in bare feet or on a wet floor.
Never switch the machine off while it’s in use. Doing so will damage the internal
circuitry.
Ensure that your circuit breaker is rated to handle the current requirements of
your machine.
Use a UL approved receptacles and plugs with your machine. Never hard wire
the machine to main power.
Work in a well ventilated area to avoid smoke. Keep your head out of the smoke.
Ensure that air is flowing away from you to avoid inhaling smoke.
Ensure proper ventilation through the machine’s louvers. Maintain a distance
least 12 inches between this cutting equipment and any other objects in the
of at
work area.
Use a screen or curtain designed to keep passers by from viewing the arc.
The arc spray and metal spray from machine use may cause nearby fires. Use
caution.
If, after reviewing this manual, you have any problems in setting up or operating
your machine, contact us at [email protected].
www.longevity-inc.com 5
Page 8

ForceCut™ Series Plasma Cutters
Specifications and Ratings
Parameter
Input Voltage
(V)
Cup Capacity
max/sev (in.)
Input
KVA/AMPS
No-load
Voltage (V)
Current Range
(A)
Rated Output
Voltage (V)
Rated Duty
cycle (%)
Efficiency 85 85 85 85 85 85
Power Factor
(Cos0)
LP-40D LP-50D LP-60D LP-70 LP-80 LP-100
110/220v 220v
Up to .75 Up to 1.0
6/17 6/17 9/31 11/36 11/36 15/49
110/220v 110/220v 110/220v
10-40 10-50 10-60 10-70 20-80 20-100
100 100 120 120 125 130
60 60 60 60 60 60
0.93 0.93 0.93 0.93 0.93 0.93
Up to
1.25
Models
Up to 1.5
(1Phase)
220v
Up to
1.75
220v
(1Phase)
(3Phase)
Up to
2.25
220v
Insulation Class B B B B B B
Protection
Class
Arc Starting
Suggest Air
Pressure (psi)
Suggested Air
Volume (cfm)
Machine
Weight (lbs)
Size LxWxH
(inches)
IP21 IP21 IP21 IP21 IP21 IP21
HF
Arc/Pilot
Arc-
leading
70 70 70 75 80 85
2-4 2-4 3-4 3-6 3-6 5-7
18 19 40 50 60 77
15 x 6 x
12
HF/Pilot
Arc-
leading
15 x 6 x
12
HF
Arc/Pilot
Arc-
leading
19 x 8 x
14
HF Arc-
leading
21 x 9 x 14
HF Arc-
leading
21 x 9 x
14
HF Arc-
leading
25 x 13 x
17
The Longevity™ LP-40/50/60D Plasma Cutters are dual voltage and can be
connected to either 110 or 220VAC.
www.longevity-inc.com 6
Page 9
Installation
ForceCut™ Series Plasma Cutters
TION
Quick-Start Tips for All Machines
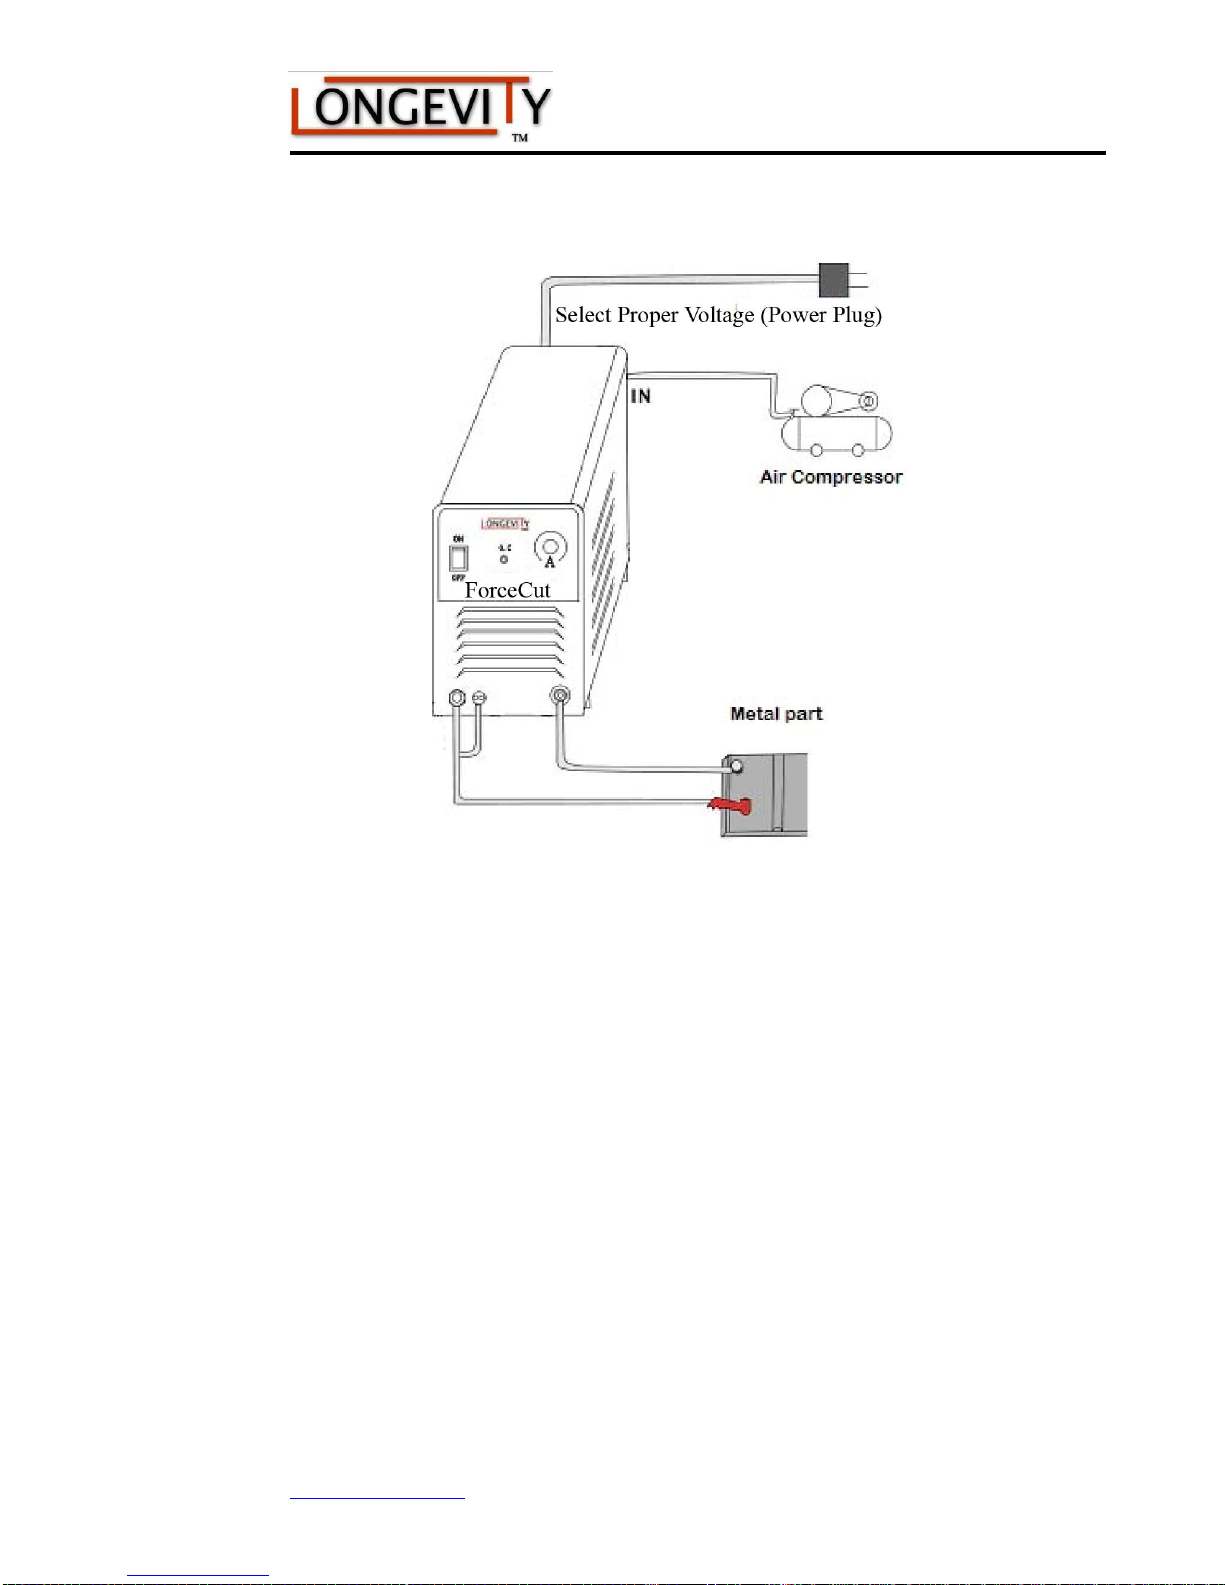
Make sure your input power connections are correct. See the wiring guides at
www.longevity-inc.com. You will want to referrer to the Longevity Wiring
Manual. Remember, some plasma cutters are dual voltage. Make sure you
determine the ground, which is the green wire with yellow inside.
Ensure that your air line is connected and that your air pressure setting is correct.
Pressure that is too high can blow out your arc. Pressure that is too low can burn
up your tips.
Ensure your work material has a clean contact point, and is well connected to the
ground clamp.
Ensure your electrical connections are tight.
If your machine is properly connected and fails to operate, have a technician
check for shipping damage or loose connections.
www.longevity-inc.com 7
Page 10
ForceCut™ Series Plasma Cutters
Making Machine Connections
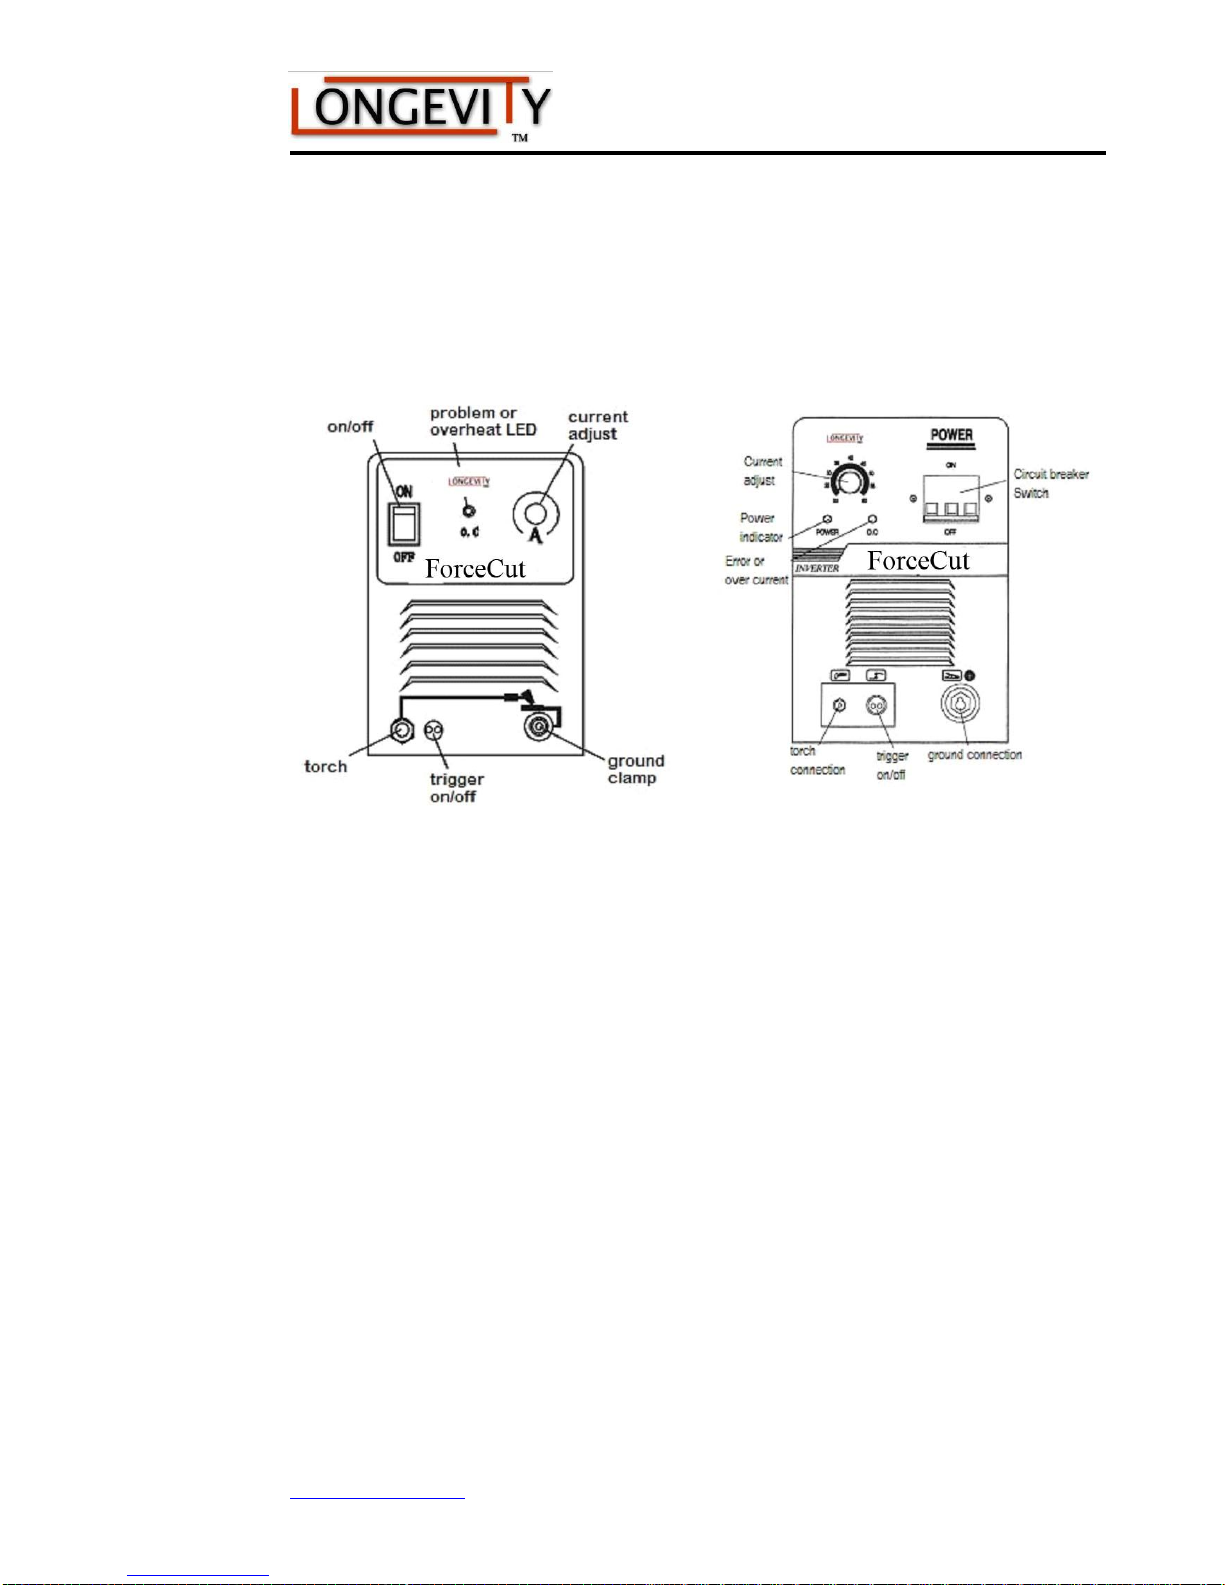
Use the pictures shown below as a guide when making the connections described in
the following paragraphs.
Connecting the Power Cord Plug
Instructions for selecting and connecting up the machine’s power cord plug are
described in the user manual, Instruction Manual for Electrical Plug Selection and
Wiring, which is available on the www.longevity-inc.com website. Please note that
the green with yellow inside is the ground wire. If you are wiring to 220v, the other
two wires are both hot wires and each wire will need to be connected to each of the
hot terminals.
Connecting Cables to the Machine
Connect the cable to the machine as follows:
1. Locate the ground clamp and end connection.
2. Place the connector into the machine’s ground connection, and turn it
clockwise for approximately one-third turn until it locks into position.
www.longevity-inc.com 8
Page 11
ForceCut™ Series Plasma Cutters
3. Connect the torch connector to the machine using a wrench or adjustable
wrench. Tighten snugly, but do not over tighten.
4. Plug in the trigger ON/OFF connector, and hand-tighten the retainer nut. For
Pilot Arc Torches make sure you connect the ground lead to the PILOT knob.
Place the bare wire in between the washer and base and tighten the Piot knob
snugly.
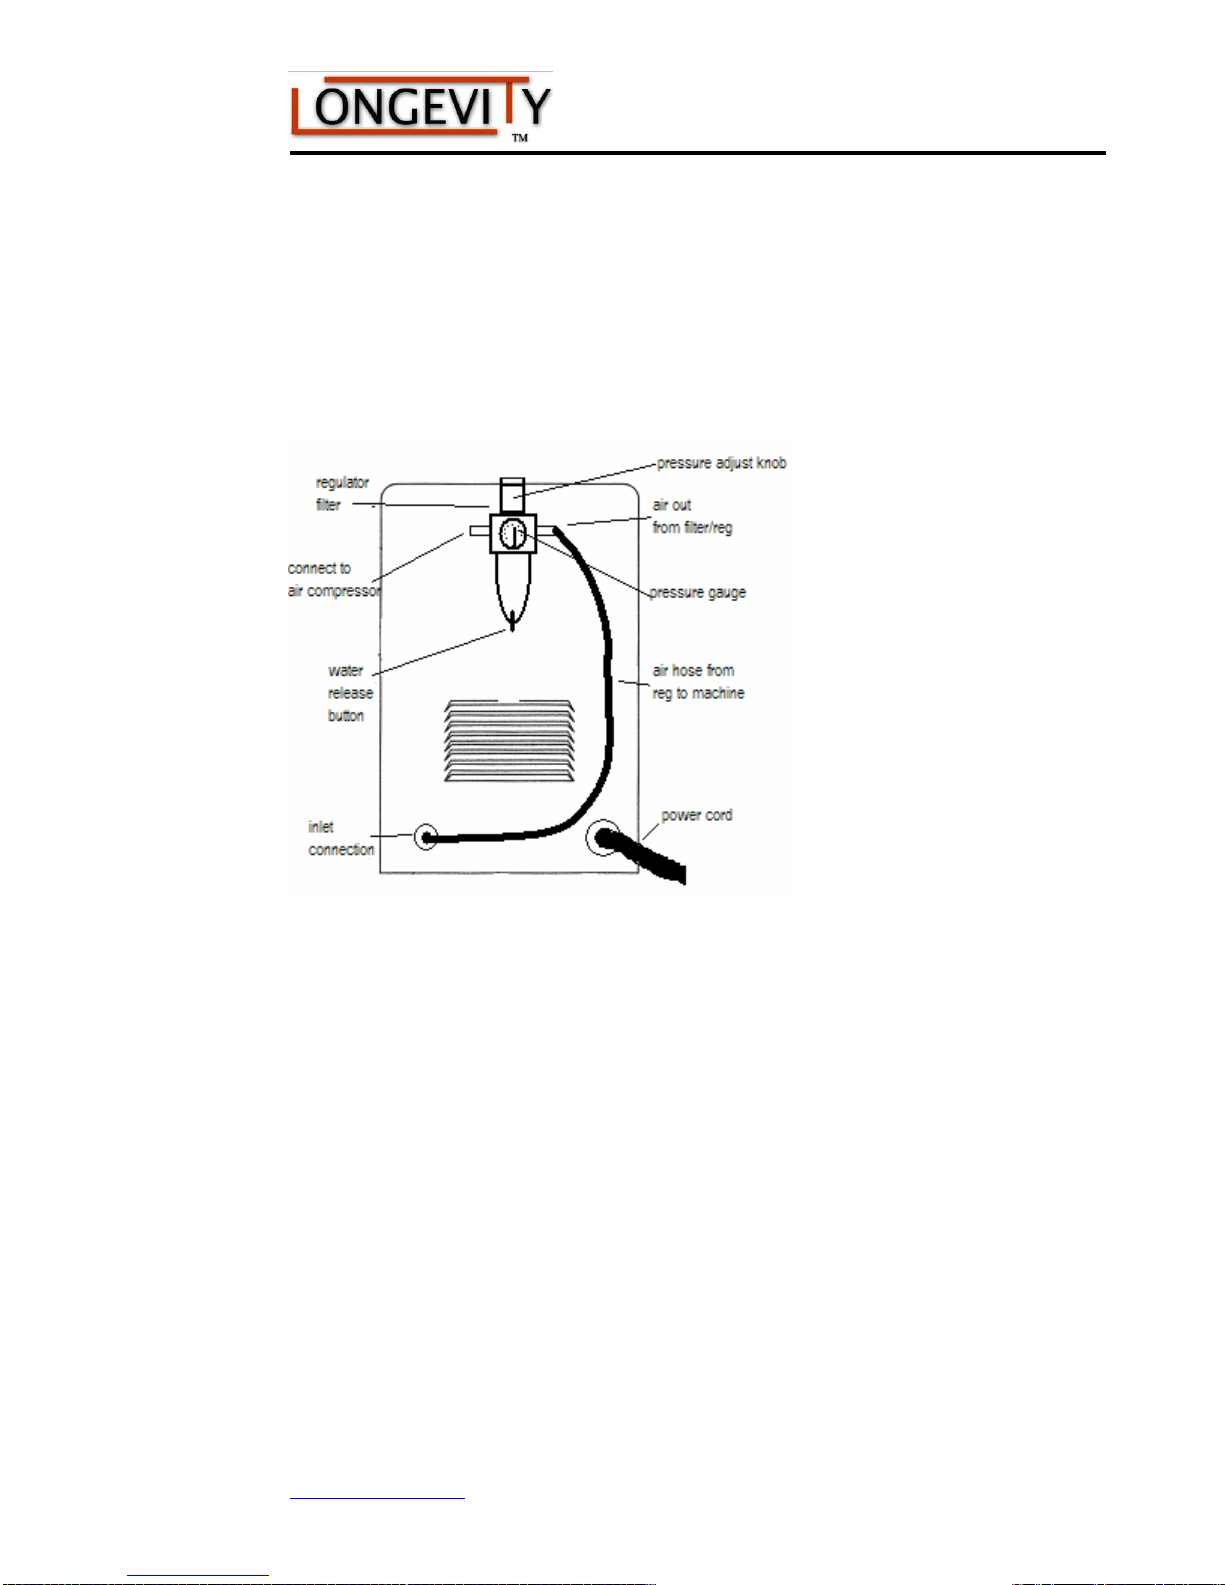
Connecting the Air Regulator Supply to the Machine
Longevity™ includes an air regulator/filter with your machine. You must attach the
bracket to the machine, and fasten the regulator to the bracket.
1. Locate the IN and OUT labeled on the regulator body.
2. Cut a section of hose long enough to reach the back of the machine, where
shown, and secure it to the regulator outlet and to the machine inlet. Please
note that the machine inlet will say GAS, but GAS in engineer terms also
includes compressed air. So you will need to use compressed air only for the
plasma cutter.
3. Connect an air compressor to the regulator inlet.
4. Set the air compressor to a higher pressure than the compressor requires.
5. Set the knob on the regulator to the pressure specified for your machine.
Periodically, after long periods of use, you must remove water from the air by
pushing the water release button to release water from the water separator section of
the regulator.
www.longevity-inc.com 9
Page 12
ForceCut™ Series Plasma Cutters
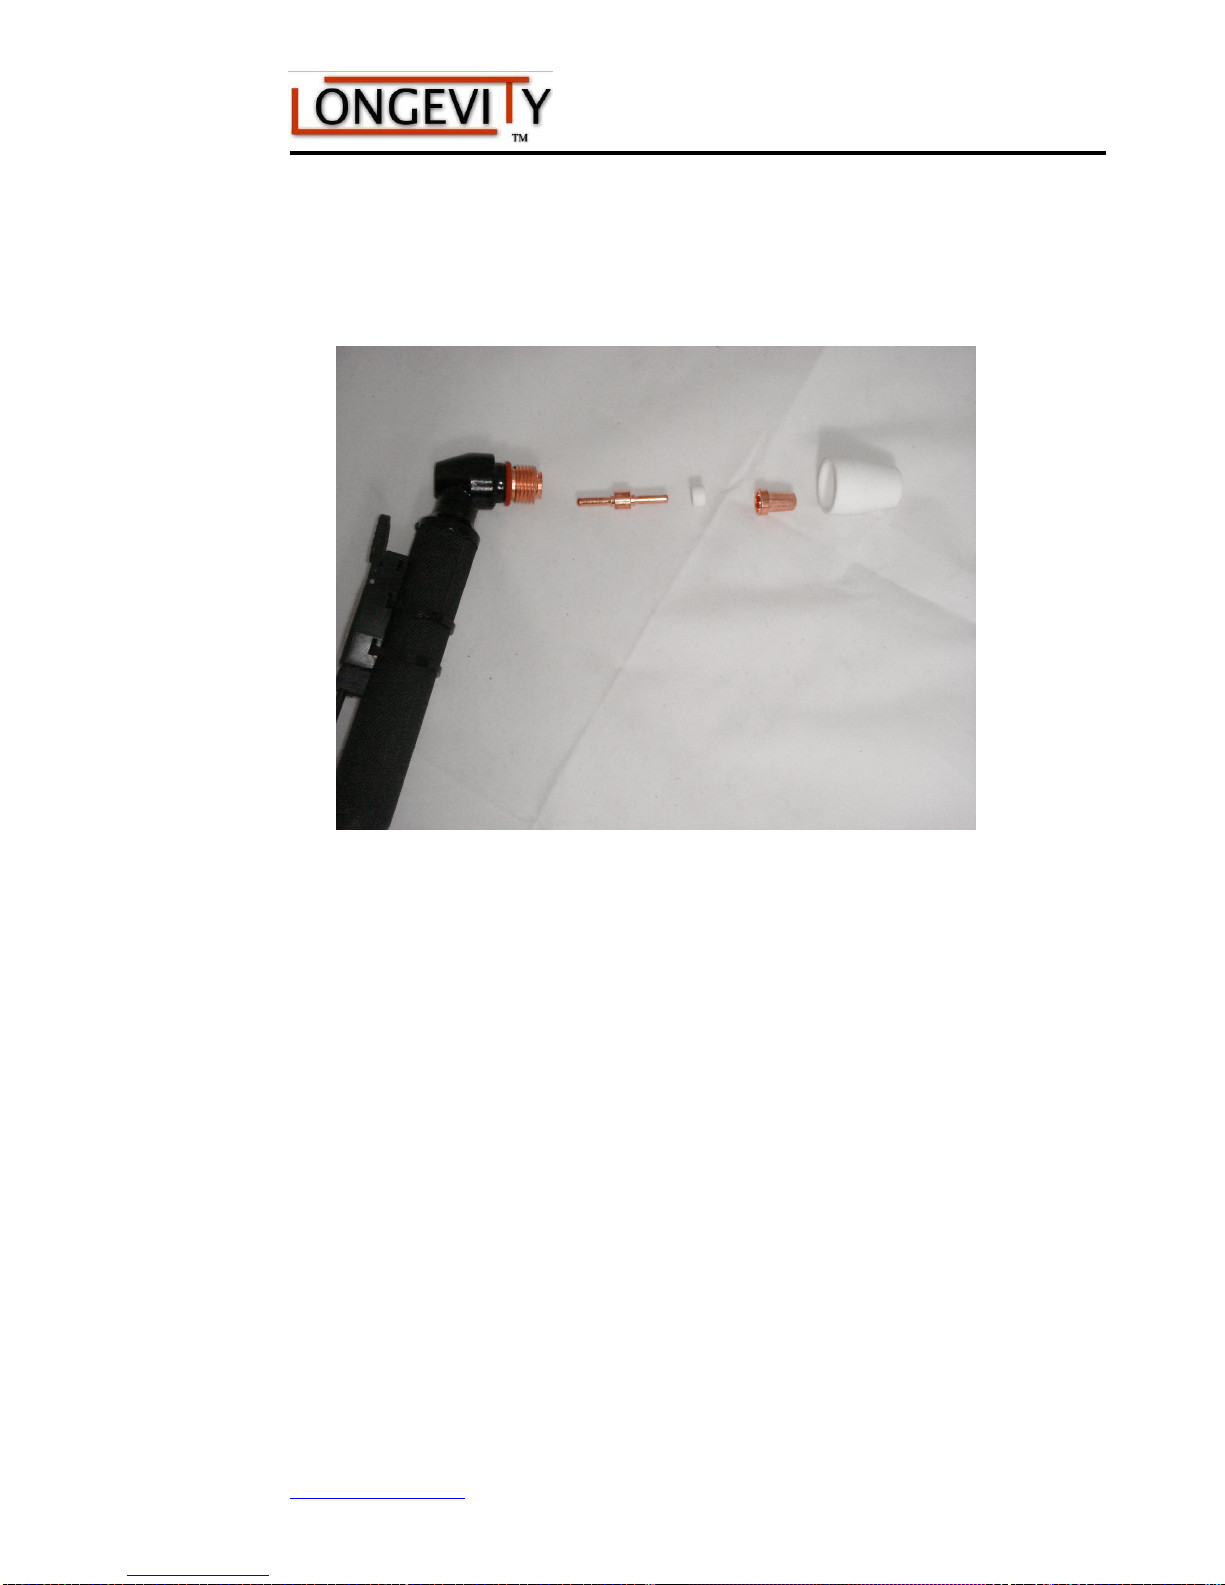
Assembly of the Plasma Cutter Torch Consumables
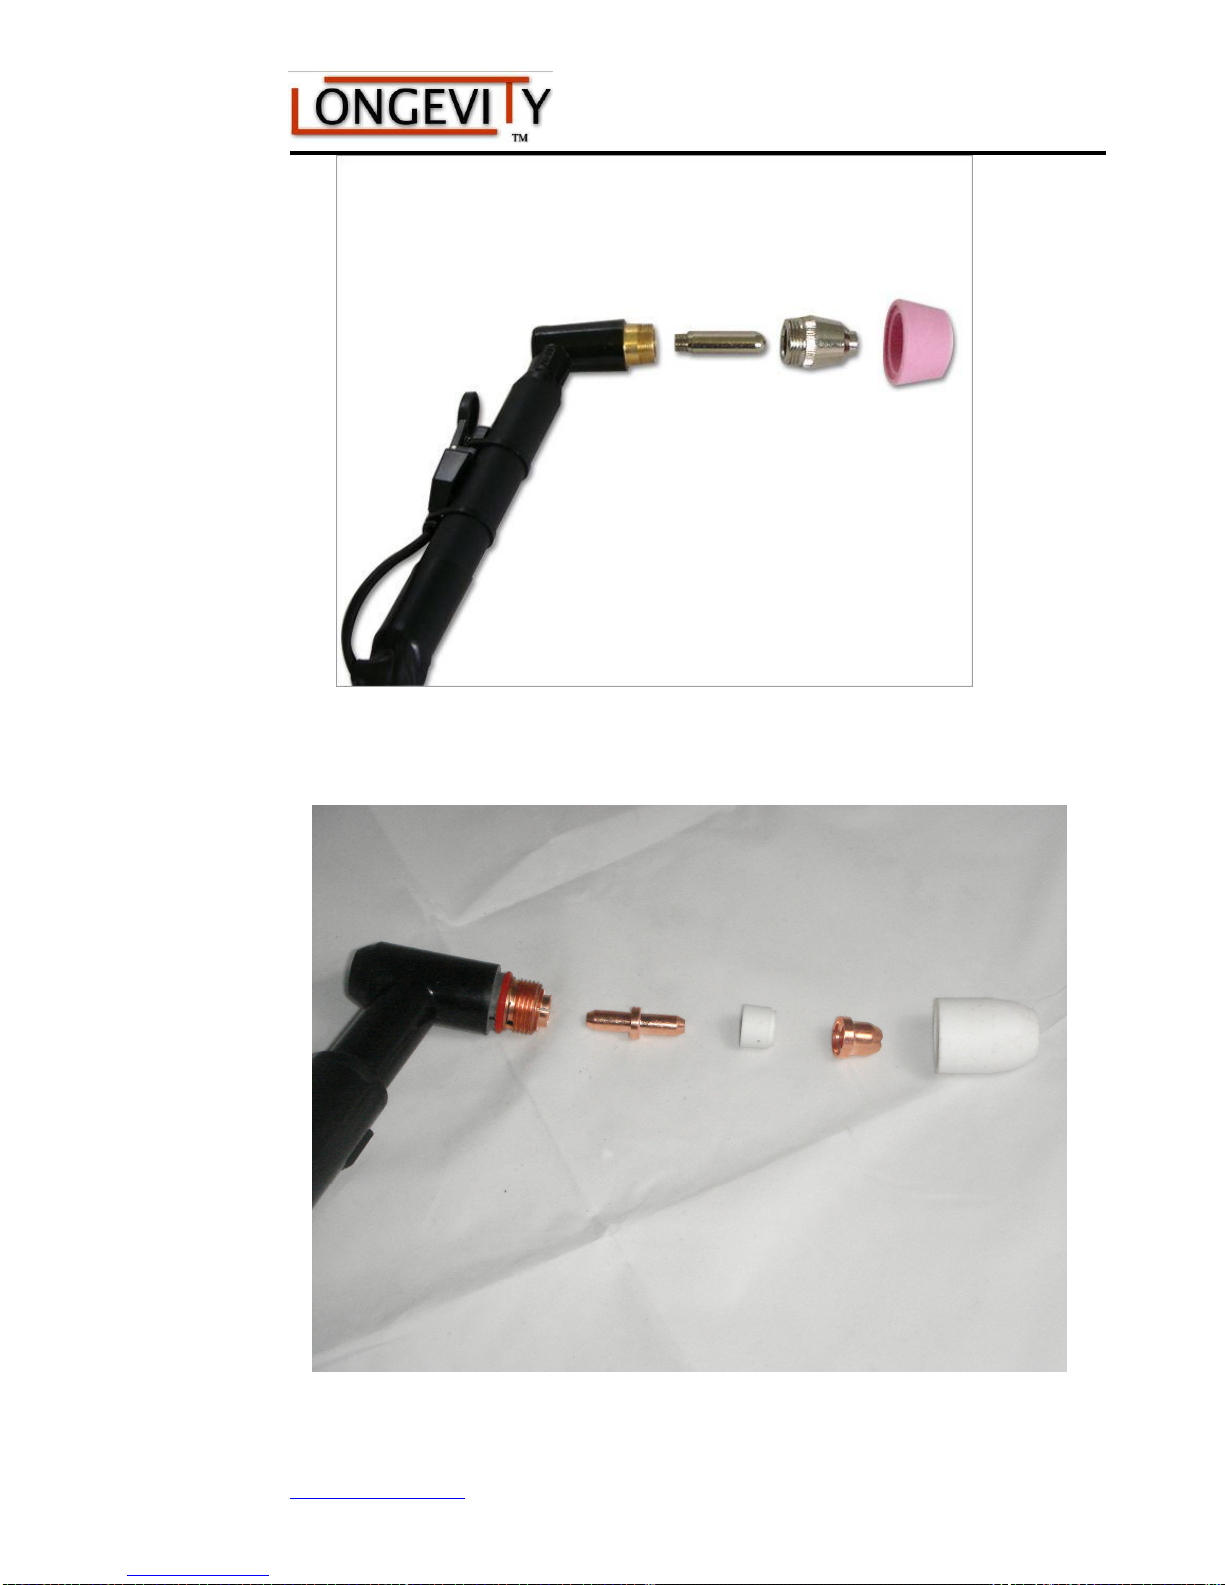
Depending on your torch, we have included numerous pictures of assembly.
The setup for the Longevity ForeceCut™ 40/50amp plasma cutter rated torch with
the white shield cups is as pictured:
Setup for the Longevity ForceCut 60amp Rated torch is as pictured:
www.longevity-inc.com 10
Page 13
ForceCut™ Series Plasma Cutters
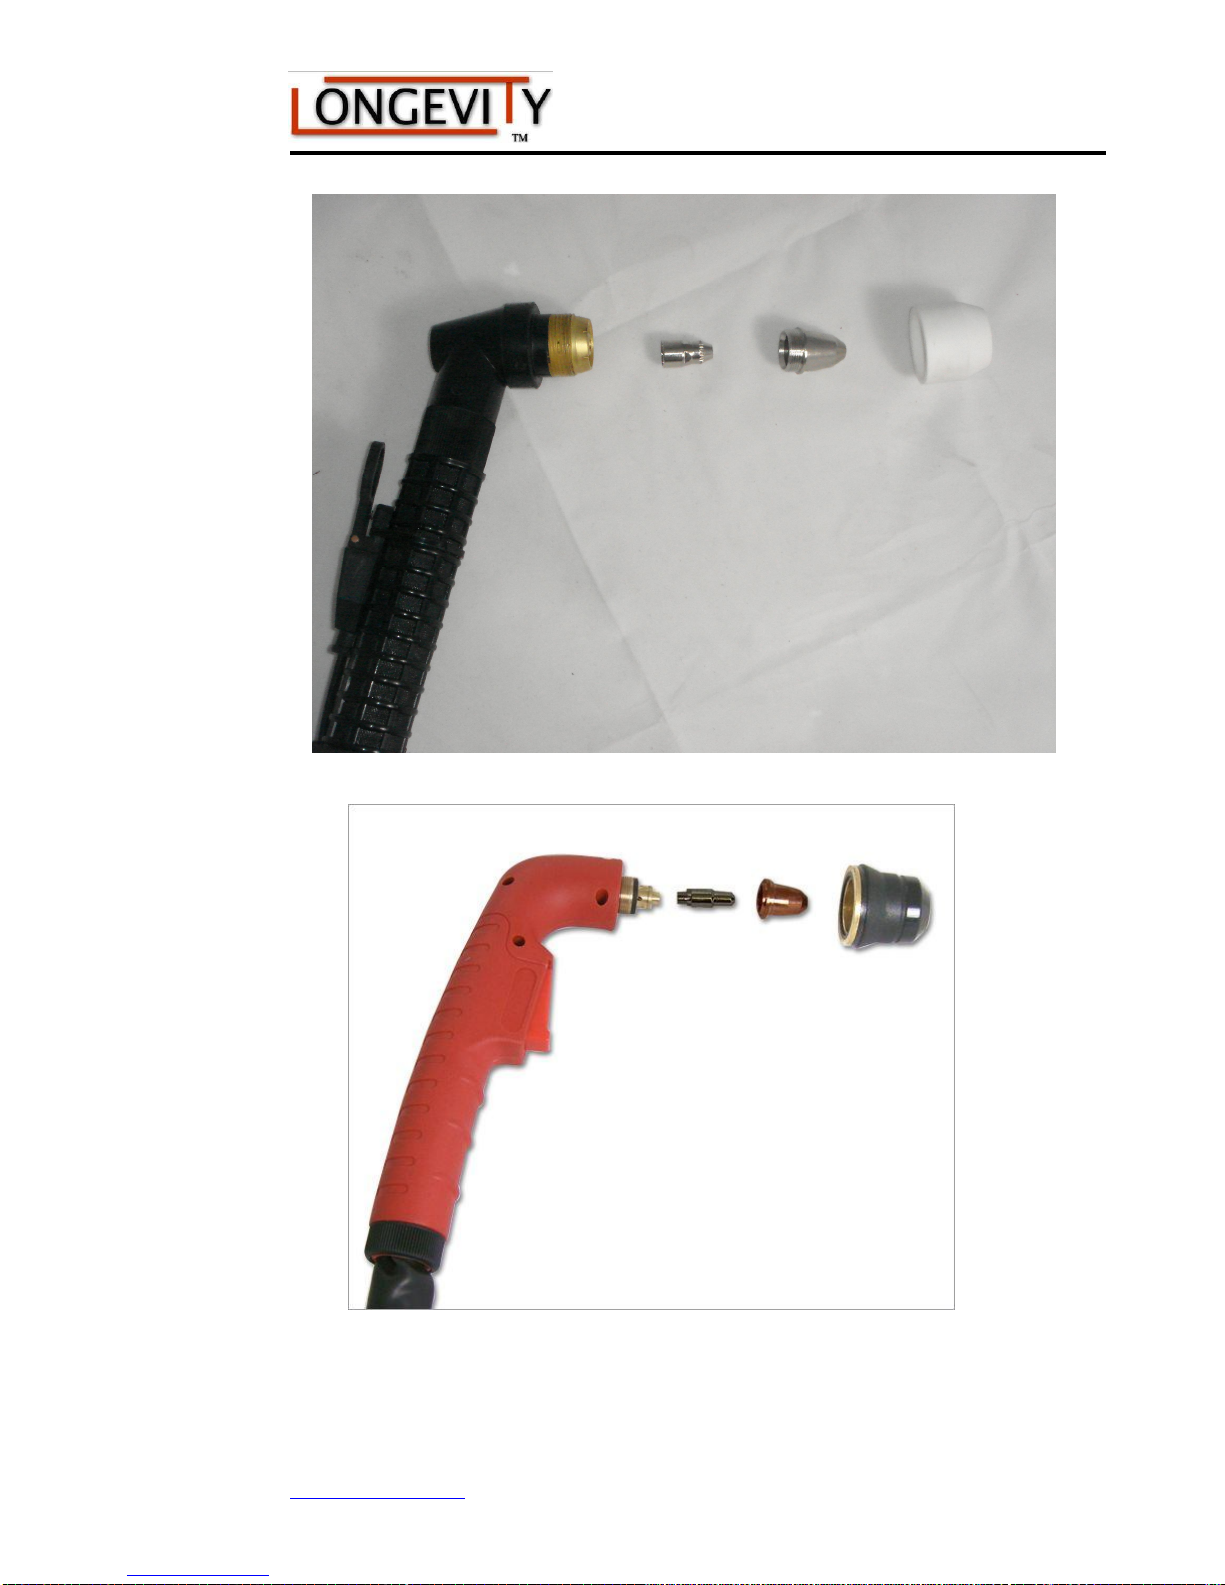
Setup for the Longevity ForceCut™ 70/80amp Plasma Cutter Rated torches is as
pictured:
Setup for the Longevity ForceCut™ 100AMP Plasma Cutter
www.longevity-inc.com 11
Page 14
ForceCut™ Series Plasma Cutters
Setup for the Longevity Pilot Arc Torch as pictured:
The plasma cutter torch handle is made of fire and heat resistant materials. Avoid
dropping the torch or striking anything with it. For convenience and ease of use, the
www.longevity-inc.com 12
Page 15

ForceCut™ Series Plasma Cutters
7
torch’s ON/OFF switch can be positioned on the top, the side, or the bottom of the
torch body for most of the torches.
Assembly of Consumables for the LP-40D/50D/60/70/80/100
Assemble the consumables as pictured above, and described below.
1. Insert the electrode.
2. Seat the ring on the electrode. Please note not all torches use a swirl ring –
the 60amp and 100amp torches do not have a ring.
3. Place the copper tip on the ring, ensuring that is seated flat.
4. Secure all parts into place by turning the ceramic cup clockwise until it is
The torch consumables are now successfully assembled.
snug. Do not over tighten.
Assembly of Consumables for the LP-60D/100
Assemble the consumables as pictured above, and described below.
1. Insert the electrode.
2. Place the copper tip on the ring, ensuring that is seated flat.
3. Secure all parts into place by turning the pink ceramic cup clockwise until it
is snug. Do not over tighten.
The torch consumables are now successfully assembled.
Assembly of Consumables for the LP-70/80/100
This assembly is similar to the cutters described above, except it does not use a ring.
1. Insert the electrode, and tighten with special electrode wrench until snug.
2. Place the copper tip on the electrode, ensuring that is seated flat, and tighten
with wrench until snug.
3. Secure all parts into place by turning the ceramic cup clockwise until it is
snug. Do not over tighten.
The torch consumables are now successfully assembled.
Operation
1. Ensure that all cables are connected to the machine.
2. Ensure that the machine’s OFF/ON switch is set to OFF, and plug the machine
into the electrical outlet.
3. Connect the air compressor supply line to the input side of the air regulator/filter.
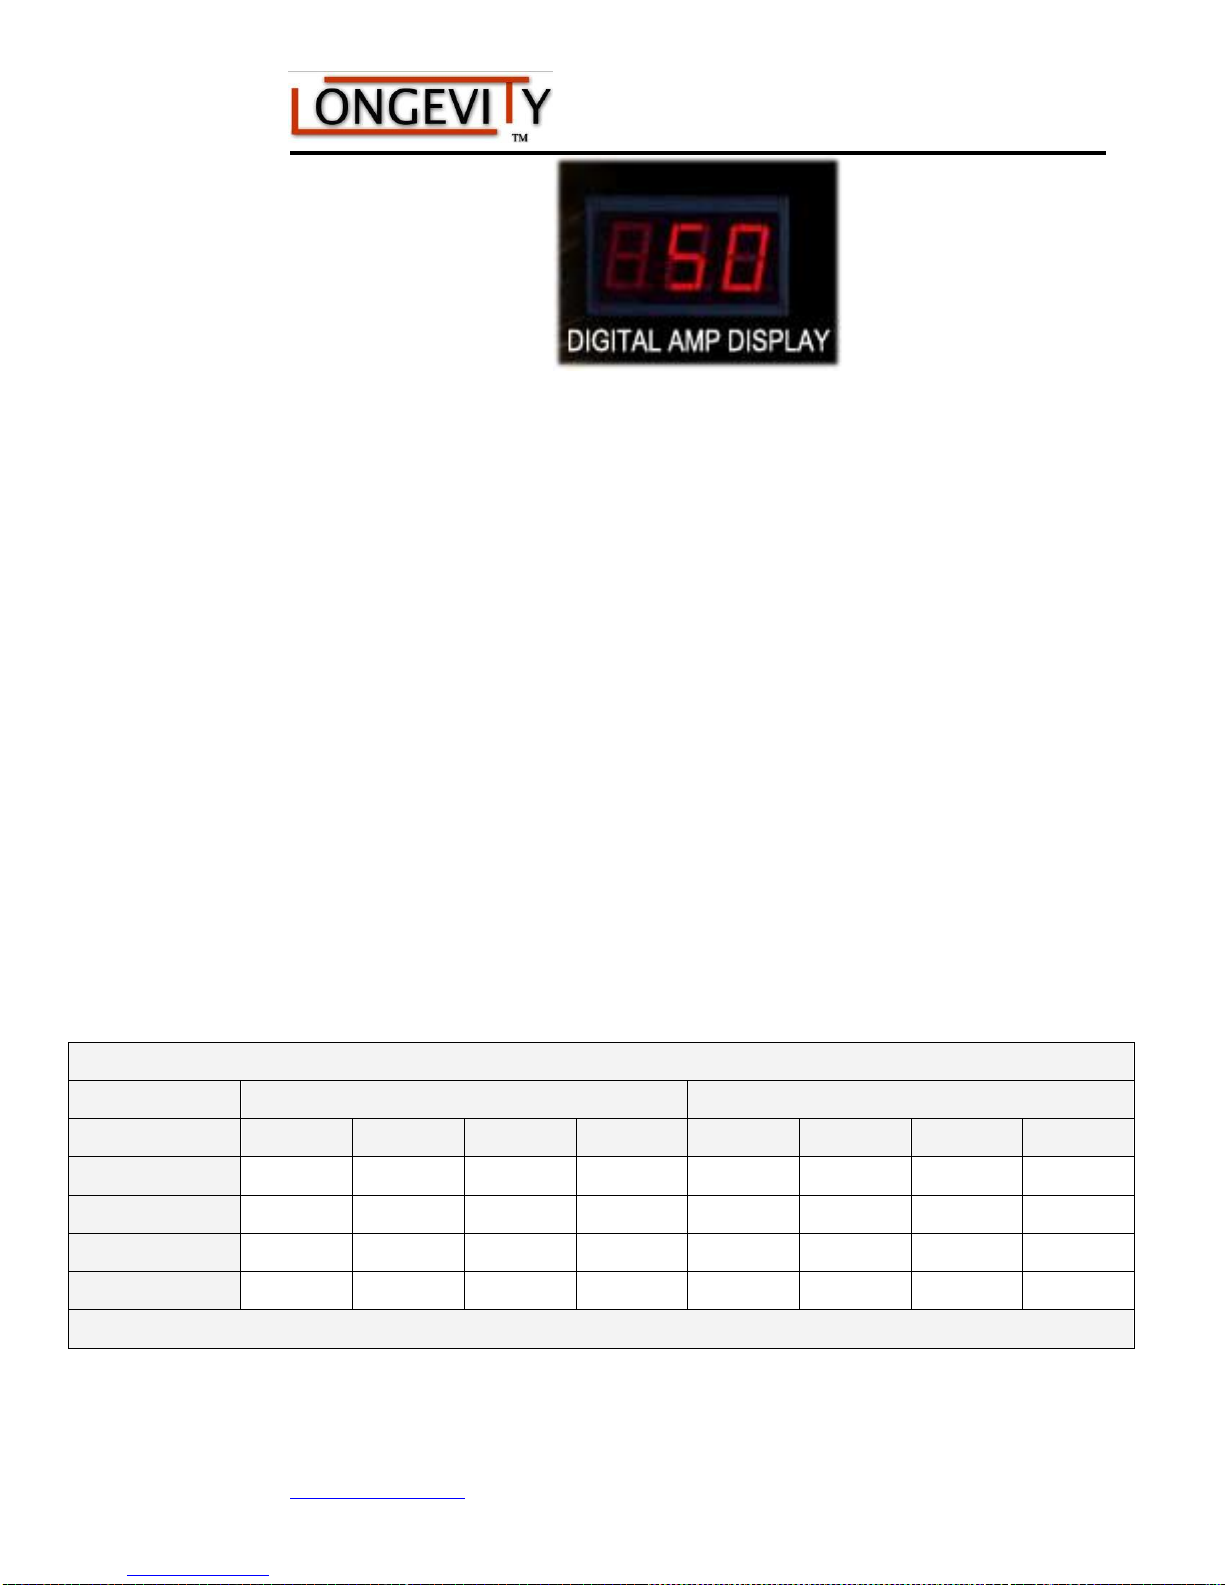
4. Turn the ON/OFF switch to ON. The cooling fans should operate and the ON
indicator LED (if applicable) should illuminate. Your amps should be shown on
the digital display and are adjustable with the knob.
www.longevity-inc.com 13
Page 16
ForceCut™ Series Plasma Cutters
5. Clean the contact point on the work piece to ensure a good electrical connection.
Ensure that no rust of paint is present that could create an open circuit.
6. Connect the ground clamp to the work piece to be cut. Remember, the ground
clamp connects to the positive side (Right Side) of the machine.
7. Bring the torch tip into contact with your work piece edge or, if cutting thick
material, over a pre-drilled pilot hole. See Cutting Guideline Table below.
8. Depress the button on your torch to start the arc and begin cutting.
9. The 2.5S and 5.0S on your is an air blow switch. If you are cutting for short
periods of time, leave the switch on 2.5s to allow a 2.5 second air delay to pass
through the torch. If you are cutting for long periods of time, leave the unit on
5.0S to allow more air to pass through the torch. This feature protects the torch
from over heating.
10. If necessary remove slag from the under part of the cut using a grinder or chisel.
Cutting Guideline Tables
Cutting Guideline Table
Machine LP-40D LP-50D LP-60D LP-70 LP-40D LP-50D LP-60D LP-70
Thin*
Medium*
Thick*
Severance Cut*
Steel, Stainless Steel, Molybdenum, Iron, etc. Aluminum, Copper, Brass, etc.
0-1/8 0-1/8 0-1/4 1/2 0-1/16 0-3/16 0-1/8 1/4
1/8-3/8 1/4-1/2 3/8-3/4 1/2-3/4 1/16-3/16 3/16-3/8 1/8-3/8 1/4-3/8
3/8-1/2 1/2-3/4 3/4/1.0 3/4-1.25 3/16-1/4 3/8/.5 3/8-1/2 3/8-1/2
3/4 1.0 1¼ 1.5 1/4 3/8 1/2 5/8
* All dimensions are in inches
www.longevity-inc.com 14
Page 17

Cutting Guideline Table
Cutting Guideline Table
ForceCut™ Series Plasma Cutters
Cutting Guideline Table
Machine LP-80 LP-100 LP-80 LP-100
Thin*
Medium*
Thick*
Severance Cut*
Steel, Stainless Steel, Molybdenum, Iron, etc. Aluminum, Copper, Brass, etc.
3/8 3/4 3/8 1/2
3/8-3/4 3/4-1¾ 3/8-1/2 1/2-3/4
3/4-1½ 1¾-2.0 1/2-3/4 3/4-1.0
1¾ 2¼ 3/4 1½
* All dimensions are in inches
Cutting Methods
Different material thicknesses require different cutting techniques.
Thin material: Start perpendicular to the work piece. It is unnecessary to
angle or start on the edge, as the arc will pass through quickly.
Medium material: Angle the torch tip to avoid damaging the tip. Once the
arc passes through the material, you may begin cutting normally.
LP-
Thick material: Drill a pilot hole through which to start your arc, or start on
the edge of the work piece.
Never cut material on a flat surface. Raise the work piece above the surface to avoid
blow back which may burn you or cause fires.
Real Time Arc-Curve Delay
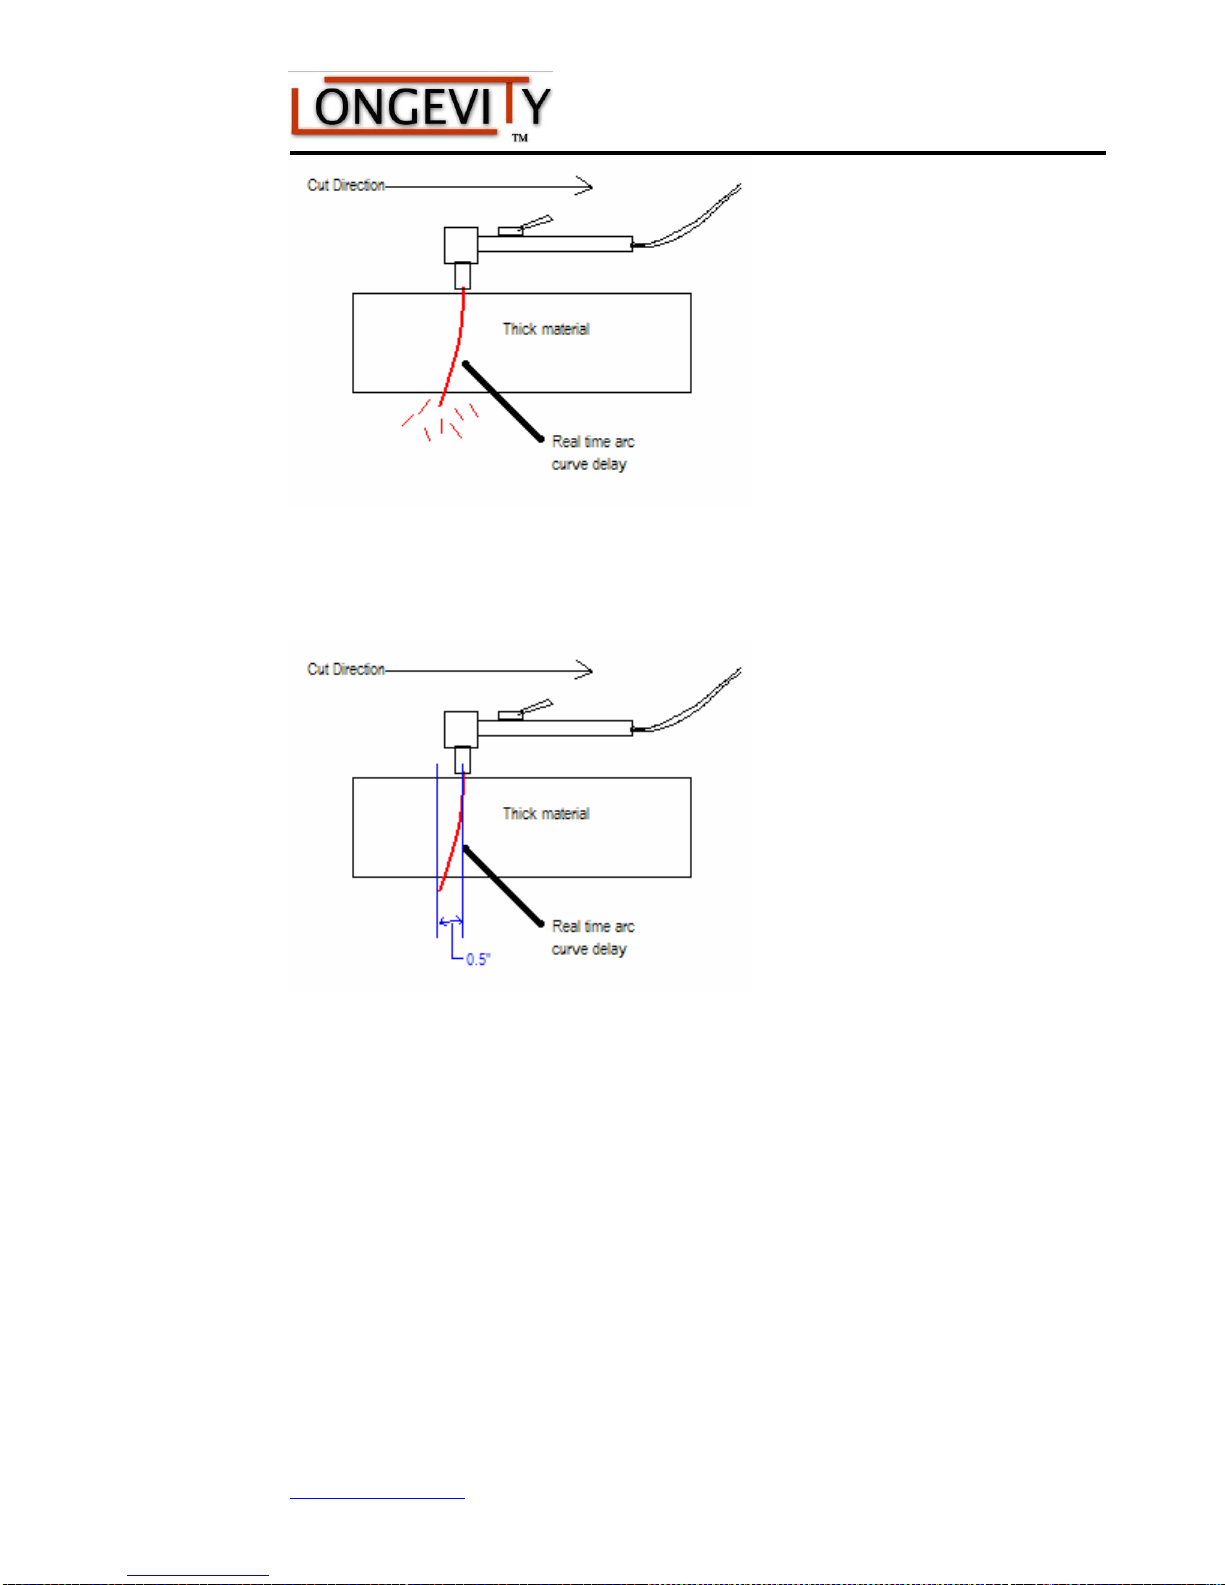
When cutting thick materials you must maintain a steady even motion in the
direction of the cut. Moving the torch too quickly causes an arc-curve delay. An
arc-curve delay can leave the work piece with uncut sections, requiring you to re-cut
those sections, which could distort or damage the work piece.
40D
www.longevity-inc.com 15
Page 18
ForceCut™ Series Plasma Cutters
To avoid arc-curve delay, allow the arc to pass completely through the work piece
before moving too far ahead. The arc-curve should lag not more than the thickness of
the material being cut. In other words, if the work piece is one-half inch thick, the arc
curve should lag not more than one-half inch behind the torch, as shown below.
Routine Maintenance
The life of your machine and the quality of the work performed using your machine,
will be enhanced by practicing periodic routine maintenance.
At regular intervals, clear dust that may accumulate in the machine using
clean and dry compressed air. If the working condition has heavy smoke and
pollution, the welding machine should be cleaned once a month.
Keep the machine exterior clean with mild soap and water.
Do not walk on or store items on the cables or cords.
Do not jar, drop, or stack items on top of the machine.
Always connect the machine to a well grounded electrical outlet.
www.longevity-inc.com 16
Page 19

ForceCut™ Series Plasma Cutters
Always check the torch consumables before and after use and ensure that
they are clear of obstructions, and that no parts are damaged.
Replace any worn or damaged consumables before using machine.
For periods of prolonged non-use, remove cables and store them in their
original boxes in a cool dry place, free of bug infestation.
www.longevity-inc.com 17
Page 20

ForceCut™ Series Plasma Cutters
Troubleshooting
Most problems confronted by machine users are the result of rough handling by the
shipping company. Regardless of the source of your problem, the most common
problems are listed in the following table, and can be resolved by you, the customer.
If you can’t find the cause of your problem in the following table, call or email us.
Problems and Causes
Problems
Power switch is ON.
Fan and machine do
not operate.
Power switch is ON,
Fan operates. Pushing
cut button on torch
allows air to pass, but
arc does not start.
Error LED illuminates
Power switch is ON,
Fan operates. Pushing
cut button on torch
allows air to pass, but
arc does not start.
Error LED does not
illuminate
Causes for ForceCut™ LP-
40/50/60 Series
Machine temporarily turned
off by over voltage
protection
Incorrectly connected
power cord
Damaged K1170 on top
PCB
Damaged step-up
transformer
Damaged control board
Loose connector wires
Improperly installed torch
consumables. Tighten
consumables more
Primary coil of arc-leading
transformer is shorted or
incorrectly connected
Damaged rectifier diode
Leaking HF capacitor
Relay is damaged
Causes for ForceCut™
LP-60D/LP70/LP-100/
Damaged assistant
transformer on control
board
Incorrectly connected
power cord
Loose connector wires
Damaged rectifier diode
Damaged 1KV/102 high
frequency capacitor
Damaged K1170 on top
PCB
Damaged step-up
transformer
Damaged control module
Improperly installed torch
consumables. Tighten
consumables more.
Primary coil of arc-leading
transformer is shorted or
incorrectly connected.
Damaged rectifier diode
Leaking HF capacitor
Relay is damaged
Arc does not start
when torch button is
pushed.
www.longevity-inc.com 18
Low input voltage
Air compressor pressure too
low or too high
Low input voltage
Air compressor pressure too
low or too high
Page 21

ForceCut™ Series Plasma Cutters
Longevity™ Global, Inc. thanks you for your purchase and opportunity to be able to
serve you. If, after reviewing this manual, you have any problems in setting up or
operating your machine, contact us at [email protected].
Longevity™ Global, Inc.
Toll-Free 1-877-LONG-INC / 1-877-566-4462
Website: www.longevity-inc.com
Sales: [email protected]
Customer Service: [email protected]
Dealers: [email protected]
Please join our welding forums to share welding tips and tricks, to receive useful
information from customers who also use our products, and to be a part of the
Longevity™ welding community at www.longevity-inc.com/forum.
www.longevity-inc.com 19
 Loading...