

Page 1

LP-40/50/60D & LP-100 Plasma Cutters
Operating Manual for
40D/50D Constant Pilot Arc
Plasma cutters
Page 2

ForceCut 40D and 50D plasma cutters
Table of Contents:
PG. 2:
PG. 3-4:
PG. 5:
PG. 6-7:
PG. 8:
Thank you From LONGEVITY
Warranty/Shipping Damage/Order Information
General Description
Warning and Safety Tips
Specifications and Ratings
PG. 9-11:
PG. 12-14:
PG. 15-16:
PG. 17:
PG. 18:
Main Unit Knob/Button/Function
Torch Consumables Assembly
PG. 19-26:
PG. 27:
PG. 28:
PG. 29:
Routine Maintenance
Trouble Shooting Chart
Enjoy Your New Plasma Cutter!
Included Accessories
Wiring and Setup Instructions
Diagram of Main Unit
Basic Operation and Cutting Methods
www.longevity-inc.com
Page 1 of 30
Page 3

ForceCut 40D and 50D plasma cutters
THANK YOU!
We, at LONGEVITY®, want to thank you for purchasing our product. You are almost ready to
experience LONGEVITY® Welding first hand. LONGEVITY® definitely appreciates your
business and understand that this equipment may be overwhelming to setup and operate so we
have prepared a manual that will assist you in understand your new plasma cutter/welder. If you
have any questions during or after reading this manual, please feel to contact us! Please take a
moment to register your product on our website at www.longevity-inc.com or www.lweld.com
Once again, thank you for choosing LONGEVITY® as your main welding supplier!
LONGEVITY® Global, Inc.
23591 Foley St
Hayward, CA 94545
Toll-Free Customer Support: 1-877-LONG-INC / 1-877-566-4462
Website: www.longevity-inc.com
Sales: [email protected]
Customer Service: [email protected]
Dealers: [email protected]
Complaints: [email protected]
Please join our welding forums to share welding tips and tricks, to receive useful information
from customers who also use our products, and to be a part of the LONGEVITY® welding
community at www.freeweldingforum.com
Page 2 of 30
www.longevity-inc.com
Page 4

ForceCut 40D and 50D plasma cutters
W
arranty
LONGEVITY Plasma Cutters, Welders, and Multi-Purpose Welders are covered for specific
Parts and Labor warranty at our facility. For detailed information regarding your specific
LONGEVITY welder or cutter, please view our Terms and Policies page on our website at the
following website link: http://www.longevity-inc.com/terms/.
Shipping Damage
Your machine is insured against damage during shipping. Keep all packing materials and
containers in case machine must be returned. We will initiate a claim with the shipping company
to cover damage or loss. If there is shipping damage upon opening your package, our customer
service team will work with you to get the matter resolved.
www.longevity-inc.com
Page 3 of 30
Page 5

ForceCut 40D and 50D plasma cutters
In Warranty Service
Customers, who own machines that are in warranty and require service, should contact our
Warranty Department by email at [email protected] to obtain a return authorization code.
When doing so, please provide the following information:
Order No.: _________________________________
Serial No: _________________________________
Date of Purchase: ____________________________
Warranty Period: ____________________________
Unit Tested Prior to Shipment By: _____________________________
Out-of-Warranty Service
Customers, who own machines that are out of warranty and require service, should contact us for
an estimate. LONGEVITY offers an exchange program on out of warranty units. We also help
non LONGEVITY customers with repairs, replacement, and service.
If your unit is not manufactured by LONGEVITY® and you cannot receive service from your
manufacturer or seller, LONGEVITY® is here to help. Our warranty policy is also available for
all plasma cutters and welders. For more information, please email us at [email protected]
www.longevity-inc.com
Page 4 of 30
Page 6

ForceCut 40D and 50D plasma cutters
General Description:
Series plasma cutters offer a revolutionary new approach to plasma cutting
technology. LONGEVITY® plasma cutters use the newest technology available in the welding
industry with the help of IGBT internal components. By producing the units with inverter
technology, we are able to produce smaller and more efficient units. During the manufacturing
process, we keep maintenance and repair in mind by enabling the internal components of the
machine to be simple plug and operate circuitry enabling all mother boards to be simply replaced
and swapped out. The ForceCut™ series plasma cutters use special safety-redundant circuitry
with built in auto-protection and self-adjusting circuitry to keep the machine running at a safe
threshold. This helps protect the machine from over-voltage, power spikes, tip blowouts and
shorting.
We hope you enjoy your LONGEVITY® ForceCut™ series plasma cutter!
www.longevity-inc.com
Page 5 of 30
Page 7

Welding and plasma cutting may be dangerous to the operator and to bystanders, if the
equipment is not operated properly. Welding or cutting must be performed in accordance
with all relevant safety regulations. Carefully read and understand this instruction manual
before installing and operating this equipment.
Changing function modes during welding may damage
equipment.
Before welding, disconnect the electrode-holder cable
from the equipment.
A circuit breaker is required to prevent electrical
overload of the equipment.
Only high quality welding tools should be used.
Electric Shock can be fatal.
Ensure that ground cable is connected in accordance with
applicable safety codes.
Never touch electrodes, wires, or circuit components with
bare hands. Wear dry welding gloves when welding.
The operator must be insulated from the work piece.
Smoke and gas can be harmful to health.
Ensure that the working area is well ventilated.
Avoid breathing smoke and gas generated during the
welding process.
Arc-light emission can be harmful to eyes and skin.
Always wear a welding helmet, anti-radiation glass, and
work clothes while welding.
Ensure that people in or near the working area are
protected.
Welding splash is a fire hazard.
Keep flammable material away from the work place.
Keep a fire extinguisher nearby, and have all personnel
trained in it’s use.
Surface noise generated while welding or cutting can be
harmful to hearing.
In the event of a machine fault.
Refer to this instruction manual.
If the fault cannot be determined, contact your local
dealer or supplier for assistance.
Warning
ForceCut 40D and 50D plasma cutters
www.longevity-inc.com
Page 6 of 30
Page 8

ForceCut 40D and 50D plasma cutters
Safety Tips
Consider the following tips to ensure safe operation of your welding/cutting equipment:
Ensure that this welding equipment is installed in an area free of corrosive chemical gases,
flammable gases or materials, and explosive chemicals.
The area should contain little dust, and have a humidity of no more than 80%.
Operate the welding equipment in an area sheltered from direct sunlight and precipitation.
Work area temperature should be maintained at -10C to +40C;
If, because of an overload, the machine suddenly stops, and it is necessary to restart it, leave
the internal fan operating to lower the inside temperature.
Always wear protective clothing and a welding mask to protect your skin.
Wear safety goggles designed to darken the arc generated by your machine.
Wear suitable noise protection to protect your hearing.
Ensure that machine is grounded through the power cord or on the machine case.
Never operate the machine in bare feet or on a wet floor.
Never switch the machine off while it’s in use. Doing so will damage the internal circuitry.
Ensure that your circuit breaker is rated to handle the current requirements of your machine.
Use a UL approved receptacles and plugs with your machine. Never hard wire the machine to
main power.
Work in a well ventilated area to avoid smoke. Keep your head out of the smoke. Ensure that
air is flowing away from you to avoid inhaling smoke.
Ensure proper ventilation through the machine’s louvers. Maintain a distance of at
12 inches between this cutting equipment and any other objects in the work area.
Use a screen or curtain designed to keep passers by from viewing the arc.
The arc spray and metal spray from machine use may cause nearby fires. Use caution.
If, after reviewing this manual, you have any problems in setting up or operating your
machine, contact us at [email protected].
least
www.longevity-inc.com
Page 7 of 30
Page 9

ForceCut 40D and 50D plasma cutters
Parameter
Type
Model
ForceCut 40D
ForceCut 50D
Input Voltage (V)
Single Phase 110V or 220/230/240V
Input Current (Amp)
30Amp
39Amp
Cup Capacity max/severance (in.)
Up to ½”
Up to 5/8”
Output Current (Amps)
40
50
No-load Voltage (V)
200V
200V
Current Range (Amp)
20-40
20-50
Rated Duty Cycle (%)
60
60
Efficiency
85
85
Power Factor (Cos0)
0.93
0.93
Insulation Class
B
B
Protection Class
IP21
IP21
Arc Starting
HF Constant Pilot Arc
HF Constant Pilot Arc
Suggest Air Pressure (psi)
45-70psi
45-70psi
Suggested Air Volume (cfm)
2.0-3.0
2.0-3.0
Adjustable Post Flow Time (Seconds)
1-10
1-10
Machine Weight (lbs)
22
23
Size LxWxH (inches)
15 x 6 x 12
15 x 6 x 12
Specifications and Ratings
www.longevity-inc.com
Page 8 of 30
Page 10

ForceCut 40D and 50D plasma cutters
Included Accessories:
Main Unit
60Amp Pilot Arc Cutting Torch
(Ground) Earth Clamp
Water separator with bracket
Air Hose
Spare Fuses for Machine
Air Hose Valves (2)
Consumables: 3 piece tips, 3 piece electrodes
Pictures of Accessories: (Note: Torch Picture Varies
on Model Purchased)
60Amp Pilot Arc Cutting Torch (Ground) Earth Clamp
www.longevity-inc.com
Page 9 of 30
Page 11

ForceCut 40D and 50D plasma cutters
www.longevity-inc.com
Page 10 of 30
Page 12

ForceCut 40D and 50D plasma cutters
Water Separator Diagram for Installation:
www.longevity-inc.com
Page 11 of 30
Page 13

ForceCut 40D and 50D plasma cutters
The LONGEVITY® 40D/50D Pilot Arc Plasma Cutters may or may not be dual voltage
varying by machine of purchase. Please check the back of your machine for the noted input
requirement or contact your LONGEVITY dealer for specifications.
Installation and Setup Instructions:
The item numbers referenced in the following paragraphs, refer to the numbered parts display in
the diagrams shown below. LONGEVITY® has an instructional setup installation video on our
website at www.longevity-inc.com, which we ask that you view prior installing the unit. The
video shows the complete assembly of the machine. The video is located in the Resources
section of the website under manuals and installation/set-up videos.
Connecting the electrical plug to the unit
Connecting the power plug to the unit is important. Please view the proper connection
instructions below:
Wiring Introduction for 220 Volt
Danger: Read this manual completely before having your electrician attempt to wire up or
connect your machine to an electrical power source. LONGEVITY® units should be wired by a
certified electrician to insure your safety and a proper 110/220v plug match at your operating
facility. Remember 220v plugs come with 3 or 4 prongs on them. Have the electrician check
your existing receptacle.
Note: The power cord on single-phase machines has one ground wire and two hot wires when
connecting to 220vac. Connecting these wires properly is extremely important. Improperly
connected wires will void the warranty, affect personnel safety, and possibly damage your
machine and electrical power outlet.
www.longevity-inc.com
Page 12 of 30
Page 14

ForceCut 40D and 50D plasma cutters
Identifying
Caution: The machine may appear to operate with an incorrectly connected ground wire, but it
will not operate properly. Selecting the correct ground wire is important for proper machine
operation and personnel safety.
Ground wires on LONGEVITY® Welding machines are usually one of the following colors:
The ground wire is a dark green with a yellow stripe. The wire may also be just SOLID
GREEN.
Clean the ends of the wires to more easily distinguish the colors. The best and safest way to
determine which wire is ground is to measure the resistance between the machine chassis and the
selected wire, using an ohmmeter. Another method is to check the continuity between the chassis
and the wire, using a continuity meter. If the selected wire is ground, the connection between the
chassis and the wire will cause the meter to illuminate. If, for any reason, you cannot visually
detect the ground wire or do not feel comfortable with your selection, ask an electrician for help.
Identifying
For 220vac service, both the brown and blue wire are positive wires. As you may know,
220vac features two hot wires. If you are wiring to 220vac, your blue and brown wires are
both hot. The green with yellow or SOLID GREEN is the ground. Remember, any hot wire
can be attached to either hot leg on the plug.
Note: Hot Wires May also be WHITE and BLACK if a GREEN WIRE is one of the three
wires. Therefore, GREEN is ALWAYS GROUND.
NOTE: LONGEVITY® recommends a 30 AMP breaker on 220v, but you can operate on a
larger AMP breaker.
the Ground wire
the hot wires
Finished Plug:
www.longevity-inc.com
Page 13 of 30
Page 15

ForceCut 40D and 50D plasma cutters
Wiring Introduction for 110 Volt - 20amp Breaker
Caution: The machine may appear to operate with an incorrectly connected ground wire, but it
will not operate properly. Selecting the correct ground wire is important for proper machine
operation and personnel safety.
Ground wires on LONGEVITY® Welding machines are usually one of the following colors:
The ground wire is a dark green with a yellow stripe. The wire may also be just SOLID
GREEN.
Clean the ends of the wires to more easily distinguish the colors. The best and safest way to
determine which wire is ground is to measure the resistance between the machine chassis and the
selected wire, using an ohmmeter. Another method is to check the continuity between the chassis
and the wire, using a continuity meter. If the selected wire is ground, the connection between the
chassis and the wire will cause the meter to illuminate. If, for any reason, you cannot visually
detect the ground wire or do not feel comfortable with your selection, ask an electrician for help.
Identifying the Neutral Wire
For 110vac service, the brown wire is is a hot wire. As you may know, 110vac features one
hot wire, a neutral wire, and a ground wire. If you are wiring to 110vac, your blue wire is
neutral, brown is hot and the green with yellow or SOLID GREEN is the ground.
Note: Hot Wires May also be WHITE and BLACK if a GREEN WIRE is one of the three
wires. Therefore, GREEN is ALWAYS GROUND. In this case one of the wires is neutral
and one is hot.
NOTE: LONGEVITY® recommends a 20 AMP breaker on 110v
110V Plug Diagram:
www.longevity-inc.com
Page 14 of 30
Page 16

ForceCut 40D and 50D plasma cutters
www.longevity-inc.com
Page 15 of 30
Page 17

ForceCut 40D and 50D plasma cutters
Pictured ForceCut™ 50D (Rear):
www.longevity-inc.com
Page 16 of 30
Page 18

ForceCut 40D and 50D plasma cutters
Main Unit Knob/Button/Function:
1. On/Off Breaker or Switch: Either breaker or switch located on the back or front of the unit will
control the unit to be turned on or off.
2. Warning Indicator: Illuminates when the duty cycle has been exceeded or the machine has
overheated due to improper ventilation. Discontinue use until lamp goes out. Allow the fan to
continue to run. Once lamp goes out, you may resume using the unit.
3. Digital Amperage Display: Displays the approximate amount of amperage set to on the unit.
4. Auto Gas Flow/ Manual Gas Flow: This mode allows you to test air pressure and release air
through the torch. Selecting Auto Gas (Air) Flow, you should have air passing through the torch as
long as the compressor is on. Manual mode allows you to use the plasma cutter with a trigger switch
activation.
5. AMP Adjustment Knob: Adjusts the amount of Amps to desired Amp setting.
6. Ground Clamp Connector (+): Location of ground clamp to be plugged in and ran to the work
piece.
7. Torch Remote Connector (Control): 2 or 7 pin torch connector plugs here to activate the torch
relay once the trigger is pressed on the torch.
8. Pilot Arc Torch Connector: Connect the torch pilot arc wire coming from the torch to this knob
for proper arching.
9. Fuse: Fuse Completes circuit for pilot arc. If machine will not strike or hold and arc, check fuse.
Replace with applicable fuse only. Contact your dealer for more details on specific fuse to be used.
10. Air Regulator Pressure Gauge: Shows the amount of pressure at the torch in PSI.
11. Pressure Regulator Adjustment Knob: Adjust the amount of pressure at the unit. Pull the knob
towards you to unlock, turn clockwise for more pressure and counter clockwise for less pressure.
Once the desired pressure is reached, pop the knob back in place to lock it in place.
12. Thermal Protection Fan: Cools your unit during operation. Fan should be operating once the
power is turned on and the unit power indicator is lit.
13. 220v/110v Power Cord: Attach the power cord to the wall outlet for unit power.
14. Ground Lug: An additional safety grounding lug. You can earth this wire or properly ground in
accordance with local electrical code. Grounding the unit and yourself during cutting is extremely
important to avoid shock and damage to the unit. Grounding Unit may also help reduce high
frequency interference.
15. Air Inlet: Attach air compressor hose to the air inlet here.
www.longevity-inc.com
Page 17 of 30
Page 19

ForceCut 40D and 50D plasma cutters
Assembly of Consumables for the 60 Amp
Torch:
Assemble the consumables as pictured above, and described below.
1. Insert the electrode.
2. Place the copper tip on the ring, ensuring that is seated flat.
3. Secure all parts into place by turning the pink ceramic cup clockwise until it is snug. Do
not over tighten.
The torch consumables are now successfully assembled.
Page 18 of 30
www.longevity-inc.com
Page 20

ForceCut 40D and 50D plasma cutters
Basic Operation
1. Ensure that all cables are connected to the machine.
2. Ensure that the machine’s OFF/ON switch is set to OFF, and plug the machine into the
electrical outlet.
3. Connect the air compressor supply line to the air input side on the water separator.
4. Turn the ON/OFF switch to ON. The cooling fans should operate and the ON indicator LED
or power switch (if applicable) should illuminate.
5. Clean the contact point on the work piece to ensure a good electrical connection. Ensure that
no rust of paint is present that could create an open circuit.
6. Connect the ground clamp to the work piece to be cut.
7. Connect the torch to the unit properly.
8. With the pilot arc knob connected, you should get a full continuous arc when the trigger on
the torch is pressed.
9. Depress the button on your torch to start the arc and begin cutting.
10. You can test the air to insure that is it properly flowing by selecting Auto Gas (Air) Flow. Air
will pass through the torch continuously.
11. If necessary remove slag from the under part of the cut using a grinder or chisel after your
cut.
www.longevity-inc.com
Page 19 of 30
Page 21
ForceCut 40D and 50D plasma cutters
LP-
40D
Cutting Guideline Table
Cutting Methods
Different material thicknesses require different cutting techniques.
Thin material: Start perpendicular to the work piece. It is unnecessary to angle or start
on the edge, as the arc will pass through quickly.
Medium material: Angle the torch tip to avoid damaging the tip. Once the arc passes
through the material, you may begin cutting normally.
Thick material: Drill a pilot hole through which to start your arc, or start on the edge of
the work piece.
Never cut material on a flat surface. Raise the work piece above the surface to avoid blow back
which may burn you or cause fires.
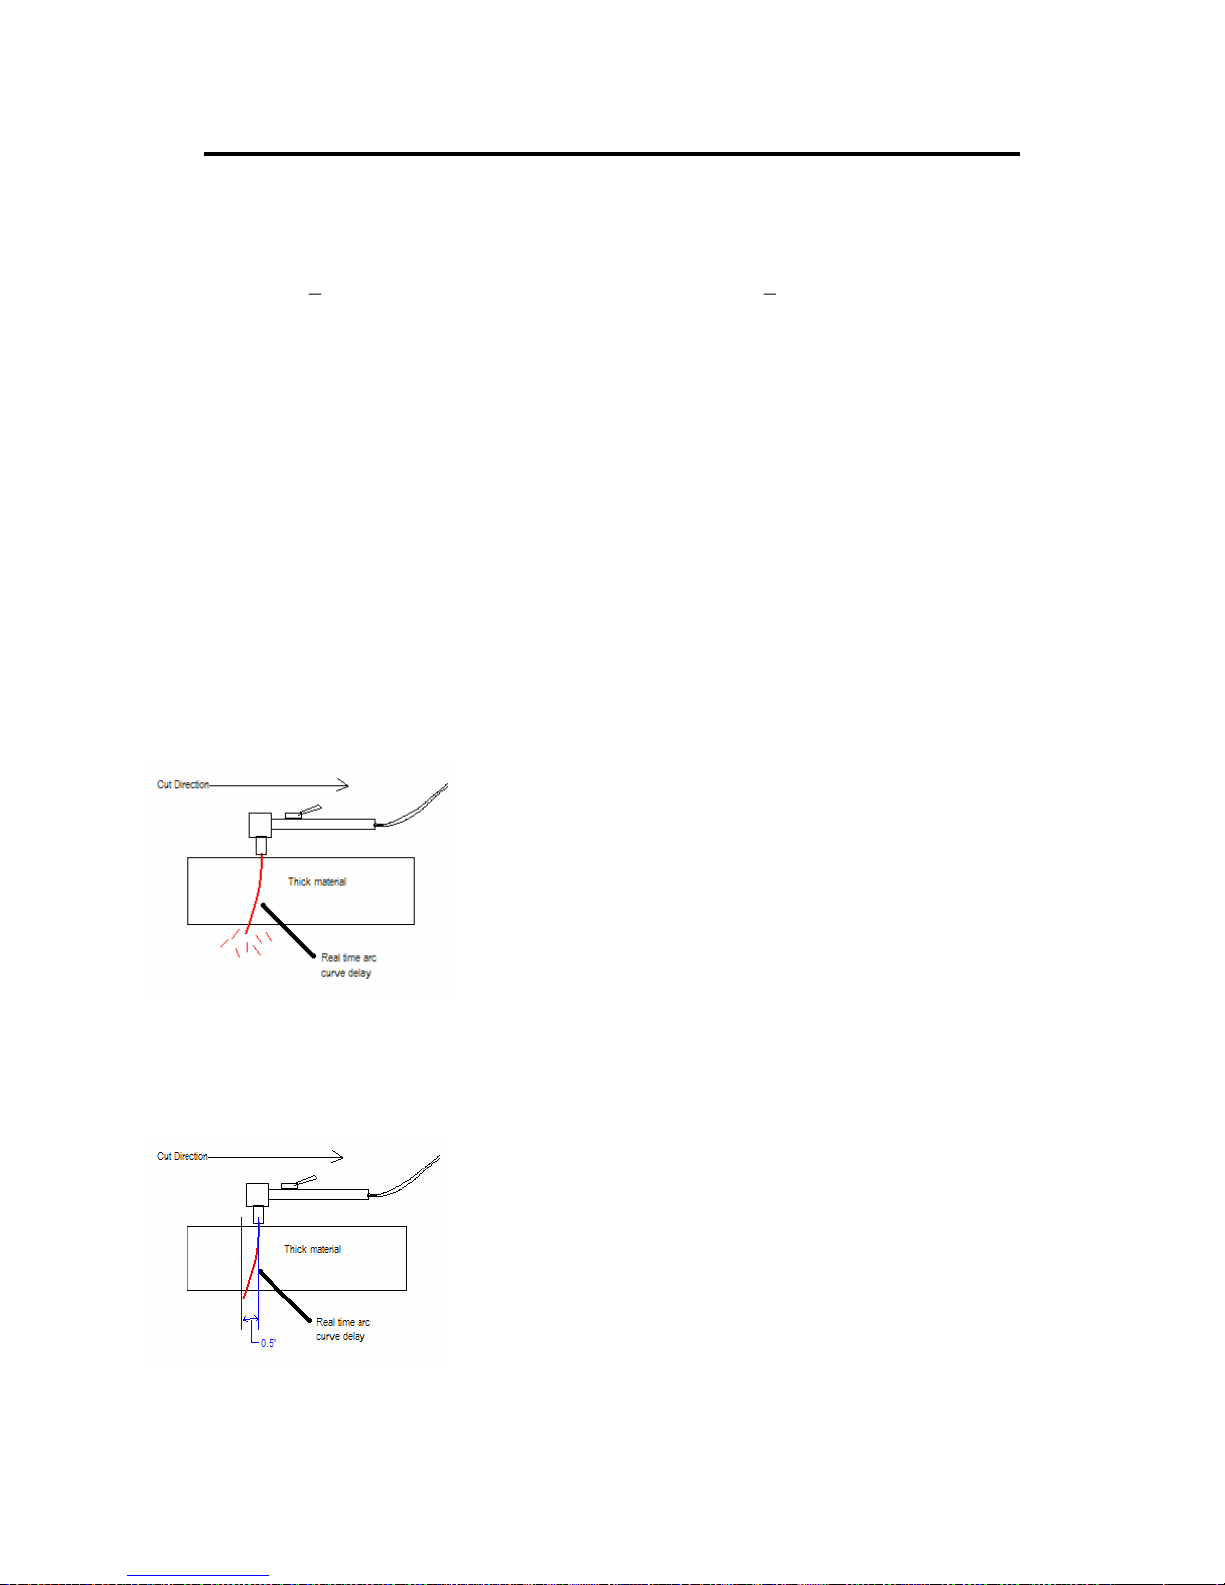
Real Time Arc-Curve Delay
When cutting thick materials you must maintain a steady even motion in the direction of the cut.
Moving the torch too quickly causes an arc-curve delay. An arc-curve delay can leave the work
piece with uncut sections, requiring you to re-cut those sections, which could distort or damage
the work piece.
To avoid arc-curve delay, allow the arc to pass completely through the work piece before moving
too far ahead. The arc-curve should lag not more than the thickness of the material being cut. In
other words, if the work piece is one-half inch thick, the arc curve should lag not more than onehalf inch behind the torch, as shown below.
www.longevity-inc.com
Page 20 of 30
Page 22

ForceCut 40D and 50D plasma cutters
Tips For LONGEVITY Plasma Cutting
provided by www.plasma-cutters.com and
www.freeweldingforum.com
Using a LONGEVITY Plasma Cutter with either High Frequency or
Pilot Arc technology is very easy to use, and since each
LONGEVITY unit is quality tested at our in house testing facility
before it is shipped , most of our customers take right out of the box,
plug it in and get to work. Naturally, it is easy to understand how
excited you would be to see the delivery truck pull up with your
brand new LONGEVITY Plasma Cutter and you should be.
Congratulations is in order and we want to ensure you have the best
experience with your LONGEVITY Plasma Cutter. However,
excited as we are you can't wait to put your LONGEVITY Plasma
Cutter into action, we would like you to consider these helpful tips
and examples that will enable you to get the most out of your
LONGEVITY Plasma Cutter and it's consumables. So, before using
your LONGEVITY Plasma Cutter it is extremely important to read
the owner's manual all the way through regardless of your experience
level. Even if you are a seasoned veteran, give it a once through and
keep it near by in case you, someone you know or someone you
work with has a question about the use or specifications of your
LONGEVITY Plasma Cutter.
At this point, let us assume that you have purchased the
LONGEVITY Plasma Cutter that is right for you, and even though
you did your research already, it is always a good idea to revisit the
safety precautions, specifications and unique options ensuring you
achieve the most with your LONGEVITY Plasma Cutter while
staying safe. In case you have not decided which LONGEVITY
Plasma Cutter is right for you, please visit the Help Me Choose
section and take advantage of the LONGEVITY Smart Selector.
In terms of safety, the price of carelessly cutting corners can be
extremely costly, not only to your health but to the people around
you as well. So, before you get started using your LONGEVITY
Plasma Cutter to create your master piece, build a bridge, or
whatever you want to do, make sure you have a quality safety
checklist you follow after you read the manual and before you get
started. Below are a list of tips and safety measures you might find
useful in developing your safety checklist. Remember, in no way
shape or form does this checklist or any other check list ever replace
the necessity of thoroughly reading the owner's manual of your
LONGEVITY Plasma Cutter.
www.longevity-inc.com
Page 21 of 30
Page 23

ForceCut 40D and 50D plasma cutters
Check List Suggestions
Connect the air supply to your LONGEVITY Plasma Cutter and
consult your owner's manual to ensure the correct PSI. The PSI is
about 65-75.
Each LONGEVITY Plasma Cutter, regardless if it uses Pilot Arc or
High Frequency technology, comes with an air flow regulator and
water catcher. Reference the owner's manual of your LONGEVITY
Plasma Cutter for specifications and care instructions of your air
flow regulator and filter.
Check the torch of your LONGEVITY Plasma Cutter and make
sure everything is in order. Reference the owner's manual of your
LONGEVITY Plasma Cutter to make sure all of your consumables
are clean, correct, and pieced together securely before you begin
cutting.
Gouging or piercing can be achieved by simply lowering the
amperage output and keeping with the recommended psi. Examples
on how to achieve the desired results can be referenced in the
owner's manual of your LONGEVITY Plasma Cutter.
Now you are ready to use your LONGEVITY Plasma Cutter safely
and efficiently. Turn the machine on and enjoy the satisfying
experience of a quality LONGEVITY Plasma Cutter.
Double check your air supply, air flow regulator and water filter.
(More on this below.)
All LONGEVITY Plasma Cutters require a solid ground connection
as close to the work piece as practical. Remember, even though
your LONGEVITY Plasma Cutter can cut through paint and other
coatings on the metal, the ground connection requires a clean, flush
connection to the work piece.
Utilizing the proper safety equipment is just as important as
understanding how to properly operate your LONGEVITY Plasma
Cutter. Consult the owner's manual of your LONGEVITY Plasma
Cutter to be sure you are using the correct gloves, eye protection,
welding leathers, face shield, etc. You can find all of the necessary
equipment as stated in the owner's manual of your LONGEVITY
Plasma Cutter in the accessories section of our website.
The old adage says to measure twice and cut once, but we want to
go ahead and suggest you make a sample cut (of the same caliber as
www.longevity-inc.com
Page 22 of 30
Page 24

ForceCut 40D and 50D plasma cutters
the intended use) with your LONGEVITY Plasma Cutter before
you get started. Use this rehearsal just to be sure you have correctly
calibrated all the settings to work as desired. If you are going to be
cutting for a large piece of metal, it can sometimes be difficult for
even the most experienced metal worker to cleanly stop and start.
We recommend you use the sample cut to thoroughly rehearse the
intended cut with your LONGEVITY Plasma Cutter.
LONGEVITY Plasma Cutter Tips
In order to successfully execute a clean cut with your LONGEVITY Plasma
Cutter you must consider a combination of elements involved in the cutting
process:
The tip of your torch is designed to focus the plasma stream to the
work piece in accordance with the appropriate setting (see owner's
manual). Trying to use a 80-amp torch tip at a 40-amp setting will
not focus the energy of your torch accurately and thus lead to a
wider kerf. And the opposite scenario of using an 80-amp setting
with a 40-amp tip will abuse your torch tip and require it to be
replaced sooner than intended.
When cutting a thicker material with your LONGEVITY Plasma
Cutter it is important to use a torch tip designed for a higher-amp
output. Higher-amp tips have a larger opening than lower-amp tips.
Attempting to use a 40-amp tip to cut thick metal with a higheramp output will distort your 40-amp tip meaning it will need to be
replaced.
Each LONGEVITY Plasma Cutter, both Pilot Arc and High
Frequency, allow you to cut different metals at different speeds.
For example to achieve a quality cut of 1/2in. thick steel with the
LONGEVITY Force Cut LP-40D Pilot Arc your speed will be
roughly 7 inches per minute. Where as the LONGEVITY Force
Cut LP-80D will cut 1.25in. thick steel at the same rate.
Use extended tips on your LONGEVITY Plasma Cutter for tough
to reach corners, tracing a pattern, or areas with tight spaces.
Pilot Arc technology allows you to ignite the arc without the tip
touching the metal. Use a torch guide or tip shield to protect your
consumable. The more often you drag your torch tip across the
material or stop and restart the Pilot Arc, the shorter the life span of
your consumables will be.
Using a torch guide or tip shield is a great way to protect the
consumables of your LONGEVITY Plasma Cutter. Remember to
www.longevity-inc.com
Page 23 of 30
Page 25

ForceCut 40D and 50D plasma cutters
maintain a 1/16in. - 1/8in. distance from the material when cutting.
* The important things to consider while using your LONGEVITY
Plasma Cutter to cleanly execute a cut is correct amperage of the torch
tip, thickness of the material, intended speed, proper technique, and
ultimately protecting the life of your consumables.
Cutting Posture
Sometimes you may find that you are unable to use a guide or shield
when operating your LONGEVITY Plasma Cutter. In some instances a
project may be a very ornate design with different curves and
protrusions or the material is too thick to apply a shield or guard to
your LONGEVITY Plasma Cutter torch tip. In order to maintain the
quality and consistency of your work we recommend that you use your
other hand as a guide. Give yourself a fighting chance to steady your
hands and take advantage of the protective gear you have like our guys
on the LONGEVITY Facility Testing Team .
One of the reasons you purchase a LONGEVITY Plasma Cutter is
because of it's quality. Therefore, we think you should have a few
quality reminders to think about when you are cutting.
If you stop and start an arc in the middle of a cut, often the the quality of your
cut will suffer and compromise the integrity of your so far clean cut-line.
Remember, even when we do facility testing, a suitable method to apply when
using your LONGEVITY Plasma Cutter is rehearsing the cut. Be sure you are
going to be able to produce a smooth continuous cut-line all the way through.
Along with rehearsing your cut, another equally good reminder is to protect
your consumables as much as possible. Often we can get comfortable piercing
right through thin steel with our LONGEVITY Plasma Cutters, but when
cutting thicker metal often the intense back splash from initial contact will
rapidly wear down your torch tip and other consumables. Even though the
seeing the bright sparks show off the awesome power of your LONGEVITY
Plasma Cutter, remember we want you to be able to enjoy the results of your
work time and time again. So, in situations when you are going to be cutting
thick metals at high amperage with your LONGEVITY Plasma Cutter, we
recommend you start with the torch pointed at a 45 degree angle. This angled
approach allows for the first blast of metal to be released without back splash
on to your valuable consumables.
Know Your Amperage, Know Your Metal
At www.longevity-inc.com, you can see the cutting thickness capability.
Understanding the amperage in relation to your cut speed is important. Some
www.longevity-inc.com
Page 24 of 30
Page 26

ForceCut 40D and 50D plasma cutters
metals respond differently than others. For example the faster you move on a
material such as aluminum, the cleaner your cut will be. Conversely, when
using your LONGEVITY Plasma Cutter to cut thicker material, set your unit to
full output and vary your travel speed accordingly. Thin material requires you
to turn down the amperage and change to a lower-amperage to achieve a
narrow kerf.
Figuring out if you are going too slow or too fast can be a daunting task that
really only comes with time and experience. However, our guys in the
LONGEVITY Facility Testing Team have a few pointers for you:
If your cut has a lot of spray back then you are probably going
too fast.
If the arc exits the material going straight down then you are
probably moving too slow and you will have an unnecessary
buildup of "dross" or "slag."
Your arc should be exiting the material at a 15 - 20 degree angle,
but opposite the direction of your cut path.
Using A Cutting Guide
First thing in using a torch guide with your LONGEVITY Plasma Cutter is
make sure it isn't flammable! Aluminum works as a great torch guide, but be
sure it is attached to the torch cup and not the torch tip. Aluminum is a great
contact guide because of its smooth surface but beware of the torch tip because
of electrical conductivity of aluminum. It would be a terrible mess of a cut,
loss of consumables, and overall depressing mistake if your torch guide melted
to the torch tip or the project at hand. Next you want to mark the material to be
cut with either white chalk or a black marker. If you are unsure of how steady
your hands are, we recommend you try using a straight edge clamp attached to
the work piece or torch guide.
All articles are composed by the LONGEVITY Facility Testing Team and are
written with expressed interest of maintain a strong standard in LONGEVITY
Global Inc. quality, to help address topics, and answer questions for amateur
and experienced users alike. Please remember to always exercise extreme
causation and abide by all provided safety specification.
www.longevity-inc.com
Page 25 of 30
Page 27

ForceCut 40D and 50D plasma cutters
Sample Photos:
For more information on plasma cutting from professionals go to
www.freeweldingforum.com and
www.plasma-cutters.com
www.longevity-inc.com
Page 26 of 30
Page 28

ForceCut 40D and 50D plasma cutters
Routine Maintenance
The life of your machine and the quality of the work performed using your machine, will be
enhanced by practicing periodic routine maintenance.
At regular intervals, clear dust that may accumulate in the machine using clean and dry
compressed air. If the working condition has heavy smoke and pollution, the welding
machine should be cleaned once a month.
Keep the machine exterior clean with mild soap and water.
Do not walk on or store items on the cables or cords.
Do not jar, drop, or stack items on top of the machine.
Always connect the machine to a well grounded electrical outlet.
Always check the torch consumables before and after use and ensure that they are clear
of obstructions, and that no parts are damaged.
Replace any worn or damaged consumables before using machine.
For periods of prolonged non-use, remove cables and store them in their original boxes in
a cool dry place.
www.longevity-inc.com
Page 27 of 30
Page 29

ForceCut 40D and 50D plasma cutters
Problems, Causes, and Solutions
Problems
Causes/
Solutions
Machine will not
turn on.
LONGEVITY
The machine runs,
but nothing is
happening
Make sure the regulator adjustment knob is turned clockwise and
allow pressure. Check the consumables and make sure they are
properly assembled. Check the ground clamp and proper grounding
to the unit. Check pilot arc wire to insure it is properly connected to
the unit.
Consumables
(tips) are being
consumed
leaks in the hose, maintain a distance of 1/8” from the torch tip or
work piece.
Heavy Underside
Slag (Cutting)
Poor Cut Quality
desired thickness of material. Check the consumables to insure they
are producing a stable arc. Replace Consumables and insure you
have the proper PSI at the regulator.
Inconsistent
Arc
replace consumables and adjust the regulator to proper PSI
Plasma Cutter
Pilot Does not
Ignite
the tips. Insure that you have compressed air flowing to the unit.
Drop the PSI pressure.
O.C. Over
Current LED
Lights
on and allow fans to cool the machine. You can also turn the
machine off to properly cool it. Do not continue to weld until light
is off.
Issue Not Listed
Trouble shooting
If your unit is not properly functioning, please call us immediately toll free at 1-877-566-4462
for support. We have included a small table here to diagnose most common problems.
www.longevity-inc.com
Page 28 of 30
Page 30

ForceCut 40D and 50D plasma cutters
LONGEVITY® Global, Inc. thanks you for your purchase and opportunity to be able to serve
you. If, after reviewing this manual, you have any problems in setting up or operating your
machine, contact us at [email protected].
LONGEVITY® Global, Inc.
Toll-Free 1-877-LONG-INC / 1-877-566-4462
Website: www.longevity-inc.com
Sales: [email protected]
Customer Service: [email protected]
Dealers: [email protected]
Please join our welding forums to share welding tips and tricks, to receive useful information
from customers who also use our products, and to be a part of the LONGEVITY® welding
community at www.freeweldingforum.com
For the coolest LONGEVITY sponsored race teams plus a complete racing forum that covers
everything from Drag Racing to RC Car Racing, please check out www.longevity-racing.com!
Enjoy your new plasma cutter from LONGEVITY! Thanks again!
www.longevity-inc.com
Page 29 of 30
 Loading...