

Page 1
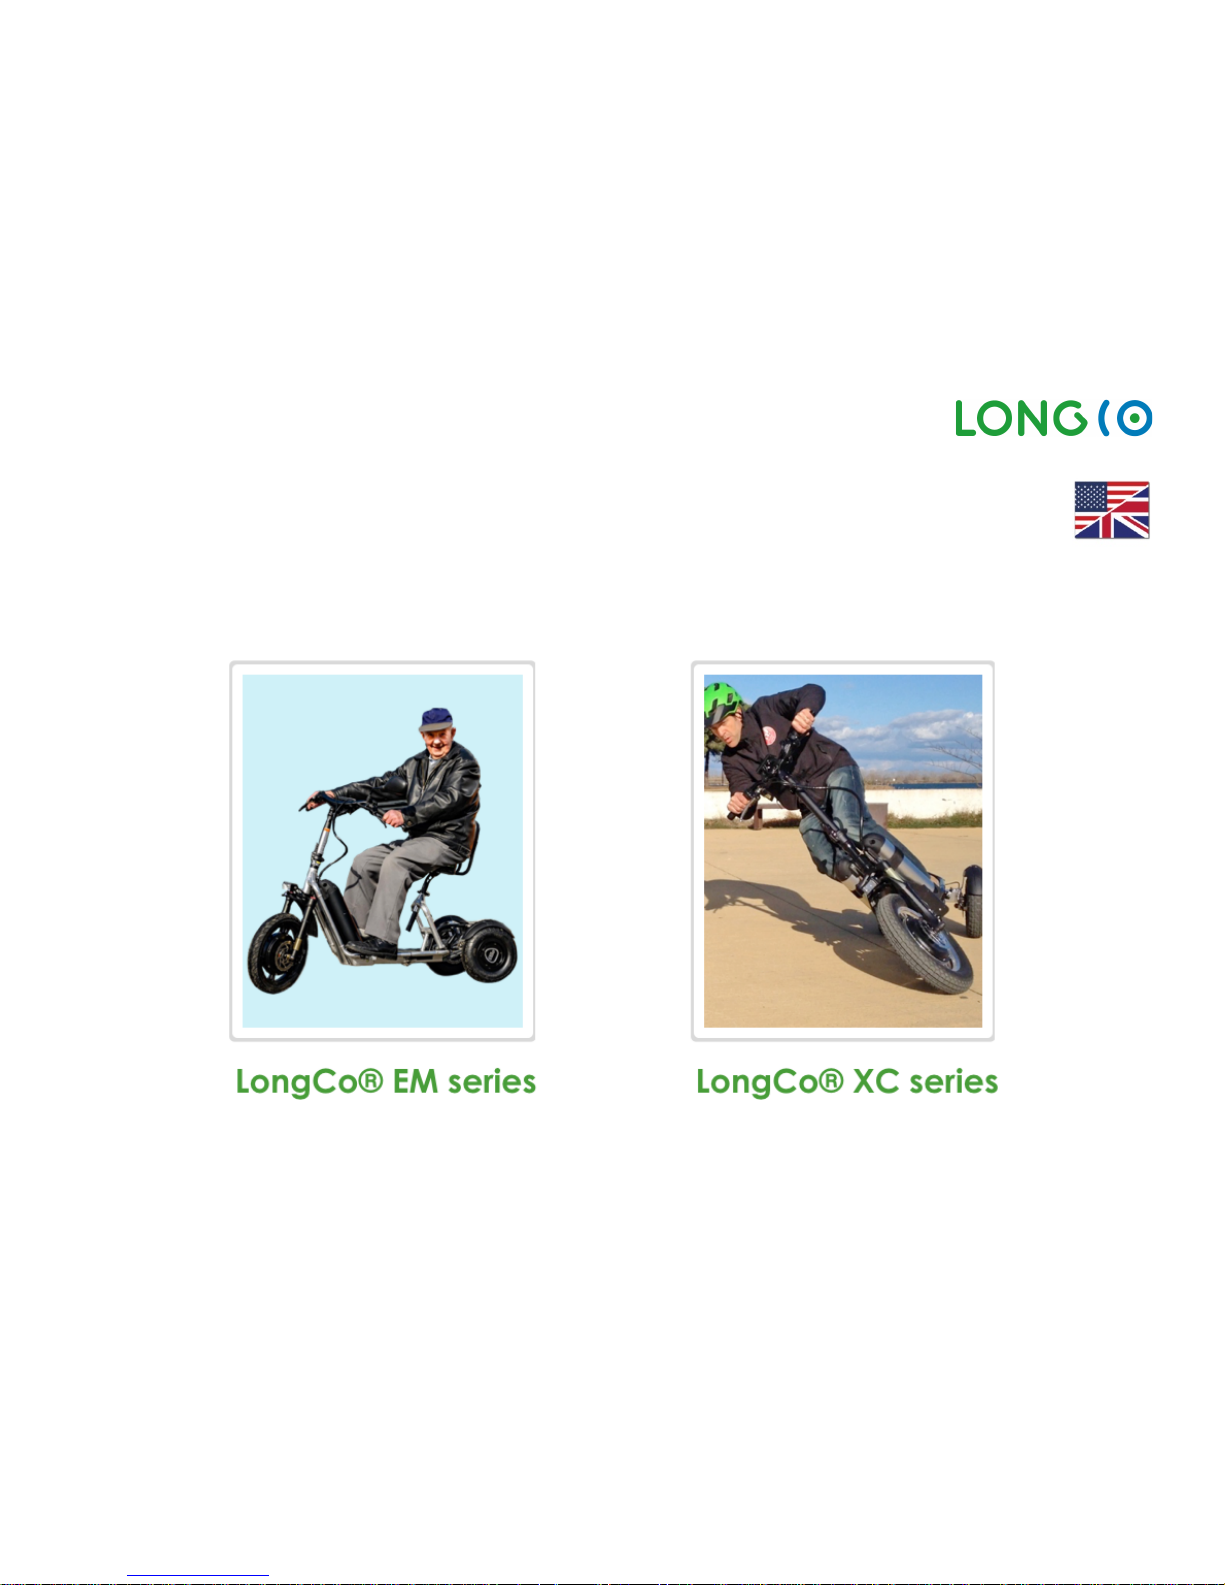
LongCo: User Manual V05 / 11. Juni 2018 Page 1 of 54
USER MANUAL
Rev. V05: 11. June 2018
Page 2
LongCo: User Manual V05 / 11. Juni 2018 Page 2 of 54
Please read the following instructions carefully before the first drive. note especially the
safety instructions in chapter 1.4. Not to pay attention to the safety instructions can cause
serious injury and / or death.
Welcome to the World of
LongCo!
The LongCo is a completely new kind of transportation.
Although keeping your balance on three wheels is easy, the risk of
injury from loss of control, collisions and falls will always be present. The
manufacturer wants you to enjoy riding your new LongCo and be safe
at the same time.
This User Manual is designed to help you learn and understand how to
properly drive, control, the road traffic laws to observe and enjoy your
LongCo while minimizing risks.
This manual was developed to help them.
Always Follow National
State and local Laws!
The LongCo comply with the homologation in Europe for mopeds and
motorcycle. There is also difference in individual countries. Many other
countries are based on this registration.
Therefore, always follow the applicable local legislation concerning
the use of the LongCo on public roads and public places. In some
countries, it is forbidden to use the LongCo in public areas.
If you are uncertain regarding the local legislation, contact your local
authorities for information or contact an authorized LongCo dealer.
Page 3

LongCo: User Manual V05 / 11. Juni 2018 Page 3 of 54
Table of Contents
1. Safe Riding ......................................................................................................................................................................................................................... 5
1.1. Basics .......................................................................................................................................................................................................................... 5
1.2. Where to Ride?.......................................................................................................................................................................................................... 6
1.3. Protective Gear......................................................................................................................................................................................................... 7
1.4. Protective Measures ................................................................................................................................................................................................ 8
1.5. Pre-Ride Inspection ................................................................................................................................................................................................. 10
1.6. How to Ride ............................................................................................................................................................................................................. 10
2. Preparation ...................................................................................................................................................................................................................... 13
2.1. Unfold frame ............................................................................................................................................................................................................ 13
2.2. Installation of Seat Enforcement ........................................................................................................................................................................ 23
2.3. Folding stem............................................................................................................................................................................................................. 24
2.4. Unfold Stem.............................................................................................................................................................................................................. 24
2.5. Insert/Remove Batteries ......................................................................................................................................................................................... 25
3. LongCo Features ............................................................................................................................................................................................................ 26
3.1. Batteries .................................................................................................................................................................................................................... 26
Basics ........................................................................................................................................................................................................................... 26
Battery LCD Read Out .............................................................................................................................................................................................. 26
3.2. Charging batteries.................................................................................................................................................................................................. 27
3.3. Control Features: Handlebar and TFT-Display .................................................................................................................................................... 30
3.4. RFID-Key Set ............................................................................................................................................................................................................. 32
Page 4

LongCo: User Manual V05 / 11. Juni 2018 Page 4 of 54
3.5. TFT-Display ................................................................................................................................................................................................................ 33
3.6. Read TFT-Display...................................................................................................................................................................................................... 34
3.7. Switch buttons from the TFT-Display ..................................................................................................................................................................... 35
3.8. Setup-Mode TFT-Display ................................................................................................................................................................................... 36
3.9. Speed levels and Power Mode ............................................................................................................................................................................ 39
4. Consumer Information ................................................................................................................................................................................................... 40
4.1. Maintenance ........................................................................................................................................................................................................... 40
4.2. Repairs ...................................................................................................................................................................................................................... 43
4.3. Warranty and Limited Liability............................................................................................................................................................................... 43
Warranty Terms and Conditions ...................................................................................................................................................................... 43
Warranty Claims ................................................................................................................................................................................................. 44
4.4. Transport ................................................................................................................................................................................................................... 45
4.5. Storage and Care Instructions .............................................................................................................................................................................. 46
4.6. Disposal..................................................................................................................................................................................................................... 47
4.7. Troubleshooting ....................................................................................................................................................................................................... 49
5. Inspection-Plan ............................................................................................................................................................................................................... 50
5.1. Maintenance Plan .................................................................................................................................................................................................. 51
6. Index ................................................................................................................................................................................................................................. 54
Page 5

LongCo: User Manual V05 / 11. Juni 2018 Page 5 of 54
1. Safe Riding
1.1. Basics
Driver's License /Restrictions
If required by law, you must carry a valid driver’s license that is locally accepted for riding
the LongCo
Who cannot safely operate the LongCo in the traffic due to physical or mental defects is
only allowed to ride if he himself has made provision that he does not endanger others. In
case of doubt on the ability to drive the LongCo, then order at the driver's license office a
professional medical opinion, a medical-psychological examination or an technical
expertise
Before first ride
The owner must ensure that any operator of the LongCo fully reads, understands and follows
all instructions in this manual. A demonstration to ensure that the rider understands the
operation of the LongCo is strongly advised.
Maximum Total Weight
Payload Rear Carrier
Permissible max. laden Mass: 200kg / 440lbs à Be aware, if the rider is more than 100kg
(220lbs) and want to use the seat system, the optional seat enforcement system must be
installed (see chapter 2.2.).
The maximum allowed payload for the rear carrier is 30kg / 66lbs.
No Stunts
The LongCo is not developed for any type of tricks, stunts, jumping, wheelies or racing.
Page 6

LongCo: User Manual V05 / 11. Juni 2018 Page 6 of 54
Take account of
Regardless of where you use the LongCo, operators should always show courtesy to others
and ride in a safe and suitable manner.
Insurance
Make sure you are covered with insurance for both you and your LongCo.
Modifications
Do not remove, modify or alter any components of the LongCo. Any modification can
cause malfunctions and the loss of road approval or warranty claims. Modifications can be
dangerous and lead to serious injuries. Do not open, disassemble or service the battery.
1.2. Where to Ride?
Legislation
Always pay attention to the locally applicable legislation about the use of the LongCo on
public roads and in public places. If you are uncertain regarding your local legislation,
contact your local authorities or your LongCo dealer for information.
Private property
To ride the LongCo on private property, always obtain permission from the owner to do so.
Roads
Typical bicycle lanes and side roads with low traffic (if allowed) are suitable for riding the
LongCo.
Page 7

LongCo: User Manual V05 / 11. Juni 2018 Page 7 of 54
Models with Street Tires
The Models with Street Tires (Semi slick) are only to be used on paved roads and places
with an even surface, such as asphalt, concrete, sports field pa vement, etc.
Modes with All season or Off
road Tires
The Models with All season or Off road Tires can be used (if allowed) on streets and on dirt
roads which are in good condition for driving, on lawns, or beaches with compact sand.
Unsafe Conditions
• Do not ride when road and weather conditions do not allow safe use.
• Never ride on snow, ice or greasy surfaces (i.e. oil), in heavy rainfall or with poor visibility
(i.e. fog). Wet and icy weather impairs traction, braking, and visibility.
• Do not use the LongCo in water or drive through standstill water under any
circumstances.
• Do not ride on stairs, escalators or through revolving doors.
• Do not ride off curbs
1.3. Protective Gear
Note!
Important!
LongCo Recommends
Always inform yourself about local regulations regarding the use and wearing of protective
gear on pub lic roads and areas where you are riding. In some countri es/states, it is
mandatory to wear a helmet at all times.
• Helmets with chin protection, (DOT or SNELL certified)
• Good, sturdy footwear - No heels, open-backed shoes, or flip-flop type shoes
• Arm, elbow, knee and shin guards, as well as chest protection
Page 8
LongCo: User Manual V05 / 11. Juni 2018 Page 8 of 54
1.4. Protective
Measures
For maximum safety when riding the LongCo, it is extremely important to take certain protective
measures.
Throttle
Never use the throttle unless you are standing with both feet on the LongCo platform and are
fully ready to ride.
Turning Components
Turning wheels are a high risk for injury. Hands, feet, body parts and clothes should under no
circumstances be clos e to turning wheels. To prevent injury, never touch any moving or turning
parts.
Collapsible Frame
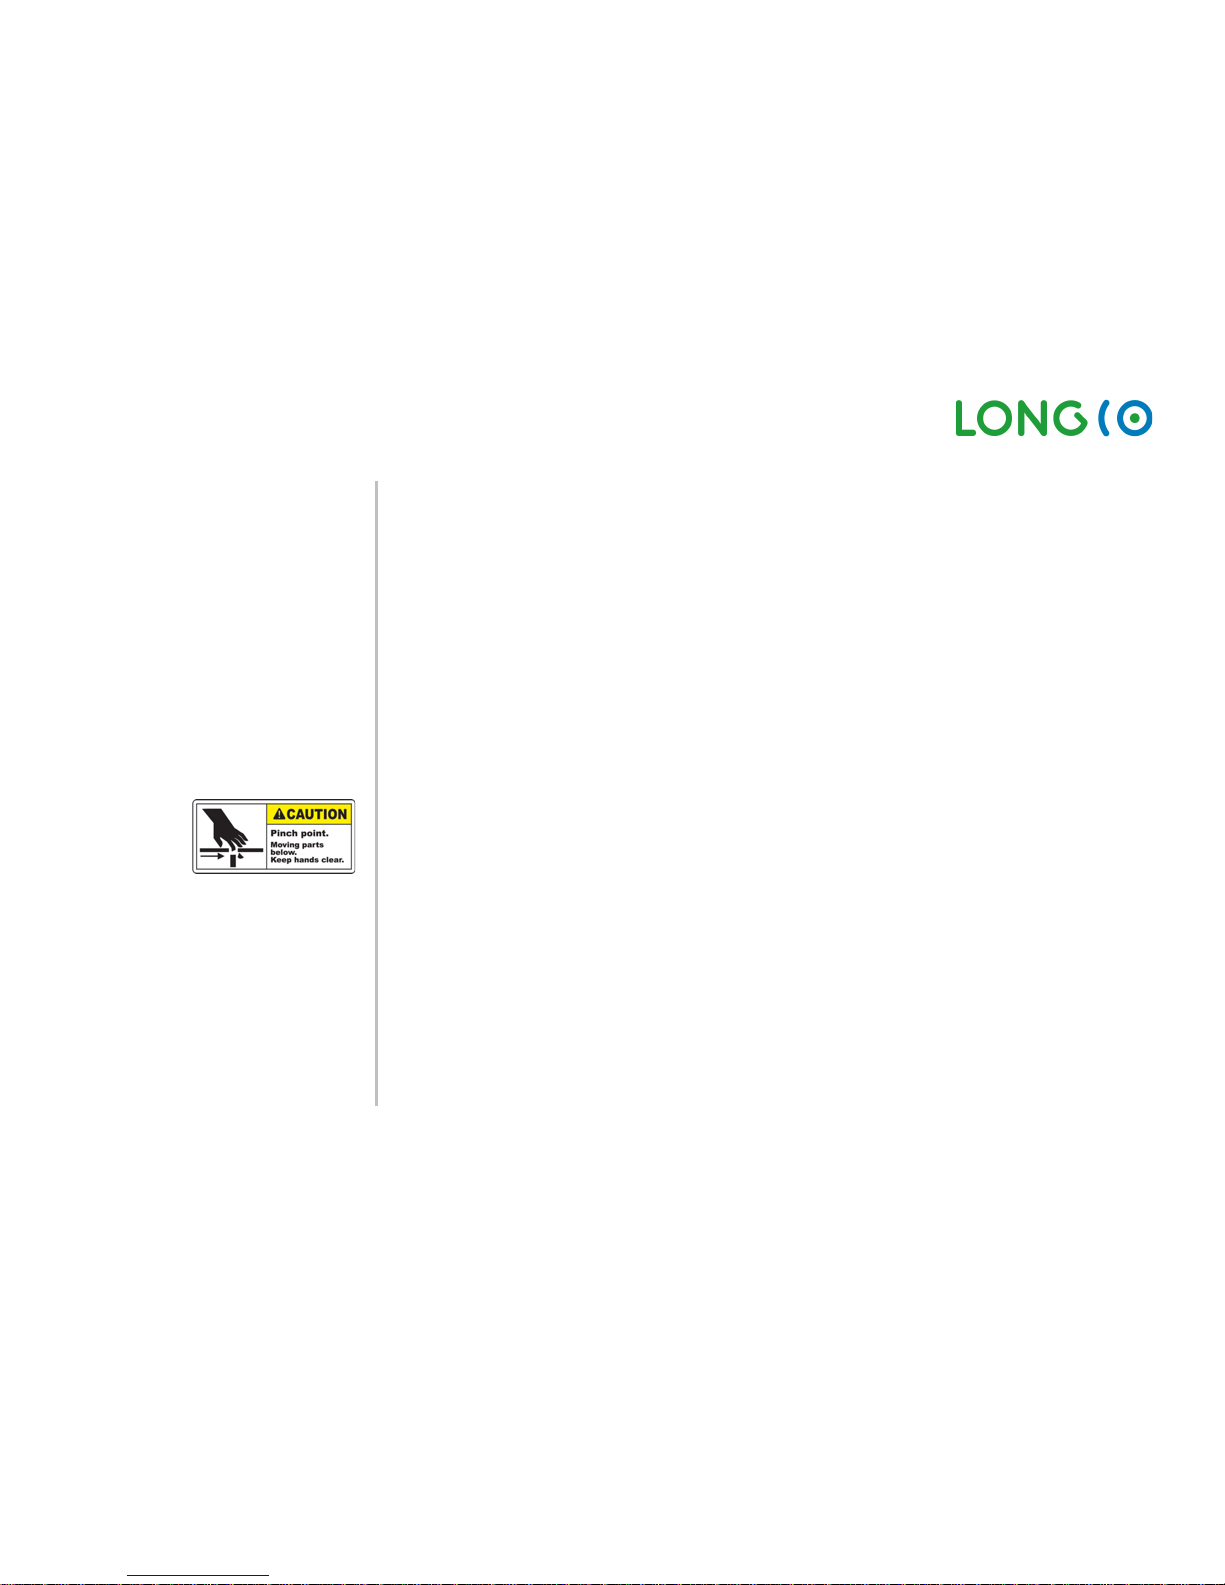
Special precaution must be used with the collapsible frame, especially when folding up the
folding stem into the riding position, as well as when folding out the platform for the riding
position. You risk injuring fingers, hands or other parts of your body.
Beware of Hot Brake Discs
Do not touch brake discs during or immediately after use, as they can get very hot when used.
Be Prepared to Stop
At any point in time during the use of the LongCo, the rider must be alert and prepared to stop.
Special care must be taken as soon as other peop le or vehicles are close by.
Normal Operational
Environment
• Temperature: -15ºC/5ºF to +45ºC/113ºF
• Humidity: 5% to 85%
Page 9
LongCo: User Manual V05 / 11. Juni 2018 Page 9 of 54
Lithium Batteries
Lithium batteries pose a risk of injury when handled improperly. Therefore:
• Do not use or leave battery near a heat source such as fire or heater
• Use only LongCo’s authorized chargers
• Do not connect battery to an electrical outlet directly
• Refer to chapter 3.1. Batteries and chapter 4.5. Storage and Care Instructions for more
detailed information
Be Aware
Adjust your riding style to your ability as well as road, traffic and weather conditions. The LongCo
is to be operated in a safe and suitable manner.
Avoid Distractions
The rider should not use a cell phone, listen to headphones, or engage in any other activity that
might distract or interfere with the ability to monitor the surroundings while driving. The attention
of the rider must be directed toward operating the LongCo.
Both Hands and Feet
While driving the LongCo, both hands should be kept on the handlebar, and both feet should
be kept on the platform.
Luggage
Do not carry objects in your hands or on the platform while driving. Use the LongCo’s carrier
equipment, such as a top case, to tra nsport objects/luggage.
Parking
Lock the LongCo and remove battery keys (also remove main key located at the throttle, if
installed) when parking it. Activate the parking brake. Secure with an adequate lock.
Page 10

LongCo: User Manual V05 / 11. Juni 2018 Page 10 of 54
1.5. Pre-Ride Inspection
• Check the functionality of the LongCo prior to each use.
• Make sure all fastening elements are tight (bolts, quick release clamps, folding mechanism
for stem and platform, etc.).
• Do not use the LongCo if any parts are loose or damaged
• Ensure that brakes work properly
• All batteries must be firmly locked onto frame and both keys must be taken off the battery
before riding the LongCo.
• Ensure that the air pressure of the tires (see Table 1) and of the air suspension system is correct
and adjusted to the riders weight. (see Table 2)
1.6. How to Ride
1.6.1 Turn on/off
1.6.2 Practice
1. Turn on the battery (or both if equipped with two batteries)
2. Activate the TFT-Display with the blue RFID-Key (Setup A) or the black RFID-Key (Setup B)
(hold RFID-Key behind the Display).
* All details of the service can be found in chapter 3.
• Beginners must practice using the LongCo first. Training rides should be performed in a safe
place on an even and non-slippery surface, away from traffic or pedestrians.
• Always be alert and ready to use the brakes.
Page 11

LongCo: User Manual V05 / 11. Juni 2018 Page 11 of 54
1.6.3 Riding Tips
Four Speed Levels *
Beginners should use speed level 1 (6 km/h) or speed level 2 (12 km/h). Speed level 3 (20 km/h)
and 4 (max speed) only if you are an experienced LongCo user.
Braking *
Use primarily the left brake lever , to slow down, which is for the rear wheels.
Reverse *
This feature should only be used by experienced LongCo users. ,
Acceleration
Never accelerate in an uncontrolled fashion.
Terrain/Surface changes
Be aware that every terrain/surface change (i.e. from pavement to grass, a threshold or speed
bump) is a potential hazard and may require a change in driving style. Do not pull up the LongCo
handlebar when riding over obstacles.
Steep Slopes
When going downhi ll never exceed a speed of 20 km/h (or 45km/h for the faster LongCo XC
Models). Instead, use the brakes to slow down or push the LongCo. If driving across a slope the
driver must balance the inclination by leaning his/her body uphill.
Added Height
Because of the added height of the LongCo platform (and the driver’s helmet) special care must
be taken when driving indoors, as well as through doorways, archways, under tree branches,
signs, or other overhead obstacles.
Visibility
To ride safely, the rider must be able to see clearly and must be visible to others. Always switch
on the light , when riding the LongCo at night time or in conditions of low visibility. Follow local
legislation regarding regulations for using the LongCo at night.
Page 12
LongCo: User Manual V05 / 11. Juni 2018 Page 12 of 54
Curves
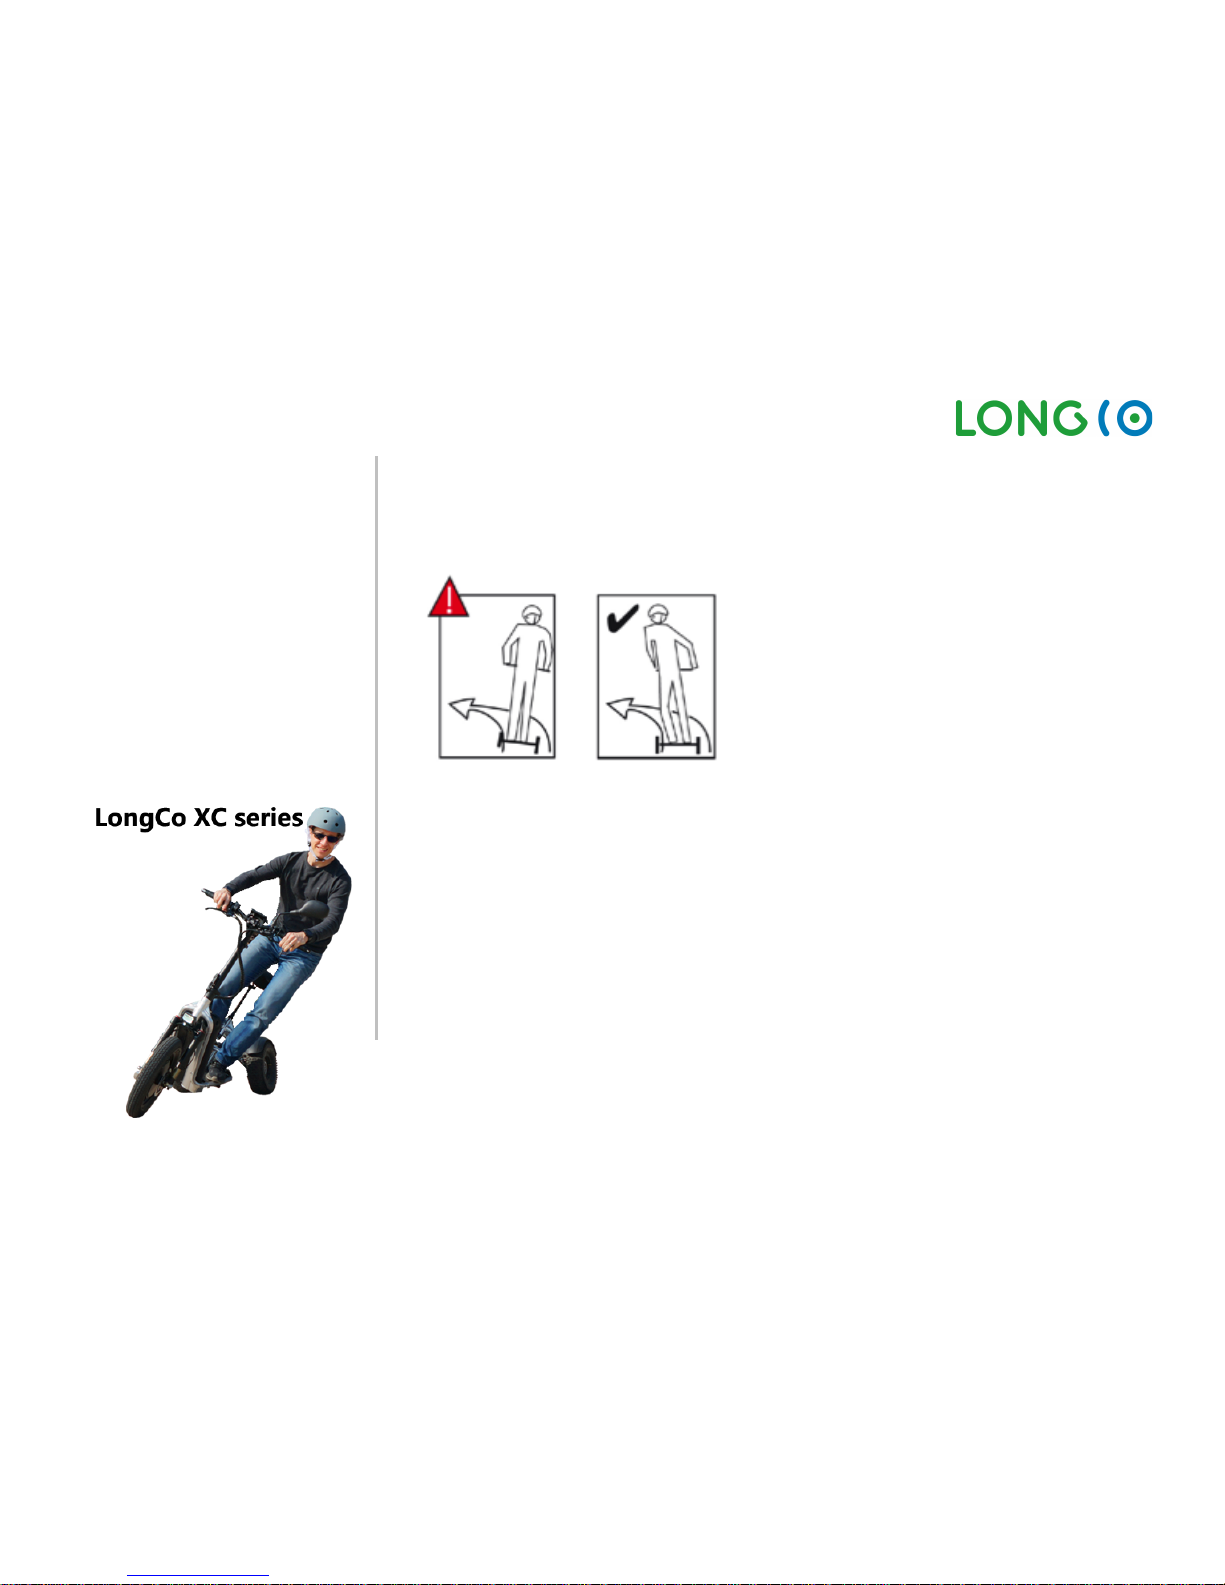
Always turn slowly and with caution - do not turn abruptly! Reduce the speed, so all 3 wheels
have always contact to the ground.
Lean into the turn to maintain balance. The body must be brought into an inclined position as on
a bicycle or motorbike. (see diagrams below)
Exceptions:
A) When driving alongside a steep hill, lean towards the hill
.
B) If you use a n Lon gCo XC Series model, and you have enough experience in riding,
you can also lean into the curves, using following riding technic:
If there is a left curv e, you push the standing platform to the left with your left leg.
Make sure, you push steady and smoothly, not with a sudden movement. If needed,
reduce the speed in order all 3 wheels having always contact to the ground.
Same for the right curv e, just pus h down the platform to the right with your right leg.
Important: In order keeping your body balanced, never push down the handlebar in
either direction.
Page 13
LongCo: User Manual V05 / 11. Juni 2018 Page 13 of 54
2. Preparation
2.1. Unfold frame
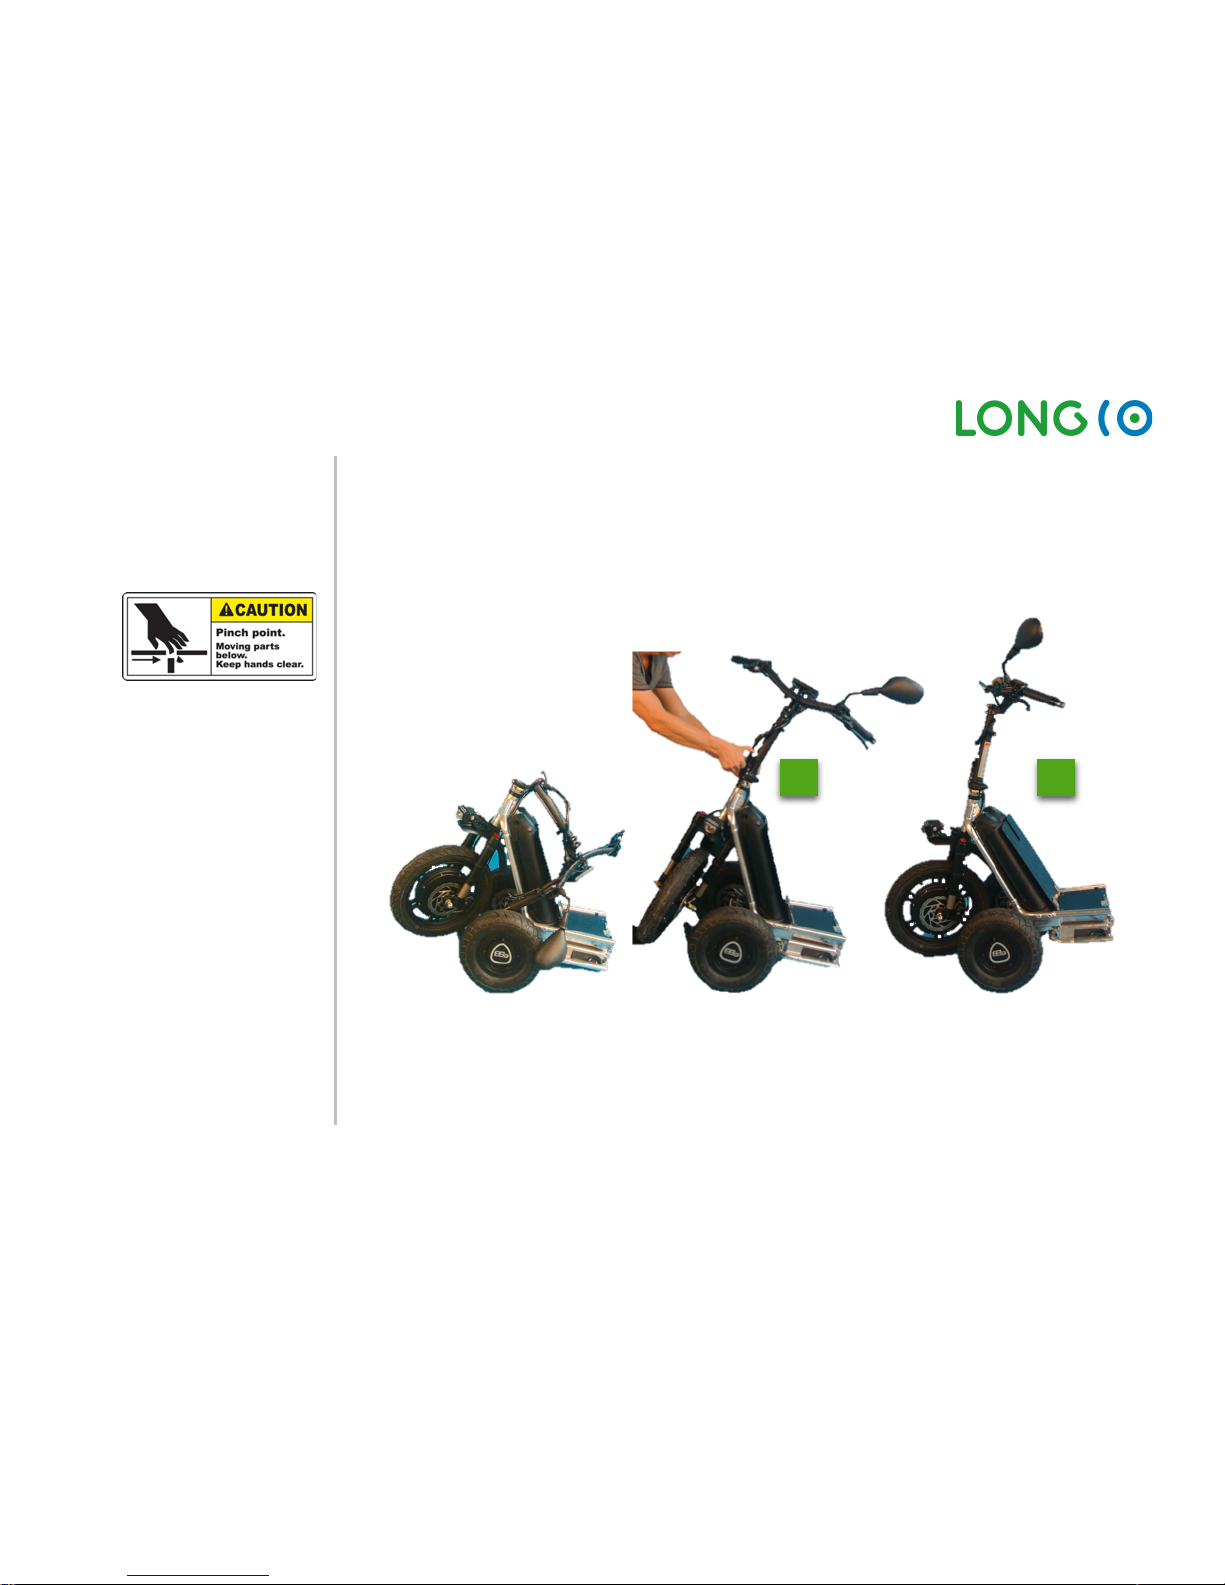
CAUTION
Beware of Pinch point!
Keep your fingers, hands or other parts of your body away, when folding out the platform, you could
get seriously injured.
å
• Unfold the stem and turn the front wh eel so it points forward.
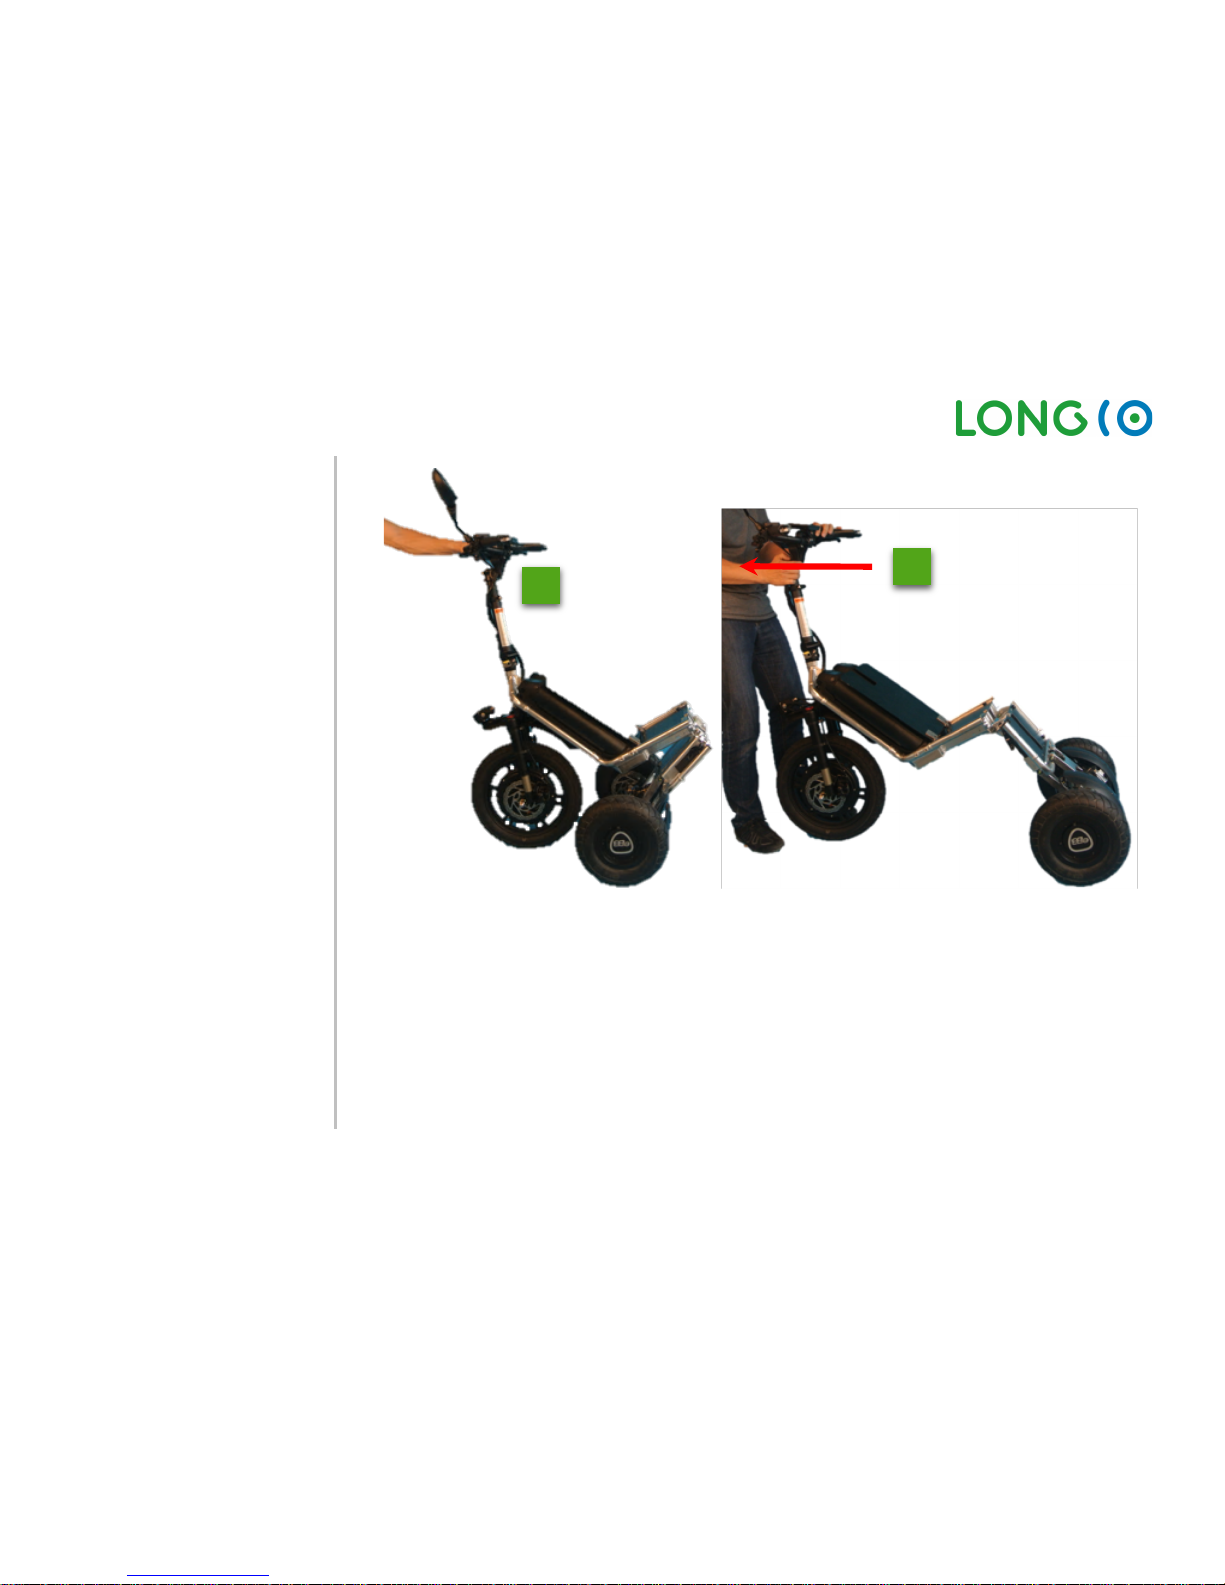
• With the rear wheel brake (brake handle on the left side), you can unfold the LongCo simply by
pulling the handlebar forward.
1
2
Page 14
LongCo: User Manual V05 / 11. Juni 2018 Page 14 of 54
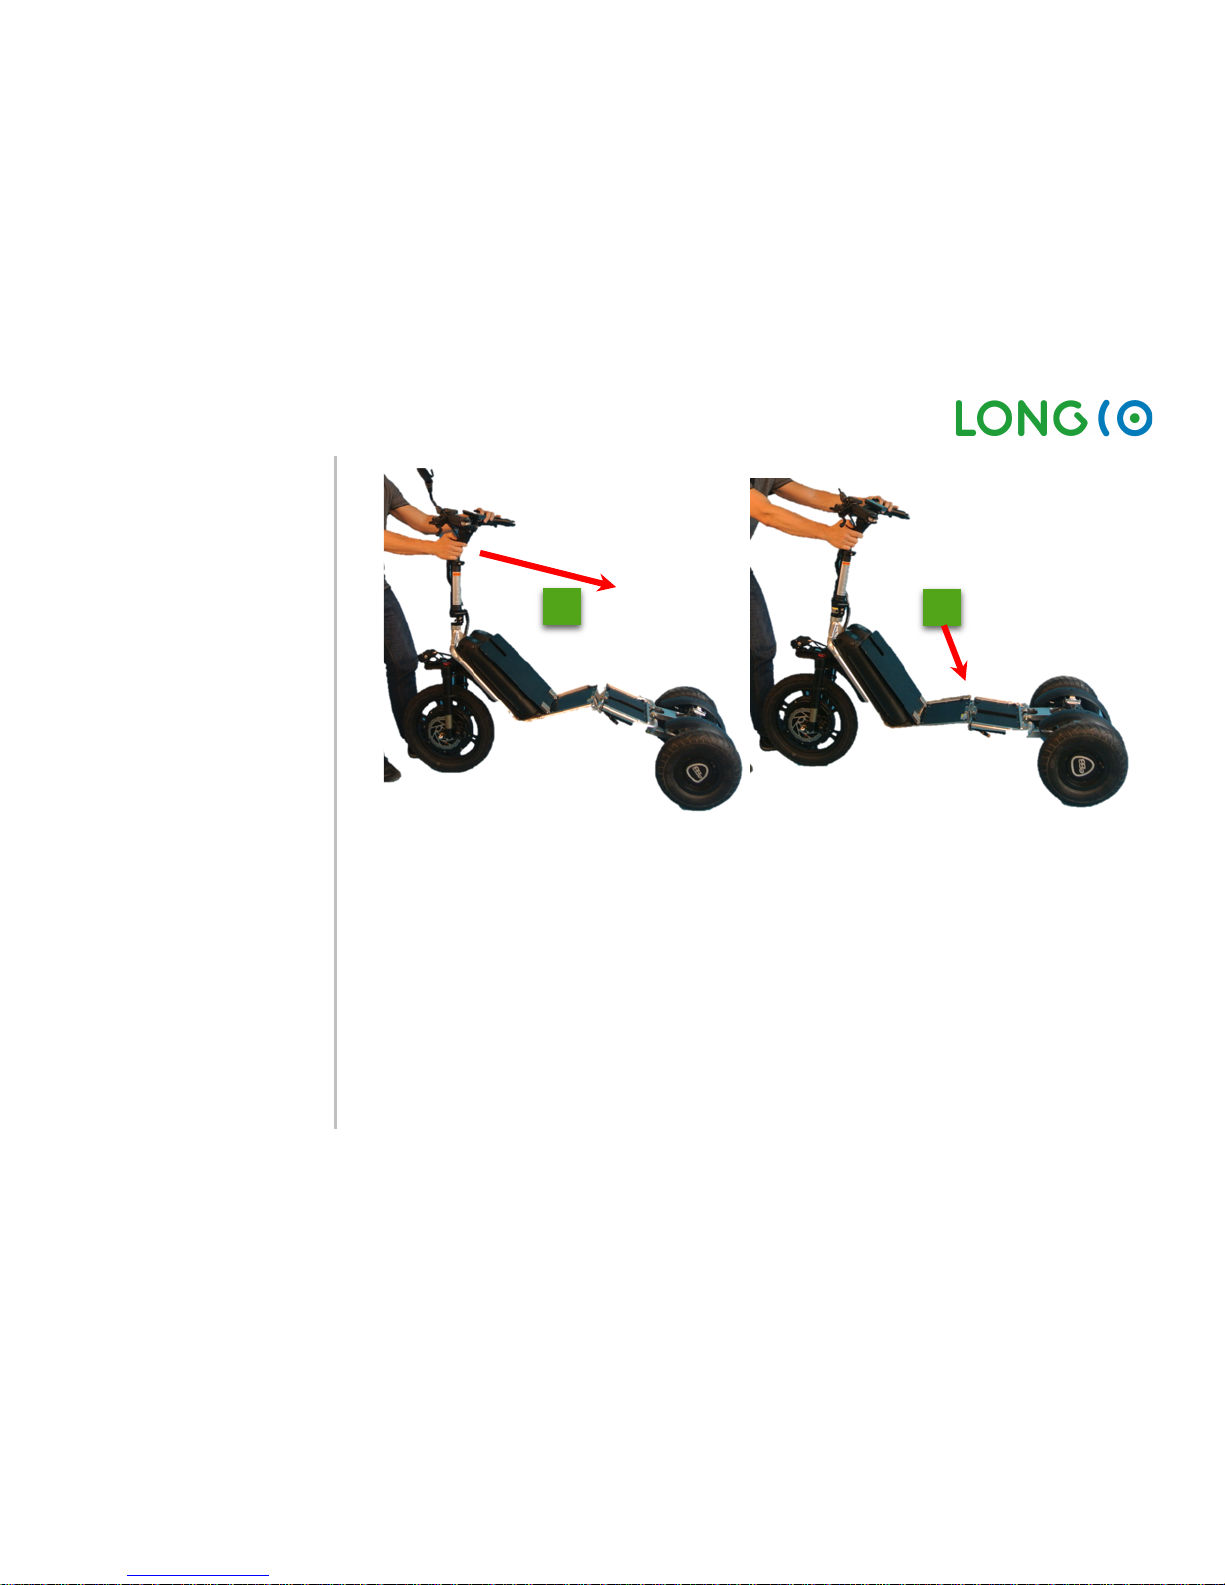
• When unfolded the LongCo about 90°, change to the rear brake (handle on the right side) and
unfold it backwards.
3
4
Page 15
LongCo: User Manual V05 / 11. Juni 2018 Page 15 of 54
5
6
Page 16
LongCo: User Manual V05 / 11. Juni 2018 Page 16 of 54
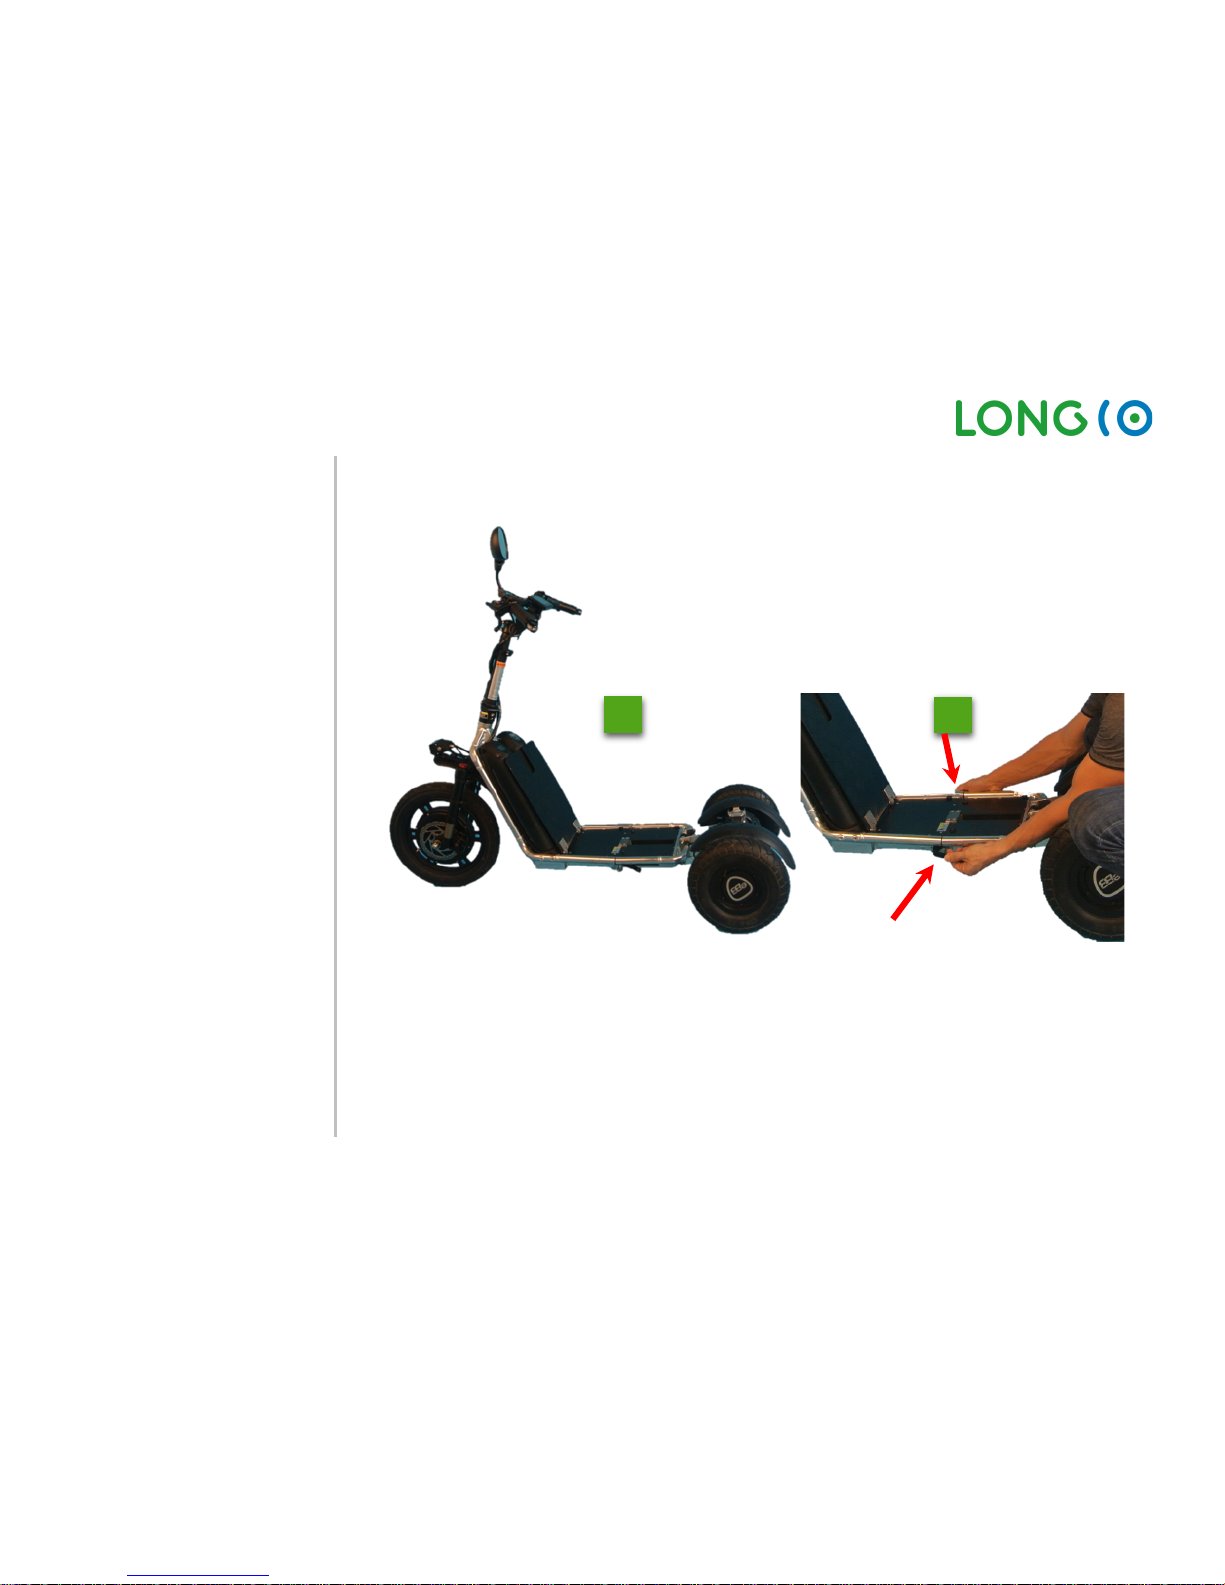
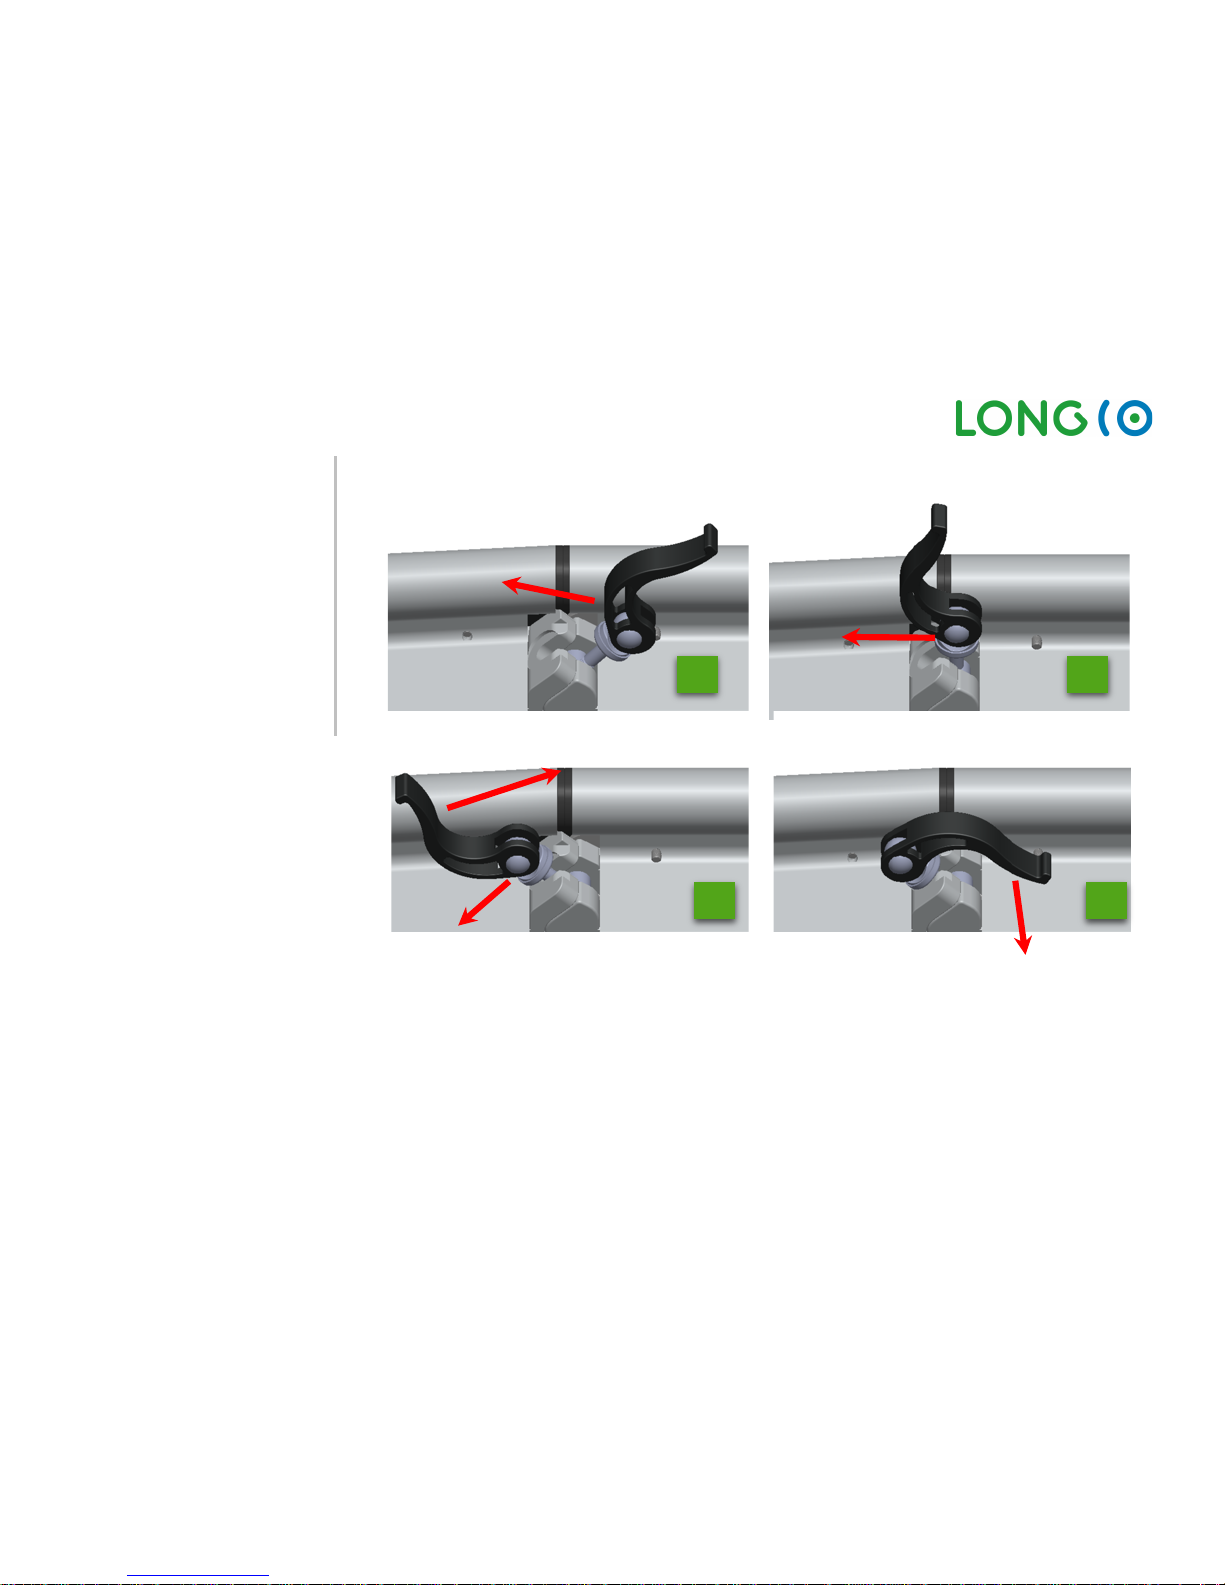
• If the LongCo is total unfolded, close the quick release on both sides of the frame. (Picture 8a to
8d). If the quick release is not tight after it is locked, then adjust the M6 Nut.
7
8
Page 17
LongCo: User Manual V05 / 11. Juni 2018 Page 17 of 54
8a
8b
8c
8d
Page 18
LongCo: User Manual V05 / 11. Juni 2018 Page 18 of 54
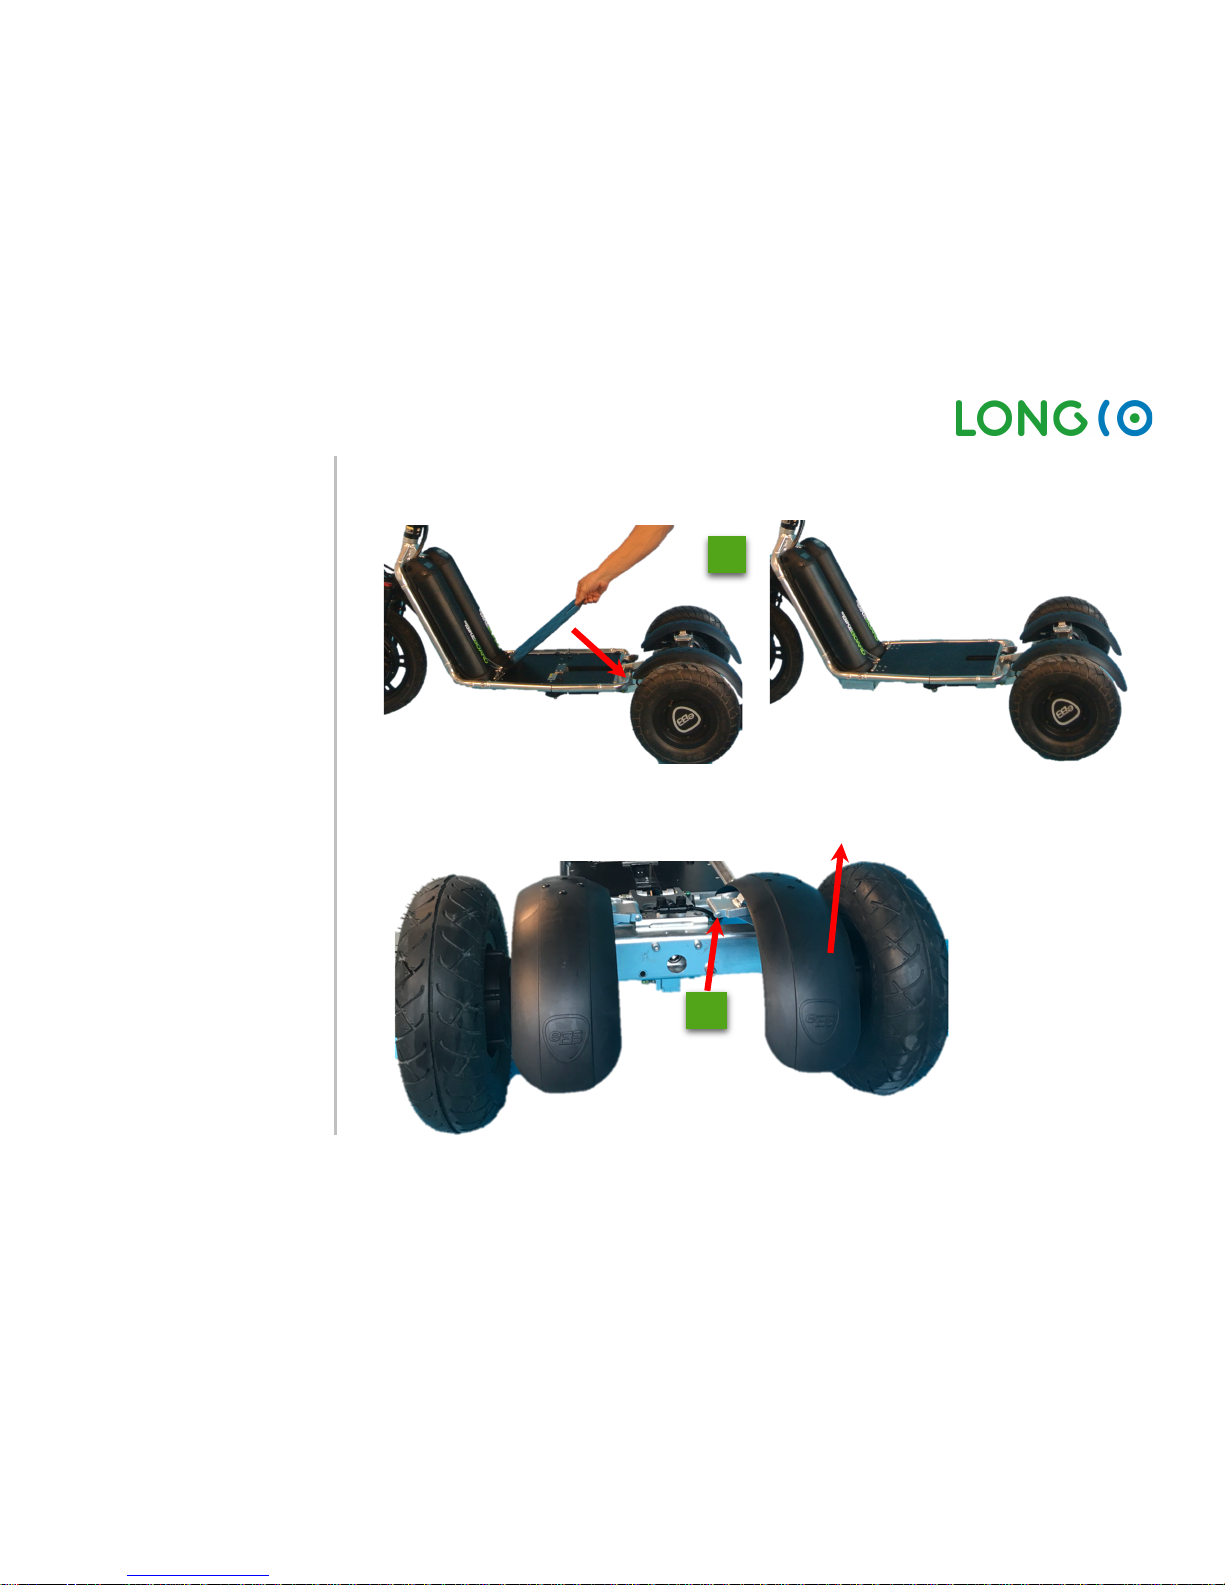
• Now can the platform be unfolded downwards.
• Next the rear fender can be unfold ed. The rear fender can easily be pulled up, when one hand
pulls from the inner aluminum part, the other on the rear fender.
9
10
Page 19
LongCo: User Manual V05 / 11. Juni 2018 Page 19 of 54
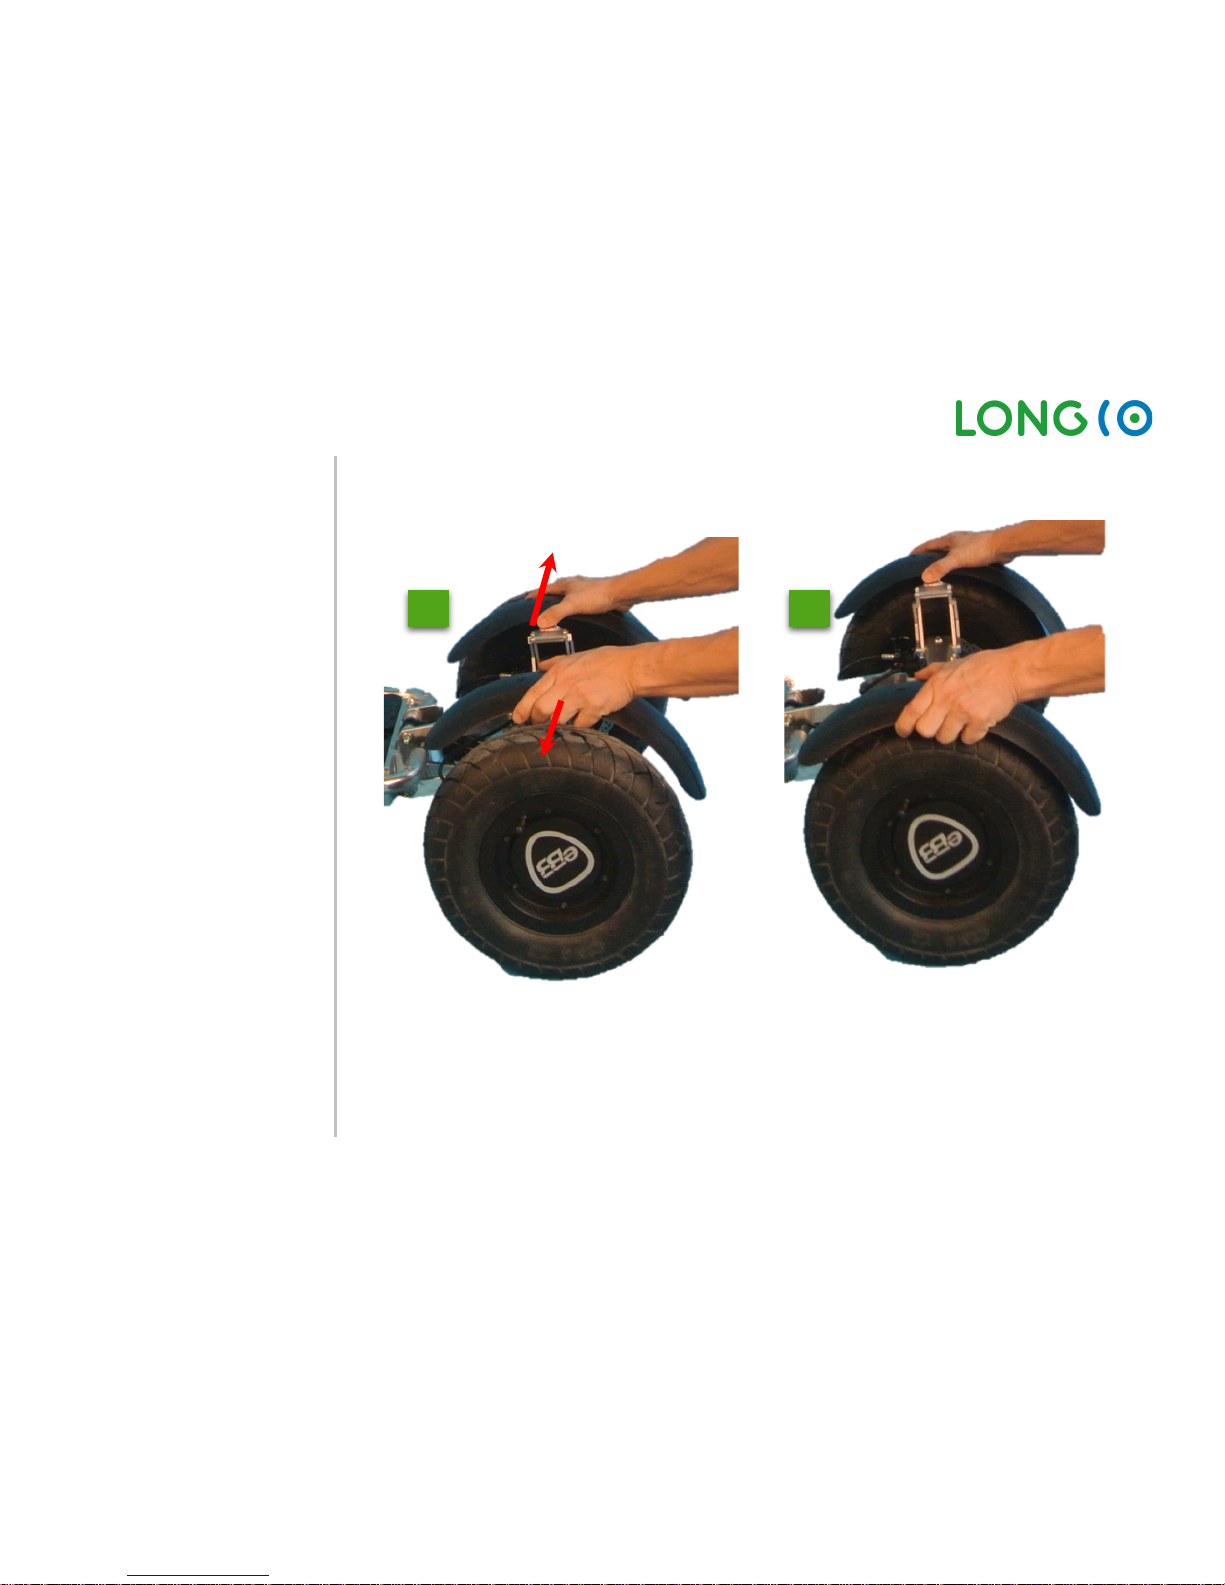
• Once the rear fenders are in a middle position, they can ne grabbed with both hands at the
same time, push the fender to the end position over the tire.
11
12
Page 20
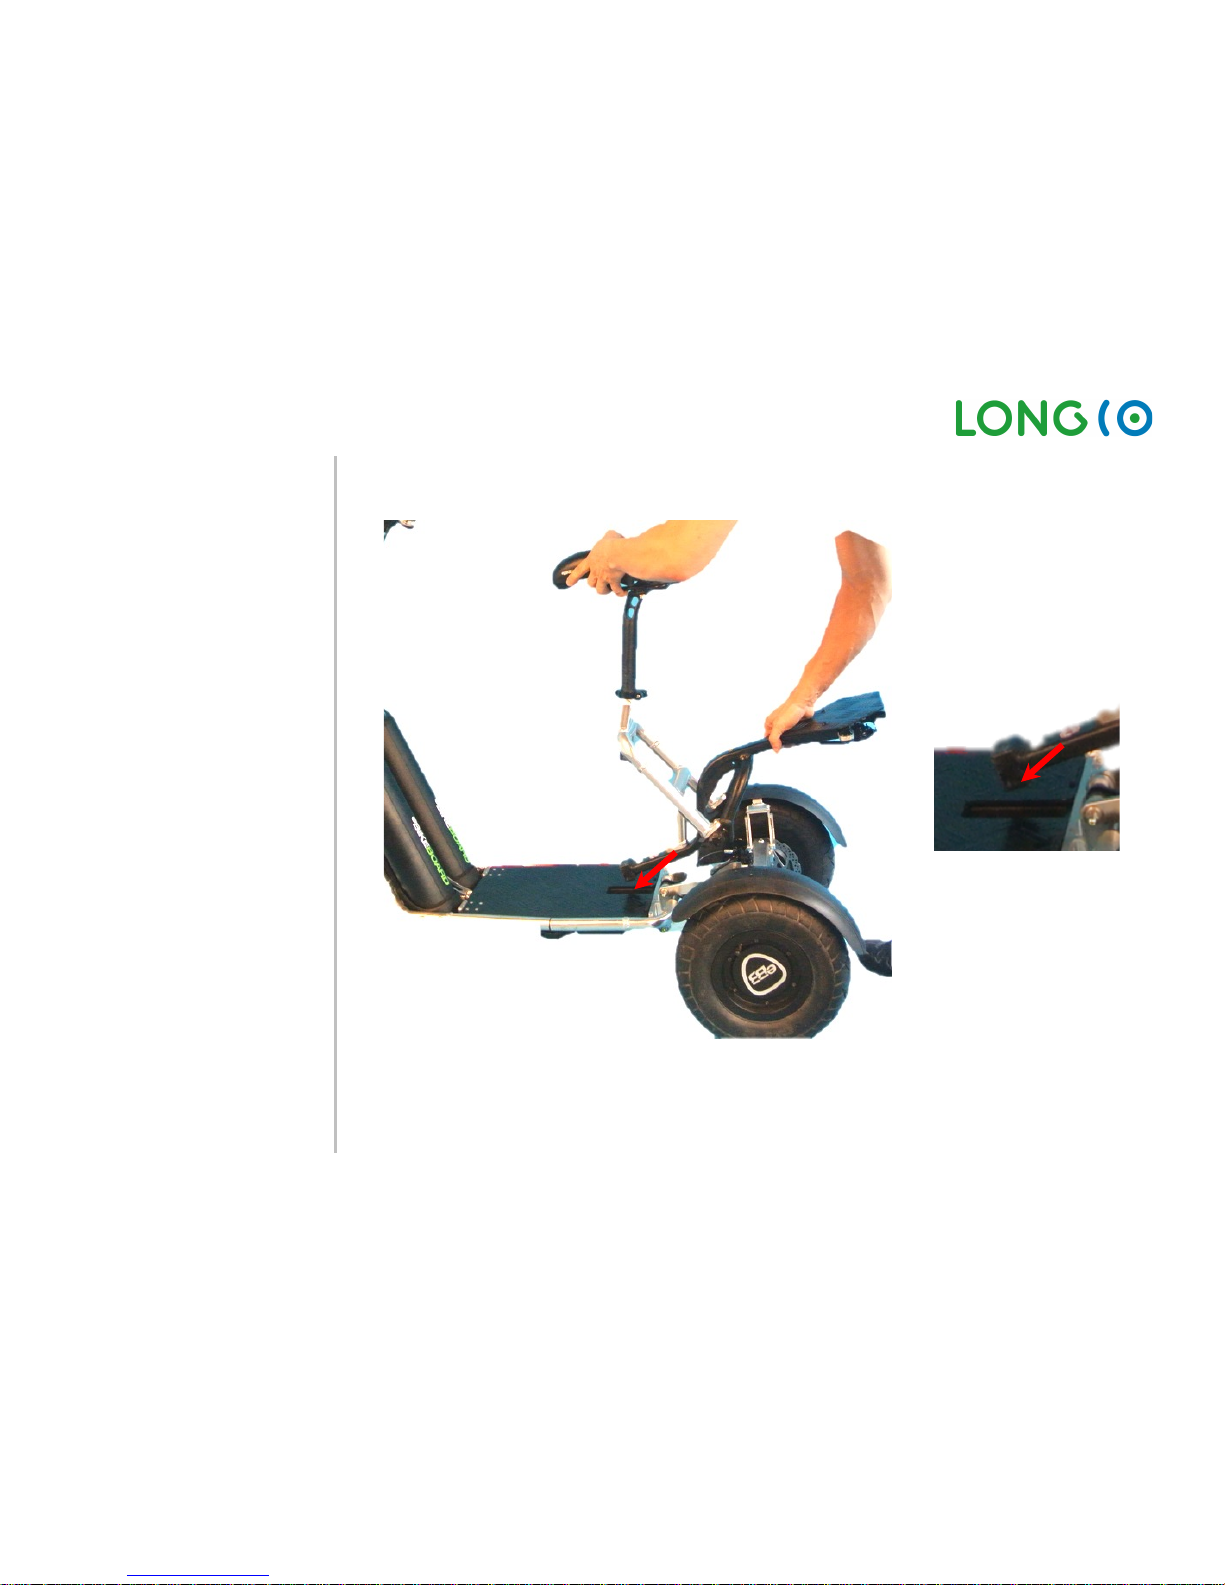
LongCo: User Manual V05 / 11. Juni 2018 Page 20 of 54
• At the end the rear carrier will be installed, first the rear carrier must be pushed in the lead
groove
Page 21
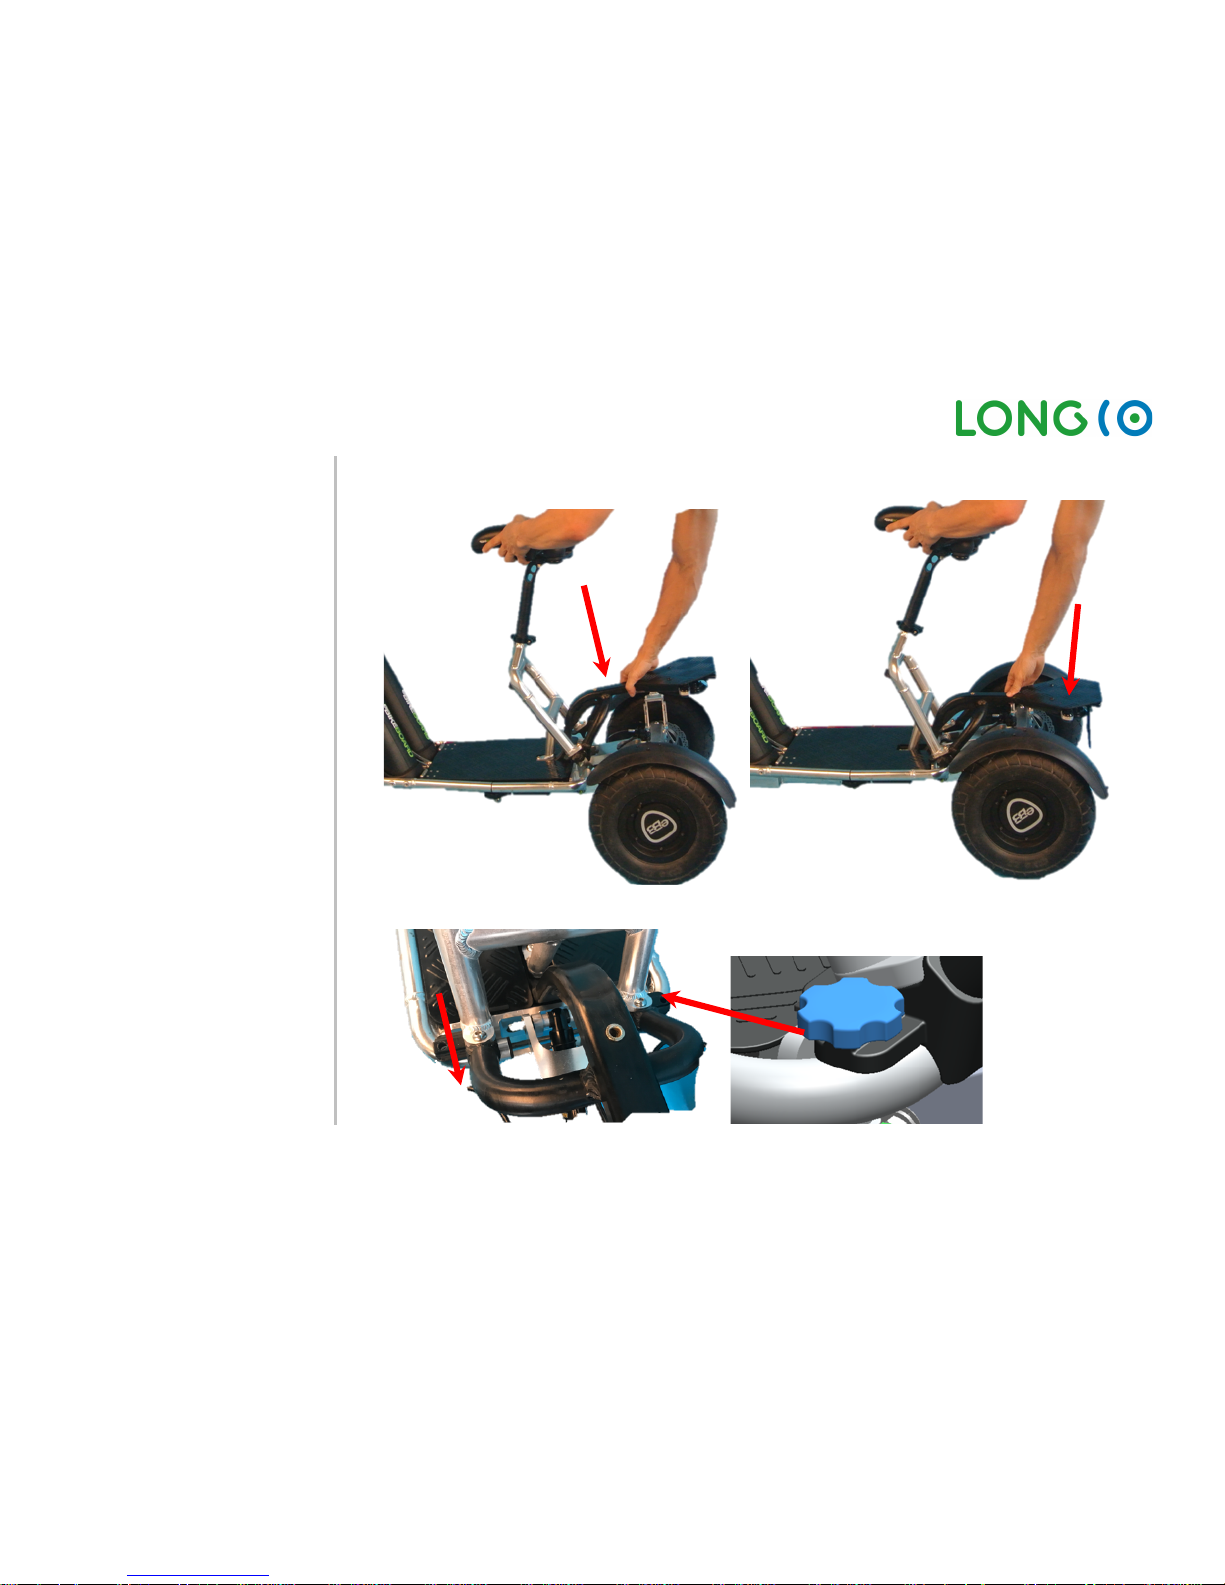
LongCo: User Manual V05 / 11. Juni 2018 Page 21 of 54
• Then back of the rear carrier will be pressed downward.
• Finally, will the two thumb screws have to be inserted and tightened.
Page 22
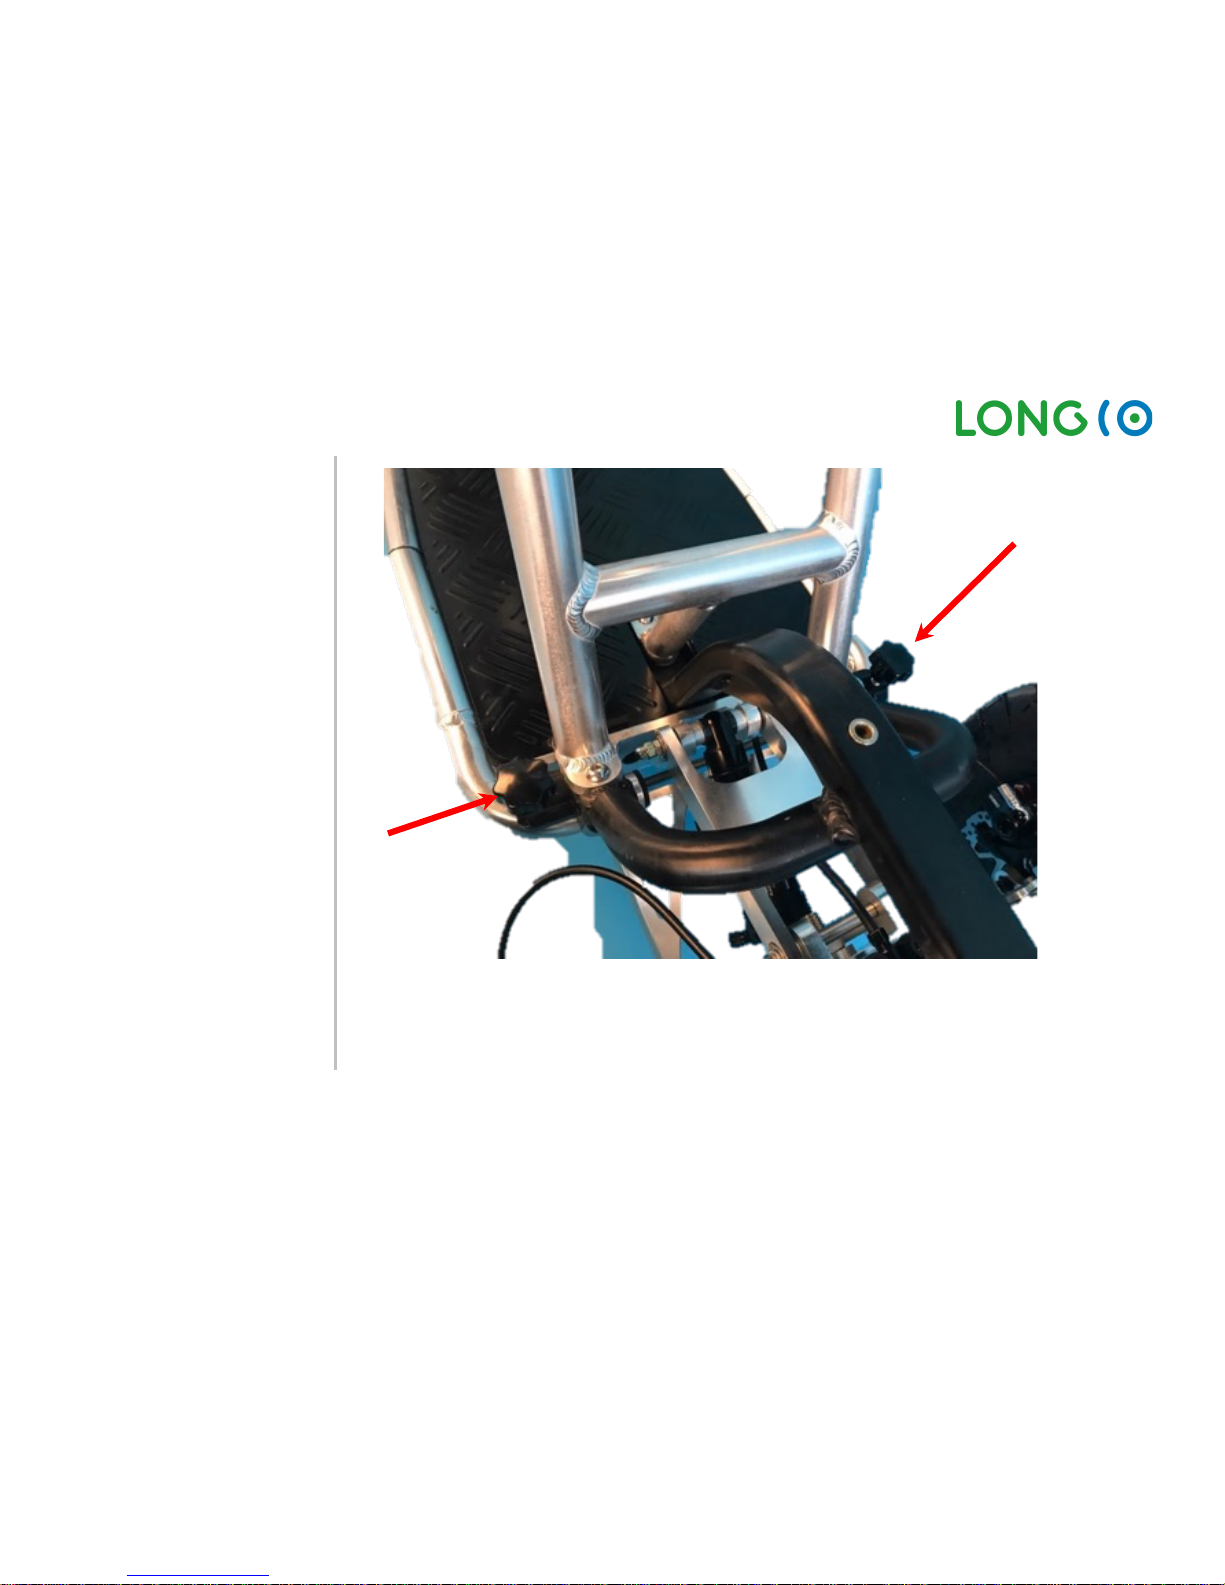
LongCo: User Manual V05 / 11. Juni 2018 Page 22 of 54
• After 1-2 km travel should the thumb screws be checked and tightened again if necessary.
Page 23
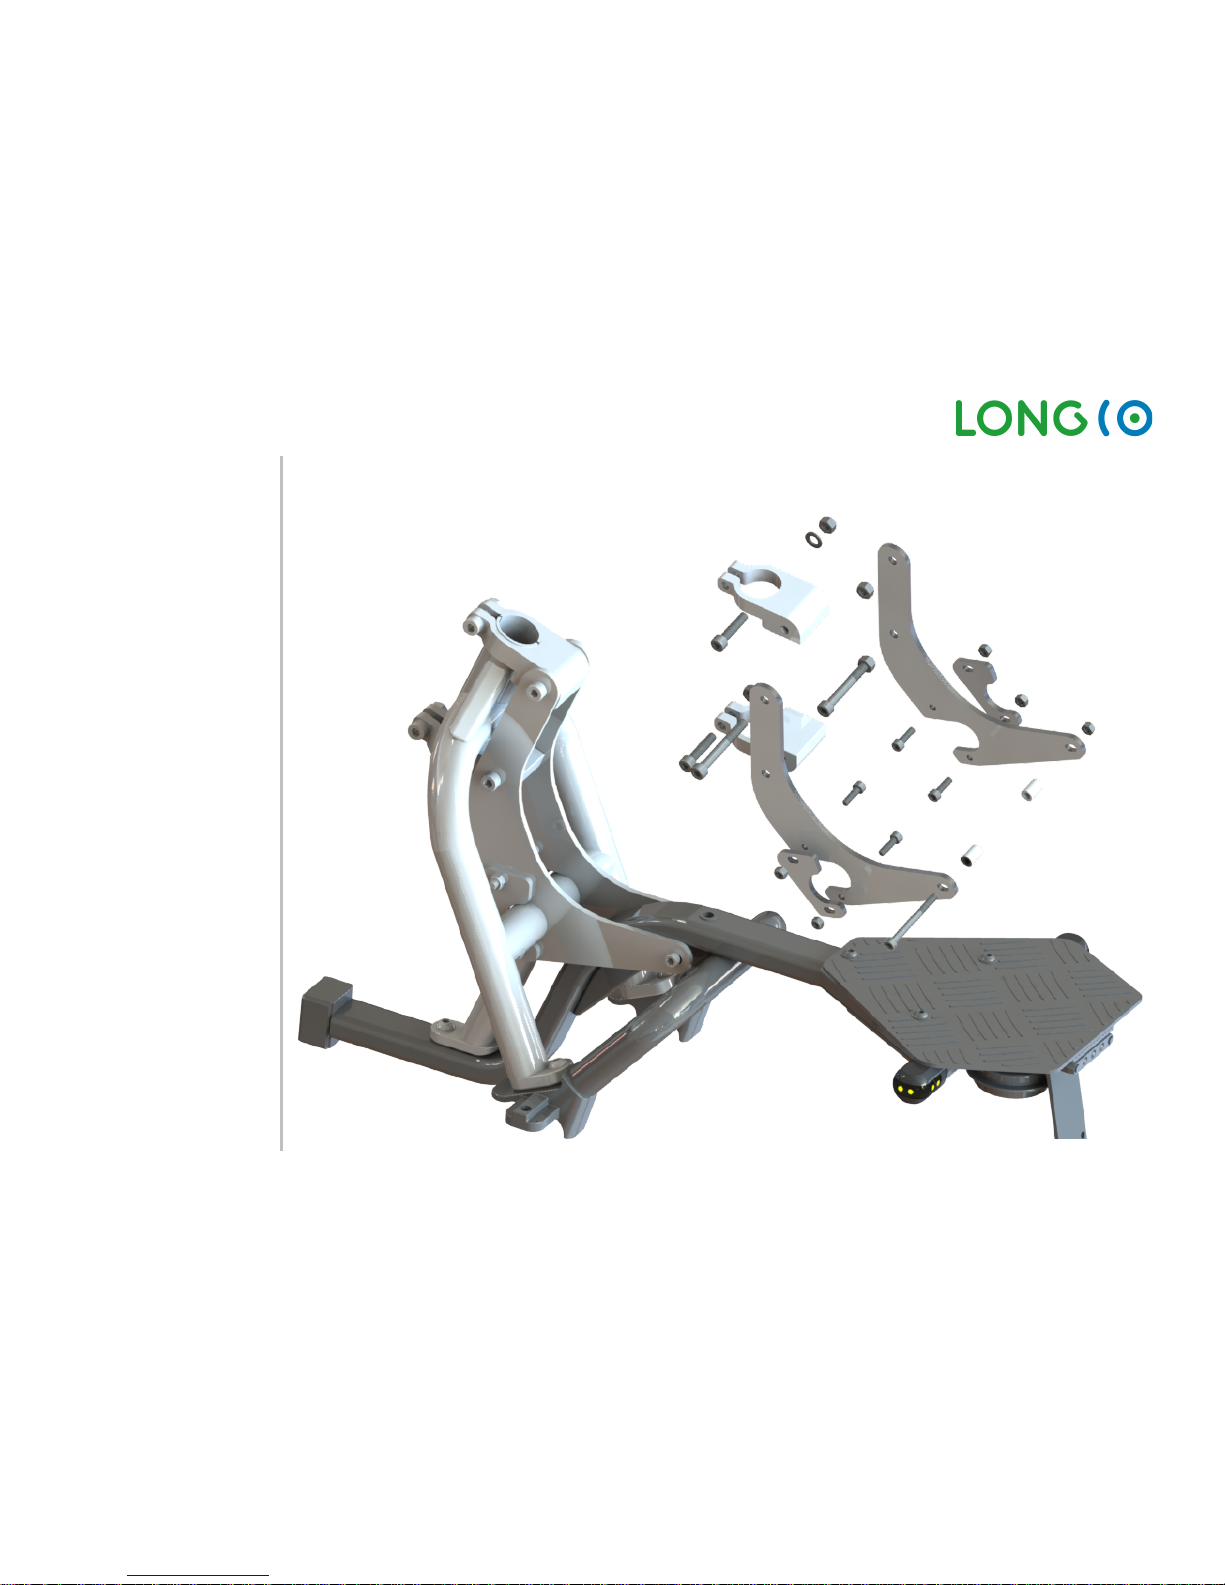
LongCo: User Manual V05 / 11. Juni 2018 Page 23 of 54
2.2. Installation
of
Seat
Enforcement
For Rider more than 100kg (220lbs), the optional Seat Enforcement system must be installed. See more
Details in the drawings below, and for the assembly please ask your authorized dealer.
Page 24
LongCo: User Manual V05 / 11. Juni 2018 Page 24 of 54
2.3. Folding stem
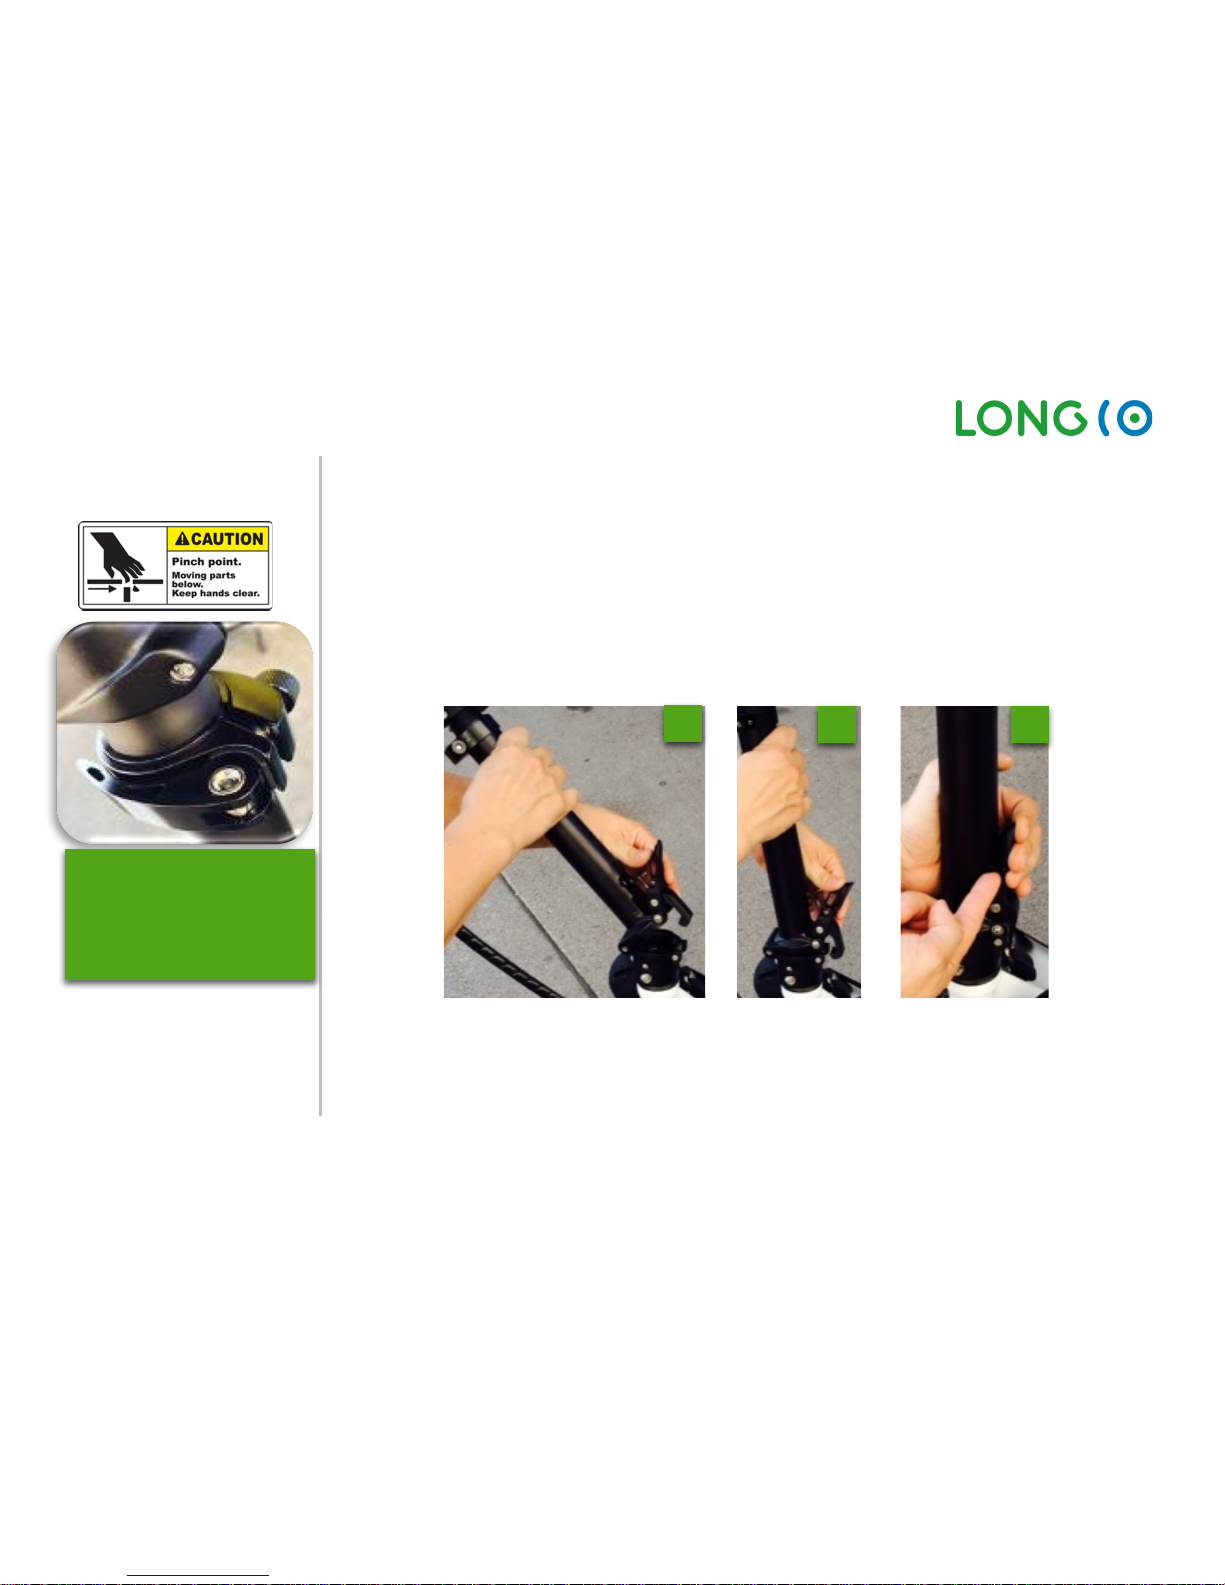
Folding Stem (height adjustable, Pictures below)
1. Unfold the stem (1), and keep the hook up, so it can be placed over the connection
piece.
2. Place the hook in the connection piece. Make sure, there is enough pressure when
closing, otherwise ti ghten the adjusting screw (use an Allen wrench size 5)
3. Close the lever; make sure the small lever locks the big lever.
2.4. Unfold Stem
• Follow steps 6 – 1 from previous chapter
• Make sure that the safety lock button (2) is pushed in all the way before pulling up the
stem.
1 2 3
CAUTION:
Stem quick release
should be always tied
up!
Page 25
LongCo: User Manual V05 / 11. Juni 2018 Page 25 of 54
2.5. Insert/Remove
Batteries
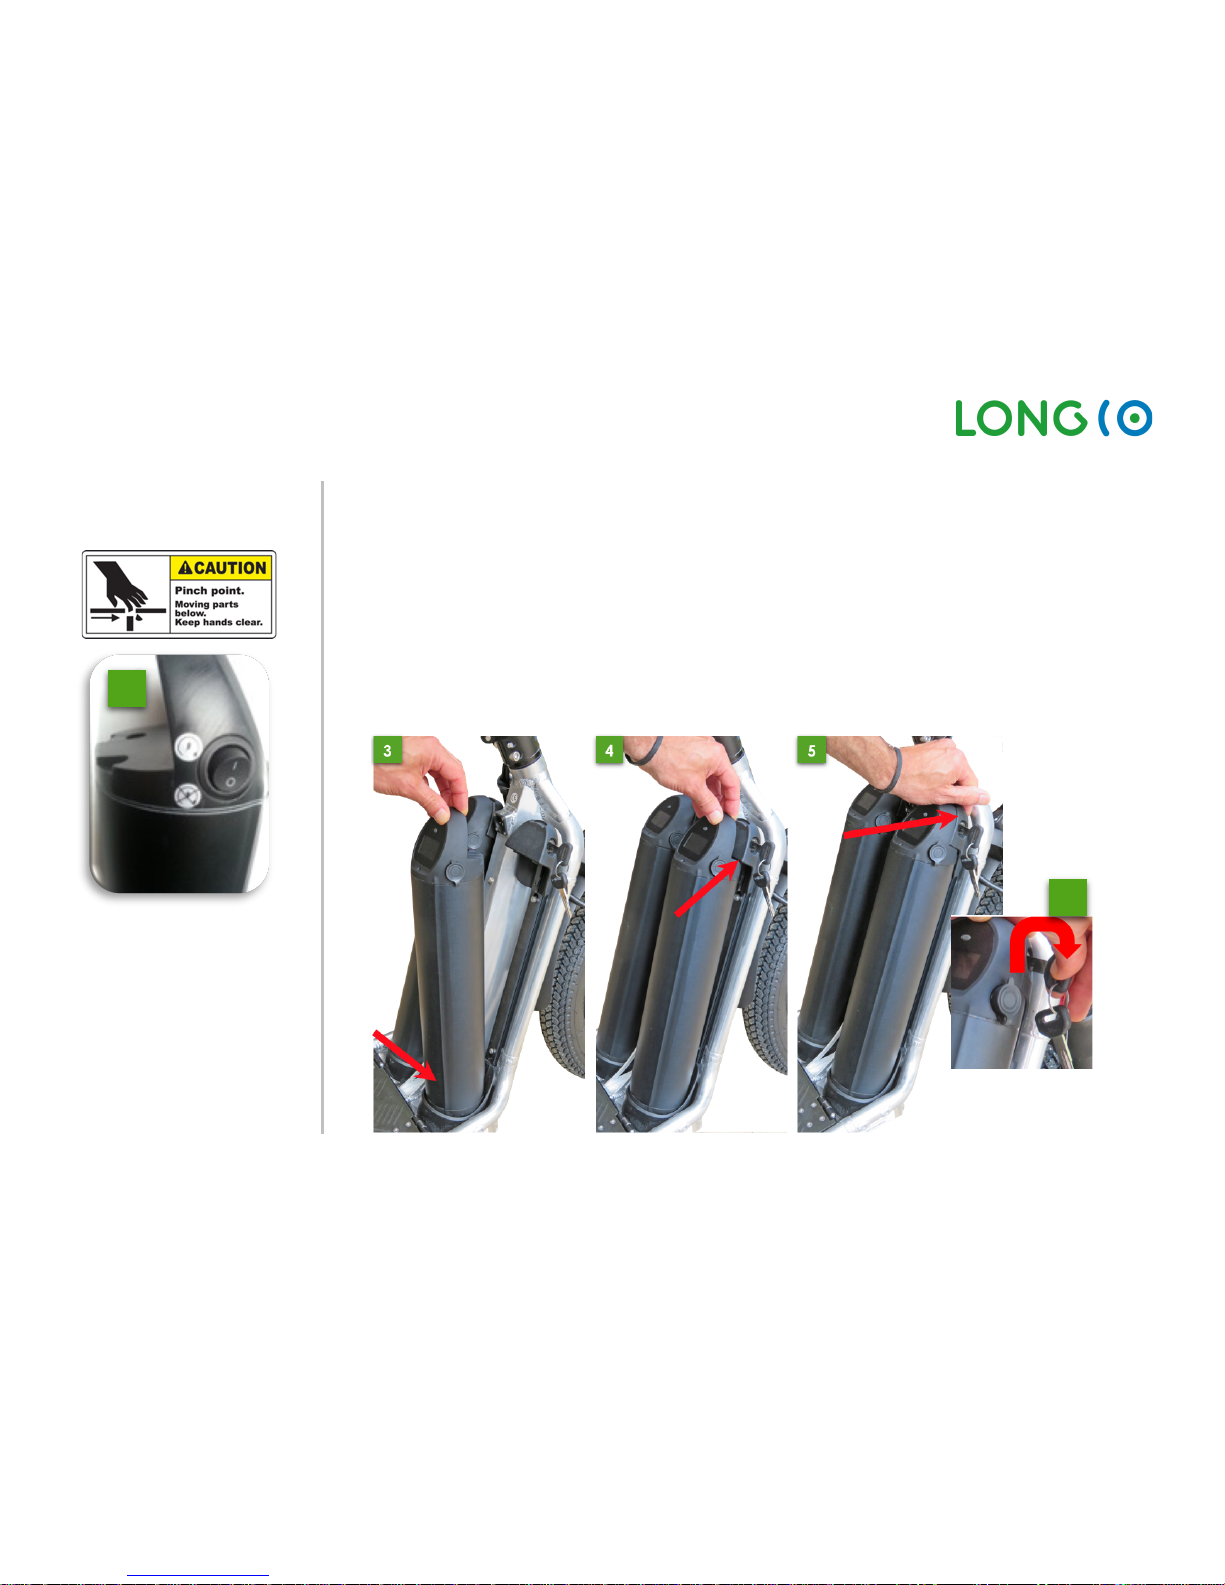
Beware of Pinch point! Keep hands off battery bracket while inserting or
removing the battery
1. Make sure the lock on the battery bracket is unlocked (open, turn to left side))
2. Make sure the battery (or both batteries if installed) is turned off: black switch
located at the battery top must be on 0.
3. Align the battery bottom with the bracket.
4. Align the battery top with th e bracket
5. Push the battery in the bracket, use your palm and make sure you don’t squeeze
your finger!
6. Lock the battery to the bracket (turn the key to the right side) and make sure, the
battery is secured and firmly fixed
2
6
Page 26
LongCo: User Manual V05 / 11. Juni 2018 Page 26 of 54
3. LongCo Features
3.1. Batteries
Basics
The batteries used on the LongCo are based on Lithium technology. These batteries are
designed using the latest technology for high power density, low weight and a long life span.
Before using the LongCo for the first time, p lease charge fully both Batteries (approximately 8
hours with the standard charger).
Always turn off the batteries with the Switch when you store the LongCo for longer than 1 day!
Otherwise the battery will be empty in a few days.
Battery LCD Read Out
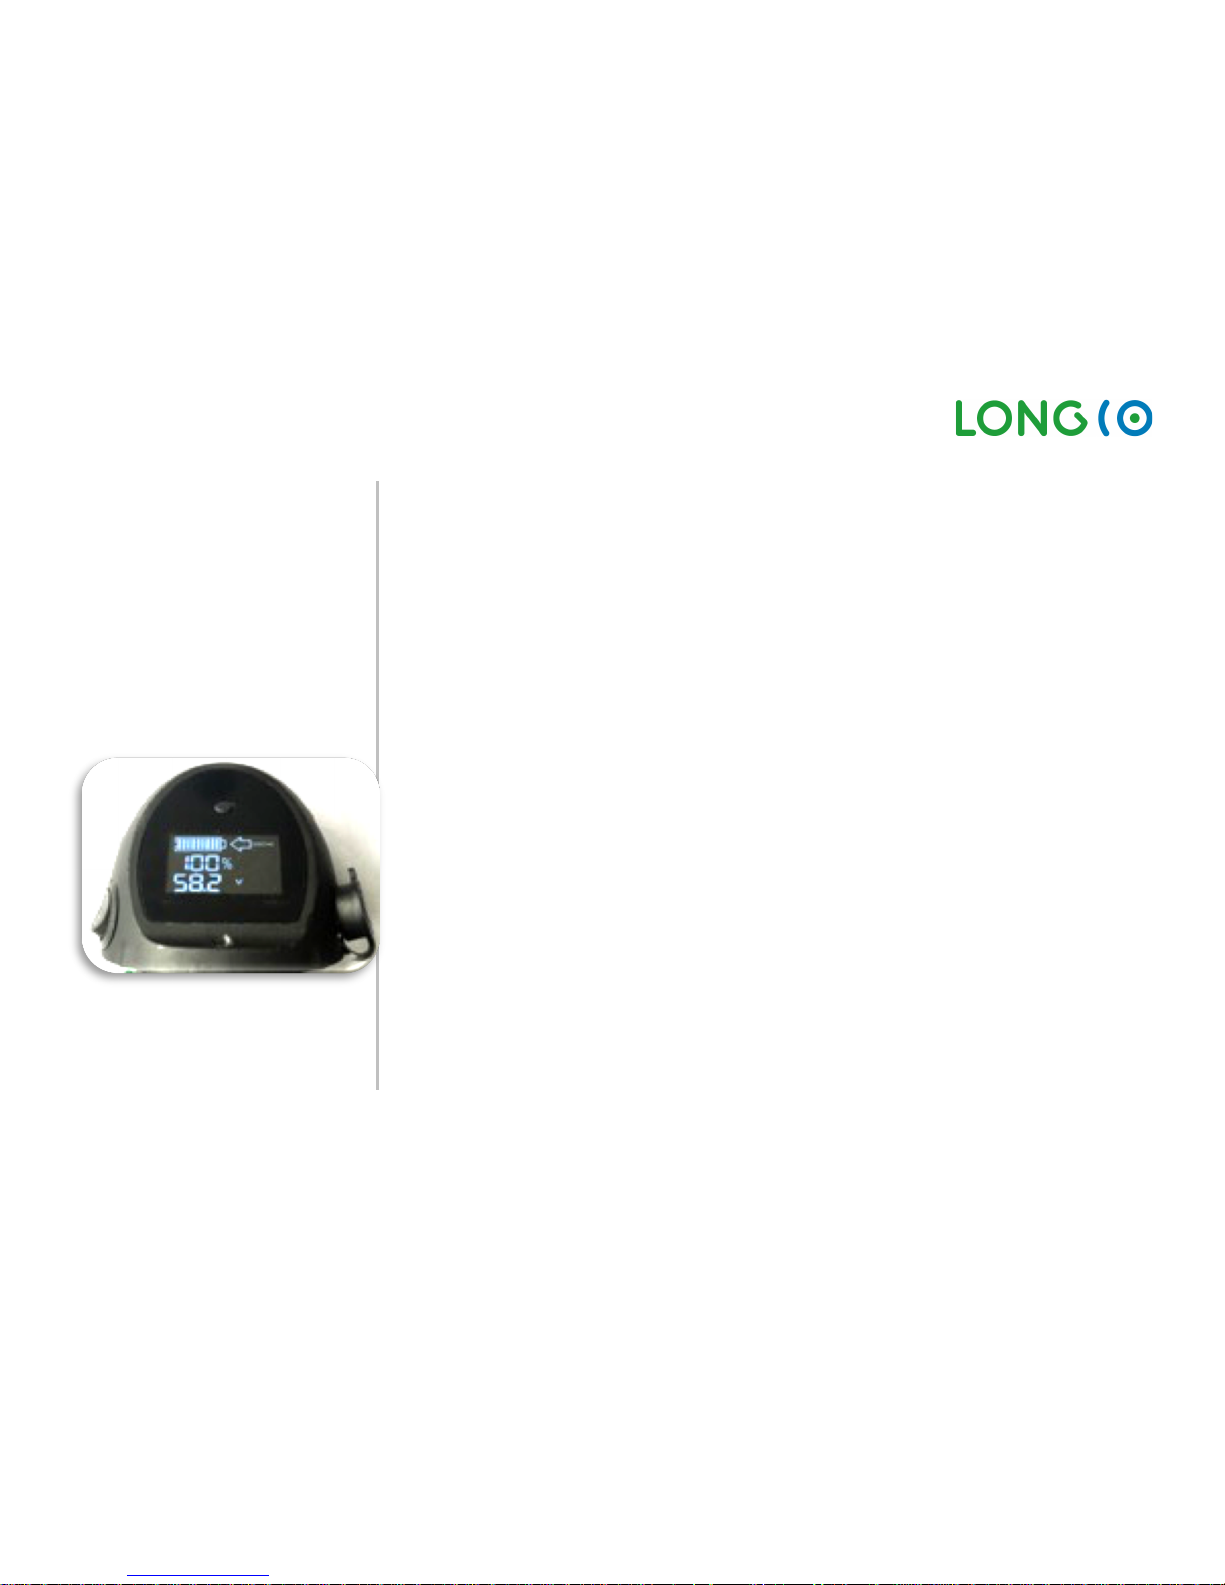
On the top of the battery shows (see picture on the left side):
- Main-switch of the battery (left side)
- LCD-Display and buttons (in the middle)
- Charging port with secure cap, use this charge port only when the battery is not
installed in the LongCo (right side).
The Display shows:
- Remaining capacity as bar chart (on the picture: full capacity remaining)
- Remaining capacity in % (on the picture: 100%, remaining)
- The third line can be changed by push the button in the middle above the display.
Voltage [V] (on the picture 58.2V), Current [A], Capacity [Ah], Numb er of Cycles
[CYC] (charge or discharge of battery) and remaining charge or discharge time
[MIN]. Discharge will be shown with an arrow to the left side “DISCHG”, and charge
with an arrow to the right side “CHG”.
The Battery can be charged if removed from the LongCo (OffBoard) or if installed on the
LongCo (OnBoard).
Page 27
LongCo: User Manual V05 / 11. Juni 2018 Page 27 of 54
3.2. Charging batteries
Charging OffBoard
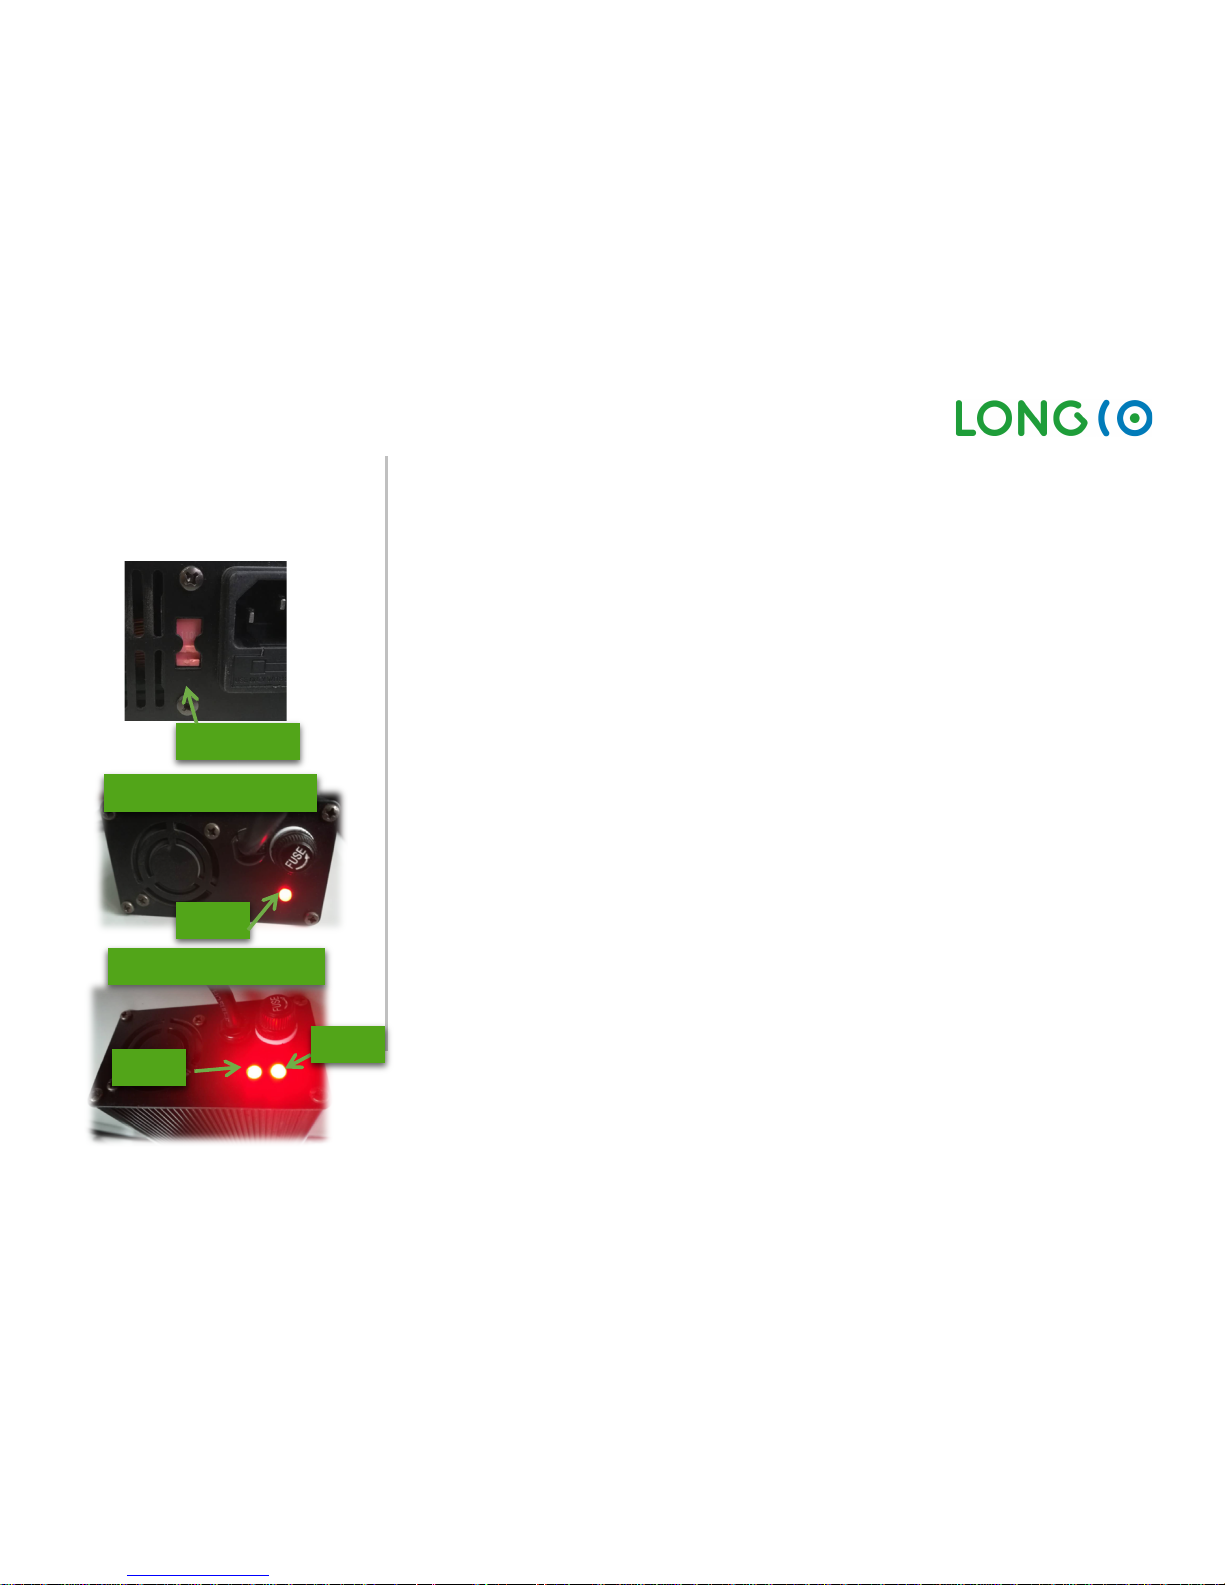
Procedure for Charging if Batteries are not installed on the LongCo:
A) Turn off batteries at the main switch and dismount them from unit
B) If you use a char ger for USA/Canada (110V):
Make sure the charger is set to the correct voltage (110V or 220V) with the small
red switch next to the power cable
C) Now plug the charger first to the outlet.
D) LED1 is now Green, and if there is a LED2, this will be red. This means the charger is
ready for charge.
(Make sure the charger was unplugged before and the LED are off).
E) Open the cap of charging port on the top of battery and plug in charger to the
battery. LED1 turns from green to red (start to charge). You can check the charge
current at the battery’s LCD Screen)
F) Charge until the LED1 of the charger turns fro m red to green and on the LCD –
Display 100%. This can take up to 8h, until the Battery is fully charged.
G) Make sure that after charging the charge socket is secured with the rubber cap
and the charger is unplugged from the power supply.
Means of the light LED1 and LED2 (not all charger have 2 LED’s)
LED1 green:
• If not plugged in on the
battery: ready to use
• If connected to battery:
the battery is fully charged.
LED1 red:
Charging process on-going.
LED2 red (optional):
Charger is connected to the
power and ready to use.
LED 1
- Charger with 2 LED
- Charger with 1 LED
110V/220V
LED 2
LED 1
Page 28
LongCo: User Manual V05 / 11. Juni 2018 Page 28 of 54
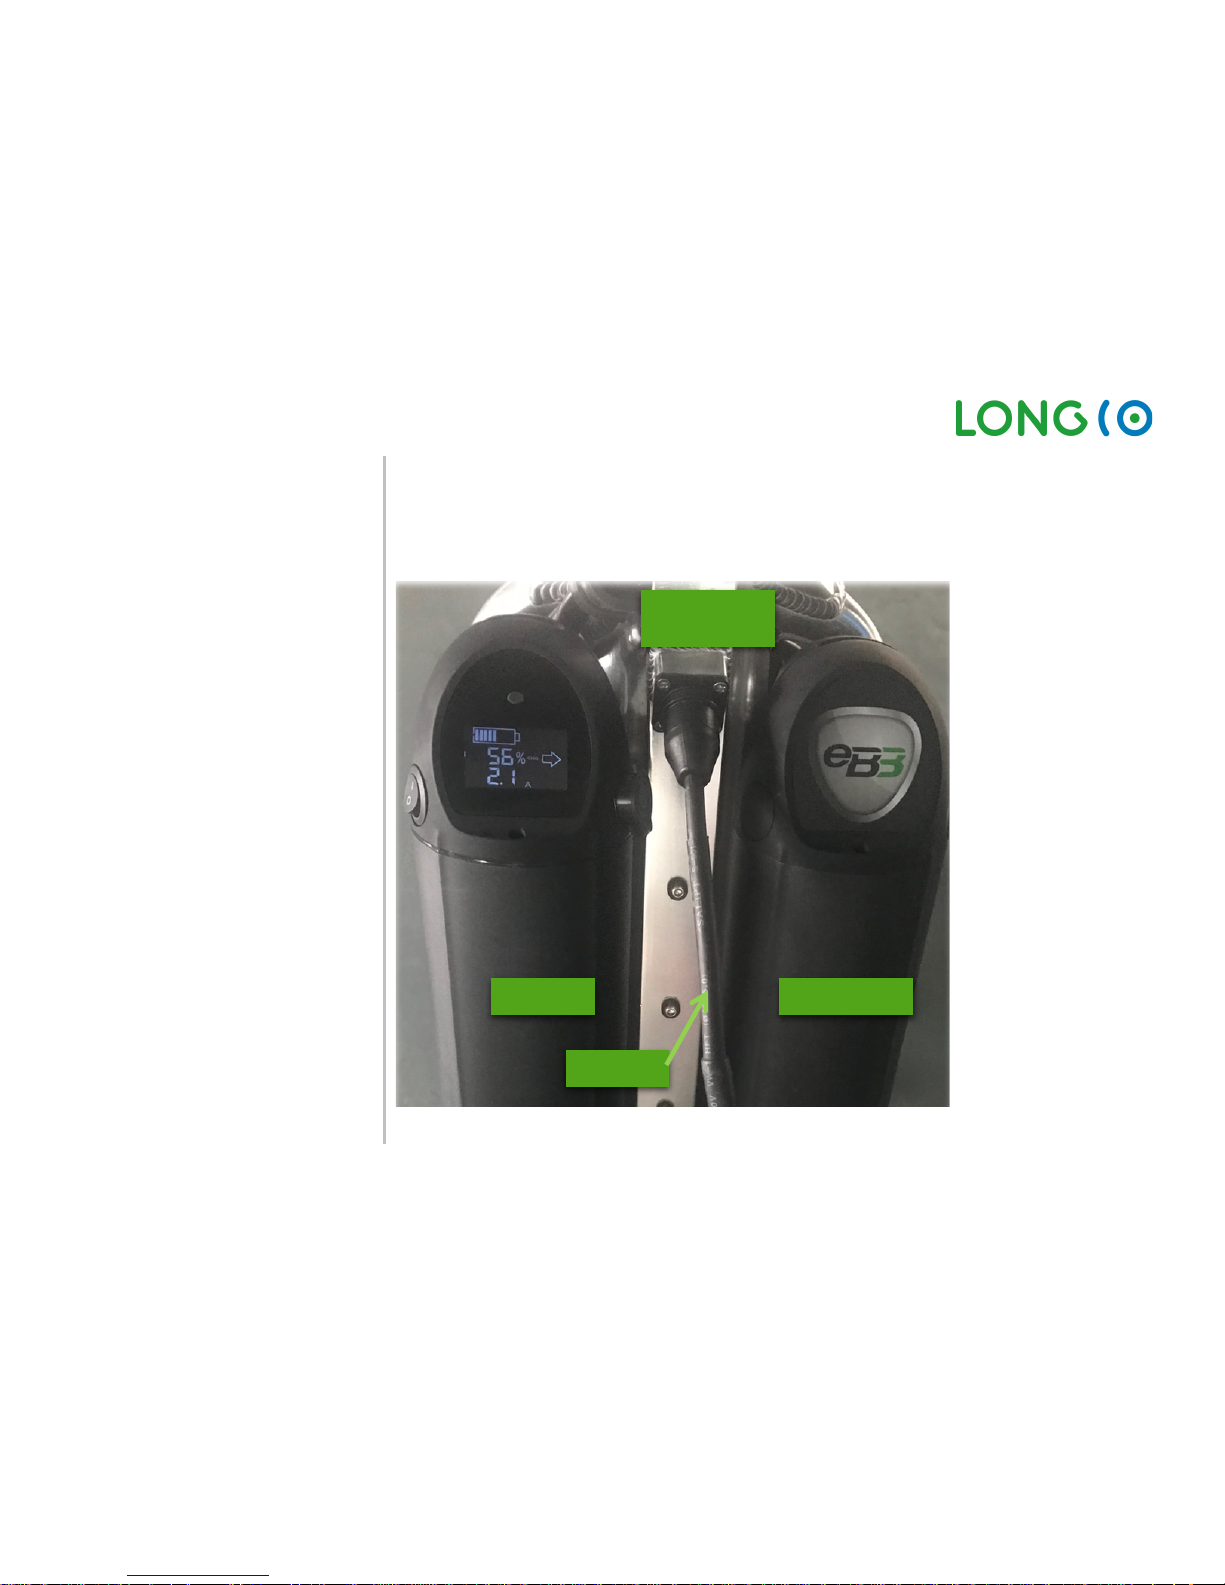
Charging OnBoard:
Rosenberger™ magnetic
central port
If You want to charge the batteries installed on the LongCo (OnBoard), then use the
Rosenberger™ magnetic central charge port with the adapter cable (see picture below). In
this way, you can charge battery up to 3 the LongCo together. IN the picture below is only
one battery installed (right side is the empty case). Anyway, OnBoard always use the central
charge port for charge the batteries.
SAFETY
ALWAYS USE ONLY AN ORIGINAL LONGCO CHARGER.
Battery 1
Empty Case
Central
Charge Port
Adapter
Page 29

LongCo: User Manual V05 / 11. Juni 2018 Page 29 of 54
Follow all safety instructions regarding the handling of the batteries, including the following:
• Only use the approved, original LongCo battery charger to charge your batteries.
• Use only in temperatures ranging from -15°C (5F) to 45°C (113F).
• Do not let children play with batteries.
• Do not put batteries in a microwave.
• Do not expose batteries to an open flame.
• Do not use batteries in water.
• Do not throw batteries into the garbage, for proper disposal of batteries see section
“Disposal”.
If the battery is not charged, can only be maintained by an authorized specialist.
Always turn off the batteries at the main switch, if You store the LongCo for longer than one
day! Otherwise the battery will be empty in a few days. It’s recommended to charge the
batteries once per month, so the cells won’t be totally empty.
Page 30
LongCo: User Manual V05 / 11. Juni 2018 Page 30 of 54
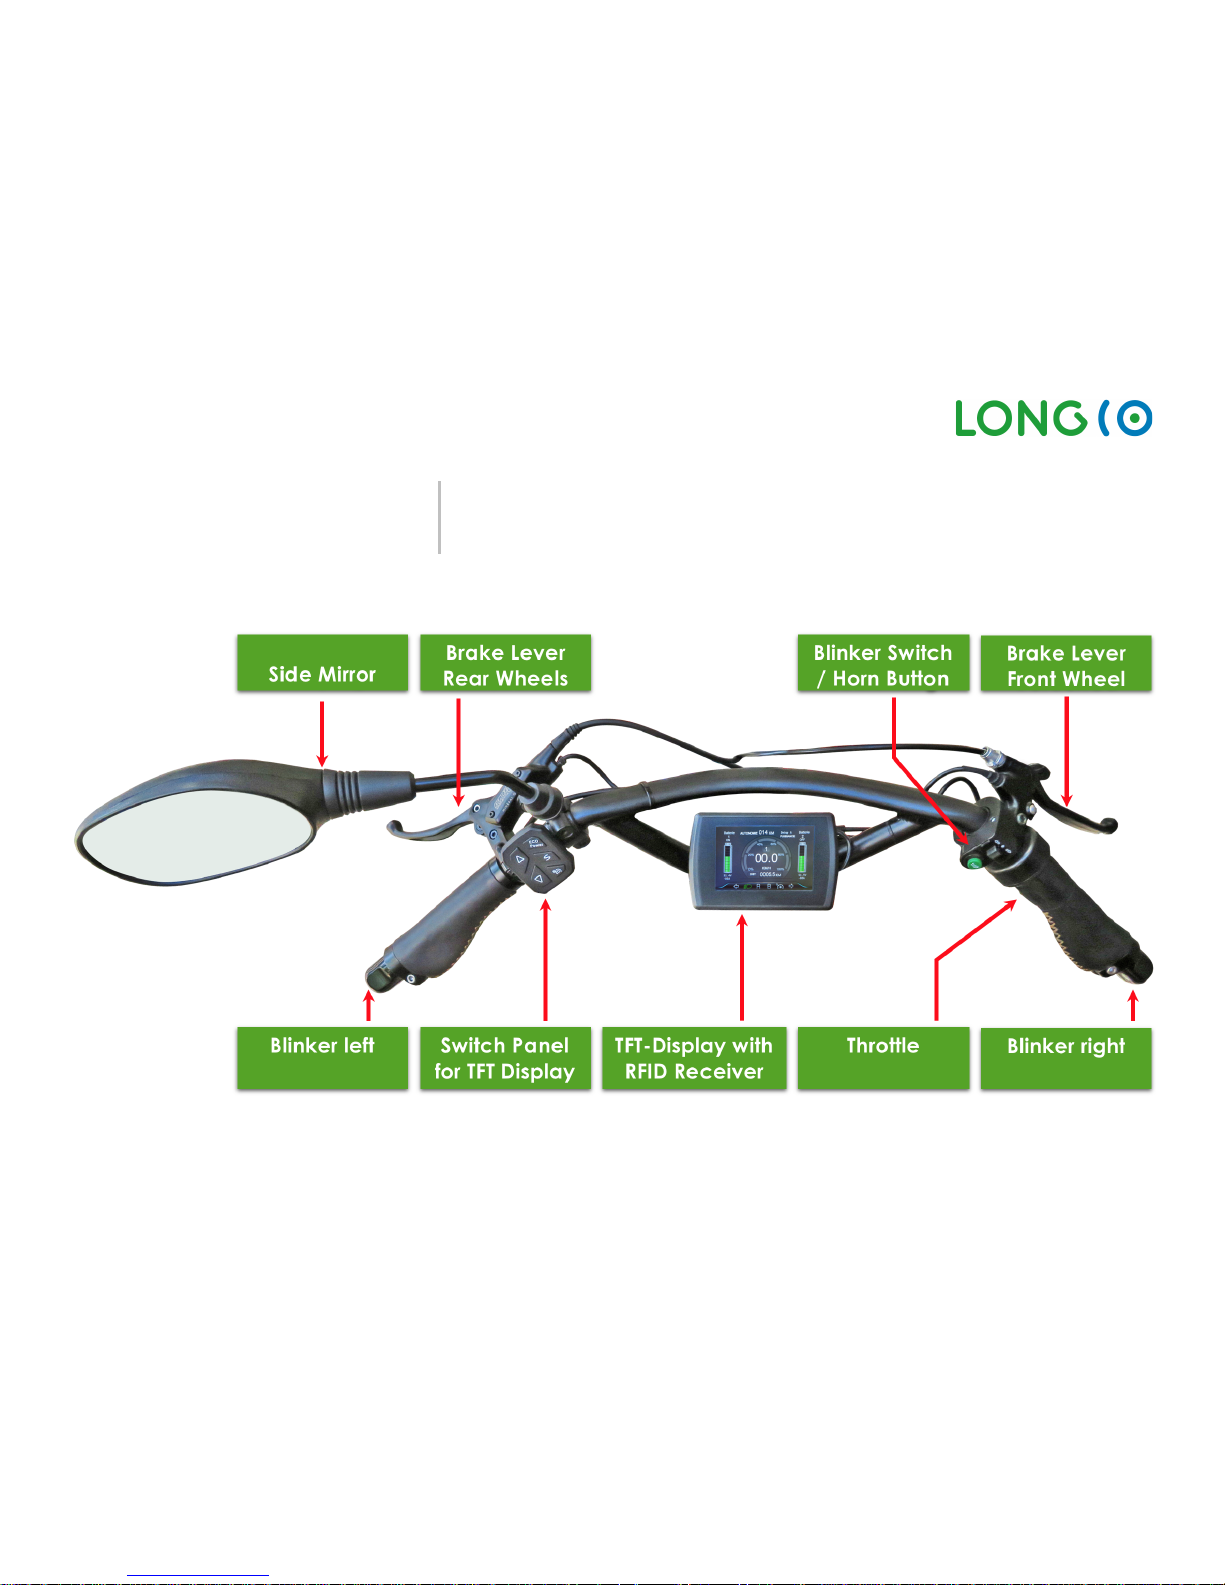
3.3. Control Features:
Handlebar and TFT-Display
Page 31
LongCo: User Manual V05 / 11. Juni 2018 Page 31 of 54
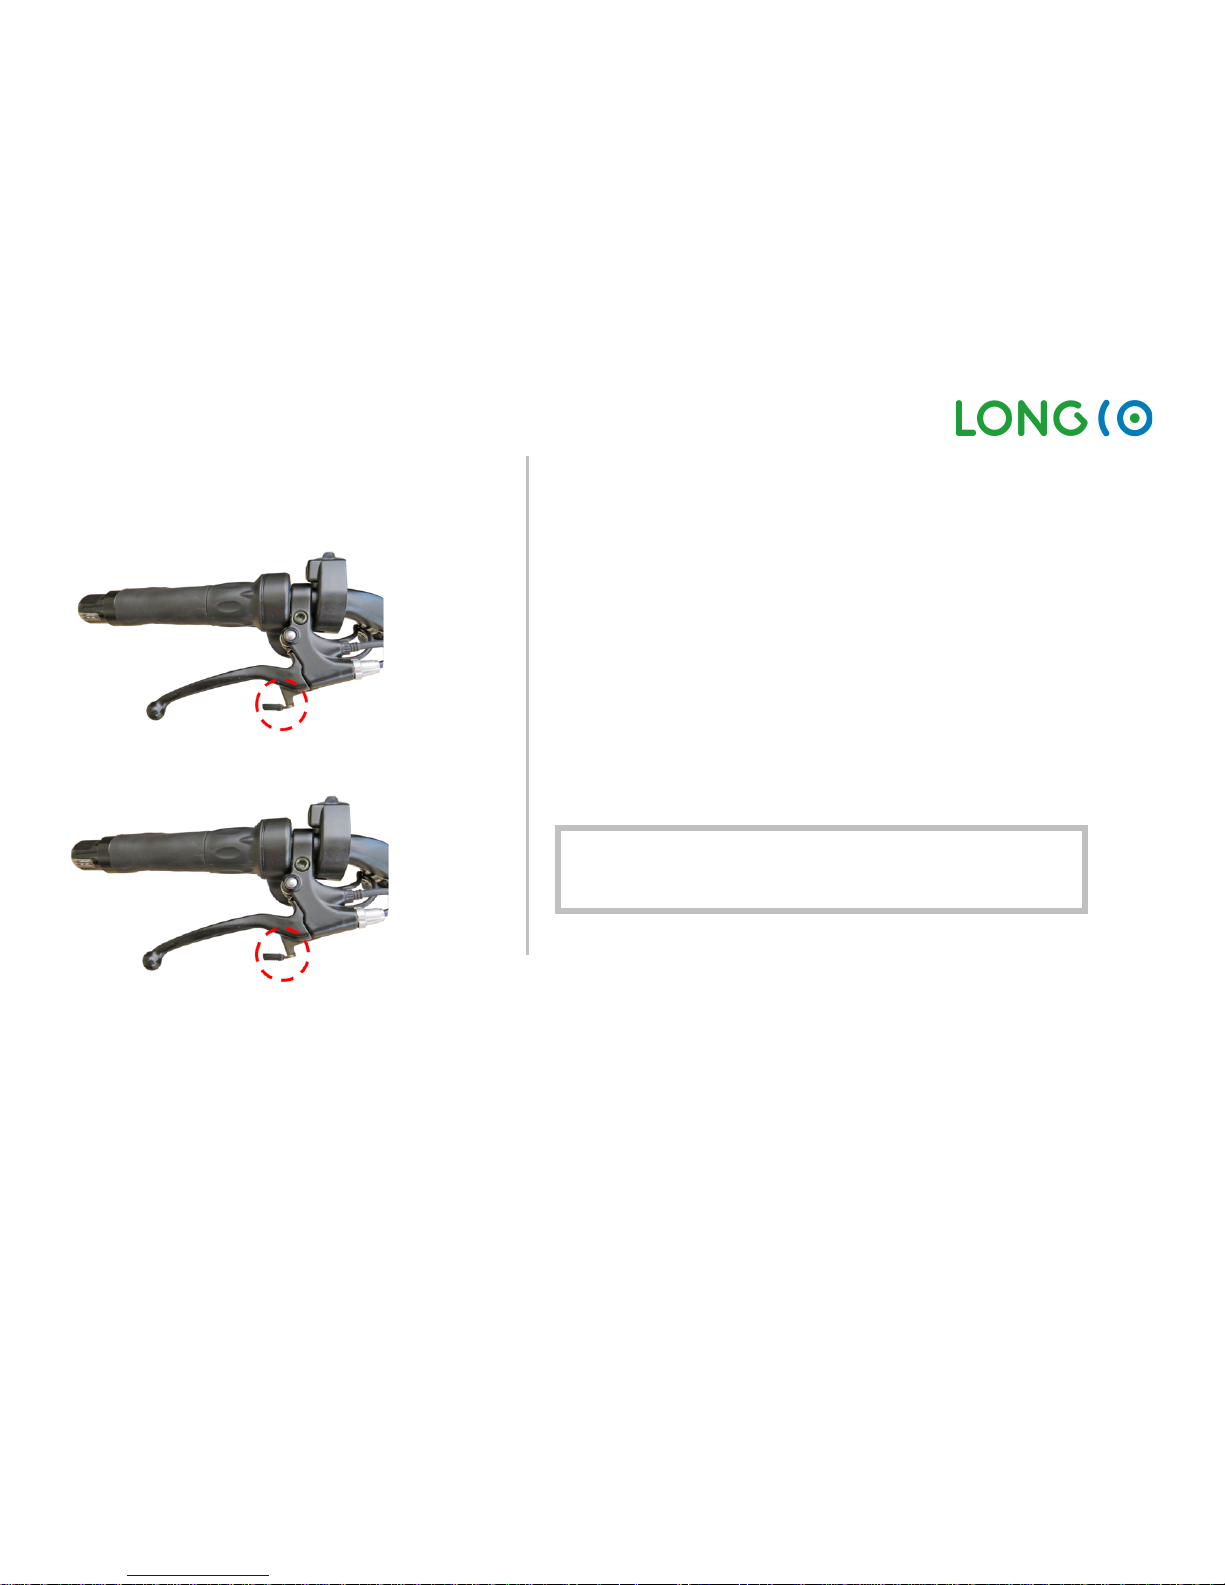
Right side of the Lever
- Parking Brake
Parking brake
front wheel
activated
Parking brake
front wheel
released
To ensure that the LongCo does not inadvertently move, the parking brake
must be activated. Pull up the small black lever on the right handlebar brake
lever to activate the park brake (see photos).
Check functioning of the brake by pushing the LongCo forward while brake
is activated. For further theft protection, you may use a motorbike lock.
Pull up once the brake lever to release parking brake.
In public places be sure to park the LongCo only
where parking is officially allowed.
Page 32
LongCo: User Manual V05 / 11. Juni 2018 Page 32 of 54
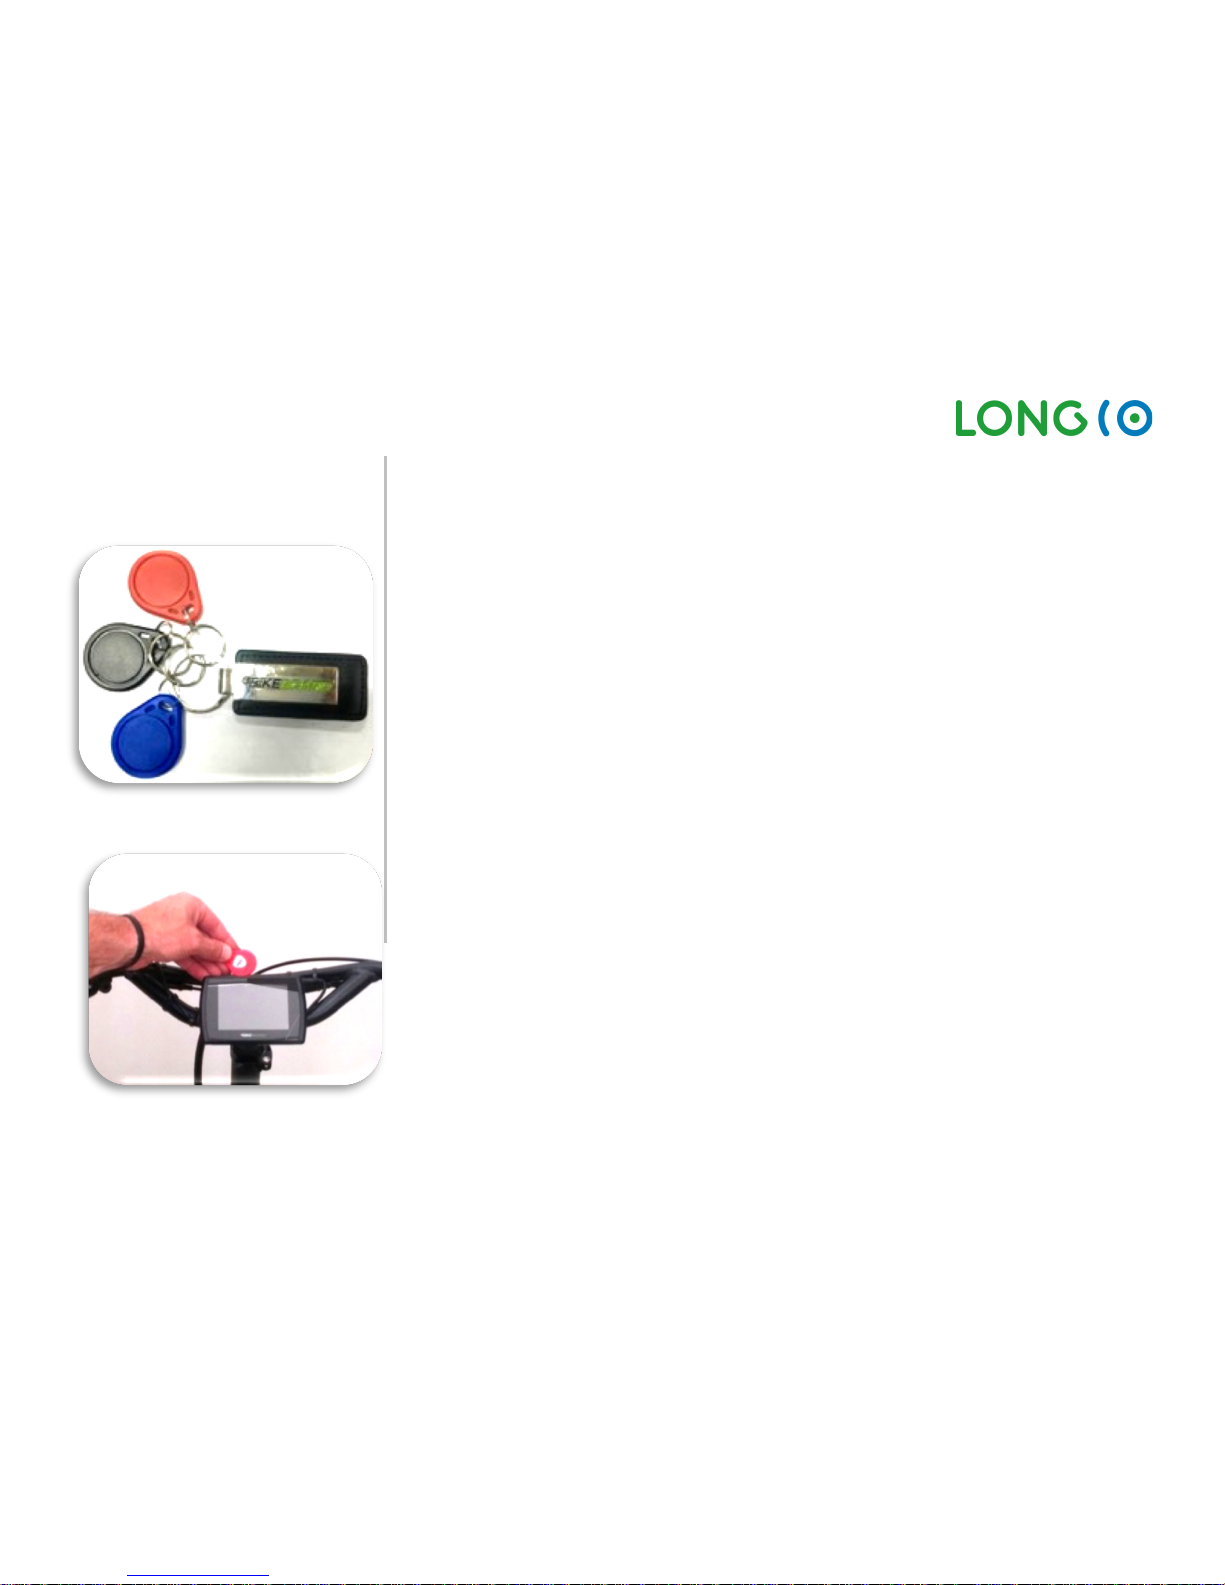
3.4. RFID-Key Set
The RFID-Key-Set (picture 1) has 3 keys:
1) red RFID Chip (ADMIN): allows access to setup-mode of TFT-Display to change settings for
Setup A and B
2) black RFID Chip: turn the LongCo on and off, usage with settings of Setup B
3) blue RFID Chip: turn the LongCo on and off, usage with settings of Setup A
Please note: Lost chip-keys can only be replaced by the manufacturer. Customers receive
2 sets, please secure the second set.
For turn on the System hold the RFID-Key behind the TFT-Display (picture 2). Display is activated
and shows the general information. Now parking brake released and ready to go.
To turn off the LongCo please hold the RFID-Key behind the Display again. Please make sure the
speed is zero.
.
Page 33
LongCo: User Manual V05 / 11. Juni 2018 Page 33 of 54
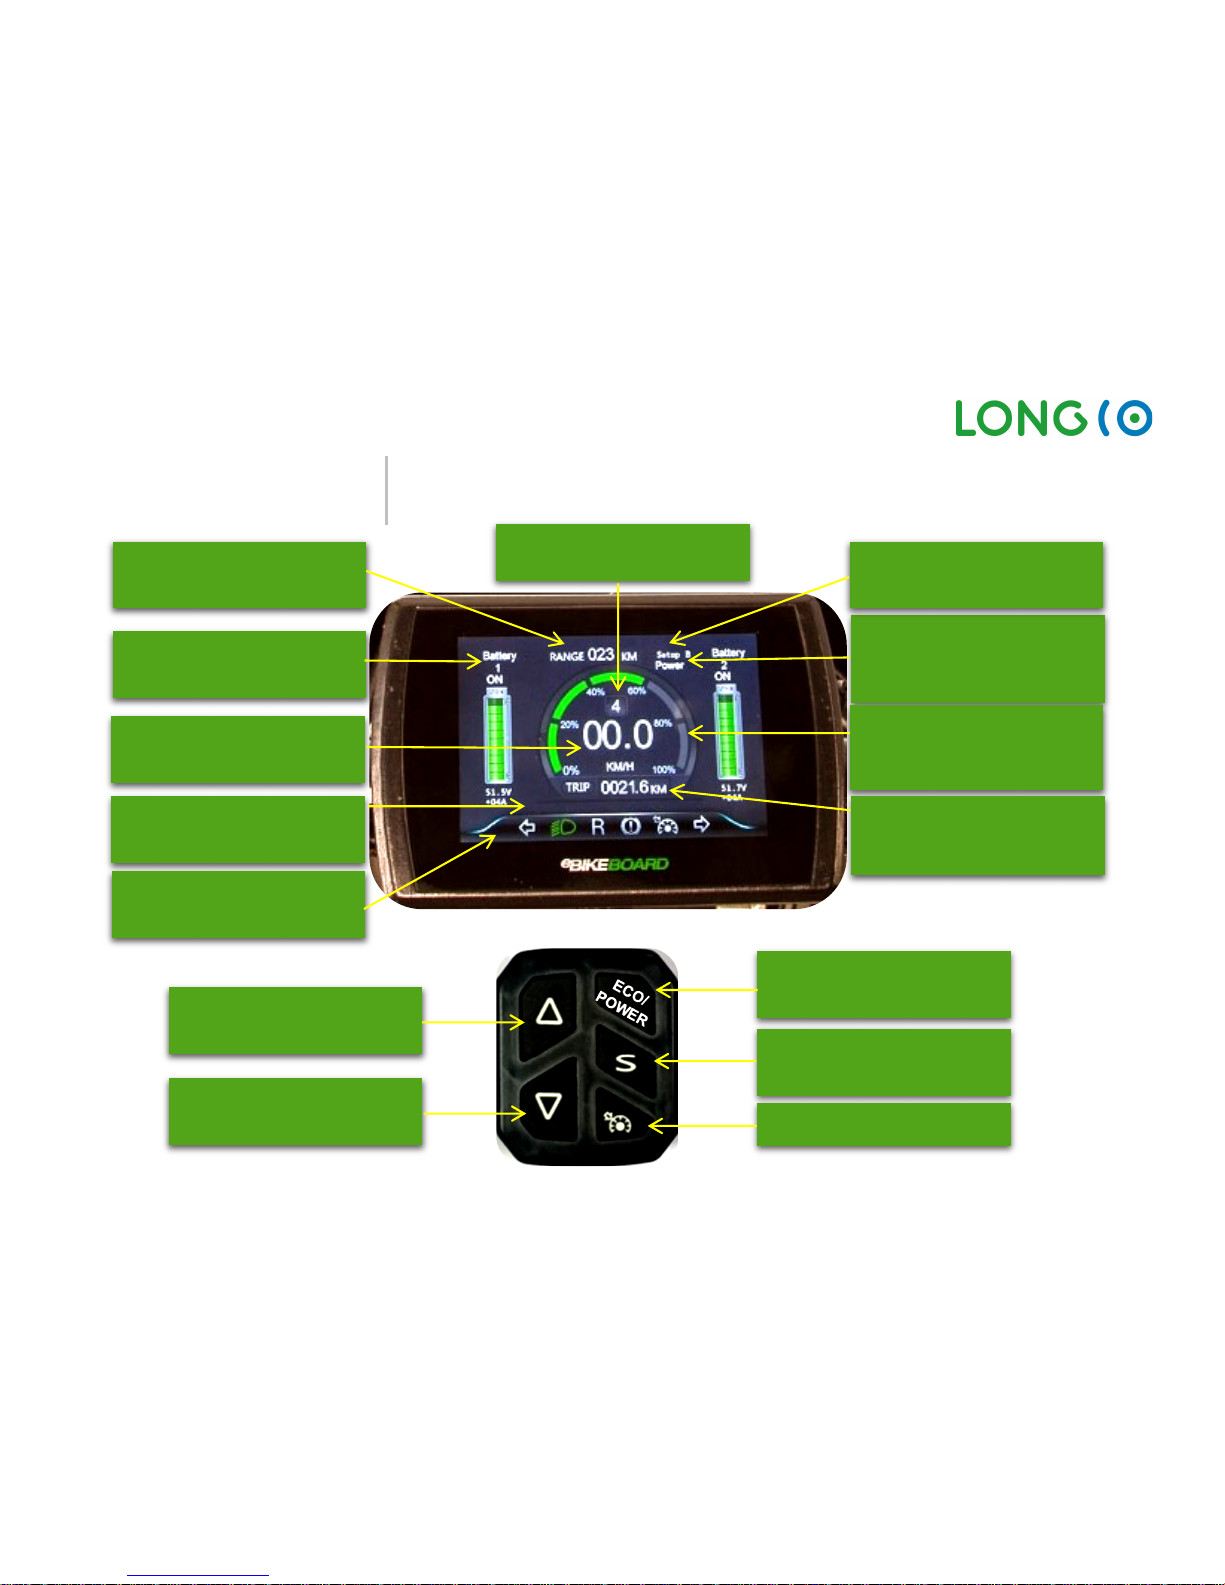
3.5. TFT-Display
Power Mode:
ECO/POWER
Read Battery 1
Status-Bar
Power cycle bar
Range
Setup A oder B
Speed
TRIP/ODO view
Speed Level
Change ECO/POWER
„S“ (change
ODO/TRIP-view)
Cruise control
Arrow UP
Arrow DOWN
Control-Light
Page 34
LongCo: User Manual V05 / 11. Juni 2018 Page 34 of 54
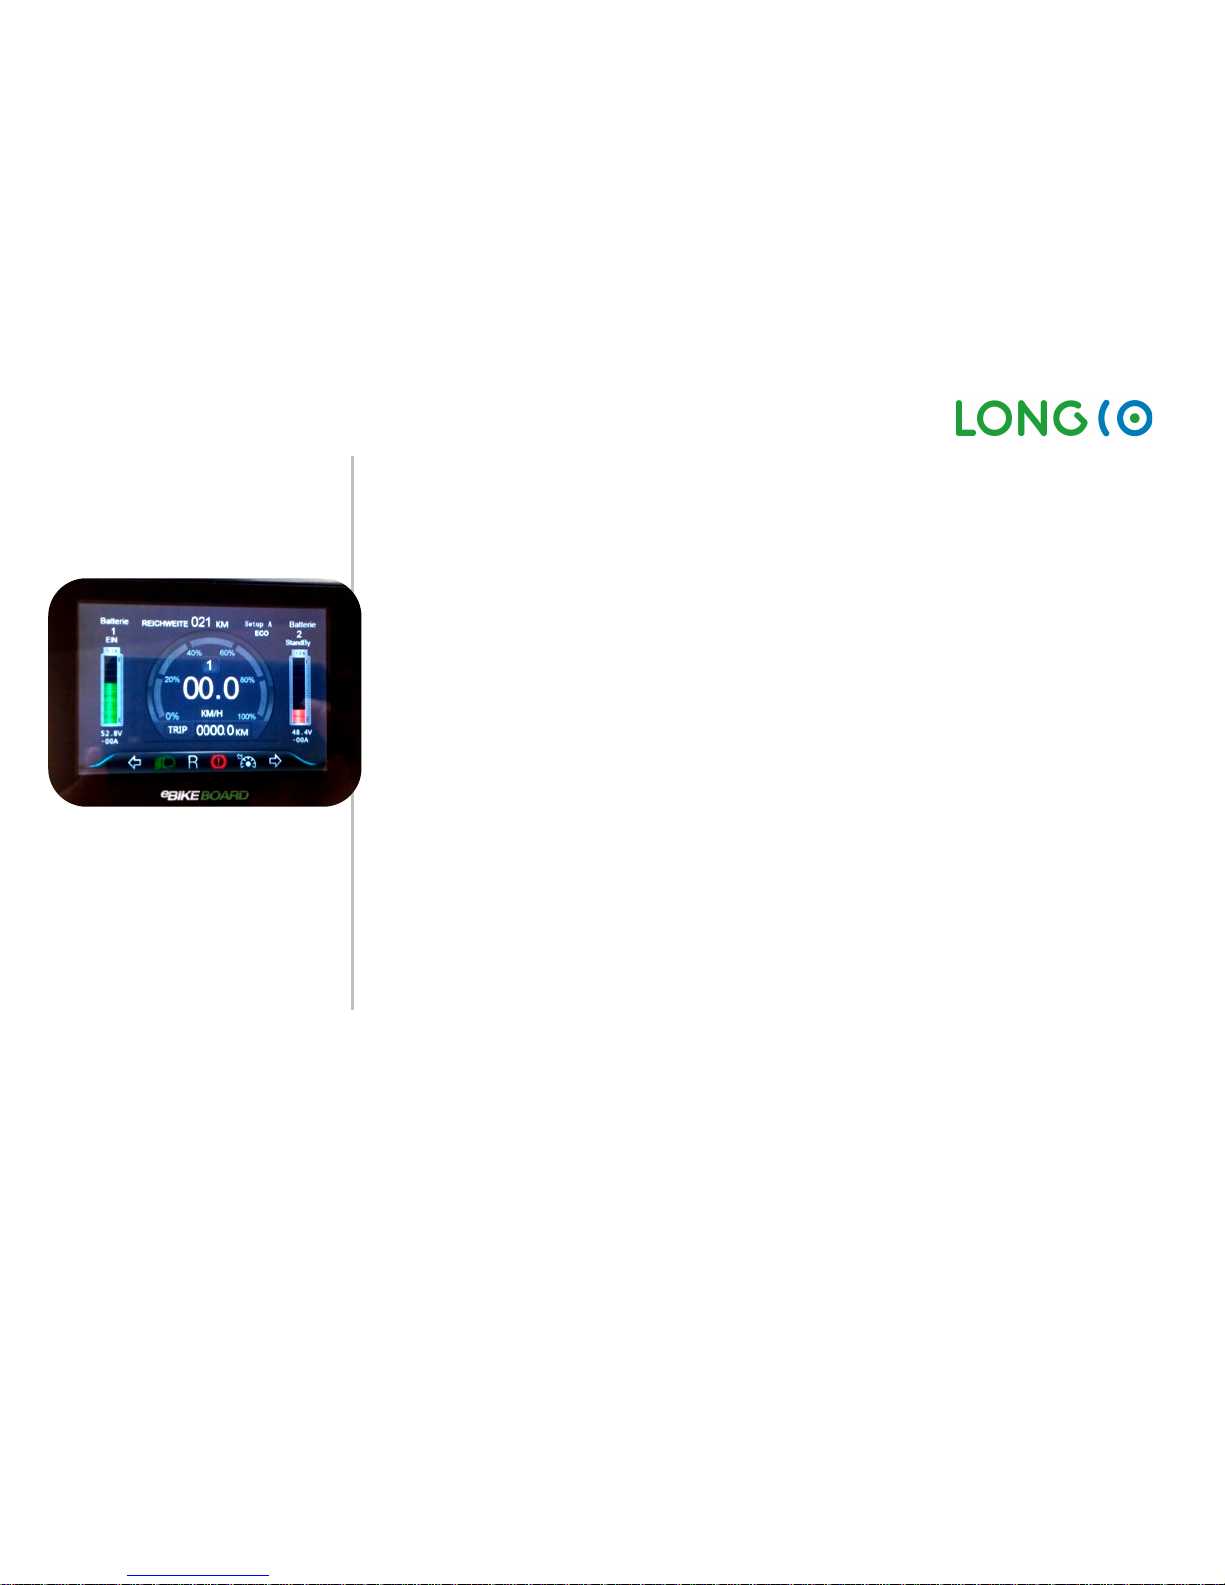
3.6. Read TFT-Display
For example see picture on the left side:
• Battery 1 is ON (52.8V)
• Battery 2 is StandBy (48.4V) (Battery 3, when installed is also shown)
• Range: 21 km
• Power cycle bar: 0 % (Power-Chart is gray)
• Setup A (blue RFID-Chip registered)
• Mode: ECO (energy saving)
• TRIP (line): 0 km
• Status-Bar Signs:
§ Turn signal left is OFF (sign arrow left is not green)
§ Front light is ON (sign for front light is green)
§ Reverse is not active (sign “R” is not red)
§ Cruise control is OFF (sign for cruise control is not green)
§ Turn signal right is OFF (sign arrow right is not green)
Batteries can be shown as ON, OFF or Standby. Standby means that the battery is on but not used,
because the voltage difference is too big. It will be automatically reactivated, when voltage
difference is smaller than 2V.
Additionally, Status-Bar shows some errors as rolling text from right to left:
o Throttle error
o Motor 1 (2 or 3) Hall Defect
o Communication Problem - Restart System
o Motor 1 (2 or 3) over-temp
o Battery 1, 2 or 3 over-temp, Power reduced
o Service, contact service
Page 35
LongCo: User Manual V05 / 11. Juni 2018 Page 35 of 54
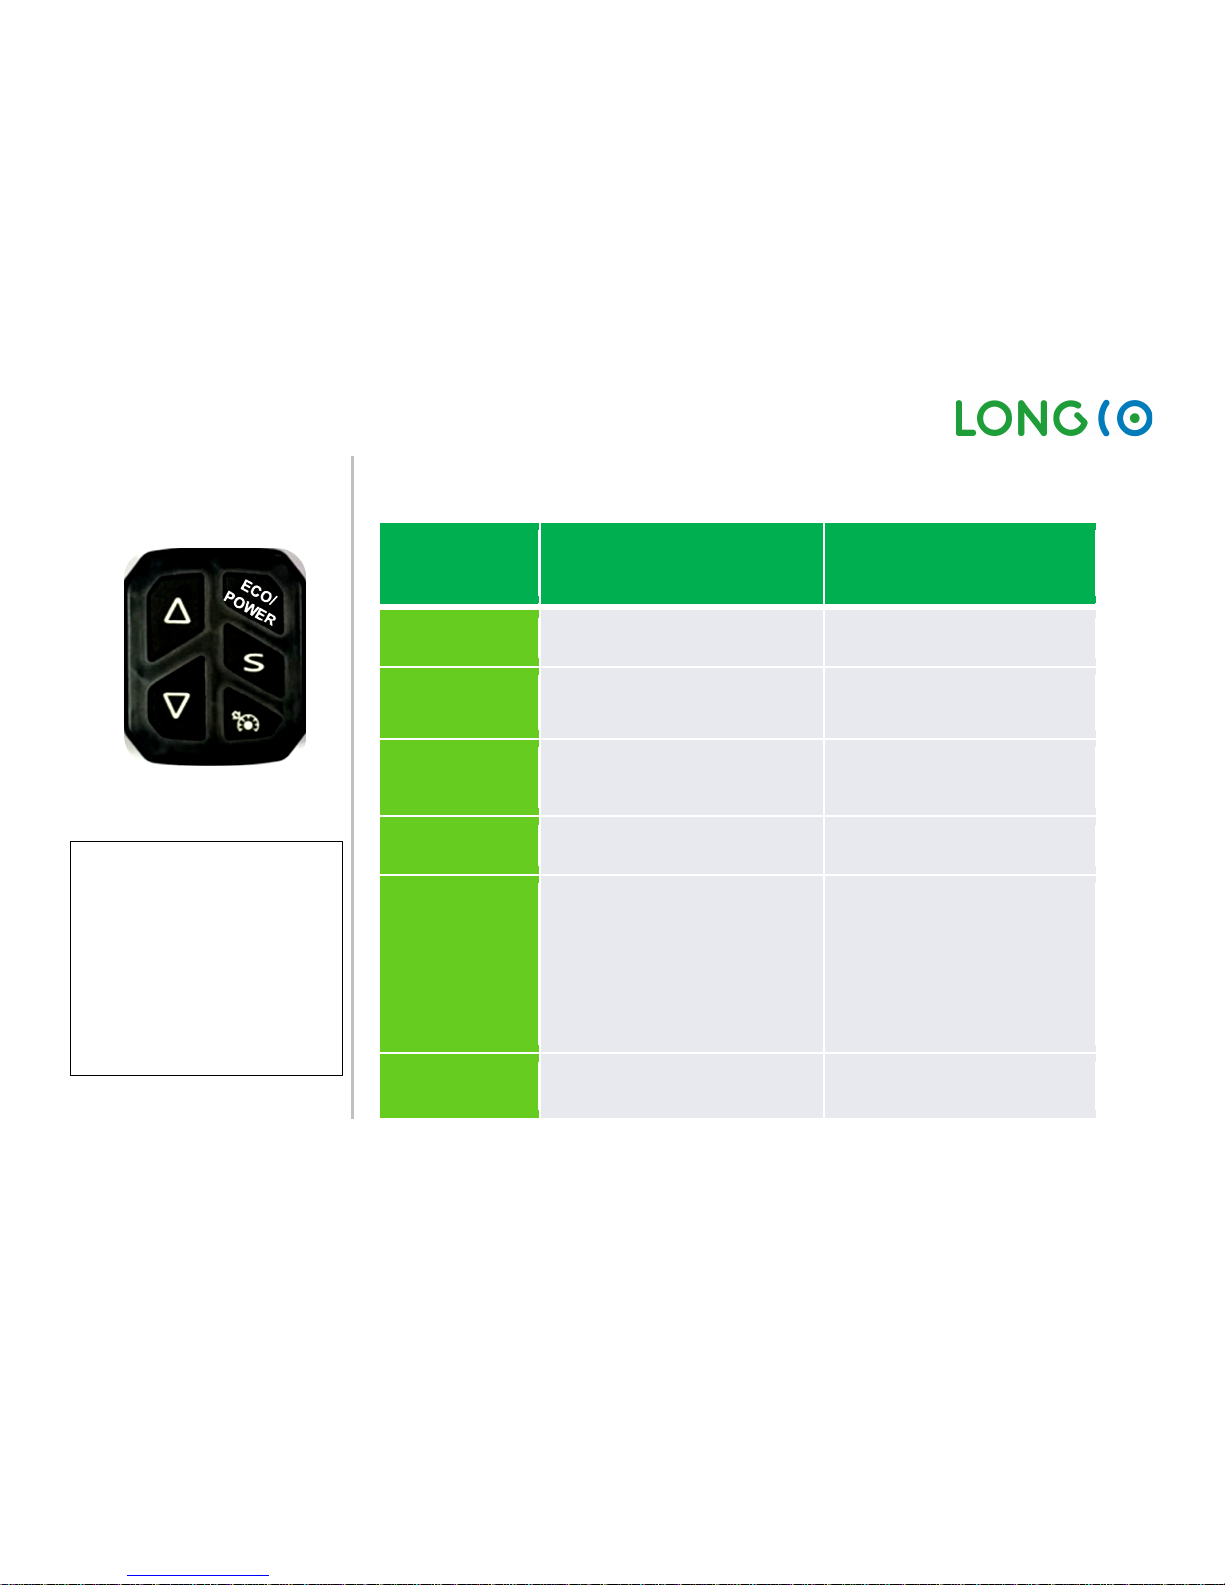
3.7. Switch buttons
from the TFT-Display
Details about the functions of switch buttons:
Switch
button
Push short
Push long
(about 3 seconds)
UP
Speed higher or forward if
reverse was activated * *
DOWN
Speed Level down
Reverse (only if activated in
Setup with ADMIN RFID-Key)
ECO/POWER
Change Power Mode: ECO
(energy saving) or POWER
S
Change view ODO or TRIP
Cruise
control
Activate Cruise Control*
(only if activated in Setup with
ADMIN RFID-Key)
If the Blinker is activated, and
the LongCo is stopped: Both
blinker flash as emergency
blinker
UP+DOWN
Reset TRIP
*Cruise control deactivating:
Push “UP”, “DOWN”, “CRUISE
CONTROL”, brake lever to
slow down or move the
throttle to rise the speed.
** available only if one-handsetup in the settings menu has
been activated
Page 36
LongCo: User Manual V05 / 11. Juni 2018 Page 36 of 54
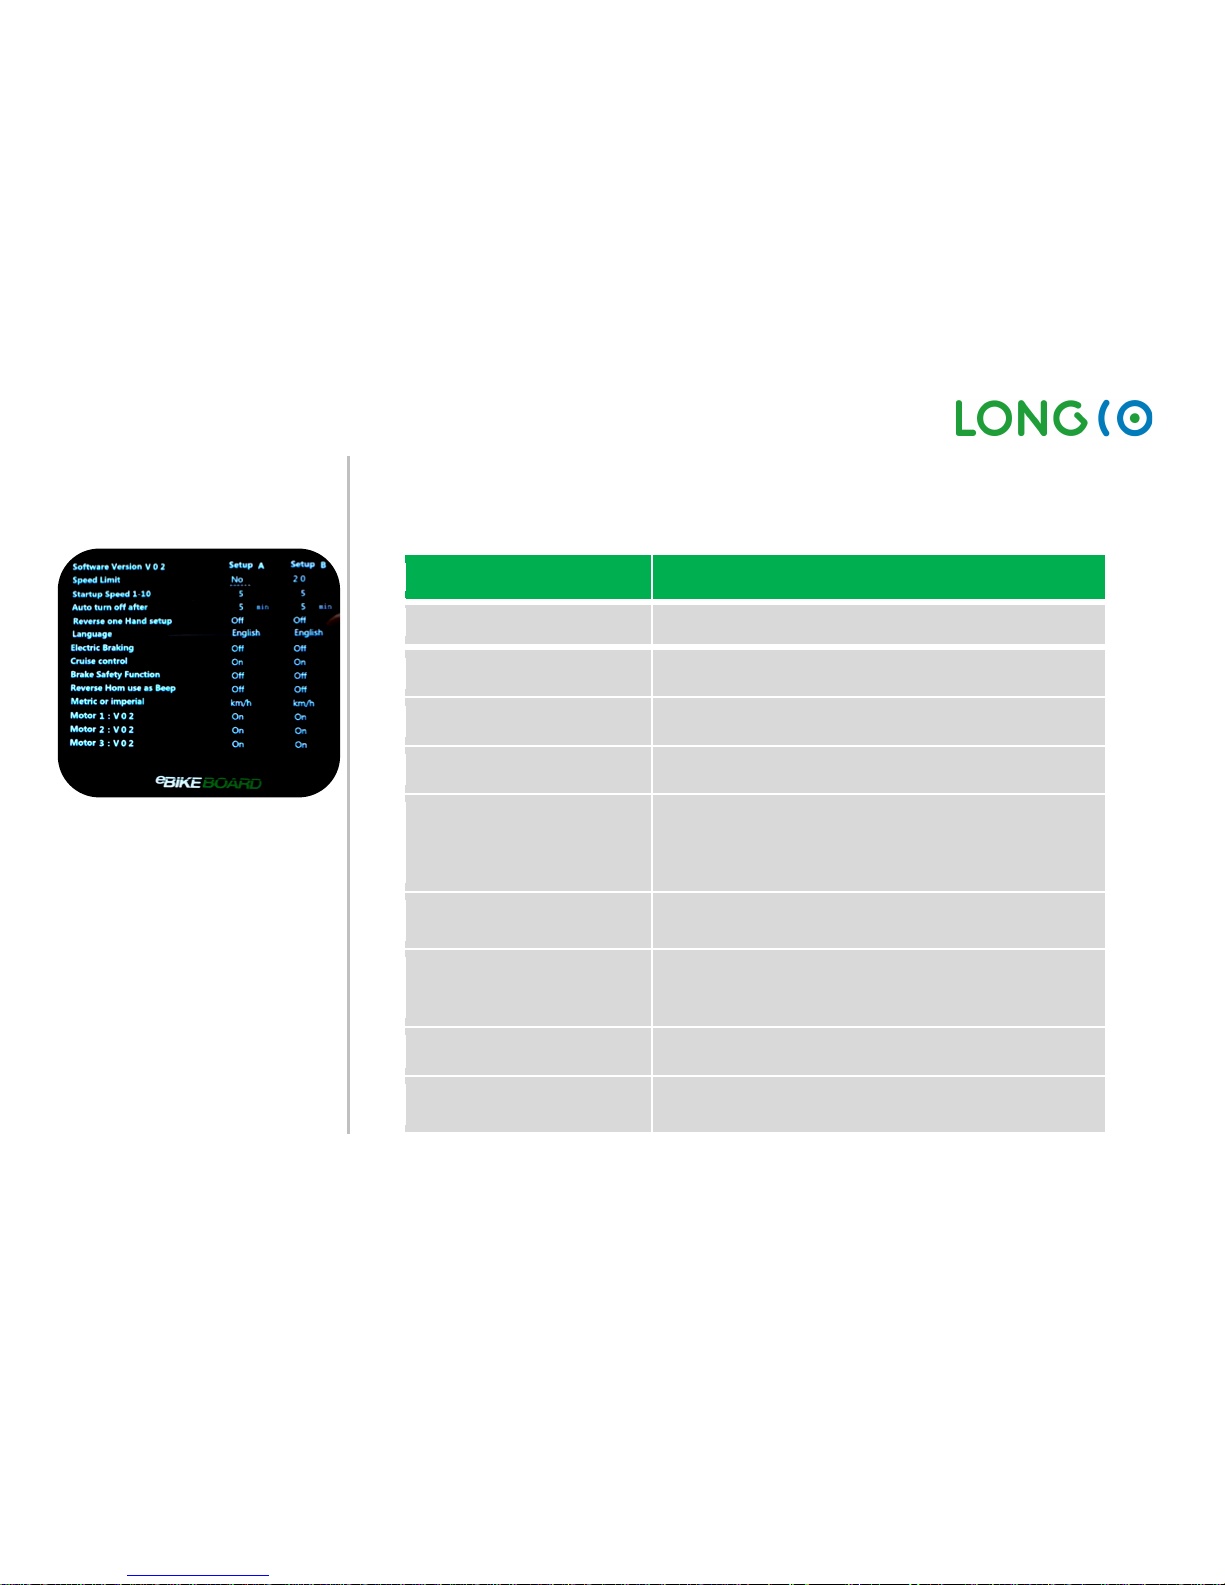
3.8. Setup-Mode T
FT-Display
To enter Setup use red RFID-Key (ADMIN-Key).
Setup Menu
Description
Software Version V01
Installed Software Version of the TFT-Display
Speed Limit
Set the maximal Speed
Startup Speed 1-10
Set the startup speed
Auto turn off after
Shutdown of the System after x min
Reverse One Hand Setup
Push Button Down long time, then “R” turns red on the
TFT-Display. You can release the Down Button and use
only the throttle, it will be always on reverse. Push the
arrow up button short to go back to normal mode
Language
Choose the Language for the Main Screen
(Englisch, German, French)
Electric Braking
Electric Braking (Regenerative Brake)
(only works if rear- or all-wheel drive system)
Level 1 to 10 (1 = soft … 10 = strong braking)
Cruise control
Set if Cruise Control Button is activated or not
Brake Safety Function
If Activated, means the throttle has to be released
and start over if the brakes have been used.
Page 37

LongCo: User Manual V05 / 11. Juni 2018 Page 37 of 54
Reverse Horn use as Beep
Activate Acoustic Signal when on Reverse
Metric or Imperial
Choose Metric (km) or Imperial (miles))
Motor 1: V02
Motor 1 (is always ON / Shows the Software Version
of the Main Controller)
Motor 2: V02
Motor 2 (ON or OFF / Shows the Software Version of
the slave controller)
Have to be set to “OFF” if the Vehicle has only front
wheel drive. If it has all wheel drive, with this option
the rear motors can b e deactivated
Motor 3: V02
Motor 2 (ON or OFF / Shows the Software Version of
the slave controller)
See Motor 2: Both will be together switched to ON or
OFF)
Use the ECO/POWER Button to scroll through settings, and the arrow UP and DOWN to change the
value. Setup-Mode can only be displayed in English. The Language-Settings are only for the Main
Screen.
CAUTION! If you turn off the batteries while accessing setup-mode, the changes won’t be saved!
To save changes, exit the Setup-Mode with the red RFID-Key.
Page 38

LongCo: User Manual V05 / 11. Juni 2018 Page 38 of 54
The possible options in the setting menu:
Software Version
(Display)
Setup A
Default
Setup A
Setup B
Default
Setup B
Speed Limit
6-45, or no
no
6-45, or no
20
Start-up Speed
1-10
1-10 5 1-10
5
Auto turn off after
1-20min
5
1-20min
5
Reverse one
Hand setup*
On / Off
Off
On / Off
Off
Language
English/
German/
French
English
English/
German/
French
English
Electric Braking
Off, 1-10
Off
Off, 1-10
Off
Cruise control
On / Off
On
On / Off
On
Brake Safety
Function
On / Off
Off
On / Off
Off
Reverse use Horn
as Beep
On / Off
Off
On / Off
Off
Metric or Imperial
km/h or
mph
km/h
km/h or
mph
km/h
Motor 1: Software
Version …
On / Off
On
On / Off
On
Page 39

LongCo: User Manual V05 / 11. Juni 2018 Page 39 of 54
Motor 2: Software
Version …
On / Off
Off
On / Off
Off
Motor 3: Software
Version …
On / Off
Off
On / Off
Off
*Push Button Down long time, then “R” turns red on the TFT-Display. You can release the Down
Button and use only the throttle, it will be always on reverse. Push the arrow up button short to go
back to normal mode.
3.9. Speed levels and
Power Mode
Four speed levels are allowing controlling maximum speed.
ECO/POWER-Mode are setting the energy management:
• ECO: economic power use for energy saving
• POWER: full power for steep climb’s
Speed levels
4 speed levels:
LEVEL
1 2 3
4
(default)
Max. Speed
6km/h
12km/h
20km/h
maximum (20, 35, 45 km/h)
Power mode
ECO-Mode is around 70% less than the Full power (POWER-Mode).
Page 40

LongCo: User Manual V05 / 11. Juni 2018 Page 40 of 54
4. Consumer
Information
4.1. Maintenance
• Service:
The first inspection must be done after around 500km or max. 6 months.
The normal inspection must be done regularly after around 2000km, latest after one y ear.
• Check all Screw Connections Regularly:
Please check all screw connections regularly, especially the ones for the steering, wheel axles
and suspension.
• Adjustment of Brakes:
The mechanical front wheel brake can be adjusted at any time with its adjusting screws, one
at the brake lever and one directly at the brake caliper. The hydraulic rear brake adjusts itself.
• Tire and Tire Pressure:
Maintain tire air pressure as stated on the tire sidewall. If you exceed the tire air pressure stated
on the tire sidewall, you increase the risk of loss of control, collisions, and falls. Lower pressure
reduces range and can cause tire and wheel damage! Once the tired tread is worn out, the
tire needs to be replaced.
Table 1
Rim SIze
Recommended Tire Pressure
Maximal Tire Pressure
Front
12“ Rim
2.5 bar / 36psi
2.8 bar / 40 psi
Rear
4“/6" Rim
2.5 bar / 36psi
3.5 bar / 50 psi
Page 41
LongCo: User Manual V05 / 11. Juni 2018 Page 41 of 54
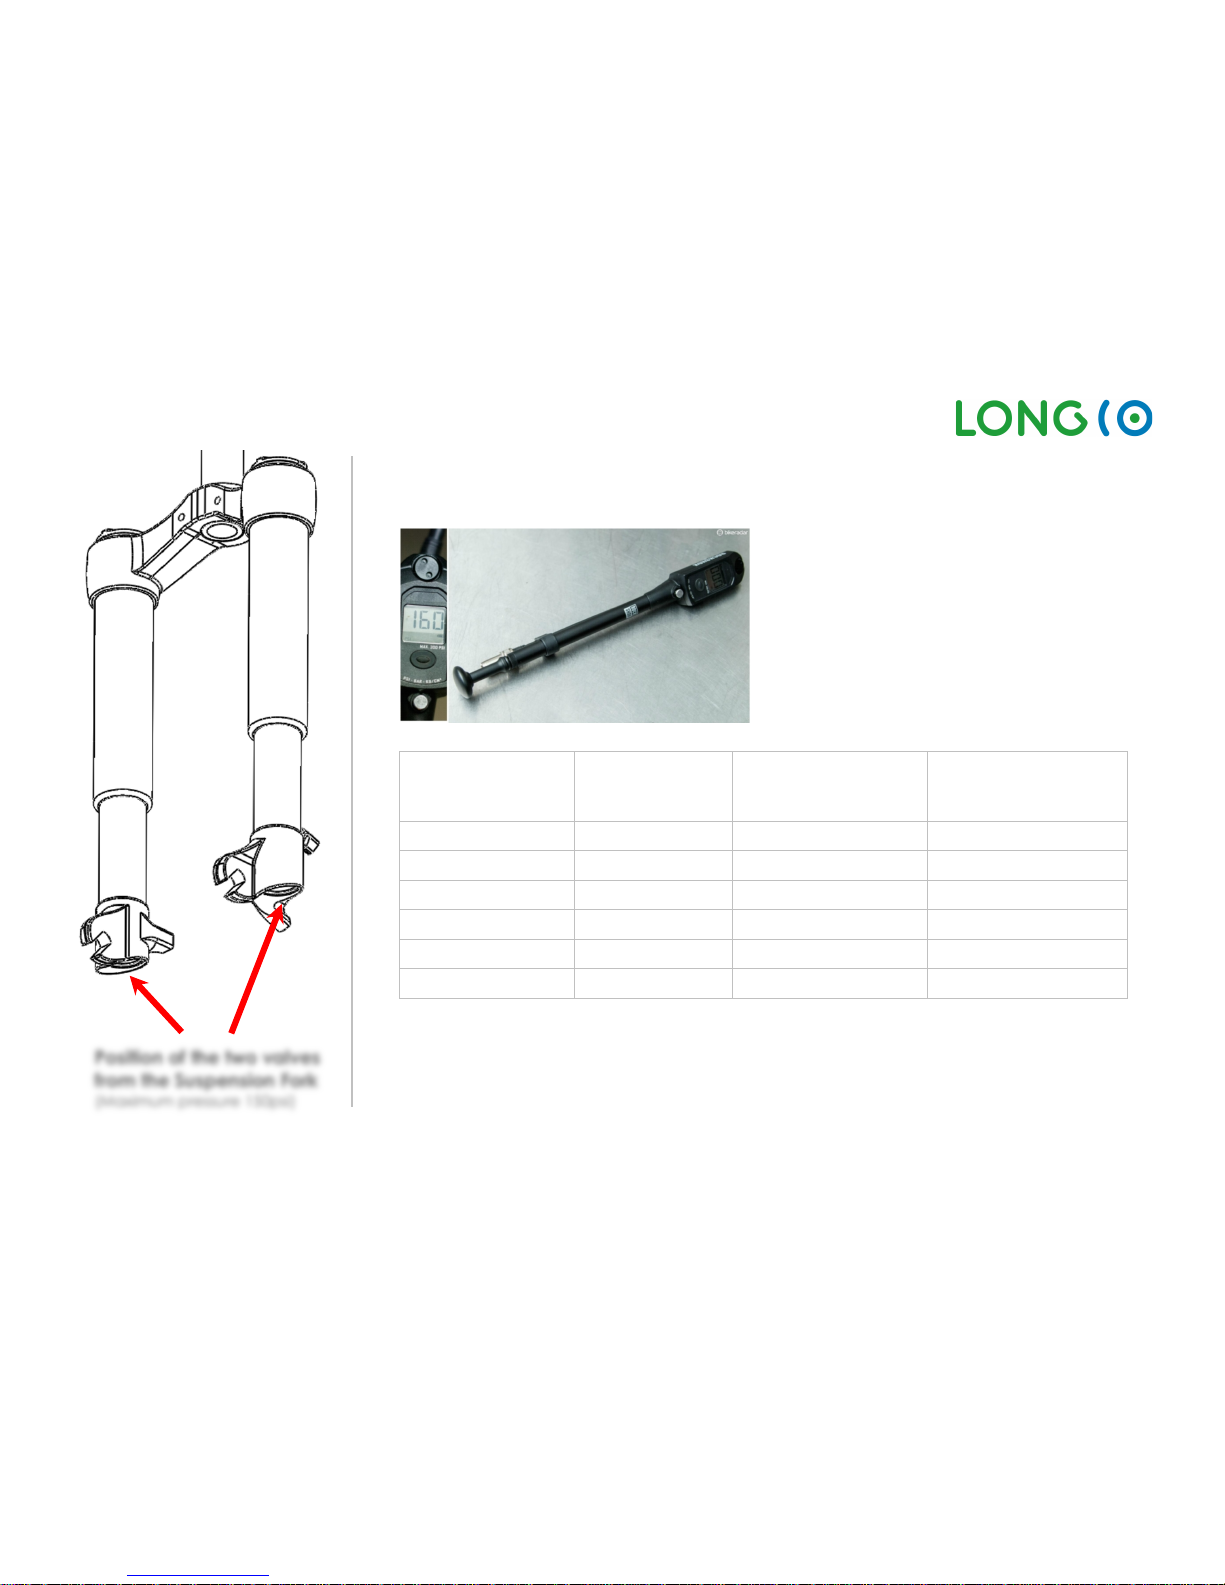
• Air Suspension
The correct setting of the air Pressure is important for a safe ride. There is a special pump in
need for setup the correct pressure:
The correct pressure depends on the payload (Rider + Load):
Table 2 (Attention: If you remove the pump, the air chamber loses some pressure during this
procedure. Therefor add always more pressure, for the fork approx. 10pis, for the main air
chamber around 20psi and for the negative air chamber around 50psi)
Payload
(Rider + Load)
Suspension Fork
(left and right
side)
Rear Shock Main air
Chamber
Rear Shock Negative
Air Chamber
70kg (154lbs)
40psi
120psi
55psi
90kg (198lbs)
45psi
150psi
70psi
105kg (231lbs)
50psi
170psi
75psi
125kg (275lbs)
60psi
190psi
80psi (max.)
160kg (353lbs)
70psi
220psi
80psi (max.)
200kg (440lbs)
80psi
250psi (max.)
80psi (max.)
Position of the two valves
from the Suspension Fork
(Maximum pressure 150psi)
Page 42
LongCo: User Manual V05 / 11. Juni 2018 Page 42 of 54
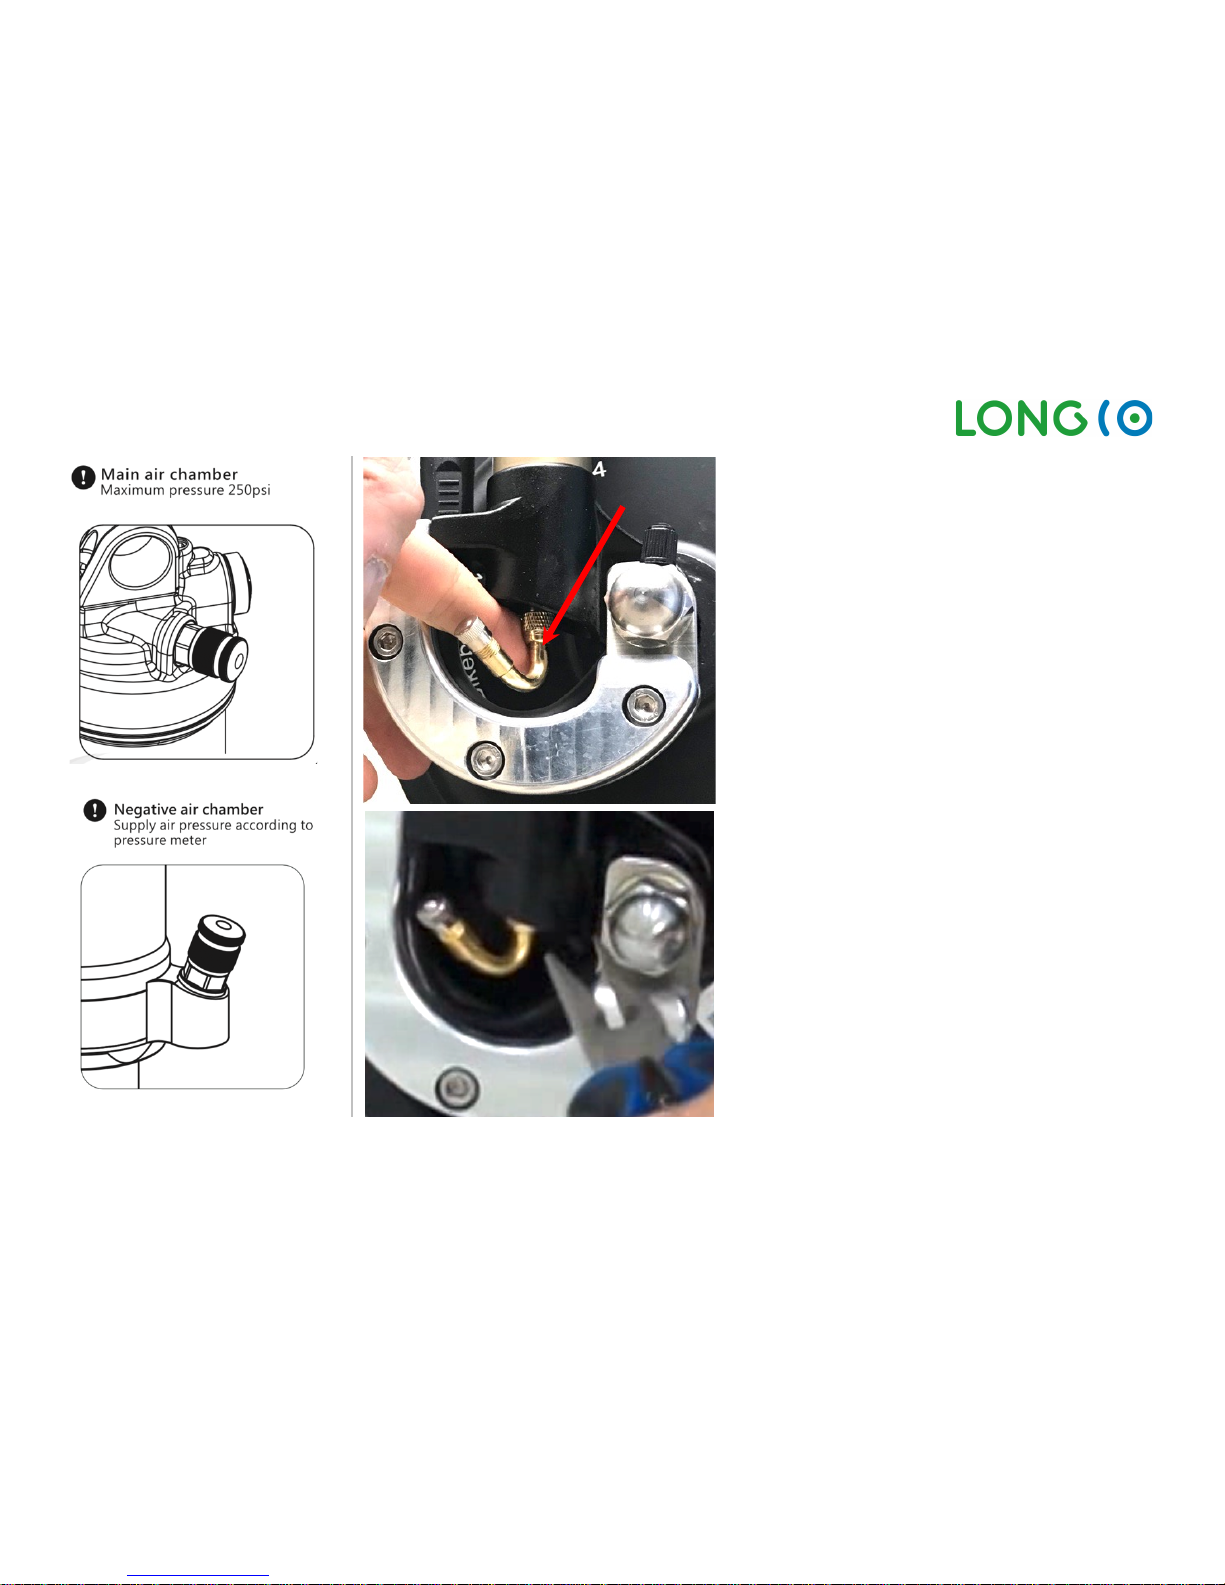
The Suspension fork has on the right side the
torque holder, which can cause a problem using
the air pump directly. The angled valve adapter
(delivered or already mounted) will solve this
problem.
If the valve adapter is not mounted yet, this is the
way how to assemble it:
Remove the black plastic cap and install the
angled valve adapter by screw it on.
If the nut cannot be tightened enough by hand,
use a needle nose plier.
Turn the adapter all the way back, then use the
needle nose plier to tight the nut. After that the
adapter can be pushed to the middle and by this
it will be in a fixed position.
After that the pump can be used at the angled
valve without problem. After change the pressure,
remove the angled valve adapter and close it
with the metal cap.
Page 43

LongCo: User Manual V05 / 11. Juni 2018 Page 43 of 54
4.2. Repairs
• Replacing Wear Parts:
Any repairs must be per formed by your specialized LongCo dealer. You can find your closest
dealer in the internet. Only original parts, supplied by manufacturer are permitted.
• Do not modify the LongCo from the manufacturer's original des ign and configuration.
4.3. Warranty and
Limited Liability
Scope of Warranty
• The designer and manufacturer of the LongCo, offers a limited warranty for each purchased
original LongCo. This warranty covers the replacement of original parts that fail prematurely due
to material or fabrication defects.
• The warranty is only active, if the warranty form is registered and all inspections are done
• Tires, tubes and brake pads are not included in the warranty.
• The warranty covers the statutory warranty period valid in the country of purchase, with a
maximum period of 2 years for the LongCo and 2 years or 700 recharges for the
battery(whichever occurs first)
• It is r estricted to the first purchaser of the LongCo.
• The period of warranty does not extend to parts that are replaced during the period of warranty.
Warranty Terms and
Conditions
In order for a warranty claim to be valid, the following conditions must be satisfied:
• The LongCo must be complete and correctly assembled.
• The LongCo must have been used only under normal conditions and for its intended purpose in
line with the instructions of use.
• The original proof of purchase with the VIN number.
• If the terms and conditions of the warranty have been satisfied, the defective parts will be
replaced free of charge by an authorized dealer.
Page 44

LongCo: User Manual V05 / 11. Juni 2018 Page 44 of 54
Warranty Claims
All claims that are covered by this warranty must be processed by an authorized LongCo dealer.
Any defective parts must be returned with the claim
To find the nearest authorized dealer please check the Internet
Warranty Exceptions
The following conditions are not covered by warranty:
Damage or wear and tear caused by:
• External mechanical, chemical or temperature factors
• Accidents, misuse, sabotage, negligence or natural disasters
• Improper assembly
• Failure to observe the guidelines issued in this User Manual in regard to handling, use or
maintenance of the LongCo
• Improper maintenance or repair work
• Changes of any kind to the original LongCo
• Illegal use of the equipment
• Use of LongCo parts for other purposes
• Use in races or competitions
The warranty a lso does not cover any paint damage or scratches, normal wear and tear to parts, in
particular tires, inner tubes, brake pads, handles and protective coatings, or any other wear and tear
caused by the normal use of the LongCo.
The liability of the Manufacturer and its authorized dealers is limited to the repair and replacement of
defective parts. It does not cover any direct or indirect liability for any alleged damages and their
consequences. The Manufacturer and its authorized dealers will not reimburse any travel expenses
incurred by people or by the transport of the product from the purchaser to the authorized dealer
and back.
Page 45

LongCo: User Manual V05 / 11. Juni 2018 Page 45 of 54
Secondary Damage
Exclusion
The Manufacturer will not accept liability for incidental or indirect losses or damages caused by the
use of the LongCo.
4.4. Transport
You can easily transport the collapsible LongCo in almost any car with the handle bar and
platform folded. When transporting the LongCo, you must first remove the battery set from the
frame.
To transport the LongCo via airplane, please make sure you research safety regulations in regards
to the transport of Lithium batteri es. There might be restrictions, depending on the airline you are
using.
Limited Liability
All LongCo products have been developed, manufactured and sold for their intended use as
detailed in the instructions for use. They should not be used with other engines or with any other forms
of propulsion or batteries other than those supplied.
The Manufacturer and its authorized dealers will not accept liability for any injuries or damages of any
kind caused by the improper use of the LongCo. This warranty only gives the user the limited rights
that are stated by law.
Page 46

LongCo: User Manual V05 / 11. Juni 2018 Page 46 of 54
4.5. Storage and
Care Instructions
• Storage:
o Please store the LongCo in a dry place
o Temperatures should not exceed 60°C (140°F) or fall below -15°C (-5°F) at any time.
Keep in mind that the batteries in particular are sensitive to higher temperatures.
o Please charge the batteries at least once per month.
• Care instructions:
o Keep the LongCo dry and clean.
o Avoid moisture and water on electric or electronic parts. Water could cause a short
circuit and damage electric parts. Electricity is dangerous and could cause injury in
combination with water.
o Always switch off the batteries after use. Keep the keys as well as the battery keys in a
safe place and out of reach of children at all times.
o Whi le cleaning, check for cracks, deterioration of cables, metal warping or
discoloration. In case of any concerns or doubts about the condition of the LongCo ,
please contact your LongCo dealer.
o Do not get any oily products or oil on the brake pads or disks. Doing so may cause the
brakes to fail!
o When cleaning the LongCo with water, first r emove the battery packs. Water could
cause a short circuit, which could lead to injuries of people and damage to the
LongCo.
o Clean the battery packs with a damp cloth only. Insert the battery packs only when
the battery contacts on the Lo ngCo are completely dry.
Page 47
LongCo: User Manual V05 / 11. Juni 2018 Page 47 of 54
4.6. Disposal
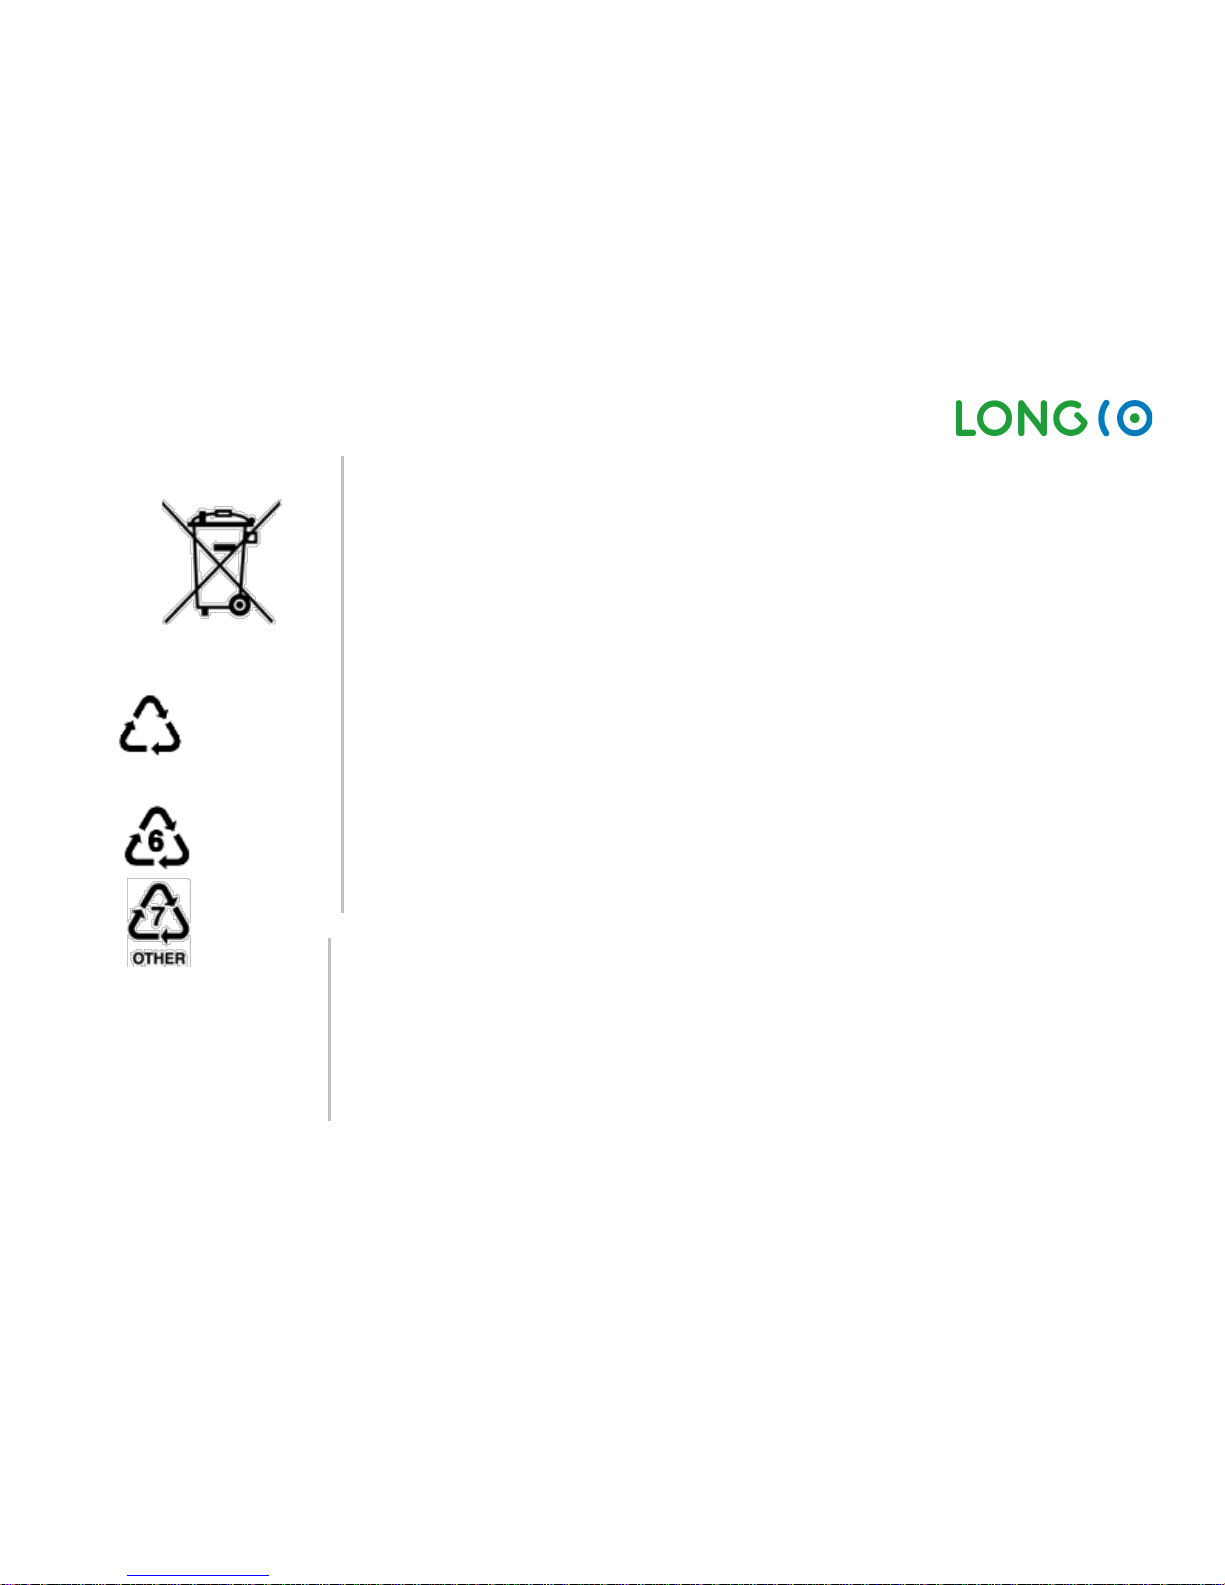
The LongCo is designed to allow for separate disposal and recycling of its various materials. When
you need to dispose of the LongCo, choose one of the following options:
1. Return it to your LongCo dealer.
2. Professional disposal through a local disposal/recycling company/facility.
The main components are listed below and show their proper waste classification:
Batteries
The batteries contain chemicals and heavy metals. Therefore, they MUST be returned to any
LongCo dealer or be disposed of at special local collection points for batteries.
Packing Foam
The packing foam is made of polystyrene and can be recycled at special local collection points.
Plastic Covers
The plastic covers are made of Acrylonitrile Butadiene Styrene (ABS) and can be disposed of at
special local collection points for recycling.
The LongCo also contains following materials:
Steel
Screws, axles, motor co mponents, spring fork components
Aluminum
Engine housing and LongCo frame
Rubber
Tires and inner tube
Copper
Motor coils, cables
Page 48

LongCo: User Manual V05 / 11. Juni 2018 Page 48 of 54
Cardboard
Main packing box. This box should be kept during the life span of your LongCo. To dispose of your
LongCo, you can use this original box to return the complete LongCo to your nearest dealer or directly
to the importer of LongCo.
Magnets
Rosenberger™ magnetic central charging port and charging adapter (if installed)
Page 49

LongCo: User Manual V05 / 11. Juni 2018 Page 49 of 54
4.7. Troubleshooting
• LongCo does not work at all:
o Check if the battery is fully charged (Check if the po wer switch of the battery on 1 and
the LCD Display)
• LongCo is switched on but does not run:
o Check if the brake light is on or the „R“ Lamp on the TFT display is activated. If yes, then
the electric switch may be activated or is stuck in the "on" position on one of the brake
levers .
• Noise from the Brake Disc:
o Check if the brake caliper is aligned correctly.
o Check if the brake pads are not worn out.
o Check if the brake disc is bent.
• Folding Stem does not work:
o Centre guide of folding stem might be bent (please refer to chapter 2.2 “Unfold Folding
Stem” ).
• TFT-Display: Messages on the Status-Bar of TFT-Display:
o Throttle error
o Motor 1 (2 or 3) Hall Defect
o Communication Problem - Restart System
o Motor 1 (2 or 3) over-temp
o Battery 1, 2 or 3 over-temp, Power reduced
o Service, contact [email protected]
For further customer service and troubleshooting, please contact your authorized LongCo dealer
for assistance.
Page 50

LongCo: User Manual V05 / 11. Juni 2018 Page 50 of 54
5. Inspection-Plan
Modell/
Color
max. km/h
VIN
Motor1 SN
Motor 2 SN
Motor 3 SN
Battery1
Battery 2
Battery 3
Display SN
Specials:
............................................
............................................
............................................
............................................
............................................
............................................
............................................
............................................
............................................
............................................
............................................
Inspection
Km
Date
Dealer Stamp
Handover acc.
Handover Protocol
First Inspection
after 500km,
latest after 6
months
Main Inspection
every 2000km,
latest after one
year
Main Inspection
every 2000km,
latest after one
year
Main Inspection
every 2000km,
latest after one
year
Main Inspection
every 2000km,
latest after one
year
Main Inspection
every 2000km,
latest after one
year
Page 51
LongCo: User Manual V05 / 11. Juni 2018 Page 51 of 54
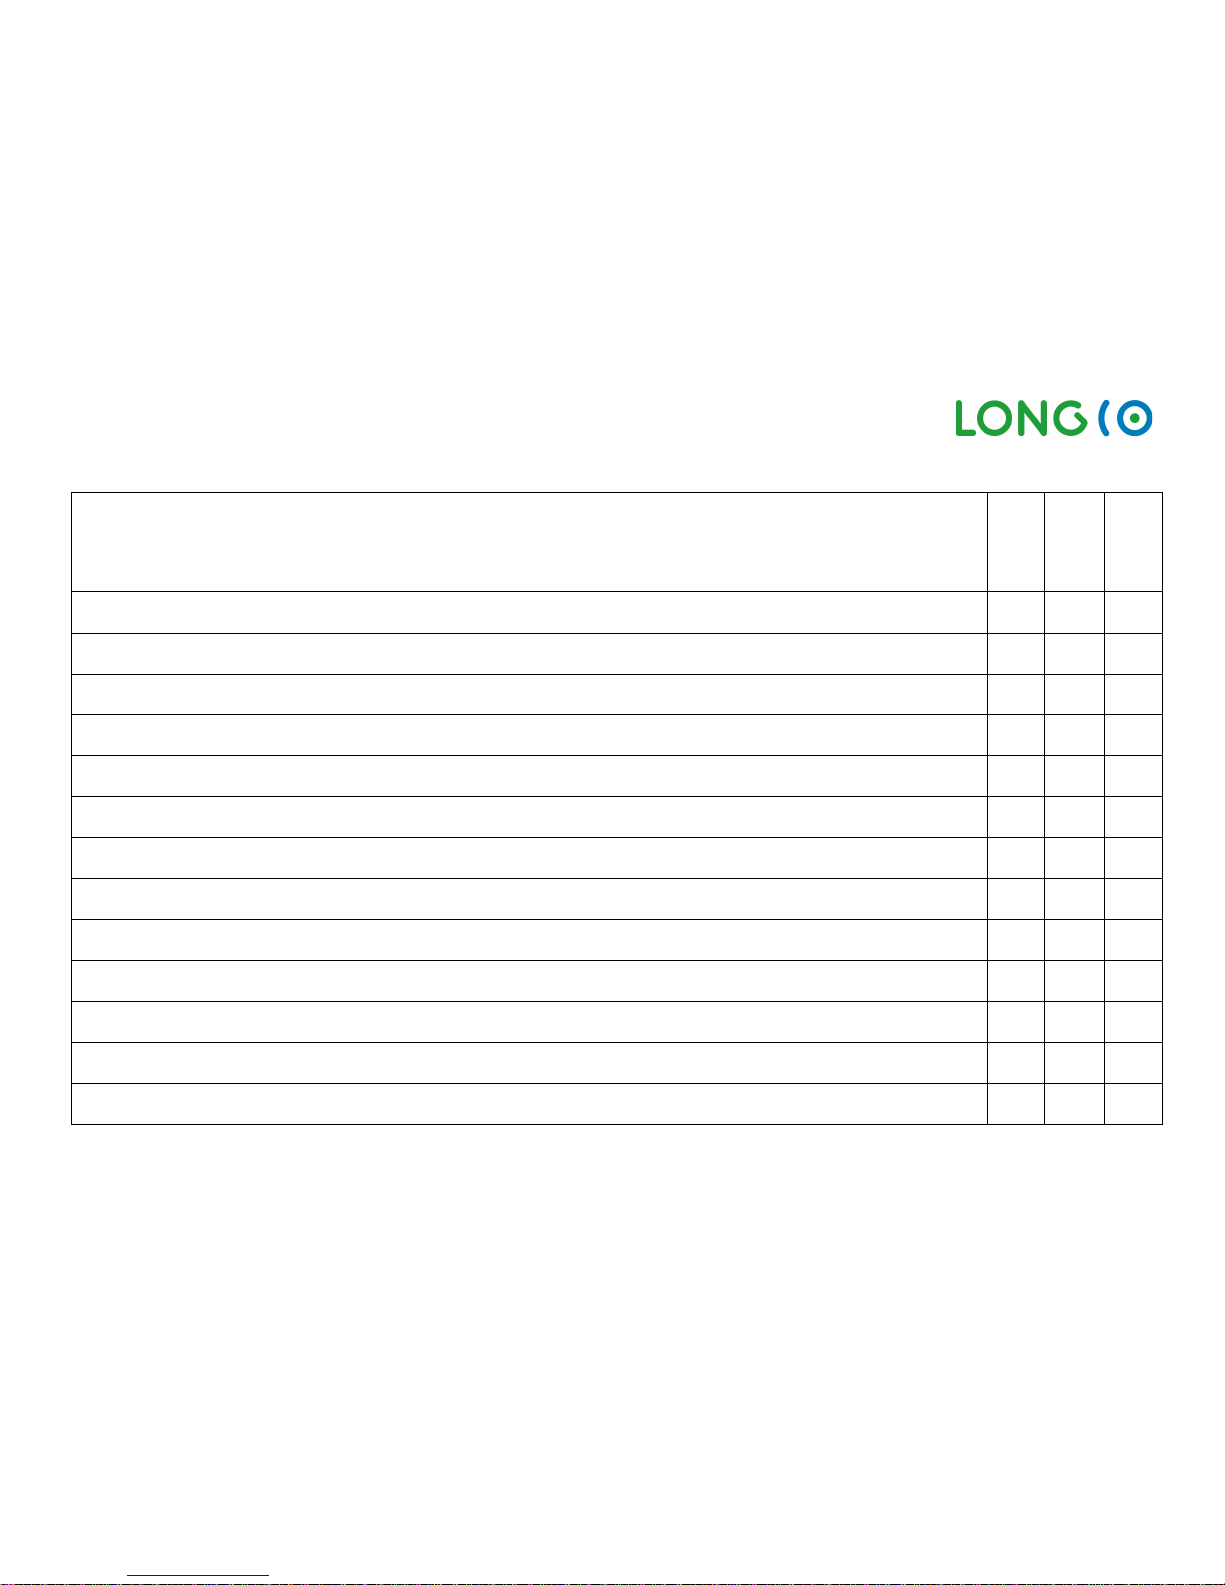
5.1. Maintenance Plan
Before
riding
First
Inspectio
n
Main
Inspectio
n
Front brake deactivates Motor, enough Braking force, Brake Pads ok
X X X
Parking brake (lock in on 2nd stop) blocks the LongCo
X X X
Rear brakes deactivate Motor, enough Braking force, Brake Pads ok
X X X
Batteries are stable locked in and fixed stable
X X X
Throttle is easy to use and release back without any resistance
X X X
Light system including brake light and blinker is working and the front light horizon is set on 40cm
X X X
Horn is working
X X X
Grips and Switches are mounted and are fixed
X X X
All Quick releases are tight (2xFrame, Folding Stem, Seat)
X X X
Tire Tread is still ok and the tire pressure is correct
X X X
The Air Suspension front and rear is in correct setting
X X X
Handlebar Steering works without resistance and don’t have play
X X X
The Handlebar can be turned 90° to both sides and no cable will be squeezed or damaged
X X X
Page 52
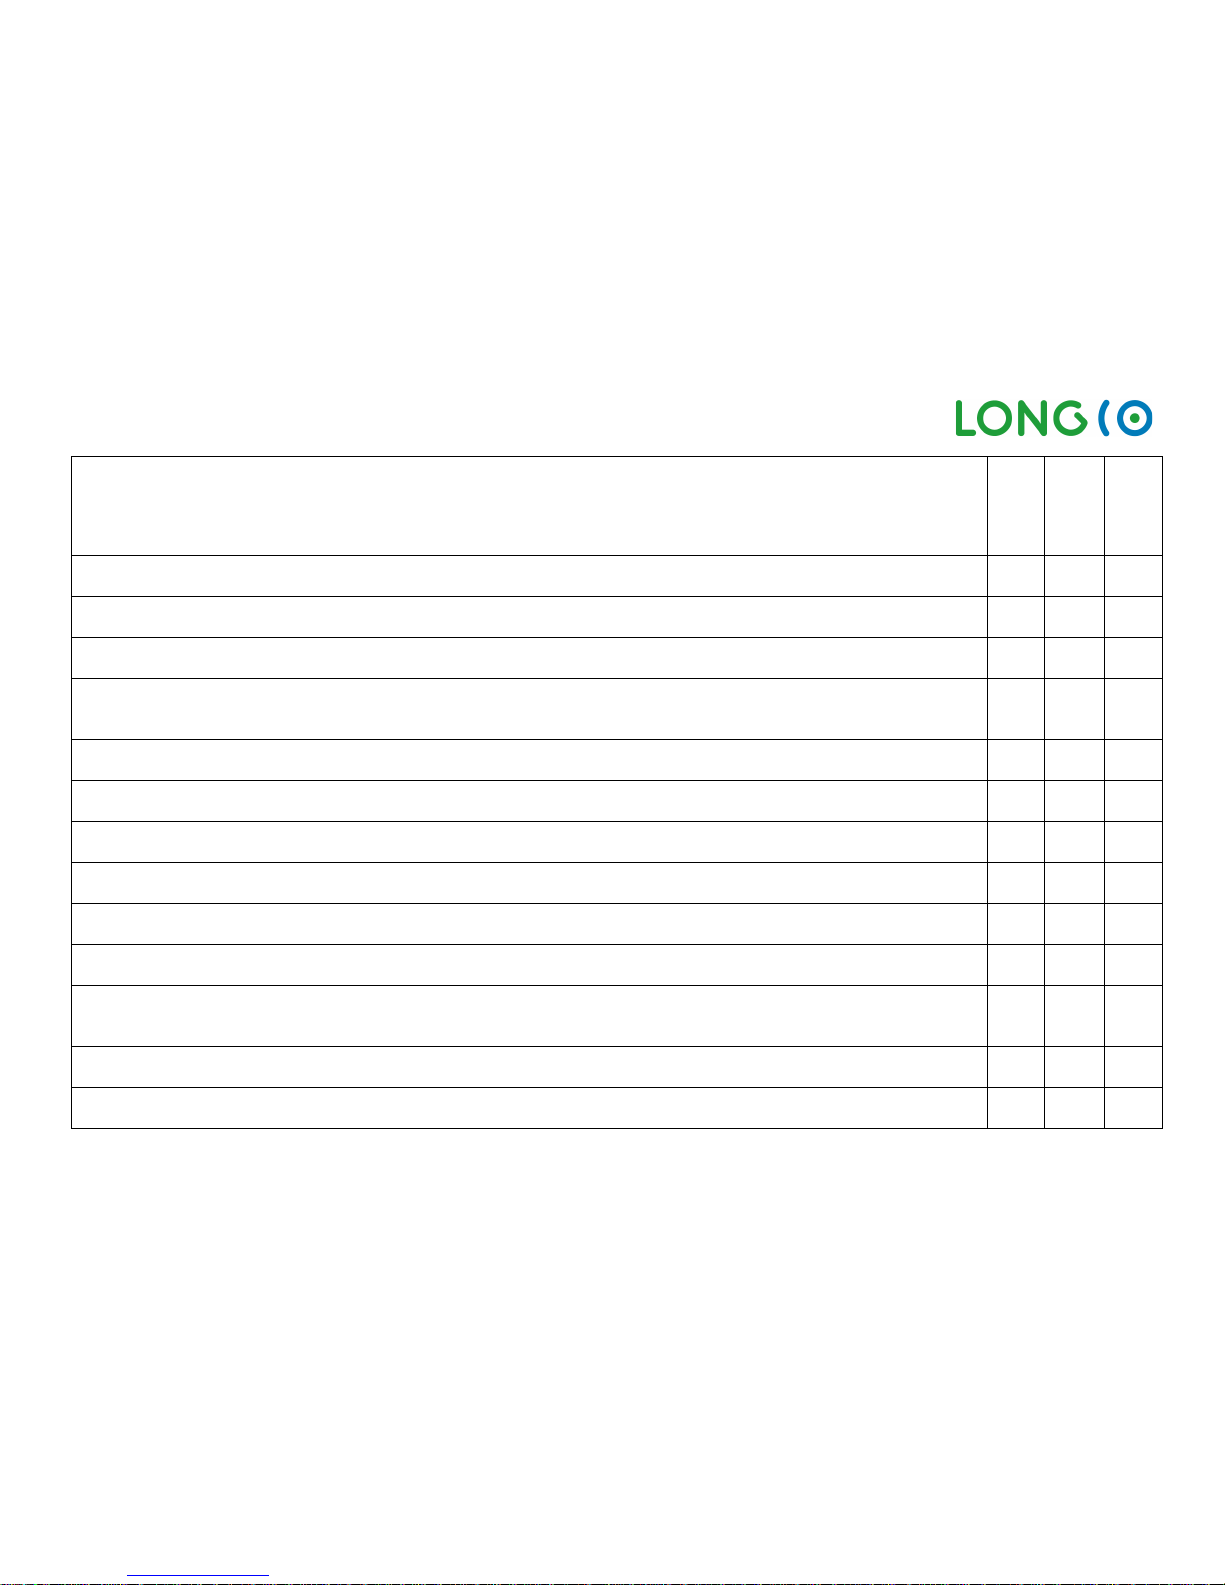
LongCo: User Manual V05 / 11. Juni 2018 Page 52 of 54
Before
riding
First
Inspectio
n
Main
Inspectio
n
Folding stem is properly closed and cannot be folded while moving the handlebar left or right
X X X
The thumb screws of the rear carrier system are tight
X X X
Overall Condition is ok
X X X
Special for the XC-Series: The Torsion Axle don’t have any play in the center position, and the leaning resistance
for both sides is same!
X X X
All Charger are working, and every Battery can be charged >58V
X X
The Batteries are working one by one and on both brackets separate
X X
Charger Connector fits the battery / adapter is available i f needed
X X
All Cables are placed correctly
X X
Display Setup is correct, actual Software Version is installed, Batteries are shown (communication)
X X
All speed Levels incl. Reverse are working, Display shows Speed correct
X X
Check the Battery Bracket, just use one battery and test all functions one by one in each bracket separate. Also
check the TFT Display, if it shows the correct battery information
X X
Hydraulic-Brakes are not leaking
X X
All screws at the Battery-Bracket including Lock are tight
X X
Page 53
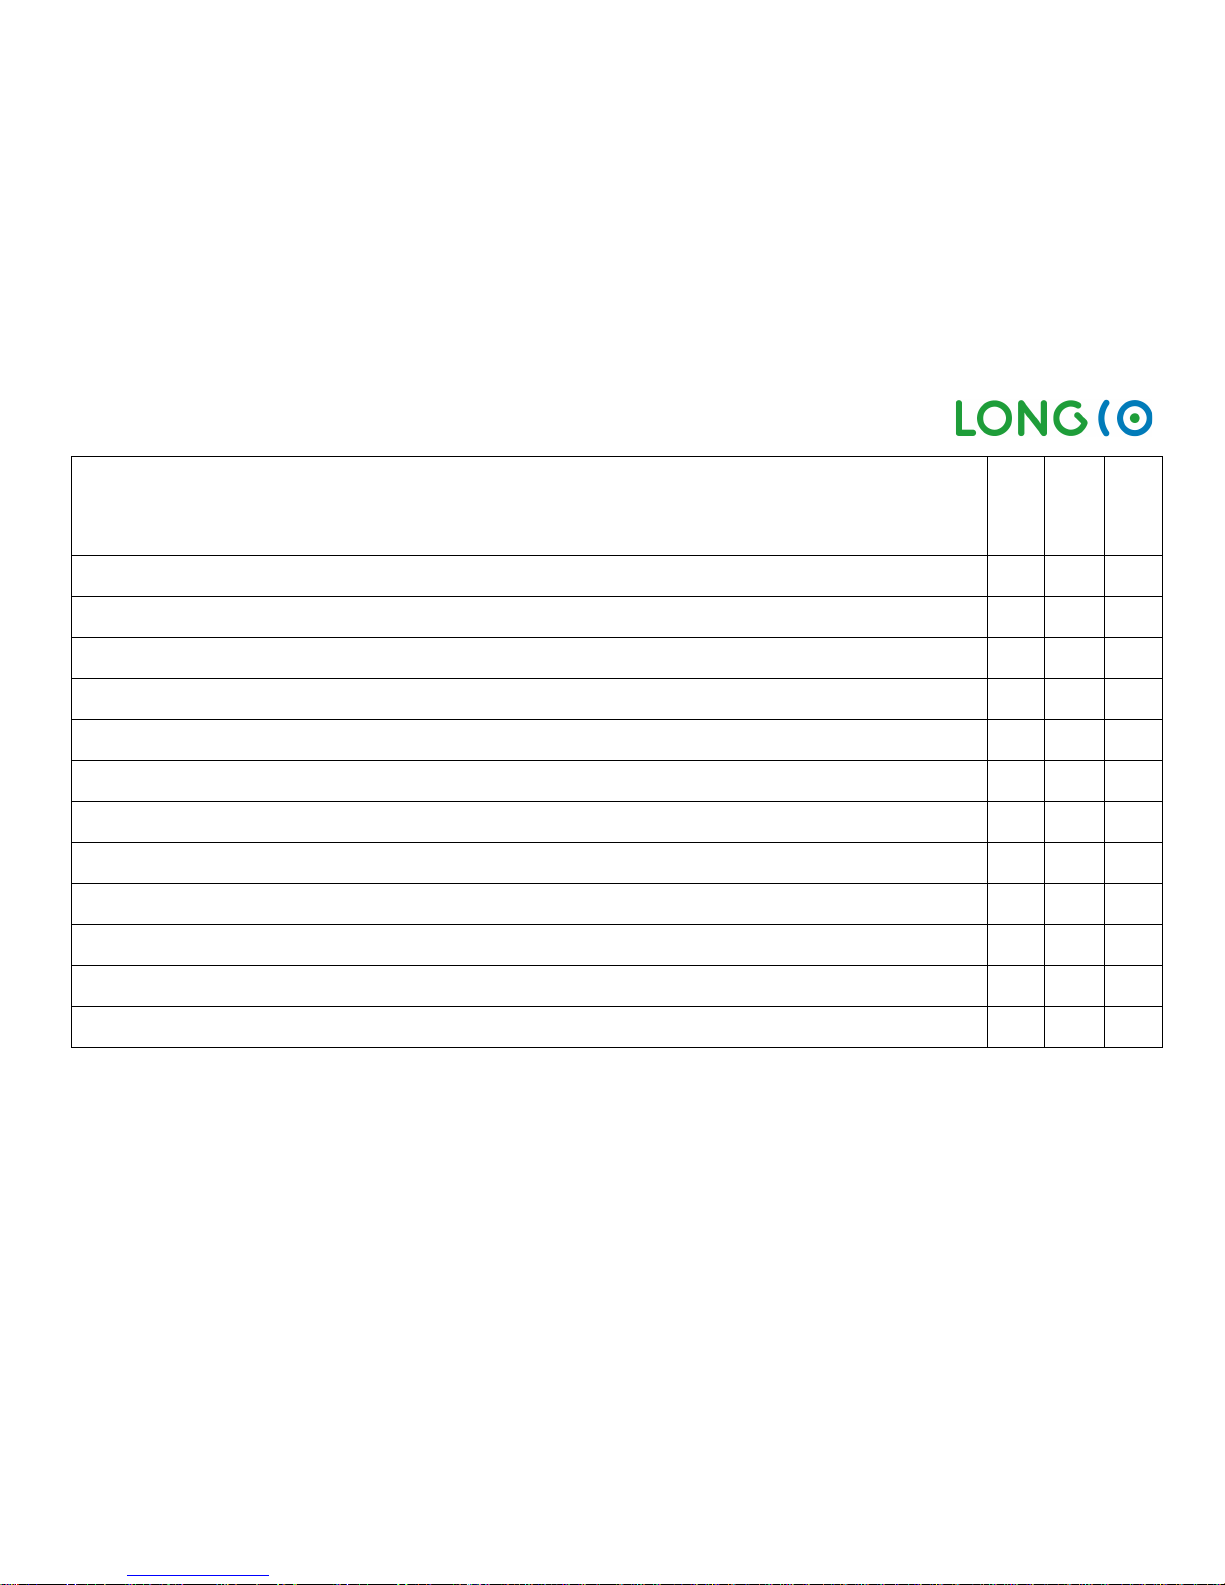
LongCo: User Manual V05 / 11. Juni 2018 Page 53 of 54
Before
riding
First
Inspectio
n
Main
Inspectio
n
All Screws of Brake Disc/Calliper/Brackets front/back are tight
X X
All screws are tightened and secured with with Loctite
X X
Motor nut is tight with 90Nm, (Rubber Protector are installed and glued, if installed).
X X
Rear Wheel Screw is tight with 90Nm
X X
The handle bar end Blinker are tight mounted (front and rear)
X X
The Motor cable is placed correctly and not cracked
X X
Install latest software
X
Open Front Compartment, check all cable connections
X
Open Rear Compartment and check all cable connections
X
Check all Tires carefully if there are any damages
X
Check for cracks at all Suspension and folding hinges
X
Check for cracks at the Stem
X
Page 54

LongCo: User Manual V05 / 11. Juni 2018 Page 54 of 54
6. Index
Air Susp ension ................................................................................... 41
Authorized dealer ............................................................................ 44
Batteries ............................................................... 10, 26, 29, 45, 46, 47
Brake ............................................................................................ 11, 49
Brake Lever ....................................................................................... 11
Brakes................................................................................................. 40
Care Instructions .............................................................................. 46
Charge Batteries OffBoard............................................................. 27
Charge Batteries OnfBoard ........................................................... 28
Control Features............................................................................... 30
Curves ................................................................................................ 12
Disposal ....................................................................................... 29, 48
Driver License ......................................................................................5
Folding Stem ..................................................................................... 24
Handlebar ................................................................................... 30, 33
Insurance..............................................................................................6
Light.................................................................................................... 11
Maintenance Plan ........................................................................... 51
Parking Brake .................................................................................... 31
Pinch Point .................................................................................. 13, 25
Power Level ...................................................................................... 39
Rear Shock......................................................................................... 41
Reverse............................................................................................... 11
RFID-Key ............................................................................................. 36
RFID-Key Set ....................................................................................... 32
Rim ...................................................................................................... 40
Rosenberger™ magnetic Charge Port ................................... 28, 48
Seat enforcement ........................................................................ 5, 23
Setup-Mode ...................................................................................... 36
Speed levels ................................................................................ 11, 39
Storage............................................................................................... 46
Suspension Fork ................................................................................. 41
Switch Buttons ................................................................................... 35
TFT-Display ....................................................................... 30, 33, 34, 49
Tire ....................................................................................................... 40
Tire Pressure ....................................................................................... 40
Tires ..................................................................................................... 47
Troubleshooting .......................................................................... 34, 49
Unfold Frame ..................................................................................... 13
Warranty ............................................................................................ 43
Warranty Exceptions ........................................................................ 44
Text and Pictures: LongCo Smart Electric Vehicle
Technical details with regards to information and figures in this user guide are subject to change
 Loading...