

Lomanco Omni Solar Gable Vent Installation Instructions Manual
OMANCO
Omni Solar Gable Vent
Limited Warranty
Provided that the Omni Solar Gable Vent powered ventilator
product has been installed in strict accordance with the Lomanco,
Inc. written installation instructions and in accordance with all
local codes and standards, including those pertaining to fire-rated
construction, Lomanco, Inc. warrants to the original purchaser of
the Omni Solar Gable Vent powered ventilator product that all
parts are free from manufacturing defects for a period of 5 years for
the motor and solar panel and 10 years on the vent.
Lomanco, Inc. will provide replacement parts or product in
accordance with this warranty should any failure occur during the
warranty periods shown below as a result of manufacturing defect.
This warranty does not extend to labor costs incurred in removing
the part or installing replacement parts or product.
The warranty period starts at the completion of installation of
your Omni Solar Gable Vent powered ventilator product and
terminates if either your Omni Solar Gable Vent powered ventilator
products are replaced or if the building is sold or transferred. In the
event of replacement according to the terms of this warranty, the
replacement part or product will be warranted only for the original
warranty period.
Limitations
Even if the Omni Solar Gable Vent powered ventilator product
was not properly installed according to Lomanco, Inc.’s installation
instructions, this limited warranty remains in effect if the Omni
Solar Gable Vent powered ventilator product fails as a result of
manufacturing defects.
Lomanco, Inc. shall not be liable for, and this warranty does not
apply to:
1. Damage to roof or building resulting from anything other than
a manufacturing defect in your Omni Solar Gable Vent powered
ventilator product, including, but not limited to:
a. Improper installation of your Omni Solar Gable Vent powered
ventilator product.
b. Applications not in strict accordance with Lomanco, Inc.’s written
installation instructions.
2. Damage to your Omni Solar Gable Vent powered ventilator
product or leaking into building resulting from factors beyond
Lomanco, Inc.’s control, including, but not limited to:
a. Acts of nature – hail, storms, or wind
b. Improper storage or handling of your Omni Solar Gable Vent
powered ventilator product.
c. Damage resulting from the application of overlying or
adjacent roofing materials.
Transferability
This limited warranty may not be transferred or assigned,
directly or indirectly.
Sole and Exclusive Warranty
THIS WARRANTY IS EXCLUSIVE AND REPLACES
ALL OTHER WARRANTIES, CONDITION,
REPRESENTATIONS, AND GUARANTEES, WHETHER
EXPRESS OR IMPLIED, WHETHER BY STATUTE,
AT LAW OR IN EQUITY, INCLUDING THE IMPLIED
WARRANTIES OR MERCHANTABILITY AND FITNESS
FOR A PARTICULAR PURPOSE. This written warranty is
your exclusive warranty from Lomanco, Inc. and represents the
SOLE REMEDY available to any owner of Lomanco, Inc.’s
Omni Solar Gable Vent powered ventilator product. Lomanco, Inc.
makes NO OTHER REPRESENTATIONS, CONDITION,
GUARANTEE, OR WARRANTY of any kind other than that
stated herein. LOMANCO, INC. WILL NOT BE LIABLE
IN ANY EVENT FOR CONSEQUENTIAL, PUNITIVE,
SPECIAL, INCIDENTAL, OR SIMILAR DAMAGES OF
ANY KIND, INCLUDING DAMAGE TO THE INTERIOR
OR EXTERIOR OF ANY BUIDING, WHETHER FOR
BREACH OF THIS WARRANTY, NEGLIGENCE, STRICT
LIABILITY IN TORT, OR FOR ANY OTHER CAUSE.
Some jurisdictions do not allow the exclusion or limitation of
incidental or consequential damages so the above exclusions or
limitations may not apply to you.
Modification
This limited warranty may not be changed or modified except in
writing signed by an officer of Lomanco, Inc. No one, including
any representative or employee of Lomanco, Inc. has authority to
assume any additional liability or responsibility for Lomanco, Inc.
in connection with a Omni Solar Gable Vent powered ventilator
product except as described in this warranty. This warranty gives you
specific legal rights, and you may have other rights, which vary from
jurisdiction to jurisdiction.
Effective Date
This limited warranty is effective for Omni Solar Gable Vent
powered ventilator products installed within the continental United
States, Hawaii, and Canada after June 1, 2011
What The Customer Must Do
If you believe any part is defective, call 1-800-643-5596 for
Customer Service.
Federal Tax Credit For Solar Powered Attic Fans
The federal tax credit for solar attic fans is available through 2021.
The Omni Solar Gable Vent is eligible for a 30% (up to $1,500)
credit on the purchase price of the fan, installation and sales tax.
To assist with claiming a tax credit, Lomanco has provided a
Statement of Certification for homeowners. This form and more
information on obtaining a tax credit is available online at
omnisolarvent.com
Scan to register online.
ONLINE WARRANTY REGISTRATION
Please fill out the online form at lomanco.com
to complete your warranty registration. If for
any reason you are unable to register your
product online please call 800-643-5596 and
we will assist you. Purchase and install date
information will be required.
4
1.800.643.5596 • Lomanco, Inc. • www.lomanco.com 1.800.643.5596 • Lomanco, Inc. • www.lomanco.com
20870_0318
OMANCO
OMANCO
READ THESE
INSTRUCTIONS CAREFULLY
BEFORE STARTING
INSTALLATION.
This unit is only intended to
function as an attic exhaust
vent; other applications are
not supported. If you have any
questions, contact customer
service toll free at
1-800-643-5596.
IMPORTANT!
` Installation work should be done
by a qualified person.
` Installation should comply with all
local codes and standards.
` Adequate intake ventilation must
be provided for proper operation.
A minimum of 768 square inches
of inlet area must be provided for
each solar powered ventilator.
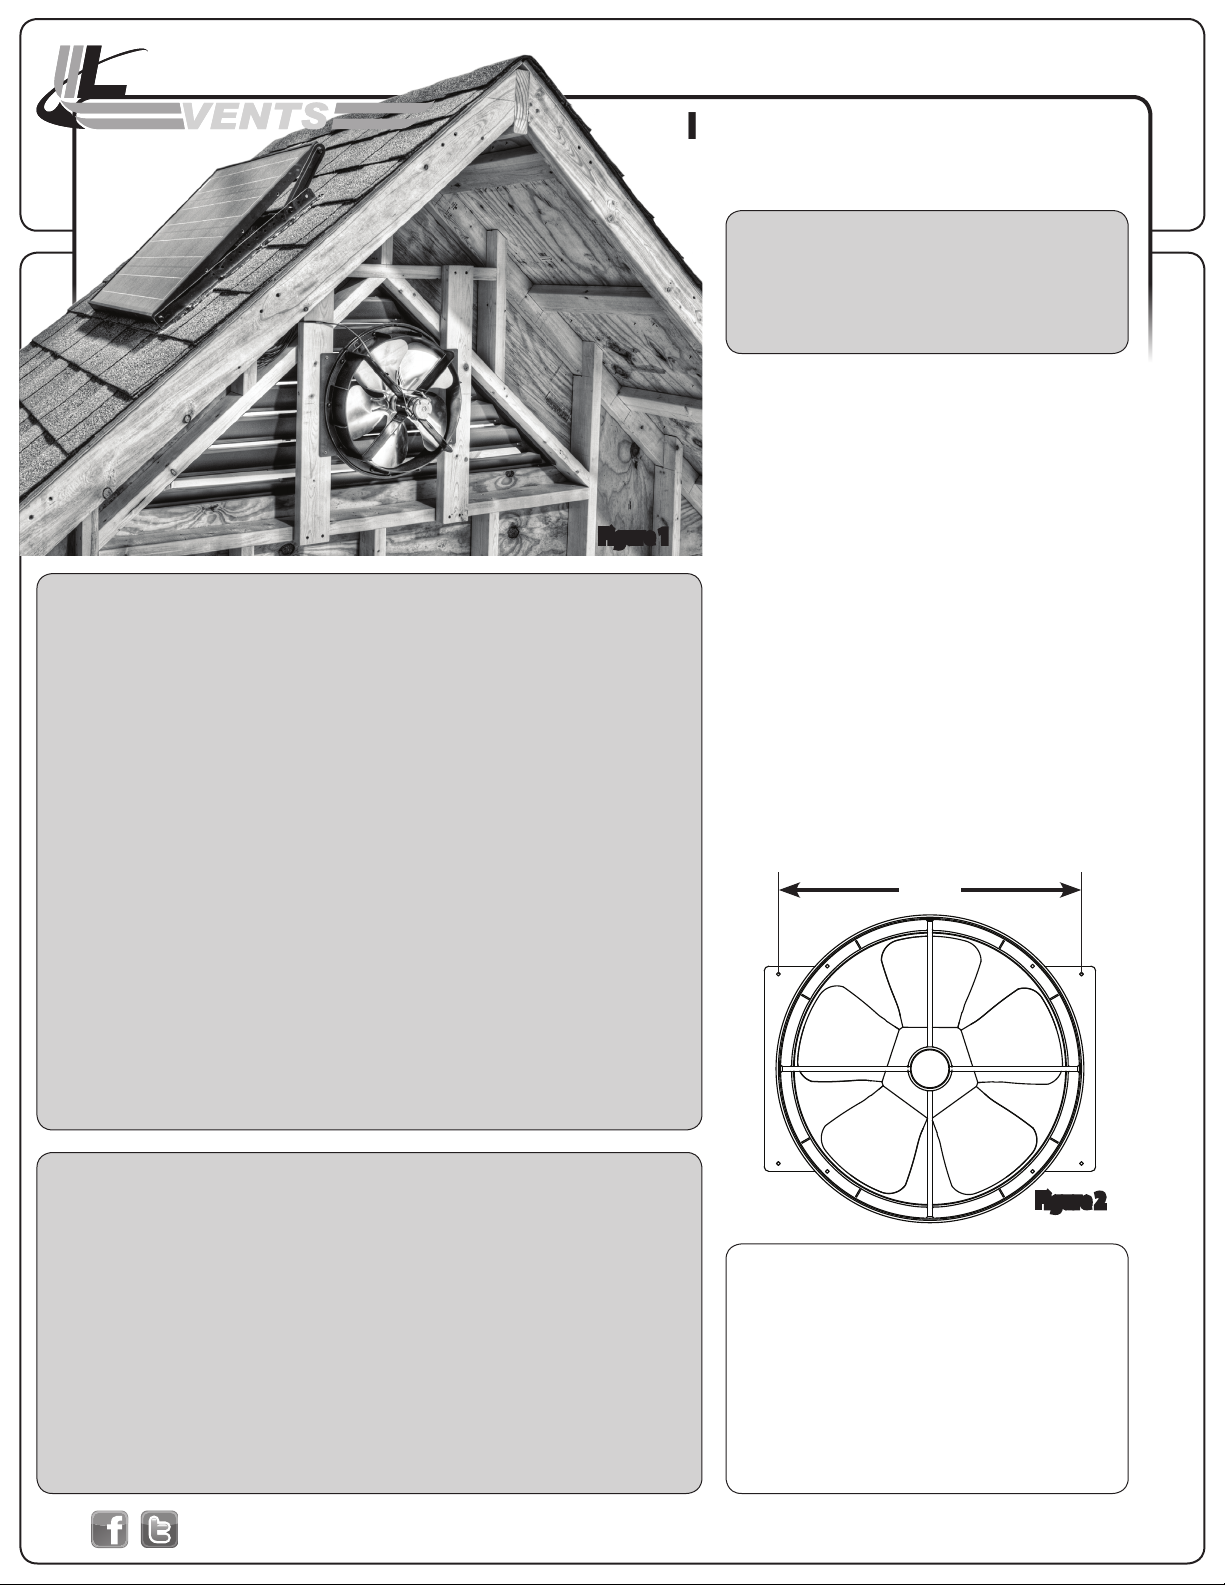
Omni Solar Gable Vent
Figure 1
CAUTION!
` For general ventilating use only.
DO NOT use to exhaust hazardous
or explosive materials and/or
vapors.
` This unit has an unguarded fan
blade. DO NOT use in locations
readily accessible to people or
animals. This fan is intended for
use facing an unoccupied space.
` When cutting or drilling into
walls of ceiling, do not damage
electrical wiring or other utilities.
` Sharp edges are exposed during
installation. Use gloves and other
appropriate safety equipment to
avoid injury.
OPERATION
` Your Omni Solar Gable Vent unit
will operate automatically when
the solar panel is illuminated by
sunlight. Its speed of operation
will vary with the intensity of
sunlight the panel is exposed to.
Installation Instructions
NOTE: The Omni Solar Gable
Vent ventilator is designed to add
solar power to exisiting ventilation
systems. It can be mounted behind
many types of vents or louvers.
VENT INSTALLATION
The Omni Solar Gable Vent is designed
to make installation easy. Normally you
can mount it to existing studs behind your
louver. The mounting bracket may be
installed either horizontally or vertically. If
the studs are not correctly spaced on your
home, 2x4 headers should be installed on
16“ centers.
See figures 1 and 2.
DO NOT CUT STUDS OR
FRAMING MEMBERS. Cutting studs
or framing members can weaken the
structural integrity of the end wall, if any
reframing is required for the installation
of this unit consult a professional.
16"
DO install all Exhaust Ventilation at the SAME HEIGHT within a common attic area.
DO’S AND DON’TS FOR ATTIC VENTILATION.
Installation of exhaust vents at more than one level on a roof allows the upper exhaust
vent to wrongly pull air in from lower exhaust vent rather than from the soft Intake
Vents.
DON’T install exhaust vents at different heights.
DON’T install Ridge Vents down the hip.
DO install ONLY ONE TYPE of Exhaust Ventilation within a common attic area.
Exhaust Vents pull air from the easiest Intake source. The use of two or more types
of exhaust vents such as Power Vents with Roof Vents or Gable Vents with Ridge
Vents or Roof Vents could make one of these vents act as intake instead of pulling air
from the soft vents.
DON’T mix different types of exhaust vents.
DO install a BALANCED SYSTEM of Intake and Exhaust Ventilation. 50% Intake
and 50% Exhaust is a balanced system. Improper intake may lead to snow or rain
inltration into the exhaust vents.
Figure 2
Tools and Materials Needed
• wood screws(4)
• Drill with 3/8” drill bit
• 3/8” open-end wrench
• Phillips head power bit
• Grease pencil
• Roong cement and applicator
1
 Loading...