

Page 1

iSUP USER GUIDE
(Inflatable StandUp Paddle)
20
19
English
Page 2

NOTES
2
Page 3
PHILOSOPHY
At Lokahi, we want you to discover
our passion
At Lokahi, we want you to discover our passion, our sensations and share
our experiences with you in all the practices offered by Stand up Paddle:
Discover, Touring, Wave, Race and Harmony.Our goal is to allow as many
people as possible to participate in this sport.
In collaboration with our riders, we have developed the most accessible,
versatile and high-performance products, so that each stand up Paddler
finds a board adapted to its expectations and its level of practice.
With more than 20 years of experience in the sliding world, we are constantly
exploring new possibilities in search of new materials and shapes.
3
EN
Page 4

LOKAHI
1
Philosophy
3
INTRODUCTION
5
Discharge of responsability
5
Security
6-7
SUM
MA
RY
13
FEW TIPS
14
Good start
15-16
19
Fit your paddle
17
Cleaning and storage
18
Few repair advices
WARRANTY
EQUIPMENT OVERVIEW
8
Inflate a board
9
Install a fin
10
Install a leash
11
Deflate a board
12
4
Page 5

INTRODUCTION
DISCHARGE OF RESPONSABILITY
By installing and/or using this LOKAHI material, you concede that you have read and understood the LOKAHI
Product User Guide, including all the instructions and warnings contained in this manual.
In addition, you agree that any additional or subsequent user will read and understand the entire LOKAHI
Product User Guide, including all instructions and warnings contained in this manual.
RISK TOLERANCE
The use of LOKAHI equipment and its components implies some inherent risks and dangers that can cause
serious injury and death to both the user and third parties. By using LOKAHI products, you assume and
accept any risk of known and unknown injuries that may be inflicted on you or that you may inflict on a
third party during the use of this equipment. The inherent risk of this sport can be markedly reduced by
following to the warning instructions set out in the Product User Guide and using common sense.
DISCLAIMER
Renounce any claim whatever you formulate or may formulate in the future towards LOKAHI and ONE
KINand any related party resulting from the use of LOKAHI equipment or any of its components.
Discharge Lokahi and ONE KIN and any party to it from any liability whatsoever for any damage, loss,
injury or expense that you or any other user of your LOKAHI equipment may suffer, or that your parents
may suffer, as a result of the use of the LOKAHI product, due to any cause, including neglect or breach
of contract by LOKAHI, ONE KIN and any party there to with respect to the design or manufacture of the
LOKAHI material and its components.
In the case of your death or disability, all of the provisions included are effective and involve your heirs,
parents, executors, administrators, assignees and representatives. The parties to ONE KIN have not made
and expressly deny having made any oral or written statement other than that specified here and in the
LOKAHI Product User Guide.
5
EN
Page 6

SECU
RITY
IMPORTANT GUIDELINES FROM LOKAHI
If you do not yet practice Stand Up Paddle it is recommended to start sailing in calm water (without
wave), but also to have some knowledge of the sea. Surfers promote the practice of Stand up Paddle in
less crowded areas.
Practicing the Stand up Paddle solicits a lot your body. Practice only if you are in good health, physical
condition and if no medical condition may limit you in the practice of Stand up paddle.
You are responsible for not endangering or injuring any third party or other surfer by your actions or
equipment. You need to be aware of the risks you take and minimize them.
Before you go sailing, you need to familiarize yourself with the main features of LOKAHI equipment. For your
own safety, we ask you to carefully read the following safety instructions as well as the product description.
WARNING & TERMS OF USE
• For SUPs in the category of beach gear (less than 3,50 meters in size), navigation is limited to 300
meters from the coast.
• On the sea you will have to imperatively equip yourself with personal buoyancy equipment or a protective
suit of either a life jacket or a neoprene suit.
• You will also need a way of light detection and finally a towing device on the ocean and river (the leash
allows to fulfil these conditions).
• On the river a life jacket, some closed shoes and the wearing of a helmet are obligatory, on the other
hand the use of a leash is to be proscribed, it may be blocked in rocks or elsewhere.
YOU WISH TO GO FURTHER ?
SUP over 3.50m (11’6 and over) are no longer considered as beach gear.They are therefore allowed to
pass the band of 300m without going beyond the 2 miles of a shelter.They must, however: be in possession
of basic weapons and safety equipment (adapted to the characteristics of the boat), have two inflatable
compartments and be registered at the office of maritime affairs.
6
Page 7
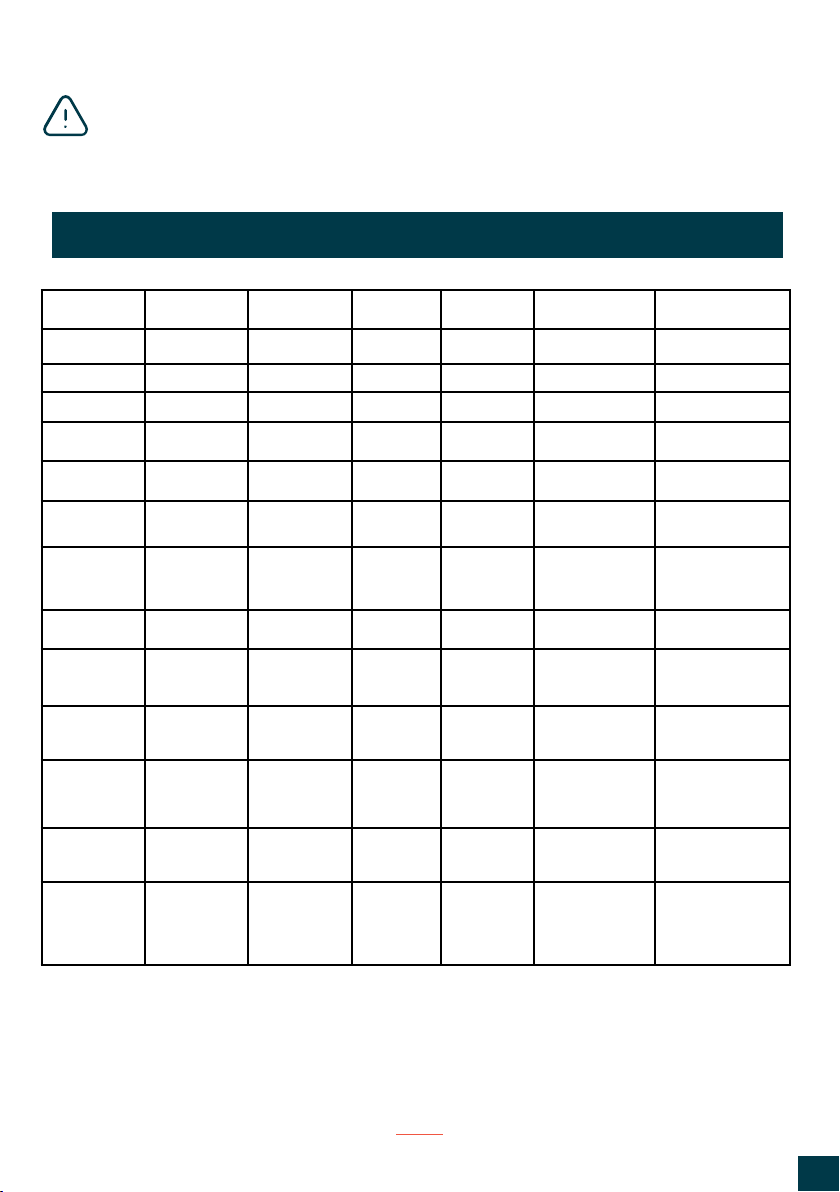
Warning : Do not use SUPs when the wind is greater than 10 knots, also of course in case
of a storm or thunderstorm. The basic rules of the practice of Stand Up Paddle are above
all common sense rules as for most outdoor sports.
Wind speed chart for conversion of Nodes, Beaufort, m/s and km/h.
Beaufort Nodes m/s km/h mi/h Wind State Sea State
0 1 0 - 0,2 1 1 Calm Mirror surface
1 1 - 3 0,3 - 1.5 1 - 5 1 - 3 Very light breeze Few wrinkles
2 4 - 6 1,6 - 3.3 6 - 11 4 - 7 Light breeze Wavelet
3 7 - 10 3.4 - 5.4 12 - 19 8 - 12 Breeze Small waves, few
4 11 - 15 5.5 - 7.9 20 - 28 13 - 17 Moderate breeze Small waves, many
5 16 - 21 8.0 - 10.7 29 - 38 18 - 24 Cold breeze Medium waves,
6 22 - 27 10.8 - 13.8 39 - 49 25 - 30 Strong breeze Medium waves, sea
7 28 - 33 13.9 - 17.1 50 - 61 31 - 38 Strong gusts Medium waves
swirls
swirls
swirls, sea spray
spray
8 34 - 40 12.2 - 20.7 32 - 74 39 - 46 High wind High waves with
9 41 - 47 20.8 - 24.4 75 - 88 47 - 54 Very high wind Breaking waves,
10 48 - 55 24.5 - 28.4 89 - 102 55 - 63 Strong storm Large long-crested
11 56 - 63 28.5 - 32.6 103 - 117 64 - 73 High storm The crest of the
12 64 - 71 >32.7 >118 >74 Hurricane The sea is white due
dense foam streaks
visibility reduced by
spray, high waves
waves. Roll-over.
Reduced visibility, very
high waves.
blades causes moss.
Waves very high.
to drifting foam banks.
Visibility very reduced.
Waves greater than
14m.
THIS LIST OF HAZARDS INHERENT IN THE PRACTICE OF
STAND UP PADDLE IS NOT EXHAUSTIVE.
7
EN
Page 8
EQUIPMENTS
OVERVIEW
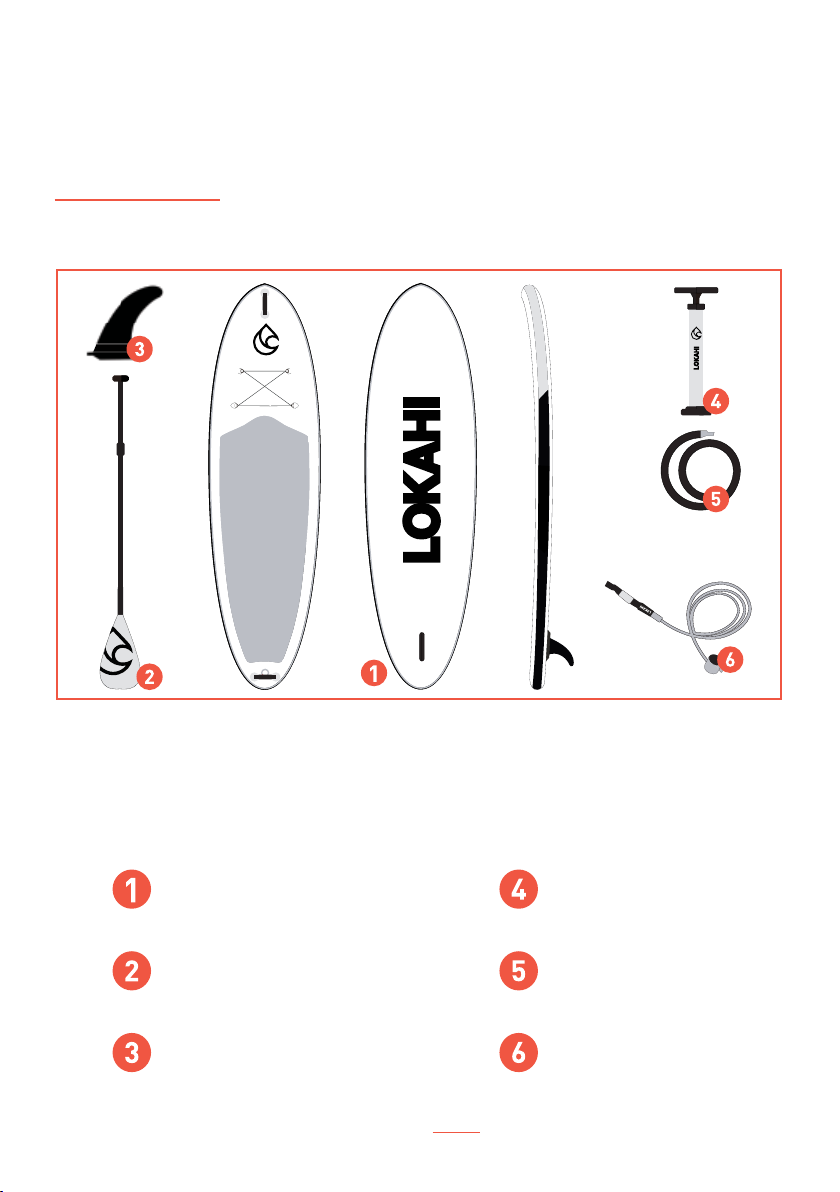
Here is the set of equipment you will need for the practice
of the StandUp Paddle.
SUP Board Pump
Paddle
Fin Leash
8
Pump tubing
Page 9
INFLATE
A
BOARD
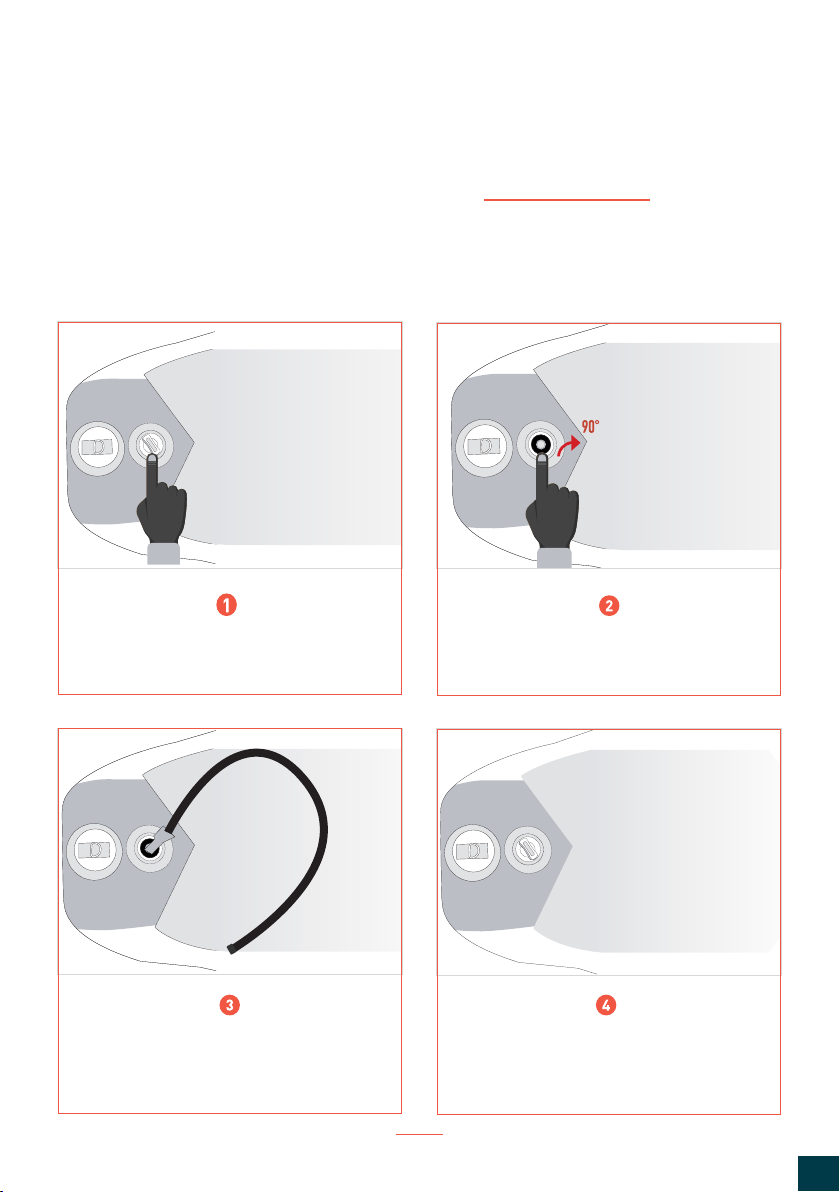
Before starting to inflate your board, it is necessary to spread it on a flat surface (floor, table, sand, etc.)
where no object could damage. Position it flat with the side of the inflation valve facing you and follow
these instructions:
Unscrew the valve cap from the tail of the
board.
Then come and attach the pump tube, and
inflate the board to at least 15 PSI.
Press the button inside the valve and turn it
(about 90°) until it is blocked.
Once the board has inflated, close the
inflation valve with the appropriate cap.
9
EN
Page 10
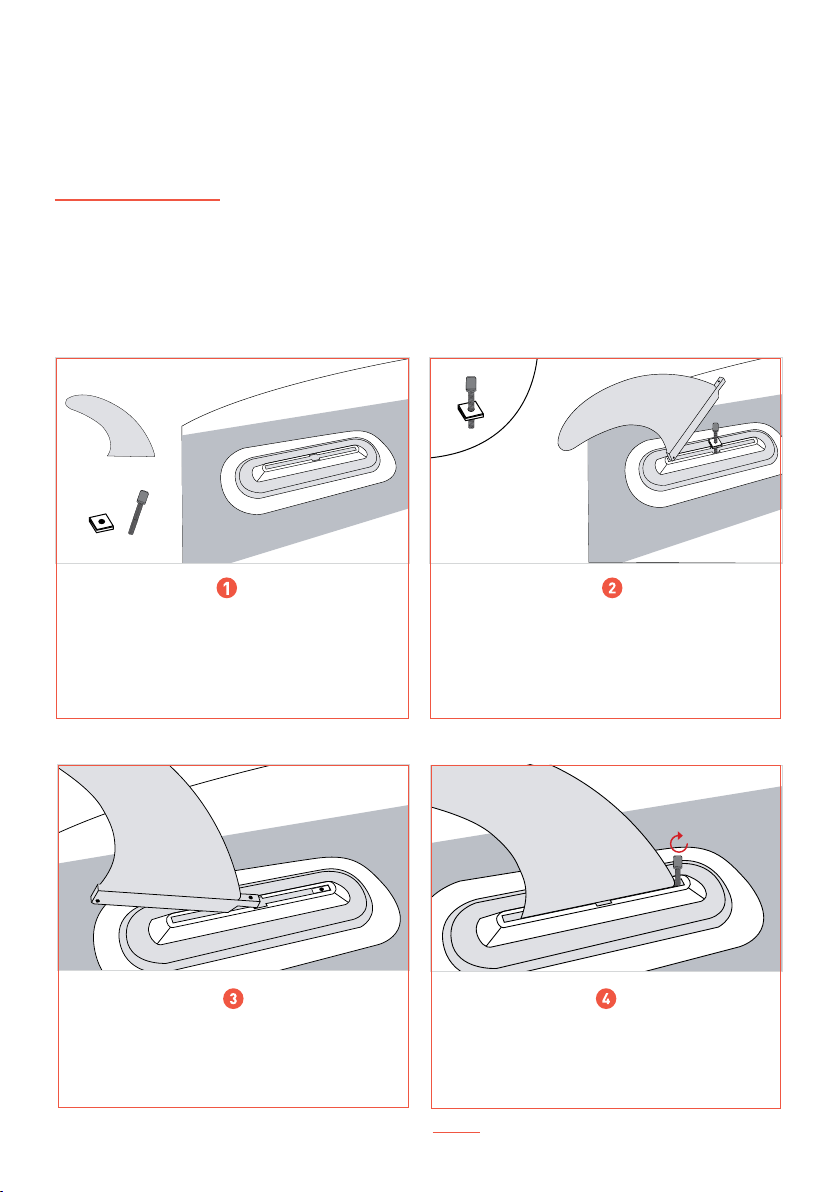
INSTALL
A
FIN
Our Stand Up Paddle boards come with one or more fins of different sizes. Each board has its own fin
configuration. They have the ability to significantly change the reactivity and behaviour of the boards.
Their installation is imperative for the proper functioning of Stand Up Paddle boards.
This is the equipment needed to install the
fin: fin, screw and square nut.
Then come and attach the fin to the center of
the case, then slide it away from the square.
First place the screw slightly screwed into
the square nut and then insert it into the front
half of the case by sliding it away from the fin.
Finally place the square parallel to the aileron
so that the screw passes through the hole of
the aileron and comes to screw in the square.
10
Page 11
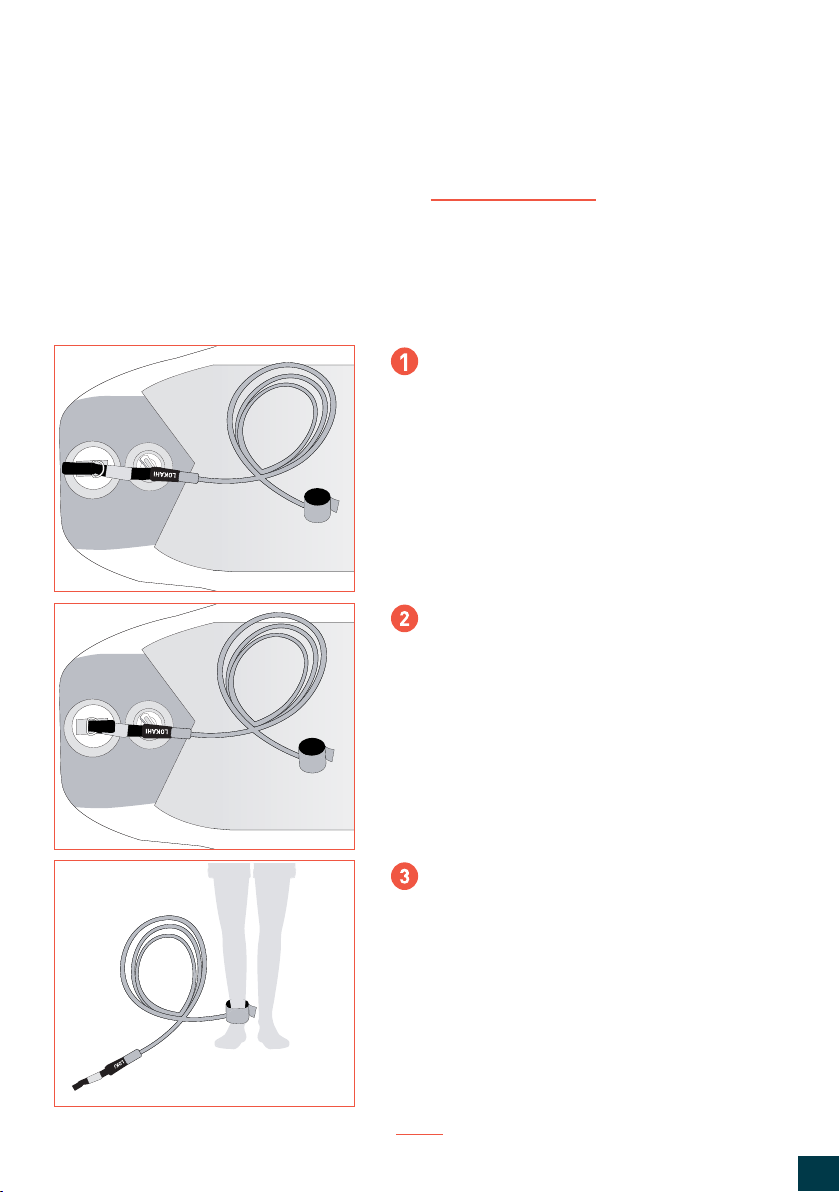
INSTALL
A
LEASH
It is mandatory to use a leash when practicing Stand Up Paddle on oceans, lakes and canals,
this one must be at least equal to the length of the board.
Place the longest end of the leash in the
appropriate loop at the back of the board.
Then hold the loop in the middle of the velcros,
fold the end inwards (adhesive part) so that the
leash comes to wrap around the loop.
Finally, hang the other part of the leash on your
ankle using velcros.
11
EN
Page 12
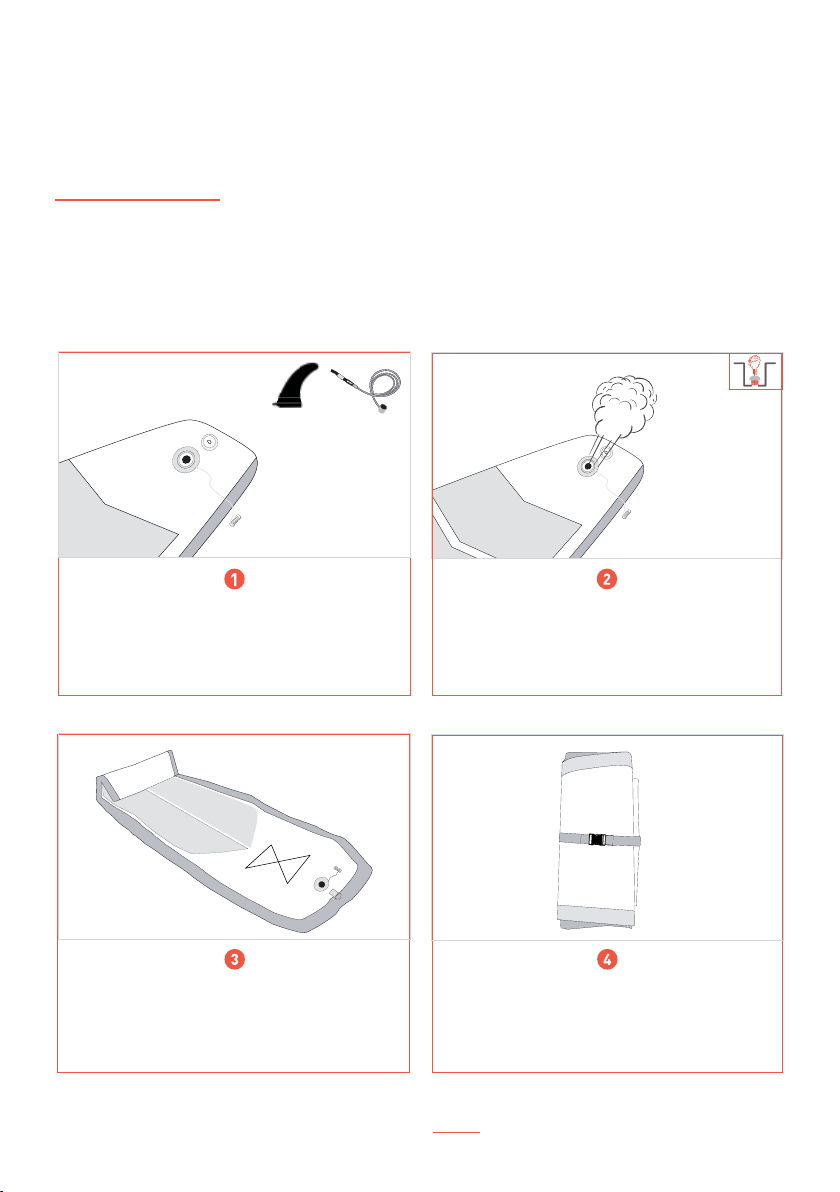
DEFLATE
A
BOARD
Whether for one night or for life, there is no problem to leave your board inflated. If you can afford it, it
will save you time for your next ride.
Just don’t leave your board in the sun. In addition to disliking prolonged exposure to UV radiation, the
board may experience overpressure with heat. In order to deflate your paddle, it is very simple.
X
Start by removing the fin and the cap from the
inflation valve. Then, as with inflation press and
rotate the button (about 90°) so that it will sink, stay
stuck and let air pass through.
X
Keep your face away from the inflation valve so you
won’t receive high air or residue pressure.
Start by folding the board, starting with the nose (it
is vital to start from the opposite side of the inflation
valve) by pressing to drain the air every time you roll
it on itself.
If you want to evacuate all the air contained in your board, use the suction function of your pump. Simply screw the pump hose into the second
screw step of your pump and pump normally in order to drain the air.
Renew this step so that your paddle has released all
the air.
Finally, come and fix it with the belt.
12
Page 13
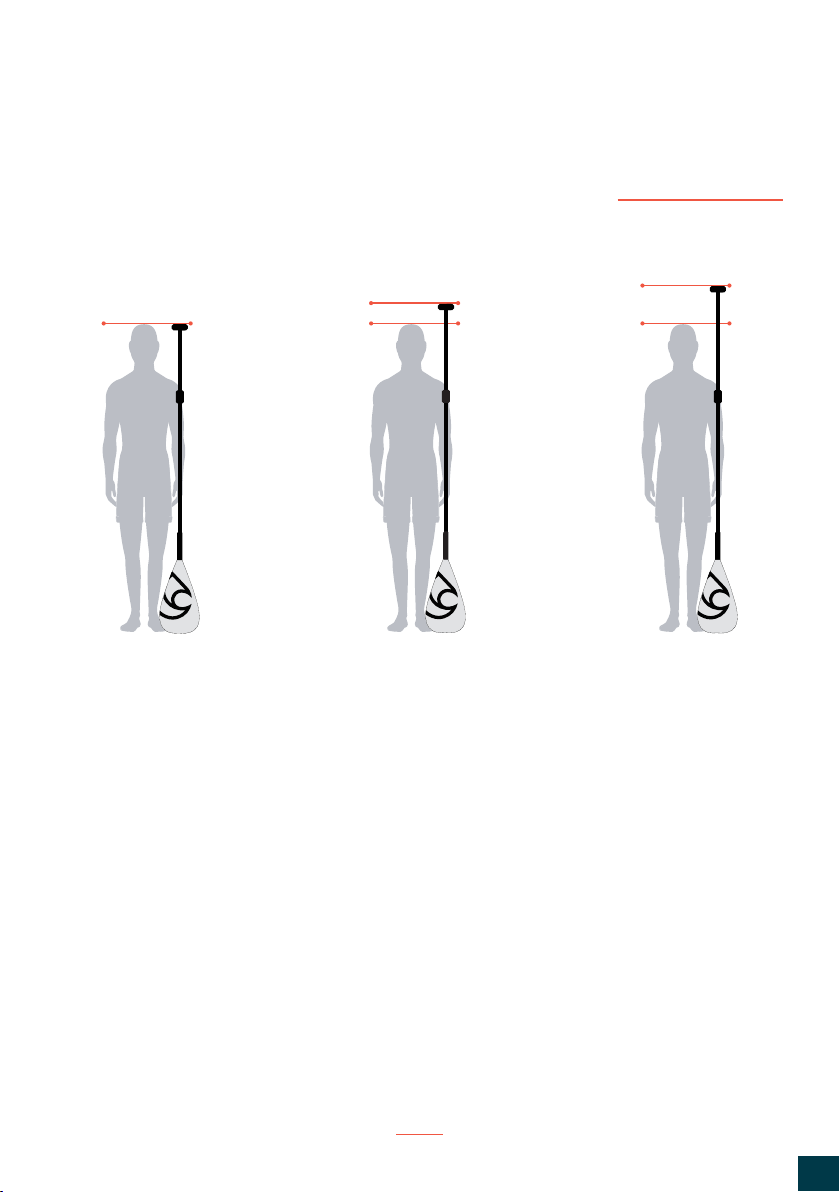
We have several ranges of paddles: fixed and adjustable in length.
FEW
TIPS
0 cm
For our adjustable paddles: unlock the adjustment system (clip), extend your arm over your
head and adjust the variable part so that the paddle handle reaches your wrist.
For our stationary paddles: size is a major factor in the choice of model. In fact, it has to be
about 10cm more than your size for most uses.
Please note :
- For exclusively «Wave» use, this height must be reduced to lower the centre of gravity of the
supper and be in a position more conducive to the practice of Stand Up Paddle.
+ 10 cm
+ 10 à 20 cm
- The thickness of your paddle and your more or less bent position are taken into account
when calculating the height of your paddle.
Lock the clamping system, you are now ready to get into the
water.
13
EN
Page 14
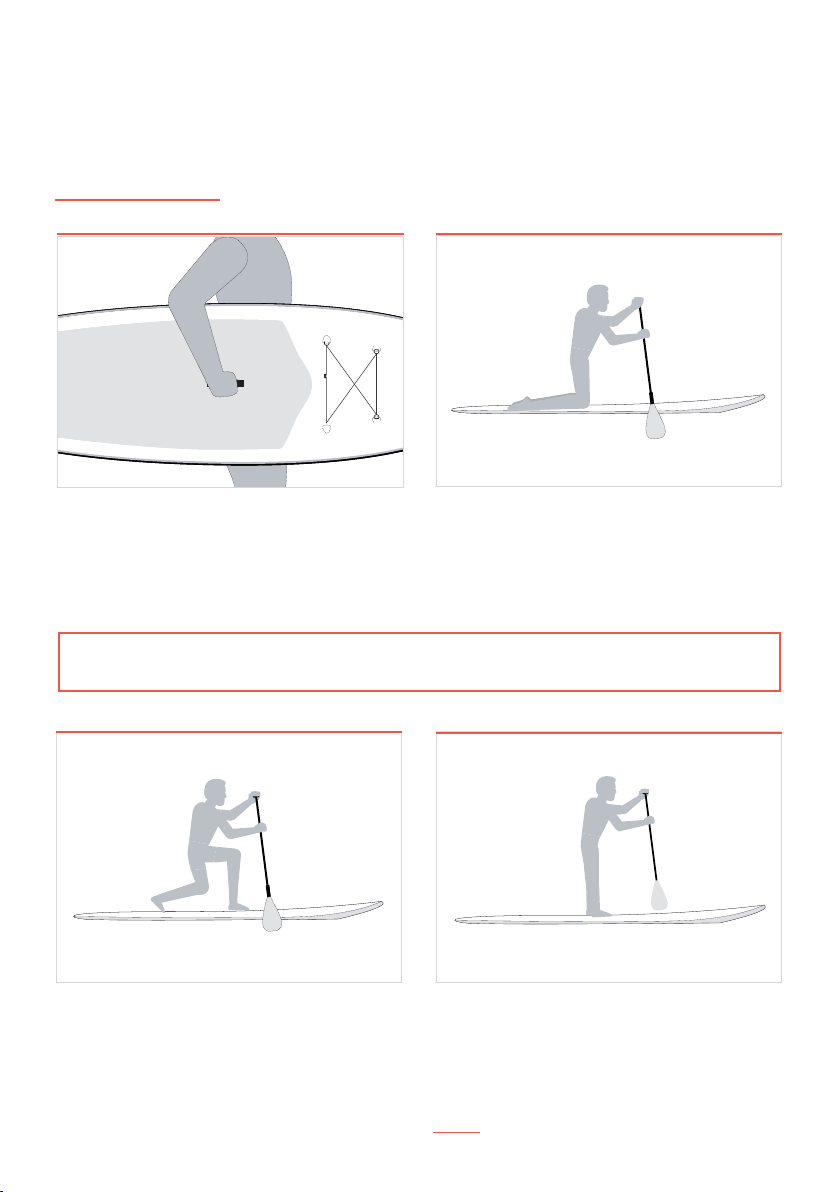
GOOD
START
In order to carry your board, a handle (located in the middle
of most boards) is made for this. So you just have to wear your
SUP under your arm, just like a surfboard.
In case of strong wind, place your board in front of it. If you
need to walk for a while, we advise you to place the paddle
on your head.
Place your feet
Once you feel ready, stand up. Position your feet in the middle of the length of the board. The ideal position is to
place your feet perpendicular to the axis of your board at the carrying handle.
The link between your paddle and the board is not only made
with your arms but with your whole body. It is therefore
important to place your whole body in the right place so that
he can properly transmit the energy you need to row. Begin
by slightly bending the knees in order to adopt an effective
paddling position, a good balance starts with stable legs.
Your back must remain straight in any condition.
You can start by kneeling on the board to familiarize yourself
with the board and find your balance. Try to reach the farthest
ahead with your paddle, and lift it up as soon as it reaches
your knees.
Place your right hand on the paddle handle. Your left hand
should be positioned on the sleeve and the gap between
the two hands should be more or less equal to the shoulder
width. The paddle blade must be opened forward of the
board. In order to generate power, push the blade into the
water to the handle. Start by “planting” the blade forward of
the board and then bring it back to your feet.
14
Page 15
OKAHI
FIT
YOUR
PADDLE /1
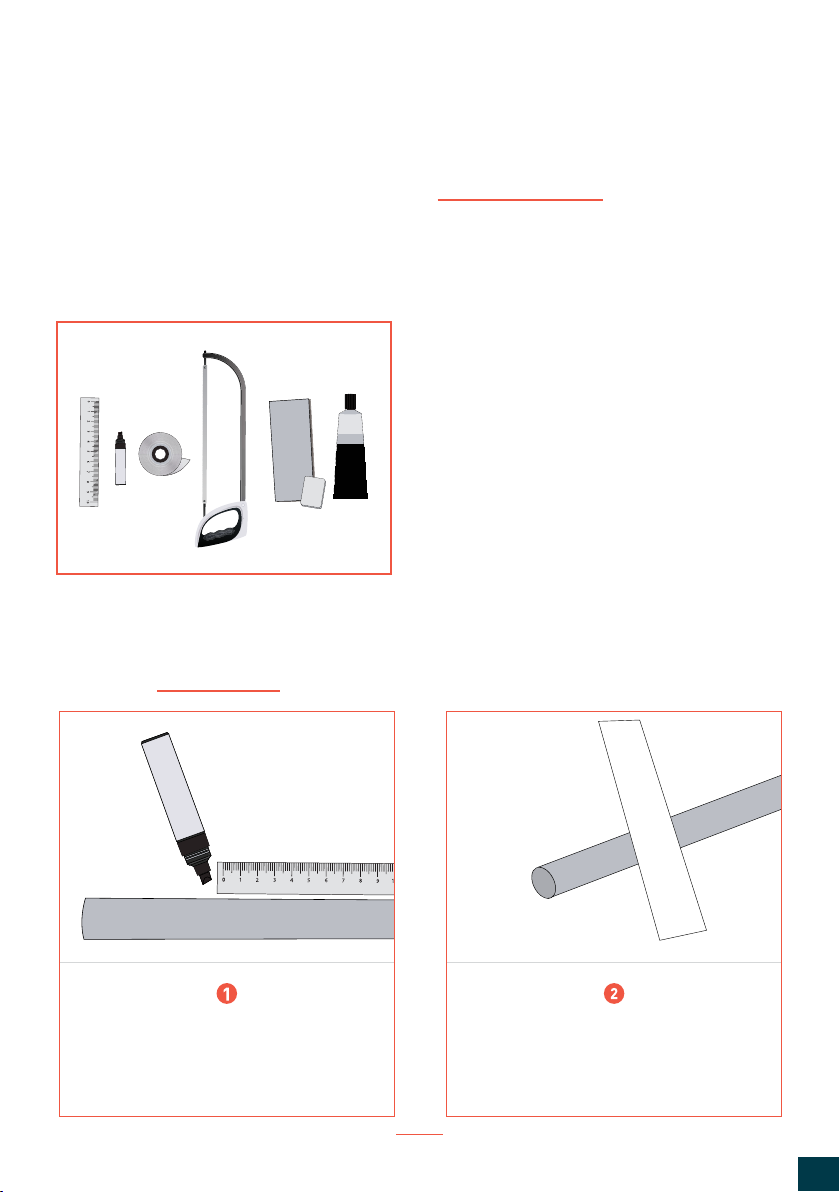
If you have acquired a non-adjustable paddle, you must cut the paddle to the correct length
for your size and discipline, then stick it to the provided handle.
SUPPLIES NEEDED :
Strip set ruler
Permanent marker pen
Masquerade strip
Hacksaw
Glass paper
Sanding block (or paper around a» sponge or
square block)
Epoxy
(The drying time for epoxy depends on the brand
used)
To measure the length of the paddle, place the paddle
standing next to you with the tip of the paddle touching the
ground.
LOKAHI
Check the length of the paddle and use a
permanent marker to draw a line on the
handle you want to cut.
L
Wrap a band of masking tape around the
sleeve where you made a mark.
15
EN
Page 16
OKAHI
OKAHI
OKAHI
FIT
YOUR
PADDLE /2
L
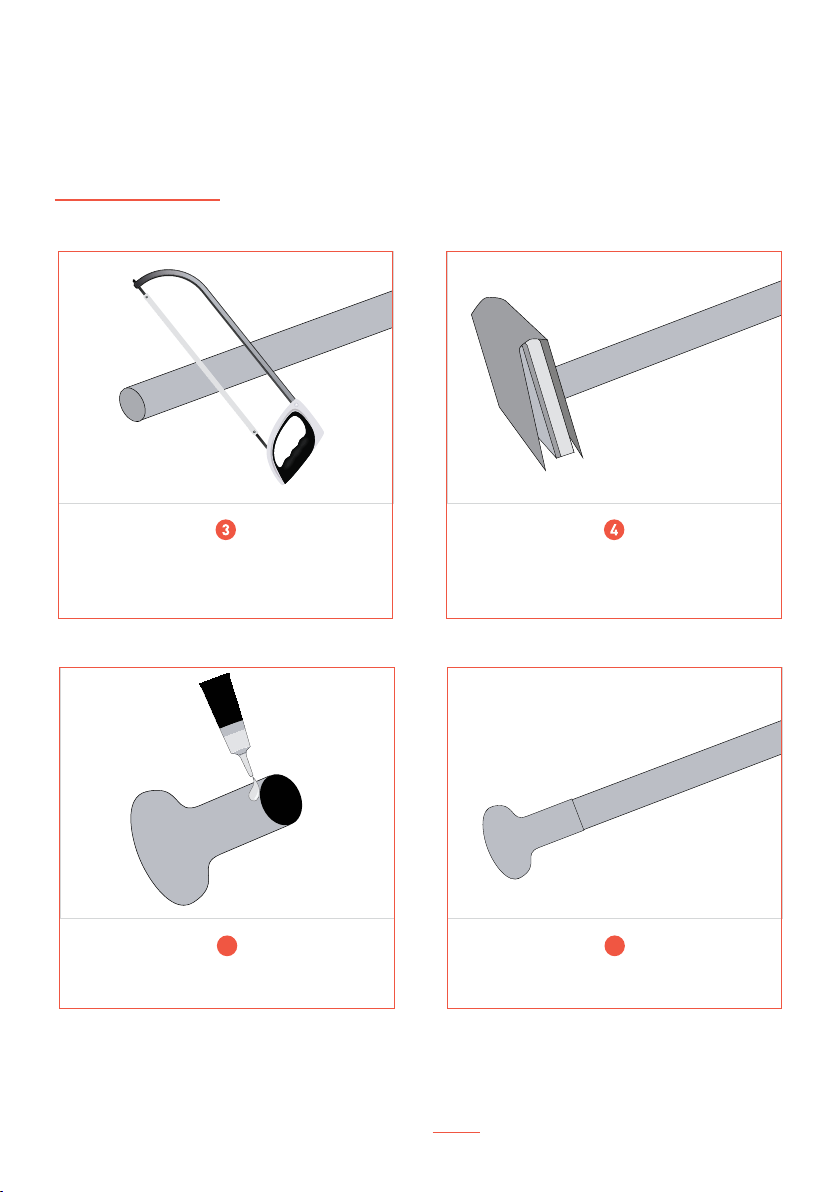
Use the hacksaw to cut the handle.
L
Use the sanding/paper block to sand the end
of the handle flat.
L
5 6
Coat the tube with epoxy. Insert the handle tube into the other part.
Make sure that the front (flat) side of the handle is perfectly parallel to the
front side of the blade.
16
Page 17

CLEANING
&
STORAGE
Our Stand Up Paddle are obviously simple to store, here are some tips to keep your paddle
in good condition:
Ideally, an inflatable SUP board should be stored dry in an aerated
1
area. Storage can be done once you’ve have folded your board but, if
there is room, the best is to let it inflate to 8-10 psi and store it without
physical restraint.
To store inflated board it is necessary to release some pressure and to
2
store the board flat or straight against a wall. Be careful not to store
the distorted board or with loads on it to avoid permanently deforming.
If you want to save space, you can of course ride your inflatable Stand
3
Up Paddle. Before doing so, sweep away any sand or other grains that
are attached to your board. At this point, you should fold your SUP into
three or four, avoiding over-tightening.
It is preferable to store it out of its carrying bag.
It is important to wash your inflatable Stand Up Paddle for three
4
reasons:
- Get rid of algae or anything else that may have stuck to it
- Check after use to see if everything is fine (puncture start, small hole,
any tear, etc.)
- Avoid bad water smells and mold when stored for a long time
17
EN
Page 18
FEW
REPAIR
ADVICE
WARNING
Rocks, corals, sticks and other stuff can be dangerous for your board. Use extreme caution when
transporting or handling your board in areas that may pose a threat of puncture.
If a large perforation occurs, leave the water and immediately stop using your board until it has been repaired by
professionals. Failing this can cause delamination and other serious damage to the board.
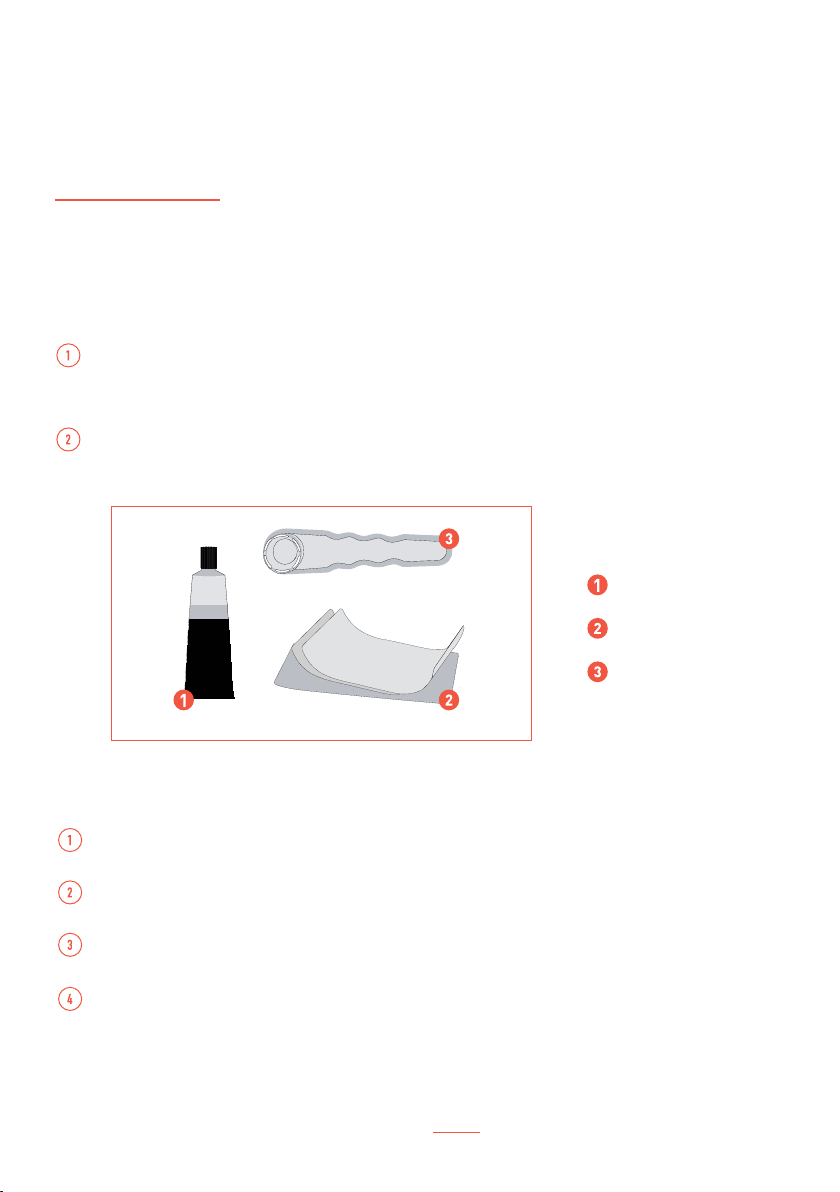
If you need to repair your board (for an impact of less than 10cm maximum) by yourself, use the items included
in your repair kit.
IN YOUR KIT :
Glue
PVC Stick Patch
Valve ke y
REPAIR TIPS FOR A NOTCH LESS THAN 10CM
Make sure the board is completely deflated, dry and flat.
Cut a patch piece (which you will find in your repair kit) about 2 inches more than the damaged surface.
Clean the area where the patch should be placed using a substance such as acetone or alcohol.
Apply glue evenly over the entire patch surface. Apply the patch to the damaged surface and press firmly
until hardened.
Wait 24 hours before replenishing the board. Be sure to perform the repair in a wellventilated area and avoid inhaling toxic vapours. Avoid contact with skin and eyes and keep
any repair equipment away from children.
18
Page 19

WARRANTY
We are proud of the quality of our LOKAHI boards and products as well as the lines of accessories. All
our LOKAHI products are guaranteed against material and manufacturing defects for a period of one
LOKAHI will repair any defective product after inspection by our technical staff for a period of one year
from the date of purchase. If this is not possible, it will be replaced by a similar product and/or the
same value if the product no longer exists. This warranty commitment does not cover any other claim
Damage or defects caused by impact with any material or object including a paddle.
Damage or defects caused by, collisions, abuse, misuse or accidental damage.
Damage or defects caused by transport, loading, unloading, dropping, out of water handling or similar.
Damage or defects caused by exposure to temperatures over 40 and under 0 degrees Celsius.
Damage or defects caused by nature, such as earthquake, fires etc.
Damage or defects caused by alterations or modifications.
Damage or defects caused by repairs.
year from the date of purchase.
conditions such as :
Damage or defects caused by usage of the board after a claim is reported.
Damage or defects caused by storage of the board in closed, damp conditions.
Damage or defects caused by riding in shallow water: as shallow as 1m deep.
Damage or defect caused by big waves or shorebreaks.
Cleaning, maintenance, storage :
- Rinse with fresh water each time you use the board (if dirt persists, prefer soft soaps)
- Do not store your board in a car that is exposed to high temperatures.
- Bright colours fade when exposed to the sun for extended periods of time (not covered by warranty). To protect your board
from ultraviolet rays from sunlight, store your board in a suitable bag when not in use.
Avertissement :
- Stand Up Paddle is an extreme sport, so there is a risk of serious injury or death. Only good swimmers over the age of
12 should participate.
- Use of a life jacket and helmet is required. It is recommended to consult a doctor about physical fitness before practising
an intense sport.
- If you do not accept these risks, do not practice Stand Up Paddle.
Do not hesitate to contact us if you have any questions about any of our products
19
EN
Page 20

NOTES
20
Page 21

NOTES
21
Page 22

20
19
All rights reserved Lokahi For further informations, please visit : www.lokahi-boards.com
 Loading...