

LogTag Recorders TRIX-8, TRIX-16, HAXO-8, SRIC-4, TREX-8 Quick Start Manual
...
is Quick-Start guide covers preparation, use and maintenance to
assist you in getting the best results from your LogTag®.
Products
LogTag® Recorders offer a variety of different models. The
product range is constantly being updated and new models added,
so visit
www.thermoworks.com/products/logger/logtag.html
to get the latest information and news
about upcoming product releases.
You can nd a list of the most common
models in table1. Using the LogTag®
most appropriate to your measuring
and monitoring task will ensure the
best results.
LogTag® recorder products have a number of features in common: a green OK
LED, a red ALERT LED, a START/
MARK button and a mounting lug.
GettinG started
All you need to use the LogTag® recording
system are a LogTag® interface, a PC running
Windows XP or later, the LogTag® Analyzer
PC application and the LogTag® recorder itself.
Don’t plug the interface into the computer just
yet, this will be done at the conclusion of the
software installation.
software installation
Before using a LogTag® recorder you will need to
download the LogTag® Analyzer software from
LogTag’s web site at
www.thermoworks.com/software/
. After
registering you will be e-mailed with a link, from
where you can download the latest version,
which supports multiple languages, including
those with special characters such as Chinese or
Greek.
Once downloaded, start the executable to initiate the installation
process; please note you will need local administrator rights to do
this.
Wait until nished before installing your interface.
interface installation
After the installation is complete, you will see a new icon
on your desktop. You can now plug your interface into
a USB port, or an RS232 port if you were supplied this
type of interface. For USB interfaces the drivers will now
install automatically. Your operating system will notify
you once the driver installation has succeeded. You can use
multiple interfaces on one computer and also mix RS232 and USB
interfaces.
When all interfaces are installed you are ready to proceed.
confiGurinG a loGtaG
You will need to congure a LogTag® if you
want to take readings with it. Insert the LogTag®
into the interface, contacts in rst and the
LED’s towards the interface label as shown in
the picture on the right.
Start the software. e easiest way to
congure the LogTag® for a trip is the
use of the LogTag® Wizard by clicking
on the Wizard toolbar button or selecting
LogTag-Wizard from the menu.
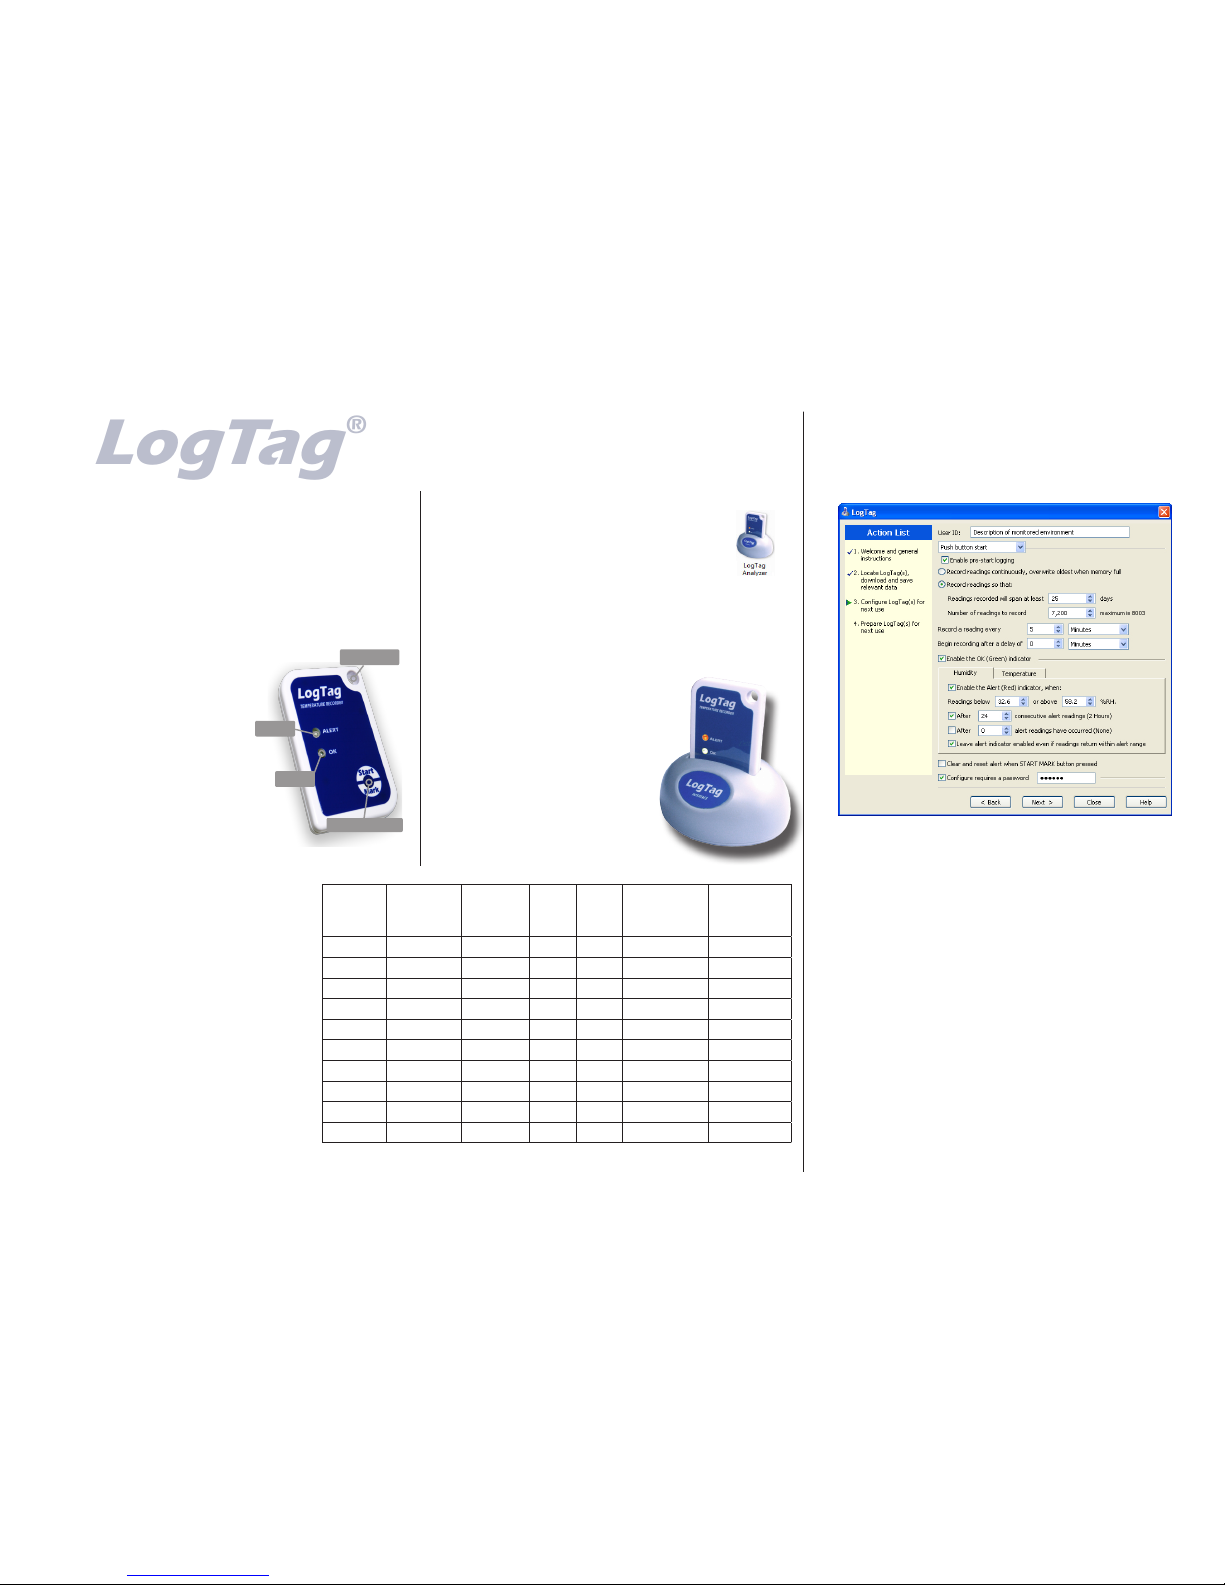
e Wizard will
• Query all interfaces and any recorders inside them
• Download any data from recorders found and save them to les
• Allow you to enter parameters for a new trip, like shown in this
screen:
• Upload the new conguration to the recorders
You can enter parameters such as start method (push button or date/
time), logging interval (30 seconds to 18 hours), logging duration,
start delay, access passwords and not to forget Alert values, which
are used for the Alert LED activation and the reporting functions in
LogTag® Analyzer, and also add a description about your trip.
analysinG the results
Once loggers have completed a trip, you can use the LogTag®
Analyzer software to analyse and archive the data, to export them to
other programs such as MS Excel or to e-mail them and upload them
to an o-site server.
A number of controls and displays assist you in operating the software.
• Menu
• Toolbars
• Status
• Data window with graph, list, summary and averaging tabs
• Multichart windows and annotations for adding notes
• Context menus allowing quick access to the most used functions.
Quick Start Guide
Product
Type
Integrated
Temperature
Sensor
Integrated
Humidity
Sensor
Sensor
Probe
Display Recording
Temperature
Range
Memory
TRIX-8
-40ºC to 85ºC 8,000 samples
TRIX-16
-40ºC to 85ºC 16,000 samples
HAXO-8
-40ºC to 85ºC 8,000 samples
SRIC-4
-20ºC to 65ºC 4,000 samples
TREX-8
-40ºC to 99ºC 8,000 samples
TRIL-8
-80ºC to 40ºC 8,000 samples
TREL-8
-80ºC to 40ºC 8,000 samples
SRIL-8
-80ºC to 40ºC 8,000 samples
TRID30-7
-30ºC to 60ºC 7770 samples
TRED30-7
-40ºC to 99ºC 7770 samples
Table 1: LogTag Logger Models
LogTag
®
®
alert led
oK led
start/MarK Button
MountinG
luG

Signal Sequence Occurrence
LogTag® wake-up
signal
Sequence of four
alternate ashes of
green-red LED’s
• displayed after conguration has been successfully applied to the LogTag
®
• when a LogTag® is woken up from hibernation state
Not to be mixed up with...
LogTag
®
start-up
signal
Sequence of sixteen
alternate ashes of
green-red LED’s
• displayed when the LogTag® starts its recording cycle
Mark signal Sequence of ve
simultaneous ashes of
green and red LED’s
• displayed when pressing start/mark button while recording to indicate an inspection
mark in the software
• displayed directly after the start-up signal following a push button start where a
recording delay has been congured. In this instance the start-up signal is repeated
when the actual recording begins
Logging active, no
alert present
Single ash of green
LED every 4 seconds
(approx.)
• indicates LogTag® is recording
• is is not displayed when pre-start is active and the main logging cycle has not
yet started. It is also not displayed when the green LED has been turned o in the
conguration screen
Logging nished,
no alert present
Single ash of green
LED every 8 seconds
(approx.)
• indicates LogTag® has nished recording
• is is not displayed when the green LED has been turned o in the conguration
screen. Will also be displayed when unit has been woken up from hibernation
Alert condition
present
Single ash of red
LED every 4 seconds
• displayed when the LogTag® has detected an alert condition and the Alert LED has
been activated
If an alert is present you cannot determine if the unit is still logging or has nished its log cycle. If the Alert LED has not been activated during conguration,
in essence the visual indicators have been disabled, and the green LED will ash
every 4 or 8 seconds as above.
Communication e green LED will
ash occasionally
• during communication with the interface the green LED will ash occasionally; no
information is conveyed in this
Start button press red LED glows faintly
• is is by design but conveys no information
Table 2: Light Patterns
For a full list of features please see the LogTag® Analyzer User Guide,
which can be accessed through the Help Menu. You can also call up
on-line help information for all windows and dialogue buttons by
pressing the F1 key.
loGtaG indicator leds
e LogTag® recorder itself can give you important status information
by ashing its indicator LEDs in dierent patterns. Both the red ‘Alert’
LED and the green ‘OK’ LED convey information about conguration
and trip parameters, Alert status and give feedback when users interact
with the START/MARK button.
You will nd a summary of the LED patterns with a description about
their meaning in table 2 on the right.
start/MarK Button
Once a LogTag® has been congured, pressing the START/MARK button has a dierent outcome depending on what
the recorder is doing at the time the button is
pressed.
• If the recorder is congured for a push button start, pressing this button will activate
the main recording. ere is no need to be
concerned about any lost data if the user
forgets to press this button, as a pre-start
recording feature can be activated, logging
data even before the trip is started.
• Once the LogTag® has been started, pressing
the button will insert an inspection mark in
the data recordings, which is displayed when
viewing the data in the software.
• If congured, Alert Conditions can be reset
when this button is pressed.
custoMi;inG the software
The software allows you to customize many of
the features to your individual requirements.
Not only can you change some of the more
basic options like display language and
temperature units, but also adapt some of the
more advanced parameters for e-mail and FTP
functions, storage folder location, le name and
frequency for automatic software updates.
GettinG the riGht results
When you use the LogTag® units, please take a
moment to consider the application and how
to best approach the monitoring task. Allow the units to be located in
a place with good air movement, make sure HAXO units are not lying
at so water and dust cannot gather around the sensor lter and provide adequate insulation around access holes for sensors with probes.
certifications
LogTag® has achieved certication with a number of Authorities,
demonstrating the quality and suitability of the LogTag® Recorders for
applications where accuracy and consistency is required. Such certications have - amongst others- been issued by such organisations as the
FCC, CE, C-TICK, TÜV and the WHO.
fda title 21 cfr 11
Compliance to the FDA requirements is available to users via a special
server utility, available on request, which can log events and be used to
digitally sign data les.
Maintenance
LogTag® recorder products are rugged and need little maintenance,
it does pay however to observe some basic rules when handling the
recorders to maximize their use.
Battery rePlaceMent
Most LogTag® recorder products have a replaceable battery, some of
which may be soldered to the electronics to avoid contact issues that
exist with other branded loggers; for these you will need some soldering
expertise and a battery replacement kit from your distributor. Please
also note that the products do contain a non-rechargeable Lithium Battery, which must be disposed of in accordance with local regulations.
hiBernation
To prolong the life of your recorder you can hibernate it between trips
via LogTag® Analyzer when it is not being used for extended periods.
Please refer to the User Guide in the section about ‘Hibernation’
caliBration
All LogTag® recorders can be calibrated with special utility software, which will be made available
to calibration labs upon request. Re-calibrated
loggers can be identied and traced back to the
calibrating lab thus reducing the risk of fraudulent data tampering.
Basic trouBleshootinG
water inGress
Please carefully observe the IP rating for your unit
and remember that none of the LogTag® products
can be immersed into liquids.
contact cleaninG
Keep the three metal contacts at the back of the
recorder clean and free from tape residue, dirt
or other contaminants, as these usually result in
communications problems. If required, clean
them with a soft pencil eraser, but don’t use abrasive materials as you may permanently damage
them.
GettinG helP
If after studying the User Guide you still need
further information, please visit the Support section of the LogTag® Recorders website.
thanK you...
...for choosing LogTag® Recorders, we are looking
forward to working with you!
 Loading...