

Page 1
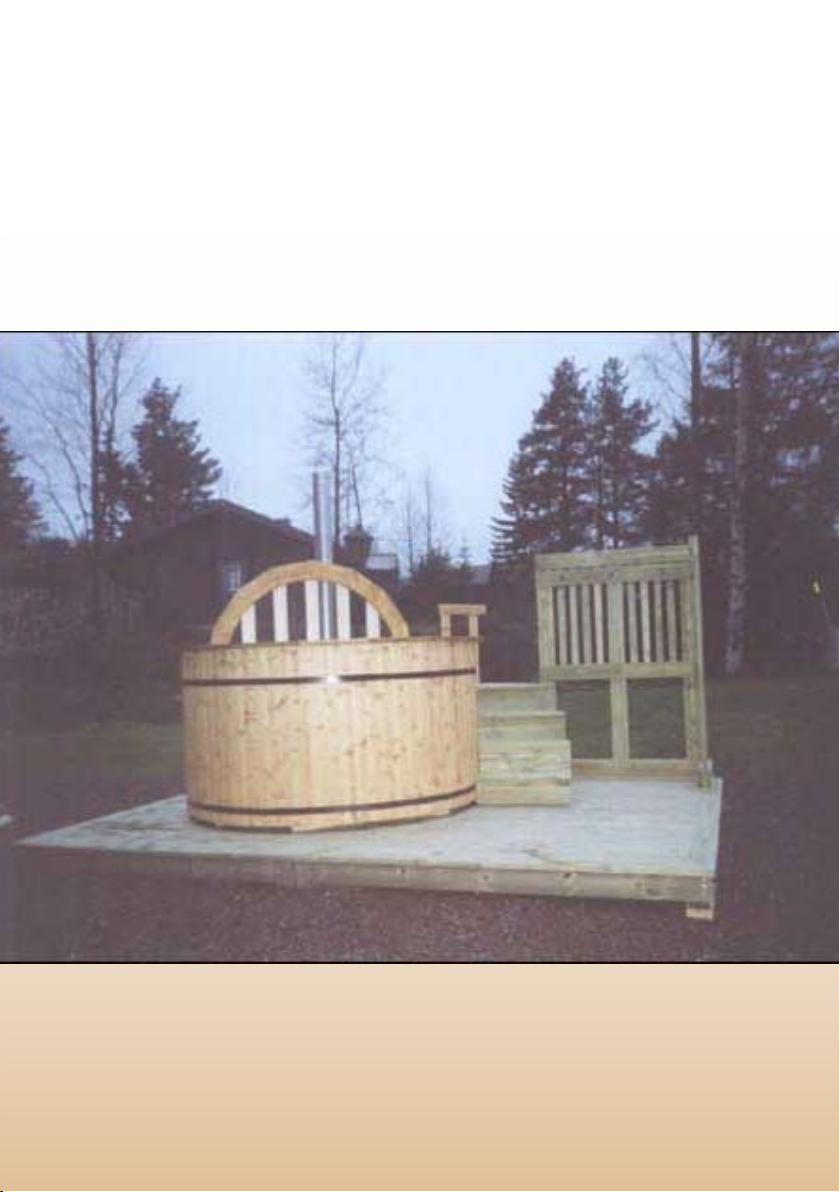
Handbook
Build Your Own Outdoor Hot Tub
With Stove and Mount Kit
from Logosol
Page 2

Introduction
These instructions are based on the
assumption that you have bought
the Hot Tub Kit (which includes a
stove, mounts and accessories)
from Logosol, art. no. 9999-000-
9999.
These instructions are very
exhaustive and describe all steps
in detail. Do not let the mass of text
scare you off. Building an outdoor
hot tub is quite easy; the rst time
you do it, it will take about 15-25
hours, starting from unprocessed
boards. It will take considerable
less time if you build more than
one, since you then already have
everything set up. Read all the
instructions before starting the
work.
Accuracy
Most of the time, accuracy is not
all that important. One centimetre
more or less does not matter so
much. There are some exceptions,
though. Accuracy within +/- 1 mm
is required when you carve the
lines with the compass. Also, be as
careful as possible when you are
cutting with the jigsaw.
Accuracy within +/- 0.3 mm is
required when the side boards are
being cut into length, and when
you are cutting the recess where
the bottom will be tted. (Take it
easy, it is not hard to saw correctly
when you know how to do it.)
Page 3
Safety instructions
While building
Work on a level ground.
Risk of injury!
Use the safety equipment
stipulated for each of the machines
you are operating.
Use approved eye protectors,
preferably a visor, when the groove
in the side boards is being cut out.
Your face will surely be in the line
of re when chips and splinters are
hurled out.
Use gloves when handling the
stove and the metal hoops.
Risk of crush injury when
turning the hot tub over.
A minimum of three persons
is required. The hot tub weighs
approx. 250 kg, but this can vary
depending on what sort of wood
you have used and the size of the
tub.
cold water can cause dangerously
high blood pressure.
Do not bath in water hotter than
39° C.
Never bath alone in the hot
tub.
Bathing under the inuence of
alcohol or other drugs increases
the drowning risk considerably.
The stove
Risk of re.
Place the hot tub so that it is
at least 10 m from the nearest
building. Do not light a re when
local warnings of re risk have
been issued.
Risk of burn!
A deciently secured stove is
immediately dangerous.
Always use gloves when loading
the stove with rewood.
Other risks
Drowning risk!
Consider the risk of children
drowning. Use a stable and solid
cover when the hot tub is not being
used. Ensure that small children
cannot open it!
Do not bath in hot water if you
have cardiovascular problems.
Bathing alternately in hot and
Never touch the sides of the
stove or the chimney ues when
the stove is hot. Only the wooden
handle of the stove cover may be
touched.
Avoid having re in the stove
when you are bathing in the hot
tub, especially when there are
children in the tub.
Risk of damaging the stove. Do
not light a re until the top side of
the stove is covered by water.
Page 4

Material
Outdoor Hot Tub Kit
Art. no: 9999-000-9999
1 Stove of aluminium
1 Stainless grating
1 Stainless bafe plate
1 Cover with wooden handle
2 Galvanized chimney ues
1 Galvanized chimney top
1 Stainless outlet
2 Rubber pipe connection
1 Plastic pipe with bend
1 Straight plastic pipe (overow outlet)
1 Hose clamp
2 Hoops of aluzink, L:6.7 m
4 Bolted joints of lacquered steel
4 Screw plates for the bolted joints
4 M12 Threaded bars
8 M12 nuts with washers
16 M8 Flathead screws with washers and nuts
10 Fleur-de-lis of lacquered steel
6 Bench brackets of galvanized steel
Wood needed (ttings not included):
Side boards: approx. 45x95 mm, 90 linear metres for a hot tub of D:2
m.
Tongued and grooved bottom boards: 25-40 mm, approx. 4 m
Bottom joists: 8 linear metres, approx. 50x120 mm.
Larch, spruce or oak is preferable for the bottom and side boards.
Boards: 10 m 22x120 mm of which 7 linear metres should be of rot
resistant wood, e.g. larch or pine heartwood.
A couple of sturdy planks that will be used as work surface
Some boards for building the work station at the compound saw, and
for the compass (see below)
2
.
Page 5

Tools needed
PH260 or DH410 with moulding knives for bottom, sides and joists.
Jigsaw
Electric slide compound saw with a linear length of stroke of at least
100 mm and adjustable cutting depth (Art. No. 95-210)
Handheld belt sander
Sandpaper on a block
Rubber mallet or plastic hammer
Carpenter’s hammer
Electric screwdriver with screw bit
Spanners: two 18 mm, one 13 mm
Polygrip pliers
Angular grinder with abrasive cut-off wheel
Strong electric drill
8 mm metal drill bit
8 mm wood drill bit
65 mm hole saw (check the diameter of the outlet)
Two C-clamps
Pencil, tape measure, folding rule, set square
Four 100 mm nails
Transparent silicone
Approx. 120 screws, 35 mm (The screws should be of good quality,
preferably Torx.)
Approx. 50 screws, 25 mm (The screws should be of good quality,
preferably Torx.)
Eight stainless carriage bolts M8x60 and nuts
Page 6
Moulding
Bottom boards
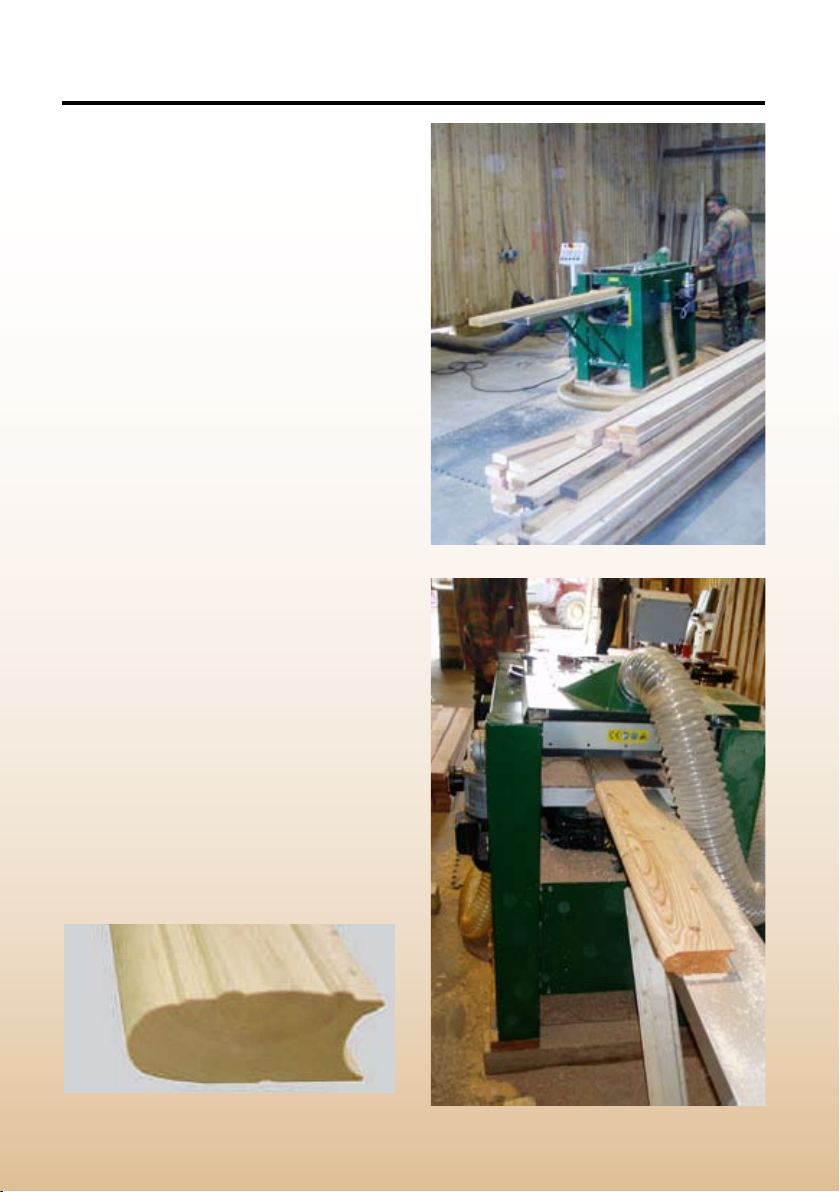
The bottom is made of straight boards
without big open knots. For the
machining you use e.g. the knives
9017/9016 HSS. In these instructions
the bottom will be 30 mm thick, but
everything from 25 to 40 mm works.
You just have to have the same measurement on the cut-out (recess) in
the side boards. The width of the bottom boards should be 120 mm.
Side boards
The side boards can be made 40 mm
(knives 95038/95039 HSS) or 45 mm
(knives 95049/95050 HSS). Most
people prefer the narrower alternative.
If you want to mould the outside this
should, of course, be done at the same
time as the tongue and groove. It does
not matter whether the heartwood
side of the boards faces outwards or
inwards, but be consistent and turn all
the boards the same way. Some experts claim that the pith should face
outwards, others claim the opposite.
95 mm is a suitable width, which will
give a width of about 80 mm when t-
ted in the next board’s groove.
A nice moulding can add character
to the hot tub!
Page 7
Start Building
Building instructions for
an outdoor hot tub, 2m.
The hot tub is built upside down.
Make a compass: Take a narrow board
that is just over one metre long. Drive
two nails straight through the board.
The distance between the nails should
be the same as the radius of the hot
tub, 1 m (Diameter/2). The nails should
stick out 3 cm on the underside. Check
the distance between the nail points,
and bend the outermost nail until you
have the correct measurement.
Approximate list of boards for
the bottom:
Nine or ten 210 cm long boards; two
175 cm long boards; two 155 cm long
boards; two 130 cm long boards; two
100 cm long boards.
Page 8

Laying out the bottom boards
Lay out two planks on a level surface.
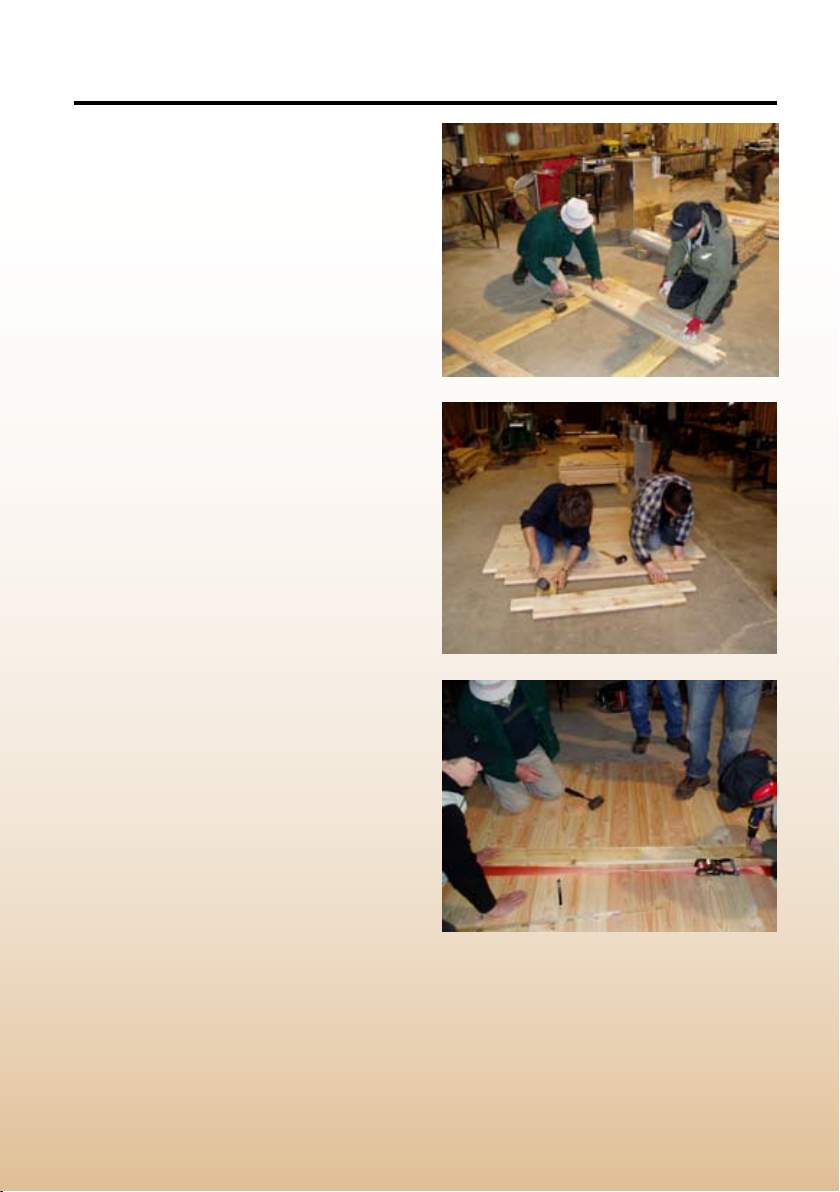
Lay out the tongued and grooved
boards on the two planks. The future
upper side should face downwards.
Use the compass to check if the
boards are long enough and have a
safety margin of at least 6 cm in all
directions. Hammer them together
properly. Use a stop on one side
to facilitate this operation. To avoid
damaging the tongue on the bottom
boards, you can use a remaining
piece of the tongued and grooved
boards as a buffer between the mallet
(or hammer) and the bottom boards.
Using the compass, check that the
boards lie within the circle. If not,
hammer them into place. Check again
with the compass when you have put
half the bottom together, so that you
know exactly how many boards you
will need (concerning the outermost
boards, see below).
Temporary board: Cut a board into
length, approx. ¾”4 (20x100 mm).
The board should be 80 mm shorter
than the diameter of the bottom (i.e.
192 cm).
With the help of the compass, measure
where the centre of the bottom is to
be. Make sure that the outermost (and
shortest) boards will be of the same
width, and that they will be at least 60
mm wide. This means that the centre
nail of the compass should be placed
either centred on a bottom board, or
between two boards.
Use a pencil to draw a line that goes
perpendicular to the boards straight
across the whole bottom, and another
line that is half a metre long and
goes over the centre in line with the
boards.
Page 9
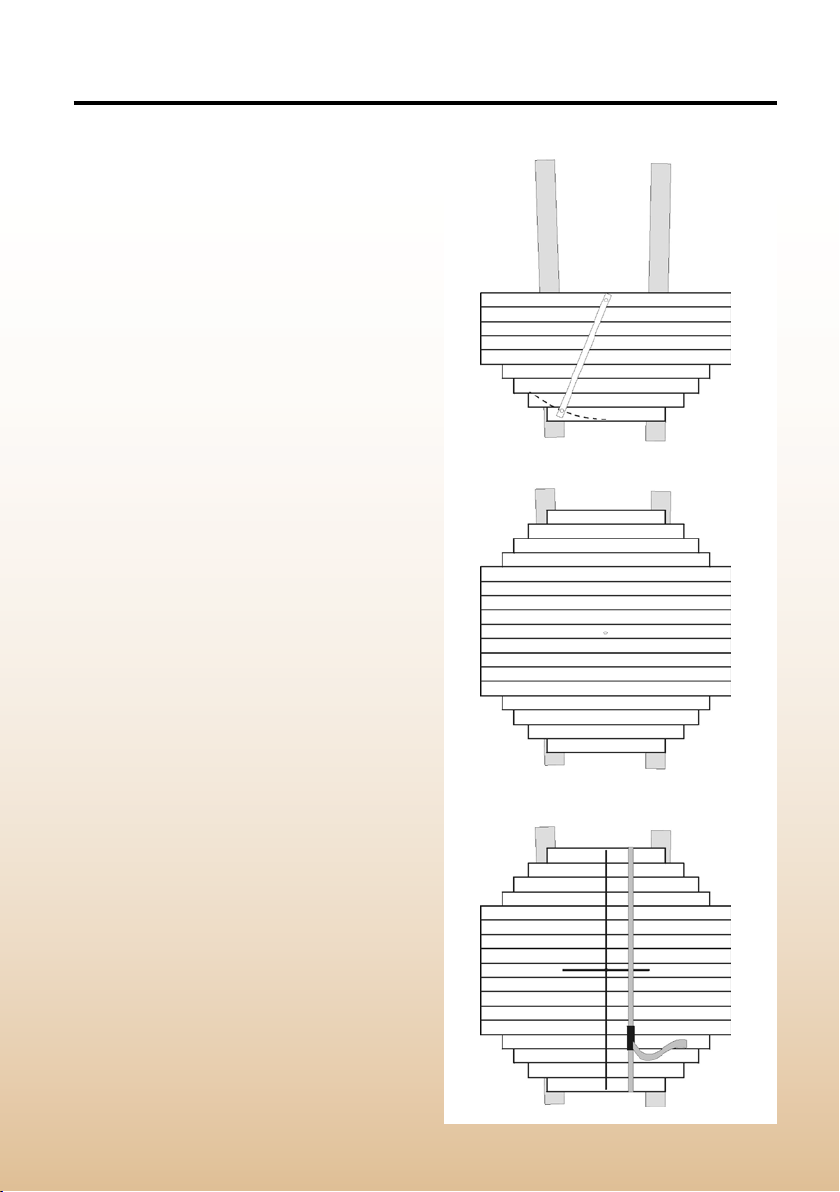
Use a ratchet strap, which you place
15 cm from the long line, to strap the
boards together. Here, you can use
the help of two friends: Weigh the
outermost boards down so that they
do not bend upwards. Hammer lightly
on the outermost boards when they
have been strapped together. Having
placed it centred in both directions on
the drawn cross, screw the temporary
board to the bottom so that the tongued
and grooved boards stay together.
A couple of screws in the outermost
boards, and one screw in the middle
will sufce. Continue to weigh down
the outermost boards until you have
loosened the ratchet strap. Offer your
friends some coffee or some other
suitable drink.
(If you have to do this alone, skip the
ratchet strap and hammer the boards
together. They will be tightly tted
together anyway.)
Page 10
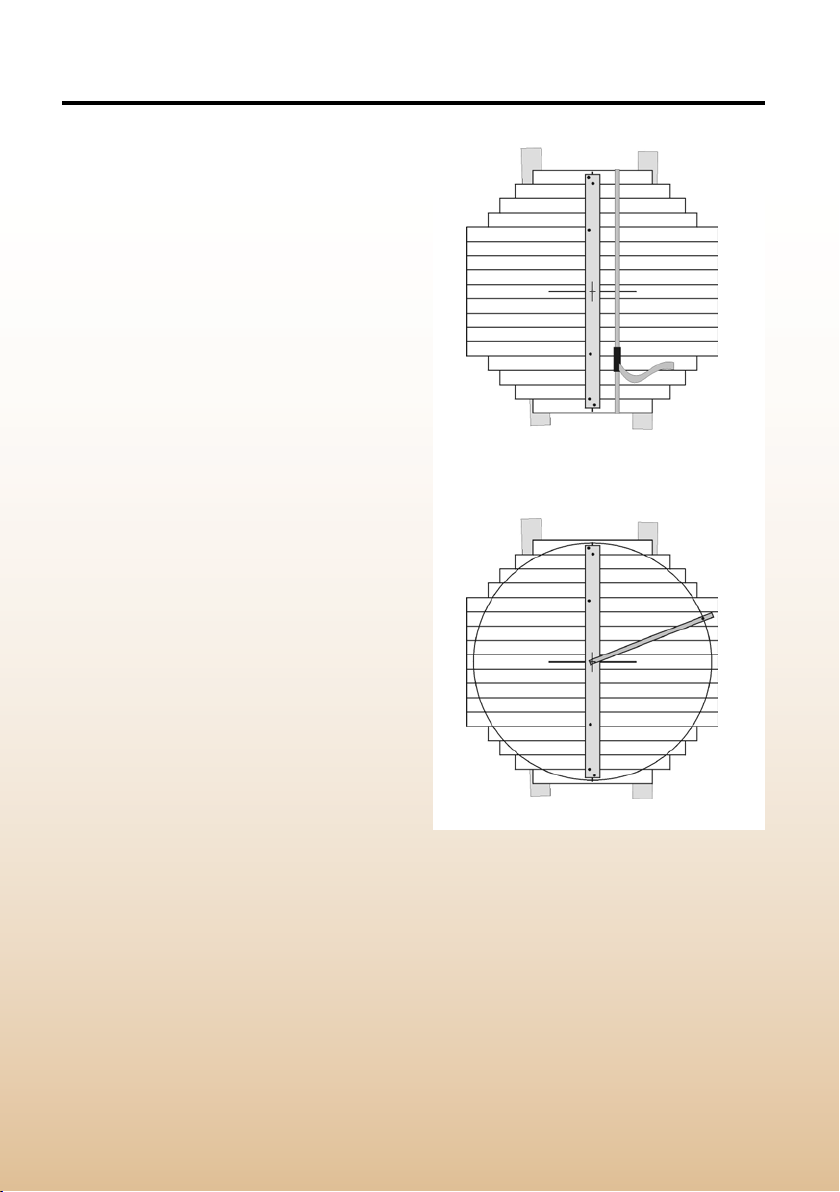
Carve the diameter of the hot tub in
the bottom boards: Mark the centre
of the temporary board, which is now
covering the centre of the cross. Check
the measurements of the outermost
bottom boards. Hold the compass
slightly angled and carve around the
bottom.
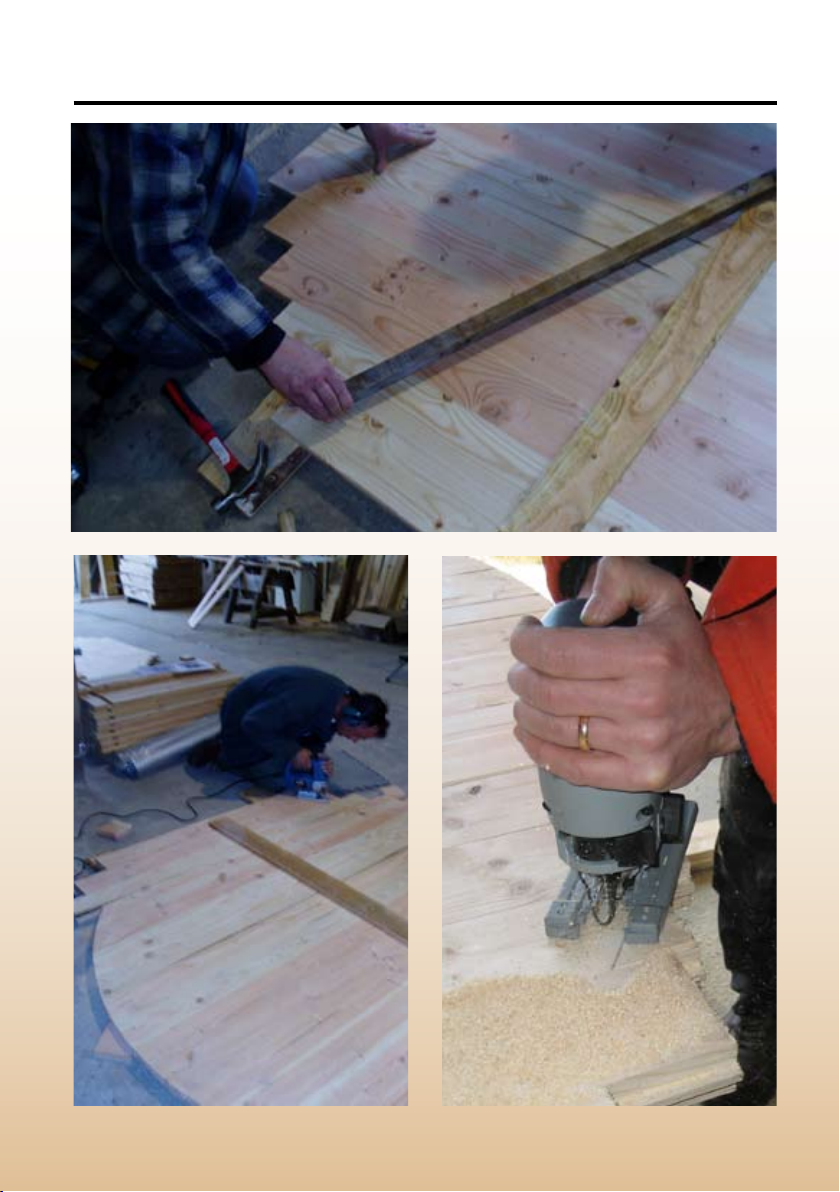
Cut along the line with a jigsaw: Make
sure that the saw blade can cut freely,
and that you do not cut into anything
under the bottom boards. This is to
prevent the saw blade from breaking.
Do not forget to move the planks, on
which the bottom rests, when you have
reached them with the saw. If the saw
cannot pass the temporary board, you
can stop and wait until later when you
have turned the bottom over. Then
you can cut the last part from below.
Be careful. Cut slowly so that the saw
blade cuts as straight as possible
through the bottom boards. Angular
misalignments over 3 mm should be
sanded with the belt sander (until the
deviation is at most 3 mm).
Page 11
Page 12
The underframe
Two circles are to be carved around
the entire circumference of the bottom:
one circle 10 mm from the edge, and
the other 20 mm. Start by moving the
outermost compass nail 10 mm further
in on the compass. Measure the
distance (990 mm) and bend the nail if
necessary. Carve the circle. Move the
nail another 10 mm further in on the
compass (980 mm between the nails)
and carve the other circle (20 mm
from the edge) and around the entire
circumference of the bottom.
Fixing boards
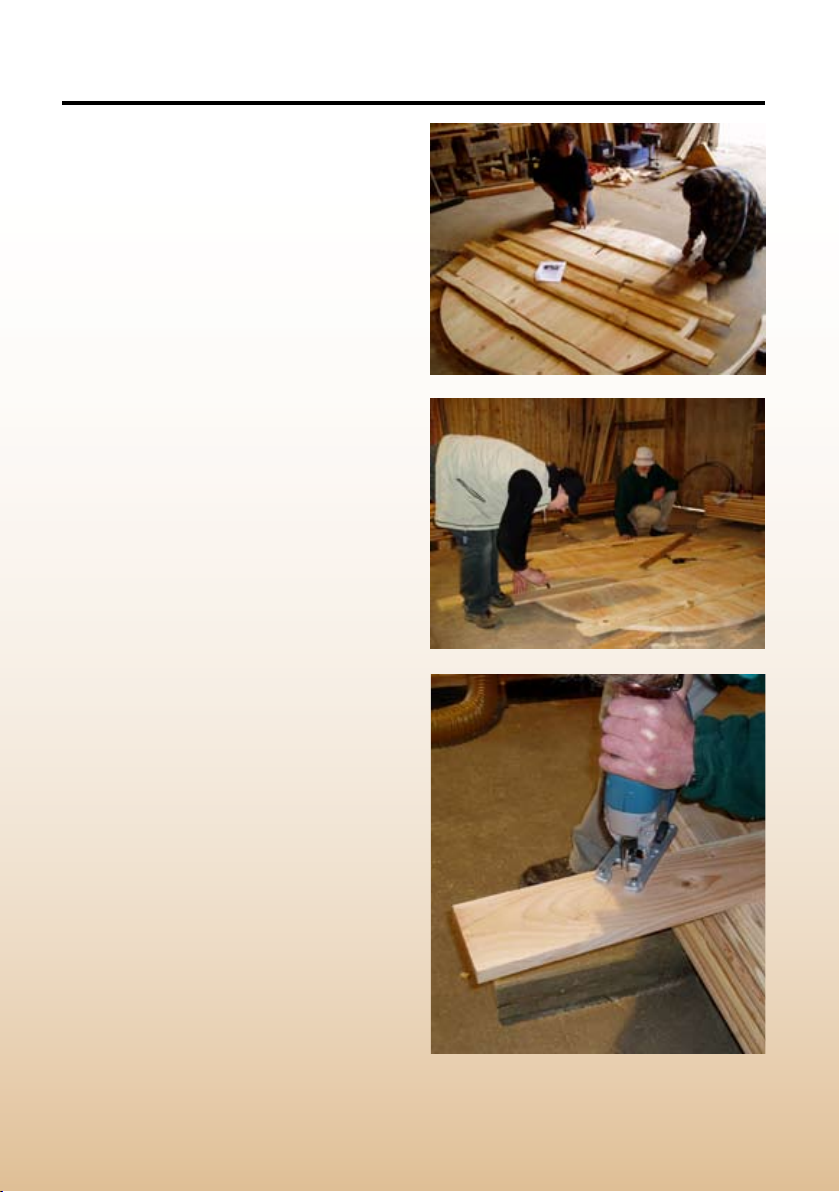
Lay out four 22X100 mm boards,
preferably heartwood, on the bottom
boards. The two in the middle should
have a space of c/c 400 between
them, and the two outer boards should
lie centred between the middle boards
and the edge of the bottom. Measure
against the temporary board to make
sure that the xing boards become
parallel. Draw with a pencil along both
sides of the four xing boards so that
you get lines on the bottom boards.
Use the compass to carve the 20 mm
line on the xing boards. Remove
the xing boards and saw along the
carved line.
The xing boards are cut into length along
the carved line.
Page 13
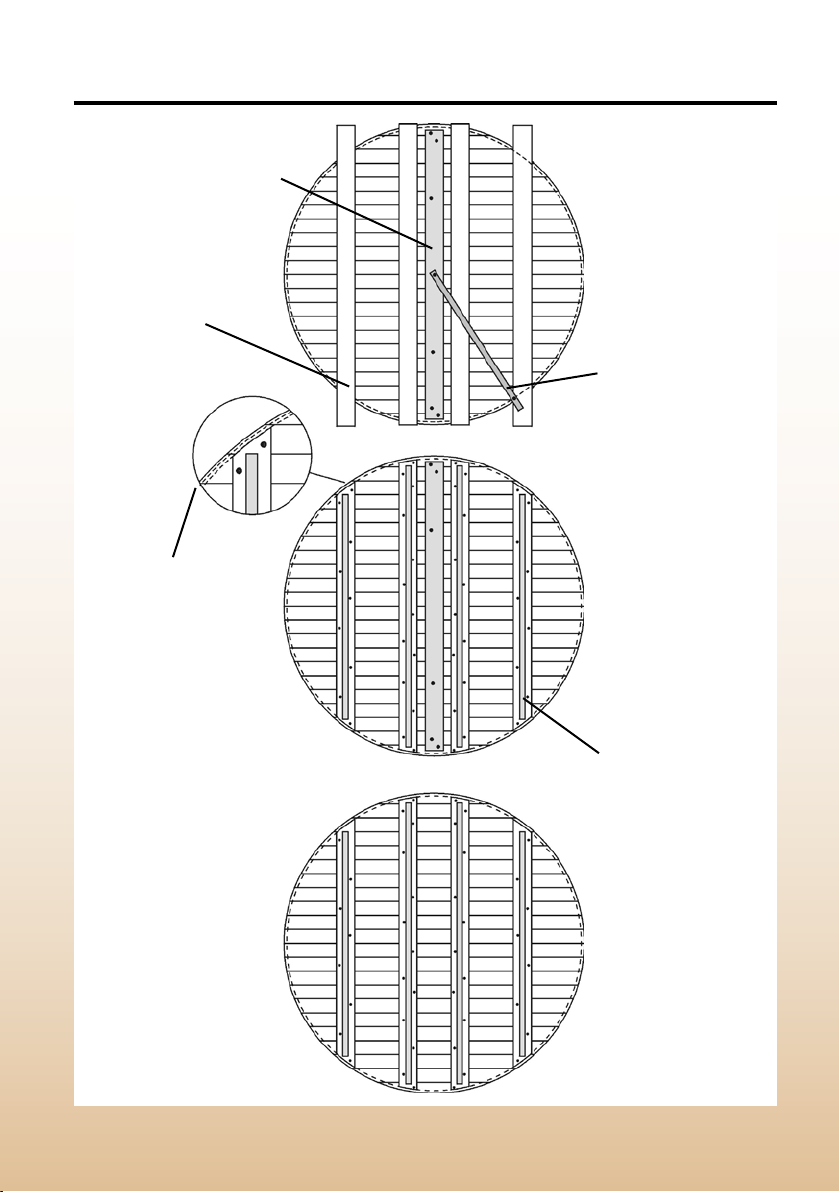
Temporary board
which holds the
bottom together.
Fixing boards
Carve guide
circles: The
circles should go
around the entire
circumference of
the bottom, one
being 10 mm from
the edge, and the
other 20 mm.
Compass
Bottom joists
Page 14
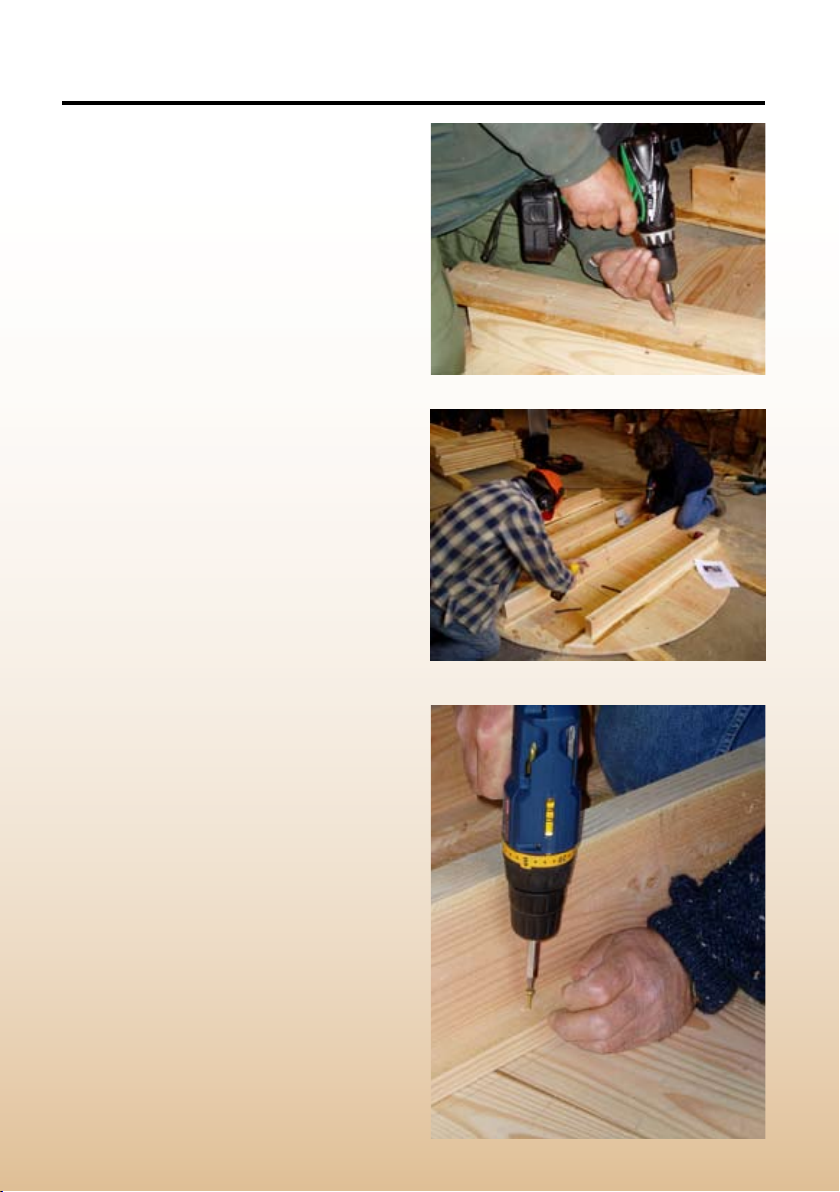
Bottom joists
Cut 4 joists into lengths, approx.
45x120 mm, so that they are about 100
mm shorter than the xing boards.
Centre each xing board on a joist and
screw them to the joists so that they
become T-beams. Screw in zigzags
every 15th centimetre using 35mm
screws.
Place the T-beams on the bottom so
that the xing boards touch the 20
mm line. They must not extend over
this line. If necessary, the T-beams
can be moved a couple of millimetres
sideways. Screw the T-beams to the
bottom by screwing through the xing
boards using 35 mm screws. Screw in
zigzags in every second or third bottom
board, but shift the screw pattern on
the T-beams so that every bottom
board, including the two outermost
boards, are fastened with at least
two screws. Now you can remove the
temporary board, which was used for
keeping the bottom together.
The T-beams are screwed together.
The T-beams are screwed to the bottom.
Page 15
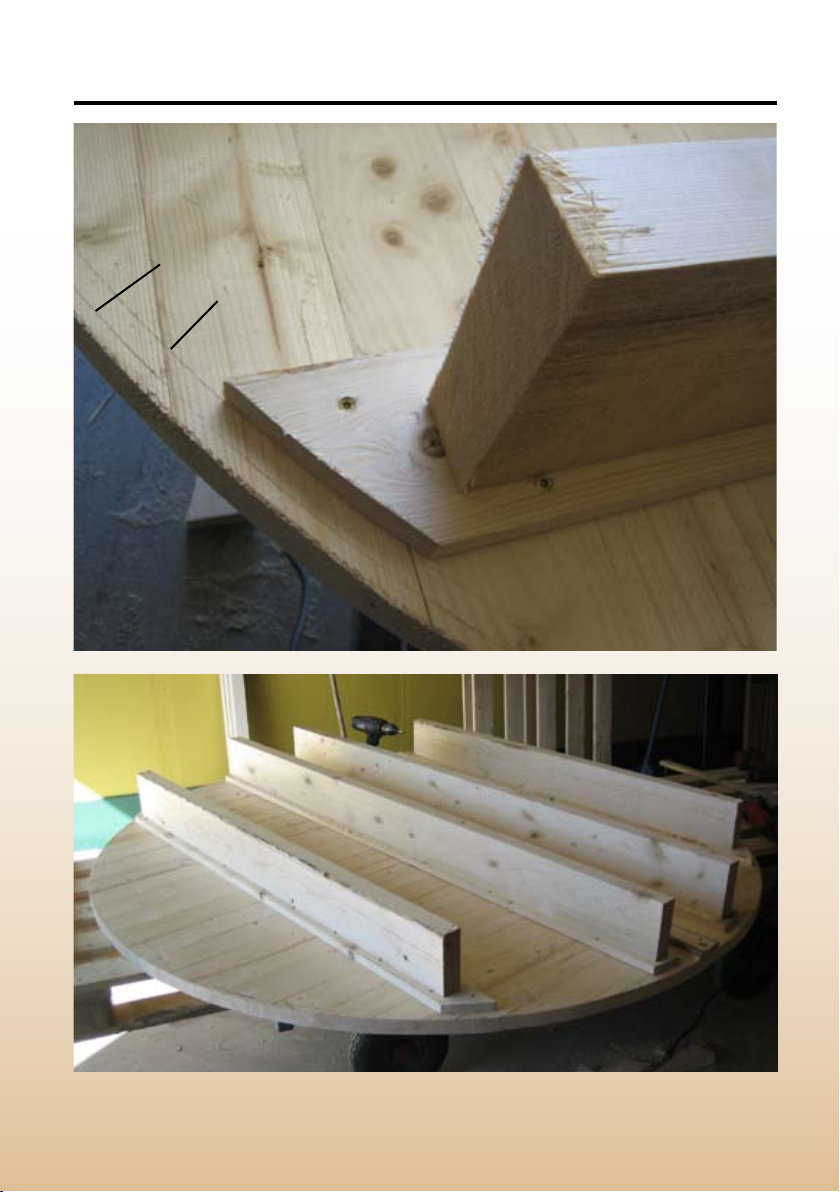
10 mm line
20 mm line
Fixing board
The xing boards and the bottom joists are screwed together into T-beams, which then
are screwed to the bottom. The ends touch the 20 mm line.
Page 16
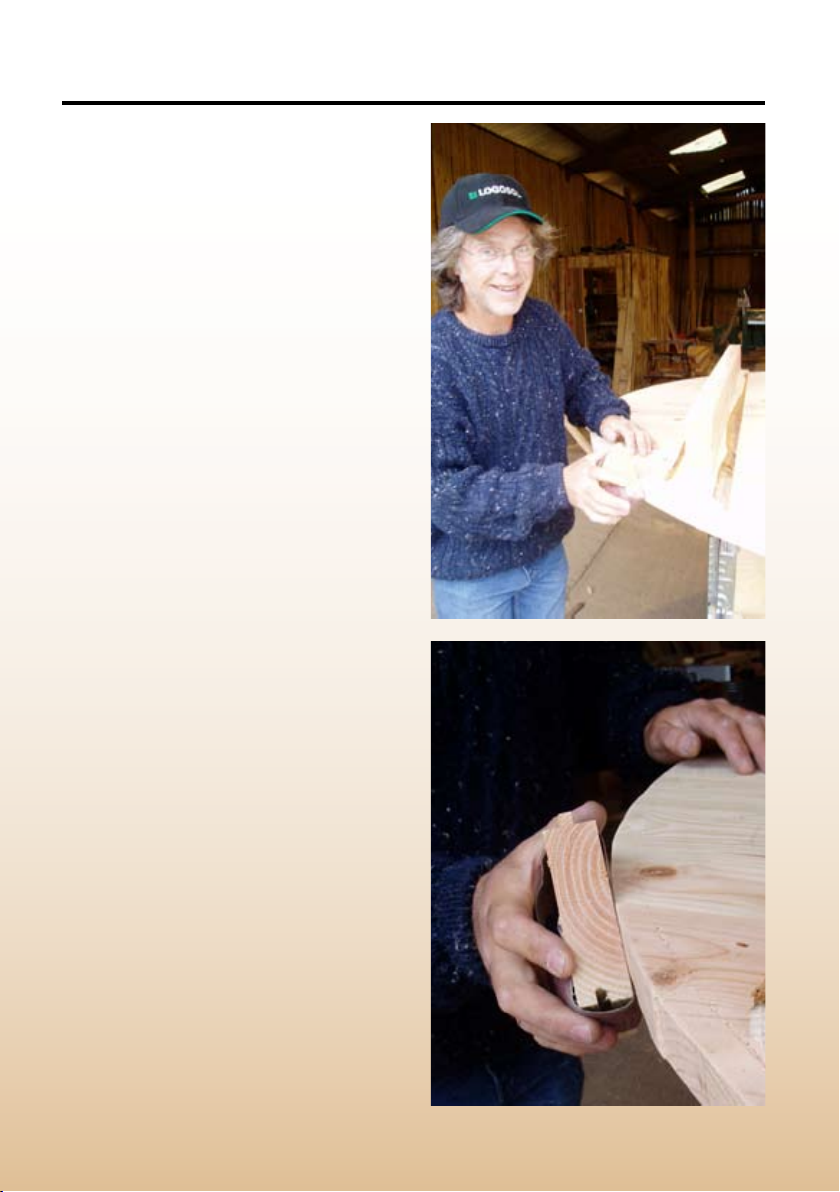
Now the bottom is ready. Place
the bottom (with the beams turned
upwards) on a stable work table that
is approx. 1.1 m high, for instance
a pallet with 5 pallet collars. Put
something over the top pallet collar to
protect the bottom.
(If there is still a part of the bottom
circle that you have not been able to
cut away due to the temporary board,
you can cut that part now. Saw from
below with the jigsaw.)
Rub off splinters along the jigsawed
edge with some sandpaper.
Page 17
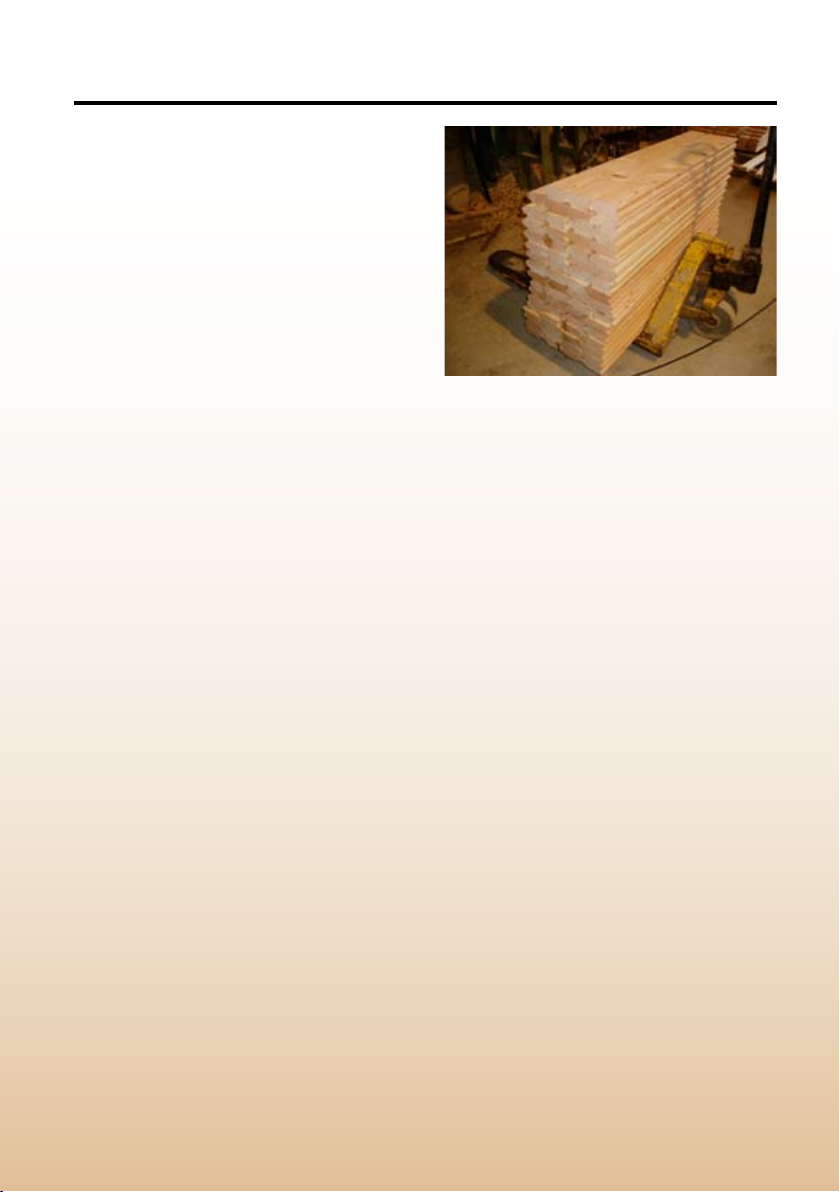
Preparation of the side boards
Use a compound saw with linear
movement and adjustable cutting
depth.
It can be used both for cutting the
boards into length and for making
the cut-out or recess in the boards.
The machine can be ordered from
Logosol.
Build a good workstation. Take two
boards (for instance some remaining
bottom boards) that are approx. 1.7
metres long. Screw them together
and secure the saw on top of them.
Ensure that there is a space of at
least 1 metre on the left side of the
saw blade. Place an additional board
on both sides of the saw. Place short
board pieces under them so that they
become level with the saw table, then
fasten the construction with screws.
It should be room to fasten the stop
boards (see below) with C-clamps.
Make sure that the saw blade cuts
at a 90 degree angle. As lateral stops
you use two short board pieces, which
you secure with C-clamps. When you
are satised with the adjustment (see
the sections Cutting into length and
Setting for the cut-out) you should
also drive a couple of screws through
the board pieces so that they do not
become displaced.
1. Cutting into length
Use a board piece as a stop 108 cm
from the saw blade, and cut all boards
into the correct length (the depth of the
hot tub will then be 97 cm). You will
need approx. 80 boards for a 2 m hot
tub, but cut a couple of extra boards
in reserve. Cut the ends clean. Avoid
using boards with big open knots, and
avoid getting knots in the cuts.
TIP: There is always a certain degree
of play in the machine. Be careful
you do not bend the saw head in any
direction while sawing. Try to take all
cuts the same way.
NB: Make sure that there is no saw
dust between the stop and the boards
that are to be sawn. Regularly check
the result by comparing the length with
side boards that you have cut before.
Page 18
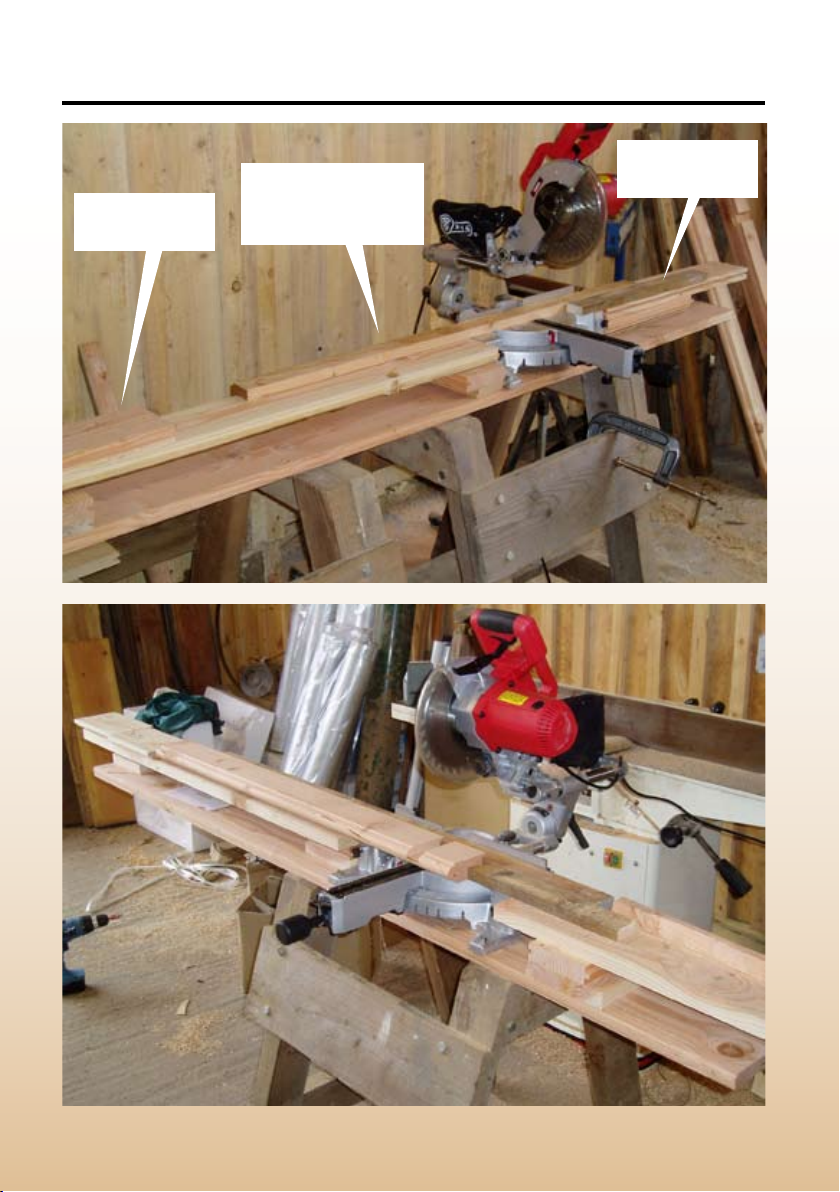
Workstation for making the cut-out
Straight wood strip
Short board as
a lateral stop
which positions
the side board.
Short board as
a lateral stop
Page 19
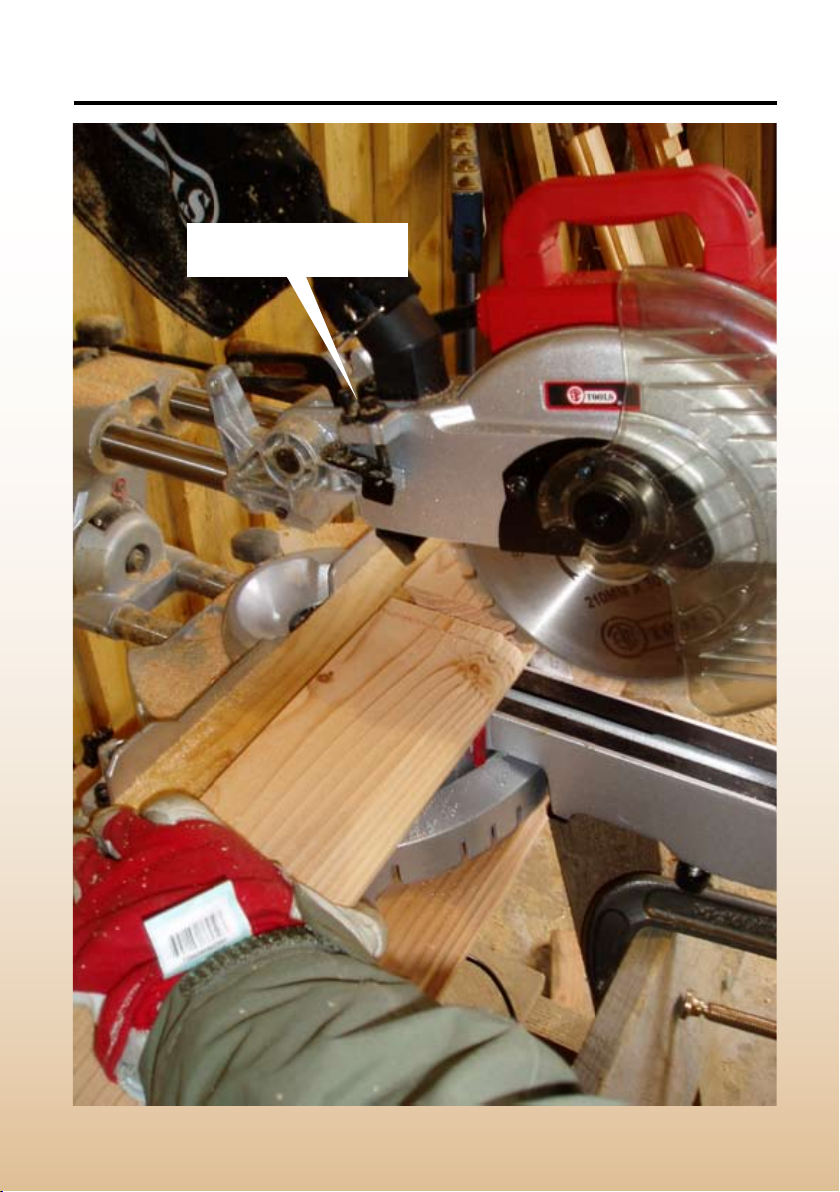
Here the cutting depth
is adjusted to 18 mm.
Page 20

2. Setting for the cut-out
Set the cutting depth of the saw so
that the saw blade will cut 18 mm into
the board.
Fit a 1 m straight strip of wood to the
side stop of the saw so that the work
piece will come in the area where the
saw blade makes a horizontal cut.
This is to avoid getting a cut-out with
a rounded side. The wood strip should
be approx. 50 mm wide. Check the
angle of the cut after the strip is tted.
Fasten the strip with two screws on
each side of the saw.
Measure the thickness of the bottom
boards, in this case 30 mm. Fit a stop
board on the left-hand side, about 1
m from the saw blade, so that you will
get the rst cut 80 mm from the bottom
edge of the side board.
Fit another stop board on the righthand side of the saw blade, so that
you will get a cut 30 mm (the thickness
of the bottom) from the rst cut.
TIP: Make the cut-out a little bit too
narrow at the start. Gently knock on
the stops until one piece of the bottom
boards ts in the cut-out. When you
are satised, fasten the stops tightly
with wood screws.
Sawing method
for the cut-out
Protective glasses MUST be used.
Turn the boards so that ít lies properly
against the wood strip, and have the
future inside facing upwards. The
rounded part of the moulding should
be turned inwards when tted onto
the bottom, and the bevel should
be turned outwards when using the
knives 95038/95039.
First, make the two outer cuts. Make
sure that the side board contacts
the stop boards, and that there is
no sawdust or splinters between.
Regularly check the result by testing
the cut-out on a bottom board.
Cut out the wood between the outer
cuts by moving the side board a couple
of millimetres for each cut. Make sure
that the bottom gets a close t in the
cut-out or, at least, that the play is no
more than 0.5 mm.
A cut-out that is difcult to t on the
bottom should be widened. Side
boards with too much play should be
discarded.
TIP: It is easy to turn a board the wrong
way by accident. Screw a piece of a
moulded side board to your sawing
template so that you can check that
you have placed the side board in the
correct direction.
TIP: Be careful so that you do not
bend the saw head in any direction
when taking the outer cuts.
Page 21
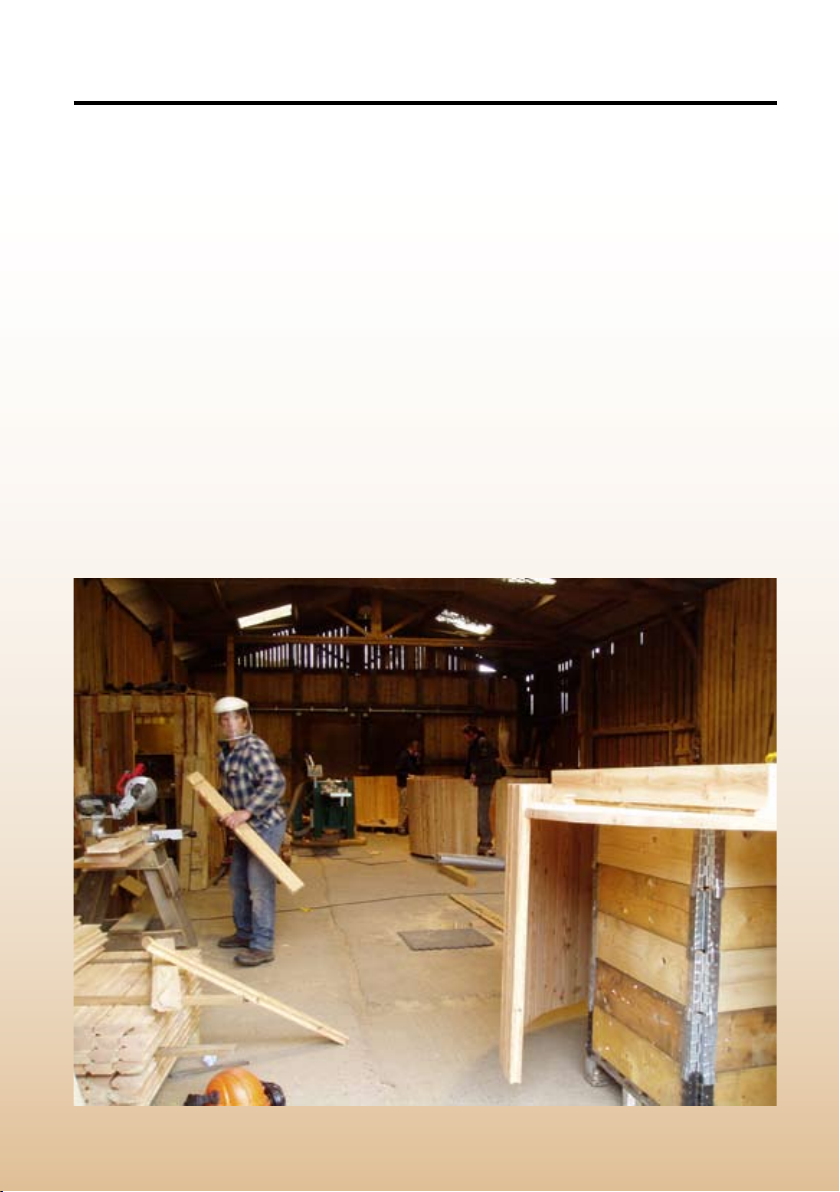
Assembly
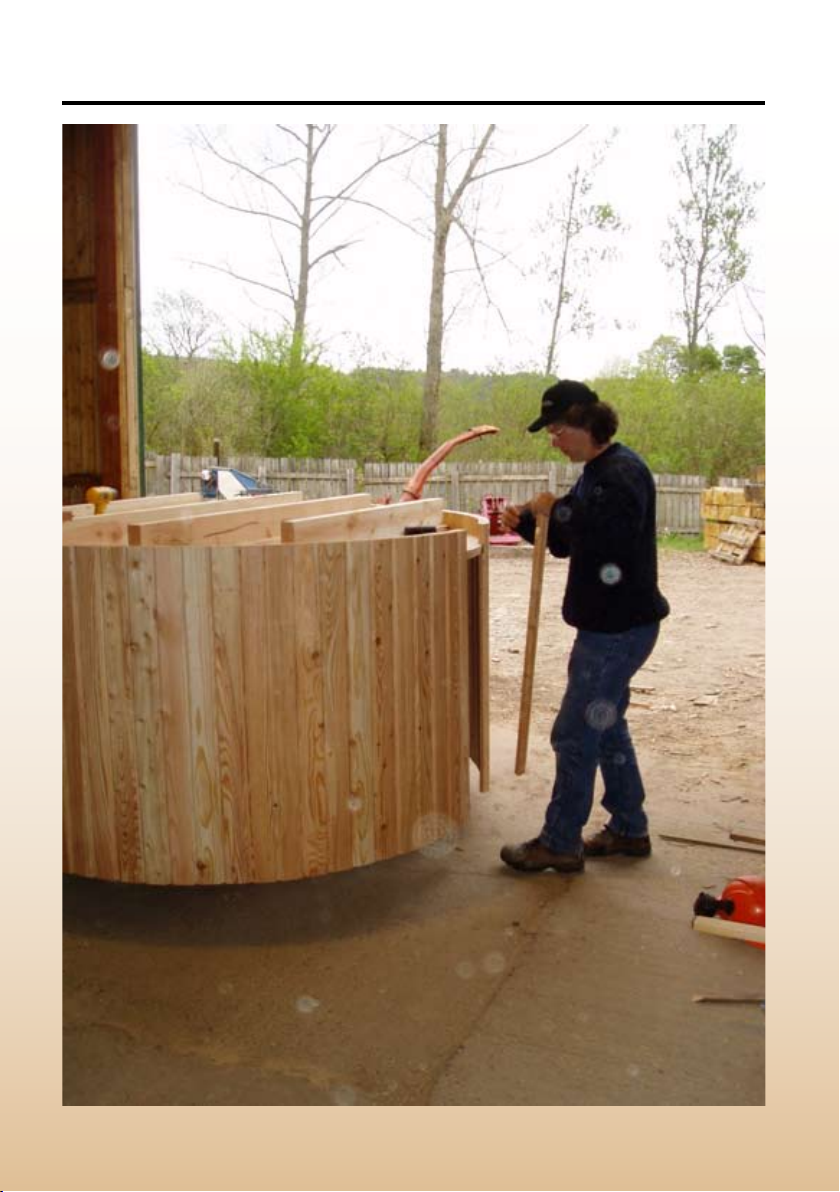
Hang the side boards up on the
bottom. Fit them as closely together
as possible and push them onto the
bottom, but make sure that the carved
10 mm line is still completely visible.
Start at the future back of the hot tub
and t the next board in the direction
of the tongue. Gently knock the boards
together both at the top and bottom. If
a board is too bent to t, discard it.
The last board: If the gap is less than 10
mm, you can pull the hot tub together
using ratchet straps. Otherwise,
you remove a board so that the gap
becomes 140 mm, for instance. Mould
and cut two narrower side boards that
will t in the gap when they are tted
next to each other, i.e. 70+70 mm
(excluding tongue and groove).
Page 22
Page 23
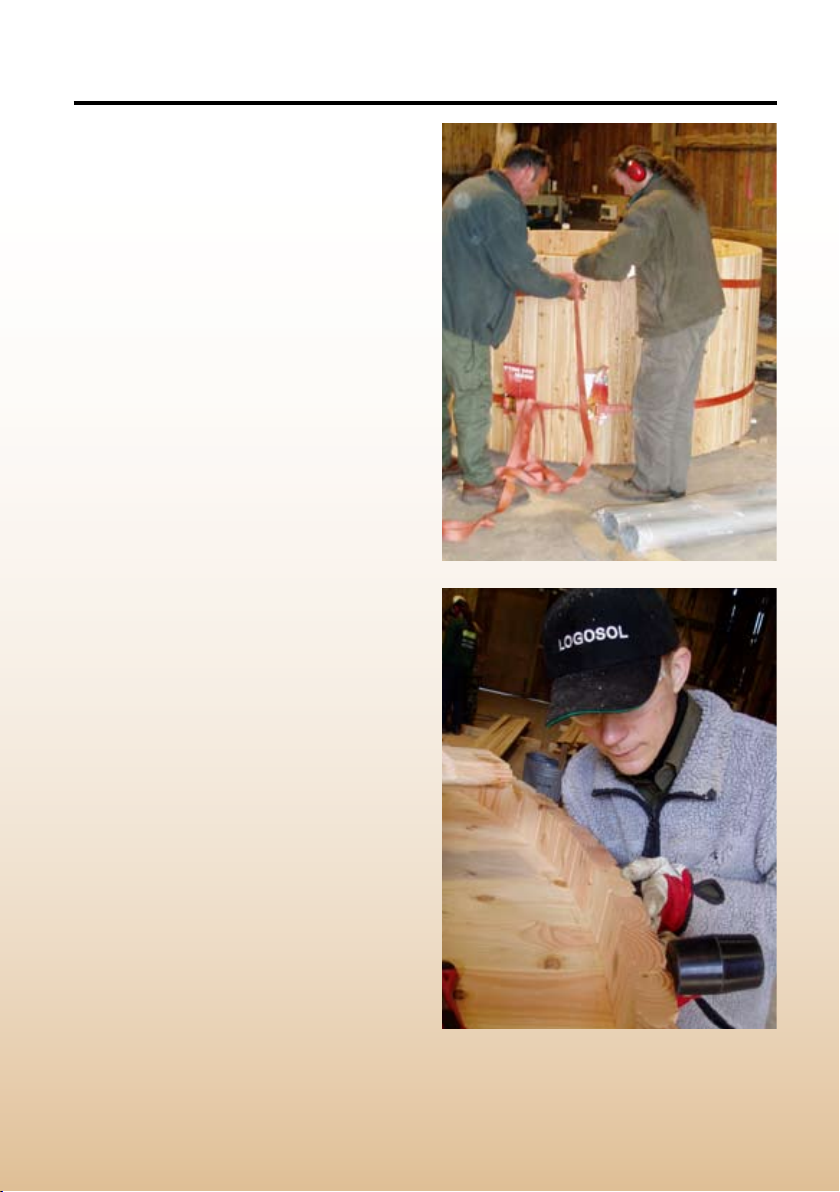
Strapping the side boards together
The ratchet strap
Fit a ratchet strap around the side
boards approx. 10 cm below the
bottom, and one approx. 10 cm above
the future upper edge of the hot tub.
Let the buckles come at the side of
the back of the hot tub. Put some
protection under the buckle and the
hooks. Pull the straps gradually tighter
and gently knock on the side boards
with a rubber mallet until they have
formed a close circle. Measure against
the carved 20 mm line to make sure
that the distance between the line
and the boards is fairly the same all
around the tub. Do not worry if the hot
tub should creak.
The side boards are adjusted with a rubber
mallet until the distance between the 10
mm line and the boards is the same all
around the hot tub.
Page 24
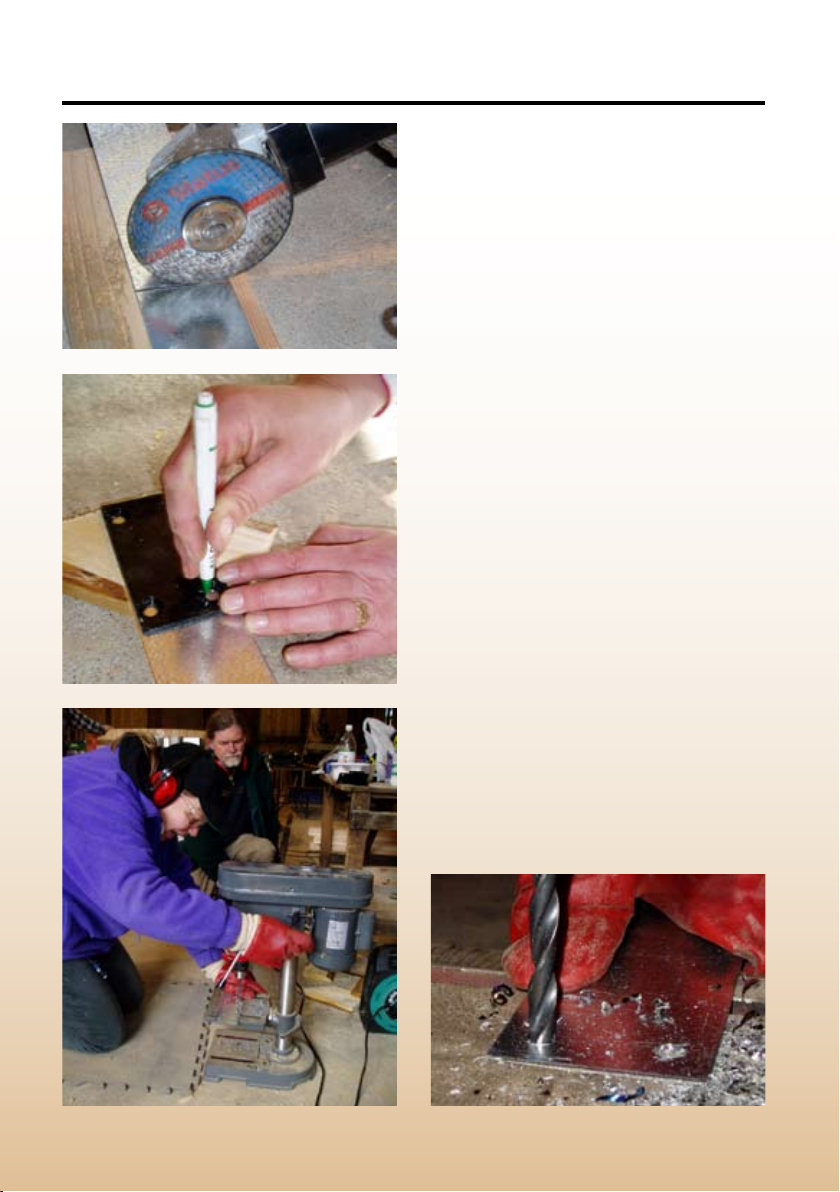
The metal hoops
One of the hoops should be placed at
the same height as the bottom, and
the other should be placed 15 cm from
the future top edge of the hot tub.
Measure where the hoops should be
tted, and drive four screws for each
hoop in the sides of the hot tub. These
screws will support the hoops while you
are tting them around the tub. Screw
one of the bolted joints to one side of
the hoop and insert the threaded bar
with the screws being as close to the
ends of the bar as possible. Place the
hoop on the supporting screws and
use a C-clamp to x the end having
the joint. The C-clamp should be tted
about 50 cm from the joint. Tighten the
hoop manually around the tub. Draw
a line on the hoop to indicate where
the other bolted joint should be tted.
The threaded bar should reach 5 mm
through the hole of the other bolted
joint.
Remove the hoop and cut it into
length using an abrasive cut-off
wheel. Break off sharp edges on the
hoop and the piece that was cut away.
Page 25
Drill the holes in the hoop end for the
other joint using an 8-9 mm drill bit.
This can be made easier by rst drilling
pilot holes with a smaller drill bit.
TIP: Bend the metal hoop a little, just
behind the bolted joint, so that the
threaded bar can pass straight through
the holes.
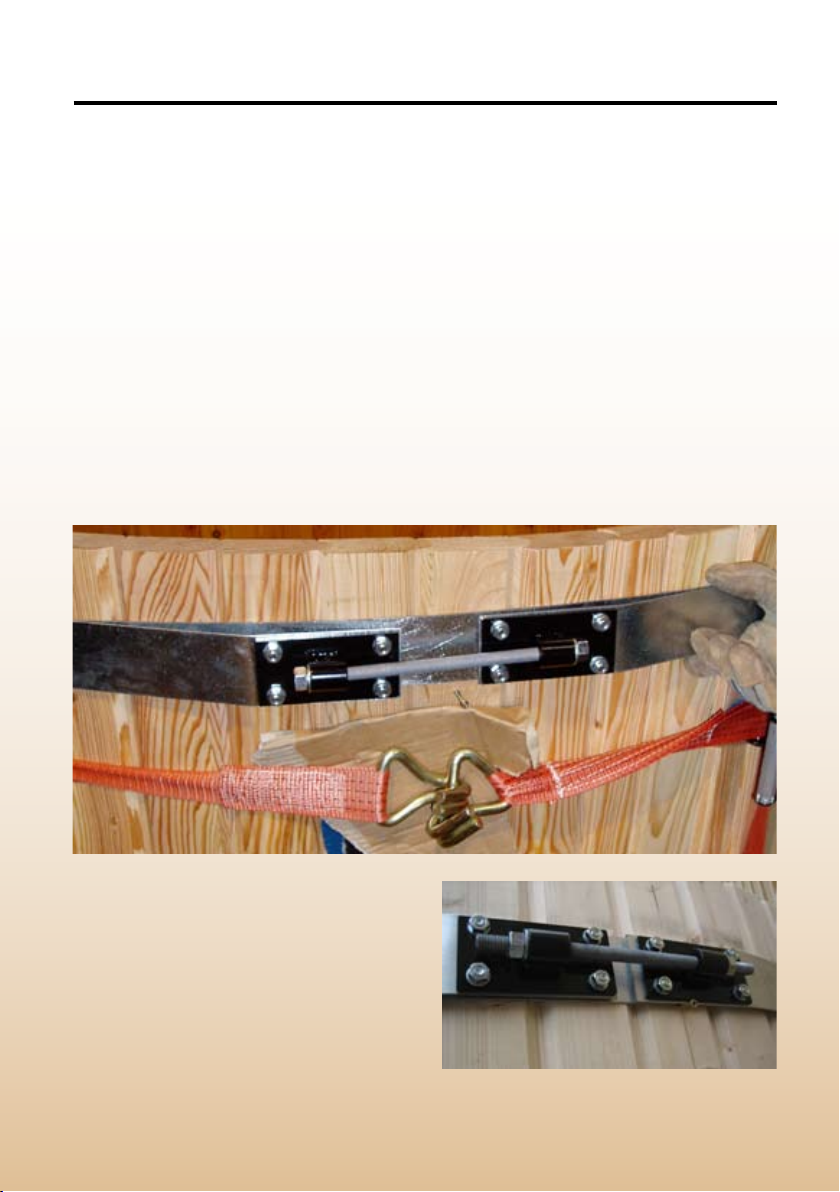
Fit the two hoops. Place the bolted
joints straight above one of the
shortest bottom boards on the back of
the tub. Put the piece of the hoop that
was cut off under the hoop ends as a
support for the bolted joints.
Tighten the nuts on the threaded bar
and, if necessary, knock around the
hoop with the rubber mallet. Tighten
until you begin having difculty in
turning the nuts. Leave the ratchet
straps on the tub.
TIP: If the threaded bar tends to rotate,
you can hold it with a pair of polygrip
pliers. Adjust the nuts so that the
threaded bar sticks out just as much
on both sides.
TIP: Rub the side board edges off with
the belt sander before turning the hot
tub over.
The nuts can only just be tted on the
threaded bar before they have been
tightened. The piece of the metal hoop
that was cut off is placed under the bolted
joints. The piece of cardboard under the
ratchet strap protects the side boards. The
metal hoop should be adjusted so that it
rests on the support screws. One of these
screws can be seen under the threaded
bar in the photo above.
Tightened!
Page 26
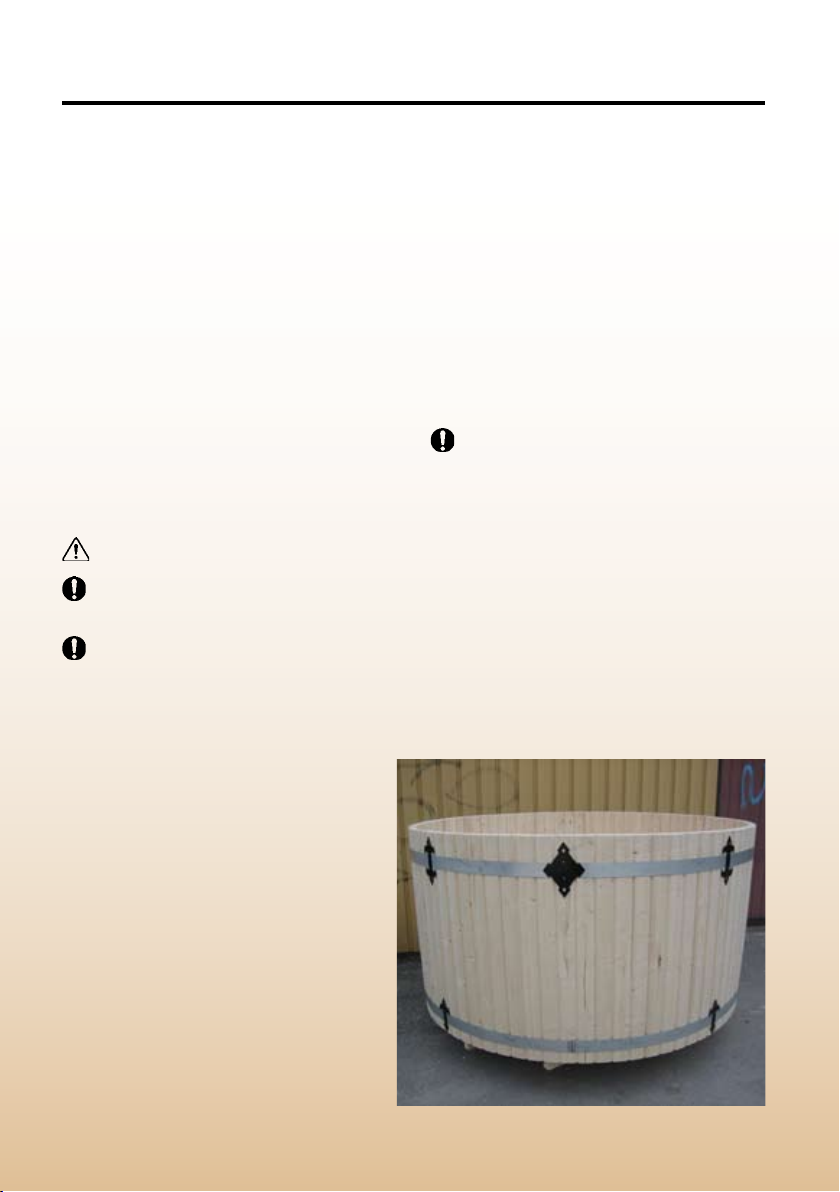
Turning the hot tub over
Go and get your friends again. You
should be at least three persons when
turning the hot tub over but, if possible,
more than three is even better. The
hot tub should be turned over in line
with the bottom joists, and without
getting any buckles or joints under it.
Place something on the ground as a
protection for the side boards, and a
couple of thick planks on the sides
in order to prevent the hot tub from
rolling sideways when it is standing
on its end. Tip the tub over on its end.
Place boards under the middle bottom
joists to avoid breaking the side boards
against the ground before the hot tub
is completely tipped over.
Take caution.
Stand at the side of the hot tub
when turning it over.
Do not stand where you run the risk
of getting the hot tub over you in case
it should fall down accidentally.
Foundation-laying
Choose a site with a rm and level
ground. Cover the ground with
agstones, or something else, to
prevent grass from growing under the
hot tub. Air must be allowed to circulate
under the hot tub. The bottom joists
should not be in contact with the soil.
Each bottom joist should rest on three
points: one in the middle and one on
each end. Use, for instance, agstones
or sleepers on wich you lay tar paper.
The hot tub should lean a couple of
millimetres towards the outlet.
Fit the eur-
de-lis over the
metal hoops.
Page 27
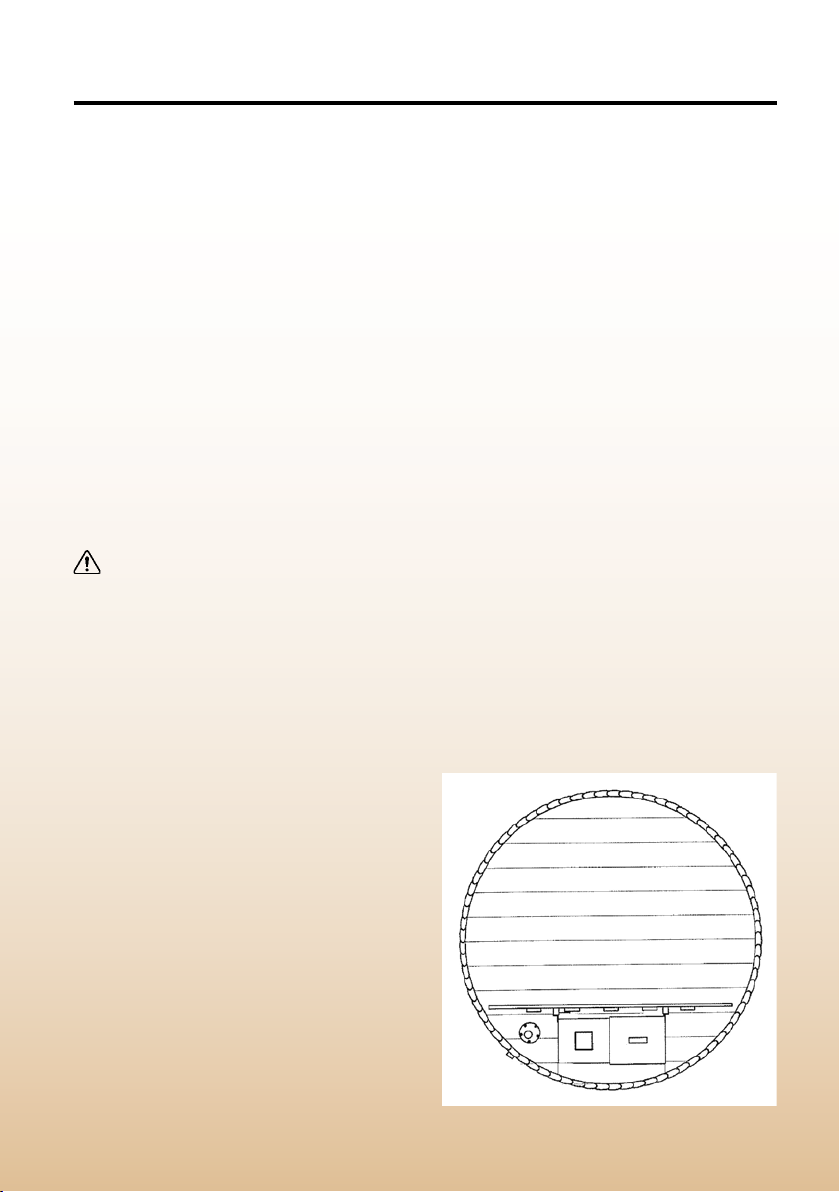
Fittings
Now, the hot tub is ready. When it comes to ttings, you are free to use your
creativity, but there is still a couple of important points you have to perform:
The stove
Screw the stove to the side boards so
that it stands in line with the bottom
boards on the side where the bolted
joints are. The stove should be
securely fastened with at least four
8 mm carriage bolts. The top of the
stove should be 5 cm above the upper
edge of the hot tub. Mark out where
the holes are to be, and then drill them.
The nuts should be on the inside, so
that the stove is easy to detach. Put
some silicone on the part of the bolt
that is not threaded.
The lifting power of the stove is
close to 200 kg when the hot tub is
lled with water. A poorly secured
stove can lead to serious burn injury.
The small mounting brackets on the
other long side of the stove, are xing
points for the stove guard.
The outlet
The outlet should be placed behind the
stove guard, approx. 10 cm from the
side boards. Drill and cut out a hole that
is approx. 65 mm in diameter. Make
sure that you do not drill in the bottom
joists! Put silicone under the screw
plate and fasten it with 25 mm screws.
Drill pilot holes with a small drill bit
and it will be easier to get the screws
straight. Fit a rubber pipe connection
on the overow outlet pipe (the
straight, white plastic pipe) and secure
it with the hose clamp. Press down
the overow outlet into the hole. Press
the bent pipe with a pipe connection
into the hole from underneath. Extend
the outlet with a hose, a pipe, a
rain gutter, or the like. Keep in mind
that you will empty a lot of water
out of the tub (approx. 3000 litres).
Tip: Counter sink the
edge of the outlet
with a router or a
chisel, so that the last
of the water runs out
of the tub. This will
also make it easier to
rinse out dirt from the
hot tub.
Stove
Page 28
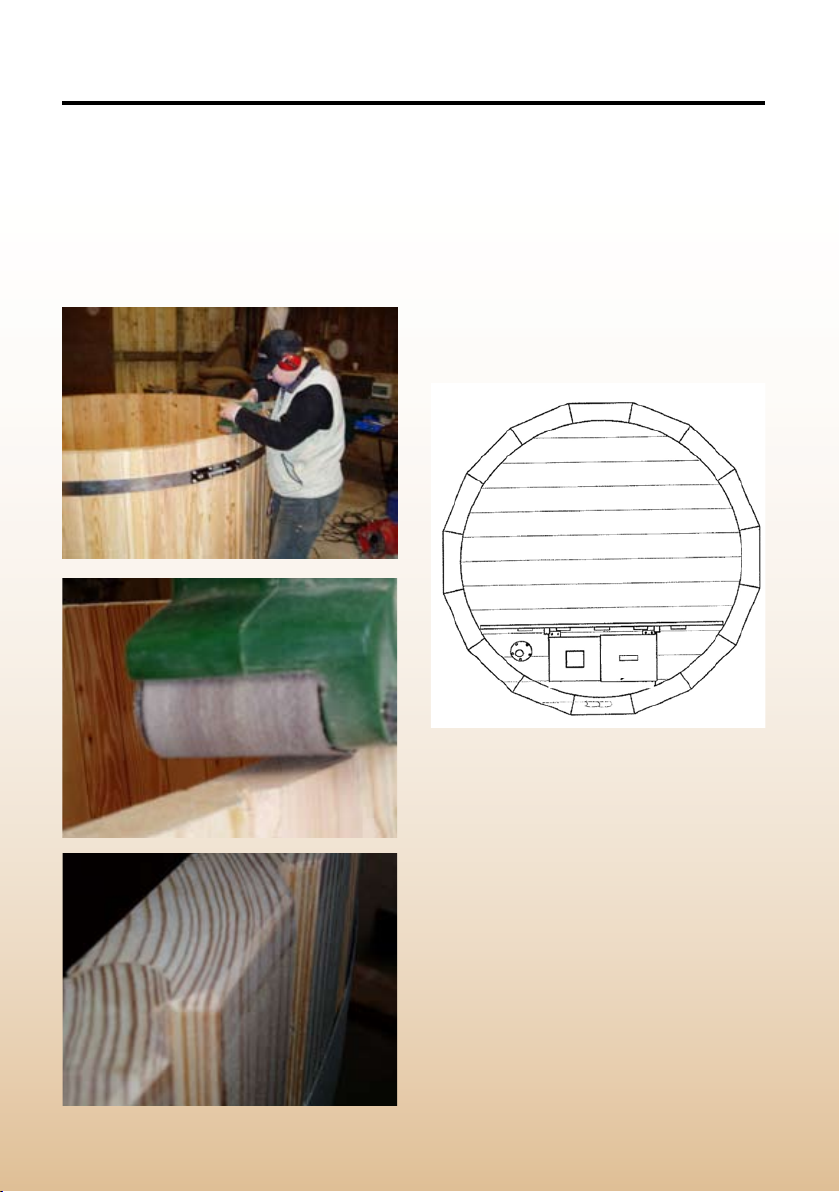
The upper edge
The easiest way to get the top even
and the edges round or bevelled, is to
use the belt sander. This is the method
we rst recommend.
Many people build a 16-sided top seat
which, of course is even more elegant.
It is, however, hard to keep such a
construction neat, since the hot tub
constantly moves. The pieces must
be joined together and should only be
screwed to one or a couple of points
on the hot tub.
Stove
Page 29
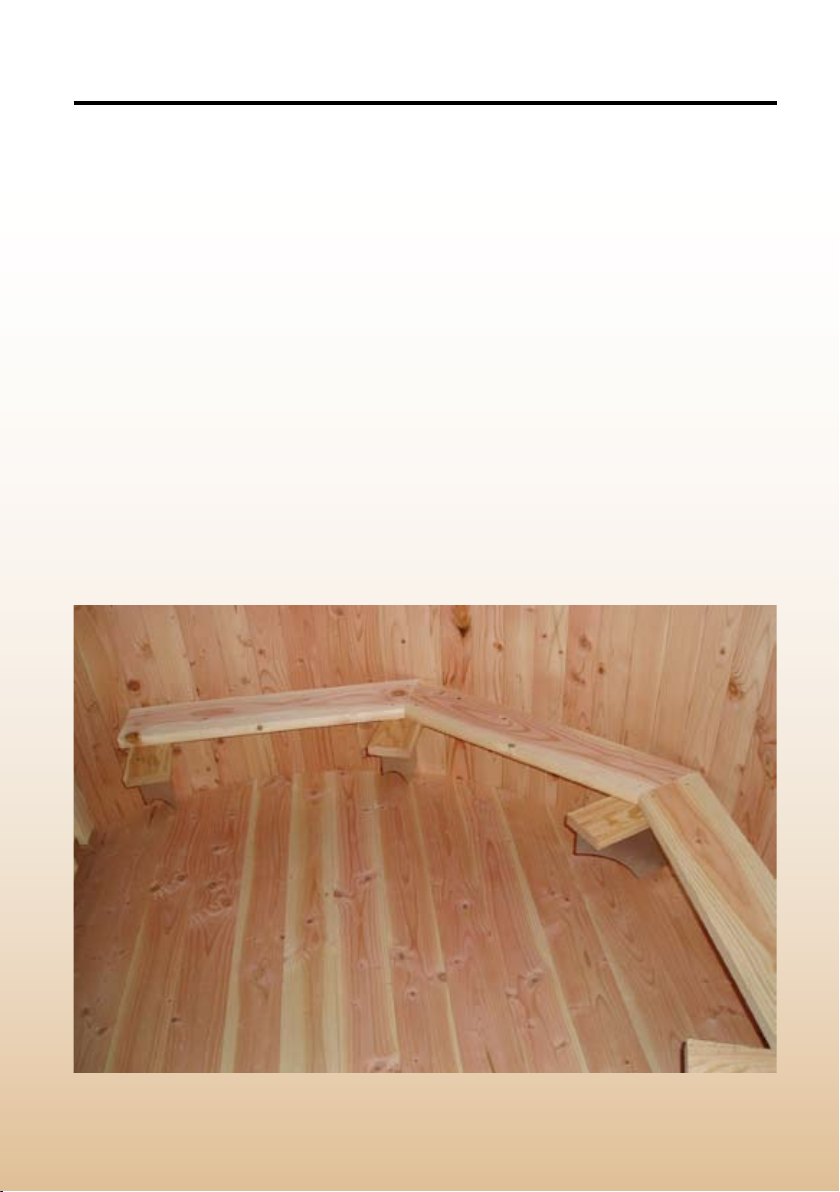
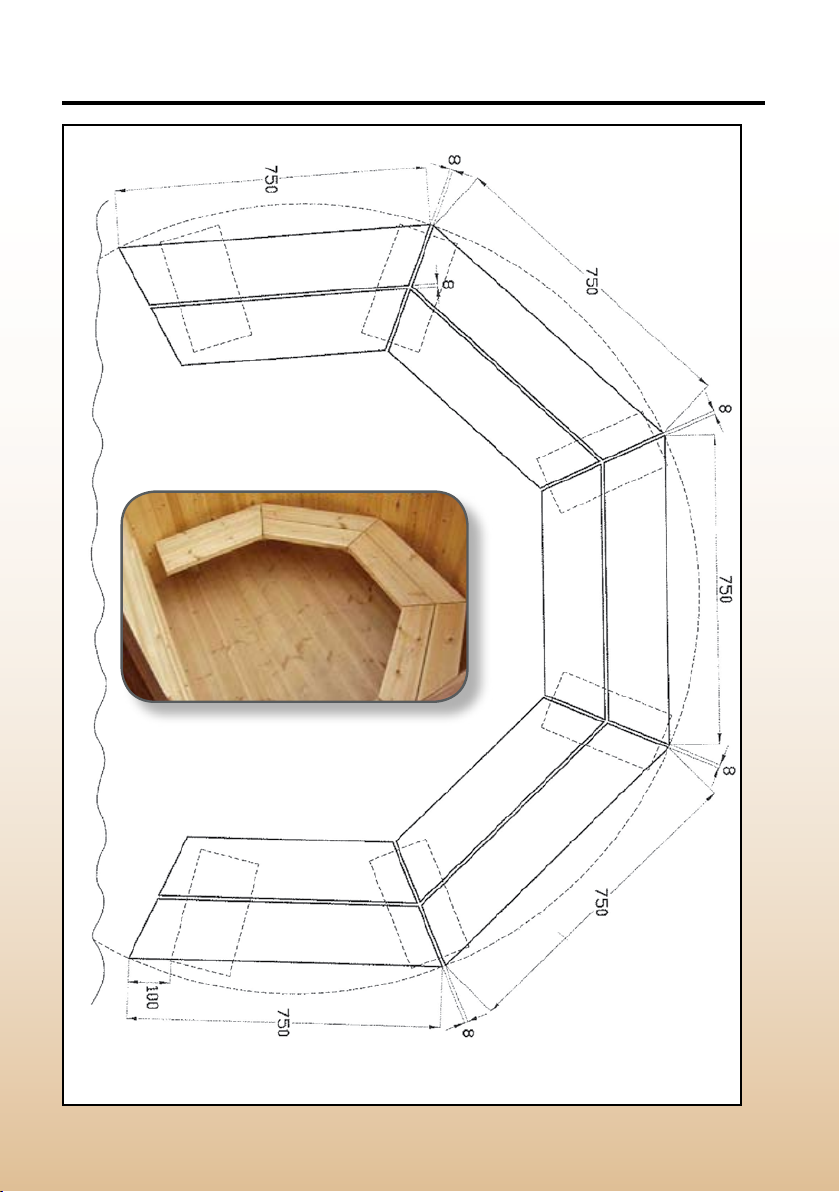
The benches
The benches and the stove guard can
be made of the same material, for
instance 22x120 mm decking boards
or the like. First, cut the seat boards.
TIP: If you have difculty in cutting
the correct angle, you can rst cut the
boards into the correct length. Lay
out the boards so that they overlap
each other, and draw a line where the
boards cross on the inner side. Cut
along the drawn lines.
TIP: Router or sand off all the edges
on the seat boards before mounting
them in the hot tub.
TIP: Lay out all the nished seat
boards on the bottom of the hot tub
before deciding where the bench
brackets should be.
TIP: When making the benches, take
off your shoes before climbing into
the hot tub. It is a sad thing to have
footprints in the new hot tub.
Screw a short board piece to each
bench bracket with short screws.
Screw the brackets to the side boards
inside the hot tub. They should be
approx. 3 cm above the bottom with a
c/c distance of about 75 cm. On both
sides, the outermost bracket should be
tted somewhat closer to its adjacent
bracket, so that it is covered by the
seat boards. Fasten the seat boards
with 25 mm wood screws.
Half-nished bench, see drawing on next page.
Page 30
Page 31
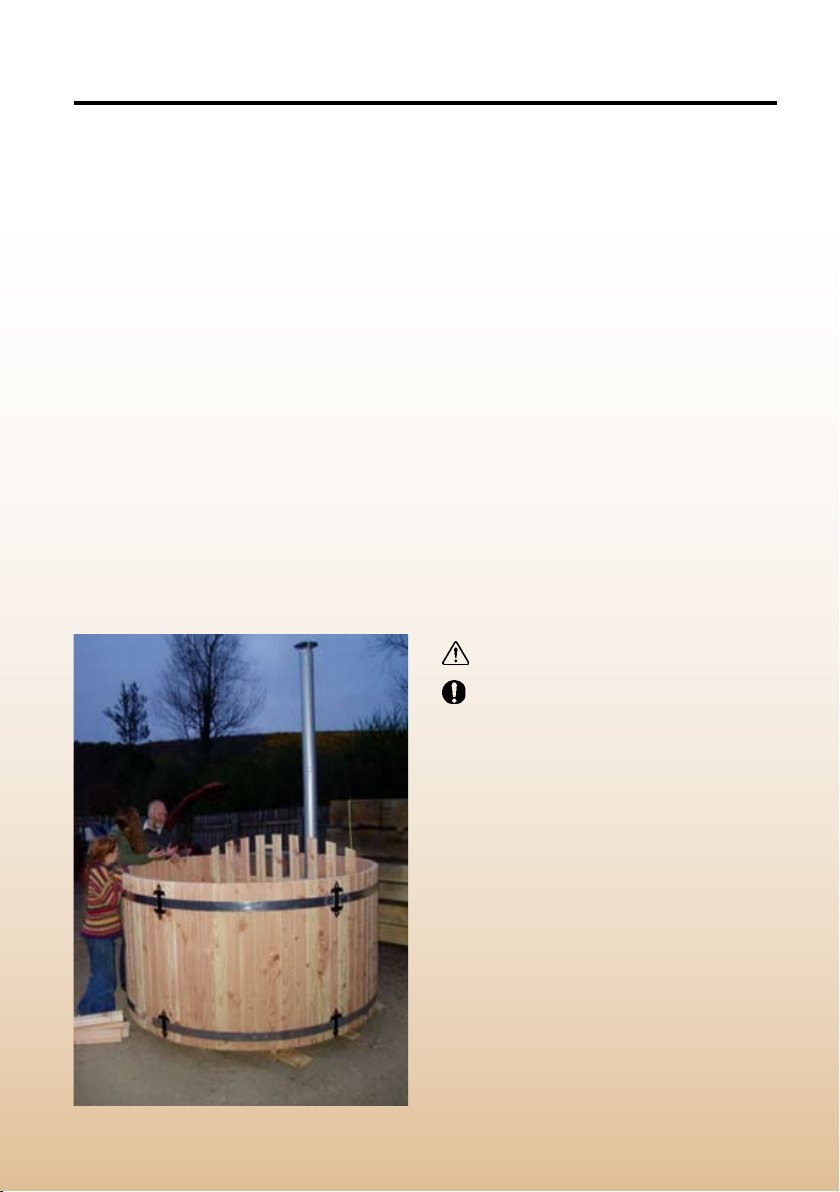
The stove guard
Screw two boards horizontally to the
xing points on the stove. Let there
be a space of a couple of centimetres
between them and the side boards.
Build a vertical fence on the horizontal
boards. The fence should be tted
about 15 cm above the bottom and
10 cm above the highest point of the
stove.
TIP: Build the entire fence on a suitable
work surface, and then screw it to the
stove. It is difcult to reach the srews
from behind so, in this case, use torx
wood screws or through bolts.
TIP: The stove guard is a good xing
point for a narrow table, on a level with
the upper edge of the hot tub, on which
you can place a bowl of peanuts (see
Wooden cover).
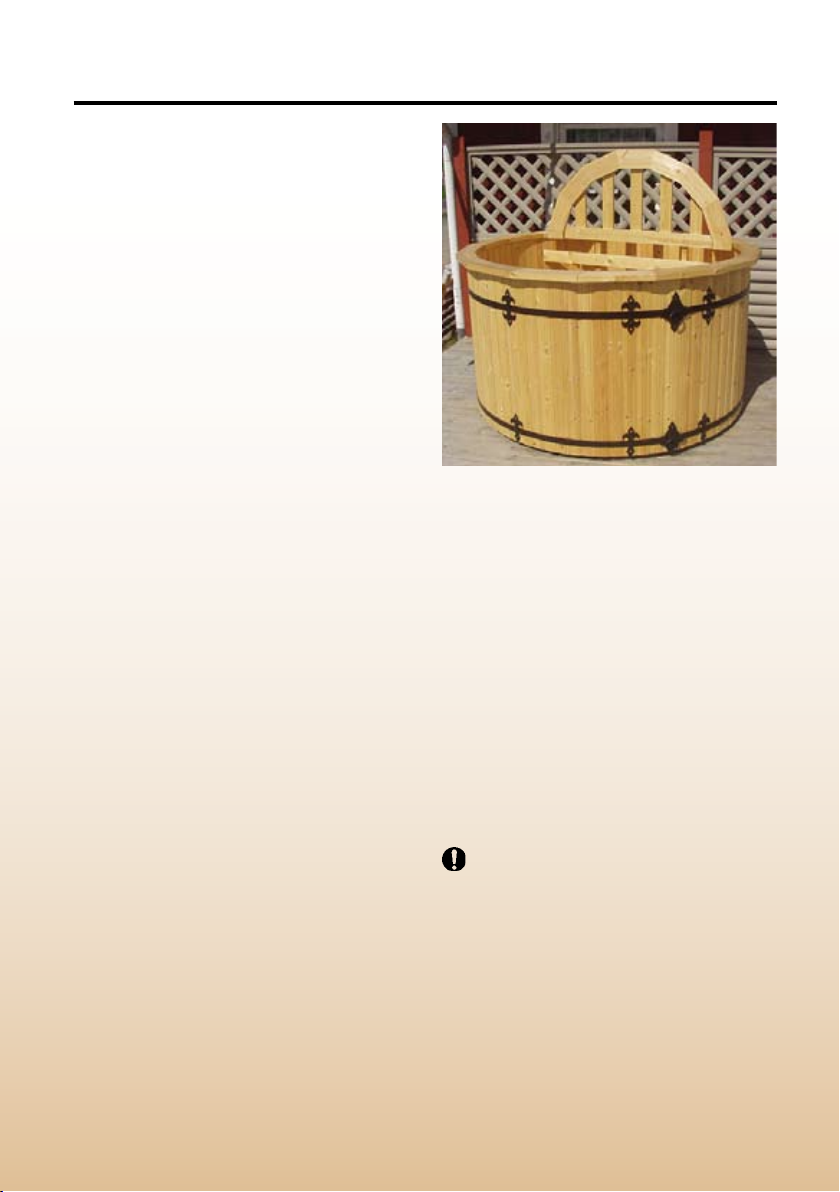
Wooden cover
Make a wooden cover of some kind of
water-resistant wooden board, or thin
tongued and grooved boards that bear
at least 50 kg. The cover is best done
in three sections. Two sections over
the bath area, and one section that is
cut to t around the stove behind the
stove guard. The ”peanut table” can
serve as a support for one section of
the cover.
The cover has three functions:
1. It is a protection preventing small
children from falling into the hot tub
when no adults are around.
2. It keeps the heat in the water during
night.
3. It is a protection against leaves and
bird droppings.
Drowning risk!
Consider the risk of children
drowning. Use a stable and solid cover
when the hot tub is not being used.
Ensure that small children cannot
open it!
Page 32

Congratulations! You have built your own outdoor hot tub.
Getting started
The rst time you ll up the hot tub,
you should start by lling it with a
couple of buckets of warm water, so
that the bottom is covered. Wait for
30-60 minutes.
After this, you ll the hot tub with the
desired amount of water.
When the water reaches over the
water ducts in the stove, you can start
heating it up by lightening a re.
Lightening the re
Set re to some paper and put it into
the stove. Poke the burning paper
in under the chimney, so that the
chimney gets hot in order to give a
good draught.
Make a re by using small sticks.
Feed the re with more wood on the
grating. Use logs that are no more
than 40 cm long, to prevent the wood
from jamming in the wrong part of the
stove, which gives poorer efciency,
and to prevent the part of the stove
that is over water surface from getting
too hot.
When the hot tub is leaking
A new hot tub leaks for a couple of
hours or up to twenty-four hours the
rst time it is lled with water.
If the hot tub does not stop leaking,
you can apply sawdust in the gaps
that leaks. The sawdust will swell
inside the gaps.
If the hot tub has been left empty for a
period of time, it should be moistened
with clean water both on the outside
and the inside at least 24 hours before
being used. This will make the wood
expand to some extent.
If the hot tub dries out completely after
the wood has been swollen, it can
be difcult to get it watertight again.
Then, you may need to cover it with a
tarpaulin and keep it wet on the inside
and outside during a couple of days.
The heating-up time, 2-4 hours,
depends on the water volume, the
water temperature, and the quality of
the wood.
Page 33
Other tips and ideas
TIP: Build a footbath, using the same
method as for the hot tub, so that you
can wash off grass and dirt from your
feet before plunging into the bath.
TIP: Cresset holders beside the hot
tub increase the cosiness factor. You
should, however, not place them too
close. The candle grease can ’explode’
if water gets into the cresset.
TIP: A oating table, for instance
a remodelled lifebuoy, gives you
somewhere to place juice glasses
and snacks that are easily reached by
everyone in the hot tub.
TIP: As a help to climb into the hot
tub, you can have a decking oor at
a convenient height around the hot
tub, or small steps on the inside and
outside of the side boards.
TIP: Fit a beautifully carved pole to the
outside of the hot tub, which can serve
as a handgrip when you are climbing
into or out of the hot tub.
TIP: Nail two boards (0.5 m and 1.5 m)
together, so that they form a big T. This
is the perfect tool to stir in the hot tub
in order to get an even temperature.
Tips on purication accessories:
Water purication system with pump
and sand lter: from about £300.
A large, powerful aquarium lter
costs about £150. Chlorine tablets
1 kg, £7-10. Chlorine meter, £7-10.
(For 2000 litres of water a couple of
teaspoons of chlorine is needed.)
Talk to a retailer of swimming pool
accessories.
TIP: If you use chlorine tablets, place
them in a plastic jar with holes in it.
The tablets can leave burn marks if
they are in direct contact with wood.
Find out what regulations apply
to the chemical you are using.
Follow the safety instructions and
the recommended handling of the
chemical.
Page 34

Maintenance
The outside of the hot tub
The outside of the hot tub does not
require any complicated maintenance.
If necessary, it can be painted with a
linseed oil mixture, with or without
pigment, consisting of one part
linseed oil and two parts turpentine.
This should be done once a year. Sun
is probably the most damaging factor.
Therefore you should, if possible,
rotate the hot tub half a turn after a
couple of years.
The inside of the hot tub
The inside of the hot tub, the wood
heated stove and the stove guard
should not be painted. Clean the hot
tub with water and soft soap after
each time it has been used. You can
also add some bleach.
The stove
Remove ashes from the stove
regularly. Wait until the stove has
cooled. Remove the bafe plate
and the grating. Use a long-handled
dustpan to scrape the ashes out of the
stove. Alternatively, unscrew the stove,
lift it out, and turn it upside-down.
Other maintenance
Summer: Store the hot tub lled with
water.
Autumn: Empty it before the water
freezes, remove the plastic pipes, and
cover it with a tarpaulin.
Winter: Fill the hot tub with snow, if
there is any. Leave the outlet open.
Spring: Fill the hot tub with water when
the spring sun begins to warm.
TIP: When you have nished bathing,
add some chlorine (of the same type
as is used for swimming pools) to the
water. This prevents algal growth and,
to some extent, protects the wood
from rot.
Regularly check the condition of
the chimney. Sometimes, it may need
to be replaced depending on the
environment in which the outdoor hot
tub is placed.
Page 35

Calculations
Calculation of water volume
Keep in mind that the water volume
increases with about 300 litres per
every decimetre added to the diame-
ter, which affects the time it takes to ll
and heat the hot tub.
D=Diameter
R= D/2
The water volume is calculated according to the formula below. The measurements are in metres:
R x R x 3.14 x Water depth = Volume in m3 (or weight in tonnes)
Calculation of the number
of boards needed:
To calculate the number of side boards
needed, you can use this formula:
Use measurements in millimetres
B= The width of the side board,
excluding the tongue and groove.
D= Diameter
The centre of the side board is about
one centimetre outside the bottom of
the hot tub, so add another 20 mm to
the diameter.
D + 20 x 3.14 / B = The number of boards needed
Page 36

Swedish Wood Processing Products
How to contact us:
Telephone: 01361 840 251
Fax: 01361 840 389
E-mail: [email protected]
Internet: www.logosol.co.uk
Address:
Logosol UK
The Sawmill
Abbey St Bathans
Duns
Berwickshire TD11 3TX
Page 37

Page 38

Page 39

Page 40

 Loading...