

Page 1
Read through the user manual carefully and make sure you understand
its contents before you use the machine.
This user manual contains important safety instructions.
WARNING! Incorrect use can result in serious or fatal injuries to the
operator or others.
TRANSLATION OF ORIGINAL USER MANUAL
USER MANUAL
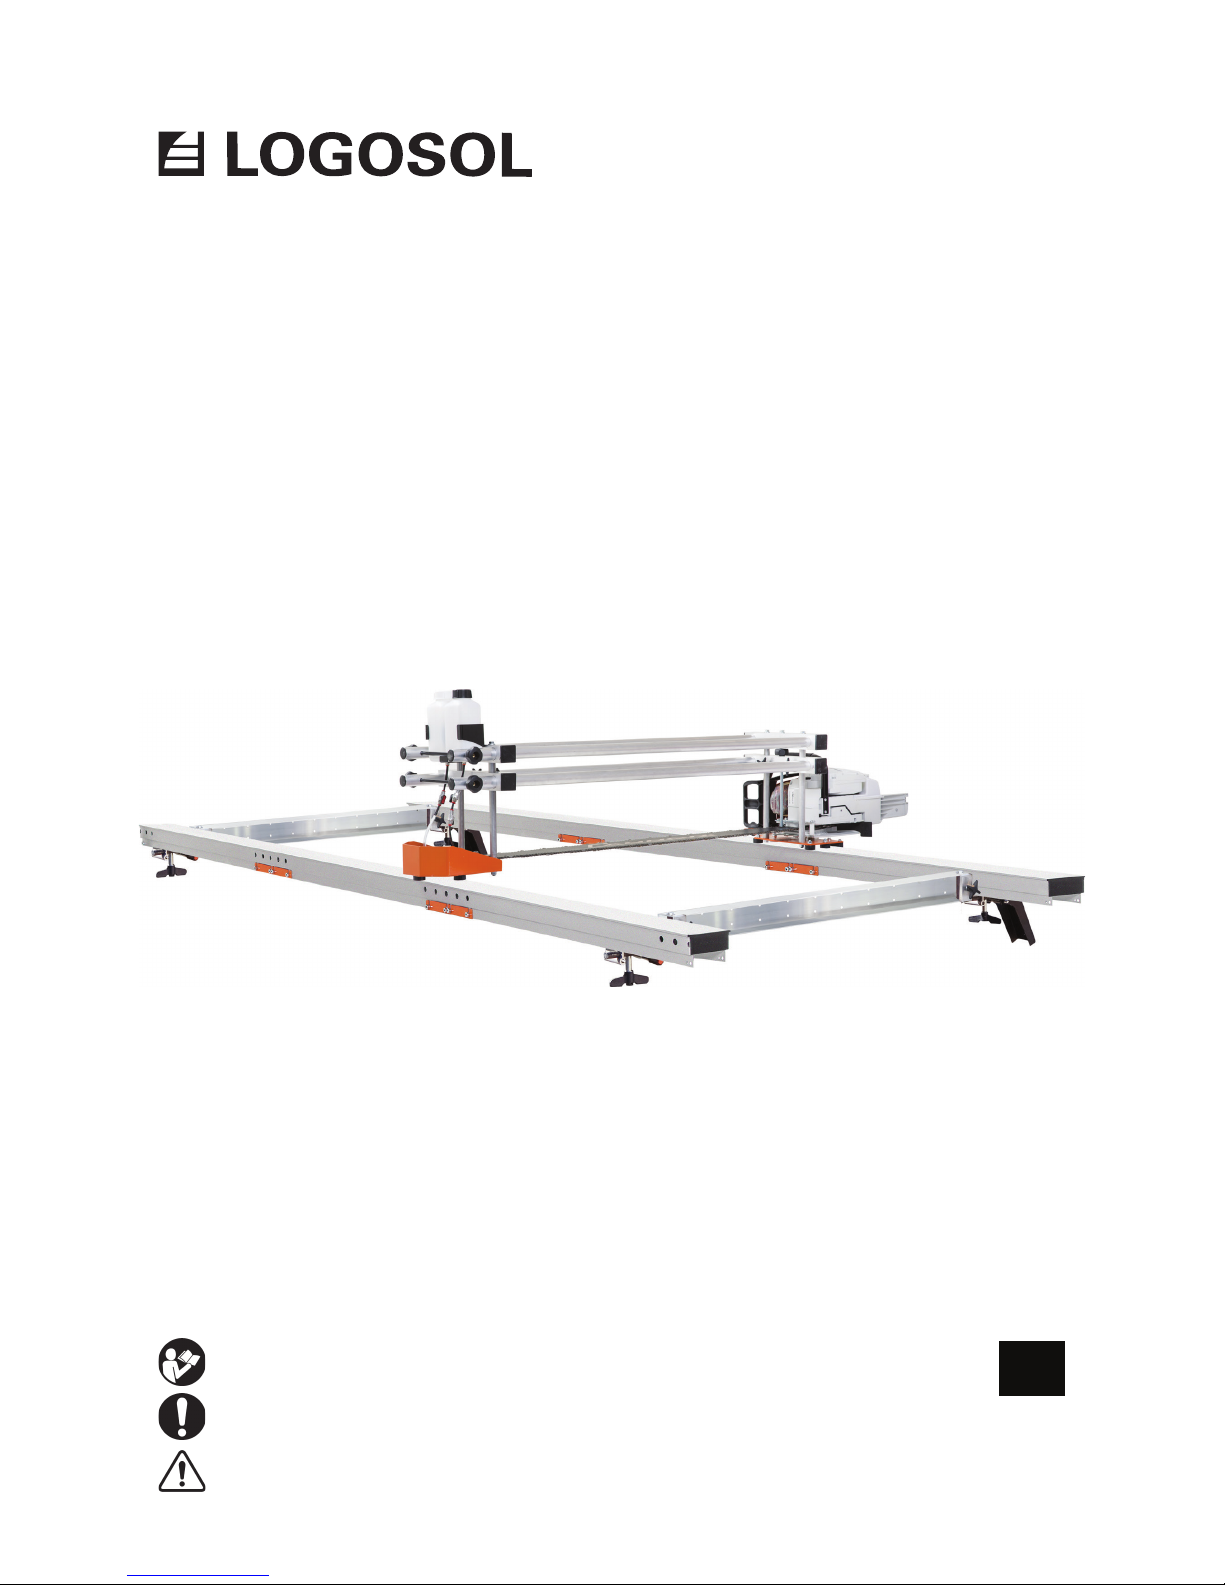
LOGOSOL BIG MILL
WIDE SLAB SAWMILL
EN
Ref. no. 0458-395-5201
Page 2

2
LOGOSOL continuously develops its products.
For this reason, we must reserve the right to modify
the conguration and design of our products.
Document: LOGOSOL Big Mill, User Manual
Manual, ref. no.: 0458-395-5201
Text: Mattias Byström, Robert Berglund, Martin Söderberg
Illustrations: Martin Söderberg
Last revised: June 2018
© 2018 LOGOSOL, Härnösand Sweden
THANK YOU FOR CHOOSING A LOGOSOL MACHINE!
W
e are very pleased that you have demonstrated your condence in us by purchasing this
sawmill and we will do our utmost to meet your expectations.
Logosol has been manufacturing sawmills since 1989, and in that time we have supplied
approximately 50 000 machines to satised customers the world over.
We are just as concerned with your safety as we are that you achieve the best possible results with
your sawmill. We therefore recommend that you take the time to carefully read this user manual
from cover to cover in peace and quiet before you begin using the saw. Remember that the
machine itself is just part of the value of the product. Much of the value is also to be found in the
expertise we pass on to you in this user manual. It would be a pity if that were not utilised.
We hope you get a lot of satisfaction from the use of your new machine.
Bengt-Olov Byström
Founder and chairman,
Logosol in Härnösand, Sweden
#1
Page 3

3
TABLE OF CONTENTS
Components 4
Exploded view 6
Safety instructions 8
Operating instructions 10
Maintenance instructions 12
Assembly 14
Changing chain 21
Assembly, guide rail package 26
Material drying 31
CE declaration of conformity 32
Page 4
4
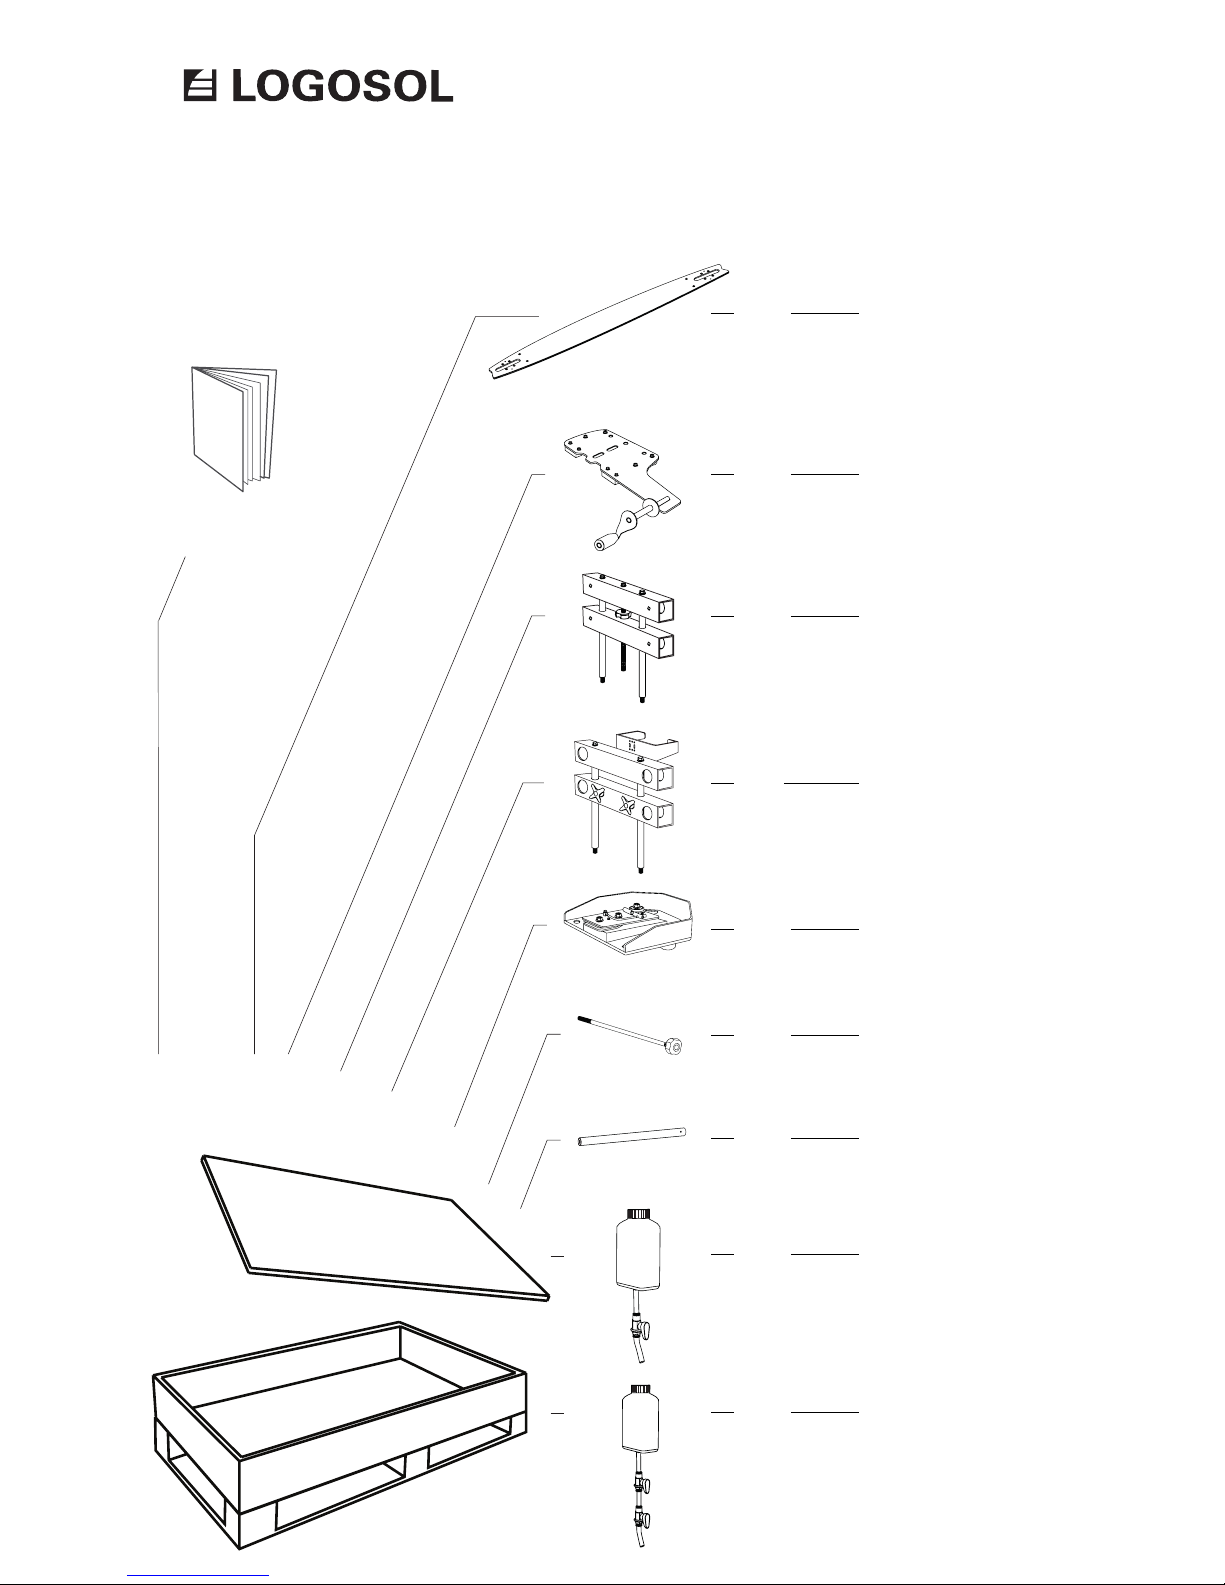
COMPONENTS
User manual
Saw carriage
Guide bar
Tube holder, saw carriage
Tube holder,
bar nose carriage
Oil bottle
Tube
Tube lock
Bar nose carriage
Water bottle
1 pc
1 pc
1 pc
1 pc
1 pc
4 pcs
2 pcs
1 pc
1 pc
Check that all components are
included in the shipment.
Page 5
5
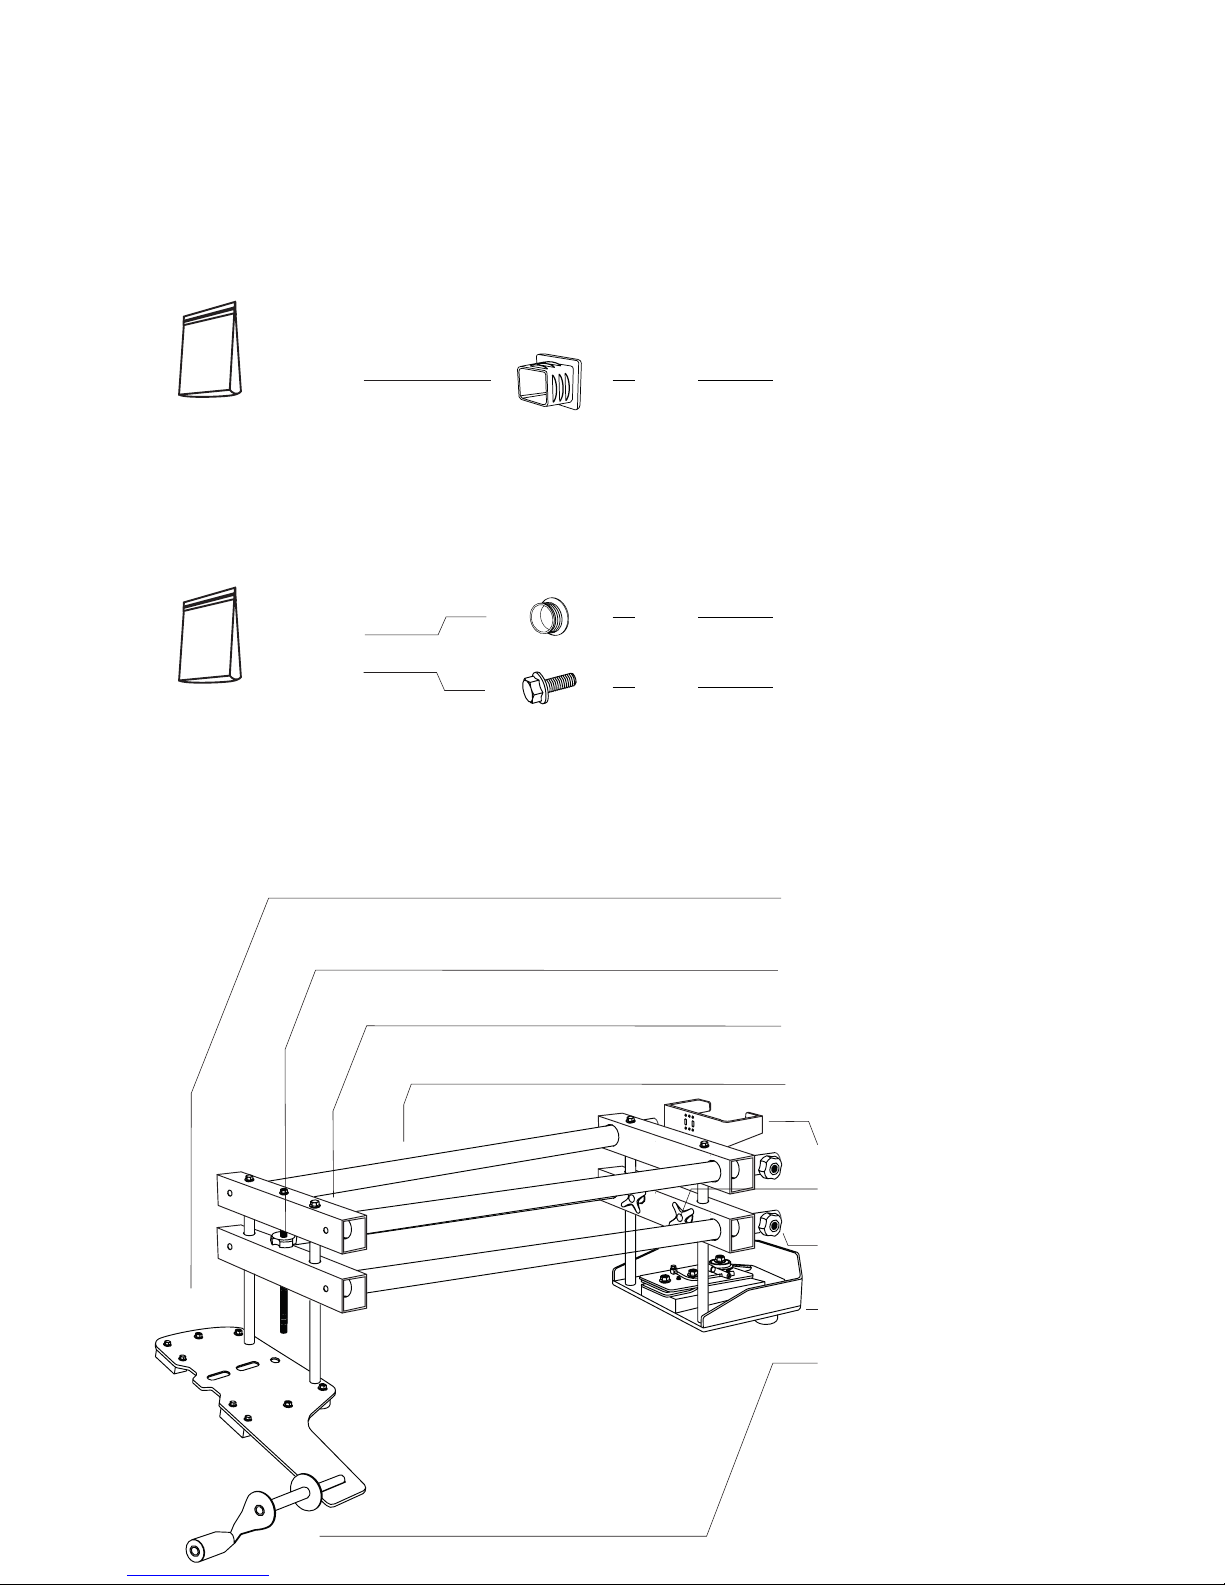
Round tube plug
Flange bolt M8x20
Bag 2
Bag 1
Square tube plug
8 pcs
4 pcs
4 pcs
COMPONENTS
Tube
Locking knob
Bottle holder
Saw carriage
Bar nose carriage
Height adjustment knob
Crank
Tube holders, saw carriage
Tube lock
DESCRIPTION
Page 6
6
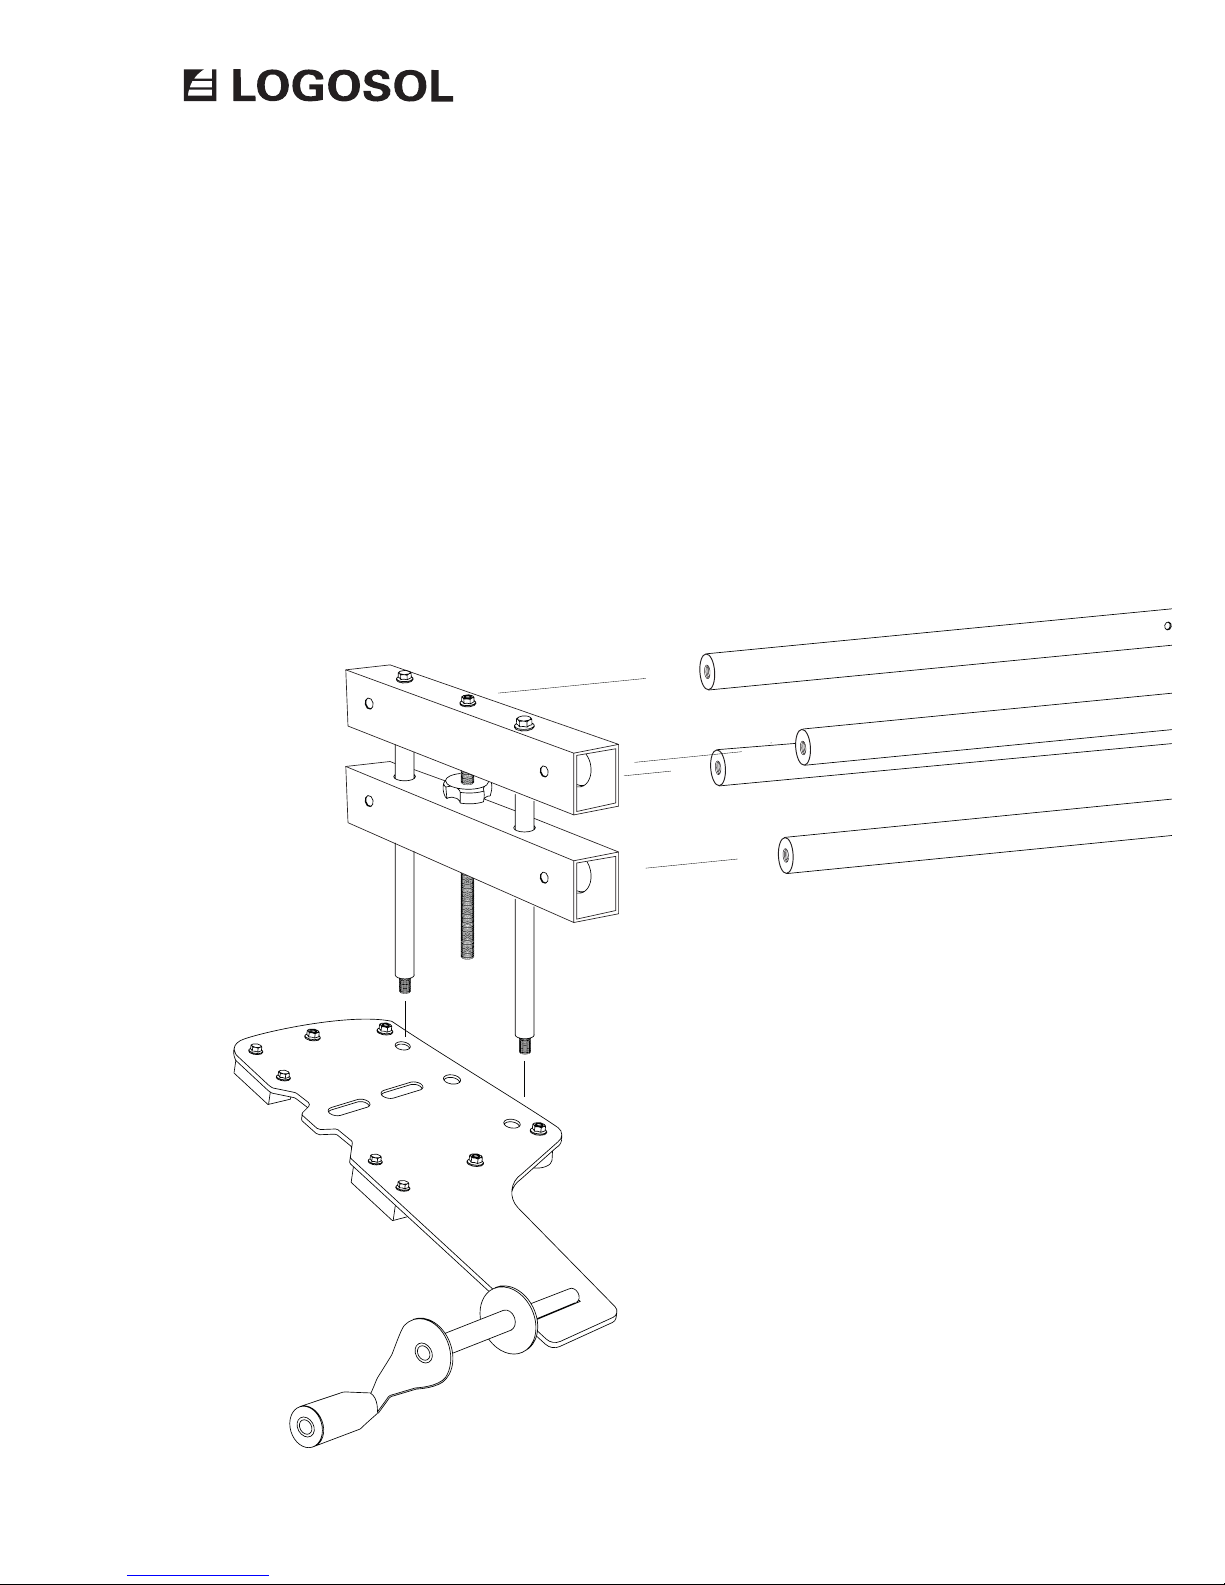
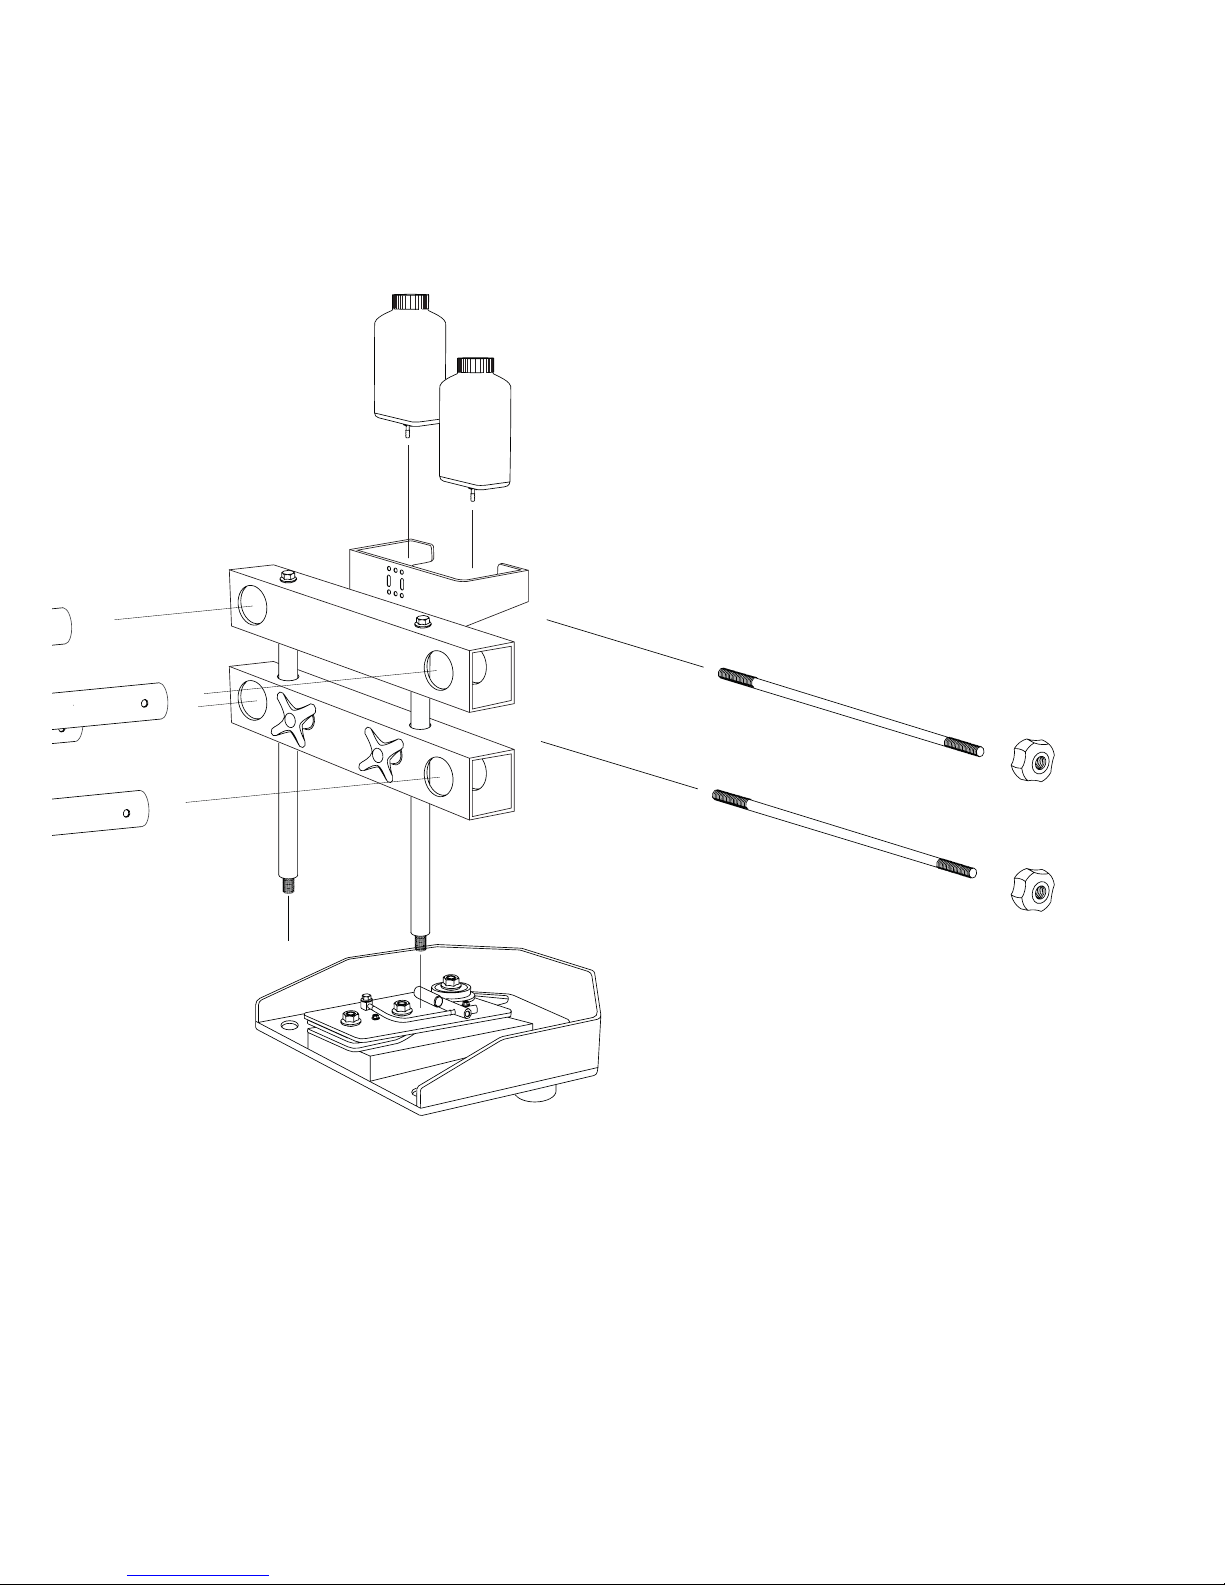
EXPLODED VIEW
Page 7
7
Page 8

8
KEY TO SYMBOLS
WARNING! This symbol means that you
should pay particular attention and it is
always followed by information about the
relevant risk.
This symbol is followed by important
information or instructions. Pay particular
attention when this symbol appears in the
manual text.
For your own safety and the safety of others,
do not use the equipment without rst
having read and understood all the contents
of this user manual.
WARNING! Cutting tools: Incorrect use of
the equipment can lead to life-threatening
injuries.
Always use protective gloves (class 1)
when working with the equipment. Risk of
sustaining cuts when handling cutting tools.
The equipment and engine parts can be hot
after sawing.
Always use approved hearing protection
when working with the machine. Even
short exposure to high frequency noise
can damage your hearing. Always use
closetting safety goggles when working
with the machine or handling band blades.
Under certain circumstances the use of
respiration protection may be necessary. This
would mainly apply if you are sawing dry
wood or sawing indoors.
Always wear approved protective footwear
with saw protection, steel toe-caps and
nonslip soles when working with the
equipment.
Always wear full-length protective trousers
when working with the equipment. Never
wear loose-tting clothing, scarves, neck
chains, etc., that can get caught in the
equipment during operation. Secure loose
hair before working with the equipment.
SAFETY INSTRUCTIONS
Make sure that all warning and information lables are in place, clean and legible.
Damaged labels should be replaced immediately.
Page 9

9
The safety distance for persons other than the
operator is 10 m. A chain that breaks can be
thrown out through the sawdust outlet.
Risk of the chain being thrown out through the
sawdust outlet if it breaks.
Always stand behind the chainsaw during
operation.
Increased throw-out risk! Do not use a ripping
chain when cross cutting.
Never work alone and make sure there are
other persons within earshot who you can
summon if you need help.
SAFETY INSTRUCTIONS
All protective equipment (safety goggles,
protective helmet, hearing protection,
protective footwear, protective gloves,
protective trousers and protective jacket) should
be CE-certied and approved for work with
chainsaws.
If used incorrectly, the equipment can cause
serious injury.
The most important safety instructions are
found on these two pages. Additional safety
instructions will appear in connection to
the sections they concern. All warnings and
instructions must be followed to avoid serious
injury.
Only persons who have read and understood
all of the instructions in this manual, and who
are well-rested, in good physical health, and
have good eyesight are qualied to use the
equipment. Persons who do not meet these
requirements are not qualied operators.
Do not use the equipment under the inuence
of alcohol or drugs.
Only use the equipment in good visibility
conditions.
Minors under 18 years of age are not allowed
to use the equipment. Make sure that children
and animals are not in the vicinity when the
sawmill is being operated.
Page 10

10
OPERATING INSTRUCTIONS
Fire risk. Turn off the engine before refuelling.
Petrol is extremely ammable. Burn injuries
can be life-threatening. If you spill fuel,
immediately clean the components the fuel has
come in contact with. Clothes on which fuel
has been spilt are to be changed immediately.
Tighten the fuel cap as hard as possible to
minimize the risk that the cap vibrates loose
during sawing.
Never saw with the chainsaw throttle locked.
Always operate the throttle manually when
sawing.
Safety check before starting the chainsaw
Always check that:
…all bolts and knobs are tight on all
equipment.
…there is no risk that you will saw
unintentionally into something behind or at the
ends of the log. Kickback risk!
…the log is rmly secured.
…the fuel cap and oil cap are tightened.
…the chain brake is activated.
…both you and your equipment are standing
rmly on the ground.
...no one but the operator is within the 10 m
safety distance.
STARTING THE CHAINSAW
Read the manual and safety instructions for the
chainsaw. Please contact Logosol if any of the
information is not clear or understood.
Make sure that you are standing rmly. Use the
chainsaw decompression valve, if there is one.
The chain brake should always be activated when
the equipment is being lifted on or off the log.
WHEN USING A PETROL-DRIVEN
CHAINSAW:
DURING SAWING
Hold the chainsaw handle rmly with one hand, and
the crank with the other.
When using only the saw frame (no guide
rails): Hold the chainsaw handle rmly with both
hands. When the guide bar has completely entered
the log, you can move your right hand to the upper
horizontal saw frame tube, but take great caution.
AFTER EACH CUT
Release the throttle and wait until the chain stops.
Activate the chain brake and turn off the chainsaw
before lifting the equipment off the log. Keep your
work site clean. Always remove slabs and boards.
Never leave the equipment unattended such that
unauthorized persons can start it.
Always keep in mind that most accidents with
dangerous machines happen when something
goes wrong and the operator attempts to x
it while the machine is still running. Whenever
an operational disturbance occurs, turn the
chainsaw off immediately! A stop seldom
shows up on the nished product.
Page 11

11
THE WORK SITE
Prepare a work site on clean and level ground. The
easiest way is, if you place the project log across two
parallel, smooth and level blocks or logs. These log
beds should not be more than 50 cm in height.
If you are going to use logs as log beds, you
have to prevent them from rolling sideways by
using wedges, e.g.
Ensure that you do not saw on an upward slope. It
is better that the log bed is somewhat higher on the
side you start sawing on, so that you saw slightly
downwards.
Wedges, or the like, should be xed to the log
bed on both sides of the log. This is to prevent the
log from slipping sideways when you are sawing
through it, but also to prevent the log from rolling
down on you.
Risk of serious injury.
If you are working close to a pile of logs,
secure the pile with a strong strap around the
front logs, to prevent the log pile from falling
down over you.
Keep the work site free of tools, pieces of
wood, sawdust, and other things you can trip
over.
Risk of crush injury if the log rolls down.
Always prevent the log from rolling down from
the log bed by using wedges or the like.
Tipping risk. Always check that the log is rmly
secured.
Use screws that are suitable for the purpose
when securing the log.
Do not start the chainsaw until you have read
and understood the chainsaw manual and its
safety instructions.
Always perform the ”Safety check before
starting the chainsaw” (see Safety Instructions
on p.10) before each saw cut.
PREPARING FOR SAWING
It is good if the project logs are cut straight at the
ends. In the beginning, it is a good idea if you mark
where the cuts are to be made at the root and top
end of the log. Start from the centre of the log
when you are measuring. Use a 6 mm felt tip, so the
line will match the kerf.
OPERATING INSTRUCTIONS
Page 12

12
WARNING! Risk of serious injury.
WARNING! Risk of cutting injury:
Saw chains are sharp. Always handle saw
chains with utmost care.
WARNING! Risk of re:
Do not smoke or perform any work (welding,
sharpening saw chains, etc.) that can produce
sparks or ames near fuel or other ammable
material.
If you spill fuel on the equipment when
refueling, wipe this up immediately. If you
get any fuel on your clothes, change clothes
immediately.
Never run the chainsaw if there is a fuel or
oil leak. Always turn the chainsaw off before
refuelling.
MAINTENANCE
The regular maintenance that is expected to
be performed by the operator, is described in
this chapter. Be sure to perform the prescribed
maintenance intervals, as this forms the basis for a
good functionality of the equipment.
MAINTENANCE INSTRUCTIONS
Page 13

13
MAINTENANCE INSTRUCTIONS
LOGOSOL’s ripping chain allows quick length sawing
with a thin kerf. But it is less durable than normal
chains. If you keep the cutting equipment in good
condition, you get the right timber dimensions,
faster sawing and the cutting equipment will last
longer.
Sharpen the chain before it gets dull
When the chain is beginning to get dull, you will
notice that the cutting speed is decreasing, the
guide bar becomes hot and it becomes harder
to feed the saw unit forward. Stop sawing
immediately! Acctually, when this happens, it is
already too late to sharpen the chain. Sawing with
a dull chain exposes the cutting equipment to high
levels of mechanical stress. Therefore, sharpen the
chain before it becomes dull!
Avoid chain breaks
If you are sawing too long with a dull chain, it can
break. The chain breaks under the cutting teeth, and
you will see that it is worn there.
If, however, a drive link breaks, this can be due to
the chain and sprocket not being a good match. A
completely new chain on a worn sprocket can break
in the rst few minutes of use.
The guide bar can pull askew
If the chain has been damaged on one side or been
led unevenly, it can run incorrectly. The guide bar is
pressed upwards or downwards and ”springs back”
when it comes out of the log. The chain will then
wear more on one bar rail, and if you continue to
saw the guide bar will wear unevenly. Even though
you replace the chain, an unevenly worn bar can
guide the chain incorrectly and, in addition, the
new chain can also be worn down. An unevenly
worn bar can be repaired. File the bar rails so they
are equally high with an edge le (SKU: 9999-000-
0450) or LOGOSOL’s electric guide bar grinder (SKU:
7804-000-0005).
Another more common reason for the guide bar
pulling askew is that it is worn out so that the drive
links touches the bottom in the track of the guide
bar and the chain loses the support provided by the
bar rails. This is shown on the chain by the tip on
the drive link becoming worn.
The best chain oil
In order for the chain oil to work well it must
be viscous and thready. When you place a drop
between the thumb and the index nger and
then open them, long threads should form. We
recommend LOGOSOL’s sawmill chain oil, SKU
numbers as given below:
1 litre, SKU: 0718-000-1001
10 litres, SKU: 0718-000-1010
Handbook for your cutting tools
LOGOSOL has a separate document which we
keep updated with respect to the technical
specication of the latest new products. It is called
’The Handbook for Your Cutting Tools’ and can be
downloaded free of charge from our web site. You
can also order a printed version.
Page 14
14
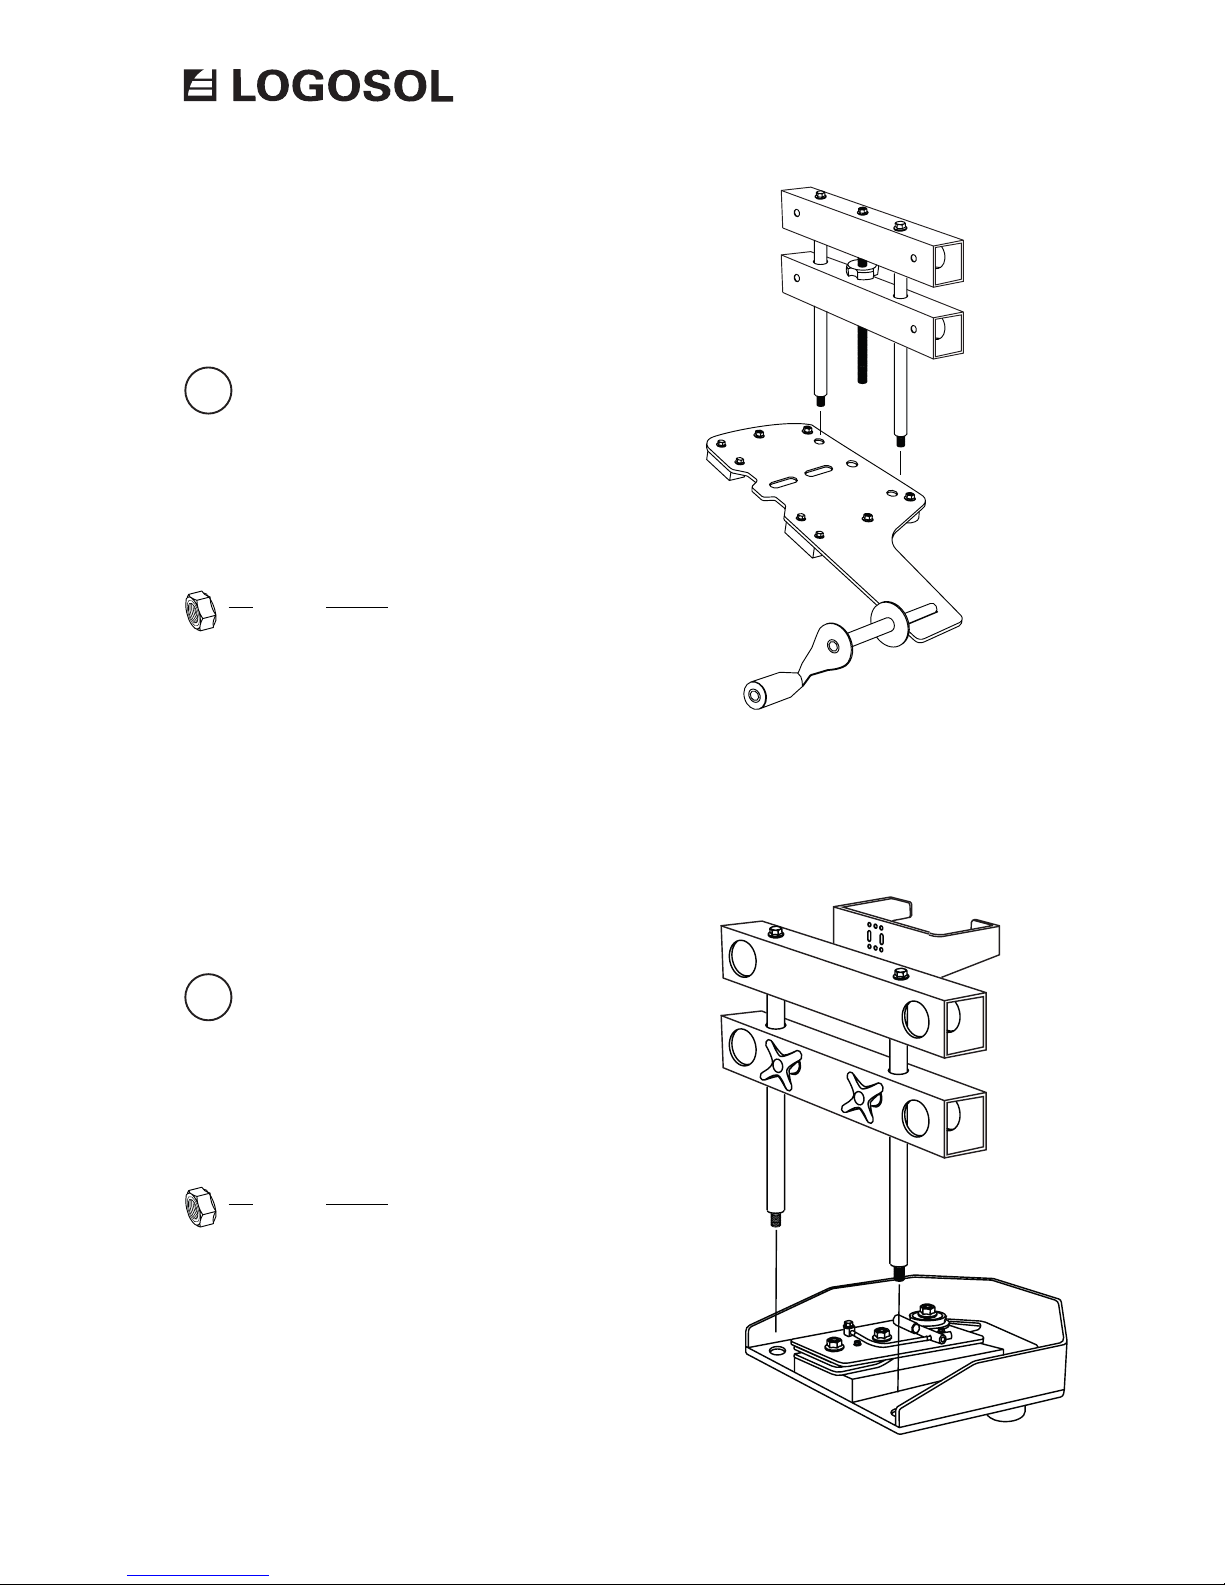
Fit the tube holder to the saw carriage.
Fit the other tube holder to the bar nose
carriage.
ASSEMBLY
ASSEMBLY: SAW FRAME
1
2
Lock nut M10
Lock nut M10
2 pcs
2 pcs
Page 15
15
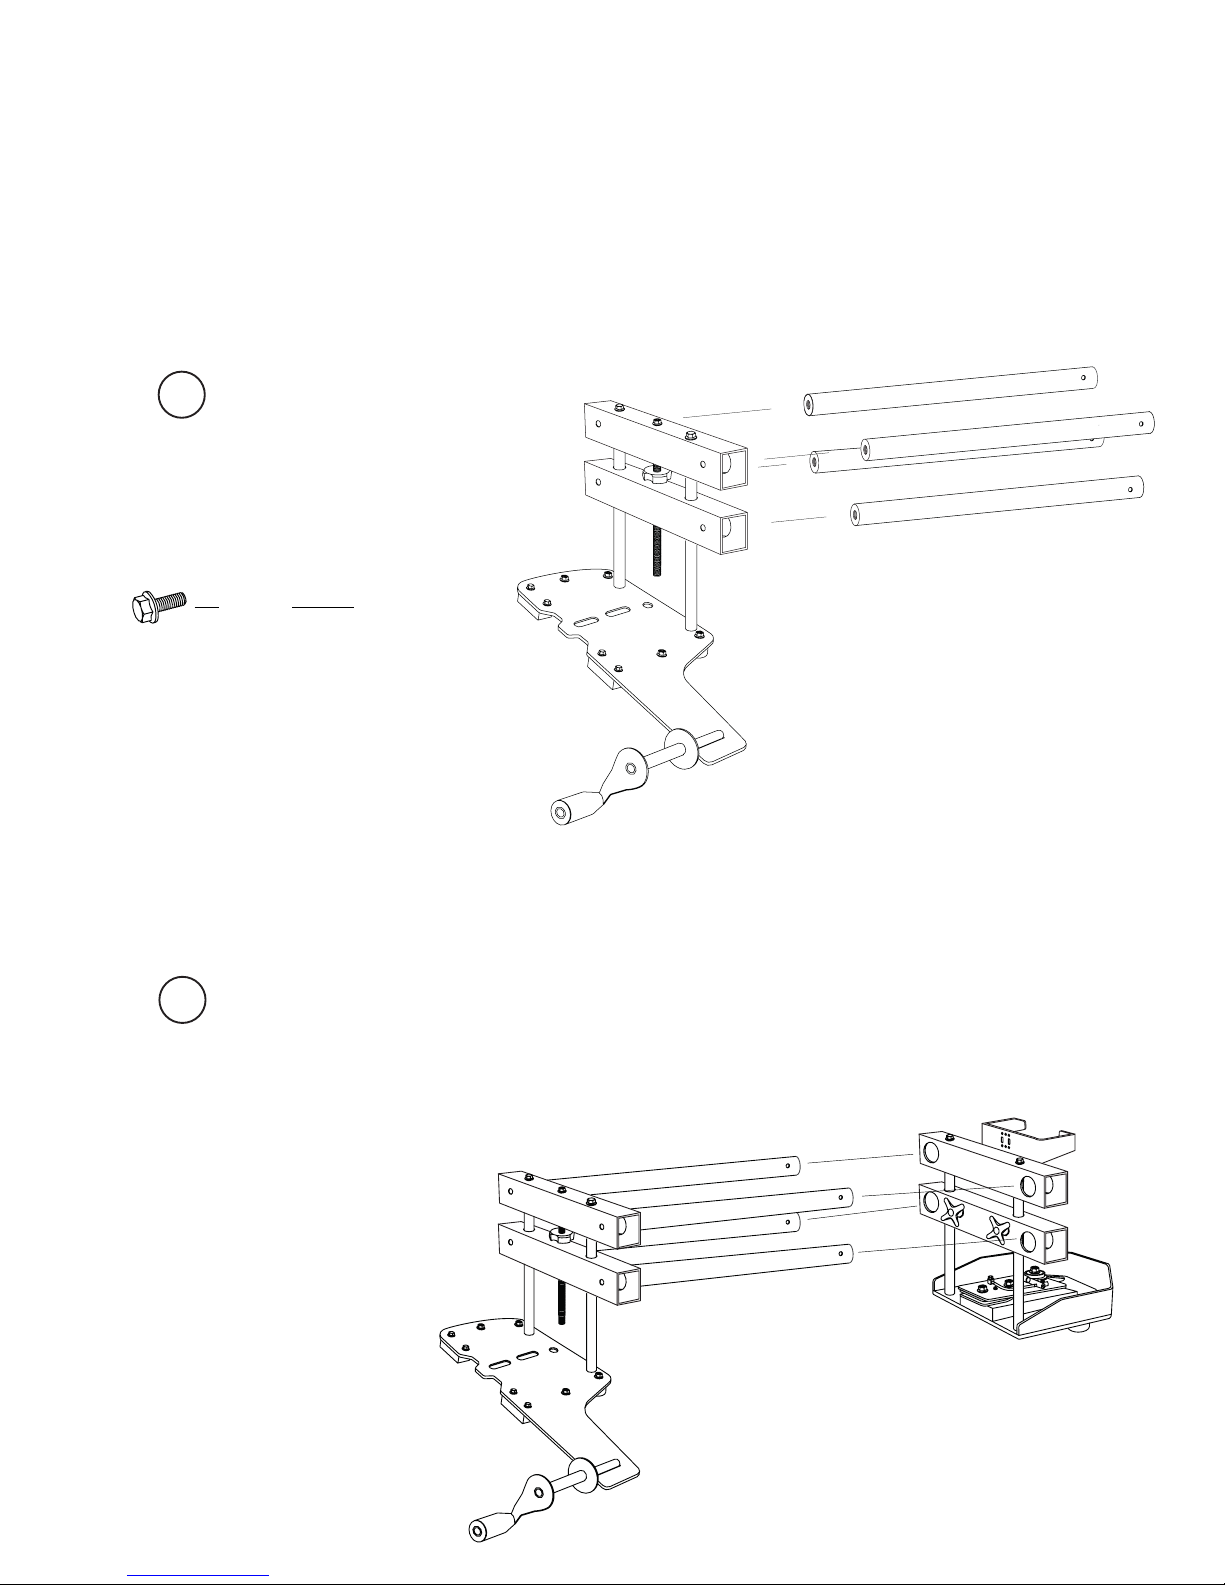
Install the tubes in the tube holder on
the saw carriage.
3
Fit the tubes through the tube holder
on the bar nose carriage.
4
Flange bolt M8x20
4 pcs
Page 16
16
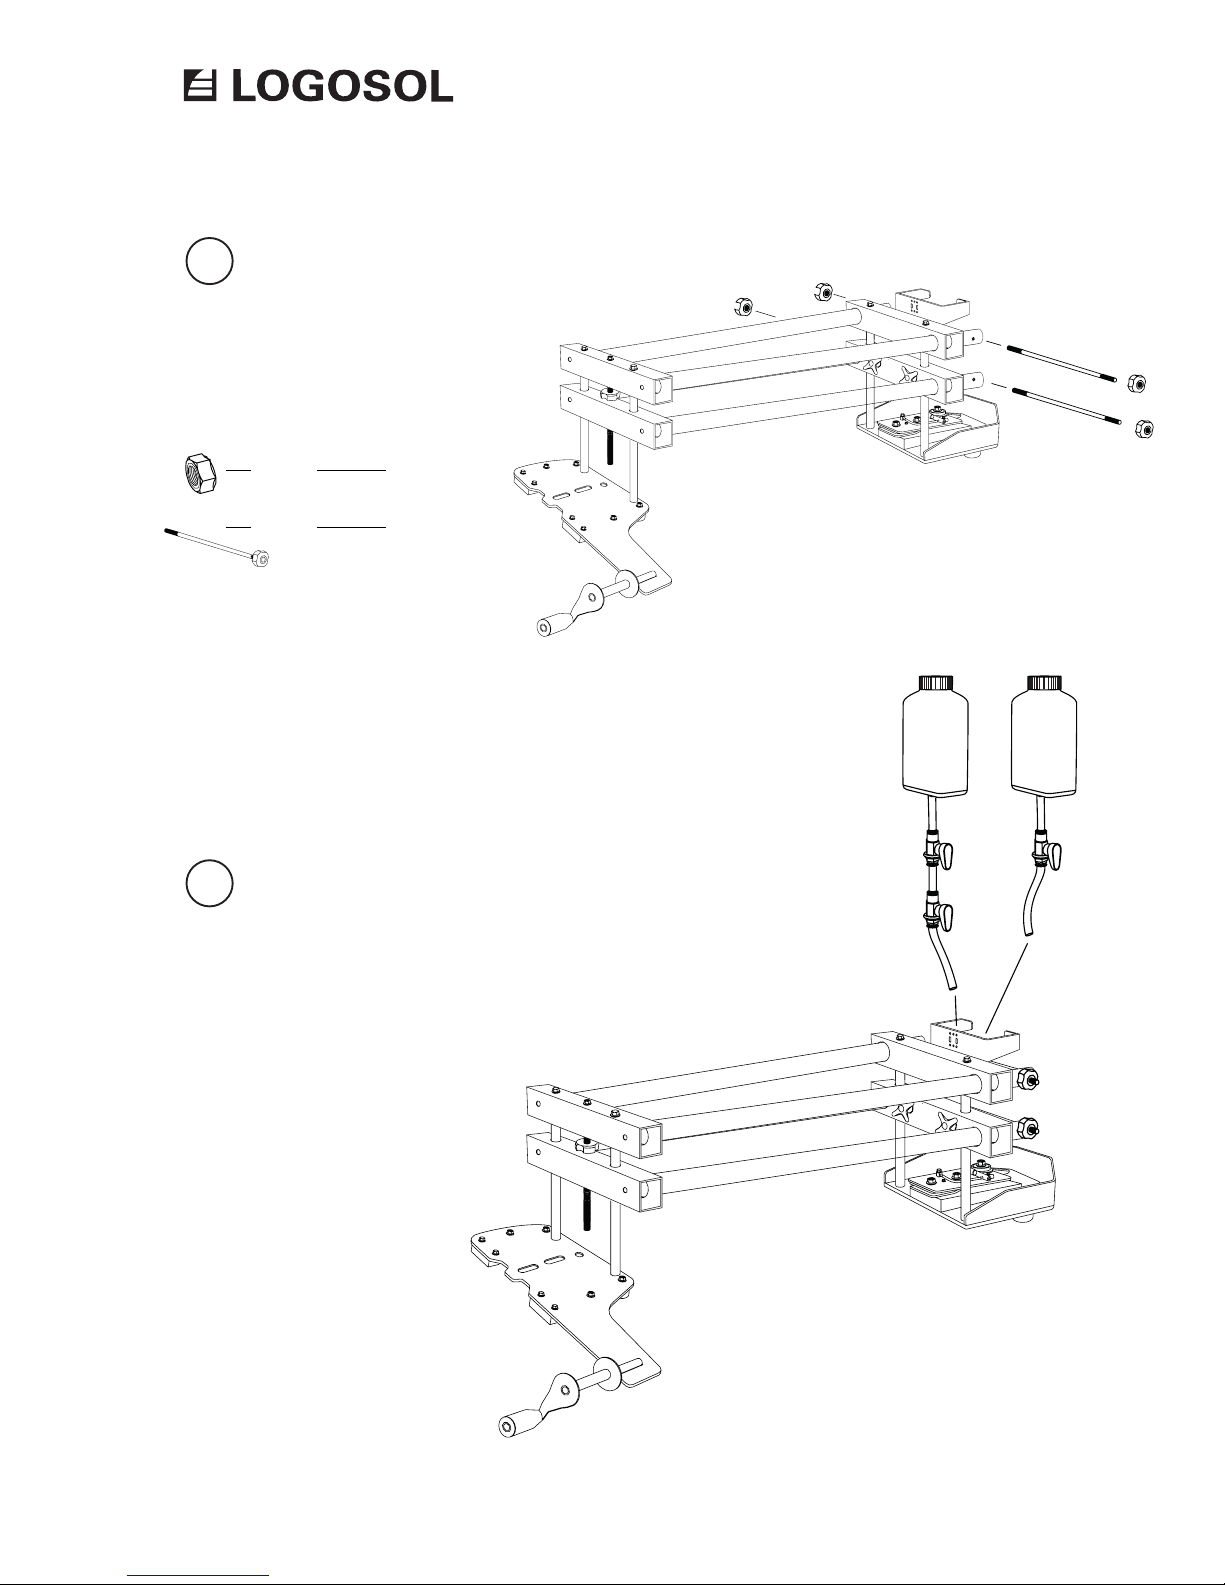
Fit the tube locks through the tubes.
Fit the bottles in the bottle holder.
5
6
Lock nut M8
Tube lock with knob
2 pcs
2 pcs
Page 17
17
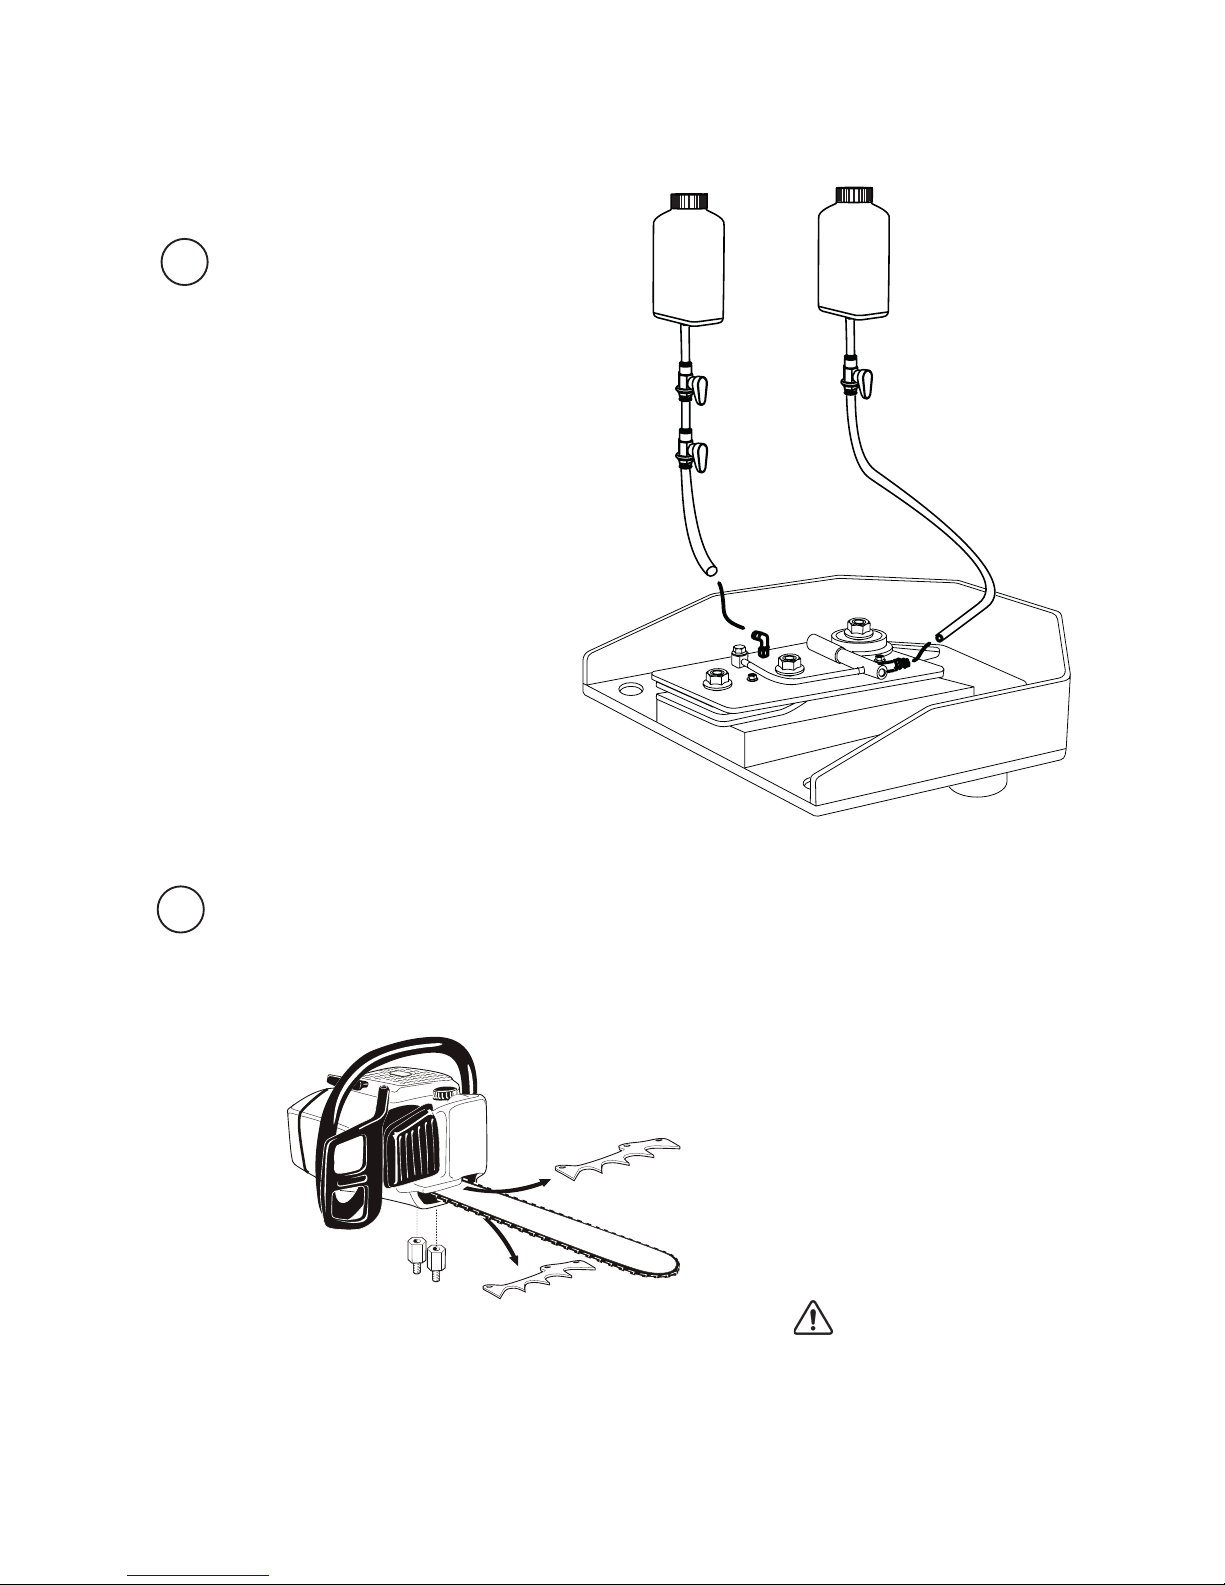
Connect the bottles to their respective
valve. Note that the water bottle has
two valves, one for adjusting the water
ow and one for turning the water
ow on or off. The oil bottle is connected to the oil pump.
WATER OIL
7
Replace the bumper spikes.
8
Unscrew the two guide bar nuts
from the chainsaw and remove
the guide bar cover.
Replace the chainsaw bumper
spikes and the chain catcher with
the supplied bumper spikes.
If the chainsaw is to be used for
cross cutting, the original bumper
spikes have to be reinstalled.
Only CE-approved
chainsaws with two
guide bar nuts may be
used with the Big Mill
equipment.
Page 18
18
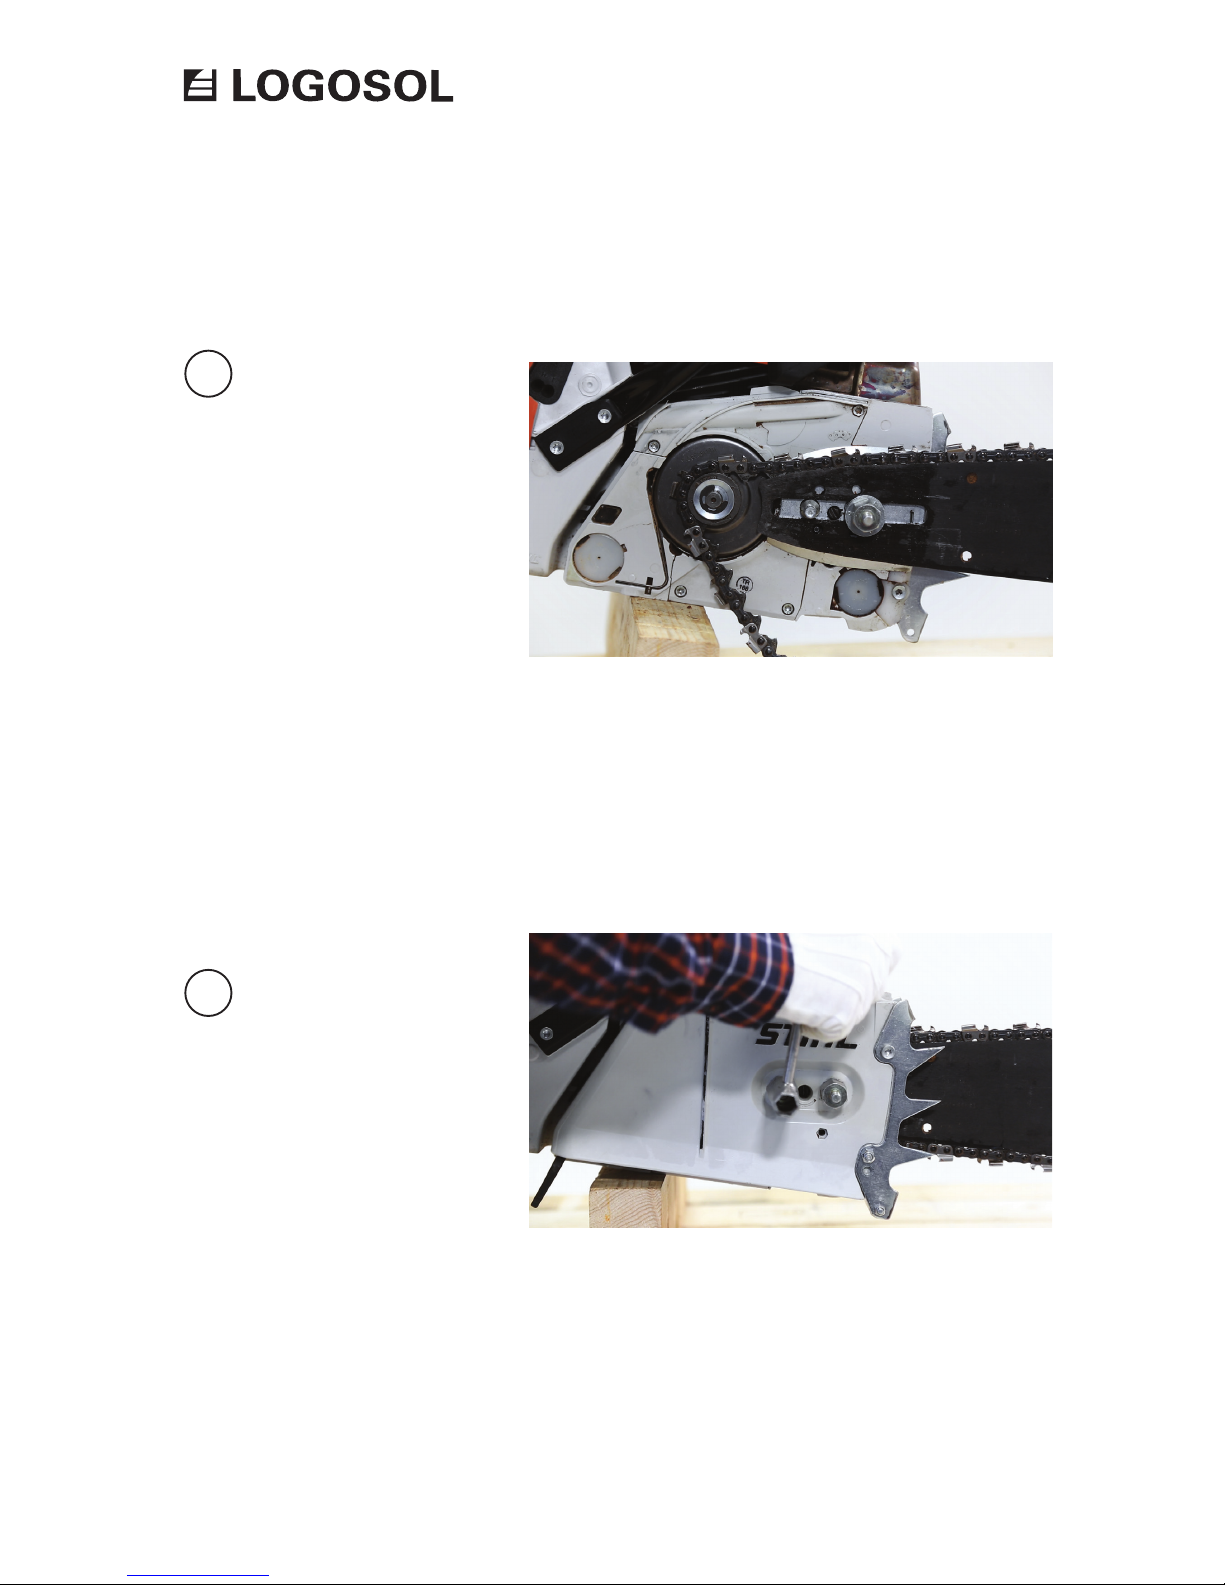
Temporarily t the guide bar to the
chainsaw using the supplied washer
and Logosol nut on one of the guide
bar bolts. Install the saw chain on the
guide bar. Remove the washer and the
Logosol nut.
Reinstall the guide bar cover. Use the
supplied Logosol nuts.
9
10
Page 19
19
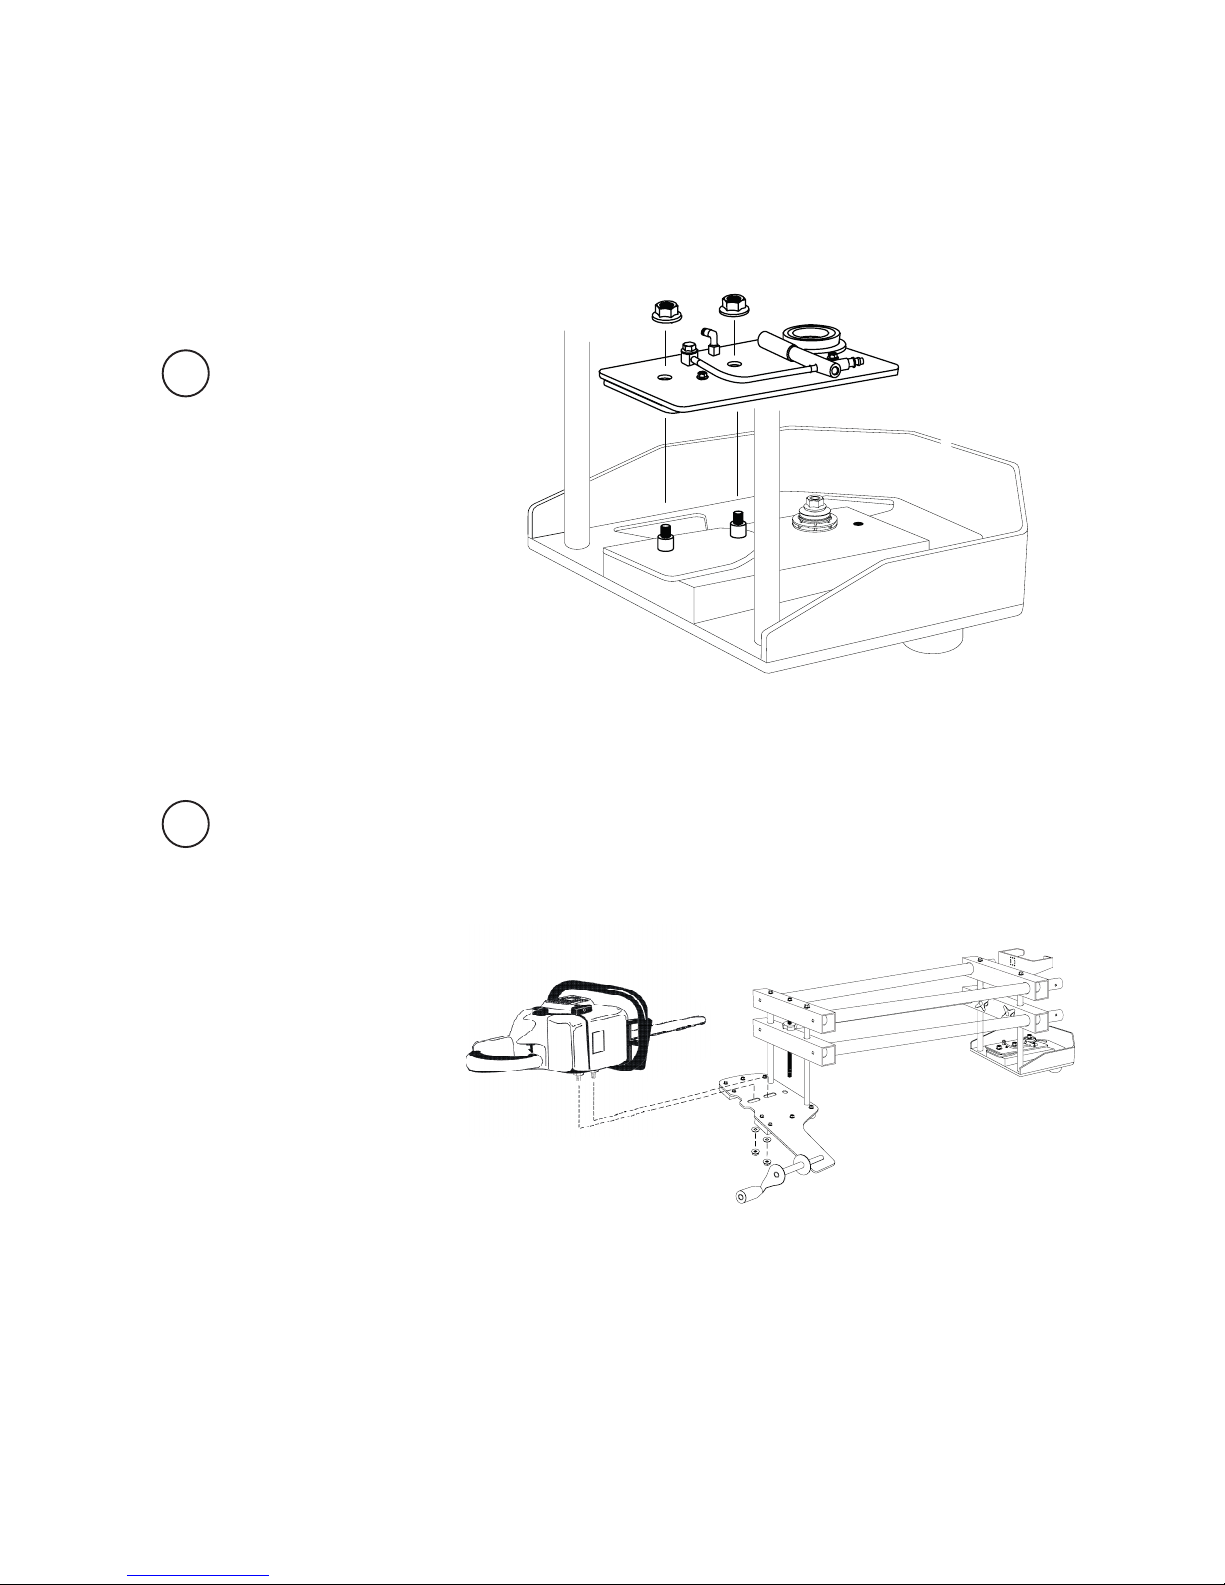
Mount the chainsaw, equipped with
guide bar and chain, on the saw
carriage.
12
Motorsågens svärds-
muttrar med brickor
(11x28x2)
Stödskruv
Remove the oil pump plate from the
bar nose carriage.
11
Page 20
20
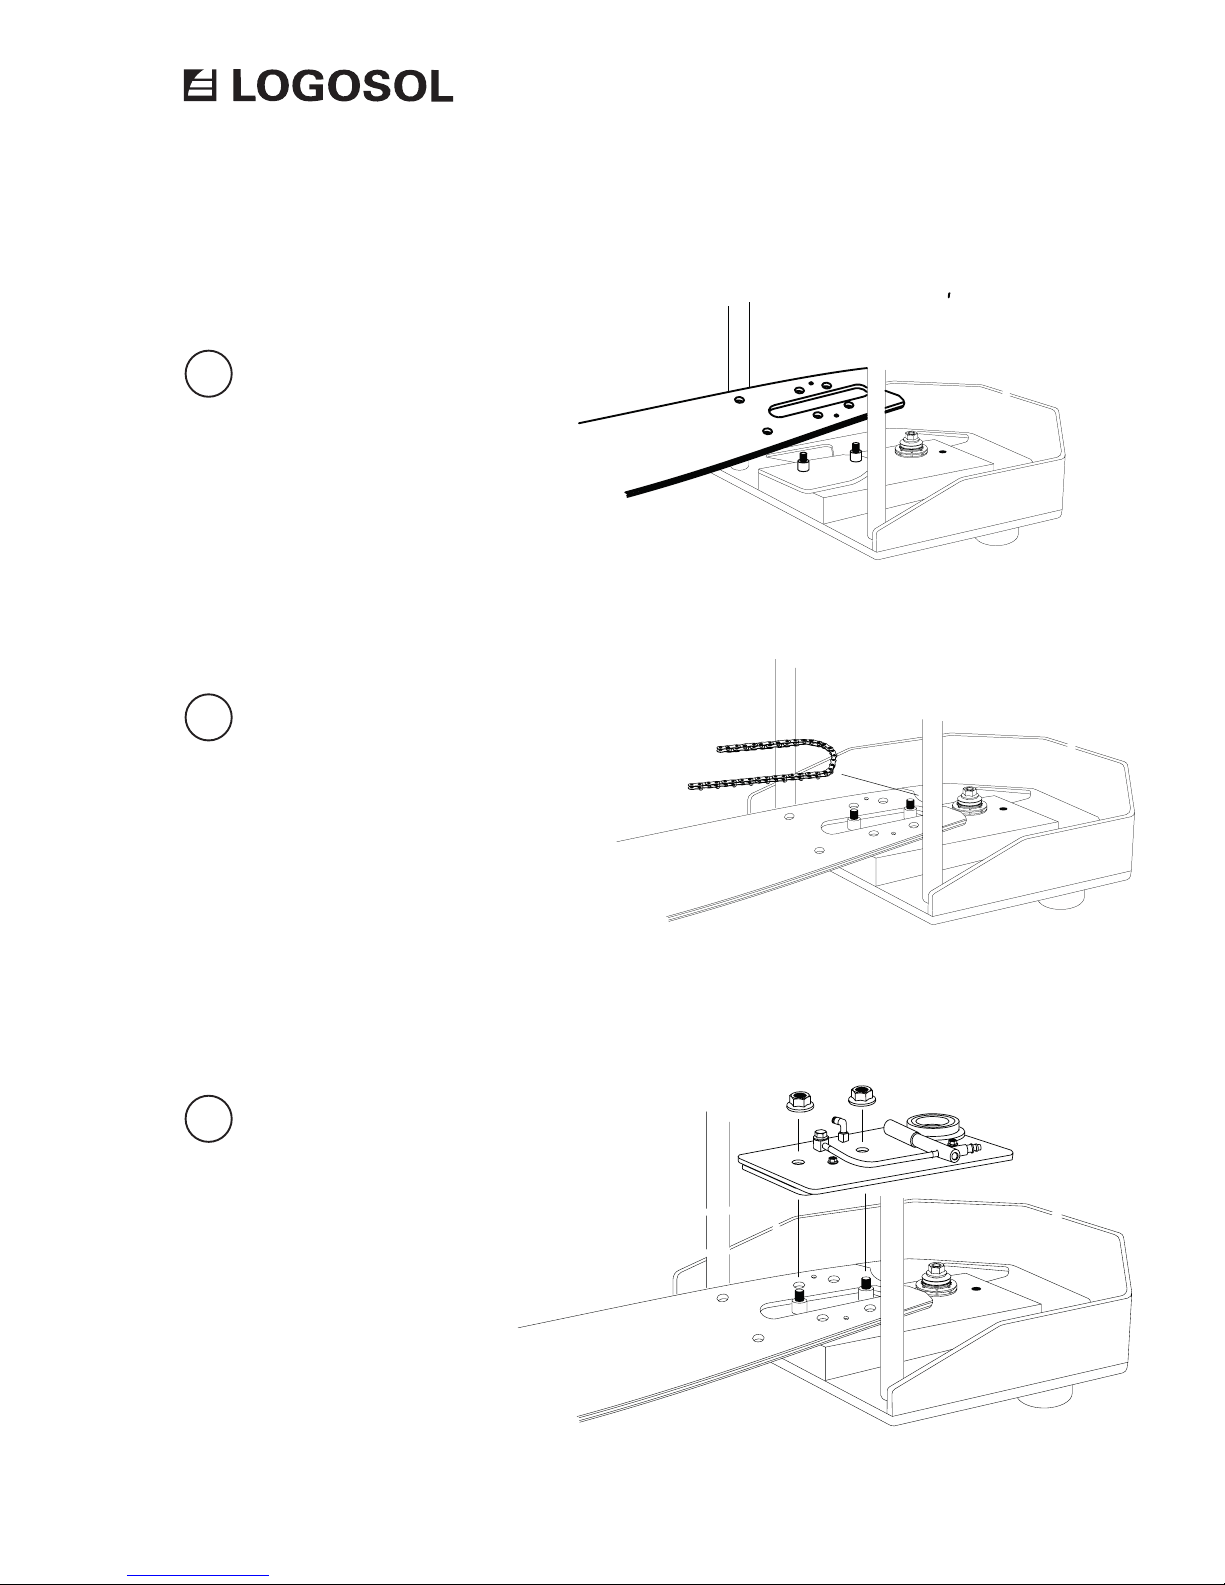
Fit the guide bar to the bar nose
carriage.
Install the chain on the bar nose
carriage.
Ret the oil pump plate.
11
12
13
Page 21
21
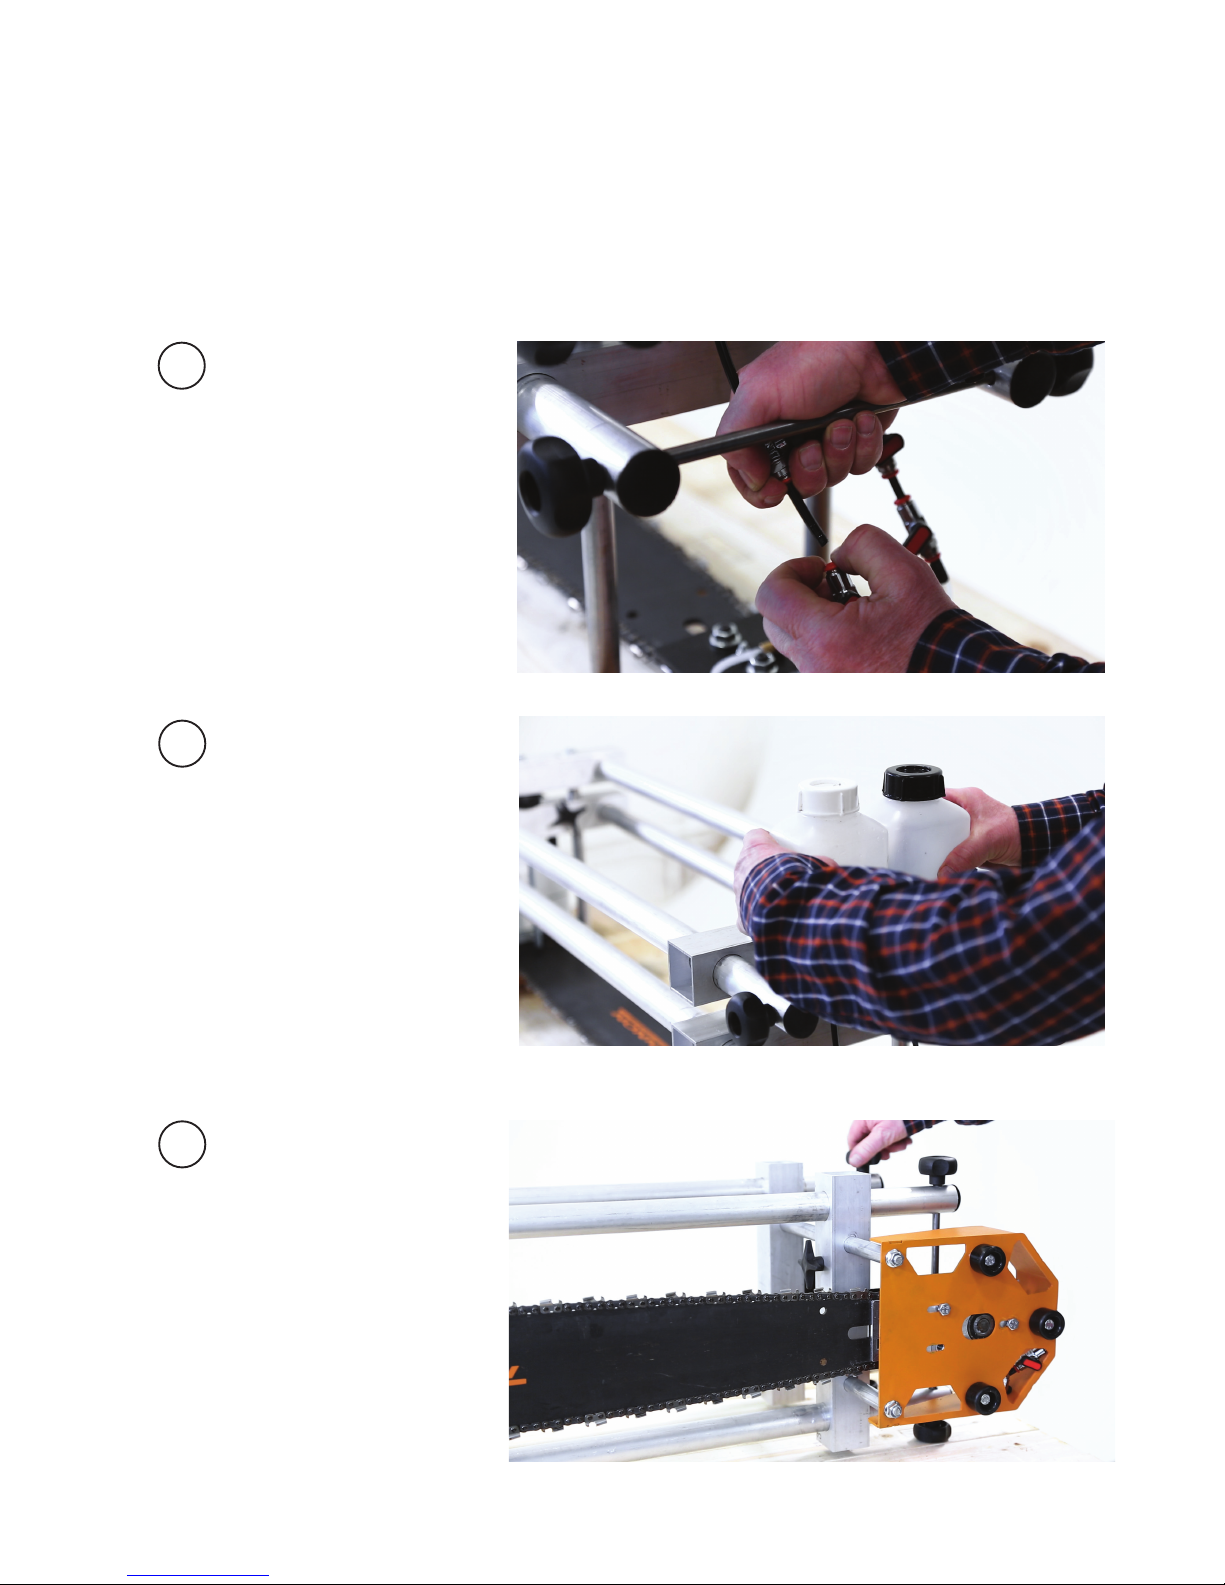
Start by detaching the valves from the
lubrication tubes at the guide bar end.
Remove the bottles from the bottle
holder at the guide bar end.
Loosen the tube locks.
CHANGING CHAIN
1
2
3
Page 22
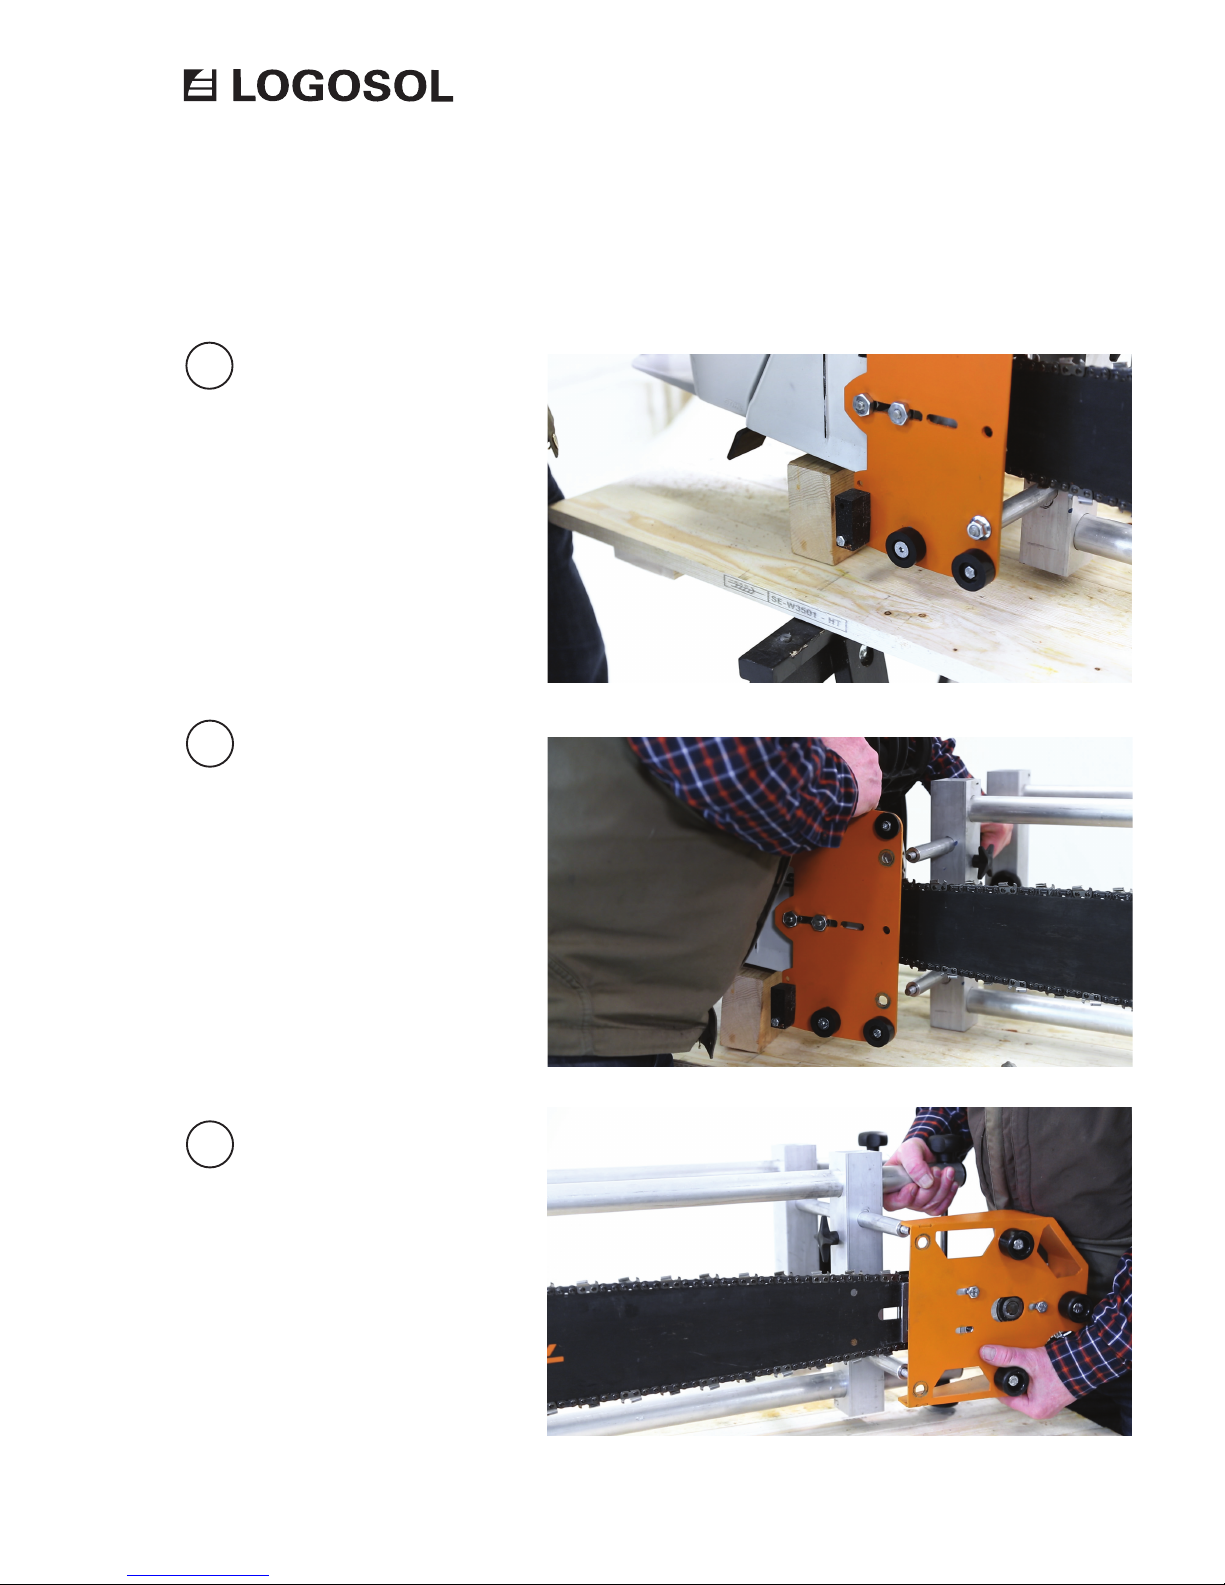
22
Place a block under the chainsaw to
facilitate the next steps.
Remove the tube holder from the saw
carriage.
4
5
6
Remove the tube holder from the bar
nose carriage.
Page 23
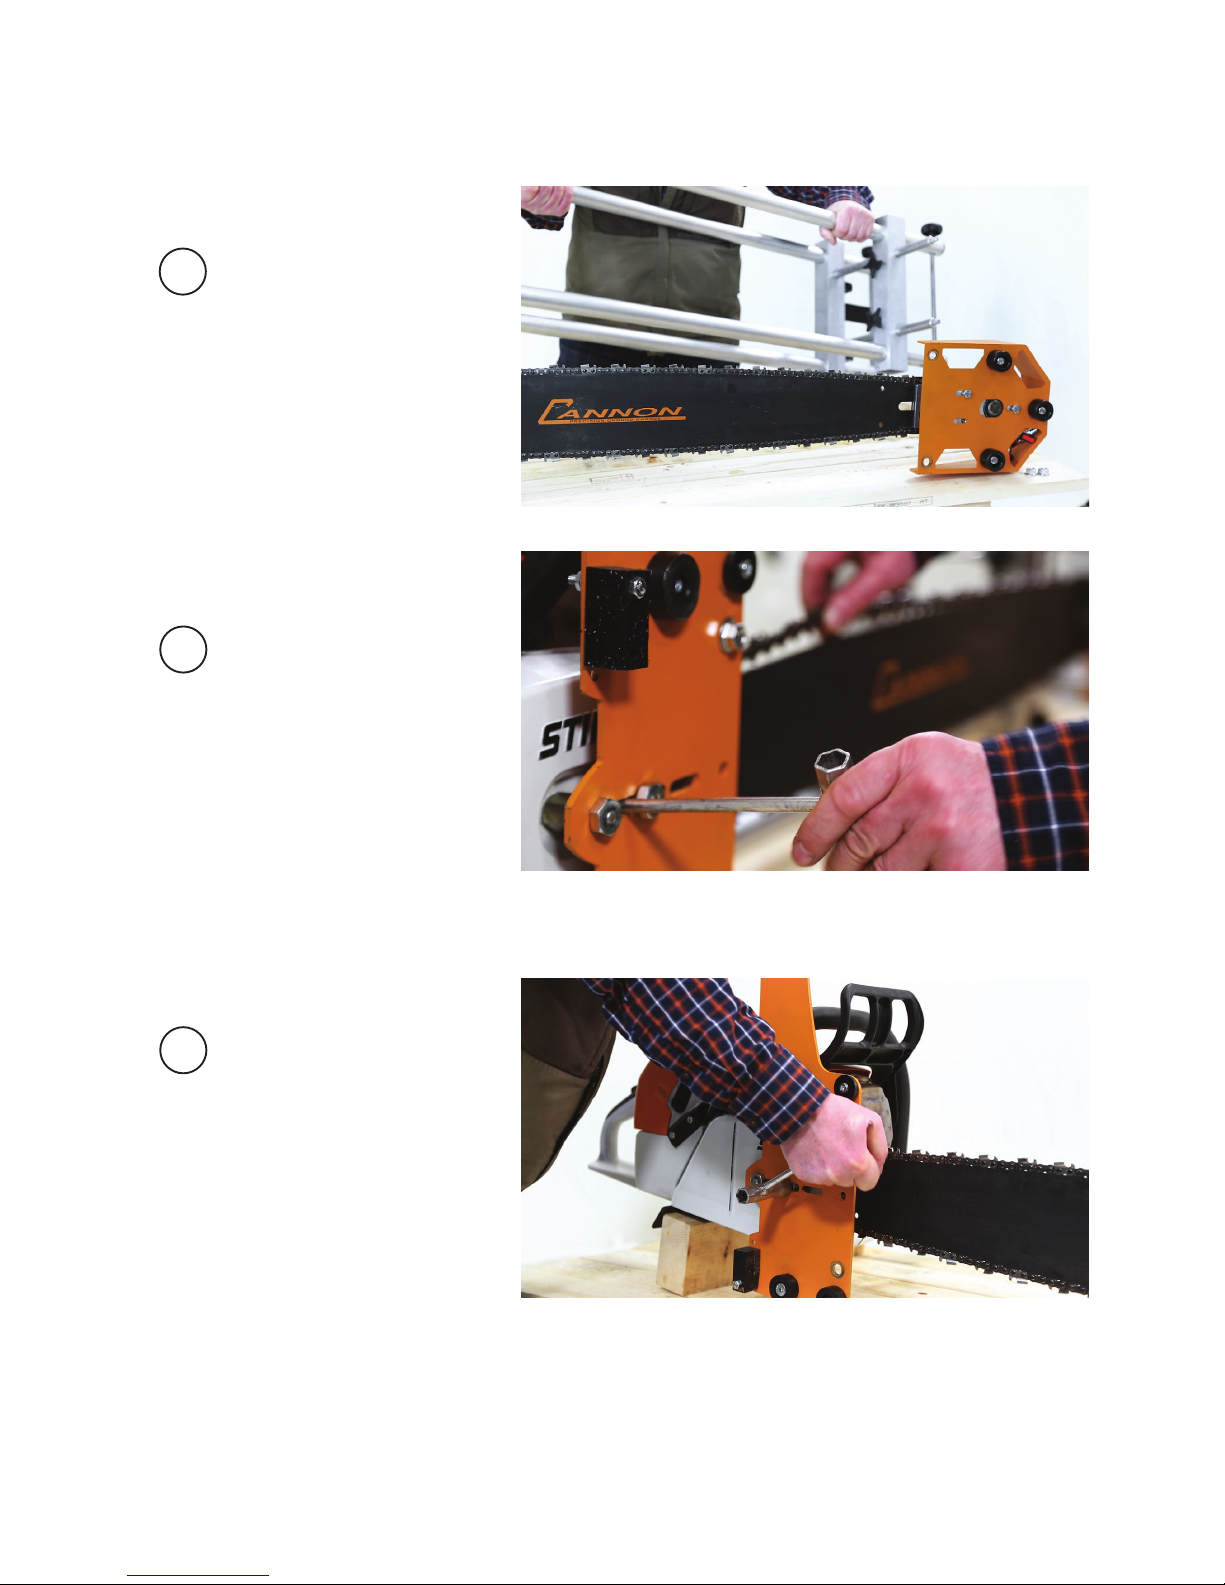
23
Take away the tube holders and tubes.
7
8
9
Turn the tensioning bolt on the
chainsaw to release the chain tension.
Unscrew the saw carriage, using a
19 mm spanner.
Page 24
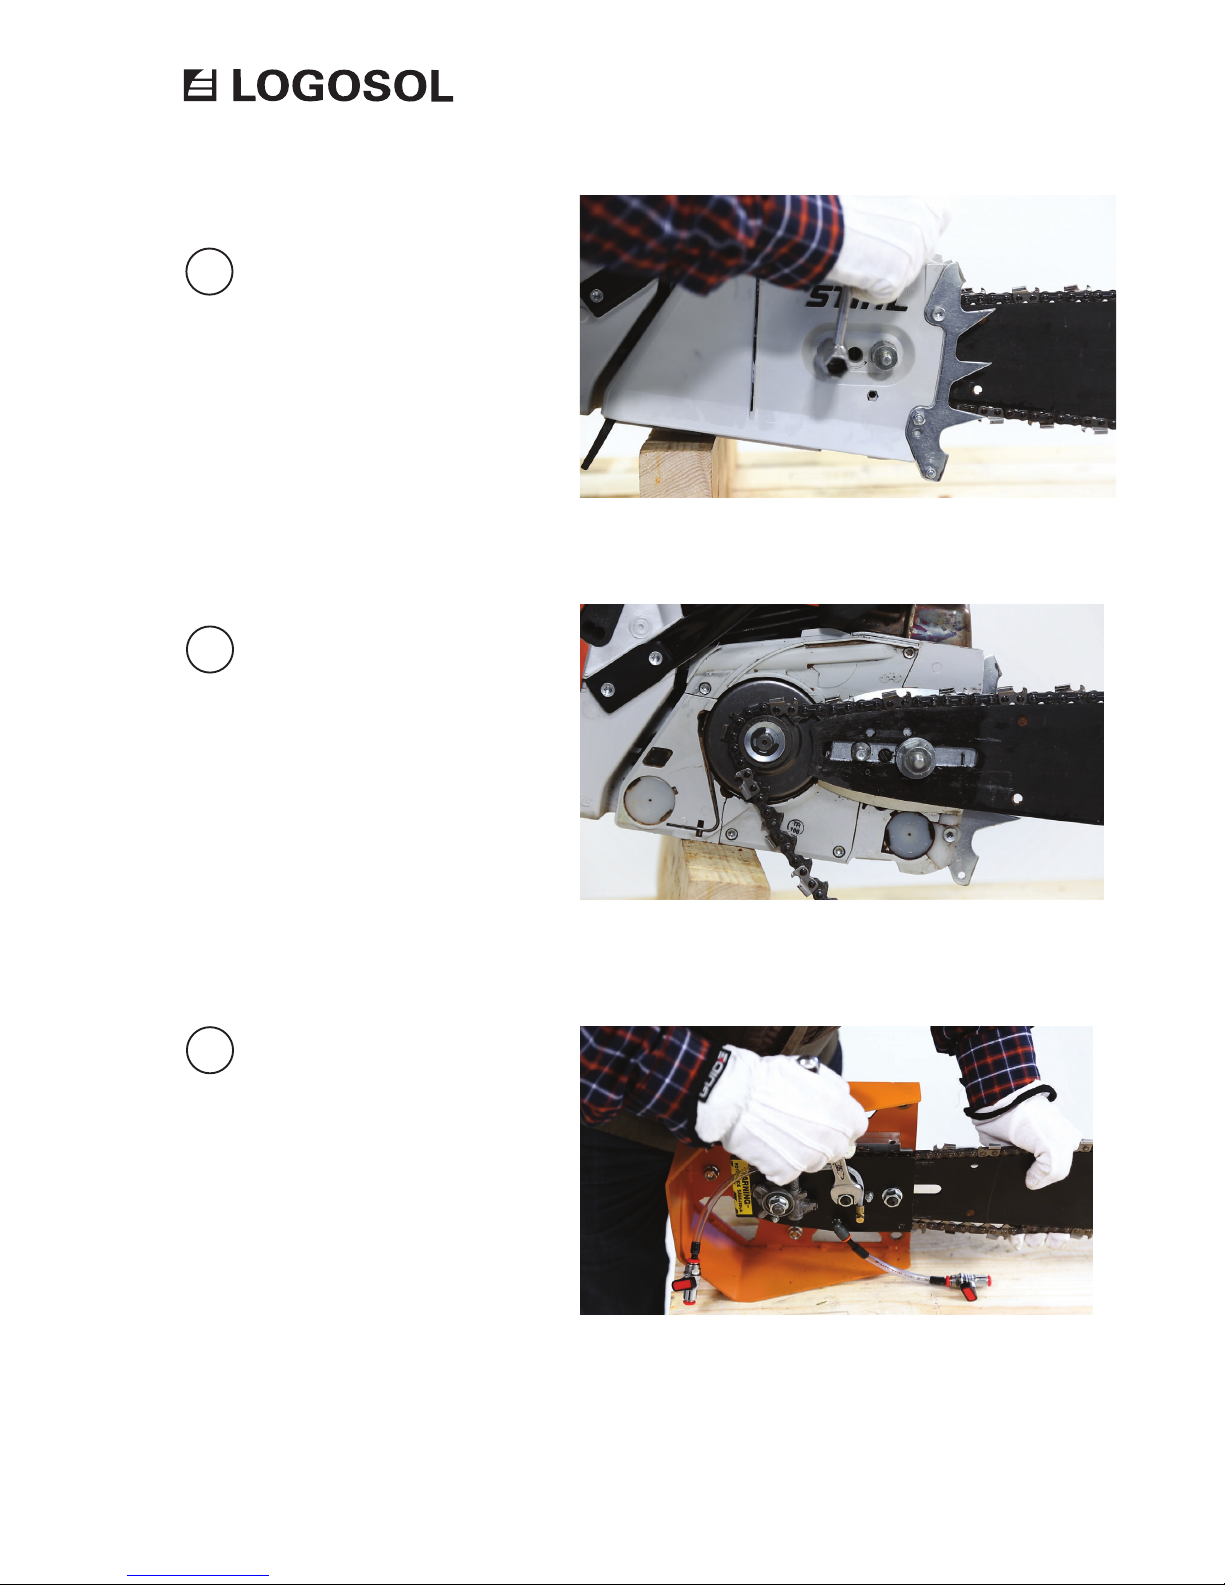
24
10
11
12
Loosen the Logosol nuts and remove the
cover.
Loosen the two nuts on the
oil pump plate.
Temporarily t the guide bar using
a washer and a Logosol nut on one
of the guide bar bolts. Now, you can
easily remove the chain from the
chainsaw.
Page 25
25
13
14
15
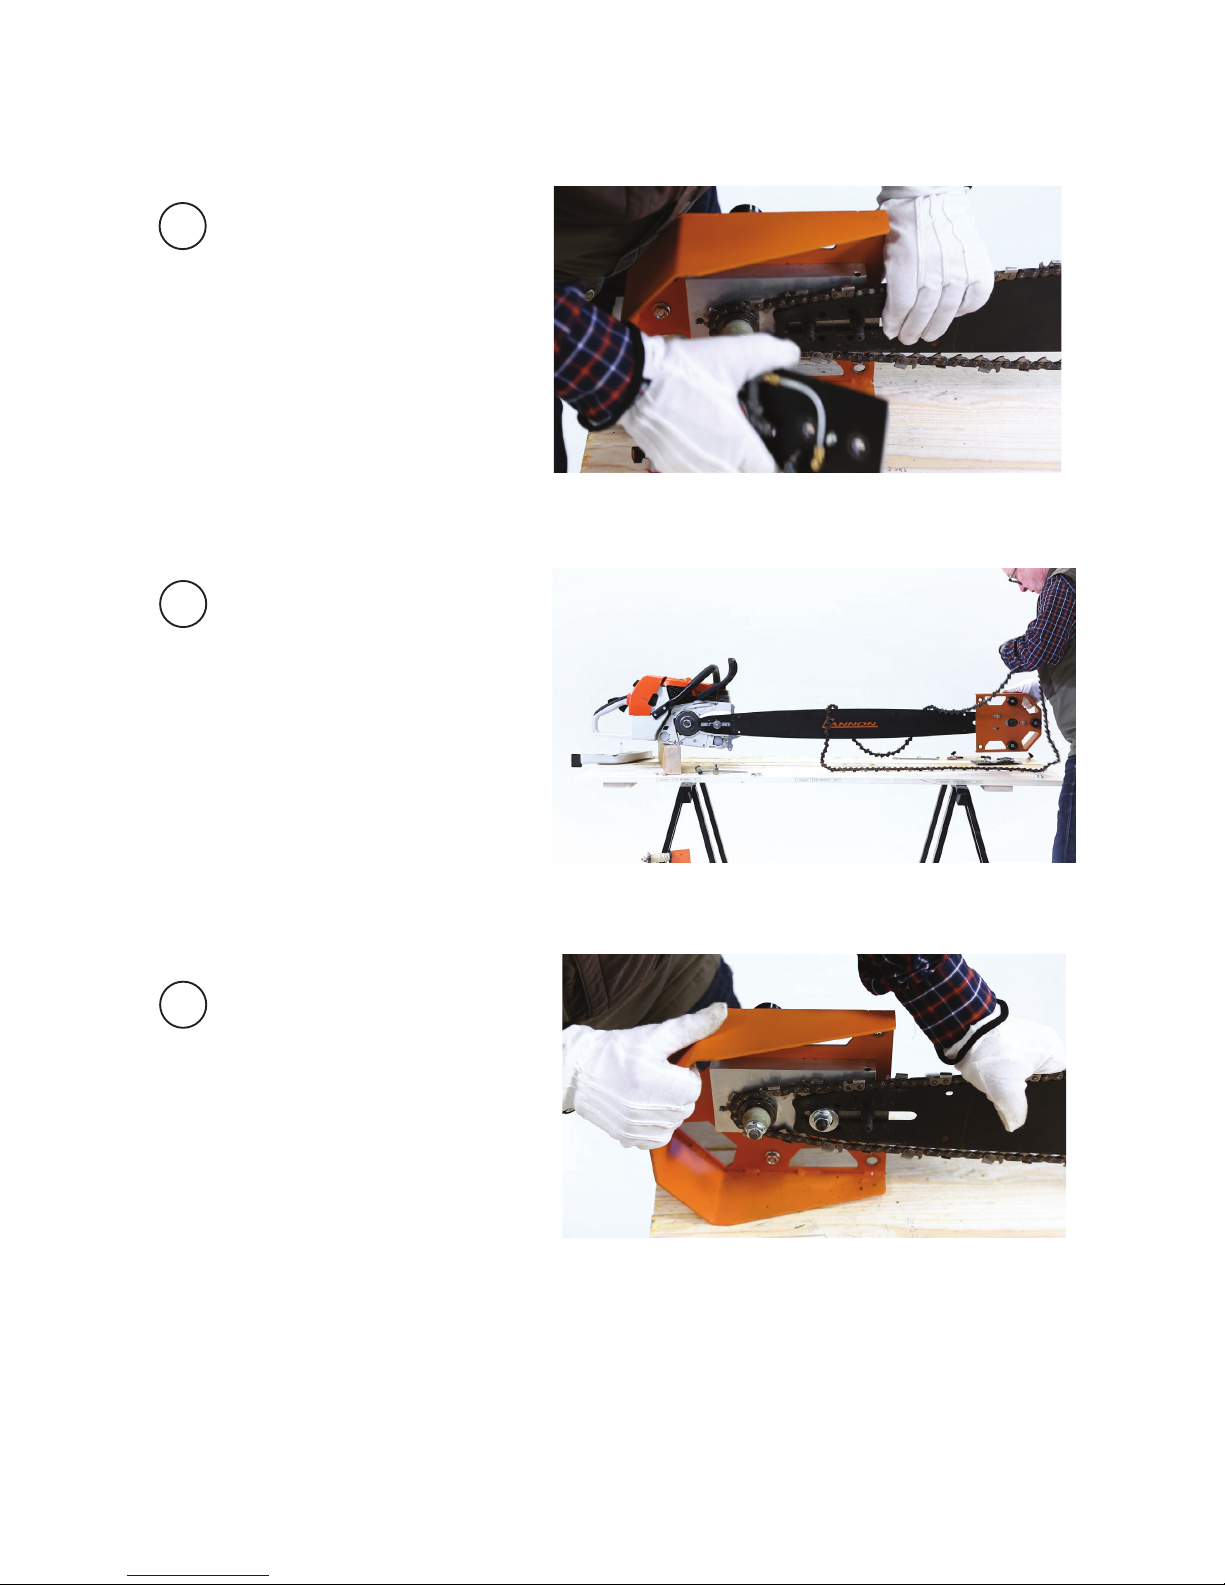
Lift off the chain.
Install the new chain by carrying out these
instructions in reverse order. Note that you
should nger tighten the chain tension at
the bar nose before using the tensioning
bolt.
Remove the oil pump plate.
Page 26
26
ASSEMBLY, GUIDE RAIL PACKAGE
ASSEMBLE THE GUIDE RAIL PACKAGE
ON THE LOG
1
2
3
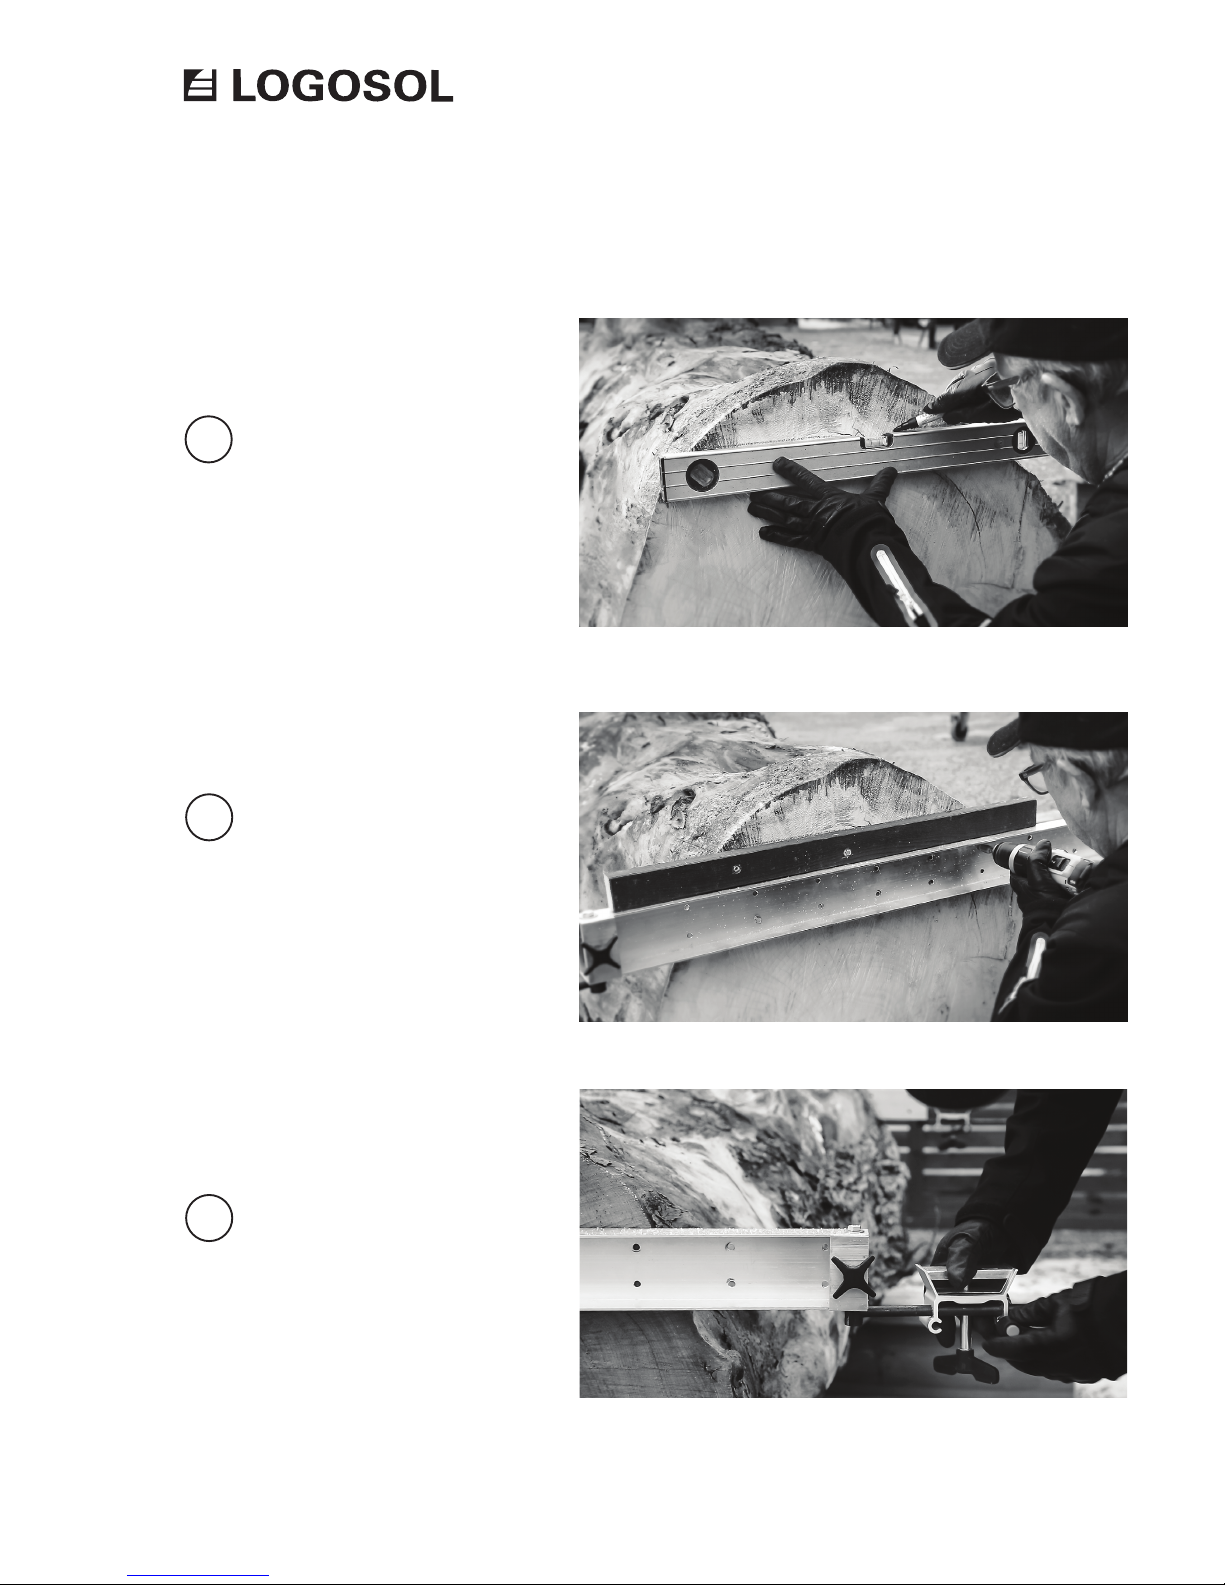
Draw a line to mark the rst cut on the
log. Note that the line will be used for
positioning the guide rail holder. The actual
cut will come 50 mm above the line.
Screw the guide rail holder to the log end so
that the upper edge touches the line.
Install the guide rail supports.
Page 27
27
4
5
6
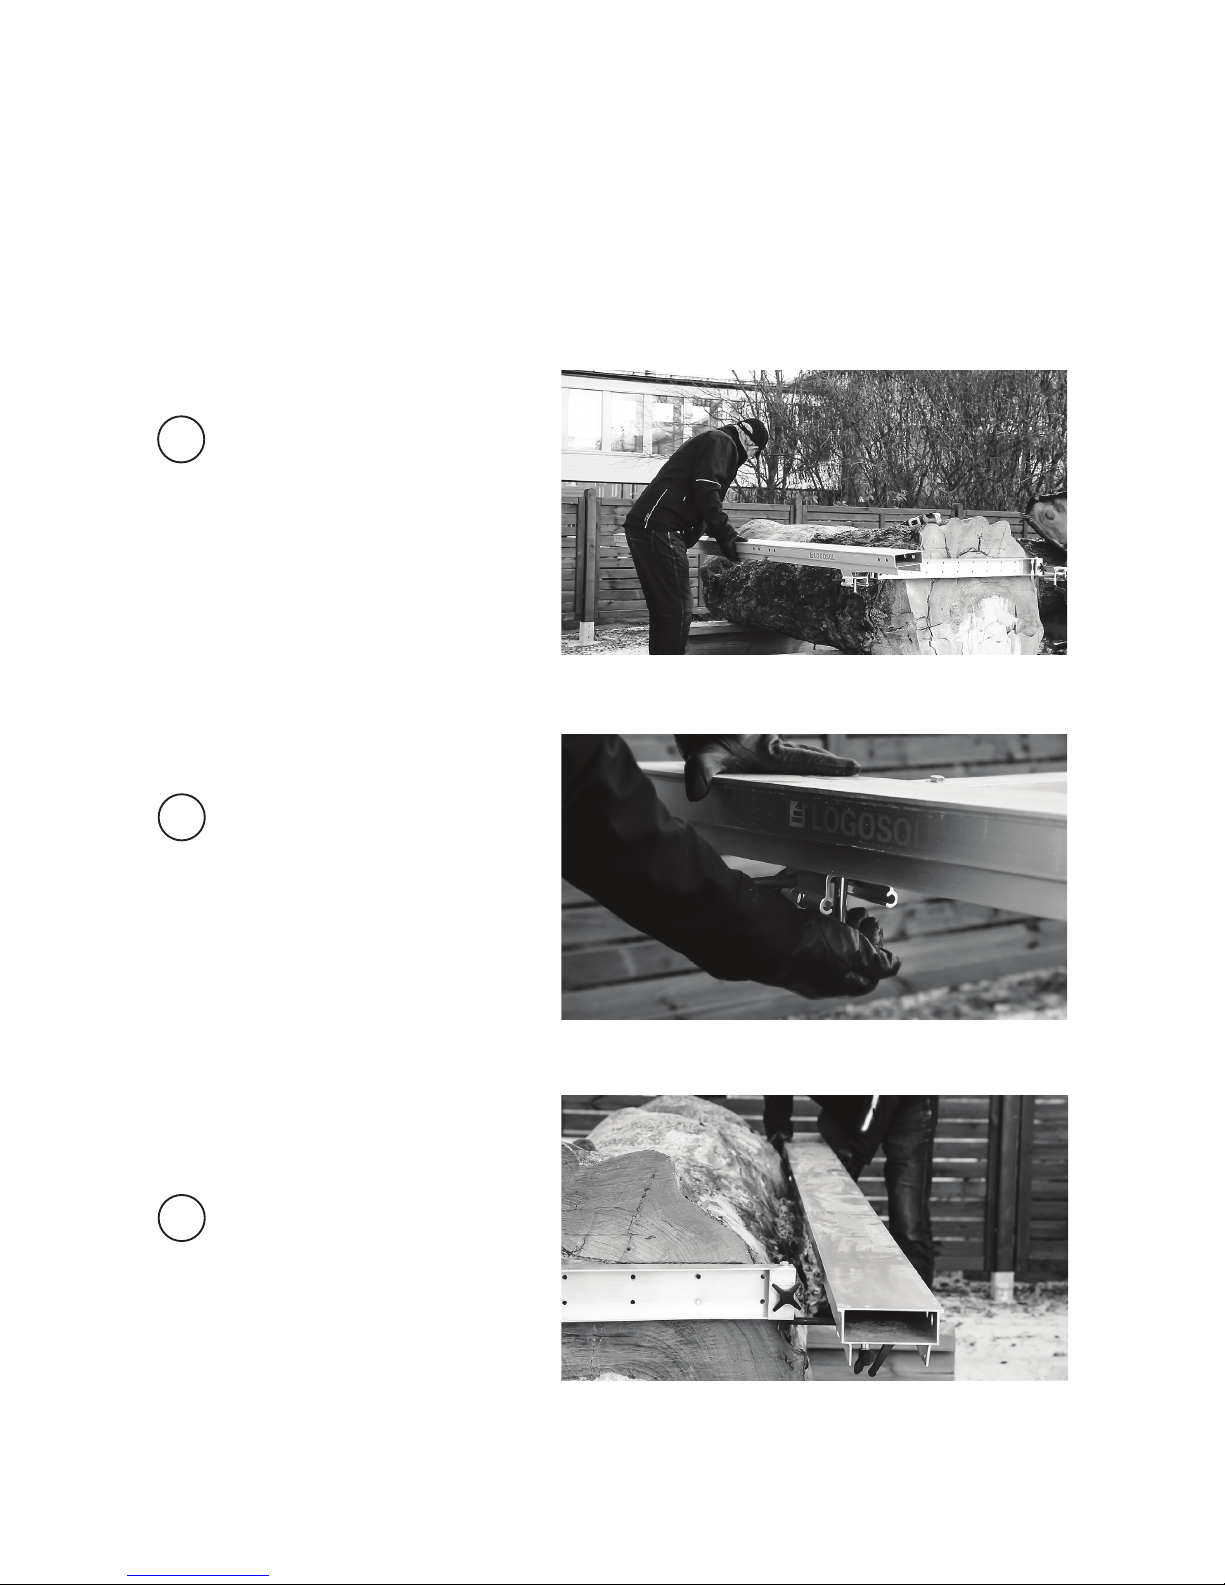
Fit the guide rails to the guide rail holders.
Secure the guide rails.
The guide rails can be adjusted in or out, to
adjust the parallelity between them.
Page 28
28
7
8
9
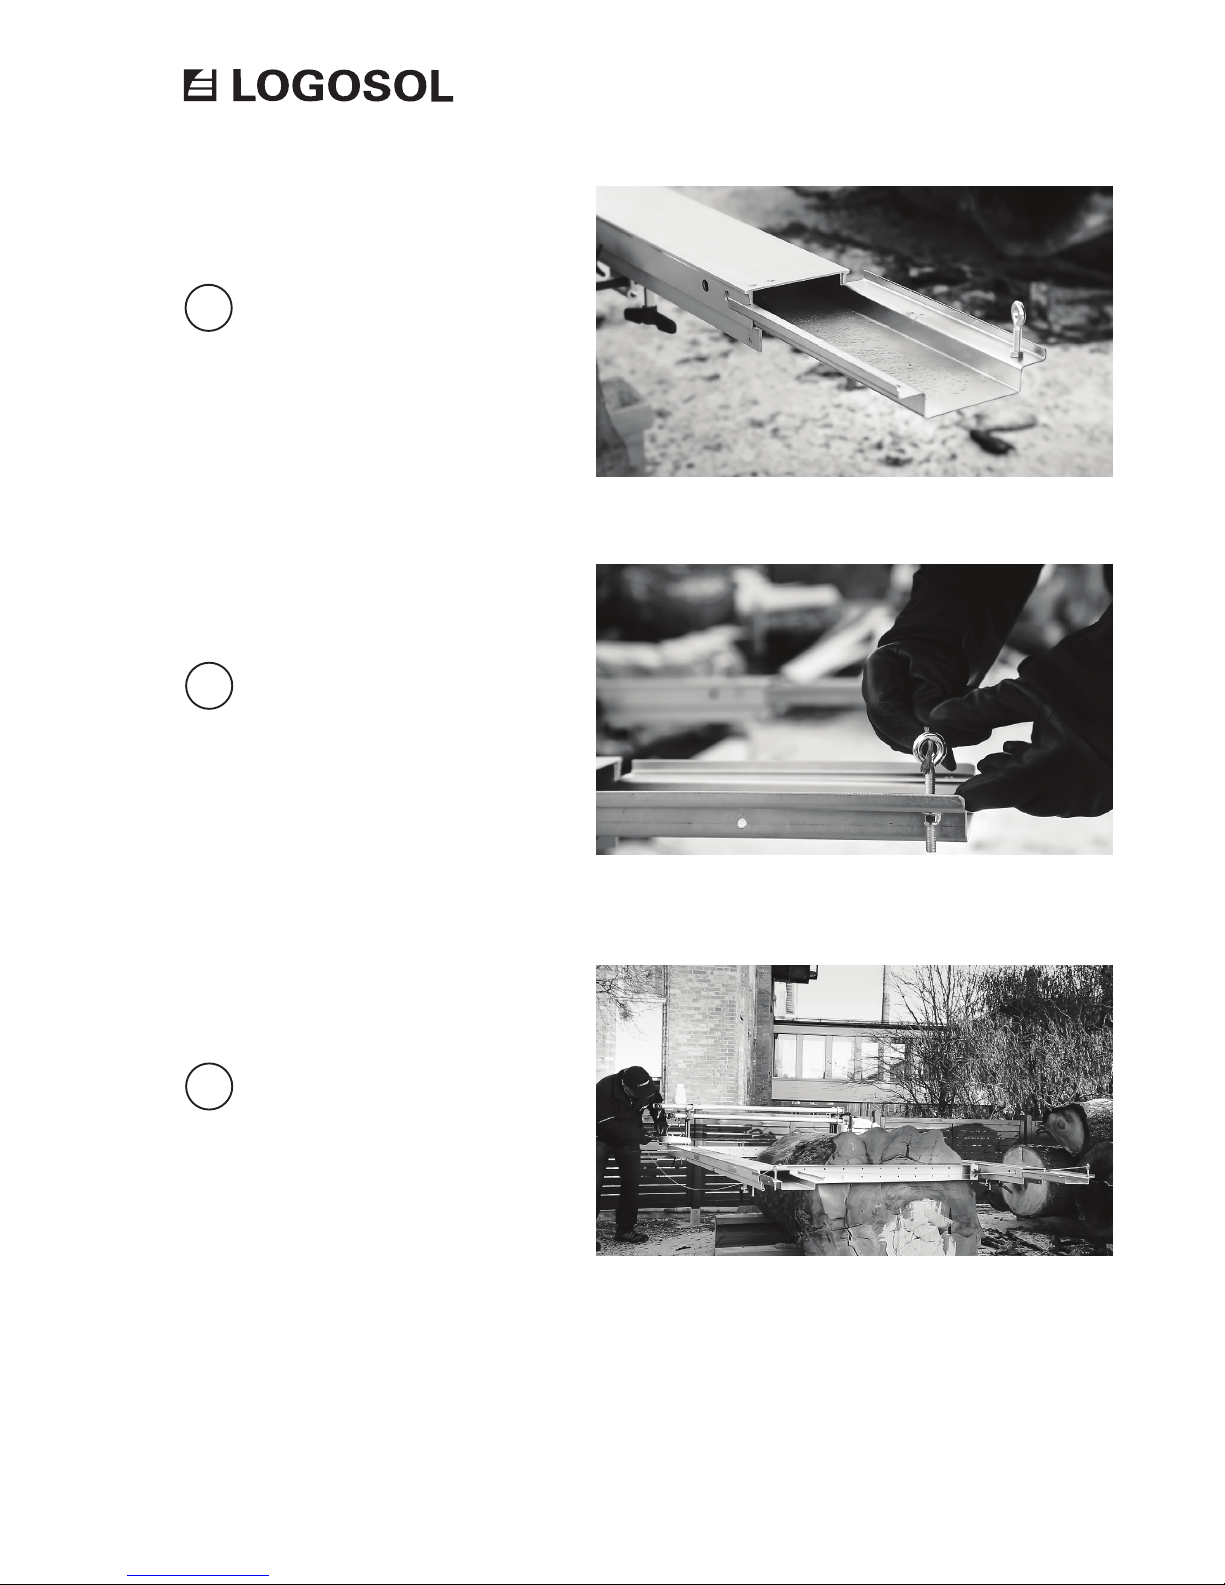
Thread the feed line through the eyebolts.
Fasten the feed line to the bar nose carriage.
Fit the plate, together with its eyebolt, to the
guide rail. Note that the eyebolt should be
located on the ”outer side” of the guide rail.
Repeat the assembly on the other guide rail.
Page 29
29
10
11
12
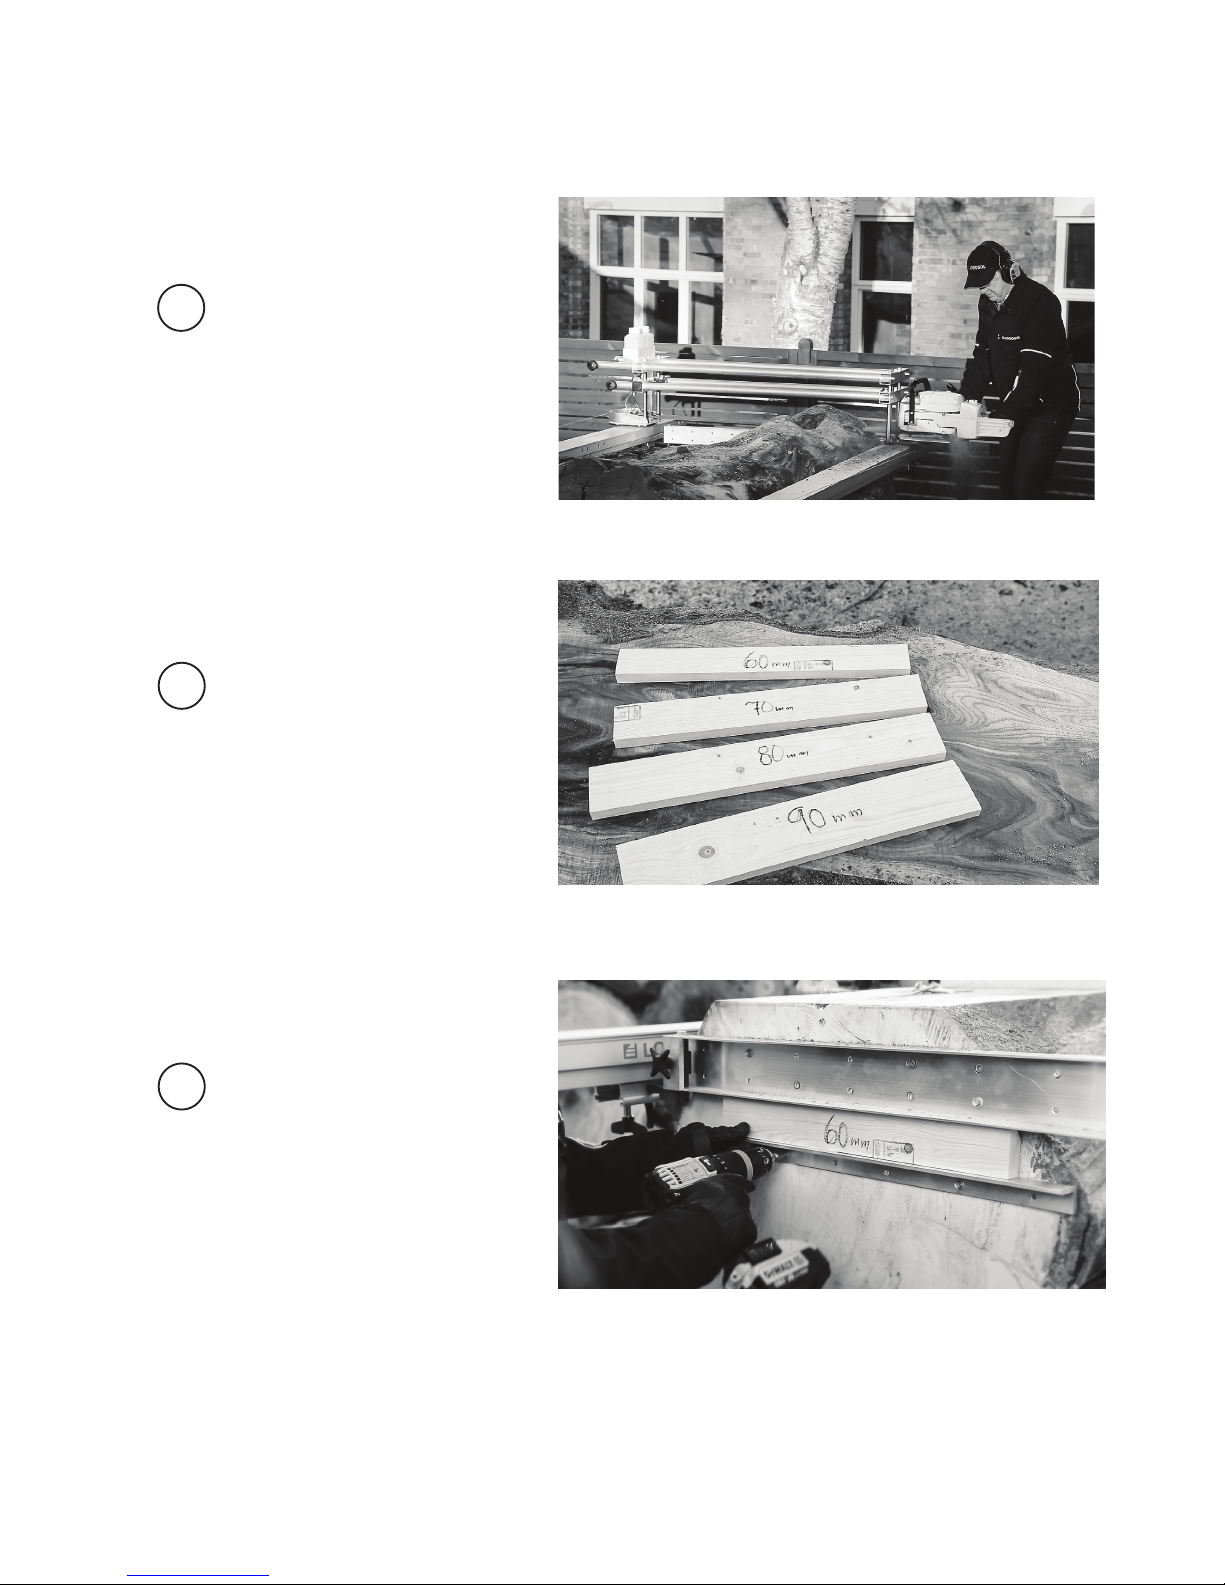
Now, you can make the rst saw cut.
You can make saw templates of different
sizes to facilitate when moving the guide rail
for the next cut.
Place a saw template below the guide rail
holder, and then fasten the aluminium angle
iron under the lower edge of the template.
TIP!
Page 30
30
13
14
15
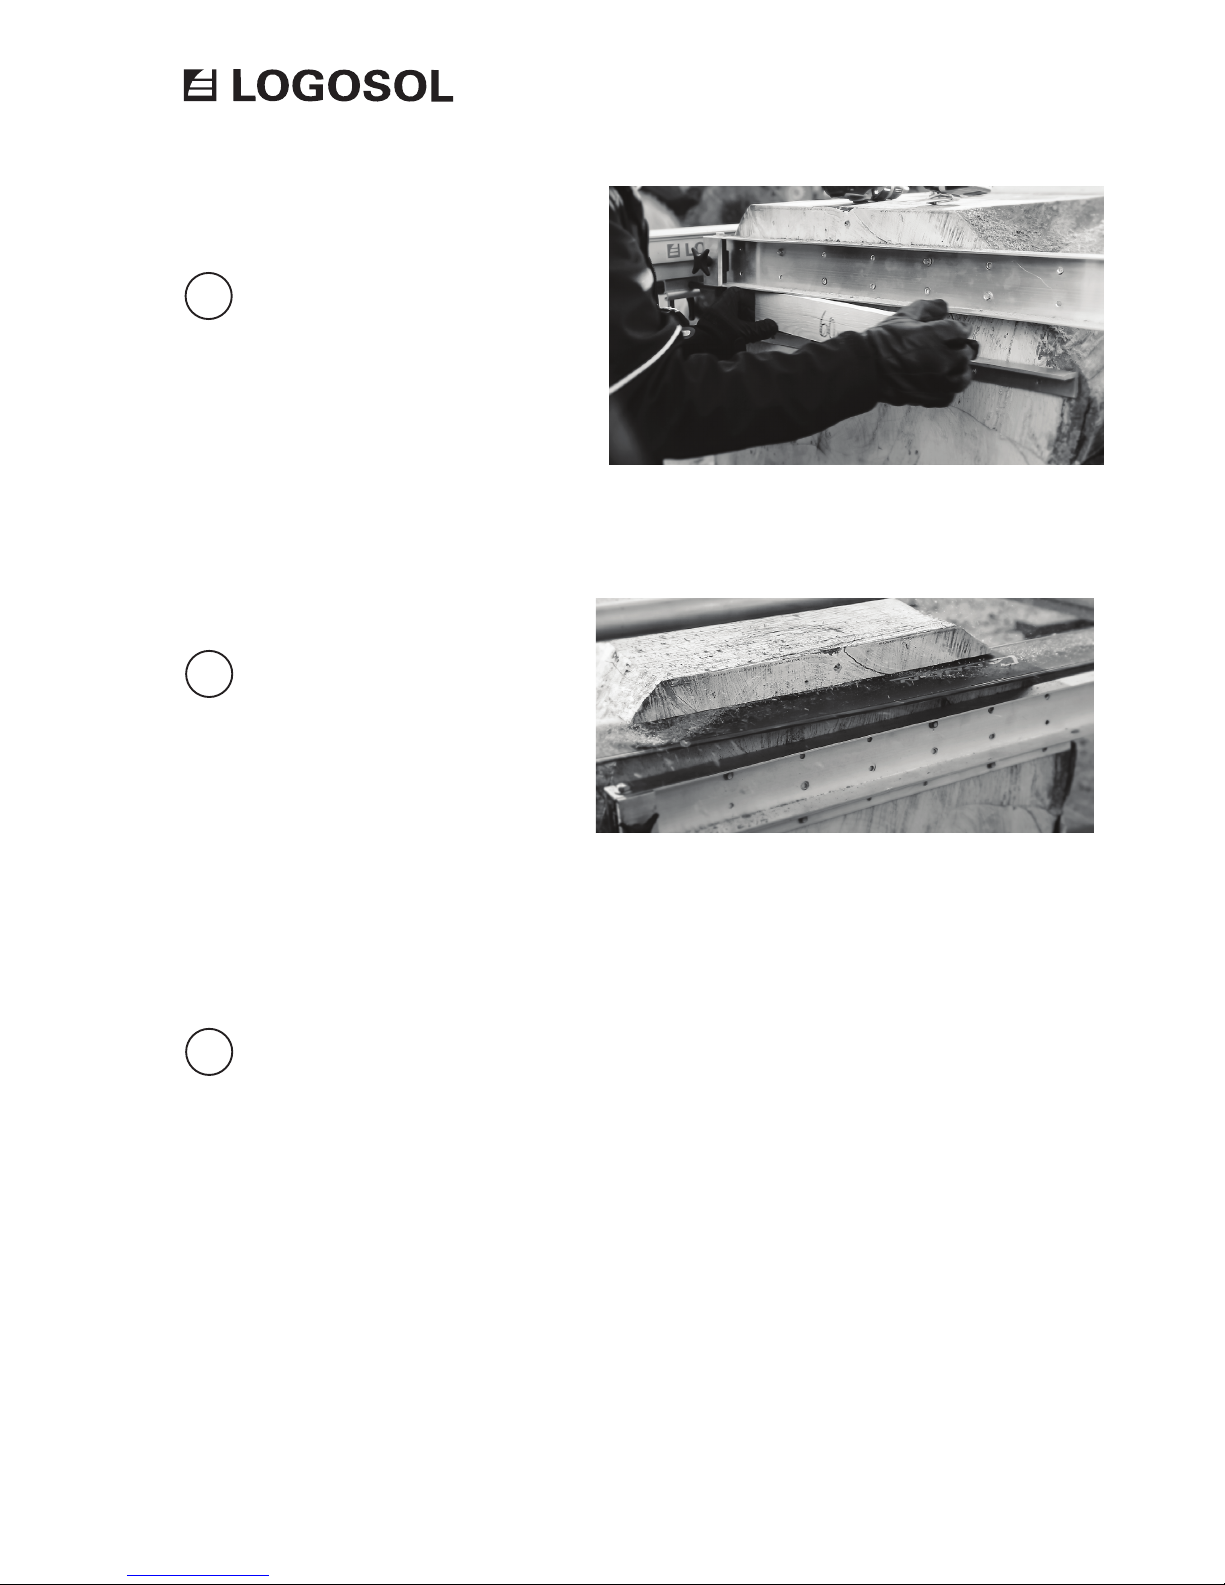
Remove the saw template and loosen the
screws that hold the guide rail holder. When
the guide rail holder has been lowered down
to the aluminium angle iron, you fasten it
for the next cut. Repeat all the steps at the
other end of the log.
Now you can make the next cut.
By repeating the steps 12-15, you can cut up
the log into the desired number of boards
and dimensions.
Page 31
31
Once the wood is sawn it must be dried. If this is
not done in the right way, there is a danger it will be
damaged by dry or fungal rot.
The best time for outdoor drying is in the spring.
Then the relative humidity of the air is very low and
the wood will dry in a couple of weeks.
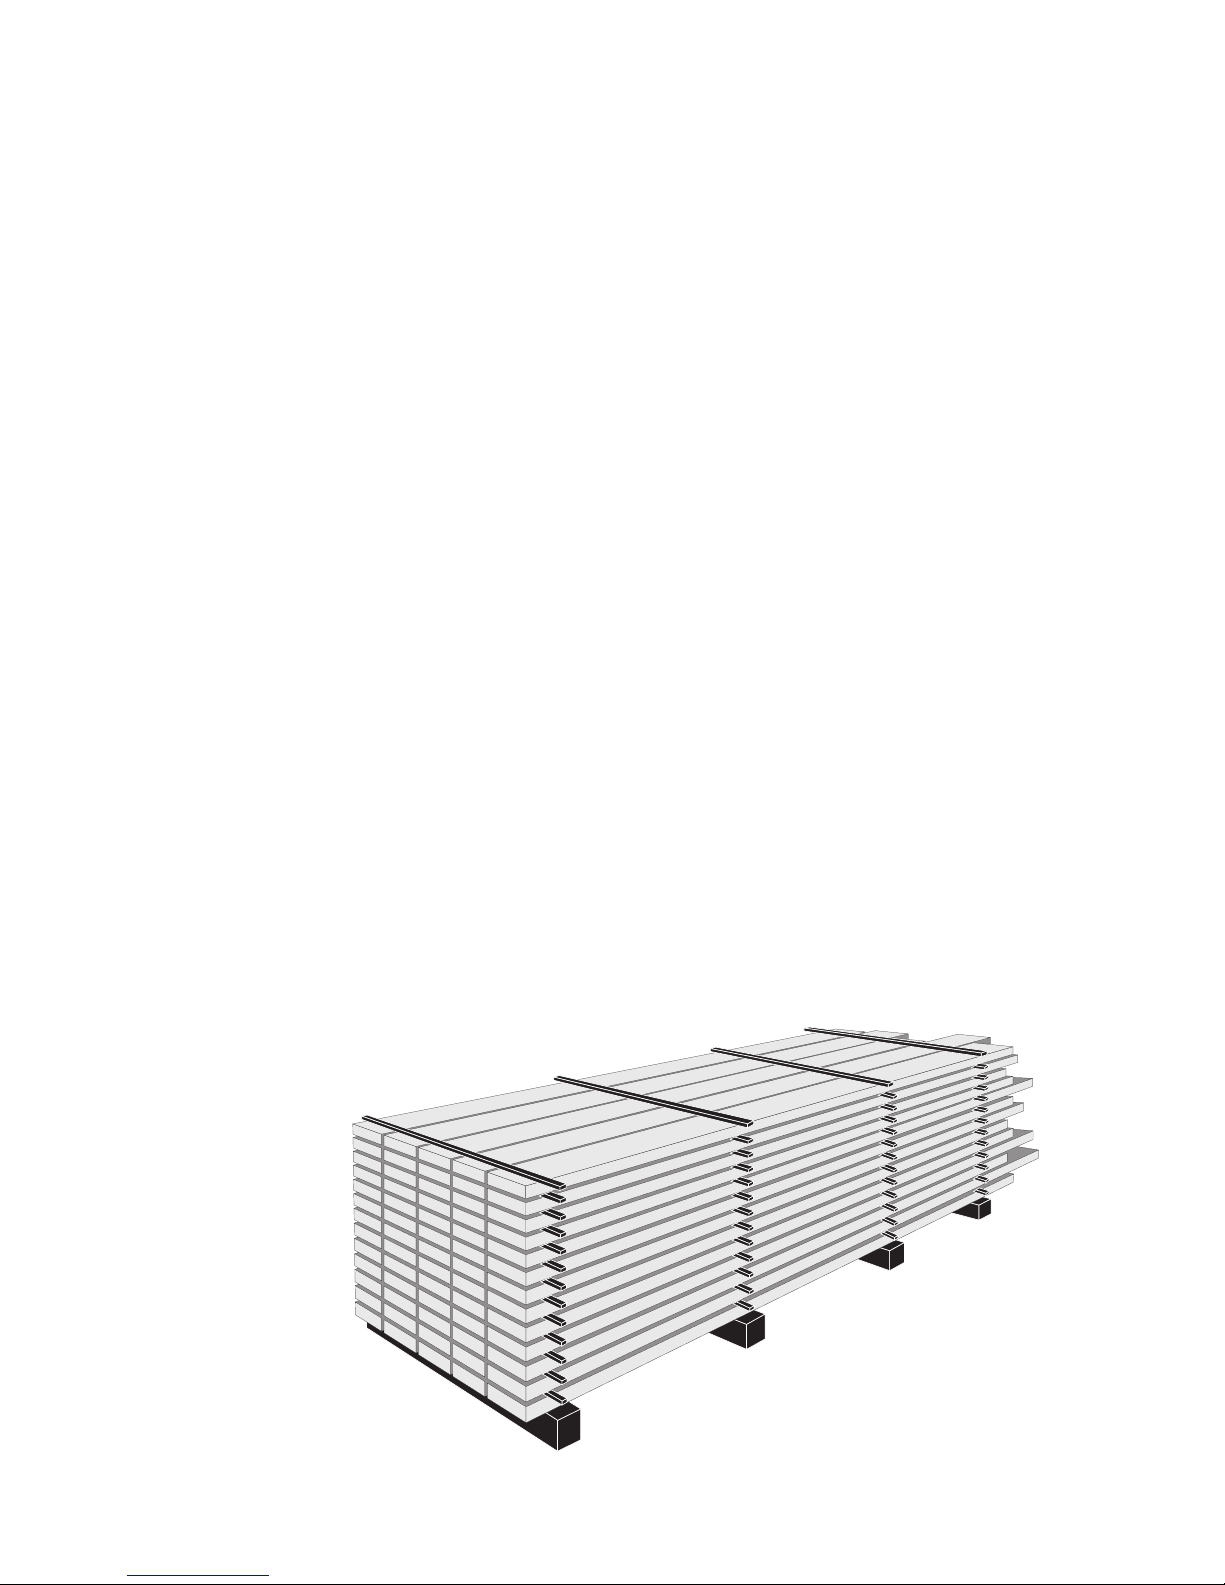
Cut some supportive blocks in the length that
corresponds to the width of your pile, ideally larger
pieces, e.g. 5’’5, to raise the wood from the ground,
which should also be dry, level and free of growth.
The spacing should not exceed 1 m and should lie
level and in line with each other.
Cut spacers or drying sticks in the same length as
the supportive blocks.They should be of the same
thickness (1x1’’ or 1x2’’) and dry. (You can get
material for these by making an extra cut when
edging your boards.)
Place the rst row of boards on the underlying
surface. The boards should be of the same thickness
and be positioned a few centimetres apart. Then
place spacers on the boards (in the same positions
as the underlying supportive blocks) before the
next layer is laid. It is important to place the spacers
exactly over each other, to keep the boards from
warping or bending.
The higher you pile the boards, the better pressure
there is on the lower boards. Place roong of plastic,
metal sheeting or masonite over the top to provide
protection from rain, but leave the sides open. Put a
weight of some sort on the roof to put pressure on
the top planks.
If the wood is to be used for ne joinery, it should
be stored in a heated room for another 3-4 weeks
(longer for thicker dimensions) or be dried in a wood
drying kiln for a perfect result.
It is possible to use undried wood in some
constructions, but it must be kept in mind that the
width and height will shrink 5%. Wood also shrinks
around 0.3% in length, but this can usually be
disregarded. In order to avoid rot, you should not
enclose undried wood in a way that makes it hard
for air to circulate. One further tip: Do not drive two
nails next to each other as the board will probably
crack in the middle when it dries out. Drive one nail
and wait with the second until the wood has dried.
One example of where you should use undried
wood is when building log structures. In such a
situation, a heavy wall is a plus, as is the possibility
that the logs still can be shaped when they are
pressed against each other.
LOGOSOL also has electric
wood drying kilns for
preparation of ne joinery
timber.
MATERIAL DRYING
Page 32

32
LOGOSOL
Fiskaregatan 2, 871 33 Härnösand, Sweden
+46 611-182 85 | [email protected]
www.logosol.com
Declaration of conformity
In accordance with Directive 2006/42/EG, Annex 2A
Logosol AB
Fiskaregatan 2
871 33 Härnösand, Sweden
herewith declares that the Logosol Big Mill
(SKU: 5000-000-0001)
has been manufactured in conformity with:
The Machinery Directive 2006/42/EG
The EMC Dierctive 2004/108/EU
and has been manufactured in conformity with the
following harmonized standards:
EN ISO 12100:2010
EN 60204-1:2006
EN 50370-1, -2.
Notied body, 0404, RISE SMP Swedish Machinery Testing
Institute AB, Box 7035, 750 07 Uppsala, Sweden, has
executed EC type-examination according to Directive
2006/42/EG, article 12, paragraph 3b. The EC type
examination certicate has the number: 0404/17/2408
The delivered chain sawmill corresponds to the sawmill
that was subject to EC type-examination.
Mattias Byström, Product Manager, is responsible for
the technical les.
Härnösand, Sweden, 2018-06-01
Malte Frisk, CEO
 Loading...