

Page 1
WELL PLATE IMAGING
QUICK START GUIDE
VC1811-02
© 2018 Logos Biosystems, Inc. All Rights Reserved.
Logos Biosystems |www.logosbio.com
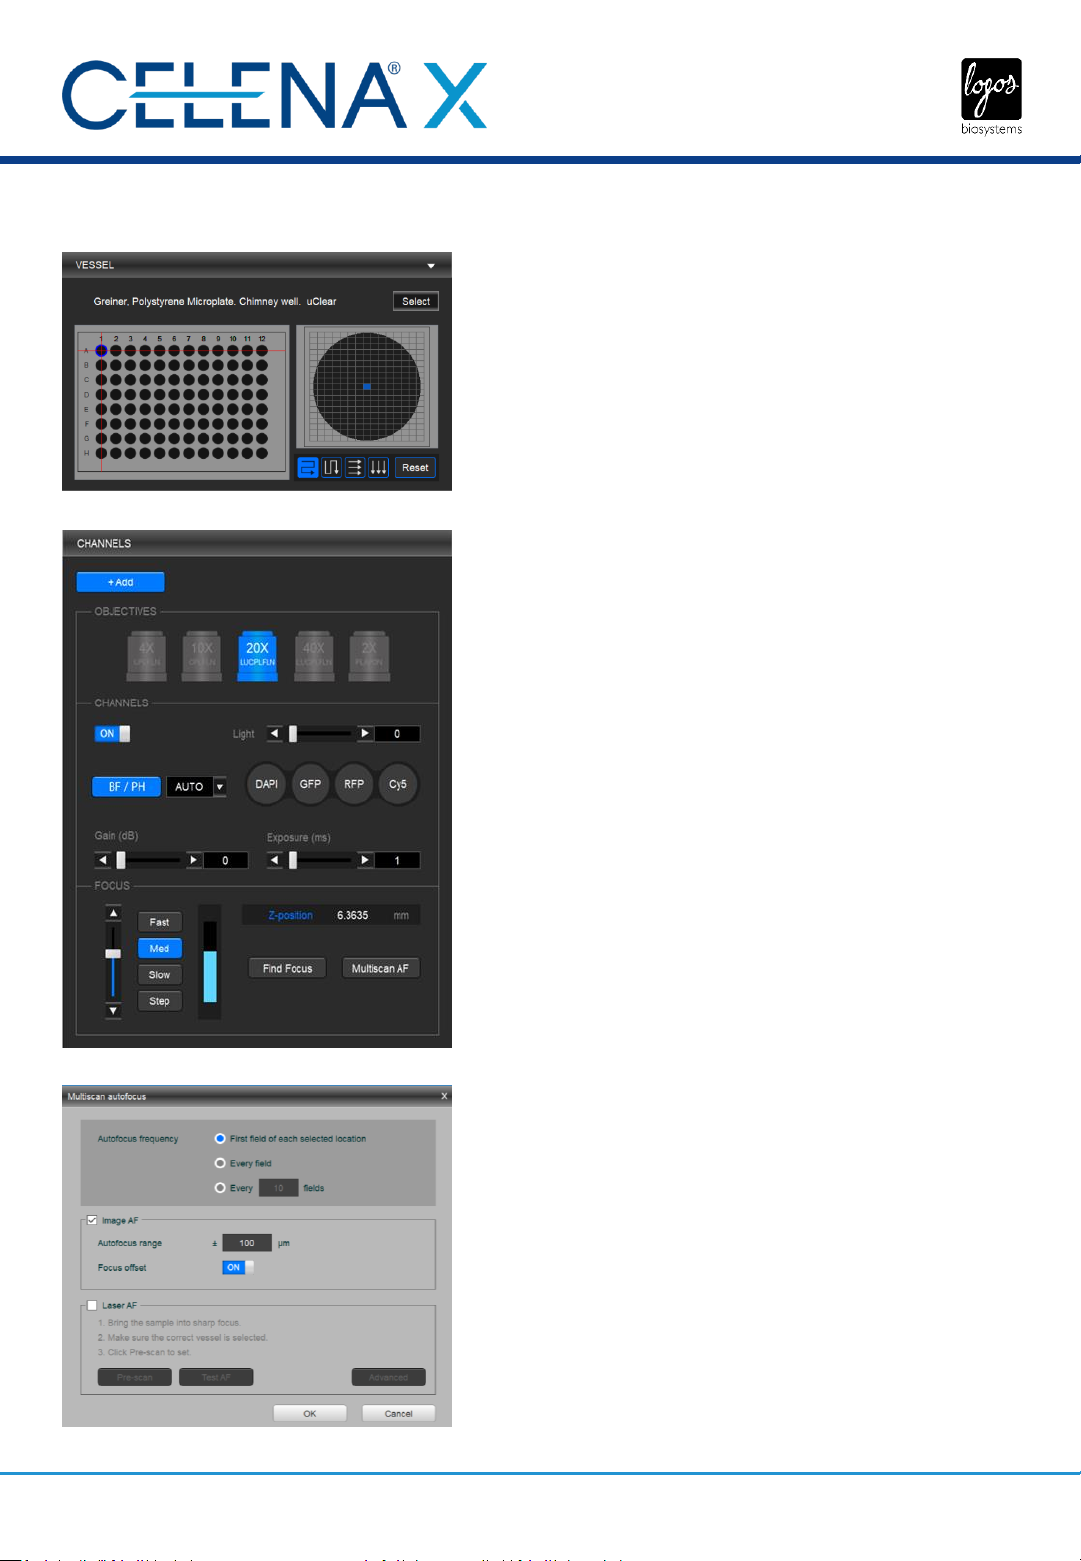
1. Select a vessel.
In the VESSEL panel, click Select to bring up the vessel selection
window and select a vessel.
2. Select an objective.
In the CHANNELS panel, click the desired objective to select the
corresponding magnification.
IMPORTANT! If using an objective with a correction collar, adjust the
correction collar as necessary according to the bottom
thickness of the selected vessel.
3. Set up the channels.
In the CHANNELS panel, set up channels as needed.
CAUTION! The CELENA® X uses Class 3B ultraviolet LEDs that are in
accordance with IEC/EN 60825-1. Make the door is closed
when imaging.
IMPORTANT! Minimize the time that the sample is being exposed to
light to prevent photobleaching and/or phototoxicity.
Select a channel. Click the desired channel and adjust the
condenser’s iris diaphragm.
└ For brightfield imaging, click BF/PH for transmitted light and
adjust the iris diaphragm as desired.
└ For fluorescence imaging, click the desired fluorescence
channel.
Adjust light intensity. Move the slider in the desired direction or
enter the desired value in the text box.
Adjust camera gain and exposure. Move the slider in the desired
direction or enter the desired value in the text box.
QUICK TIP When searching for a sample, increase gain and decrease
exposure for a faster frame rate. For imaging, decrease gain
and increase exposure to reduce background noise.
Focus sharply. Move the focus slider in the desired direction or enter
the desired value in the Z-position box. Alternatively, click Find Focus
to have the CELENA® X find the optimal focal plane.
Set the range to scan from the current focal position.
NOTE The speed of the image-based autofocus is entirely
dependent on the set exposure. Reducing the exposure to
< 10 ms will increase focusing speed.
Set up Multiscan AF. Make sure the current field is focused sharply
before proceeding. Click Multiscan AF. Select how often to autofocus
during an automated scan. Select whether to use the image-based or
laser autofocus.
└ Image-based: Set the range to scan from the current focal
position. Turn the user-defined focus offset on or off.
└ Laser AF: Click Pre-Scan to configure the laser autofocus
settings. Click Test AF to test the accuracy of the autofocus.
Laser AF cannot be used with magnifications below 10X.
NOTE When using this feature for imaging in multiple channels,
Multiscan AF must be set for each channel. This is especially
important when the fluorescent markers in different
channels are in different focal planes.
Add to the project protocol. Click Add.
Repeat for all necessary channels.
This Quick Start Guide provides instructions for well plate imaging with the CELENA® X High Content Imaging System.
For detailed instructions, refer to the user manual in the supplied USB drive.
VESSEL panel
CHANNELS panel
Multiscan autofocus window
Page 2
WELL PLATE IMAGING
QUICK START GUIDE
VC1811-02
© 2018 Logos Biosystems, Inc. All Rights Reserved.
Logos Biosystems |www.logosbio.com
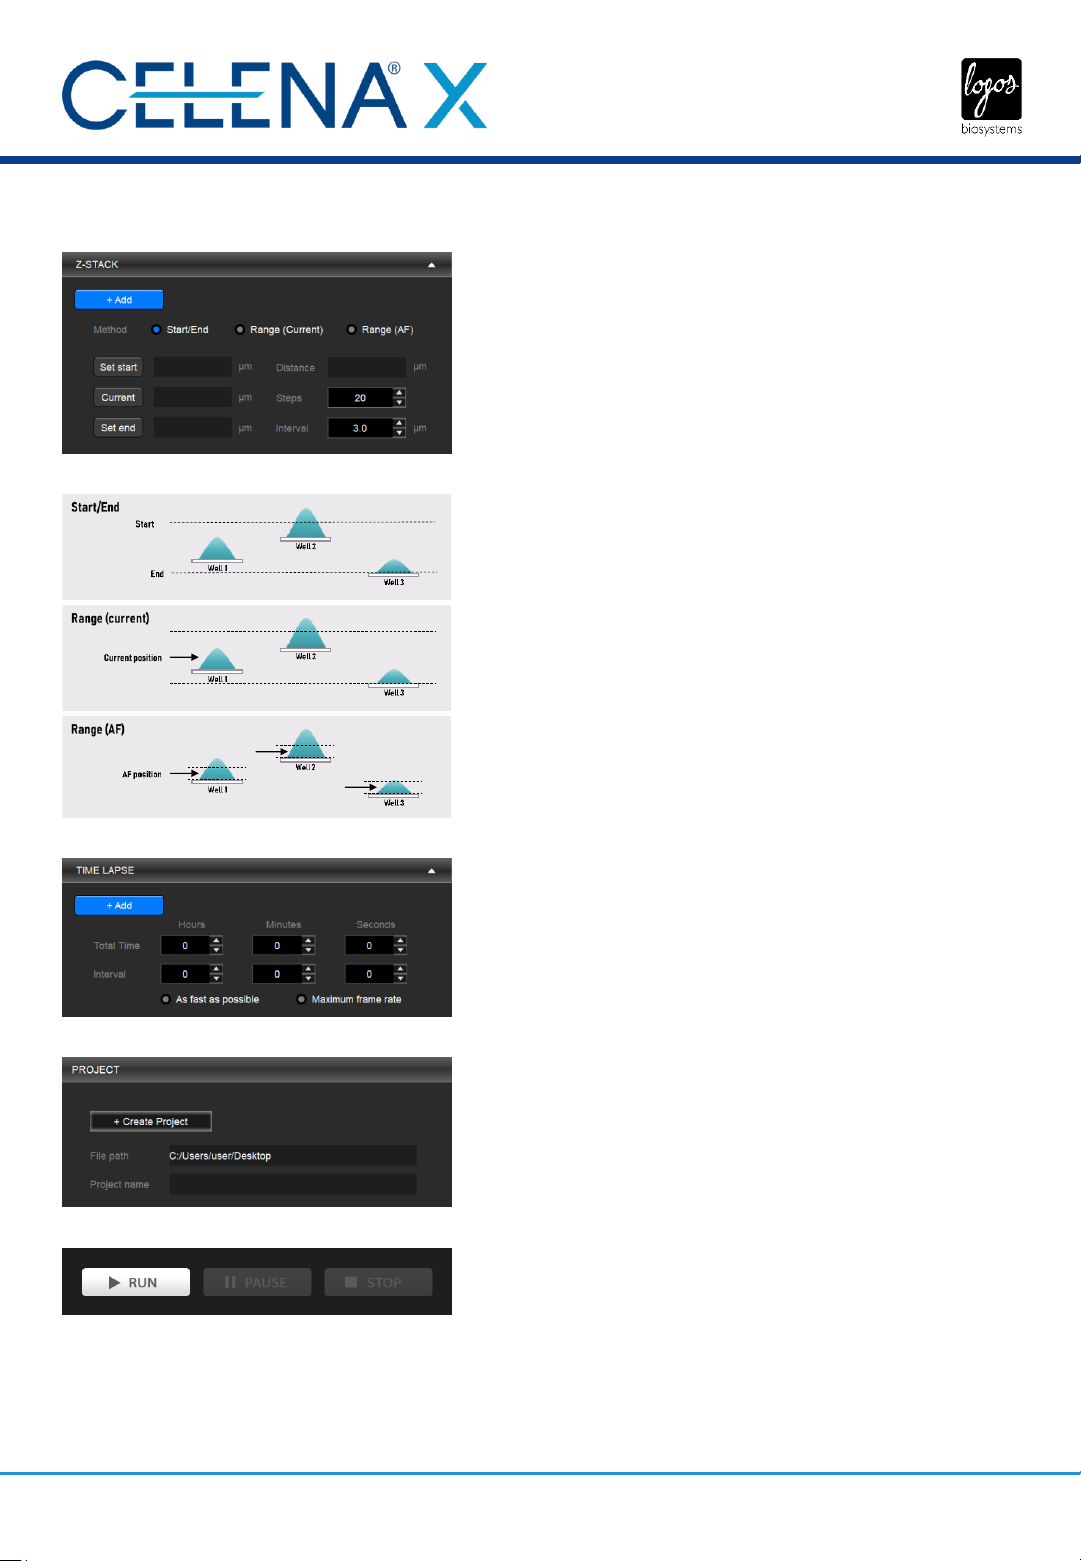
4. Select areas and fields to be captured.
In the VESSEL panel, select the well(s) to image in the vessel map by
clicking individual wells or dragging and dropping to select multiple
wells. Select the field(s) to image in the well map by clicking
individual fields or dragging and dropping to select multiple fields.
5. (Optional) Set up Z-stack imaging.
In the Z-STACK panel, select a Z-stack method and set appropriately.
└ Start/End: Move the focal plane to the desired start Z-position
and click Set Start. Move the focal plane to the desired end Zposition and click Set End. Select to capture images at specific
intervals (µm) or to capture a specific amount of images (steps)
and enter the desired value.
└ Range (current): Move the to the desired start position. To set
the imaging range, enter how far above (+) and below (-) the
current position to set the imaging range. Select to capture
images at specific intervals (µm) or to capture a specific
amount of images (steps) and enter the desired value.
└ Range (AF): Make sure Multiscan AF has been set. To set the
imaging range, enter how far above (+) and below (-) the
autofocused position. Select to capture images at specific
intervals (µm) or to capture a specific amount of images (steps)
and enter the desired value.
Click Add.
6. (Optional) Set up time lapse imaging.
In the TIME LAPSE panel, set the total imaging time and interval.
IMPORTANT! Set up time lapse imaging last so that the CELENA® X can
account for the other imaging options you have set, which
affect the time required to capture one image.
Click Add.
7. Create a project.
In the PROJECT panel, click Create Project. Name the project and
designate where to save the project folder.
IMPORTANT! Save projects on the computer from which you are running
Explorer. Do not save the project to an external hard drive
or a USB drive as this can affect imaging time.
8. Run the project.
Once a protocol has been set and project has been created, click RUN
at the bottom of the PROJECT panel.
IMPORTANT! Make sure the CELENA® X door is closed for fluorescence
imaging applications to block ambient light and improve
fluorescence image quality.
To pause a running project, click PAUSE.
To stop a running project, click STOP.
This Quick Start Guide provides instructions for well plate imaging with the CELENA® X High Content Imaging System.
For detailed instructions, refer to the user manual in the supplied USB drive.
PROJECT panel
Project control buttons
Z-STACK panel
TIME LAPSE panel
Z-STACK methods
 Loading...