

Page 1

FLIGHT MULTI PANEL
Professional Autopilot Cockpit Simulation Controller
专用自动导航驾驶舱模拟控制器
USER GUIDE | 用户指南
logitechG.com
Page 2
Page 3

4 ENGLISH
9 简体中文
3
Page 4
INTRODUCTION
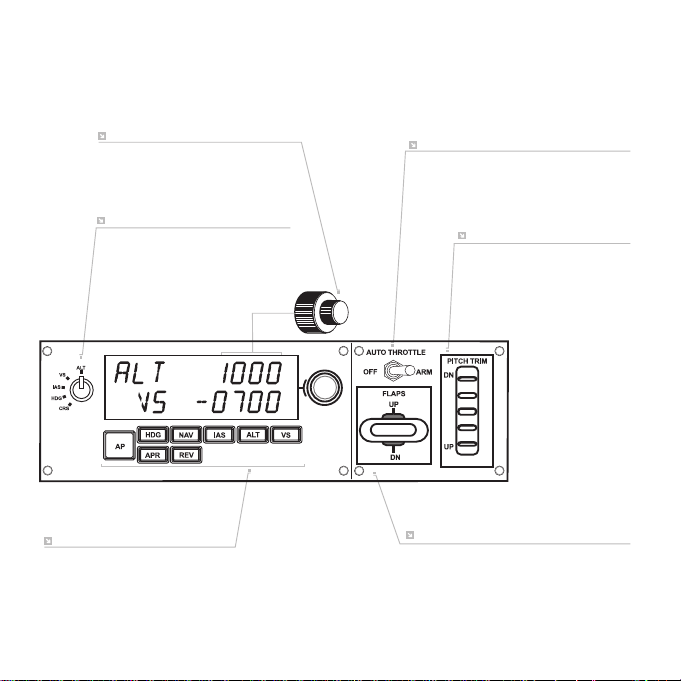
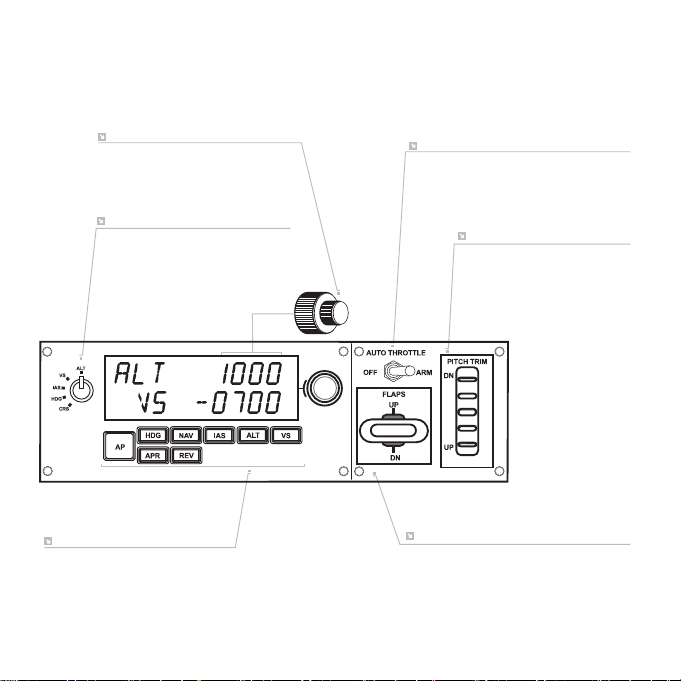
The Multi Panel interacts with Microsoft Flight Simulator X to control
a range of functions, including auto pilot settings, aps and trim controls.
SETTINGS ADJUSTMENT WHEEL
AUTOPILOT SETTINGS SELECTOR
AUTOPILOT FUNCTIONS
BUTTONS
4 English
AUTO THROTTLE ARM
PITCH TRIM
ROTARY CONTROL
FLAPS RETRACT (UP)
OR EXTEND (DOWN)
Page 5
INSTALLATION
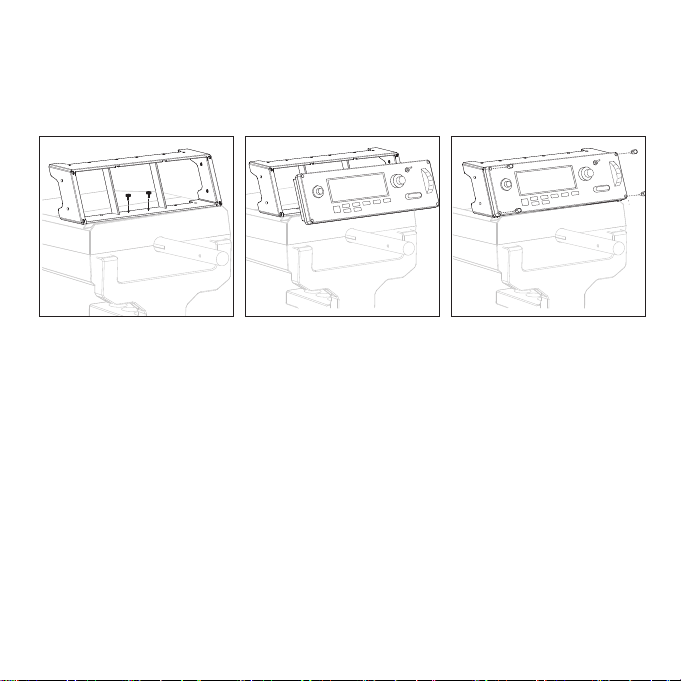
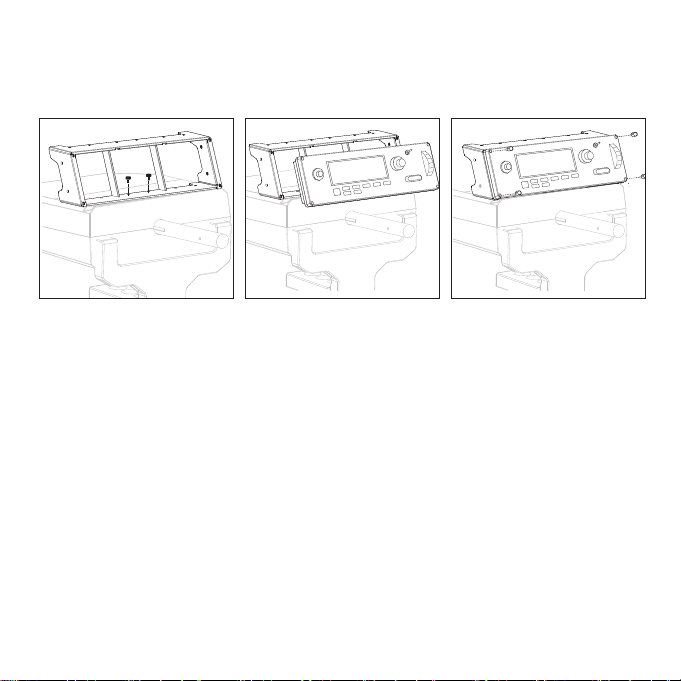
Fix the Multi Panel to the supplied mounting bracket. Insert the screws through
the holes at the corners of the Panel into the bracket behind and tighten.
If you already own a Logitech G Flight Yoke System, you can mount the Panel
and bracket on top of the Yoke unit using the screws provided.
1
2
3
INSTALLATION FOR WINDOWS® 10, WINDOWS® 8.1
AND WINDOWS® 7
DRIVER INSTALLATION
1 Visit logitech.com/support/multi-panel to download the latest drivers and software
for your operating system.
2 With device disconnected, follow the onscreen instructions to complete the
installation.
3 At the Driver Setup screen, only when prompted, insert USB cable into one of
your computer’s USB ports, then click Next.
5 English
Page 6
USING THE LOGITECH G FLIGHT MULTI PANEL
Button Autopilot function
AP Master switch to engage or disengage the autopilot
HDG Plane will y to selected compass heading
NAV Plane will y to selected NAV1 frequency or GPS
IAS Plane will y at selected indicated airspeed
ALT Plane will y to and maintain selected altitude
VS Plane will climb or descend at selected vertical speed
APR Plane will y on approach to runway localizer
REV Plane will y on a back course from the localizer
6 English
Page 7

ADJUSTING AUTOPILOT SETTINGS
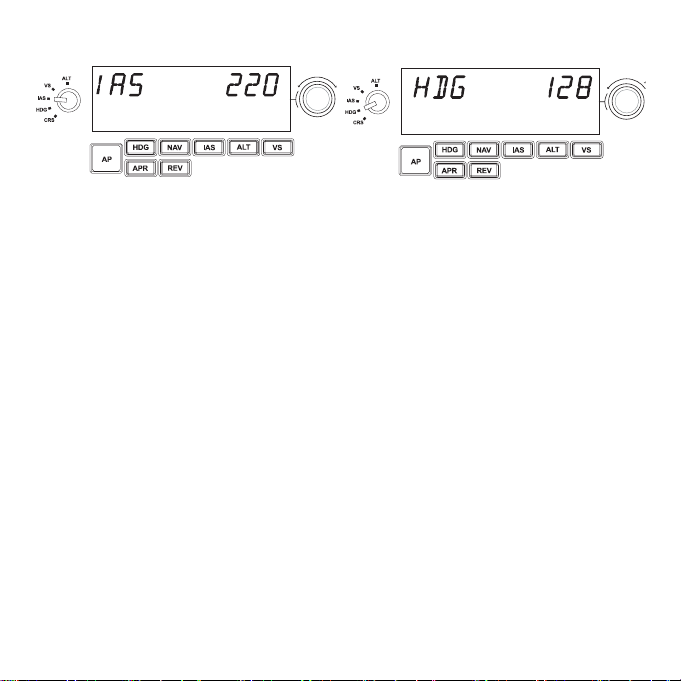
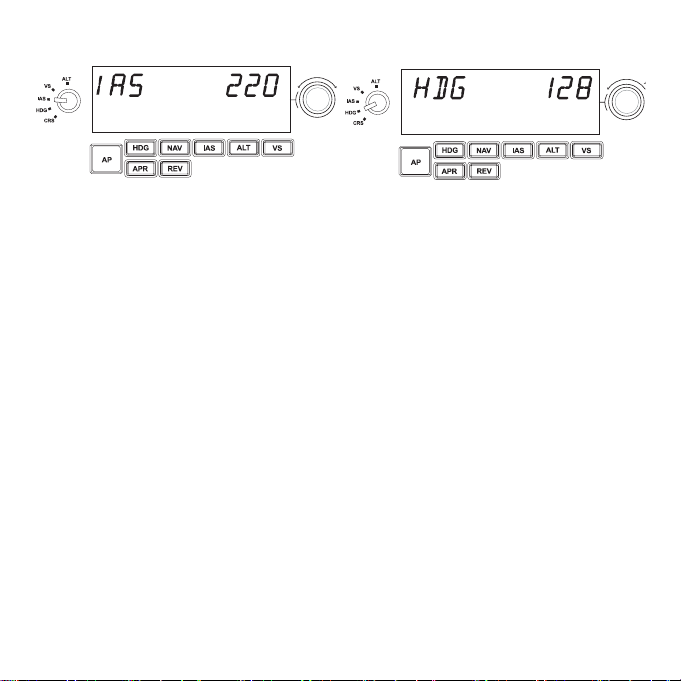
To change the values of the autopilot settings, rst turn the selector switch on the left
side of the Multi Panel to the function you want to adjust. Turn the rotary control
to the right of the LED display to increase or decrease the values for the function
you have selected.
For example, if you want to adjust the altitude setting, rst turn the selector switch
on the left to ALT and then increase or decrease the desired altitude setting using
the rotary controls on the right.
To engage any of the autopilot functions, rst select the function, e.g., HDG, NAV,
etc., and then press the autopilot master switch.
It is possible to use each of the autopilot functions individually but more common
to use a combination of functions. For example, if you wanted to y at 20,000 feet at
a speed of 150 knots on a heading of 210 degrees, rst select the ALT function with the
selector knob on the left and adjust altitude to 20,000 with the right rotary controls.
Next, turn the function selector knob to IAS and adjust speed to 150. Now turn
the function selector to HDG and adjust heading to 210. To engage the altitude,
speed and heading functions, rst switch the autothrottle to “Arm” (this allows
the autopilot to control the engines to maintain speed), then press the HDG, IAS and
ALT buttons under the LED screen and press the AP button to engage the autopilot.
Your plane should now climb or descend to 20,000 feet, turn to heading 210 degrees
and maintain a speed of 150 knots.
Please note: Not all aircraft available in Microsoft FSX have the full range of autopilot
functions. For instance, the Cessna C172SP Skyhawk and many of the smaller aircraft
do not have an autothrottle arm control - using this function on the multi Multi Panel
will have no eect on the aircraft’s autopilot.
7 English
Page 8

TROUBLESHOOTING
Once you have installed the appropriate plug-in for Flight Simulator X (FSX), the next
time you run FSX it will prompt you that it is attempting to load the Logitech G
Panel(s) Plug-in for FSX - click Yes on this screen.
After that you should see a Windows security warning asking you if you want to run
LogiFlightSimX.exe - click Yes on that screen.
Finally, FSX will prompt you if you wish to make LogiFlightSimX.exe a trusted piece
of software - click Yes.
Once you have installed the Panel software, the Panel buttons and controls should
be automatically congured to control their functions in FSX software. If your FSX
software does not recognise the Panel, unplug the USB cable and plug it back in.
For further help with other sims or any other questions, check the support page
at logitech.com/support/multi-panel.
TECHNICAL SUPPORT
Online Support: support.logitech.com
8 English
Page 9
简介
多功能面板 可与 Microsoft Flight Simulator X 搭配,
控制一系列功能,包括自动导航设置、襟翼和配平控制。
设置调整轮
自动导航设置传感器
自动导航功能按钮
9 简体中文
自动导航 装备
俯仰配平旋转控制
襟 翼 收 回( 上 )
或 伸 出( 下 )
Page 10
安装
将多功能面板固定到提供的安装托架上。 在面板四角的孔中穿入螺丝,固定到后面的
托架上。 如果已拥有罗技 G 飞行控制器系统,还可通过随附的螺丝将面板与托架一并安
装到飞行控制器上面。
1
2
3
WINDOWS® 10、WINDOWS® 8.1 和 WINDOWS® 7
的安装
驱动程序安装
1 访问 logitech.com/support/multi-panel,下 载 面 向 您 操 作 系 统 的 最 新 驱 动 程 序
和软件。
2 在设备连接情况下,按屏幕说明完成安装。
3 在“驱动程序安装”画面中,只有在出现提示时,再 将 USB 线插入计算机 USB 端口,
然后单击下一步。
10 简体中文
Page 11
使用罗技 G 多功能飞行面板
按钮 自动导航 功能
AP 控制自动导航功能整体启用或停用的主开关
HDG 飞机按所选罗盘 航向飞行
NAV 飞机按所选的 NAV1 频率或 GPS 飞行
IAS 飞机以所选的指示空气速度飞行
ALT 飞机将飞到所选高度并维持此高度
VS 飞机以 选择的垂直速度 爬升或下降
APR 飞机以靠近跑道定位器的方式飞行
REV 飞机以远离跑道定位器的方式飞行
11 简体中文
Page 12

调整导航设置
要更改自动导航设置的值,先将多功能面板左侧的选择开关转到所要调整的功能。 转动
LED 屏幕右侧的旋转控制,增大或减小所选功能的值。
例如,如要调整高度设置,先将左侧的选择开关转到 ALT,然后通过右侧的旋转控制增大
或减小所需的高度设置。
要启用任何自动导航功能,都需要先选择 HDG、NAV 等的功能,然后再按下自动导航主
开关。
可以单独使用各个自动导航功能,但更常见的做法是使用一组功能。 例 如 ,如 要 在
20,000 英尺高度以 150 节速度朝 210 度飞行,首先用左侧选择旋钮选择 ALT 功 能 ,并 用
右侧旋转控制钮将高度调整到 20,000。
然后,将功能选择旋钮转到 IAS 并将速度调为 150。 至此,再将功能选择旋钮转到 HDG
并将航向调为 210。 要启用高度、速度和航向功能,首先将自动油门开关设为“装备”
(借此,发动机的控制将由自动导航将接管,以保持速度),然后按下 LED 屏下方的
HDG、IAS 和 ALT 按 钮 ,并 按 下 AP 按钮来启用自动导航。 您的飞机现在应爬升或下降到
20,000 英尺高度,转向到 210 度并维持 150 节速度。
请注 意: 并不是 Microsoft FSX 中的所有飞机都具有全部的自动导航功能。 例如,
Cessna C172SP Skyhawk 和许多较小的飞机没有自动油门装备控制 - 此 时 ,在 多 功 能 面 板
上使用此功能将不会在飞机上起到任何自动导航效果。
12 简体中文
Page 13

疑难解答
在已为 Flight Simulator X (FSX) 安装相应的插件后,下一次运行 FSX 时便会提示其正在
尝试加载 FSX 的罗技 G 面板插件 - 在此屏幕中单击“是”。
此 后 ,应 可 看 到 Windows 安全警告,询问您是否要运行 LogiFlightSimX.exe - 在此屏幕中
单击“是”。
最后,FSX 将询问您是否要将 LogiFlightSimX.exe 列为受信任的软件 - 单击“是”。
在已安装面板软件后,面板按钮与空间应自动配置,并可控制 FSX 软件中的相应功能。
如果您的 FSX 软件未识别本面板,拔出 USB 线并重新插入。
有关其他模拟装备的更多帮助,或有任何其他问题,请 查看支持页
面:logitech.com/support/multi-panel。
技术支持
在线支持:support.logitech.com
13 简体中文
Page 14
© 2017 Logitech. Logitech, Logi, 罗技 and other Logi tech mark s are owned by Logitech and may be registered.
Allother tra demark s are the property of their respective ow ners.
版权所有 © 2017 年罗技。罗技、Logi 和其他罗技商标均归罗技所有,并或已注册。所有其他商标均是其各自所
有者 的 财 产。
WEB-621-000922.003
 Loading...