

Page 1
Thank you!
!
!
1
Federal Communication Commission Interference Statement
This equipment has been tested and found to comply with the limits for a Class B digital
device, pursuant to Part 15 of the FCC Rules. These limits are designed to provide
reasonable protection against harmful interference in a residential installation. This
equipment generates, uses and can radiate radio frequency energy and, if not installed
and used in accordance with the instructions, may cause harmful interference to radio
communications. However, there is no guarantee that interference will not occur in a
particular installation. If this equipment does cause harmful interference to radio or
television reception, which can be determined by turning the equipment off and on, the
user is encouraged to try to correct the interference by one of the following measures:
- Reorient or relocate the receiving antenna.
- Increase the separation between the equipment and receiver.
- Connect the equipment into an outlet on a circuit different from that
to which the receiver is connected.
- Consult the dealer or an experienced radio/TV technician for help.
FCC Caution: Any changes or modifications not expressly approved by the party
responsible for compliance could void the user's authority to operate this equipment.
This device complies with Part 15 of the FCC Rules. Operation is subject to the following
two conditions: (1) This device may not cause harmful interference, and (2) this device
must accept any interference received, including interference that may cause undesired
operation.
Industry Canada Statement
This device complies with RSS-210 of the Industry Canada Rules. Operation is subject to
the following two conditions:
1) this device may not cause interference and
2) this device must accept any interference, including interference that may cause
undesired operation of the device.
M-RBY125
Cordless Mouse for
Notebooks
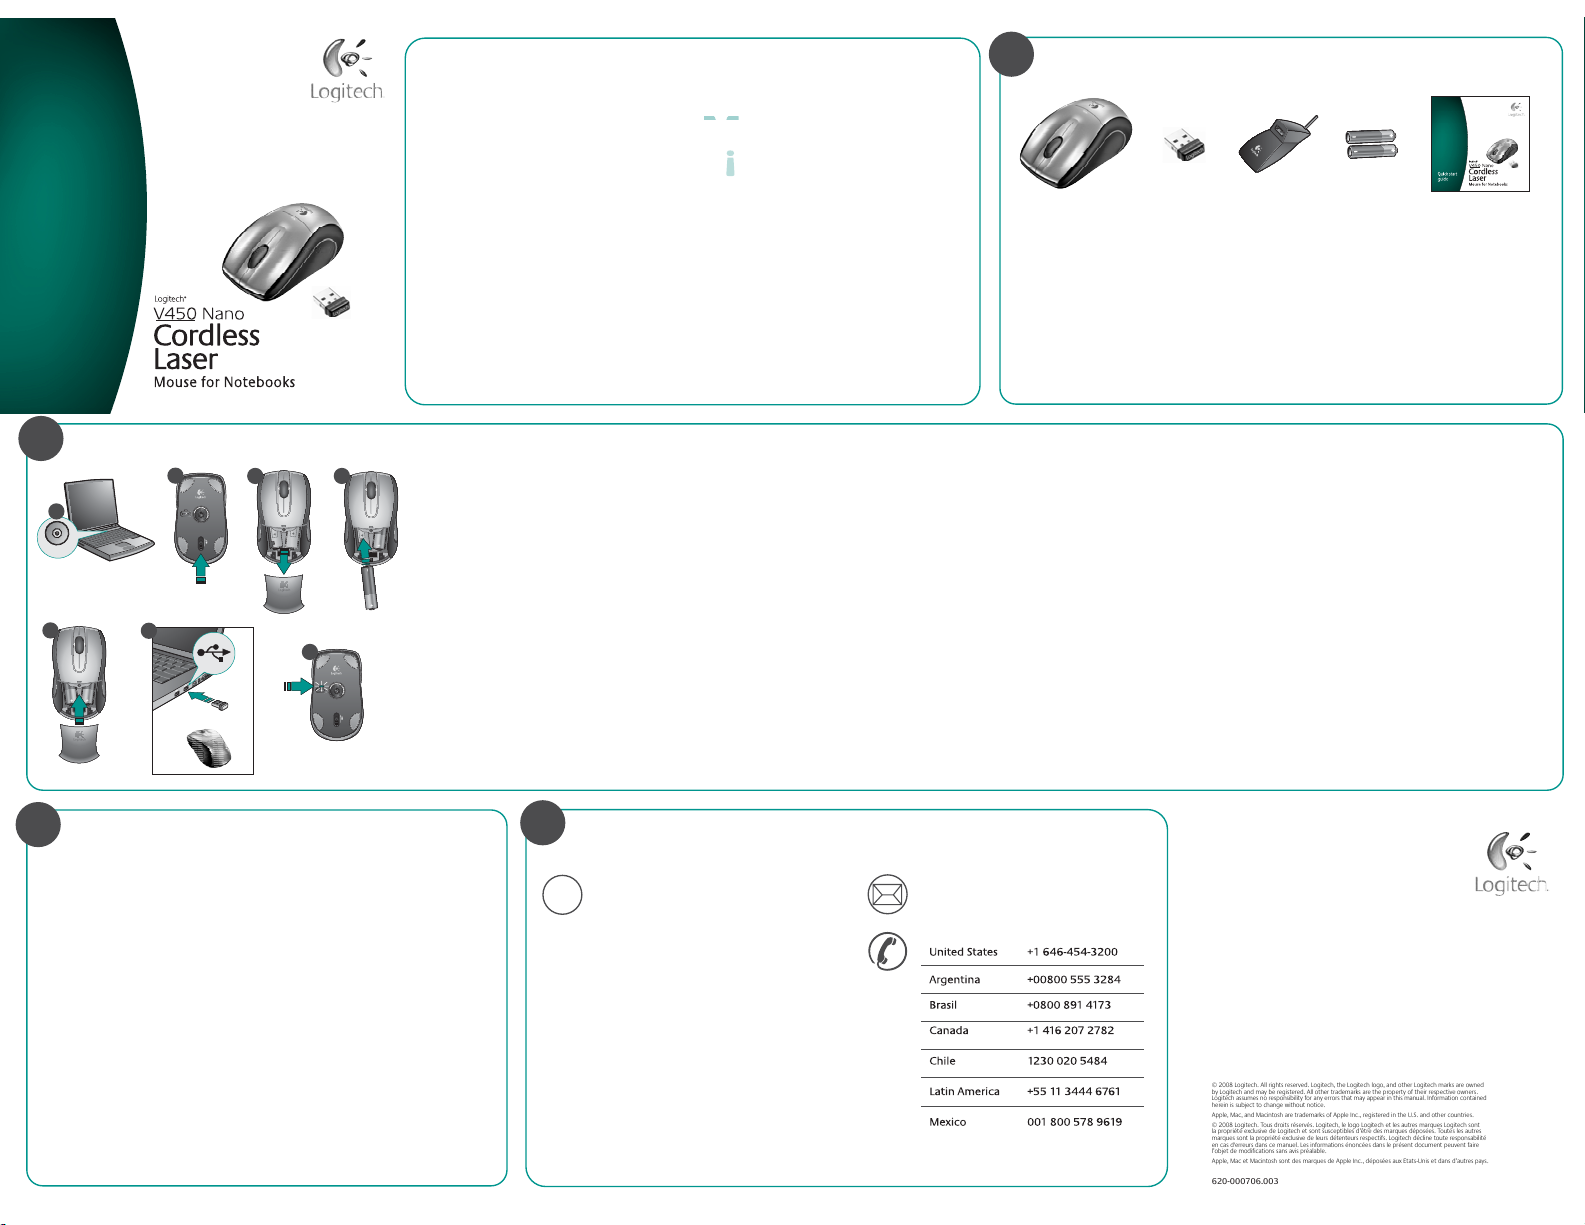
Package contents
Quick start
guide
Setting up the mouse
2
1
ON
5
Obrigado
English
Thank you for purchasing the Logitech
Cordless Laser Mouse for Notebooks. Follow the easy
steps in this guide to begin enjoying the features
of your new mouse.
Español
Le agradecemos la adquisición de Logitech® V450 Nano
Cordless Laser Mouse for Notebooks. El sencillo
procedimiento detallado en esta guía le permitirá
empezar a disfrutar de las funciones de su nuevo ratón.
English
Setting up the mouse
2
3
4
6
7
USB
1. Turn on the computer.
2. Slide the Release button on the bottom of the mouse
to release the battery door.
3. Remove the battery door.
4. Insert the two AA alkaline batteries in the mouse battery
compartment.
5. Replace the battery door.
6. Insert the USB Plug-and-Forget Nano-receiver into
a notebook USB port. So small, the USB Nano-receiver
can stay attached to your notebook permanently.
7. The green LED light on the mouse bottom should be on.
(If the green LED light is not on, go to the
Troubleshooting section for more information.)
Congratulations! You can now enjoy the basic functions of
your mouse, including the left- and right-mouse buttons,
up and down scrolling with the wheel, and the middle
mouse button (the wheel button). In Microsoft® Windows®,
the function assigned to the middle button depends
on the application you are using. In Macintosh® OS X,
the middle button typically does not have a function
unless the software is installed.
®
V450 Nano
Gracias
Français
Nous vous remercions d'avoir acheté la souris Logitech
V450 Nano Cordless Laser Mouse for Notebooks.
Suivez les étapes de ce guide pour commencer
à apprécier les fonctionnalités de votre nouvelle souris.
Português
Obrigado por ter adquirido o Rato Laser Sem Fios
Logitech® V450 Nano para Portáteis. Siga os passos
simples neste guia para começar a desfrutar das
funcionalidades do novo rato.
Español
Configuración del ratón
1. Encienda el ordenador.
2. Deslice el botón situado en la parte inferior del ratón
para abrir el compartimiento de las pilas.
3. Quite la tapa.
4. Coloque las dos pilas alcalinas AA en el compartimento.
5. Coloque la tapa en su sitio.
6. Conecte el nanorreceptor USB a un puerto USB del
portátil. El nanorreceptor es de tipo "conectar y olvidar",
tan pequeño que puede seguir conectado al portátil
permanentemente.
7. Debería iluminarse el diodo verde, en la parte inferior
del ratón. De no ser así, consulte la sección de
resolución de problemas.
¡Enhorabuena! Ya puede disfrutar de las funciones básicas
del ratón: con los botones izquierdo y derecho, el botón
rueda para desplazamiento vertical y dicho botón también
utilizable como botón central, mediante pulsación.
En Microsoft® Windows®, la función asignada al botón
central depende de la aplicación en uso. En Macintosh
OS X, el botón central no suele realizar ninguna función
a menos que se haya instalado el software.
®
1
English
Package contents
1. Mouse
2. USB Plug-and-Forget
Nano-receiver
3. Desktop USB extension
stand
4. Two AA alkaline batteries
5. Quick start guide
Français
Configuration de la souris
1. Mettez l'ordinateur sous tension.
2. Faites glisser le bouton d'ouverture situé sous la souris
pour ouvrir le clapet du compartiment à piles.
3. Otez le clapet du compartiment.
4. Insérez les deux piles alcalines de type AA dans
le compartiment.
5. Remettez le clapet en place.
6. Insérez le nano-récepteur USB ultra-discret dans l'un
des ports USB de l'ordinateur portable. Le nanorécepteur est si petit que vous pouvez le laisser relié
à l'ordinateur portable en permanence.
7. Le témoin vert situé sous la souris doit être illuminé.
Si ce n'est pas le cas, accédez à la section
de dépannage pour en savoir plus.
Félicitations! Vous pouvez maintenant profiter des
fonctions élémentaires de la souris, comme les boutons
gauche et droit, la roulette de défilement vertical et le
bouton central (bouton de la roulette). Sous Microsoft
®
Windows®, la fonction attribuée au bouton central dépend
de l'application en cours d'utilisation Sous Macintosh® OS X,
le bouton central ne possède généralement aucune
fonction, à moins que le logiciel ne soit installé.
Español
Esta caja contiene
1. Ratón
2. Nanorreceptor USB de
3. Base de extensión USB
4. Dos pilas alcalinas AA
5. Guía de inicio rápido
2
tipo "conectar y olvidar"
de sobremesa
®
3
Français
Contenu
1. Souris
2. Nano-récepteur USB
ultra-discret
3. Support d'extension USB
pour le bureau
4. Deux piles alcalines
de type AA
5. Guide de démarrage
rapide
Português
Configurar o rato
1. Ligue o computador.
2. Desloque o botão Release na parte inferior do rato
para libertar a porta do compartimento das pilhas.
3. Remova o compartimento das pilhas.
4. Introduza as duas pilhas alcalinas AA no compartimento
de pilhas do rato.
5. Volte a colocar a porta das pilhas.
6. Introduza o Nano-Receptor USB “Ligar e Esquecer”
numa porta USB do portátil. Devido à sua pequena
dimensão, o Nano-Receptor USB pode estar
permanentemente ligado ao portátil.
7. O LED verde na parte inferior do rato deve estar ligado.
(Se o LED verde não estiver ligado, consulte a secção
Resolução de Problemas para obter mais informações.)
Parabéns! Agora pode desfrutar das funções básicas
do rato, incluindo botões esquerdo e direito do rato,
deslocamento para cima e para baixo com a roda
e o botão central do rato (o botão da roda). No Microsoft
Windows®, a função atribuída ao botão central depende
da aplicação que estiver a usar. No SO Macintosh® X,
o botão central geralmente não tem uma função,
a menos que seja instalado o software.
4
Português
Conteúdo da embalagem
1. Rato
2. Nano-Receptor USB
“Ligar e Esquecer”
3. Suporte de secretária
de extensão USB
4. Duas pilhas AA alcalinas
5. Guia de iniciação rápida
5
®
Downloading the mouse software
3
English
Downloading the mouse software
For enhanced mouse features, including
Document Flip and side-to-side scrolling,
and for changing button assignments,
please download the free mouse software
at www.logitech.com/downloads.
After installing the mouse software, launch it
by double-clicking the keyboard-mouse logo in
the Windows® System Tray or the Logitech® logo
in Macintosh® System Preferences.
Español
Descarga de software del ratón
Si quiere utilizar funciones avanzadas del ratón
tales como la de cambio rápido de documentos
o desplazamiento horizontal, así como
para poder cambiar asignaciones de botones,
descargue el software de ratón gratuito
disponible en www.logitech.com/downloads.
Después de instalar el software de ratón, inícielo
haciendo doble clic en el logotipo de teclado/
ratón (situado en la bandeja del sistema
®
de Windows
) o el logotipo de Logitech
(en Preferencias del Sistema de Macintosh®).
Français
Téléchargement du logiciel de la souris
Pour bénéficier des fonctionnalités avancées
de la souris, notamment le défilement latéral et le
changement rapide de document, ainsi que pour
changer l'affectation des boutons, téléchargez
le logiciel pour souris gratuit, à partir de la page
www.logitech.com/downloads.
Après avoir installé le logiciel de la souris,
vous pouvez le lancer en cliquant deux fois sur
le logo clavier-souris dans la barre d'état système
sous Windows
les Préférences système sous Macintosh®.
Português
Transferir o software do rato
Para obter as funcionalidades avançadas
do rato, incluindo Rotação de Documentos
e deslocamento horizontal, e para alterar as
atribuições do botão, transfira o software do rato
gratuito em www.logitech.com/downloads.
Depois de instalar o software do rato,
inicie o software, fazendo duplo clique no
logótipo do teclado-rato no Tabuleiro de Sistema
do Windows
em Macintosh
®
ou sur le logo Logitech® dans
®
ou no logótipo da Logitech
®
System Preferences.
We’re here to help / Asistencia / Nous sommes là pour vous aider. / Estamos cá para o ajudar
+
WWW
www.logitech.com/support
English
FAQs
Troubleshooting
Downloads
Forums
Registration
Warranty information
Español
Preguntas más habituales
Resolución de problemas
Descargas
Foros
Registro
Información de garantía
Français
Questions fréquentes
Dépannage
Téléchargements
Forums
Inscription
Informations sur la garantie
Português
Perguntas Mais Frequentes
Resolução de problemas
Transferências
Fóruns
Registo
Informação da garantia
support@logitech.com
© 2008 Logitech. All rights reserved. Logitech, the Logitech logo, and other Logitech marks are owned
by Logitech and may be registered. All other trademarks are the property of their respective owners.
Logitech assumes no responsibility for any errors that may appear in this manual. Information contained
herein is subject to change without notice.
Apple, Mac, and Macintosh are trademarks of Apple Inc., registered in the U.S. and other countries.
© 2008 Logitech. Tous droits réservés. Logitech, le logo Logitech et les autres marques Logitech sont
la propriété exclusive de Logitech et sont susceptibles d’être des marques déposées. Toutes les autres
marques sont la propriété exclusive de leurs détenteurs respectifs. Logitech décline toute responsabilité
en cas d'erreurs dans ce manuel. Les informations énoncées dans le présent document peuvent faire
l’objet de modifications sans avis préalable.
Apple, Mac et Macintosh sont des marques de Apple Inc., déposées aux Etats-Unis et dans d’autres pays.
620-000706.003
 Loading...