

Page 1

FRONT
A50 - QSG (PS4)
PACKAGING
DATE
P/N REV
DIMENSIONS
FOLD SIZE
TRIM SIZE
A50 Mimas QSG (PS4)
181011
XXX Rev 001
457.2 x 609.6mm (W x H)
228.5 x 151.5mm
457.2 x 609.6mm (W x H)
Pantone Cool Gray 6
dieline - fold
(do not print)
WIRELESS
+ BASE STATIOn
quickstart guide
FOR PS4
MICROPHONE
DAN: MIKROFON
DEU: MIKROFON
ESP: MICRÓFONO
FRA: MICROPHONE
ITA: MICROFONO
NED: MICROFOON
NOR: MIKROFON
POL: MIKROFON
POR: MICROFONE
SUO: MIKROFONI
SVE: MIKROFON
DEU: MIKROFON
ESP: MICRÓFONO
FRA: MICROPHONE
ITA: MICROFONO
NED: MICROFOON
NOR: MIKROFON
POL: MIKROFON
POR: MICROFONE
SUO: MIKROFONI
SVE: MIKROFON
РУС: МИКРОФОН
한국어: 마이크로폰
日本語: マ イク
简化字:麦克风
CHARGE CONTACTS
DAN: OPLADNINGSKONTAKER
DEU: AUFLADEKONTAKTE
ESP: CONTACTOS DE CARGA
FRA: CONTACTS DE CHARGEMENT
ITA: CONTATTI PER CARICABATTERIE
NED: OPLAADCONTACTEN
NOR: LADEKONTAKTER
POL: WTYKI DOŁADOWYWANIA
POR: CONTACTOS DE CARGA
SUO: LATAUSKOSKETTIMET
SVE: LADDNINGSKONTAKTER
DEU: AUFLADEKONTAKTE
ESP: CONTACTOS DE CARGA
FRA: CONTACTS DE CHARGEMENT
ITA: CONTATTI PER CARICABATTERIE
NED: OPLAADCONTACTEN
NOR: LADEKONTAKTER
POL: WTYKI DOŁADOWYWANIA
POR: CONTACTOS DE CARGA
SUO: LATAUSKOSKETTIMET
SVE: LADDNINGSKONTAKTER
РУС: КОНТАКТЫ ДЛЯ ПОДЗАРЯДКИ
한국어: USB 충전 부위
日本語: 充電端子
简化字:充电接口
MIC UP: MUTE
DAN: MIKROFON OP: DÆMP LYD
DEU: MIKROFON OBEN: STUMMSCHALTEN
ESP: MICRÓFONO ARRIBA: SILENCIO
FRA: MICRO VERS LE HAUT : MUET
ITA: MICROFONO SU: SPENTO
NED: MICROFOON OMHOOG: GELUID DEMPEN
NOR: MIKROFON OPP : DEMPE
POL: MIKROFON GŁOŚNIEJ: WYCISZENIE
POR: MICROFONE LEVANTADO: SILENCIAR
SUO: MIKKI YLHÄÄLLÄ: MYKISTYS PÄÄLLÄ
SVE: MIKROFON UPP: MIKROFON AV
РУС: УВЕЛИЧЕНИЕ ГРОМКОСТИ
МИКРОФОНА: ОТКЛЮЧИТЬ ЗВУК
한국어: MIC UP: 음소거
日本語: マ イクアップ:ミュート
简化字:麦克风音量加大:静音
MIC DOWN: ON
DAN: MIC DOWN: TÆNDT
DEU: MIKROFON UNTEN: AN
ESP: MICRÓFONO ABAJO: ENCENDIDO
FRA: MICRO VERS LE BAS : ALLUMÉ
ITA: MICROFONO GIÙ: ACCESO
NED: MICROFOON OMLAAG: AAN
NOR: MIKROFON NED : PÅ
POL: MIKROFON CISZEJ: WŁ.
POR: MICROFONE BAIXO: LIGADO
SUO: MIKKI ALAS: MYKISTYS POIS PÄÄLTÄ
SVE: MIKROFON NER: PÅ
DEU: MIKROFON UNTEN: AN
ESP: MICRÓFONO ABAJO: ENCENDIDO
FRA: MICRO VERS LE BAS : ALLUMÉ
ITA: MICROFONO GIÙ: ACCESO
NED: MICROFOON OMLAAG: AAN
NOR: MIKROFON NED : PÅ
POL: MIKROFON CISZEJ: WŁ.
POR: MICROFONE BAIXO: LIGADO
SUO: MIKKI ALAS: MYKISTYS POIS PÄÄLTÄ
SVE: MIKROFON NER: PÅ
РУС: УМЕНЬШЕНИЕ ГРОМКОСТИ
МИКРОФОНА: ВКЛЮЧИТЬ
한국어: MIC DOWN: 켜짐
日本語: マ イ クダ ウ ン:オ ン
简化字:麦克风音量减小:打开
SWAPPABLE
EAR CUSHIONS
DAN: AFTAGELIGE ØREPUDER
DEU: ABNEHMBARE OHRENPOLSTER
ESP: ALMOHADILLAS PARA OREJAS REMOVIBLES
FRA: COUSSINETS AMOVIBLES
ITA: CUSCINETTI AURICOLARI RIMOVIBILI
NED: VERWIJDERBARE OORKUSSENS
NOR: UTSKIFTBARE ØREPUTER
POL: ODPINANE NAUSZNIKI
POR: ALMOFADAS DE OUVIDO REMOVÍVEIS
SUO: IRROTETTAVAT KUULOKEPEHMUSTEET
SVE: BORTTAGBARA ÖRONKUDDAR
РУС: ВЫКЛЮЧАТЕЛЬ ПИТАНИЯ
한국어: 착탈 가능 이어쿠션
日本語: 脱着可能な耳用クッション
简化字:可拆卸的耳垫
DOLBY ON / SOURCE AUDIO
DAN: DOLBY HEADPHONE TÆND/SLUK
DEU: DOLBY HEADPHONE EIN/AUS
ESP: ENCENDIDO/APAGADO DE DOLBY HEADPHONE
FRA: DOLBY HEADPHONE ON / OFF
ITA: ATTIVAZIONE/DISATTIVAZIONE DOLBY HEADPHONE
NED: DOLBY HEADPHONE AAN / UIT
NOR: DOLBY HEADPHONE PÅ / AV
POL: DOLBY HEADPHONE WŁ. / WYŁ.
POR: LIGAR / DESLIGAR DOLBY®
SUO: DOLBY HEADPHONE PÄÄLLÄ/POIS PÄÄLTÄ
SVE: DOLBY HEADPHONE PÅ/AV
РУС: DOLBY HEADPHONE ВКЛ./ ВЫКЛ.
한국어: DOLBY HEADPHONE 켜기 / 끄기
日本語: DOLBY HEADPHONEオン/ オフ
简化字:DOLBY HEADPHONE 打开/关闭
SWAPPABLE HEADBAND
DAN: AFTAGELIG HOVEDBØJLE
DEU: ABNEHMBARES KOPFBAND
ESP: BANDA PARA LA CABEZA REMOVIBLE
FRA: BANDEAU AMOVIBLE
ITA: ARCHETTO RIMOVIBILE
NED: VERWIJDERBARE HOOFDBAND
NOR: UTSKIFTBART HODEBÅND
POL: ODPINANY PAŁĄK NA GŁOWĘ
POR: FITA PARA CABEÇA REMOVÍVEL
SUO: IRROTETTAVA PANTA
SVE: BORTTAGBAR HUVUDBYGEL
DEU: ABNEHMBARES KOPFBAND
ESP: BANDA PARA LA CABEZA REMOVIBLE
FRA: BANDEAU AMOVIBLE
ITA: ARCHETTO RIMOVIBILE
NED: VERWIJDERBARE HOOFDBAND
NOR: UTSKIFTBART HODEBÅND
POL: ODPINANY PAŁĄK NA GŁOWĘ
POR: FITA PARA CABEÇA REMOVÍVEL
SUO: IRROTETTAVA PANTA
SVE: BORTTAGBAR HUVUDBYGEL
РУС: СЪЕМНАЯ ДУЖКА ДЛЯ НАУШНИКОВ
한국어: 착탈 가능 헤드밴드
日本語: 脱着可能なヘッドバンド
简化字:可拆卸的头带
POWER SWITCH
DAN: DOLBY HEADPHONE TÆND/SLUK
DEU: DOLBY HEADPHONE EIN/AUS
ESP: ENCENDIDO/APAGADO DE DOLBY HEADPHONE
FRA: DOLBY HEADPHONE ON / OFF
ITA: ATTIVAZIONE/DISATTIVAZIONE DOLBY HEADPHONE
NED: DOLBY HEADPHONE AAN / UIT
NOR: DOLBY HEADPHONE PÅ / AV
POL: DOLBY HEADPHONE WŁ. / WYŁ.
POR: LIGAR / DESLIGAR DOLBY®
SUO: DOLBY HEADPHONE PÄÄLLÄ/POIS PÄÄLTÄ
SVE: DOLBY HEADPHONE PÅ/AV
DEU: DOLBY HEADPHONE EIN/AUS
ESP: ENCENDIDO/APAGADO DE DOLBY HEADPHONE
FRA: DOLBY HEADPHONE ON / OFF
ITA: ATTIVAZIONE/DISATTIVAZIONE DOLBY HEADPHONE
NED: DOLBY HEADPHONE AAN / UIT
NOR: DOLBY HEADPHONE PÅ / AV
POL: DOLBY HEADPHONE WŁ. / WYŁ.
POR: LIGAR / DESLIGAR DOLBY®
SUO: DOLBY HEADPHONE PÄÄLLÄ/POIS PÄÄLTÄ
SVE: DOLBY HEADPHONE PÅ/AV
РУС: DOLBY HEADPHONE ВКЛ./ ВЫКЛ.
한국어: DOLBY HEADPHONE 켜기 / 끄기
日本語: DOLBY HEADPHONEオン/ オフ
简化字:DOLBY HEADPHONE 打开/关闭
USB CHARGE PORT
DAN: USB-OPLADNINGSPORT
DEU: USB AUFLADEN PORT
ESP: PUERTO DE CARGA USB
FRA: PORT D'ALIMENTATION USB
ITA: PORTA DI CARICA USB
NED: USB LADEN POORT
NOR: USB LADE-PORT
POL: USB PORT ŁADOWANIA
POR: USB CARREGAMENTO PORTA
SUO: USB-LATAUSPORTTI
SVE: USB-LADDNINGS PORT
DEU: USB AUFLADEN PORT
ESP: PUERTO DE CARGA USB
FRA: PORT D'ALIMENTATION USB
ITA: PORTA DI CARICA USB
NED: USB LADEN POORT
NOR: USB LADE-PORT
POL: USB PORT ŁADOWANIA
POR: USB CARREGAMENTO PORTA
SUO: USB-LATAUSPORTTI
SVE: USB-LADDNINGS PORT
РУС: USB ЗАРЯДКА ПОРТ
한국어: USB 충전포트
日本語: USB充電ポート
简化字:USB 充电端口
USB PLAY & CHARGE
PORT
DAN: USB-OPLADNINGSPORT
DEU: USB AUFLADEN PORT
ESP: PUERTO DE CARGA USB
FRA: PORT D'ALIMENTATION USB
ITA: PORTA DI CARICA USB
NED: USB LADEN POORT
NOR: USB LADE-PORT
POL: USB PORT ŁADOWANIA
POR: USB CARREGAMENTO PORTA
SUO: USB-LATAUSPORTTI
SVE: USB-LADDNINGS PORT
DEU: USB AUFLADEN PORT
ESP: PUERTO DE CARGA USB
FRA: PORT D'ALIMENTATION USB
ITA: PORTA DI CARICA USB
NED: USB LADEN POORT
NOR: USB LADE-PORT
POL: USB PORT ŁADOWANIA
POR: USB CARREGAMENTO PORTA
SUO: USB-LATAUSPORTTI
SVE: USB-LADDNINGS PORT
РУС: USB ЗАРЯДКА ПОРТ
한국어: USB 충전포트
日本語: USB充電ポート
简化字:USB 充电端口
BASE STATION
DAN: BASE STATION
DEU: BASISSTATION
ESP: ESTACIÓN BASE
FRA: STATION DE BASE
ITA: STAZIONE BASE
NED: BASISSTATION
NOR: BASESTASJON
POL: STACJA BAZOWA
POR: ESTAÇÃO BASE
SUO: TUKIASEMA
SVE: BASSTATION
DEU: BASISSTATION
ESP: ESTACIÓN BASE
FRA: STATION DE BASE
ITA: STAZIONE BASE
NED: BASISSTATION
NOR: BASESTASJON
POL: STACJA BAZOWA
POR: ESTAÇÃO BASE
SUO: TUKIASEMA
SVE: BASSTATION
РУС: БАЗОВАЯ СТАНЦИЯ
한국어: 베이스 스테이션
日本語: ベースステーション
简化字: 支架
VOLUME
DAN: LYDSTYRKE
DEU: LAUTSTÄRKE
ESP: VOLUMEN
FRA: VOLUME
ITA: VOLUME
NED: VOLUME
NOR: VOLUM
POL: GŁÓWNA
POR: VOLUME
SUO: VOIMAKKUUS
SVE: VOLYM
DEU: LAUTSTÄRKE
ESP: VOLUMEN
FRA: VOLUME
ITA: VOLUME
NED: VOLUME
NOR: VOLUM
POL: GŁÓWNA
POR: VOLUME
SUO: VOIMAKKUUS
SVE: VOLYM
РУС: ГРОМКОСТЬ
한국어: 마스터 볼륨
日本語: ボリューム
简化字:主音量
GAME / VOICE BALANCE
DAN: GAME : VOICE BALANCE
DEU: SPIEL:STIMME ABGLEICH
ESP: EQUILIBRIO JUEGO : VOZ
FRA: BALANCE JEU : VOIX
ITA: EQUILIBRIO GIOCO:VOCE
NED: GAME : SPRAAK BALANS
NOR: SPILL-:TALE-BALANSE
POL: BALANS GRY : GŁOSU
POR: JOGO :VOZ EQUILÍBRIO
SUO: PELI-:ÄÄNI-TASAPAINO
SVE: SPEL-:LJUD-BALANS
DEU: SPIEL:STIMME ABGLEICH
ESP: EQUILIBRIO JUEGO : VOZ
FRA: BALANCE JEU : VOIX
ITA: EQUILIBRIO GIOCO:VOCE
NED: GAME : SPRAAK BALANS
NOR: SPILL-:TALE-BALANSE
POL: BALANS GRY : GŁOSU
POR: JOGO :VOZ EQUILÍBRIO
SUO: PELI-:ÄÄNI-TASAPAINO
SVE: SPEL-:LJUD-BALANS
РУС: ИГРЫ : ГОЛОСА БАЛАНС
한국어: 게임 : 음성밸런스
日本語: ゲーム:音声バランス
简化字:游戏:语音平衡
EQ BUTTON
DAN: LYDTILSTAND VÆLG
DEU: AUDIO-MODUS AUSWÄHLEN
ESP: SELECCIÓN DE MODO DE AUDIO
FRA: SÉLECTION DU MODE SON
ITA: SELEZIONE MODALITÀ AUDIO
NED: AUDIO-MODUS SELECTEREN
NOR: LYDMODUS VELG
POL: WYBÓR TRYBU AUDIO
POR: SELEÇÃO DE MODO ÁUDIO
SUO: ÄÄITILAN VALINTA
SVE: LJUDLÄGE VÄLJ
DEU: AUDIO-MODUS AUSWÄHLEN
ESP: SELECCIÓN DE MODO DE AUDIO
FRA: SÉLECTION DU MODE SON
ITA: SELEZIONE MODALITÀ AUDIO
NED: AUDIO-MODUS SELECTEREN
NOR: LYDMODUS VELG
POL: WYBÓR TRYBU AUDIO
POR: SELEÇÃO DE MODO ÁUDIO
SUO: ÄÄITILAN VALINTA
SVE: LJUDLÄGE VÄLJ
РУС: РЕЖИМ ЗВУКА ВЫБРАТЬ
한국어: 오디오 모드선택
日本語: オーディオモードの選択
简化字:音频模式选择
MODE SWITCH
DAN: AUX IN/MIC OUT
DEU: AUX EIN/MIKROFON AUS
ESP: ENTRADA AUX/SALIDA DE MIC
FRA: ENTRÉE AUX/SORTIE MICRO
ITA: INGRESSO AUSILIARIO/USCITA
MICROFONO
NED: AUX-INGANG/MICROFOON-UITGANG
NOR: AUX INN/MIKROFON UT
POL: WEJŚCIE AUX/WYJŚCIE MIKROFONU
POR: ENTRADA AUX/SAÍDA MIC
SUO: AUX-SISÄÄNTULO / MIKROFONIN
ULOSTULO
SVE: AUX IN / MIKROFON UT
РУС: ВХОД AUX IN/ВЫХОД МИКРОФОНА
日本語: AUX入力/マイク 出 力
한국어: AUX IN/MIC OUT
简化字:AUX 输入/麦克风输出
OPTICAL IN PORT
DAN: OPTISK INDGANG FRA TV ELLER KONSOL
DEU: OPTISCHER EINGANG VON TV ODER KONSOLE
ESP: ENTRADA ÓPTICA DE LA TELEVISIÓN O CONSOLA
FRA: ENTRÉE OPTIQUE DE LA TV OU CONSOLE
ITA: INGRESSO OTTICO
NED: OPTISCH IN VAN TV OF CONSOLE
NOR: OPTISK INN FRA TV ELLER KONSOLL
POL: WEJŚCIE OPTYCZNE Z TELEWIZORA LUB KONSOLI
POR: ENTRADA ÓTICA DA TV OU CONSOLA
SUO: OPTINEN SISÄÄNTULO TV:STÄ TAI KONSOLISTA
SVE: OPTISK-INGÅNG FRÅN TV ELLER KONSOL
РУС: ОПТИЧЕСКИЙ ВХОД С ТВ ИЛИ С КОНСОЛИ
한국어: TV나 콘솔로부터 OPTICAL IN
日本語: テレビまたはコンソールからの光デジタル入力
简化字:从电视或游戏机光纤输入
OPTICAL OUT PORT
DAN: OPTICAL OUT PASSTHROUGH
DEU: OPTISCHE AUSGANGSDURCHLEITUNG
ESP: PASO DE SALIDA ÓPTICA
FRA: SORTIE OPTIQUE INTERMÉDIAIRE
ITA: USCITA OTTICA PASSANTE
NED: OPTISCH UIT-PASSTHROUGH
NOR: OPTISK UTGJENNOMGANG
POL: PRZELOTOWE WYJŚCIE OPTYCZNE
POR: PASSAGEM DE SAÍDA ÓTICA
SUO: OPTISEN ULOSTULON LÄPIKULKU
SVE: OPTISK-UTGÅNG GENOMSTRÖMNING
РУС: СКВОЗНОЙ РАЗЪЕМ ОПТИЧЕСКОГО ВЫХОДА
한국어: OPTICAL OUT 패스스루
日本語: 光デジタル出力パススルー
简化字:光纤输出传递
AUX IN / MIC OUT
DAN: AUX IN/MIC OUT
DEU: AUX EIN/MIKROFON AUS
ESP: ENTRADA AUX/SALIDA DE MIC
FRA: ENTRÉE AUX/SORTIE MICRO
ITA: INGRESSO AUSILIARIO/USCITA MICROFONO
NED: AUX-INGANG/MICROFOON-UITGANG
NOR: AUX INN/MIKROFON UT
POL: WEJŚCIE AUX/WYJŚCIE MIKROFONU
POR: ENTRADA AUX/SAÍDA MIC
SUO: AUX-SISÄÄNTULO / MIKROFONIN
ULOSTULO
SVE: AUX IN / MIKROFON UT
РУС: ВХОД AUX IN/ВЫХОД МИКРОФОНА
日本語: AUX入力/マイク 出 力
한국어: AUX IN/MIC OUT
简化字:AUX 输入/麦克风输出
USB POWER / AUDIO
(5.0V – 0.5A)
DAN: USB-LYD/STRØM
DEU: USB AUDIO/STROM
ESP: ENCENDIDO/AUDIO USB
FRA: USB AUDIO/ALIMENTATION
ITA: USB AUDIO/ALIMENTAZIONE
NED: USB-AUDIO/OPLADEN
NOR: USB LYD/STRØM
POL: USB AUDIO/ZASILANIE
POR: ENTRADA/ÁUDIO USB
SUO: USB-ÄÄNI/-VIRTA
SVE: USB LJUD / STRÖM
DEU: USB AUDIO/STROM
ESP: ENCENDIDO/AUDIO USB
FRA: USB AUDIO/ALIMENTATION
ITA: USB AUDIO/ALIMENTAZIONE
NED: USB-AUDIO/OPLADEN
NOR: USB LYD/STRØM
POL: USB AUDIO/ZASILANIE
POR: ENTRADA/ÁUDIO USB
SUO: USB-ÄÄNI/-VIRTA
SVE: USB LJUD / STRÖM
РУС: АУДИО/ПИТАНИЕ ЧЕРЕЗ USB-ПОРТ
한국어: USB 오디오/전원
日本語: USBオ ー ディオ /電源
简化字:USB 音频/电源
MAGNETIC
CHARGE DOCK
DAN: MAGNETIC CHARGE DOCK
DEU: MAGNETIC CHARGE DOCK
ESP: MAGNETIC CHARGE DOCK
FRA: MAGNETIC CHARGE DOCK
ITA: MAGNETIC CHARGE DOCK
NED: MAGNETIC CHARGE DOCK
NOR: MAGNETIC CHARGE DOCK
POL: MAGNETIC CHARGE DOCK
POR: MAGNETIC CHARGE DOCK
SUO: MAGNETIC CHARGE DOCK
SVE: MAGNETIC CHARGE DOCK
DAN: MAGNETIC CHARGE DOCK
DEU: MAGNETIC CHARGE DOCK
ESP: MAGNETIC CHARGE DOCK
FRA: MAGNETIC CHARGE DOCK
ITA: MAGNETIC CHARGE DOCK
NED: MAGNETIC CHARGE DOCK
NOR: MAGNETIC CHARGE DOCK
POL: MAGNETIC CHARGE DOCK
POR: MAGNETIC CHARGE DOCK
SUO: MAGNETIC CHARGE DOCK
РУС: MAGNETIC CHARGE DOCK
한국어: 광케이블
日本語: 光ケーブル
简化字: 光纤电缆
1.0M MICRO
USB CABLE
DAN: 1,0M USB MICRO-KABEL
DEU: 1,0M USB-MIKROKABEL
ESP: CABLE MICRO-USB 1.0M
FRA: CÂBLE MICRO-USB 1M
ITA: CAVO MICRO USB 1 M
NED: 1,0M MICRO USB-KABEL
NOR: 1,0M USB-MIKROKABEL
POL: KABEL MIKRO USB 1,0M
POR: CABO MICRO USB 1,0M
SUO: 1,0M USB MICRO -JOHTO
SVE: 1,0M USB MICRO-KABEL
DAN: 1,0M USB MICRO-KABEL
DEU: 1,0M USB-MIKROKABEL
ESP: CABLE MICRO-USB 1.0M
FRA: CÂBLE MICRO-USB 1M
ITA: CAVO MICRO USB 1 M
NED: 1,0M MICRO USB-KABEL
NOR: 1,0M USB-MIKROKABEL
POL: KABEL MIKRO USB 1,0M
POR: CABO MICRO USB 1,0M
SUO: 1,0M USB MICRO -JOHTO
РУС: ПОРТ ЗАРЯДКИ
한국어: 1.0M USB 마이크로 케이블
日本語: 1.0M USBマイクロケーブル
简化字: 1.0M USB 微电缆
USB 1,0M
1.0M TOSLINK
OPTICAL CABLE
DAN: 1,0M TOSLINK-OPTISK KABEL
DEU: 1,0M TOSLINK OPTISCHES KABEL
ESP: CABLE ÓPTICO TOSLINK 1.0M
FRA: CÂBLE OPTIQUE TOSLINK 1M
ITA: CAVO OTTICO TOSLINK 1 M
NED: 1,0M OPTISCHE TOSLINK-KABEL
NOR: 1,0M TOSLINK OPTISKE KABLER
POL: TOSLINK KABEL OPTYCZNY 1,0 M
POR: CABO ÓTICO TOSLINK 1,0M
SUO: 1,0M TOSLINK OPTINEN JOHTO
SVE: 1,0M TOSLINK OPTISK KABEL
DAN: 1,0M TOSLINK-OPTISK KABEL
DEU: 1,0M TOSLINK OPTISCHES KABEL
ESP: CABLE ÓPTICO TOSLINK 1.0M
FRA: CÂBLE OPTIQUE TOSLINK 1M
ITA: CAVO OTTICO TOSLINK 1 M
NED: 1,0M OPTISCHE TOSLINK-KABEL
NOR: 1,0M TOSLINK OPTISKE KABLER
POL: TOSLINK KABEL OPTYCZNY 1,0 M
POR: CABO ÓTICO TOSLINK 1,0M
SUO: 1,0M TOSLINK OPTINEN JOHTO
РУС: TOSLINK ОПТИЧЕСКИЙ КАБЕЛЬ 1,0M
한국어: 1.0M TOSLINK 광케이블
日本語: 1.0M TOSLINK 光ケーブル
简化字:1.0M TOSLINK 光纤电缆
Page 2
BACK
BASE STATION LED BEHAVIOR
MODE INDICATOR
PS4 Mode: White PS4
PC Mode: White PC
DAN: TILSTANDSINDIKATOR; KONSOLTILSTAND: RØD / PC-TILSTAND: HVID
DEU: MODUSANZEIGE; KONSOLENMODUS: ROT / PC-MODUS: WEIß
ESP: INDICADOR DE MODO; MODO CONSOLA: ROJO / MODO PC: BLANCO
FRA: INDICATEUR DE MODE; MODE CONSOLE : ROUGE / MODE PC : BLANC
ITA: INDICATORE DI MODALITÀ; MODALITÀ CONSOLE: ROSSO / MODALITÀ PC: BIANCO
NED: INDICATOR-MODUS; CONSOLE-MODUS: ROOD / PC-MODUS: WIT
NOR: MODUS-INDIKATOR; KONSOLLMODUS: RØD / PC-MODUS: HVIT
POL: WSKAŹNIK TRYBU; TRYB KONSOLI: CZERWONY/ TRYB PC: BIAŁY
POR: INDICADOR DE MODO; MODO DE CONSOLA: VERMELHO / MODO PC: BRANCO
SUO: TILAN MERKKIVALO; KONSOLITILA: PUNAINEN/ PC-TILA: VALKOINEN
SVE: LÄGESINDIKATOR; KONSOLLÄGE: RÖD / PC-LÄGE: VIT
DEU: MODUSANZEIGE; KONSOLENMODUS: ROT / PC-MODUS: WEIß
ESP: INDICADOR DE MODO; MODO CONSOLA: ROJO / MODO PC: BLANCO
FRA: INDICATEUR DE MODE; MODE CONSOLE : ROUGE / MODE PC : BLANC
ITA: INDICATORE DI MODALITÀ; MODALITÀ CONSOLE: ROSSO / MODALITÀ PC: BIANCO
NED: INDICATOR-MODUS; CONSOLE-MODUS: ROOD / PC-MODUS: WIT
NOR: MODUS-INDIKATOR; KONSOLLMODUS: RØD / PC-MODUS: HVIT
POL: WSKAŹNIK TRYBU; TRYB KONSOLI: CZERWONY/ TRYB PC: BIAŁY
POR: INDICADOR DE MODO; MODO DE CONSOLA: VERMELHO / MODO PC: BRANCO
SUO: TILAN MERKKIVALO; KONSOLITILA: PUNAINEN/ PC-TILA: VALKOINEN
SVE: LÄGESINDIKATOR ; KONSOLLÄGE: RÖD / PC-LÄGE: VIT
РУС: ИНДИКАТОР РЕЖИМА; ИНДИКАТОР КОНСОЛИ: КРАСНЫЙ / РЕЖИМ ПК: БЕЛЫЙ
한국어: 방식 표시 ; 콘솔 방식: 빨간색 / PC 방식: 흰색
日本語: モード表示;コンソールモード:赤/PCモ ード:白
简化字:稳定红色 ; 打开/全功率/USB 充电
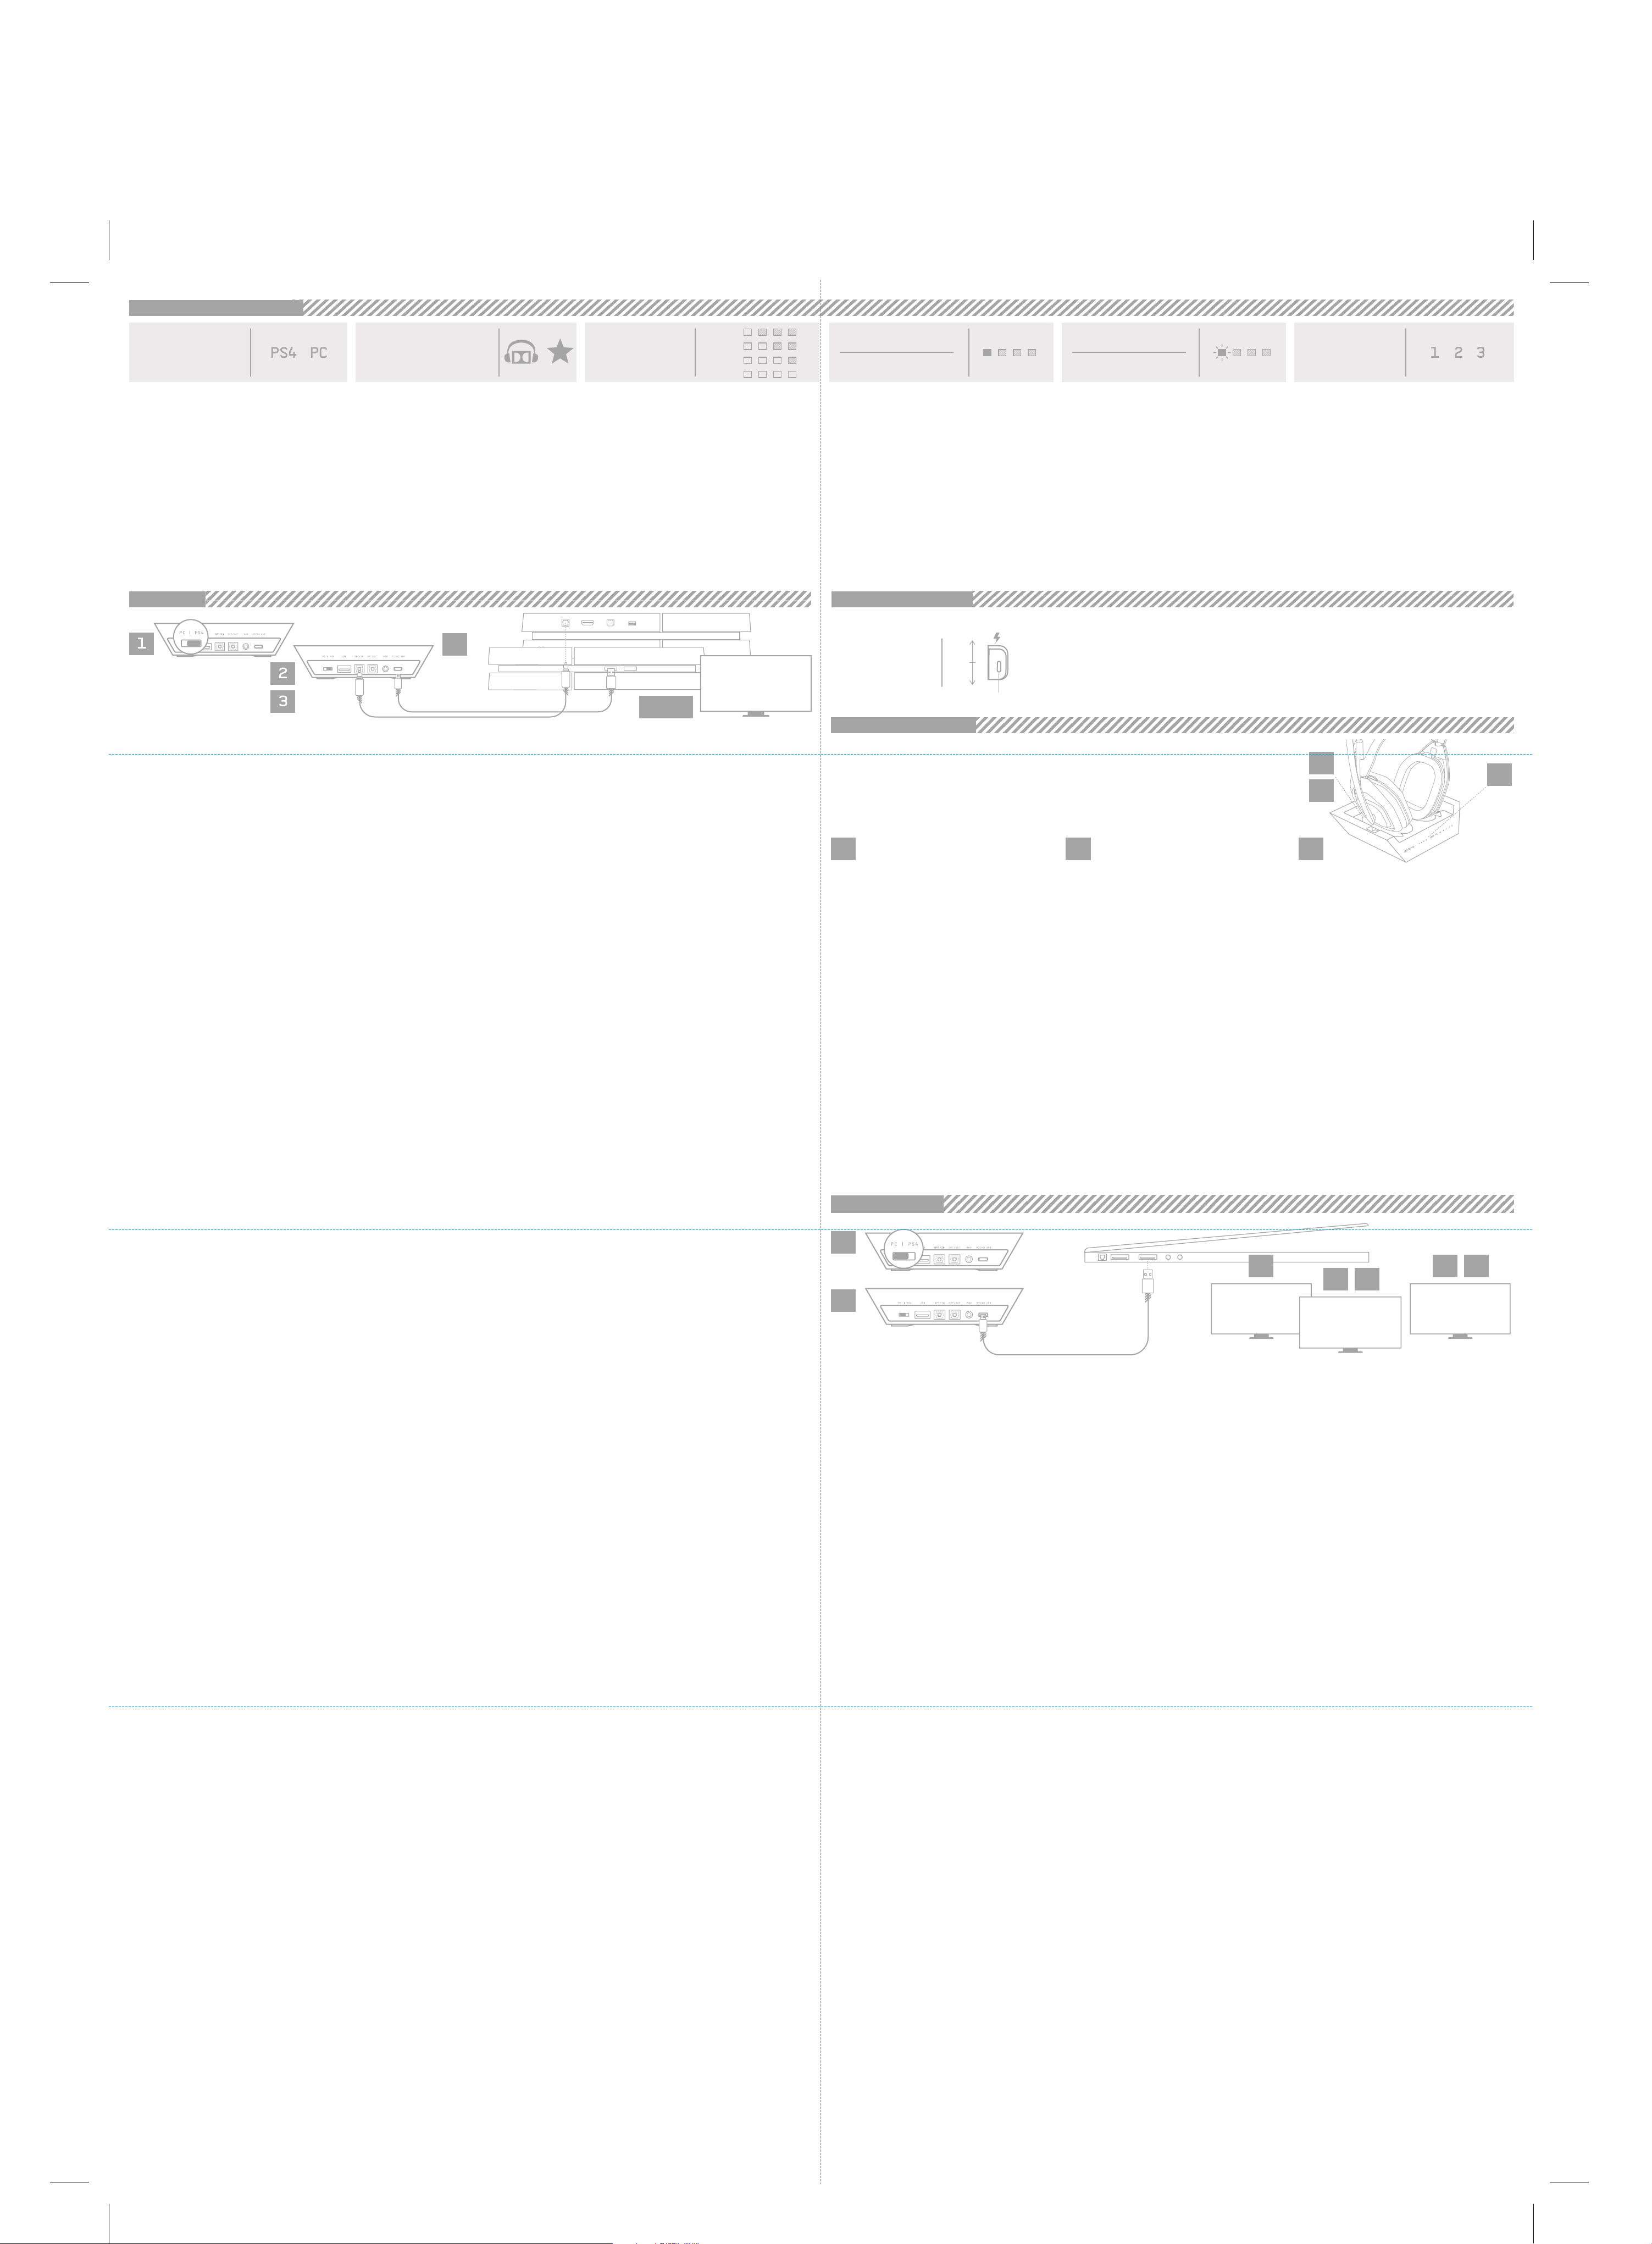
PS4 SETUP
ENG
1. Ensure the Mode Switch on the Base Station is set to PS4.
2. Plug Micro end of the Micro USB cable into the Base Station & the USB end into
the PlayStation 4.
3. Plug TOSLink Optical Cable into the PS4 Optical port & plug the other end into the
Optical In port on the the Base Station.
4. Your A50 Wireless Headset comes pre-paired to the Base Station. However, you
will need to charge your headset before use. To do so, use both hands to reseat the
headset into the Base Station.
5. Once the Base Station is connected to the PS4, the Base Station will detect
automatically as a USB device.
6. From the Dashboard, navigate to 'Settings’ then select ‘Devices' and select 'Audio
Devices.'
7. Ensure Input Device is set to USB Headset (Astro A50 Voice) and the Output
Device is set to the same.
8. Ensure the Output to Headphones is set to “Chat Audio.”
9. Navigate back to the Settings menu, then select “Sound and Screen.”
10. Navigate to Audio Output Settings, and ensure Primary Output Port is set to
Digital Out (Optical) and Audio Format (Priority) is set to Bitstream (Dolby).
11. Change the Input and Output Device to USB Headset (ASTRO Wireless
Transmitter).
12. To toggle to a new EQ preset, press the EQ Button until the desired preset is
selected.
13. That’s it! Your A50 Wireless Headset and PS4 are set up and ready to game!
DAN
1. Ensure the Mode Switch on the Base Station is set to PS4.
2. Plug Micro end of the Micro USB cable into the Base Station & the USB end into
the PlayStation 4.
3. Plug TOSLink Optical Cable into the PS4 Optical port & plug the other end into the
Optical In port on the the Base Station.
4. Your A50 Wireless Headset comes pre-paired to the Base Station. However, you
will need to charge your headset before use. To do so, use both hands to reseat the
headset into the Base Station.
5. Once the Base Station is connected to the PS4, the Base Station will detect
automatically as a USB device.
6. From the Dashboard, navigate to 'Settings’ then select ‘Devices' and select 'Audio
Devices.'
7. Ensure Input Device is set to USB Headset (Astro A50 Voice) and the Output
Device is set to the same.
8. Ensure the Output to Headphones is set to “Chat Audio.”
9. Navigate back to the Settings menu, then select “Sound and Screen.”
10. Navigate to Audio Output Settings, and ensure Primary Output Port is set to
Digital Out (Optical) and Audio Format (Priority) is set to Bitstream (Dolby).
11. Change the Input and Output Device to USB Headset (ASTRO Wireless
Transmitter).
12. To toggle to a new EQ preset, press the EQ Button until the desired preset is
selected.
13. That’s it! Your A50 Wireless Headset and PS4 are set up and ready to game!
DEU
1. Ensure the Mode Switch on the Base Station is set to PS4.
2. Plug Micro end of the Micro USB cable into the Base Station & the USB end into
the PlayStation 4.
3. Plug TOSLink Optical Cable into the PS4 Optical port & plug the other end into the
Optical In port on the the Base Station.
4. Your A50 Wireless Headset comes pre-paired to the Base Station. However, you
will need to charge your headset before use. To do so, use both hands to reseat the
headset into the Base Station.
5. Once the Base Station is connected to the PS4, the Base Station will detect
automatically as a USB device.
6. From the Dashboard, navigate to 'Settings’ then select ‘Devices' and select 'Audio
Devices.'
7. Ensure Input Device is set to USB Headset (Astro A50 Voice) and the Output
Device is set to the same.
8. Ensure the Output to Headphones is set to “Chat Audio.”
9. Navigate back to the Settings menu, then select “Sound and Screen.”
10. Navigate to Audio Output Settings, and ensure Primary Output Port is set to
Digital Out (Optical) and Audio Format (Priority) is set to Bitstream (Dolby).
11. Change the Input and Output Device to USB Headset (ASTRO Wireless
Transmitter).
12. To toggle to a new EQ preset, press the EQ Button until the desired preset is
selected.
13. That’s it! Your A50 Wireless Headset and PS4 are set up and ready to game!
ESP
1. Ensure the Mode Switch on the Base Station is set to PS4.
2. Plug Micro end of the Micro USB cable into the Base Station & the USB end into
the PlayStation 4.
3. Plug TOSLink Optical Cable into the PS4 Optical port & plug the other end into the
Optical In port on the the Base Station.
4. Your A50 Wireless Headset comes pre-paired to the Base Station. However, you
will need to charge your headset before use. To do so, use both hands to reseat the
headset into the Base Station.
5. Once the Base Station is connected to the PS4, the Base Station will detect
automatically as a USB device.
6. From the Dashboard, navigate to 'Settings’ then select ‘Devices' and select 'Audio
Devices.'
7. Ensure Input Device is set to USB Headset (Astro A50 Voice) and the Output
Device is set to the same.
8. Ensure the Output to Headphones is set to “Chat Audio.”
9. Navigate back to the Settings menu, then select “Sound and Screen.”
10. Navigate to Audio Output Settings, and ensure Primary Output Port is set to
Digital Out (Optical) and Audio Format (Priority) is set to Bitstream (Dolby).
11. Change the Input and Output Device to USB Headset (ASTRO Wireless
Transmitter).
12. To toggle to a new EQ preset, press the EQ Button until the desired preset is
selected.
13. That’s it! Your A50 Wireless Headset and PS4 are set up and ready to game!
FRA
1. Ensure the Mode Switch on the Base Station is set to PS4.
2. Plug Micro end of the Micro USB cable into the Base Station & the USB end into
the PlayStation 4.
3. Plug TOSLink Optical Cable into the PS4 Optical port & plug the other end into the
Optical In port on the the Base Station.
4. Your A50 Wireless Headset comes pre-paired to the Base Station. However, you
will need to charge your headset before use. To do so, use both hands to reseat the
headset into the Base Station.
5. Once the Base Station is connected to the PS4, the Base Station will detect
automatically as a USB device.
6. From the Dashboard, navigate to 'Settings’ then select ‘Devices' and select 'Audio
Devices.'
7. Ensure Input Device is set to USB Headset (Astro A50 Voice) and the Output
Device is set to the same.
8. Ensure the Output to Headphones is set to “Chat Audio.”
9. Navigate back to the Settings menu, then select “Sound and Screen.”
10. Navigate to Audio Output Settings, and ensure Primary Output Port is set to
Digital Out (Optical) and Audio Format (Priority) is set to Bitstream (Dolby).
11. Change the Input and Output Device to USB Headset (ASTRO Wireless
Transmitter).
12. To toggle to a new EQ preset, press the EQ Button until the desired preset is
selected.
13. That’s it! Your A50 Wireless Headset and PS4 are set up and ready to game!
ITA
1. Ensure the Mode Switch on the Base Station is set to PS4.
2. Plug Micro end of the Micro USB cable into the Base Station & the USB end into
the PlayStation 4.
3. Plug TOSLink Optical Cable into the PS4 Optical port & plug the other end into the
Optical In port on the the Base Station.
4. Your A50 Wireless Headset comes pre-paired to the Base Station. However, you
will need to charge your headset before use. To do so, use both hands to reseat the
headset into the Base Station.
5. Once the Base Station is connected to the PS4, the Base Station will detect
automatically as a USB device.
6. From the Dashboard, navigate to 'Settings’ then select ‘Devices' and select 'Audio
Devices.'
7. Ensure Input Device is set to USB Headset (Astro A50 Voice) and the Output
Device is set to the same.
8. Ensure the Output to Headphones is set to “Chat Audio.”
9. Navigate back to the Settings menu, then select “Sound and Screen.”
10. Navigate to Audio Output Settings, and ensure Primary Output Port is set to
Digital Out (Optical) and Audio Format (Priority) is set to Bitstream (Dolby).
11. Change the Input and Output Device to USB Headset (ASTRO Wireless
Transmitter).
12. To toggle to a new EQ preset, press the EQ Button until the desired preset is
selected.
13. That’s it! Your A50 Wireless Headset and PS4 are set up and ready to game!
NED
1. Ensure the Mode Switch on the Base Station is set to PS4.
2. Plug Micro end of the Micro USB cable into the Base Station & the USB end into
the PlayStation 4.
3. Plug TOSLink Optical Cable into the PS4 Optical port & plug the other end into the
Optical In port on the the Base Station.
4. Your A50 Wireless Headset comes pre-paired to the Base Station. However, you
will need to charge your headset before use. To do so, use both hands to reseat the
headset into the Base Station.
5. Once the Base Station is connected to the PS4, the Base Station will detect
automatically as a USB device.
6. From the Dashboard, navigate to 'Settings’ then select ‘Devices' and select 'Audio
Devices.'
7. Ensure Input Device is set to USB Headset (Astro A50 Voice) and the Output
Device is set to the same.
8. Ensure the Output to Headphones is set to “Chat Audio.”
9. Navigate back to the Settings menu, then select “Sound and Screen.”
10. Navigate to Audio Output Settings, and ensure Primary Output Port is set to
Digital Out (Optical) and Audio Format (Priority) is set to Bitstream (Dolby).
11. Change the Input and Output Device to USB Headset (ASTRO Wireless
Transmitter).
12. To toggle to a new EQ preset, press the EQ Button until the desired preset is
selected.
13. That’s it! Your A50 Wireless Headset and PS4 are set up and ready to game!
NOR
1. Ensure the Mode Switch on the Base Station is set to PS4.
2. Plug Micro end of the Micro USB cable into the Base Station & the USB end into
the PlayStation 4.
3. Plug TOSLink Optical Cable into the PS4 Optical port & plug the other end into the
Optical In port on the the Base Station.
4. Your A50 Wireless Headset comes pre-paired to the Base Station. However, you
will need to charge your headset before use. To do so, use both hands to reseat the
headset into the Base Station.
5. Once the Base Station is connected to the PS4, the Base Station will detect
automatically as a USB device.
6. From the Dashboard, navigate to 'Settings’ then select ‘Devices' and select 'Audio
Devices.'
7. Ensure Input Device is set to USB Headset (Astro A50 Voice) and the Output
Device is set to the same.
8. Ensure the Output to Headphones is set to “Chat Audio.”
9. Navigate back to the Settings menu, then select “Sound and Screen.”
10. Navigate to Audio Output Settings, and ensure Primary Output Port is set to
Digital Out (Optical) and Audio Format (Priority) is set to Bitstream (Dolby).
11. Change the Input and Output Device to USB Headset (ASTRO Wireless
Transmitter).
12. To toggle to a new EQ preset, press the EQ Button until the desired preset is
selected.
13. That’s it! Your A50 Wireless Headset and PS4 are set up and ready to game!
POL
1. Ensure the Mode Switch on the Base Station is set to PS4.
2. Plug Micro end of the Micro USB cable into the Base Station & the USB end into
the PlayStation 4.
3. Plug TOSLink Optical Cable into the PS4 Optical port & plug the other end into the
Optical In port on the the Base Station.
4. Your A50 Wireless Headset comes pre-paired to the Base Station. However, you
will need to charge your headset before use. To do so, use both hands to reseat the
headset into the Base Station.
5. Once the Base Station is connected to the PS4, the Base Station will detect
automatically as a USB device.
6. From the Dashboard, navigate to 'Settings’ then select ‘Devices' and select 'Audio
Devices.'
7. Ensure Input Device is set to USB Headset (Astro A50 Voice) and the Output
Device is set to the same.
8. Ensure the Output to Headphones is set to “Chat Audio.”
9. Navigate back to the Settings menu, then select “Sound and Screen.”
10. Navigate to Audio Output Settings, and ensure Primary Output Port is set to
Digital Out (Optical) and Audio Format (Priority) is set to Bitstream (Dolby).
11. Change the Input and Output Device to USB Headset (ASTRO Wireless
Transmitter).
12. To toggle to a new EQ preset, press the EQ Button until the desired preset is
selected.
13. That’s it! Your A50 Wireless Headset and PS4 are set up and ready to game!
DOLBY
White Headphone: Dolby On
White Star:
Source Audio Passthrough On
DAN: DOLBY; TÆNDT: HVID / SLUKKET: INGET LED-LYS
DEU: DOLBY; AN: WEIß / AUS: KEINE LED LEUCHTET AUF
ESP: DOLBY; ENCENDIDO: BLANCO / APAGADO: NO SE ILUMINA NINGÚN LED
FRA: DOLBY; ALLUMÉ : BLANC / ÉTEINT : PAS DE LED ALLUMÉE
ITA: DOLBY; ACCESO: BIANCO / SPENTO: NESSUN LED ILLUMINATO
NED: DOLBY; AAN: WIT / UIT: GEEN LED VERLICHT
NOR: DOLBY; PÅ: HVIT / AV: INGEN LED-BELYSNING
POL: DOLBY; WŁ.: BIAŁY / WYŁ.: BRAK PODŚWIETLENIA DIOD LED
POR: DOLBY; LIGADO: BRANCO / DESLIGADO: LED NÃO ILUMINADO
SUO: DOLBY; PÄÄLLÄ: VALKOINEN / POIS PÄÄLTÄ: LED-VALO EI PALA
SVE: DOLBY; PÅ VIT / AV: INGEN LED UPPLYST
РУС: DOLBY; ВКЛ.: БЕЛЫЙ / ВЫКЛ.: БЕЗ ПОДСВЕТКИ СИД
한국어: DOLBY; 켜짐: 흰색 / 꺼짐: LED 조명 없음
日本語: DOLBY; オン:白/オフ:LEDの点灯はありません
简化字:DOLBY; 开:白色/关:非LED照明
4
SEE PAIRING
AND CHARGING
POR
1. Ensure the Mode Switch on the Base Station is set to PS4.
2. Plug Micro end of the Micro USB cable into the Base Station & the USB end into
the PlayStation 4.
3. Plug TOSLink Optical Cable into the PS4 Optical port & plug the other end into the
Optical In port on the the Base Station.
4. Your A50 Wireless Headset comes pre-paired to the Base Station. However, you
will need to charge your headset before use. To do so, use both hands to reseat the
headset into the Base Station.
5. Once the Base Station is connected to the PS4, the Base Station will detect
automatically as a USB device.
6. From the Dashboard, navigate to 'Settings’ then select ‘Devices' and select 'Audio
Devices.'
7. Ensure Input Device is set to USB Headset (Astro A50 Voice) and the Output
Device is set to the same.
8. Ensure the Output to Headphones is set to "Chat Audio."
9. Navigate back to the Settings menu, then select “Sound and Screen.”
10. Navigate to Audio Output Settings, and ensure Primary Output Port is set to
Digital Out (Optical) and Audio Format (Priority) is set to Bitstream (Dolby).
11. Change the Input and Output Device to USB Headset (ASTRO Wireless
Transmitter).
12. To toggle to a new EQ preset, press the EQ Button until the desired preset is
selected.
13. That’s it! Your A50 Wireless Headset and PS4 are set up and ready to game!
SUO
1. Ensure the Mode Switch on the Base Station is set to PS4.
2. Plug Micro end of the Micro USB cable into the Base Station & the USB end into
the PlayStation 4.
3. Plug TOSLink Optical Cable into the PS4 Optical port & plug the other end into the
Optical In port on the the Base Station.
4. Your A50 Wireless Headset comes pre-paired to the Base Station. However, you
will need to charge your headset before use. To do so, use both hands to reseat the
headset into the Base Station.
5. Once the Base Station is connected to the PS4, the Base Station will detect
automatically as a USB device.
6. From the Dashboard, navigate to 'Settings’ then select ‘Devices' and select 'Audio
Devices.'
7. Ensure Input Device is set to USB Headset (Astro A50 Voice) and the Output
Device is set to the same.
8. Ensure the Output to Headphones is set to "Chat Audio."
Navigate back to the Settings menu, then select “Sound and Screen.”
9.
10. Navigate to Audio Output Settings, and ensure Primary Output Port is set to
Digital Out (Optical) and Audio Format (Priority) is set to Bitstream (Dolby).
11. Change the Input and Output Device to USB Headset (ASTRO Wireless
Transmitter).
12. To toggle to a new EQ preset, press the EQ Button until the desired preset is
selected.
13. That’s it! Your A50 Wireless Headset and PS4 are set up and ready to game!
SVE
1. Ensure the Mode Switch on the Base Station is set to PS4.
2. Plug Micro end of the Micro USB cable into the Base Station & the USB end into
the PlayStation 4.
3. Plug TOSLink Optical Cable into the PS4 Optical port & plug the other end into the
Optical In port on the the Base Station.
4. Your A50 Wireless Headset comes pre-paired to the Base Station. However, you
will need to charge your headset before use. To do so, use both hands to reseat the
headset into the Base Station.
5. Once the Base Station is connected to the PS4, the Base Station will detect
automatically as a USB device.
6. From the Dashboard, navigate to 'Settings’ then select ‘Devices' and select 'Audio
Devices.'
7. Ensure Input Device is set to USB Headset (Astro A50 Voice) and the Output
Device is set to the same.
8. Ensure the Output to Headphones is set to "Chat Audio."
9. Navigate back to the Settings menu, then select “Sound and Screen.”
10. Navigate to Audio Output Settings, and ensure Primary Output Port is set to
Digital Out (Optical) and Audio Format (Priority) is set to Bitstream (Dolby).
11. Change the Input and Output Device to USB Headset (ASTRO Wireless
Transmitter).
12. To toggle to a new EQ preset, press the EQ Button until the desired preset is
selected.
13. That’s it! Your A50 Wireless Headset and PS4 are set up and ready to game!
DAN
1. Ensure the Mode Switch on the Base Station is set to PS4.
2. Plug Micro end of the Micro USB cable into the Base Station & the USB end into
the PlayStation 4.
3. Plug TOSLink Optical Cable into the PS4 Optical port & plug the other end into the
Optical In port on the the Base Station.
4. Your A50 Wireless Headset comes pre-paired to the Base Station. However, you
will need to charge your headset before use. To do so, use both hands to reseat the
headset into the Base Station.
5. Once the Base Station is connected to the PS4, the Base Station will detect
automatically as a USB device.
6. From the Dashboard, navigate to 'Settings’ then select ‘Devices' and select 'Audio
Devices.'
7. Ensure Input Device is set to USB Headset (Astro A50 Voice) and the Output
Device is set to the same.
8. Ensure the Output to Headphones is set to "Chat Audio."
9. Navigate back to the Settings menu, then select “Sound and Screen.”
10. Navigate to Audio Output Settings, and ensure Primary Output Port is set to
Digital Out (Optical) and Audio Format (Priority) is set to Bitstream (Dolby).
11. Change the Input and Output Device to USB Headset (ASTRO Wireless
Transmitter).
12. To toggle to a new EQ preset, press the EQ Button until the desired preset is
selected.
13. That’s it! Your A50 Wireless Headset and PS4 are set up and ready to game!
DEU
1. Ensure the Mode Switch on the Base Station is set to PS4.
2. Plug Micro end of the Micro USB cable into the Base Station & the USB end into
the PlayStation 4.
3. Plug TOSLink Optical Cable into the PS4 Optical port & plug the other end into the
Optical In port on the the Base Station.
4. Your A50 Wireless Headset comes pre-paired to the Base Station. However, you
will need to charge your headset before use. To do so, use both hands to reseat the
headset into the Base Station.
5. Once the Base Station is connected to the PS4, the Base Station will detect
automatically as a USB device.
6. From the Dashboard, navigate to 'Settings’ then select ‘Devices' and select 'Audio
Devices.'
7. Ensure Input Device is set to USB Headset (Astro A50 Voice) and the Output
Device is set to the same.
8. Ensure the Output to Headphones is set to "Chat Audio."
9. Navigate back to the Settings menu, then select “Sound and Screen.”
10. Navigate to Audio Output Settings, and ensure Primary Output Port is set to
Digital Out (Optical) and Audio Format (Priority) is set to Bitstream (Dolby).
11. Change the Input and Output Device to USB Headset (ASTRO Wireless
Transmitter).
12. To toggle to a new EQ preset, press the EQ Button until the desired preset is
selected.
13. That’s it! Your A50 Wireless Headset and PS4 are set up and ready to game!
ESP
1. Ensure the Mode Switch on the Base Station is set to PS4.
2. Plug Micro end of the Micro USB cable into the Base Station & the USB end into
the PlayStation 4.
3. Plug TOSLink Optical Cable into the PS4 Optical port & plug the other end into the
Optical In port on the the Base Station.
4. Your A50 Wireless Headset comes pre-paired to the Base Station. However, you
will need to charge your headset before use. To do so, use both hands to reseat the
headset into the Base Station.
5. Once the Base Station is connected to the PS4, the Base Station will detect
automatically as a USB device.
6. From the Dashboard, navigate to 'Settings’ then select ‘Devices' and select 'Audio
Devices.'
7. Ensure Input Device is set to USB Headset (Astro A50 Voice) and the Output
Device is set to the same.
8. Ensure the Output to Headphones is set to "Chat Audio."
9. Navigate back to the Settings menu, then select “Sound and Screen.”
10. Navigate to Audio Output Settings, and ensure Primary Output Port is set to
Digital Out (Optical) and Audio Format (Priority) is set to Bitstream (Dolby).
11. Change the Input and Output Device to USB Headset (ASTRO Wireless
Transmitter).
12. To toggle to a new EQ preset, press the EQ Button until the desired preset is
selected.
13. That’s it! Your A50 Wireless Headset and PS4 are set up and ready to game!
FRA
1. Ensure the Mode Switch on the Base Station is set to PS4.
2. Plug Micro end of the Micro USB cable into the Base Station & the USB end into
the PlayStation 4.
3. Plug TOSLink Optical Cable into the PS4 Optical port & plug the other end into the
Optical In port on the the Base Station.
4. Your A50 Wireless Headset comes pre-paired to the Base Station. However, you
will need to charge your headset before use. To do so, use both hands to reseat the
headset into the Base Station.
5. Once the Base Station is connected to the PS4, the Base Station will detect
automatically as a USB device.
6. From the Dashboard, navigate to 'Settings’ then select ‘Devices' and select 'Audio
Devices.'
7. Ensure Input Device is set to USB Headset (Astro A50 Voice) and the Output
Device is set to the same.
8. Ensure the Output to Headphones is set to "Chat Audio."
9. Navigate back to the Settings menu, then select “Sound and Screen.”
10. Navigate to Audio Output Settings, and ensure Primary Output Port is set to
Digital Out (Optical) and Audio Format (Priority) is set to Bitstream (Dolby).
11. Change the Input and Output Device to USB Headset (ASTRO Wireless
Transmitter).
12. To toggle to a new EQ preset, press the EQ Button until the desired preset is
selected.
13. That’s it! Your A50 Wireless Headset and PS4 are set up and ready to game!
ITA
1. Ensure the Mode Switch on the Base Station is set to PS4.
2. Plug Micro end of the Micro USB cable into the Base Station & the USB end into
the PlayStation 4.
3. Plug TOSLink Optical Cable into the PS4 Optical port & plug the other end into the
Optical In port on the the Base Station.
4. Your A50 Wireless Headset comes pre-paired to the Base Station. However, you
will need to charge your headset before use. To do so, use both hands to reseat the
headset into the Base Station.
5. Once the Base Station is connected to the PS4, the Base Station will detect
automatically as a USB device.
6. From the Dashboard, navigate to 'Settings’ then select ‘Devices' and select 'Audio
Devices.'
7. Ensure Input Device is set to USB Headset (Astro A50 Voice) and the Output
Device is set to the same.
8. Ensure the Output to Headphones is set to "Chat Audio."
9. Navigate back to the Settings menu, then select “Sound and Screen.”
10. Navigate to Audio Output Settings, and ensure Primary Output Port is set to
Digital Out (Optical) and Audio Format (Priority) is set to Bitstream (Dolby).
11. Change the Input and Output Device to USB Headset (ASTRO Wireless
Transmitter).
12. To toggle to a new EQ preset, press the EQ Button until the desired preset is
selected.
13. That’s it! Your A50 Wireless Headset and PS4 are set up and ready to game!
NOR
1. Ensure the Mode Switch on the Base Station is set to PS4.
2. Plug Micro end of the Micro USB cable into the Base Station & the USB end into
the PlayStation 4.
3. Plug TOSLink Optical Cable into the PS4 Optical port & plug the other end into the
Optical In port on the the Base Station.
4. Your A50 Wireless Headset comes pre-paired to the Base Station. However, you
will need to charge your headset before use. To do so, use both hands to reseat the
headset into the Base Station.
5. Once the Base Station is connected to the PS4, the Base Station will detect
automatically as a USB device.
6. From the Dashboard, navigate to 'Settings’ then select ‘Devices' and select 'Audio
Devices.'
7. Ensure Input Device is set to USB Headset (Astro A50 Voice) and the Output
Device is set to the same.
8. Ensure the Output to Headphones is set to "Chat Audio."
9. Navigate back to the Settings menu, then select “Sound and Screen.”
10. Navigate to Audio Output Settings, and ensure Primary Output Port is set to
Digital Out (Optical) and Audio Format (Priority) is set to Bitstream (Dolby).
11. Change the Input and Output Device to USB Headset (ASTRO Wireless
Transmitter).
12. To toggle to a new EQ preset, press the EQ Button until the desired preset is
selected.
13. That’s it! Your A50 Wireless Headset and PS4 are set up and ready to game!
25%
BATTERY STATUS
Charge Level
50%
75%
100%
DAN: BLINKER RØDT + HØRBART BIP; LAV STRØMSTYRKE / OPLAD STRAKS
DEU: BLINKT ROT + AKUSTISCHER PIEPTON; STROM GERING / SOFORT AUFLADEN
ESP: ROJO TITILANTE + BIP AUDIBLE; BATERÍA BAJA / CARGAR INMEDIATAMENTE
FRA: CLIGNOTEMENT ROUGE + BIP AUDIBLE; BATTERIE FAIBLE / RECHARGEZ IMMÉDIATEMENT
ITA: ROSSO LAMPEGGIANTE + SEGNALE ACUSTICO; UNITÀ SCARICA / CARICARE
IMMEDIATAMENTE
NED: KNIPPEREND ROOD + PIEPTOON; LAAG VERMOGEN / ONMIDDELLIJK LADEN
NOR: BLINKER RØDT + LYDPIP; LAV STRØM / LAD UMIDDELBART
POL: KONTROLKA MIGAJĄCA NA CZERWONO + SYGNAŁ DŹWIĘKOWY; NISKIE NAPIĘCIE
ZASILANIA / NATYCHMIAST DOŁADOWAĆ
POR: PISCAR A VERMELHO + BIP AUDÍVEL; CARGA BAIXA / CARREGAR IMEDIATAMENTE
SUO: VILKKUVA PUNAINEN + KUULUVA ÄÄNIMERKKI; LÄHES TYHJÄ AKKU / LATAA HETI
SVE: BLINKANDE RÖD + HÖRBAR LJUDSIGNAL; LÅG LADDNING / LADDA OMEDELBART
ESP: ROJO TITILANTE + BIP AUDIBLE; BATERÍA BAJA / CARGAR INMEDIATAMENTE
FRA: CLIGNOTEMENT ROUGE + BIP AUDIBLE; BATTERIE FAIBLE / RECHARGEZ IMMÉDIATEMENT
ITA: ROSSO LAMPEGGIANTE + SEGNALE ACUSTICO; UNITÀ SCARICA / CARICARE
NED: KNIPPEREND ROOD + PIEPTOON; LAAG VERMOGEN / ONMIDDELLIJK LADEN
NOR: BLINKER RØDT + LYDPIP; LAV STRØM / LAD UMIDDELBART
POL: KONTROLKA MIGAJĄCA NA CZERWONO + SYGNAŁ DŹWIĘKOWY; ZASILANIA /DOŁADOWAĆ
POR: PISCAR A VERMELHO + BIP AUDÍVEL; CARGA BAIXA / CARREGAR IMEDIATAMENTE
SUO: VILKKUVA PUNAINEN + KUULUVA ÄÄNIMERKKI; LÄHES TYHJÄ AKKU / LATAA HETI
SVE: BLINKANDE RÖD + HÖRBAR LJUDSIGNAL
РУС: МИГАЮЩИЙ КРАСНЫЙ СИГНАЛ + ЗВУКОВОЙ СИГНАЛ НИЗКИЙ УРОВЕНЬ ЗАРЯДКИ / ЗАРЯДИТЕ НЕМЕДЛЕННО
한국어: 빨간색 깜박임 + 경고음 저전력 / 즉시 충전
日本語: 赤の点滅+発信音
バッテリー残量低/すぐに充電が必要
PS4 SETTINGS
5-13
POL
1. Ensure the Mode Switch on the Base Station is set to PS4.
2. Plug Micro end of the Micro USB cable into the Base Station & the USB end into
the PlayStation 4.
3. Plug TOSLink Optical Cable into the PS4 Optical port & plug the other end into the
Optical In port on the the Base Station.
4. Your A50 Wireless Headset comes pre-paired to the Base Station. However, you
will need to charge your headset before use. To do so, use both hands to reseat the
headset into the Base Station.
5. Once the Base Station is connected to the PS4, the Base Station will detect
automatically as a USB device.
6. From the Dashboard, navigate to 'Settings’ then select ‘Devices' and select 'Audio
Devices.'
7. Ensure Input Device is set to USB Headset (Astro A50 Voice) and the Output
Device is set to the same.
8. Ensure the Output to Headphones is set to "Chat Audio."
9. Navigate back to the Settings menu, then select “Sound and Screen.”
10. Navigate to Audio Output Settings, and ensure Primary Output Port is set to
Digital Out (Optical) and Audio Format (Priority) is set to Bitstream (Dolby).
11. Change the Input and Output Device to USB Headset (ASTRO Wireless
Transmitter).
12. To toggle to a new EQ preset, press the EQ Button until the desired preset is
selected.
13. That’s it! Your A50 Wireless Headset and PS4 are set up and ready to game!
POR
1. Ensure the Mode Switch on the Base Station is set to PS4.
2. Plug Micro end of the Micro USB cable into the Base Station & the USB end into
the PlayStation 4.
3. Plug TOSLink Optical Cable into the PS4 Optical port & plug the other end into the
Optical In port on the the Base Station.
4. Your A50 Wireless Headset comes pre-paired to the Base Station. However, you
will need to charge your headset before use. To do so, use both hands to reseat the
headset into the Base Station.
5. Once the Base Station is connected to the PS4, the Base Station will detect
automatically as a USB device.
6. From the Dashboard, navigate to 'Settings’ then select ‘Devices' and select 'Audio
Devices.'
7. Ensure Input Device is set to USB Headset (Astro A50 Voice) and the Output
Device is set to the same.
8. Ensure the Output to Headphones is set to "Chat Audio."
9. Navigate back to the Settings menu, then select “Sound and Screen.”
10. Navigate to Audio Output Settings, and ensure Primary Output Port is set to
Digital Out (Optical) and Audio Format (Priority) is set to Bitstream (Dolby).
11. Change the Input and Output Device to USB Headset (ASTRO Wireless
Transmitter).
12. To toggle to a new EQ preset, press the EQ Button until the desired preset is
selected.
13. That’s it! Your A50 Wireless Headset and PS4 are set up and ready to game!
SUO
1. Ensure the Mode Switch on the Base Station is set to PS4.
2. Plug Micro end of the Micro USB cable into the Base Station & the USB end into
the PlayStation 4.
3. Plug TOSLink Optical Cable into the PS4 Optical port & plug the other end into the
Optical In port on the the Base Station.
4. Your A50 Wireless Headset comes pre-paired to the Base Station. However, you
will need to charge your headset before use. To do so, use both hands to reseat the
headset into the Base Station.
5. Once the Base Station is connected to the PS4, the Base Station will detect
automatically as a USB device.
6. From the Dashboard, navigate to 'Settings’ then select ‘Devices' and select 'Audio
Devices.'
7. Ensure Input Device is set to USB Headset (Astro A50 Voice) and the Output
Device is set to the same.
8. Ensure the Output to Headphones is set to "Chat Audio."
9. Navigate back to the Settings menu, then select “Sound and Screen.”
10. Navigate to Audio Output Settings, and ensure Primary Output Port is set to
Digital Out (Optical) and Audio Format (Priority) is set to Bitstream (Dolby).
11. Change the Input and Output Device to USB Headset (ASTRO Wireless
Transmitter).
12. To toggle to a new EQ preset, press the EQ Button until the desired preset is
selected.
13. That’s it! Your A50 Wireless Headset and PS4 are set up and ready to game!
SVE
1. Ensure the Mode Switch on the Base Station is set to PS4.
2. Plug Micro end of the Micro USB cable into the Base Station & the USB end into
the PlayStation 4.
3. Plug TOSLink Optical Cable into the PS4 Optical port & plug the other end into the
Optical In port on the the Base Station.
4. Your A50 Wireless Headset comes pre-paired to the Base Station. However, you
will need to charge your headset before use. To do so, use both hands to reseat the
headset into the Base Station.
5. Once the Base Station is connected to the PS4, the Base Station will detect
automatically as a USB device.
6. From the Dashboard, navigate to 'Settings’ then select ‘Devices' and select 'Audio
Devices.'
7. Ensure Input Device is set to USB Headset (Astro A50 Voice) and the Output
Device is set to the same.
8. Ensure the Output to Headphones is set to "Chat Audio."
9. Navigate back to the Settings menu, then select “Sound and Screen.”
10. Navigate to Audio Output Settings, and ensure Primary Output Port is set to
Digital Out (Optical) and Audio Format (Priority) is set to Bitstream (Dolby).
11. Change the Input and Output Device to USB Headset (ASTRO Wireless
Transmitter).
12. To toggle to a new EQ preset, press the EQ Button until the desired preset is
selected.
13. That’s it! Your A50 Wireless Headset and PS4 are set up and ready to game!
РУС
1. Ensure the Mode Switch on the Base Station is set to PS4.
2. Plug Micro end of the Micro USB cable into the Base Station & the USB end into
the PlayStation 4.
3. Plug TOSLink Optical Cable into the PS4 Optical port & plug the other end into the
Optical In port on the the Base Station.
4. Your A50 Wireless Headset comes pre-paired to the Base Station. However, you
will need to charge your headset before use. To do so, use both hands to reseat the
headset into the Base Station.
5. Once the Base Station is connected to the PS4, the Base Station will detect
automatically as a USB device.
6. From the Dashboard, navigate to 'Settings’ then select ‘Devices' and select 'Audio
Devices.'
7. Ensure Input Device is set to USB Headset (Astro A50 Voice) and the Output
Device is set to the same.
8. Ensure the Output to Headphones is set to "Chat Audio."
9. Navigate back to the Settings menu, then select “Sound and Screen.”
10. Navigate to Audio Output Settings, and ensure Primary Output Port is set to
Digital Out (Optical) and Audio Format (Priority) is set to Bitstream (Dolby).
11. Change the Input and Output Device to USB Headset (ASTRO Wireless
Transmitter).
12. To toggle to a new EQ preset, press the EQ Button until the desired preset is
selected.
13. That’s it! Your A50 Wireless Headset and PS4 are set up and ready to game!
한국어
1. Ensure the Mode Switch on the Base Station is set to PS4.
2. Plug Micro end of the Micro USB cable into the Base Station & the USB end into
the PlayStation 4.
3. Plug TOSLink Optical Cable into the PS4 Optical port & plug the other end into the
Optical In port on the the Base Station.
4. Your A50 Wireless Headset comes pre-paired to the Base Station. However, you
will need to charge your headset before use. To do so, use both hands to reseat the
headset into the Base Station.
5. Once the Base Station is connected to the PS4, the Base Station will detect
automatically as a USB device.
6. From the Dashboard, navigate to 'Settings’ then select ‘Devices' and select 'Audio
Devices.'
7. Ensure Input Device is set to USB Headset (Astro A50 Voice) and the Output
Device is set to the same.
8. Ensure the Output to Headphones is set to "Chat Audio."
9. Navigate back to the Settings menu, then select “Sound and Screen.”
10. Navigate to Audio Output Settings, and ensure Primary Output Port is set to
Digital Out (Optical) and Audio Format (Priority) is set to Bitstream (Dolby).
11. Change the Input and Output Device to USB Headset (ASTRO Wireless
Transmitter).
12. To toggle to a new EQ preset, press the EQ Button until the desired preset is
selected.
13. That’s it! Your A50 Wireless Headset and PS4 are set up and ready to game!
日本語
1. Ensure the Mode Switch on the Base Station is set to PS4.
2. Plug Micro end of the Micro USB cable into the Base Station & the USB end into the
PlayStation 4.
3. Plug TOSLink Optical Cable into the PS4 Optical port & plug the other end into the
Optical In port on the the Base Station.
4. Your A50 Wireless Headset comes pre-paired to the Base Station. However, you will
need to charge your headset before use. To do so, use both hands to reseat the headset
into the Base Station.
5. Once the Base Station is connected to the PS4, the Base Station will detect
automatically as a USB device.
6. From the Dashboard, navigate to 'Settings’ then select ‘Devices' and select 'Audio
Devices.'
7. Ensure Input Device is set to USB Headset (Astro A50 Voice) and the Output Device is
set to the same.
8. Ensure the Output to Headphones is set to "Chat Audio."
9. Navigate back to the Settings menu, then select “Sound and Screen.”
10. Navigate to Audio Output Settings, and ensure Primary Output Port is set to Digital
Out (Optical) and Audio Format (Priority) is set to Bitstream (Dolby).
11. Change the Input and Output Device to USB Headset (ASTRO Wireless Transmitter).
12. To toggle to a new EQ preset, press the EQ Button until the desired preset is
selected.
13. That’s it! Your A50 Wireless Headset and PS4 are set up and ready to game!
简化字
1. Ensure the Mode Switch on the Base Station is set to PS4.
2. Plug Micro end of the Micro USB cable into the Base Station & the USB end into
the PlayStation 4.
3. Plug TOSLink Optical Cable into the PS4 Optical port & plug the other end into
the Optical In port on the the Base Station.
4. Your A50 Wireless Headset comes pre-paired to the Base Station. However, you
will need to charge your headset before use. To do so, use both hands to reseat
the headset into the Base Station.
5. Once the Base Station is connected to the PS4, the Base Station will detect
automatically as a USB device.
6. From the Dashboard, navigate to 'Settings’ then select ‘Devices' and select
'Audio Devices.'
7. Ensure Input Device is set to USB Headset (Astro A50 Voice) and the Output
Device is set to the same.
8. Ensure the Output to Headphones is set to "Chat Audio."
9. Navigate back to the Settings menu, then select “Sound and Screen.”
10. Navigate to Audio Output Settings, and ensure Primary Output Port is set to
Digital Out (Optical) and Audio Format (Priority) is set to Bitstream (Dolby).
11. Change the Input and Output Device to USB Headset (ASTRO Wireless
Transmitter).
12. To toggle to a new EQ preset, press the EQ Button until the desired preset is
selected.
13. That’s it! Your A50 Wireless Headset and PS4 are set up and ready to game!
Solid Red + Audible Tone
10% charge
DAN: LYSER RØD, UDEN AT BLINKE + HØRBAR TONE / 10% OPLADNING
DEU: DAUERHAFT ROT + AKUSTISCHER TON / 10% BATTERIEVERMÖGEN
ESP: ROJO SÓLIDO + TONO AUDIBLE / 10% DE CARGA
FRA: ROUGE CONTINU + SON AUDIBLE / BATTERIE À 10 %
ITA: ROSSO FISSO + SEGNALE ACUSTICO / 10% DI CARICA
NED: CONTINUE ROOD + GELUIDSSIGNAAL / 10% OPGELADEN
NOR: LYSENDE RØD + LYDSIGNAL / 10 % BATTERI
POL: JEDNOSTAJNY CZERWONY + SYGNAŁ DŹWIĘKOWY POZIOM NAŁADOWANIA 10%
POR: VERMELHO VIVO + TOM AUDÍVEL / 10% CARGA
SUO: TASAISEN PUNAINEN + ÄÄNIMERKKI / 10% VARAUSTA JÄLJELLÄ
SVE: SOLID RÖD + HÖRBAR TON / 10% LADDNING
DEU: DAUERHAFT ROT + AKUSTISCHER TON / 10% BATTERIEVERMÖGEN
ESP: ROJO SÓLIDO + TONO AUDIBLE / 10% DE CARGA
FRA: ROUGE CONTINU + SON AUDIBLE / BATTERIE À 10 %
ITA: ROSSO FISSO + SEGNALE ACUSTICO / 10% DI CARICA
NED: CONTINUE ROOD + GELUIDSSIGNAAL 10% OPGELADEN
NOR: LYSENDE RØD + LYDSIGNAL / 10 % BATTERI
POL: JEDNOSTAJNY CZERWONY + SYGNAŁ DŹWIĘKOWY POZIOM NAŁADOWANIA 10%
POR: VERMELHO VIVO + TOM AUDÍVEL / 10% CARGA
SUO: TASAISEN PUNAINEN + ÄÄNIMERKKI 10% VARAUSTA JÄLJELLÄ
SVE: SOLID RÖD + HÖRBAR TON / 10% LADDNING
РУС: ПОСТОЯННЫЙ КРАСНЫЙ СВЕТ + ЗВУКОВОЙ СИГНА Л УРОВЕНЬ ЗАРЯДКИ 10%
한국어: 진한 빨간색 + 가청 톤 / 10% 충전
日本語: 赤色点灯と電子音/10%の充電
简化字:稳定红色+蜂鸣声 / 电余量 10%
HEADSET LED BEHAVIOR
DAN: INDIKATOR LED / RAVGUL: OPLADER / RØD: TÆNDT
DEU: ANZEIGE LED: BERNSTEIN: LÄDT AUF / ROT: STROM EINGESCHALTET
ESP: LED INDICADOR / ÁMBAR: EN CARGA / ROJO: ENCENDIDO
FRA: LED INDICATEUR / ORANGE : EN CHARGEMENT / ROUGE : ALLUMÉ
ITA: INDICATORE LED / AMBRA: IN CARICA / ROSSO: ACCESO
NED: LED-INDICATOR: ORANJE: WORDT OPGELADEN / ROOD: STAAT AAN
NOR: INDIKATOR-LED / GULT: LADER / RØD: STRØM PÅ
POL: WSKAŹNIK LED: POMARAŃCZOWY: ŁADOWANIE / CZERWONY: ZASILANIE WŁĄCZONE
POR: INDICADOR LED / ÂMBAR: A CARREGAR / VERMELHO: LIGADO
SUO: LED-MERKKIVALO: ORANSSI: AKKU LATAUTUU / PUNAINEN: VIRTA PÄÄLLÄ
SVE: LED INDIKATOR / GUL: LADDNING / RÖD: STRÖM PÅ
DEU: ANZEIGE LED: BERNSTEIN: LÄDT AUF / ROT: STROM EINGESCHALTET
ESP: LED INDICADOR / ÁMBAR: EN CARGA / ROJO: ENCENDIDO
INDICATOR LED
Amber: Charging
White: Power On
OFF
ON
LED
PAIRING AND CHARGING
*BEFORE 1ST USE, CHARGE HEADSET FULLY. DAN: KONTROLLÉR, AT HEADSETTET ER
FULDT OPLADET, INDEN DET TAGES I BRUG FØRSTE GANG. DEU: VOR DEM
ERSTGEBRAUCH DAS HEADSET VOLLSTÄNDIG AUFLADEN. ESP: CARGAR POR
COMPLETO LOS AURICULARES CON MICRÓFONO ANTES DE SU PRIMER USO. FRA:
AVANT LA PREMIÈRE UTILISATION, CHARGEZ COMPLÈTEMENT LE CASQUE. ITA: PRIMA
DEL PRIMO UTILIZZO, CARICARE COMPLETAMENTE LA CUFFIA. NED: LAAD DE HEADSET
VOLLEDIG OP VÓÓR HET EERSTE GEBRUIK. NOR: FØR FØRSTEGANGSBRUK MÅ
HEADSETTET LADES HELT OPP. POL: PRZED PRZYSTĄPIENIEM DO PIERWSZEGO
KORZYSTANIA NALEŻY CAŁKOWICIE NAŁADOWAĆ SŁUCHAWKI. POR: ANTES DA
PRIMEIRA UTILIZAÇÃO, CARREGUE O AURICULAR NA TOTALIDADE. SUO: LATAA
KUULOKKEIDEN AKKU TÄYTEEN ENNEN ENSIMMÄISTÄ KÄYTTÖKERTAA. SVE: LADDA
HEADSETET HELT FÖRE FÖRSTA ANVÄNDING. DAN: ADET, INDEN DET TAGES I BRUG
1
ALIGN MICROPHONE WITH MIC SLOT, THEN PLACE HEADSET
ONTO BASE STATION.
DAN: PLACÉR MIKROFONEN, SÅ DEN FLUGTER MED MIKROFONINDGANGEN, OG PLACÉR
DEREFTER HEADSETTET PÅ DOCKEN.
DEU: DAS MIKROFON MIT DEM MIKROFONSCHLITZ AUSRICHTEN, DANN DAS HEADSET
AUF DER BASISSTATION ABLEGEN.
ESP: ALINEAR EL MICRÓFONO CON LA FICHA PARA MICRÓFONO Y COLOCAR LOS
AURICULARES EN LA ESTACIÓN BASE.
FRA: ALIGNEZ LE MICROPHONE AVEC L'EMPLACEMENT QUI LUI EST RÉSERVÉ, PUIS
PLACEZ LE CASQUE SUR LA STATION DE BASE.
ITA: ALLINEARE IL MICROFONO CON LO SLOT E POSIZIONARE LE CUFFIE SULLA
STAZIONE BASE.
NED: LIJN DE MICROFOON UIT MET MIC-SLEUF (MIC SLOT) EN PLAATS DE HEADSET
DAN OP HET BASISSTATION.
NOR: SETT MIKROFONEN I MIKROFONINNGANGEN OG SETT HEADSETTET I
BASESTASJONEN.
POL: USTAW MIKROFON W JEDNEJ LINII Z GNIAZDEM, A NASTĘPNIE UMIEŚĆ
SŁUCHAWKI W STACJI BAZOWEJ.
POR: ALINHE O MICROFONE COM A RANHURA DO MIC, E DEPOIS COLOQUE O
AURICULAR NA ESTAÇÃO BASE.
SUO: ASETA MIKROFONI MIKKIURAAN JA SIJOITA KUULOKKEET TUKIASEMAAN.
SVE: RÄTA UPP MIKROFONEN MED MIKROFONPLATSEN OCH PLACERA HEADSETET PÅ
BASSTATIONEN.
РУС: ВЫРОВНЯЙТЕ МИКРОФОН С ГНЕЗДОМ, И ПОМЕСТИТЕ НАУШНИКИ НА
БАЗОВУЮ СТАНЦИЮ.
한국어: 마이크와 마이크 구멍이 일직선이 되게 한 뒤 헤드셋을 베이스 스테이션에 꽂으세요.
日本語: マイクをマイクスロットに差し込み、ヘッドセットをベースステーションに設
置して下さい。
简化字:将麦克风同麦克风槽对齐,然后将头戴式耳机安置在支架上。
PC AND MAC SETUP
1
2
ENG
1. Ensure the Mode Switch on the Base Station is set to PC.
2. Plug the Micro end of the Micro USB cable into the Base Station & the USB end
into your PC.
3. Navigate to your ‘Playback Devices’ tab in your Sound settings on your PC.
Navigate to your ‘Settings,’ select ‘Sound,’ then ‘Output’ and choose ‘Digital Out’ on
your Mac. Your Mac is ready at this point!
4. Select ASTRO A50 Game, right click & set as Default Device.
5. Select ASTRO A50 Voice, right click & set as Default Communication Device.
6. Navigate to your ‘Recording Devices’ tab in your Sound settings on your PC.
7. Select ASTRO A50 Voice, right click & set as Default Device & Default
Communication Device.
8. That’s it! Your A50 Wireless Headset and PC are set up and ready to game!
DAN
1. Ensure the Mode Switch on the Base Station is set to PC.
2. Plug the Micro end of the Micro USB cable into the Base Station & the USB end
into your PC.
3. Navigate to your ‘Playback Devices’ tab in your Sound settings on your PC.
Navigate to your ‘Settings,’ select ‘Sound,’ then ‘Output’ and choose ‘Digital Out’ on
your Mac. Your Mac is ready at this point!
4. Select ASTRO A50 Game, right click & set as Default Device.
5. Select ASTRO A50 Voice, right click & set as Default Communication Device.
6. Navigate to your ‘Recording Devices’ tab in your Sound settings on your PC.
7. Select ASTRO A50 Voice, right click & set as Default Device & Default
Communication Device.
8. That’s it! Your A50 Wireless Headset and PC are set up and ready to game!
DEU
1. Ensure the Mode Switch on the Base Station is set to PC.
2. Plug the Micro end of the Micro USB cable into the Base Station & the USB end
into your PC.
3. Navigate to your ‘Playback Devices’ tab in your Sound settings on your PC.
Navigate to your ‘Settings,’ select ‘Sound,’ then ‘Output’ and choose ‘Digital Out’ on
your Mac. Your Mac is ready at this point!
4. Select ASTRO A50 Game, right click & set as Default Device.
5. Select ASTRO A50 Voice, right click & set as Default Communication Device.
6. Navigate to your ‘Recording Devices’ tab in your Sound settings on your PC.
7. Select ASTRO A50 Voice, right click & set as Default Device & Default
Communication Device.
8. That’s it! Your A50 Wireless Headset and PC are set up and ready to game!
ESP
1. Ensure the Mode Switch on the Base Station is set to PC.
2. Plug the Micro end of the Micro USB cable into the Base Station & the USB end
into your PC.
3. Navigate to your ‘Playback Devices’ tab in your Sound settings on your PC.
Navigate to your ‘Settings,’ select ‘Sound,’ then ‘Output’ and choose ‘Digital Out’ on
your Mac. Your Mac is ready at this point!
4. Select ASTRO A50 Game, right click & set as Default Device.
5. Select ASTRO A50 Voice, right click & set as Default Communication Device.
6. Navigate to your ‘Recording Devices’ tab in your Sound settings on your PC.
7. Select ASTRO A50 Voice, right click & set as Default Device & Default
Communication Device.
8. That’s it! Your A50 Wireless Headset and PC are set up and ready to game!
FRA
1. Ensure the Mode Switch on the Base Station is set to PC.
2. Plug the Micro end of the Micro USB cable into the Base Station & the USB end
into your PC.
3. Navigate to your ‘Playback Devices’ tab in your Sound settings on your PC.
Navigate to your ‘Settings,’ select ‘Sound,’ then ‘Output’ and choose ‘Digital Out’ on
your Mac. Your Mac is ready at this point!
4. Select ASTRO A50 Game, right click & set as Default Device.
5. Select ASTRO A50 Voice, right click & set as Default Communication Device.
6. Navigate to your ‘Recording Devices’ tab in your Sound settings on your PC.
7. Select ASTRO A50 Voice, right click & set as Default Device & Default
Communication Device.
8. That’s it! Your A50 Wireless Headset and PC are set up and ready to game!
ITA
1. Ensure the Mode Switch on the Base Station is set to PC.
2. Plug the Micro end of the Micro USB cable into the Base Station & the USB end
into your PC.
3. Navigate to your ‘Playback Devices’ tab in your Sound settings on your PC.
Navigate to your ‘Settings,’ select ‘Sound,’ then ‘Output’ and choose ‘Digital Out’ on
your Mac. Your Mac is ready at this point!
4. Select ASTRO A50 Game, right click & set as Default Device.
5. Select ASTRO A50 Voice, right click & set as Default Communication Device.
6. Navigate to your ‘Recording Devices’ tab in your Sound settings on your PC.
7. Select ASTRO A50 Voice, right click & set as Default Device & Default
Communication Device.
8. That’s it! Your A50 Wireless Headset and PC are set up and ready to game!
NED
1. Ensure the Mode Switch on the Base Station is set to PC.
2. Plug the Micro end of the Micro USB cable into the Base Station & the USB end
into your PC.
3. Navigate to your ‘Playback Devices’ tab in your Sound settings on your PC.
Navigate to your ‘Settings,’ select ‘Sound,’ then ‘Output’ and choose ‘Digital Out’ on
your Mac. Your Mac is ready at this point!
4. Select ASTRO A50 Game, right click & set as Default Device.
5. Select ASTRO A50 Voice, right click & set as Default Communication Device.
6. Navigate to your ‘Recording Devices’ tab in your Sound settings on your PC.
7. Select ASTRO A50 Voice, right click & set as Default Device & Default
Communication Device.
8. That’s it! Your A50 Wireless Headset and PC are set up and ready to game!
NOR
1. Ensure the Mode Switch on the Base Station is set to PC.
2. Plug the Micro end of the Micro USB cable into the Base Station & the USB end
into your PC.
3. Navigate to your ‘Playback Devices’ tab in your Sound settings on your PC.
Navigate to your ‘Settings,’ select ‘Sound,’ then ‘Output’ and choose ‘Digital Out’ on
your Mac. Your Mac is ready at this point!
4. Select ASTRO A50 Game, right click & set as Default Device.
5. Select ASTRO A50 Voice, right click & set as Default Communication Device.
6. Navigate to your ‘Recording Devices’ tab in your Sound settings on your PC.
7. Select ASTRO A50 Voice, right click & set as Default Device & Default
Communication Device.
8. That’s it! Your A50 Wireless Headset and PC are set up and ready to game!
POL
1. Ensure the Mode Switch on the Base Station is set to PC.
2. Plug the Micro end of the Micro USB cable into the Base Station & the USB end
into your PC.
3. Navigate to your ‘Playback Devices’ tab in your Sound settings on your PC.
Navigate to your ‘Settings,’ select ‘Sound,’ then ‘Output’ and choose ‘Digital Out’ on
your Mac. Your Mac is ready at this point!
4. Select ASTRO A50 Game, right click & set as Default Device.
5. Select ASTRO A50 Voice, right click & set as Default Communication Device.
6. Navigate to your ‘Recording Devices’ tab in your Sound settings on your PC.
7. Select ASTRO A50 Voice, right click & set as Default Device & Default
Communication Device.
8. That’s it! Your A50 Wireless Headset and PC are set up and ready to game!
Blink Red + Audible Tone
5% charge
DAN: BLINKER RØDT + HØRBAR TONE / 5% OPLADNING
DEU: ROT BLINKEND + AKUSTISCHER TON / 5% BATTERIEVERMÖGEN
ESP: ROJO PARPADEANTE + TONO AUDIBLE / 5% DE CARGA
FRA: ROUGE CLIGNOTANT + SON AUDIBLE BATTERIE À 5%
ITA: ROSSO LAMPEGGIANTE + SEGNALE ACUSTICO 5% DI CARICA
NED: KNIPPEREND ROOD + GELUIDSSIGNAAL / 5% OPGELADEN
NOR: BLINKENDE RØD + LYDSIGNAL / 5 % BATTERI
POL: MIGAJĄCY CZERWONY + SYGNAŁ DŹWIĘKOWY POZIOM NAŁADOWANIA 5%
POR: VERMELHO A PISCAR + TOM AUDÍVEL / 5% CARGA
SUO: VILKKUVA PUNAINEN + ÄÄNIMERKKI 5% VARAUSTA JÄLJELLÄ
SVE: BLINKA RÖD + HÖRBAR TON / 5% LADDNING
РУС: МИГАЮЩИЙ КРАСНЫЙ СВЕТ + ЗВУКОВОЙ СИГНАЛ УРОВЕНЬ ЗАРЯДКИ 5%
한국어: 깜박이는 빨간색 +가청 톤 / 5% 충전
日本語: 赤色点滅と電子音/5%充電
简化字:闪烁红色+蜂鸣声 / 电余量 5%
FØRSTE GANG. DEU: VOR DEM ERSTGEBRAUCH DAS HEADSET VOLLSTÄNDIG AUFLADEN.
ESP: CARGAR POR COMPLETO LOS AURICULARES CON MICRÓFONO ANTES DE SU
PRIMER USO. FRA: AVANT LA PREMIÈRE UTILISATION, CHARGEZ COMPLÈTEMENT LE
CASQUE. ITA: PRIMA DEL PRIMO UTILIZZO, CARICARE COMPLETAMENTE LA CUFFIA. NED:
LAAD DE HEADSET VOLLEDIG OP VÓÓR HET EERSTE GEBRUIK. NOR: FØR FØRSTEGANGSBRUK MÅ HEADSETTET LADES HELT OPP. POL: PRZED PRZYSTĄPIENIEM DO PIERWSZEGO
KORZYSTANIA NALEŻY CAŁKOWICIE NAŁADOWAĆ SŁUCHAWKI. PYC: ДО ПЕРВОГО
ИСПОЛЬЗОВАНИЯ НЕОБХОДИМО ПОЛНОСТЬЮ ЗАРЯДИТЬ НАУШНИКИ 한국어:
헤드셋을 처음 쓰는 경우 완전히 충전하고 쓰세요. 日本語 : 最初にご使用される前に、充電
して下さい。 简化字: 首次使用前,将头戴式耳机充满电。
2
IF BATTERY STATUS DOES NOT DISPLAY, RE-SEAT HEADSET
DEU: FALLS DER BATTERIESTATUS NICHT ANGEZEIGT WIRD, DAS HEADSET ERNEUT
EINLEGEN.
ESP: SI NO APARECE EL ESTADO DE LA BATERÍA, VOLVER A COLOCAR LOS
AURICULARES EN LA BASE.
FRA: SI LE STATUT DE LA BATTERIE NE S'AFFICHE PAS, REPLACEZ LE CASQUE.
ITA: SE LO STATO DI CARICA DELLA BATTERIA NON SI ACCENDE, RIMETTERE IN SEDE LA
CUFFIA.
NED: ALS DE BATTERIJSTATUS NIET WORDT WEERGEGEVEN, PLAATS DE HEADSET ER
OPNIEUW OP.
NOR: HVIS BATTERISTATUSEN IKKE VISES, MÅ DU SETTE INN HEADSETTET PÅ NYTT.
POL: JEŻELI NIE WYŚWIETLI SIĘ STAN BATERII, NALEŻY PONOWNIE UMIEŚCIĆ
SŁUCHAWKI W STACJI.
POR: SE O ESTADO DA BATERIA NÃO FOR EXIBIDO, VOLTE A COLOCAR O AURICULAR.
SUO: JOS AKUN TILA EI NÄY TUKIASEMASSA, NOSTA KUULOKKEET POIS JA ASETA NE
TUKIASEMAAN UUDELLEEN.
SVE: OM BATTERISTATUSET INTE VISAS ÅTERSTÄLL HEADSETET.
DAN: HVIS BATTERISTATUS IKKE BLIVER VIST, GENANBRING HEADSETTET I DOCKEN.
DEU: FALLS DER BATTERIESTATUS NICHT ANGEZEIGT WIRD, DAS HEADSET ERNEUT
EINLEGEN.
ESP: SI NO APARECE EL ESTADO DE LA BATERÍA, VOLVER A COLOCAR LOS
AURICULARES EN LA BASE.
FRA: SI LE STATUT DE LA BATTERIE NE S'AFFICHE PAS, REPLACEZ LE CASQUE.
ITA: SE LO STATO DI CARICA DELLA BATTERIA NON SI ACCENDE, RIMETTERE IN SEDE LA
CUFFIA.
NED: ALS DE BATTERIJSTATUS NIET WORDT WEERGEGEVEN, PLAATS DE HEADSET ER
OPNIEUW OP.
NOR: HVIS BATTERISTATUSEN IKKE VISES, MÅ DU SETTE INN HEADSETTET PÅ NYTT.
POL: JEŻELI NIE WYŚWIETLI SIĘ STAN BATERII, NALEŻY PONOWNIE UMIEŚCIĆ
SŁUCHAWKI W STACJI.
POR: SE O ESTADO DA BATERIA NÃO FOR EXIBIDO, VOLTE A COLOCAR O AURICULAR.
SUO: JOS AKUN TILA EI NÄY TUKIASEMASSA, NOSTA KUULOKKEET POIS JA ASETA NE
TUKIASEMAAN UUDELLEEN.
SVE: OM BATTERISTATUSET INTE VISAS ÅTERSTÄLL HEADSETET.
РУС: ЕСЛИ СТАТУС БАТАРЕИ НЕ ОТОБРАЖАЕТСЯ, ЗАНОВО ПОМЕСТИТЕ НАУШНИКИ
НА СТАНЦИЮ.
한국어: 배터리 상태가 표시되지 않는 경우 헤드셋을 다시 꽂으세요.
日本語: バッテリーの状況が表示されない場合は、ヘッドセットを設置し直して下さ
い。
简化字:如未显示电池状态,重新安放头戴式耳机。
3
CONTROL
PANEL
POR
1. Ensure the Mode Switch on the Base Station is set to PC.
2. Plug the Micro end of the Micro USB cable into the Base Station & the USB end
into your PC.
3. Navigate to your ‘Playback Devices’ tab in your Sound settings on your PC.
Navigate to your ‘Settings,’ select ‘Sound,’ then ‘Output’ and choose ‘Digital Out’ on
your Mac. Your Mac is ready at this point!
4. Select ASTRO A50 Game, right click & set as Default Device.
5. Select ASTRO A50 Voice, right click & set as Default Communication Device.
6. Navigate to your ‘Recording Devices’ tab in your Sound settings on your PC.
7. Select ASTRO A50 Voice, right click & set as Default Device & Default
Communication Device.
8. That’s it! Your A50 Wireless Headset and PC are set up and ready to game!
SUO
1. Ensure the Mode Switch on the Base Station is set to PC.
2. Plug the Micro end of the Micro USB cable into the Base Station & the USB end
into your PC.
3. Navigate to your ‘Playback Devices’ tab in your Sound settings on your PC.
Navigate to your ‘Settings,’ select ‘Sound,’ then ‘Output’ and choose ‘Digital Out’ on
your Mac. Your Mac is ready at this point!
4. Select ASTRO A50 Game, right click & set as Default Device.
5. Select ASTRO A50 Voice, right click & set as Default Communication Device.
6. Navigate to your ‘Recording Devices’ tab in your Sound settings on your PC.
7. Select ASTRO A50 Voice, right click & set as Default Device & Default
Communication Device.
8. That’s it! Your A50 Wireless Headset and PC are set up and ready to game!
SVE
1. Ensure the Mode Switch on the Base Station is set to PC.
2. Plug the Micro end of the Micro USB cable into the Base Station & the USB end
into your PC.
3. Navigate to your ‘Playback Devices’ tab in your Sound settings on your PC.
Navigate to your ‘Settings,’ select ‘Sound,’ then ‘Output’ and choose ‘Digital Out’ on
your Mac. Your Mac is ready at this point!
4. Select ASTRO A50 Game, right click & set as Default Device.
5. Select ASTRO A50 Voice, right click & set as Default Communication Device.
6. Navigate to your ‘Recording Devices’ tab in your Sound settings on your PC.
7. Select ASTRO A50 Voice, right click & set as Default Device & Default
Communication Device.
8. That’s it! Your A50 Wireless Headset and PC are set up and ready to game!
DAN
1. Ensure the Mode Switch on the Base Station is set to PC.
2. Plug the Micro end of the Micro USB cable into the Base Station & the USB end
into your PC.
3. Navigate to your ‘Playback Devices’ tab in your Sound settings on your PC.
Navigate to your ‘Settings,’ select ‘Sound,’ then ‘Output’ and choose ‘Digital Out’ on
your Mac. Your Mac is ready at this point!
4. Select ASTRO A50 Game, right click & set as Default Device.
5. Select ASTRO A50 Voice, right click & set as Default Communication Device.
6. Navigate to your ‘Recording Devices’ tab in your Sound settings on your PC.
7. Select ASTRO A50 Voice, right click & set as Default Device & Default
Communication Device.
8. That’s it! Your A50 Wireless Headset and PC are set up and ready to game!
DEU
1. Ensure the Mode Switch on the Base Station is set to PC.
2. Plug the Micro end of the Micro USB cable into the Base Station & the USB end
into your PC.
3. Navigate to your ‘Playback Devices’ tab in your Sound settings on your PC.
Navigate to your ‘Settings,’ select ‘Sound,’ then ‘Output’ and choose ‘Digital Out’ on
your Mac. Your Mac is ready at this point!
4. Select ASTRO A50 Game, right click & set as Default Device.
5. Select ASTRO A50 Voice, right click & set as Default Communication Device.
6. Navigate to your ‘Recording Devices’ tab in your Sound settings on your PC.
7. Select ASTRO A50 Voice, right click & set as Default Device & Default
Communication Device.
8. That’s it! Your A50 Wireless Headset and PC are set up and ready to game!
ESP
1. Ensure the Mode Switch on the Base Station is set to PC.
2. Plug the Micro end of the Micro USB cable into the Base Station & the USB end
into your PC.
3. Navigate to your ‘Playback Devices’ tab in your Sound settings on your PC.
Navigate to your ‘Settings,’ select ‘Sound,’ then ‘Output’ and choose ‘Digital Out’ on
your Mac. Your Mac is ready at this point!
4. Select ASTRO A50 Game, right click & set as Default Device.
5. Select ASTRO A50 Voice, right click & set as Default Communication Device.
6. Navigate to your ‘Recording Devices’ tab in your Sound settings on your PC.
7. Select ASTRO A50 Voice, right click & set as Default Device & Default
Communication Device.
8. That’s it! Your A50 Wireless Headset and PC are set up and ready to game!
FRA
1. Ensure the Mode Switch on the Base Station is set to PC.
2. Plug the Micro end of the Micro USB cable into the Base Station & the USB end
into your PC.
3. Navigate to your ‘Playback Devices’ tab in your Sound settings on your PC.
Navigate to your ‘Settings,’ select ‘Sound,’ then ‘Output’ and choose ‘Digital Out’ on
your Mac. Your Mac is ready at this point!
4. Select ASTRO A50 Game, right click & set as Default Device.
5. Select ASTRO A50 Voice, right click & set as Default Communication Device.
6. Navigate to your ‘Recording Devices’ tab in your Sound settings on your PC.
7. Select ASTRO A50 Voice, right click & set as Default Device & Default
Communication Device.
8. That’s it! Your A50 Wireless Headset and PC are set up and ready to game!
ITA
1. Ensure the Mode Switch on the Base Station is set to PC.
2. Plug the Micro end of the Micro USB cable into the Base Station & the USB end
into your PC.
3. Navigate to your ‘Playback Devices’ tab in your Sound settings on your PC.
Navigate to your ‘Settings,’ select ‘Sound,’ then ‘Output’ and choose ‘Digital Out’ on
your Mac. Your Mac is ready at this point!
4. Select ASTRO A50 Game, right click & set as Default Device.
5. Select ASTRO A50 Voice, right click & set as Default Communication Device.
6. Navigate to your ‘Recording Devices’ tab in your Sound settings on your PC.
7. Select ASTRO A50 Voice, right click & set as Default Device & Default
Communication Device.
8. That’s it! Your A50 Wireless Headset and PC are set up and ready to game!
NOR
1. Ensure the Mode Switch on the Base Station is set to PC.
2. Plug the Micro end of the Micro USB cable into the Base Station & the USB end
into your PC.
3. Navigate to your ‘Playback Devices’ tab in your Sound settings on your PC.
Navigate to your ‘Settings,’ select ‘Sound,’ then ‘Output’ and choose ‘Digital Out’ on
your Mac. Your Mac is ready at this point!
4. Select ASTRO A50 Game, right click & set as Default Device.
5. Select ASTRO A50 Voice, right click & set as Default Communication Device.
6. Navigate to your ‘Recording Devices’ tab in your Sound settings on your PC.
7. Select ASTRO A50 Voice, right click & set as Default Device & Default
Communication Device.
8. That’s it! Your A50 Wireless Headset and PC are set up and ready to game!
EQ Mode
White 1. ASTRO
White 2. Pro
White 3. Studio
DAN: BLINKER RØDT + HØRBAR TONE / 5% OPLADNING
DEU: ROT BLINKEND + AKUSTISCHER TON / 5% BATTERIEVERMÖGEN
ESP: ROJO PARPADEANTE + TONO AUDIBLE / 5% DE CARGA
FRA: ROUGE CLIGNOTANT + SON AUDIBLE BATTERIE À 5%
ITA: ROSSO LAMPEGGIANTE + SEGNALE ACUSTICO 5% DI CARICA
NED: KNIPPEREND ROOD + GELUIDSSIGNAAL / 5% OPGELADEN
NOR: BLINKENDE RØD + LYDSIGNAL / 5 % BATTERI
POL: MIGAJĄCY CZERWONY + SYGNAŁ DŹWIĘKOWY POZIOM NAŁADOWANIA 5%
POR: VERMELHO A PISCAR + TOM AUDÍVEL / 5% CARGA
SUO: VILKKUVA PUNAINEN + ÄÄNIMERKKI 5% VARAUSTA JÄLJELLÄ
SVE: BLINKA RÖD + HÖRBAR TON / 5% LADDNING
DEU: ROT BLINKEND + AKUSTISCHER TON / 5% BATTERIEVERMÖGEN
ESP: ROJO PARPADEANTE + TONO AUDIBLE / 5% DE CARGA
FRA: ROUGE CLIGNOTANT + SON AUDIBLE BATTERIE À 5%
ITA: ROSSO LAMPEGGIANTE + SEGNALE ACUSTICO 5% DI CARICA
NED: KNIPPEREND ROOD + GELUIDSSIGNAAL / 5% OPGELADEN
NOR: BLINKENDE RØD + LYDSIGNAL / 5 % BATTERI
POL: MIGAJĄCY CZERWONY + SYGNAŁ DŹWIĘKOWY POZIOM NAŁADOWANIA 5%
POR: VERMELHO A PISCAR + TOM AUDÍVEL / 5% CARGA
SUO: VILKKUVA PUNAINEN + ÄÄNIMERKKI 5% VARAUSTA JÄLJELLÄ
SVE: BLINKA RÖD + HÖRBAR TON / 5% LADDNING
РУС: МИГАЮЩИЙ КРАСНЫЙ СВЕТ + ЗВУКОВОЙ СИГНАЛ УРОВЕНЬ ЗАРЯДКИ 5%
한국어: 깜박이는 빨간색 +가청 톤 / 5% 충전
日本語: 赤色点滅と電子音/5%充電
简化字:闪烁红色+蜂鸣声 / 电余量 5%
FRA: LED INDICATEUR / ORANGE : EN CHARGEMENT / ROUGE : ALLUMÉ
ITA: INDICATORE LED / AMBRA: IN CARICA / ROSSO: ACCESO
NED: LED-INDICATOR / ORANJE: WORDT OPGELADEN / ROOD: STAAT AAN
NOR: INDIKATOR-LED / GULT: LADER / RØD: STRØM PÅ
POL: WSKAŹNIK LED: POMARAŃCZOWY: ŁADOWANIE / CZERWONY: ZASILANIE WŁĄCZONE
POR: INDICADOR LED: ÂMBAR: A CARREGAR / VERMELHO: LIGADO
SUO: LED-MERKKIVALO: ORANSSI: AKKU LATAUTUU / PUNAINEN: VIRTA PÄÄLLÄ
SVE: LED INDIKATOR: GUL: LADDNING / RÖD: STRÖM PÅ
РУС: ИНДИКАТОР СИД: ЖЕЛТЫЙ: ЗАРЯЖАЕТСЯ / КРАСНЫЙ: ПИТАНИЕ ВКЛ.
한국어: 표시 LED; 주황색: 충전중 / 빨간색: 전원 켜진 상태
日本語: 表示LED;琥珀色:充電中/赤:起動
简化字:显示器 LED; 琥珀色:正在充电 / 红色:电源开
1
3
2
3
WHEN BATTERY STATUS IS SHOWN ON THE BASE STATION,
PAIRING IS COMPLETE.
DAN: NÅR BATTERISTATUS VISES PÅ DOCKEN, ER PARDANNELSESPROCESSEN
FULDFØRT.
DEU: WENN DER BATTERIESTATUS AN DER BASISSTATION ANGEZEIGT WIRD, IST DAS
PAIRING ABGESCHLOSSEN.
ESP: CUANDO LA ESTACIÓN BASE MUESTRA EL ESTADO DE LA BATERÍA, EL
EMPAREJAMIENTO ESTÁ COMPLETO.
FRA: LORSQUE LE STATUT DE LA BATTERIE APPARAÎT SUR LA STATION DE BASE, LE
COUPLAGE EST RÉUSSI.
ITA: QUANDO LO STATO DI CARICA DELLA BATTERIA È MOSTRATO SULLA STAZIONE
BASE, L'ACCOPPIAMENTO È COMPLETO.
NED: WANNEER DE BATTERIJSTATUS OP HET BASISSTATION WORDT WEERGEGEVEN,
IS DE KOPPELING VOLTOOID.
NOR: PARINGEN ER FULLFØRT NÅR BATTERISTATUSEN VISES PÅ BASESTASJONEN.
POL: WYŚWIETLENIE SIĘ STANU BATERII W STACJI BAZOWEJ OZNACZA ZAKOŃCZENIE
PAROWANIA.
POR: QUANDO O ESTADO DA BATERIA FOR EXIBIDO NA ESTAÇÃO BASE, O
EMPARELHAMENTO ESTÁ COMPLETO.
SUO: KUN AKUN TILA NÄKYY TUKIASEMASSA, PARILIITOS ON VALMIS.
SVE: NÄR BATTERISTATUS VISAS PÅ BASSTATIONEN ÄR SAMMANKOPPLINGEN KLAR.
DEU: WENN DER BATTERIESTATUS AN DER BASISSTATION ANGEZEIGT WIRD, IST DAS
PAIRING ABGESCHLOSSEN.
ESP: CUANDO LA ESTACIÓN BASE MUESTRA EL ESTADO DE LA BATERÍA, EL
EMPAREJAMIENTO ESTÁ COMPLETO.
FRA: LORSQUE LE STATUT DE LA BATTERIE APPARAÎT SUR LA STATION DE BASE, LE
COUPLAGE EST RÉUSSI.
ITA: QUANDO LO STATO DI CARICA DELLA BATTERIA È MOSTRATO SULLA STAZIONE
BASE, L'ACCOPPIAMENTO È COMPLETO.
NED: WANNEER DE BATTERIJSTATUS OP HET BASISSTATION WORDT WEERGEGEVEN,
IS DE KOPPELING VOLTOOID.
NOR: PARINGEN ER FULLFØRT NÅR BATTERISTATUSEN VISES PÅ BASESTASJONEN.
POL: WYŚWIETLENIE SIĘ STANU BATERII W STACJI BAZOWEJ OZNACZA ZAKOŃCZENIE
PAROWANIA.
POR: QUANDO O ESTADO DA BATERIA FOR EXIBIDO NA ESTAÇÃO BASE, O
EMPARELHAMENTO ESTÁ COMPLETO.
SUO: KUN AKUN TILA NÄKYY TUKIASEMASSA, PARILIITOS ON VALMIS.
РУС: ЕСЛИ СТАТУС БАТАРЕИ ОТОБРАЖАЕТСЯ НА БАЗОВОЙ СТАНЦИИ,
СОПРЯЖЕНИЕ ЗАВЕРШЕНО.
한국어: 배터리 상태가 베이스 스테이션에 표시되면 연결이 된 것입니다.
日本語: バッテリーの状況が表示された場合は、ペアリングは完了しています。
简化字:支架上显示电池状态,表明完成配对。
7
6
4 5
RECORDING DEVICE
PLAYBACK DEVICE
POL
1. Ensure the Mode Switch on the Base Station is set to PC.
2. Plug the Micro end of the Micro USB cable into the Base Station & the USB end
into your PC.
3. Navigate to your ‘Playback Devices’ tab in your Sound settings on your PC.
Navigate to your ‘Settings,’ select ‘Sound,’ then ‘Output’ and choose ‘Digital Out’ on
your Mac. Your Mac is ready at this point!
4. Select ASTRO A50 Game, right click & set as Default Device.
5. Select ASTRO A50 Voice, right click & set as Default Communication Device.
6. Navigate to your ‘Recording Devices’ tab in your Sound settings on your PC.
Select ASTRO A50 Voice, right click & set as Default Device & Default
7.
Communication Device.
8. That’s it! Your A50 Wireless Headset and PC are set up and ready to game!
POR
1. Ensure the Mode Switch on the Base Station is set to PC.
2. Plug the Micro end of the Micro USB cable into the Base Station & the USB end
into your PC.
3. Navigate to your ‘Playback Devices’ tab in your Sound settings on your PC.
Navigate to your ‘Settings,’ select ‘Sound,’ then ‘Output’ and choose ‘Digital Out’ on
your Mac. Your Mac is ready at this point!
4. Select ASTRO A50 Game, right click & set as Default Device.
5. Select ASTRO A50 Voice, right click & set as Default Communication Device.
6. Navigate to your ‘Recording Devices’ tab in your Sound settings on your PC.
7. Select ASTRO A50 Voice, right click & set as Default Device & Default
Communication Device.
8. That’s it! Your A50 Wireless Headset and PC are set up and ready to game!
SUO
1. Ensure the Mode Switch on the Base Station is set to PC.
2. Plug the Micro end of the Micro USB cable into the Base Station & the USB end
into your PC.
3. Navigate to your ‘Playback Devices’ tab in your Sound settings on your PC.
Navigate to your ‘Settings,’ select ‘Sound,’ then ‘Output’ and choose ‘Digital Out’ on
your Mac. Your Mac is ready at this point!
4. Select ASTRO A50 Game, right click & set as Default Device.
5. Select ASTRO A50 Voice, right click & set as Default Communication Device.
6. Navigate to your ‘Recording Devices’ tab in your Sound settings on your PC.
7. Select ASTRO A50 Voice, right click & set as Default Device & Default
Communication Device.
8. That’s it! Your A50 Wireless Headset and PC are set up and ready to game!
SVE
1. Ensure the Mode Switch on the Base Station is set to PC.
2. Plug the Micro end of the Micro USB cable into the Base Station & the USB end
into your PC.
3. Navigate to your ‘Playback Devices’ tab in your Sound settings on your PC.
Navigate to your ‘Settings,’ select ‘Sound,’ then ‘Output’ and choose ‘Digital Out’ on
your Mac. Your Mac is ready at this point!
4. Select ASTRO A50 Game, right click & set as Default Device.
5. Select ASTRO A50 Voice, right click & set as Default Communication Device.
6. Navigate to your ‘Recording Devices’ tab in your Sound settings on your PC.
7. Select ASTRO A50 Voice, right click & set as Default Device & Default
Communication Device.
8. That’s it! Your A50 Wireless Headset and PC are set up and ready to game!
РУС
1. Ensure the Mode Switch on the Base Station is set to PC.
2. Plug the Micro end of the Micro USB cable into the Base Station & the USB end
into your PC.
3. Navigate to your ‘Playback Devices’ tab in your Sound settings on your PC.
Navigate to your ‘Settings,’ select ‘Sound,’ then ‘Output’ and choose ‘Digital Out’ on
your Mac. Your Mac is ready at this point!
4. Select ASTRO A50 Game, right click & set as Default Device.
5. Select ASTRO A50 Voice, right click & set as Default Communication Device.
6. Navigate to your ‘Recording Devices’ tab in your Sound settings on your PC.
7. Select ASTRO A50 Voice, right click & set as Default Device & Default
Communication Device.
8. That’s it! Your A50 Wireless Headset and PC are set up and ready to game!
한국어
1. Ensure the Mode Switch on the Base Station is set to PC.
2. Plug the Micro end of the Micro USB cable into the Base Station & the USB end
into your PC.
3. Navigate to your ‘Playback Devices’ tab in your Sound settings on your PC.
Navigate to your ‘Settings,’ select ‘Sound,’ then ‘Output’ and choose ‘Digital Out’ on
your Mac. Your Mac is ready at this point!
4. Select ASTRO A50 Game, right click & set as Default Device.
5. Select ASTRO A50 Voice, right click & set as Default Communication Device.
6. Navigate to your ‘Recording Devices’ tab in your Sound settings on your PC.
7. Select ASTRO A50 Voice, right click & set as Default Device & Default
Communication Device.
8. That’s it! Your A50 Wireless Headset and PC are set up and ready to game!
日本語
1. Ensure the Mode Switch on the Base Station is set to PC.
2. Plug the Micro end of the Micro USB cable into the Base Station & the USB end
into your PC.
3. Navigate to your ‘Playback Devices’ tab in your Sound settings on your PC.
Navigate to your ‘Settings,’ select ‘Sound,’ then ‘Output’ and choose ‘Digital Out’ on
your Mac. Your Mac is ready at this point!
4. Select ASTRO A50 Game, right click & set as Default Device.
5. Select ASTRO A50 Voice, right click & set as Default Communication Device.
6. Navigate to your ‘Recording Devices’ tab in your Sound settings on your PC.
7. Select ASTRO A50 Voice, right click & set as Default Device & Default
Communication Device.
8. That’s it! Your A50 Wireless Headset and PC are set up and ready to game!
简化字
1. Ensure the Mode Switch on the Base Station is set to PC.
2. Plug the Micro end of the Micro USB cable into the Base Station & the USB end
into your PC.
3. Navigate to your ‘Playback Devices’ tab in your Sound settings on your PC.
Navigate to your ‘Settings,’ select ‘Sound,’ then ‘Output’ and choose ‘Digital Out’ on
your Mac. Your Mac is ready at this point!
4. Select ASTRO A50 Game, right click & set as Default Device.
5. Select ASTRO A50 Voice, right click & set as Default Communication Device.
6. Navigate to your ‘Recording Devices’ tab in your Sound settings on your PC.
7. Select ASTRO A50 Voice, right click & set as Default Device & Default
Communication Device.
8. That’s it! Your A50 Wireless Headset and PC are set up and ready to game!
www.astrogaming.com/support/manuals/
Download full user's guide at
Part Number XXXXXXXXXX
Part Number XXXXXXXXXX
 Loading...