

Page 1
Logitech
®
Installation
Premium Desktop Optical
Page 2

623251-0914.A
FCC Compliance and Advisory Statement.
the following two conditions: 1) this device may not cause harmful interference, and 2) this device must accept any interference received,
including interference that may cause undesired operation. This equipment has been tested and found to comply with the limits for a Class B
digital device, pursuant to Part 15 of the FCC Rules. These limits are designed to provide reasonable protection against harmful interference
in a residential installation. This equipment generates, uses, and can radiate radio frequency energy and, if not installed or used in accordance
with the instructions, may cause harmful interference to radio communications. However, there is no guarantee that interference will not occur
in a particular installation. If this equipment does cause harmful interference to radio or television reception, which can be determined by turning
the equipment off and on, the user is encouraged to try to correct the interference by one or more of the following measures: 1) reorient or
relocate the receiving antenna; 2) increase the separation between the equipment and the receiver; 3) connect the equipment to an outlet on
a circuit different from that to which the receiver is connected; 4) consult the dealer or an experienced radio/TV technician for help. Any changes
or modifications not expressly approved by the party responsible for compliance could void the user's authority to operate the equipment.
Where shielded interface cables have been provided with the product or specified additional components or accessories elsewhere defined
to be used with the installation of the product, they must be used in order to ensure compliance with FCC regulations.
Canadian DOC Statement.
in the interference-causing equipment standard entitled “Digital Apparatus,” ICES-003 of the Department of Communications.
This device complies with RSS-210 of Industry and Science Canada. Operation is subject to the following two conditions: 1) this device may not
cause interference, and 2) this device must accept any interference, including interference that may cause undesired operation of the device.
This digital device does not exceed the Class B limits for radio noise emissions from digital apparatus specified
This hardware device complies with Part 15 of the FCC Rules. Operation is subject to
ii
Page 3

Contents
English . . . . . . . . . . . . . . . . . . . . . . . . . . . . . . . . . . . . . . . . . . . . . . . . . . . . . . . . . . . . . . 1
Deutsch . . . . . . . . . . . . . . . . . . . . . . . . . . . . . . . . . . . . . . . . . . . . . . . . . . . . . . . . . . . . . 5
Français . . . . . . . . . . . . . . . . . . . . . . . . . . . . . . . . . . . . . . . . . . . . . . . . . . . . . . . . . . . . . 9
Italiano . . . . . . . . . . . . . . . . . . . . . . . . . . . . . . . . . . . . . . . . . . . . . . . . . . . . . . . . . . . . 13
Español . . . . . . . . . . . . . . . . . . . . . . . . . . . . . . . . . . . . . . . . . . . . . . . . . . . . . . . . . . . . 17
Português . . . . . . . . . . . . . . . . . . . . . . . . . . . . . . . . . . . . . . . . . . . . . . . . . . . . . . . . . . 21
Nederlands. . . . . . . . . . . . . . . . . . . . . . . . . . . . . . . . . . . . . . . . . . . . . . . . . . . . . . . . . . 25
Svenska . . . . . . . . . . . . . . . . . . . . . . . . . . . . . . . . . . . . . . . . . . . . . . . . . . . . . . . . . . . . 29
Dansk . . . . . . . . . . . . . . . . . . . . . . . . . . . . . . . . . . . . . . . . . . . . . . . . . . . . . . . . . . . . . 33
Norsk . . . . . . . . . . . . . . . . . . . . . . . . . . . . . . . . . . . . . . . . . . . . . . . . . . . . . . . . . . . . . . 37
Suomi . . . . . . . . . . . . . . . . . . . . . . . . . . . . . . . . . . . . . . . . . . . . . . . . . . . . . . . . . . . . . 41
Ελληνικά
По-русски
Magyar
Česká verze
Po polsku
. . . . . . . . . . . . . . . . . . . . . . . . . . . . . . . . . . . . . . . . . . . . . . . . . . . . . . . . . . 45
. . . . . . . . . . . . . . . . . . . . . . . . . . . . . . . . . . . . . . . . . . . . . . . . . . . . . . . . . 51
. . . . . . . . . . . . . . . . . . . . . . . . . . . . . . . . . . . . . . . . . . . . . . . . . . . . . . . . . . . . 57
. . . . . . . . . . . . . . . . . . . . . . . . . . . . . . . . . . . . . . . . . . . . . . . . . . . . . . . . 63
. . . . . . . . . . . . . . . . . . . . . . . . . . . . . . . . . . . . . . . . . . . . . . . . . . . . . . . . . . 69
iii
Page 4

Page 5

Important Ergonomic Information
1
233
1
Long periods of repetitive motions using an improperly set-up workspace, incorrect body position,
and poor work habits may be associated with physical discomfort and injury to nerves, tendons,
and muscles. If you feel pain, numbness, weakness, swelling burning, cramping, or stiffness
in these areas, see a qualified health professional. For more information, please read the Comfort
Guidelines found in the help system located on the Logitech® software CD and on the Logitech web site
at
http://www.logitech.com/comfort
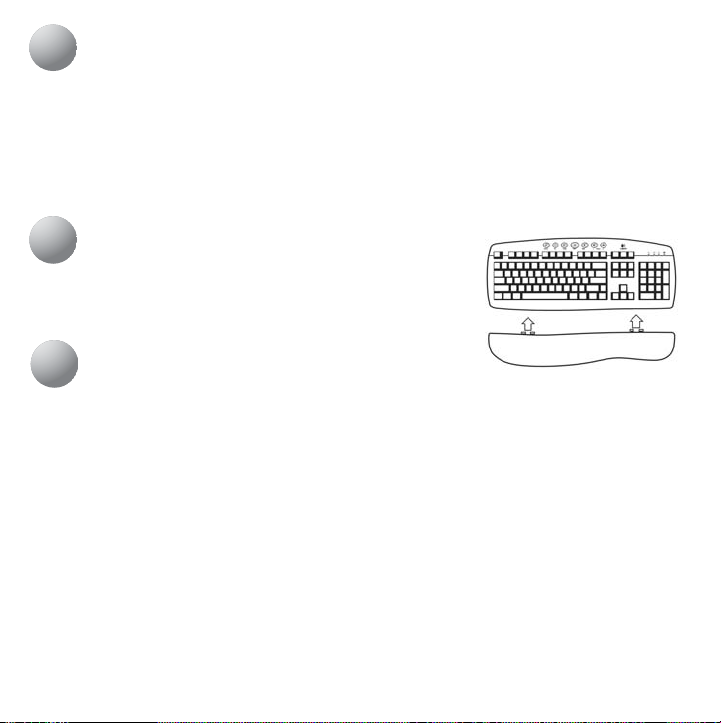
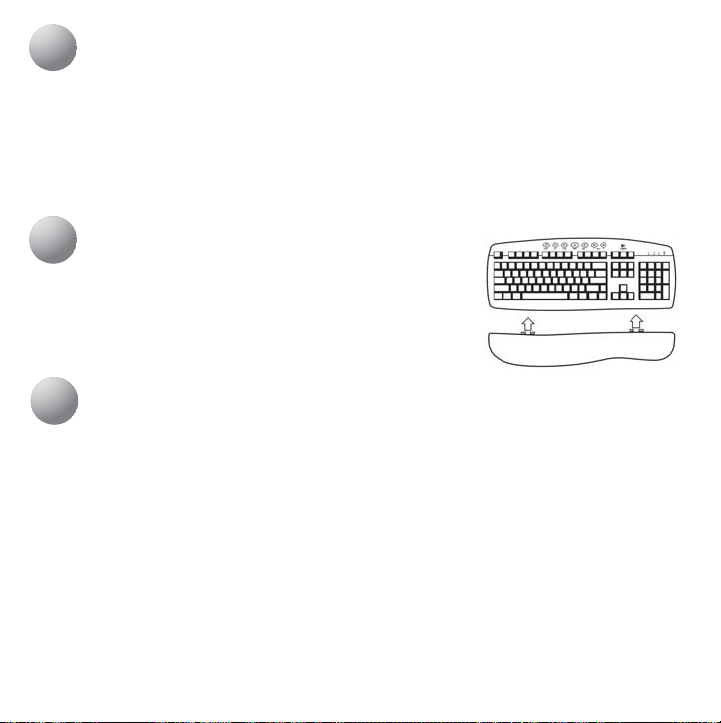
Connect the Palm Rest to the Keyboard
2
Line up the tabs on the palm rest with the slots on the keyboard,
which are located in front and underneath. Then snap both units
together.
Adjust the Keyboard Legs
The keyboard legs are located underneath and at the back of the keyboard. They are designed
to accommodate personal preferences regarding wrist position when typing. Pull out or push in
the keyboard legs to the most comfortable position for you.
.
English
1
Page 6
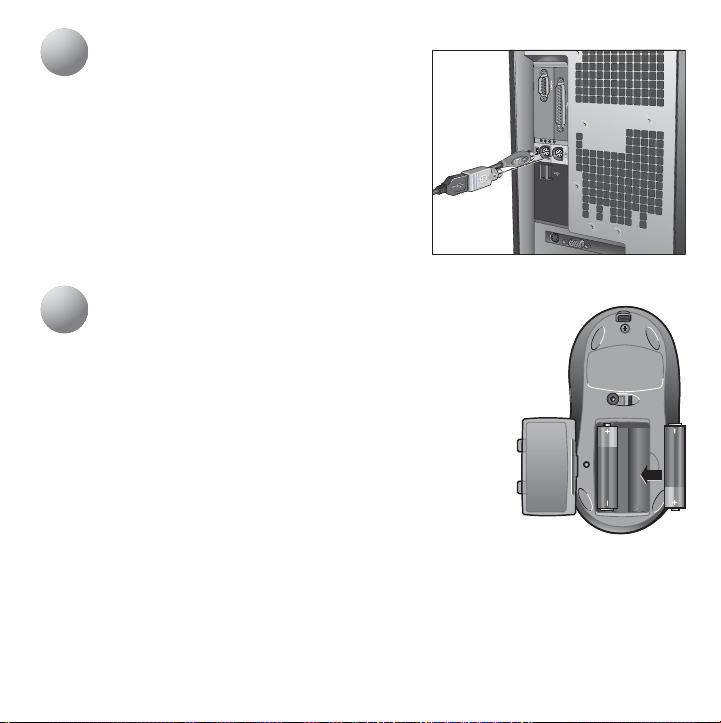
Connect the Keyboard
4
5
4
1.
Turn off your computer, and then remove the existing
keyboard and mouse.
2.
Plug the green PS/2 connector into the PS/2 mouse
port on the computer.
into the PS/2 keyboard port on your computer.
3.
Restart your computer.
Set Up and Activate the Mouse
5
1.
Open the battery compartment on the bottom of the mouse.
2.
Insert the batteries inside the battery compartment.
Refer to the battery diagram inside the compartment.
Replace the battery compartment door when finished.
3.
Make sure the keyboard’s PS/2 cable is plugged into the
computer’s PS/2 keyboard port.
4.
Establish communications: a) Press the red “Connect” button
on the bottom of the keyboard; b) Then press the red “Connect”
button on the bottom of the mouse.
5.
The mouse is active now. For more information about mouse
buttons, refer to the online help system located on your hard disk.
Plug the purple PS/2 connector
2
English
Page 7

Install the Software
6
7
8
9
6
1.
Insert the software CD into your CD-ROM drive, and then follow the on-screen instructions
to install the software.
2.
If the setup screen does not appear when you insert the CD, you will need to launch the setup
program manually. Click the “Start” button and choose “Run.” Type [drive]: setup and press Enter.
Note: replace [drive] with the letter of your CD-ROM where you inserted the software CD
(e.g., d: setup).
Using the Logitech Productivity Keys
7
The Hot-keys, located at the top of the keyboard, give you instant one-touch access to frequently
used programs and commands: Search, Files, E-mail, WWW, Mute, Volume -, and Volume +.
For more information about these keys, refer to the online help system located on your hard drive.
Keyboard Lights
8
The four lights (LEDs) located on the top right of the keyboard tell you whether the following functions
are on or off: Num Lock, Caps Lock, and Scroll Lock. If a light is on, the corresponding function is on.
If the light is off, the function is off. Note that the right LED is the cordless indicator.
Customizing the Hot-keys
9
The software on the CD (provided with the keyboard) allows you to customize the Logitech® Hot-keys
to meet your specific requirements. Insert the software CD into the CD-ROM drive, and then follow
the on-screen instructions to customize the Hot-keys. Installation of the included software is required
for all the features to operate properly.
English
3
Page 8

10
10
11
My keyboard does not work!
The Hot-keys or Feature keys do not work!
Troubleshooting
• Check the keyboard cable connection. Make sure that the keyboard cable has been plugged
into the computer’s keyboard PS/2 port and
• Check the help system on your hard drive for more information.
• Make sure to install the software located on the CD, and make sure the software is running.
• Be sure to un-install any previously installed keyboard customization software.
• Check the help system located on your hard drive.
• Make sure your Internet connection is working properly.
NOT
the mouse PS/2 port.
11
To help you get the most from the keyboard, a help system is located on the Logitech® software CD.
This help system gives you valuable information about your product, so we encourage you to take
the time to read it.
During the software installation, the help system was copied to your hard drive. After installation,
you can either view the contents of the help system on your computer screen or print it out.
You can find the help system shortcut from your computers “Start menu.”
This product comes with a limited two-year warranty. For more information, please read the Product
Warranty section found in the help system located on the Logitech software CD.
4
Refer to the Online Help System!
English
Page 9
Wichtige Hinweise zur Arbeitsplatzeinrichtung
1
233
1
Über einen längeren Zeitraum sich wiederholende Bewegungen, ein schlecht eingerichteter
Arbeitsplatz, falsche Körperhaltung und schlechte Arbeitsgewohnheiten können zu körperlichen
Beschwerden oder Schädigung der Nerven, Sehnen und Muskeln führen. Sollten Sie Schmerzen,
Taubheit, Schwäche, Schwellungen, Brennen oder Krämpfe in diesen Bereichen spüren,
konsultieren Sie einen Arzt. Weitere Informationen hierzu finden Sie in den “Richtlinien zur
Vermeidung von Gesundheitsschäden” auf der Logitech®-Software-CD und auf der Logitech-Website
unter
http://www.logitech.com/comfort
Anbringen der Handballenauflage
2
an der Tastatur
Richten Sie die Laschen an der Handballenauflage mit den Schlitzen
an der Vorder- und Unterseite der Tastatur aus und drücken Sie
die Teile zusammen, bis sie einrasten.
Einstellen der Tastaturfüße
Die Tastaturfüße sind hinten an der Unterseite der Tastatur angebracht. Sie ermöglichen die optimale
Stellung des Handgelenks beim Tippen. Probieren Sie aus, welche Stellung der Füße für Sie am
bequemsten ist.
.
Deutsch
5
Page 10
Anschließen der Tastatur
4
5
4
1.
Schalten Sie den Computer aus und entfernen Sie die
vorhandene Tastatur und die Maus.
2.
Schließen Sie den grünen PS/2-Stecker an der PS/2Mausschnittstelle des Computers an. Schließen Sie
den violetten PS/2-Stecker an der PS/2Tastaturschnittstelle des Computers an.
3.
Schalten Sie den Computer wieder ein.
Einrichten und Aktivieren der
5
Maus
1.
Öffnen Sie das Batteriefach an der Unterseite der Maus.
2.
Legen Sie die Batterien in das Batteriefach ein. Richten Sie sich
nach der Abbildung im Batteriefach. Schließen Sie anschließend
den Batteriefachdeckel.
3.
Vergewissern Sie sich, dass das PS/2-Kabel der Tastatur
an der PS/2-Tastaturschnittstelle des Computers angeschlossen ist.
4.
So stellen Sie die Verbindung her: Drücken Sie die rote Taste
“Connect” auf der Tastaturunterseite und anschließend
die entsprechende Taste auf der Mausunterseite.
5.
Die Maus ist nun aktiv. Weitere Informationen zu den Maustasten finden Sie in der Online-Hilfe
auf der Festplatte.
6
Deutsch
Page 11

Installieren der Software
6
7
8
9
6
1.
Legen Sie die Software-CD ein und folgen Sie den Anweisungen zum Installieren der Software
auf dem Bildschirm.
2.
Erscheint der Startbildschirm nach dem Einlegen der CD nicht, müssen Sie das SetupProgramm manuell starten. Wählen Sie im Menü “Start” die Option “Ausführen”.
Geben Sie “[Laufwerk]:\setup” ein, wobei [Laufwerk] der Buchstabe des CD-ROM-Laufwerks ist
(z.B. d:\setup), und drücken Sie die Eingabetaste.
Die Logitech-Tasten
7
Die Sondertasten ermöglichen das einfache Aufrufen von häufig verwendeten Programmen
und Befehlen: „Suchen“, “Dateien”, “E-Mail”, “WWW”, “Stumm”, “Lautstärke -” und “Lautstärke +”.
Weitere Informationen zu diesen Tasten finden Sie in der Online-Hilfe auf der Festplatte.
Tastatur-LEDs
8
Die vier LEDs in der oberen rechten Ecke der Tastatur zeigen an, ob folgende Funktionen aktiviert
bzw. deaktiviert sind: Num, Umschaltfeststeller und Rollen. Leuchtet die LED, ist die betreffende
Funktion aktiviert, leuchtet sie nicht, ist sie deaktiviert. Die rote LED zeigt den Status der kabellosen
Verbindung an.
Anpassen der Sondertasten
9
Die im Lieferumfang der Tastatur enthaltene CD enthält eine Software, mit der Sie die Logitech®Sondertasten an Ihre individuellen Bedürfnisse anpassen können. Legen Sie die Software-CD ein und
folgen Sie den Anweisungen zum Belegen der Sondertasten. Damit alle Funktionen ordnungsgemäß
laufen, muss die beiliegende Software installiert werden.
Deutsch
7
Page 12

10
10
11
Die Tastatur funktioniert nicht
Die Sonder- oder Funktionstasten funktionieren nicht!
Fehleranalyse
• Überprüfen Sie die Kabelverbindung. Vergewissern Sie sich, dass das Tastaturkabel an der PS/
2-Tastaturschnittstelle des Computers angeschlossen ist, und
•Weitere Informationen hierzu finden Sie in der Online-Hilfe.
•Vergewissern Sie sich, dass die Software installiert ist und dass sie läuft.
• Deinstallieren Sie bereits installierte Tastatur-Software.
•Weitere Informationen hierzu finden Sie in der Online-Hilfe.
• Prüfen Sie, ob die Internet-Verbindung ordnungsgemäß funktioniert.
nicht
an der Mausschnittstelle.
11
Die Online-Hilfe von Logitech® enthält wertvolle Informationen zu diesem Gerät, die Sie sich nicht
entgehen lassen sollten.
Während der Software-Installation wird die Online-Hilfe auf die Festplatte kopiert. Sie können sie
danach entweder direkt am Bildschirm lesen oder ausdrucken. Das Startmenü enthält eine
Verknüpfung zur Online-Hilfe.
Für dieses Gerät besteht eine beschränkte Garantie von zwei Jahren. Weitere Informationen hierzu
finden Sie in der Produktgarantie in der Online-Hilfe.
8
Weitere Informationen finden Sie in der Online-Hilfe.
Deutsch
Page 13
Informations importantes relatives au confort
1
233
1
Des tâches répétitives effectuées pendant de longues périodes et un espace de travail mal agencé
risquent de provoquer un certain inconfort, voire des blessures au niveau des nerfs, des tendons
et des muscles. Si vous ressentez des douleurs, engourdissements, faiblesses, gonflements, brûlures,
crampes ou raideurs à ces endroits, consultez un médecin. Pour plus d’informations, veuillez consulter
le guide Logitech et votre confort, situé dans le système d'aide du CD du logiciel Logitech® et sur le site
Web de Logitech à l'adresse suivante:
Fixation de l’appuie-poignets au clavier
2
Alignez les taquets de l’appuie-poignets sur les fentes du clavier,
situées sur l’avant et en dessous, puis assemblez les deux unités.
Réglage des pieds du clavier
Les pieds se situent sous le clavier et à l’arrière de celui-ci. Ils permettent à l’utilisateur de choisir
la position du poignet qu’il préfère lors de la frappe. Dépliez ou rabattez les pieds du clavier pour
obtenir la position vous convenant le mieux.
http://www.logitech.com/comfort.
Français
9
Page 14
Connexion du clavier
4
5
4
1.
Eteignez votre ordinateur, puis retirez la souris et le
clavier existants.
2.
Branchez le connecteur PS/2 vert sur le port souris PS/2
de l'ordinateur. Branchez le connecteur PS/2 violet sur
le port clavier PS/2 de l'ordinateur.
3.
Redémarrez l’ordinateur.
Installation et activation de la
5
souris
1.
Ouvrez le logement des piles situé sous la souris.
2.
Insérez-y les piles. Reportez-vous au schéma dessiné à l’intérieur
du logement des piles. Replacez le couvercle une fois les piles
en place.
3.
Vérifiez que le câble PS/2 du clavier est branché sur le port clavier
PS/2 de l'ordinateur.
4.
Etablissez la communication: a) Appuyez sur le bouton
de connexion rouge situé sous le clavier; b) Appuyez ensuite sur
le bouton de connexion rouge situé sous la souris.
5.
La souris est à présent activée. Pour de plus amples informations
sur les boutons de la souris, consultez l’aide en ligne située sur votre disque dur.
10
Français
Page 15

Installation du logiciel
6
7
8
9
6
1.
Insérez le CD du logiciel dans le lecteur de CD-ROM, puis suivez les instructions qui s'affichent
à l'écran pour installer ce logiciel.
2.
Si l’écran d’installation ne s’affiche pas après l’insertion du CD, vous devrez lancer le programme
d’installation manuellement. Cliquez sur le bouton Démarrer, puis sélectionnez la commande
Exécuter. Tapez [lecteur]:setup et appuyez sur Entrée. Remarque: remplacez [lecteur] par la
lettre correspondant au lecteur dans lequel vous avez inséré le CD du logiciel (ex.: D: setup).
Utilisation des touches de productivité Logitech
7
Les touches de raccourci, situées dans la partie supérieure du clavier, offrent un accès direct
et instantané aux commandes et programmes fréquemment utilisés: Recherche, Fichiers, Email,
WWW, Muet, Volume - et Volume +.
Pour de plus amples informations sur ces touches, consultez l’aide en ligne située sur votre disque dur.
Témoins lumineux du clavier
8
Les quatre témoins lumineux, situés dans la partie supérieure droite du clavier, indiquent si
les fonctions suivantes sont activées ou non: Verr. Num, Verr. Maj et Arrêt défil. Si le témoin est allumé,
la fonction correspondante est activée. S’il est éteint, elle est désactivée. Le témoin rouge correspond
à l'indicateur sans fil.
Personnalisation des touches de raccourci
9
Le logiciel du CD (fourni avec le clavier) permet de personnaliser les touches de raccourci Logitech®
pour répondre à vos besoins spécifiques. Insérez le CD du logiciel dans le lecteur de CD-ROM,
puis suivez les instructions qui s'affichent à l'écran pour personnaliser les touches de raccourci.
Français
11
Page 16

L’installation du logiciel fourni est obligatoire pour obtenir un bon fonctionnement de toutes
10
11
les fonctions.
10
Mon clavier ne fonctionne pas!
Les touches de raccourci ou les touches F ne fonctionnent pas!
11
Pour vous aider à tirer le meilleur parti de votre clavier, le CD du logiciel Logitech® comprend
un système d'aide. Ce système d'aide fournit des informations importantes sur votre produit;
nous vous recommandons donc de le lire.
Durant l’installation du logiciel, le système d'aide est copié sur le disque dur. Après l’installation,
vous pouvez soit visualiser le contenu de l'Aide à l’écran, soit l’imprimer. Le raccourci du système d'aide
se trouve dans le menu Démarrer de votre ordinateur.
Ce produit est fourni avec une garantie limitée de deux ans. Pour plus d’informations, veuillez lire
la section intitulée Garantie du produit dans le système d'aide situé sur le CD du logiciel Logitech.
12
Dépannage
• Vérifiez la connexion du câble du clavier. Vérifiez que le câble du clavier est branché sur
le port PS/2 pour clavier de l'ordinateur et
•Reportez-vous au système d'aide situé sur votre disque dur pour de plus amples informations.
•Veillez à bien installer le logiciel situé sur le CD et à vérifier son bon fonctionnement.
• Assurez-vous de désinstaller tous les logiciels de personnalisation du clavier déjà installés.
• Consultez le système d'aide situé sur votre disque dur.
• Vérifiez que votre connexion à Internet fonctionne correctement.
NON
sur le port PS/2 pour souris.
Pensez à consulter l'aide en ligne!
Français
Page 17
Importanti informazioni sul comfort
1
233
1
Lunghi periodi di attività ripetitiva, un utilizzo inadeguato dell’area di lavoro, una postura scorretta
e cattive abitudini possono provocare dolori e lesioni a nervi, tendini e muscoli. Se una di queste parti
fa male, è intorpidita, debole, gonfia o rigida o si avvertono crampi o sensazioni di bruciore,
consultare un medico. Per ulteriori informazioni consultare la sezione relativa alle indicazioni
per il massimo comfort riportata nella Guida in linea nel CD del software Logitech® o nel sito Web
di Logitech all'indirizzo
Fissaggio del supporto per i polsi
2
alla tastiera
Allineare le tacchette sul supporto per i polsi con gli appositi fori posti
nella parte anteriore e inferiore della tastiera. Agganciare quindi
le due unità.
Regolazione dei piedini della tastiera
I piedini della tastiera si trovano sotto la tastiera, verso la parte posteriore. La loro regolazione consente
di soddisfare le esigenze personali relative alla posizione dei polsi e alla digitazione. Estrarre o ritrarre
i piedini nella posizione più confortevole.
http://www.logitech.com/comfort.
Italiano
13
Page 18

Collegamento della tastiera
4
5
4
1.
Spegnere il computer e rimuovere la tastiera e il
mouse collegati.
2.
Collegare il connettore verde PS/2 alla porta mouse
PS/2 del computer. Collegare il connettore viola PS/2
alla porta tastiera PS/2 del computer.
3.
Riavviare il computer.
Installazione e attivazione del
5
mouse
1.
Aprire l'alloggiamento delle batterie che si trova nella parte
inferiore del mouse.
2.
Inserire le batterie all'interno dell'alloggiamento. Fare riferimento
al disegno all'interno del vano. Al termine, chiudere il coperchio
dell’alloggiamento delle batterie.
3.
Assicurarsi che il cavo PS/2 della tastiera sia collegato alla porta
tastiera PS/2 del computer.
4.
Stabilire la connessione: a) premere il pulsante di connessione
rosso sulla parte inferiore della tastiera; b) quindi premere
il pulsante di connessione rosso sulla parte inferiore del mouse.
5.
A questo punto il mouse è attivo. Per ulteriori informazioni sui pulsanti del mouse consultare
la guida in linea sul disco rigido.
14
Italiano
Page 19

Installazione del software
6
7
8
9
6
1.
Inserire il CD del software nell’apposita unità e quindi seguire le istruzioni visualizzate sullo
schermo per installare il software.
2.
Se non viene visualizzata la schermata di installazione quando si inserisce il CD, sarà necessario
avviare il programma di installazione manualmente. Fare clic sul pulsante Avvio e scegliere Esegui.
Digitare [unità]: setup e premere Invio. Nota: al posto di [unità] immettere la lettera
corrispondente all'unità CD-ROM dove è stato inserito il CD del software. setup).
Utilizzo dei tasti dedicati Logitech
7
I tasti dedicati situati nella parte superiore della tastiera consentono di accedere direttamente
a programmi e comandi utilizzati di frequente: Cerca, File, Posta elettronica, WWW, Mute, Volume e Volume +.
Per ulteriori informazioni su questi tasti consultare la guida in linea sul disco rigido.
Spie della tastiera
8
Le quattro spie luminose (LED) situate nell'angolo in alto a destra della tastiera informano l'utente
dell'attivazione/disattivazione delle seguenti funzioni: Blocco Num, Blocco Maiusc e Blocco Scorr.
Se una spia è accesa, la relativa funzione è attivata. Se la spia è spenta, la funzione è disattivata.
Notare che il LED destro è l'indicatore cordless.
Personalizzazione dei tasti dedicati
9
Il software contenuto nel CD fornito con la tastiera consente di personalizzare i tasti dedicati Logitech®
in base alle esigenze personali. Inserire il CD del software nell’apposita unità e quindi seguire le
istruzioni visualizzate sullo schermo per personalizzare i tasti dedicati. Per garantire il funzionamento
corretto di tutte le funzionalità, è necessario installare il software fornito in dotazione.
Italiano
15
Page 20

10
10
11
La tastiera non funziona.
I tasti funzione o i tasti dedicati non funzionano.
Risoluzione dei problemi
• Controllare i collegamenti del cavo della tastiera. Verificare di avere inserito il cavo
della tastiera nella porta tastiera PS/2 del PC e
•Fare riferimento alla Guida in linea nel disco rigido per ulteriori informazioni.
•Verificare di avere installato il software presente nel CD e assicurarsi che il software sia
in esecuzione.
• Disinstallare qualsiasi altro software di personalizzazione della tastiera.
•Fare riferimento alla Guida in linea che si trova sul disco rigido.
•Verificare che la connessione a Internet funzioni correttamente.
NON
nella porta mouse PS/2.
11
Per sfruttare al meglio la tastiera, è disponibile una Guida in linea nel CD del software Logitech®.
Questa Guida offre informazioni utili sul prodotto e se ne consiglia una lettura attenta.
Durante l'installazione del software la Guida viene copiata sul disco rigido. Una volta terminata
l'installazione è possibile visualizzare la Guida in linea sullo schermo oppure stamparla. Il collegamento
alla Guida in linea è presente nel menu Start.
Questo prodotto viene fornito con una garanzia limitata di due anni. Per ulteriori informazioni leggere
la sezione sulla Garanzia del prodotto nella Guida in linea nel CD Logitech.
16
Consultazione della Guida in linea
Italiano
Page 21

Información sanitaria importante
1
233
1
Realizar tareas repetidas durante largos periodos de tiempo, una disposición inadecuada del lugar
de trabajo, una posición incorrecta del cuerpo y hábitos de trabajo deficientes pueden ocasionar
cansancio y lesiones físicas en nervios, tendones y músculos. Ante cualquier síntoma de dolor,
hormigueo, debilidad, inflamación, calambre o agarrotamiento en estas zonas, póngase en contacto
con un profesional sanitario titulado. Para más información, consulte las Recomendaciones para evitar
el cansancio, detalladas en el sistema de ayuda ubicado en el CD de software Logitech® y en la página
Web de Logitech,
2
Alinee las lengüetas del reposamanos con las ranuras del teclado,
situadas en la parte delantera y en la base. Acople las dos unidades.
Las patas del teclado se encuentran en la parte inferior y posterior del teclado. Se han diseñado
para satisfacer los requisitos individuales de colocación de las muñecas al escribir. Puede plegarlas
o desplegarlas para colocar el teclado en la posición que le resulte más cómoda.
http://www.logitech.com/comfort.
Acoplamiento del reposamanos
al teclado
Ajuste de las patas del teclado
Español
17
Page 22

Conexión del teclado
4
5
4
1.
Apague el ordenador y retire el teclado y ratón
instalados actualmente.
2.
Conecte el conector PS/2 verde al puerto de ratón PS/2
del ordenador. Conecte el conector PS/2 morado al
puerto de teclado PS/2 del ordenador.
3.
Reinicie el ordenador.
Instalación y activación del ratón
5
1.
Abra la tapa del compartimento de las pilas, ubicada en la parte
inferior del ratón.
2.
Coloque las pilas en el interior del compartimento.
Consulte el diagrama de las pilas, en el interior del compartimento.
Cierre la tapa del compartimento de las pilas.
3.
Asegúrese de conectar el cable PS/2 del teclado al puerto
de teclado PS/2 del ordenador.
4.
Establezca la comunicación: a) Pulse el botón rojo de conexión
situado en la parte inferior del teclado; b) A continuación,
pulse el botón rojo de conexión situado en la parte inferior
del ratón.
5.
El ratón se activará. Para más información sobre los botones de los ratones, consulte el sistema
de ayuda en pantalla, ubicado en el disco duro.
18
Español
Page 23

Instale el software
6
7
8
9
6
1.
Introduzca el CD del software en la unidad de CD-ROM del ordenador y siga las instrucciones
en pantalla para instalar el software.
2.
Si no aparece la pantalla de instalación al introducir el CD, deberá iniciar el programa
de instalación manualmente. Haga clic en Inicio y elija Ejecutar. Escriba [unidad]: setup y pulse
la tecla Entrar. Nota: sustituya [unidad] por la letra de la unidad de CD-ROM en la que ha
introducido el CD del software (por ejemplo d: setup).
Uso de los botones y teclas de productividad Logitech
7
Los botones de acceso rápido situados en la parte superior del teclado proporcionan acceso inmediato
con un solo toque a programas y comandos usados con frecuencia: Buscar, Archivos, E-mail, WWW,
Mute, Volumen - y Volumen +.
Para más información sobre estos botones, consulte el sistema de ayuda en pantalla, ubicado en
el disco duro.
Indicadores luminosos del teclado
8
Los cuatro (4) indicadores luminosos (LED) situados en la parte superior derecha del teclado indican
si las funciones siguientes están activadas o desactivadas: Bloqueo numérico, Bloqueo de mayúsculas
y Bloqueo de desplazamiento. Si el indicador está iluminado, significa que la función correspondiente
está activada. Si el indicador está apagado, significa que la función está desactivada. Observe que
el indicador de la derecha es el indicador inalámbrico.
Personalización de los botones de acceso rápido
9
El software incluido en el CD suministrado con el teclado permite personalizar los botones de acceso
Español
19
Page 24

rápido Logitech® según los requisitos específicos de cada usuario. Introduzca el CD del software en
10
11
la unidad de CD-ROM del ordenador y siga las instrucciones en pantalla para personalizar los botones
de acceso rápido. Se requiere la instalación del software incluido para el correcto funcionamiento
de las prestaciones adicionales.
10
¡El teclado no responde!
¡Los botones de acceso rápido o las teclas de función no responden!
11
Para ayudarle a obtener el máximo partido del teclado, el CD de Logitech® incluye un sistema de ayuda.
Dicho sistema contiene información importante sobre el producto, por lo que es aconsejable leerlo
detenidamente.
Durante la instalación del software, el sistema de ayuda se copia en el disco duro. Una vez concluida
la instalación, puede imprimir el sistema de ayuda o consultarlo en pantalla. Puede encontrar el acceso
directo al sistema de ayuda en el menú Inicio del ordenador.
Este producto tiene dos años de garantía limitada. Para más información, consulte la sección
de garantía de producto que aparece en el sistema de ayuda ubicado en el CD del software Logitech.
20
Resolución de problemas
• Compruebe la conexión del cable del teclado. Asegúrese de que el cable del teclado
se ha conectado al puerto de teclado PS/2 del ordenador y NO al puerto PS/2 del ratón.
•Para más información, compruebe el sistema de ayuda ubicado en el disco duro.
• Compruebe la instalación del software ubicado en el CD y que la ejecución del mismo.
• Desinstale cualquier software de personalización de teclado instalado previamente.
• Compruebe el sistema de ayuda ubicado en el disco duro.
• Asegúrese de que no existen problemas de conexión a Internet.
Consulte el sistema de ayuda en pantalla
Español
Page 25

Informações importantes sobre ergonomia
1
233
1
Longos períodos de movimento repetitivo, num espaço de trabalho inadequado, com uma posição
incorrecta do corpo e maus hábitos de trabalho podem relacionar-se com desconforto físico e lesões
dos nervos, tendões e músculos. Se sentir dor, dormência, fraqueza, inchaço, ardor, cãibra ou rigidez
nestas áreas, consulte um médico qualificado. Para obter mais informações, leia as orientações
de conforto no sistema de ajuda no CD do software Logitech®ou no site da Web da Logitech
em http://www.logitech.com/comfort.
Anexe o apoio para as palmas ao teclado
2
Alinhe as patilhas do apoio para as palmas com as ranhuras
do teclado, que se encontram na parte da frente e por baixo.
Depois encaixe as duas peças.
Ajuste as pernas do teclado
As pernas do teclado encontram-se na parte de baixo e de trás do teclado. Foram concebidas para
se ajustarem às preferências pessoais relativamente à posição do pulso ao digitar. Puxe para fora
ou empurre para dentro as pernas do teclado até obter a posição que é mais confortável para si.
Português 21
Page 26

Ligue o teclado
4
5
4
1. Desligue o computador e, em seguida, remova o
teclado e o rato existentes.
2. Ligue o conector PS/2 verde à porta de rato PS/2 no
computador. Ligue o conector PS/2 roxo à porta de
teclado PS/2 no computador.
3. Reinicie o computador.
Configure e active o rato
5
1. Abra o compartimento das pilhas na parte de baixo do rato.
2. Insira as pilhas no compartimento das pilhas. Consulte o diagrama
das pilhas dentro do compartimento. Volte a colocar a porta
do compartimento das pilhas depois de ter acabado.
3. Certifique-se de que o cabo PS/2 do teclado está ligado à porta
de teclado PS/2 do computador.
4. Estabeleça comunicações: a) Prima o botão vermelho de conexão
na parte de baixo do teclado; b) Depois prima o botão vermelho
de conexão na parte de baixo do rato.
5. O rato está agora activo. Para mais informações sobre os botões
do rato, consulte o sistema de ajuda online no seu disco rígido.
22 Português
Page 27

Instale o software
6
7
8
9
6
1. Introduza o CD do software na unidade de CD-ROM e depois siga as instruções no ecrã para
instalar o software.
2. Se não aparecer o ecrã de instalação quando inserir o CD, precisará de executar o programa
de instalação manualmente. Clique o botão Iniciar e escolha Executar. Tipo [unidade]:
instalar e premir Enter. Nota: substitua [unidade] pela letra do seu CD-ROM onde inseriu o CD
de software (por exemplo, d: instalar).
Utilizando as teclas de produtividade da Logitech
7
As teclas de função, localizadas na parte de cima do teclado, dão-lhe acesso instantâneo, com um
só toque, a programas e controlos frequentemente utilizados: Procurar, Ficheiros, E-mail, WWW,
Sem Som, Diminuir o Volume e Aumentar o Volume.
Para mais informações sobre estas teclas, consulte o sistema de ajuda online no seu disco rígido.
Luzes do teclado
8
As quatro luzes (LEDs) que se encontram no canto superior direito do teclado dizem-lhe se as
seguintes funções estão activadas ou desactivadas: Num Lock, Caps Lock, e Scroll Lock. Se uma luz
estiver acesa, a função correspondente está activada. Se a luz estiver apagada, a função está
desactivada. Repare que o LED direito é o indicador de sem fios.
Personalizando as teclas de função
9
O software do CD (fornecido com o teclado) permite-lhe personalizar as teclas de função da Logitech®
de forma a satisfazerem os seus requisitos específicos. Introduza o CD do software na unidade de CDROM e depois siga as instruções no ecrã para personalizar o software. A instalação do software incluído
é necessária para que todas as funções funcionem de forma adequada.
Português 23
Page 28

10
10
11
O meu teclado não funciona!
As teclas de função não funcionam!
Resolução de problemas
•Verifique a ligação do cabo do teclado. Certifique-se de que o cabo do teclado está ligado
à porta de teclado PS/2 do computador e NÃO à porta PS/2 do rato.
• Consulte o sistema de ajuda no seu disco rígido para obter mais informações.
• Certifique-se de que instala o software que se encontra no CD e certifique-se de que está
a funcionar.
• Certifique-se de que desinstala qualquer software de personalização do teclado previamente
instalado.
• Consulte o sistema de ajuda no seu disco rígido.
• Certifique-se de que a ligação à Internet está a funcionar correctamente.
11
Para o ajudar a tirar o máximo partido do seu teclado, existe um sistema de ajuda no CD do software
da Logitech®. Este sistema de ajuda dá-lhe informações importantes acerca do seu produto, por isso,
gostaríamos que despendesse algum tempo a lê-lo.
Durante a instalação do software, o sistema de ajuda foi copiado para o seu disco rígido. Depois da
instalação, pode, ou visualizar o conteúdo do sistema de ajuda no ecrã do seu computador ou imprimilo. Encontra um atalho para o sistema de ajuda no menu Iniciar do seu computador.
Este produto tem uma garantia limitada de dois anos. Para obter mais informações, leia a secção
sobre garantia de produto, incluída no sistema de ajuda localizado no CD do software Logitech.
24 Português
Consulte o sistema de ajuda online!
Page 29

Belangrijke informatie over verantwoord gebruik
1
233
1
Lange perioden van herhaalde bewegingen in een slecht georganiseerde werkruimte, verkeerde
lichaamshouding en slechte werkgewoontes kunnen de oorzaak zijn van lichamelijk ongemak en letsel
aan zenuwen, pezen en spieren. Als u op deze plaatsen pijn, een dof of zwak gevoel, zwellingen,
een brandend gevoel, kramp of stijfheid ervaart, neem dan contact op met een medisch deskundige.
Lees voor meer informatie de comfortrichtlijnen in de online-Help op de Logitech®-software-cd en
op de Logitech-website via http://www.logitech.com/comfort.
De handsteun aan het toetsenbord
2
bevestigen
Breng de lipjes van de handsteun in lijn met de gleufjes aan de
onderkant en voorkant van het toetsenbord. Klik beide onderdelen
dan in elkaar.
Toetsenbordpootjes verstellen
De toetsenbordpootjes zitten onder aan de achterkant van het toetsenbord. U kunt hiermee zelf
de polspositie bepalen die voor u het meest comfortabel is tijdens het typen. U kunt de pootjes tot
de gewenste positie uittrekken of induwen.
Nederlands 25
Page 30

Het toetsenbord aansluiten
4
5
4
1. Zet uw computer uit en ontkoppel het huidige
toetsenbord en de huidige muis.
2. Sluit de groene PS/2-connector op de PS/2-muispoort
van de computer aan. Sluit de paarse PS/2-connector
op de PS/2-toetsenbordpoort van uw computer aan.
3. Start uw computer opnieuw.
De muis instellen en activeren
5
1. Open de batterijhouder aan de onderkant van de muis.
2. Plaats de batterijen in de batterijhouder. Volg het
batterijendiagram in de houder. Plaats het deksel
van de batterijhouder terug wanneer u klaar bent.
3. Zorg ervoor dat het PS/2-snoer van het toetsenbord op de PS/2toetsenbordpoort van de computer aangesloten is.
4. Breng communicatie tot stand: a) Druk op het rode
verbindingsknopje aan de onderkant van het toetsenbord;
b) Druk dan op het rode verbindingsknopje aan de onderkant
van de muis.
5. De muis is nu actief. Raadpleeg de online-Help op uw vaste schijf voor meer informatie
over muisknoppen.
26 Nederlands
Page 31

De software installeren
6
7
8
9
6
1. Plaats de software-cd in uw cd-rom-drive en volg dan de instructies op het scherm om de software
te installeren.
2. Als het setup-scherm niet verschijnt wanneer u de cd plaatst, moet u het setup-programma
handmatig starten. Klik op de Start-knop en dan op 'Uitvoeren'. Typ [drive]: setup en druk op
Enter. N.B.: Vervang [drive] met de letter van uw cd-rom-drive waarin u de software-cd geplaatst
heeft (bijvoorbeeld d: setup).
De Logitech-productiviteitstoetsen gebruiken
7
Via de sneltoetsen boven aan uw toetsenbord heeft u met één druk op een toets ogenblikkelijke
toegang tot veel gebruikte programma's en opdrachten: zoeken, bestanden, e-mail, WWW, dempen,
volume -, en volume +.
Raadpleeg de online-Help op uw vaste schijf voor meer informatie over deze knoppen.
Toetsenbordlampjes
8
De vier lampjes (LED's) rechts boven op uw toetsenbord geven aan of de volgende functies inof uitgeschakeld zijn: Num Lock, Caps Lock en Scroll Lock. Als er een lampje brandt,
is de overeenkomstige functie ingeschakeld. Brandt het lampje niet, dan is de overeenkomstige
functie uitgeschakeld. Het rechter-LED is het lampje voor draadloos.
De sneltoetsen aanpassen
9
Met de software op de cd (meegeleverd bij uw toetsenbord) kunt u de Logitech®-sneltoetsen
op uw eigen wensen afstemmen. Plaats de software-cd in uw cd-rom-drive en volg dan de instructies
op het scherm om de sneltoetsen aan te passen. De meegeleverde software moet geïnstalleerd
worden om alle functies goed te laten werken.
Nederlands 27
Page 32

10
10
11
Mijn toetsenbord werkt niet!
De sneltoetsen of F-toetsen werken niet!
Problemen oplossen
• Controleer de verbinding van het toetsenbordsnoer. Zorg ervoor dat het toetsenbordsnoer
op de PS/2-toetsenbordpoort van uw computer aangesloten is en NIET op de PS/2muispoort.
•Raadpleeg de online-Help op uw vaste schijf voor meer informatie.
• Zorg ervoor dat u de software installeert die op de cd staat, en controleer of de software
uitgevoerd wordt.
• Zorg ervoor dat eerder geïnstalleerde software voor toetsenbordaanpassing verwijderd
wordt.
•Raadpleeg de online-Help op uw vaste schijf.
• Zorg dat uw internetverbinding goed werkt.
11
Benut uw toetsenbord optimaal met behulp van de online-Help op de Logitech®-software-cd.
Aangezien hierin waardevolle informatie over uw product staat, is het raadzaam deze zorgvuldig
te lezen.
Tijdens de installatie van de software is deze online-Help naar uw vaste schijf gekopieerd. Daarna kunt
u de inhoud van de online-Help op uw computerscherm bekijken, of afdrukken. De snelkoppeling voor
de online-Help vindt u via het Start-menu van uw computer.
Dit product wordt met een beperkte garantie van twee jaar geleverd. Lees de productgarantiesectie
in de online-Help op de Logitech-software-cd voor meer informatie.
28 Nederlands
Raadpleeg de online-Help!
Page 33

Viktig ergonomisk information
1
233
1
Långa pass med monotona rörelser och en felaktig arbetsmiljö eller kroppshållning kan orsaka fysiska
obehag och skada nerver, senor och muskler. Om du upplever smärta, domningar, svaghet, svullnad,
hetta, kramper eller stelhet i händer, handleder, armar, skuldror, nacke eller rygg bör du uppsöka
läkare. För vidare information, se Riktlinjer för en god arbetsmiljö i hjälpen på program-cd:n eller
på webben på http://www.logitech.com
Montera handlovsstödet
2
på tangentbordet.
Passa in flikarna på handlovsstödet i de öppningar som sitter längst
fram på undersidan av tangentbordet. Tryck ihop delarna.
Ställ in tangentbordets fötter
Tangentbordets fötter sitter längst bort på undersidan av tangentbordet. Med hjälp av fötterna
justerar du tangentbordets lutning så att du kan hitta en bekväm skrivställning. Fäll ut eller tryck
in fötterna till ett läge som passar dig.
Svenska 29
Page 34

Anslut tangentbordet
4
5
4
1. Stäng av datorn och avlägsna det gamla
tangentbordet och den gamla musen.
2. Anslut den gröna PS/2-kontakten till musporten (PS/2)
på datorn. Anslut den gröna PS/2-kontakten till
tangentbordsporten (PS/2) på datorn.
3. Starta om datorn.
Installera och aktivera musen
5
1. Öppna batteriluckan på undersidan av musen.
2. Sätt i batterierna (följ schemat i batterifacket). Stäng batteriluckan.
3. Kontrollera att tangentbordet är anslutet till datorns
tangentbordsport (PS/2).
4. Upprätta kommunikation: Tryck på den röda anslutningsknappen
på tangentbordets undersida och sedan på den röda
anslutningsknappen på musens undersida.
5. Nu är musen aktiverad. Se den elektroniska hjälpen för vidare
information om musknapparna.
30 Svenska
Page 35

Installera programvaran
6
7
8
9
6
1. Sätt i program-cd:n, följ anvisningarna på skärmen och slutför installationen av programmet.
2. Om installationsfönstret inte öppnas när du sätter i cd:n måste du starta installationsprogrammet
manuellt. Öppna Start-menyn och klicka på Kör. Skriv [enhetsbokstav]: setup och tryck på Retur.
OBS! Ersätt [enhetsbokstaven] med bokstaven som motsvarar cd-romenheten (t.ex. D: setup).
Logitechs specialknappar
7
Snabbknapparna, som återfinns längst upp på tangentbordet, ger dig direkttillgång till flitigt använda
program och kommandon, t.ex. sök, filer, e-post, Internet, ljud av, volym – och volym +.
Se den elektroniska hjälpen för vidare information om dessa knappar.
Tangentbordets lampor
8
De fyra lamporna (lysdiodrarna) längst upp till höger på tangentbordet signalerar om följande
funktioner är aktiverade eller inte: det numeriska tangentbordet, skiftlåset och rullningslåset.
Lampan lyser när respektive funktion är på. Lampan är släckt när respektive funktion är av.
Observera att lampan längst till höger visar den trådlösa anslutningens status.
Konfigurera snabbknapparna
9
Med hjälp av programmet på cd-skivan som medföljer tangentbordet kan snabbknapparna
anpassas efter användarnas behov. Sätt i program-cd:n och följ anvisningarna på skärmen
om hur du konfigurerar snabbknapparna. Programvaran måste installeras innan du kan dra nytta
av alla funktionerna.
Svenska 31
Page 36

10
10
11
Tangentbordet fungerar inte
Snabbknapparna eller F-tangenterna fungerar inte
Felsökning
•Kontrollera att tangentbordet är korrekt anslutet. Kontrollera att tangentbordet är anslutet
till datorns tangentbordsport och inte till musporten.
• Se den elektroniska hjälpen för vidare information.
•Kontrollera att programmet på cd:n är installerat och aktiverat.
• Om annan programvara för tangentbord finns installerad måste denna avinstalleras.
• Se den elektroniska hjälpen.
•Kontrollera att Internetuppkopplingen fungerar som den ska.
11
För att du ska få ut mesta möjliga av tangentbordet finns en elektronisk hjälp på program-cd:n.
Hjälpen innehåller praktisk information om produkten så ta dig tid att läsa igenom den.
När programmet installeras kopieras hjälpen automatiskt på hårddisken. När installationen är klar
kan du antingen läsa hjälpen på skärmen eller skriva ut den. I Start-menyn finns en genväg till hjälpen.
Denna produkt säljs med två års garanti. För vidare information, se avsnittet Produktgaranti i hjälpen
på program-cd:n.
32 Svenska
Se den elektroniska hjälpen.
Page 37

Vigtige oplysninger om arbejdsfysiologi
1
233
1
Hvis du i en længere periode foretager repetitive bevægelser i en forkert arbejdsstilling på en
uhensigtsmæssigt indrettet arbejdsplads og desuden har dårlige arbejdsvaner, kan det medføre fysiske
problemer og skader på nervesystem, sener og muskler. Hvis du føler smerte, oplever følelsesløshed,
opsvulmen, en brændende fornemmelse, krampe eller stivhed i disse dele af kroppen, skal du straks
søge læge. Der er flere oplysninger om arbejdsfysiologi i hjælpen på cd'en med Logitech®-softwaren
og på Logitechs websted på adressen http://www.logitech.com/comfort
Sæt håndledsstøtten på tastaturet
2
Sørg for at tapperne på håndledsstøtten er ud for fordybningerne
på undersiden af tastaturets forkant. Tryk dem mod hinanden
til håndledsstøtten sidder fast.
Juster tastaturets ben
Benene sidder bagerst på tastaturets underside. De gør det muligt at indstille tastaturets hældning,
så den passer til din håndledsstilling når du arbejder. Benene kan slås ud eller skubbes ind alt efter hvad
der giver den mest behagelige position.
Dansk 33
Page 38

Tilslut tastaturet
4
5
4
1. Sluk for computeren, og fjern det gamle tastatur og
den gamle mus.
2. Sæt det grønne PS/2-stik i computerens PS/2museport. Sæt det lilla PS/2-stik i computerens PS/2tastaturport.
3. Genstart computeren.
Installation og aktivering af
5
musen
1. Åbn batterihuset på musens underside.
2. Sæt batterierne i. På diagrammet inde i batterihuset kan du
se hvordan batterierne skal vende. Sæt dækslet på igen når du
er færdig.
3. Sørg for at det runde PS/2-tastaturstik er sluttet til computerens PS/2tastaturport.
4. For at etablere forbindelse skal du først trykke på den røde
Connect-knap på tastaturets underside og derefter på den røde
Connect-knap på musens underside.
5. Nu er musen aktiveret. Du finder flere oplysninger om
museknapper i den elektroniske hjælp der ligger på harddisken.
34 Dansk
Page 39

Installation af softwaren
6
7
8
9
6
1. Sæt cd'en med softwaren i cd-rom-drevet, og følg anvisningerne på skærmen for at installere
softwaren.
2. Hvis installationsprogrammet ikke starter automatisk når cd'en lægges i drevet, må du starte
det manuelt. Klik på Start i proceslinjen, og vælg Kør. Indtast [drev]: setup, og tryk på returtasten.
Bemærk: Skriv det bogstav der repræsenterer dit cd-rom-drev i stedet for [drev], efterfulgt af
kolon og bagudrettet skråstreg, fx d:\ setup.
Sådan bruges de særlige Logitech-taster
7
Genvejstasterne der findes øverst på tastaturet, giver dig direkte adgang til en række
af de almindeligste programmer og kommandoer: Søgefunktion, filhåndtering, e-mail,
internettet og knapperne til regulering af lydstyrken.
Du finder flere oplysninger om disse knapper i den elektroniske hjælp der ligger på harddisken.
Lamper på tastaturet
8
De fire lysdioder i tastaturets øverste højre hjørne angiver om følgende funktioner er aktiveret eller ej:
Num Lock, Caps Lock og Scroll Lock. Hvis lampen er tændt, er den pågældende funktion slået til.
Hvis lampen er slukket, er funktionen slået fra. Bemærk at den højre lysdiode indikerer at tastaturet
er aktiveret.
Tilpasning af genvejstasterne/-knapperne
9
Du kan tilpasse funktionerne og kommandoerne der skal udføres vha. specialtasterne på Logitech®tastaturet, så de svarer til dine behov, ved hjælp af softwaren på den medfølgende cd. Sæt cd'en
med softwaren i cd-rom-drevet, og følg anvisningerne på skærmen for at tilpasse genvejstasternes
Dansk 35
Page 40

og -knappernes funktioner. Den medfølgende software skal installeres på computeren for at alle
10
11
funktionerne fungerer som de skal.
10
Tastaturet fungerer ikke.
Genvejstasterne eller funktionstasterne virker ikke.
11
Der findes en elektronisk hjælp på cd'en med Logitech®-softwaren med råd, så du kan få mest muligt
ud af tastaturet. Her finder du masser af oplysninger om tastaturet, så du opfordres til at bruge lidt tid
på at læse den.
Hjælpen blev kopieret til harddisken under installationen af softwaren. Når installationen er færdig,
kan du enten læse hjælpen på skærmen eller skrive den ud. Der er en genvej til den under Logitech
i computerens startmenu.
Kameraet leveres med en begrænset garanti på to år. Der findes flere oplysninger i afsnittet
om garanti i hjælpen der findes på software-cd'en fra Logitech.
36 Dansk
Problemløsning
•Kontroller at tastaturet er tilsluttet korrekt. Sørg for at stikket fra tastaturet er sat i PS/2-
tastaturporten på computeren og IKKE i museporten.
• Du finder flere oplysninger i den elektroniske hjælp der ligger på harddisken.
•Kontroller at du har installeret softwaren fra cd'en og at softwaren kører.
• Sørg for at al anden tastatursoftware er afinstalleret.
• Du finder flere oplysninger i den elektroniske hjælp der ligger på harddisken.
•Kontroller at internetforbindelsen fungerer korrekt.
Du finder flere oplysninger i den elekroniske hjælp.
Page 41

Viktig informasjon om arbeidsstilling
1
233
1
Fysisk ubehag samt skader på nerver, sener og muskler kan oppstå hvis du utfører de samme
bevegelsene mange ganger, bruker et dårlig organisert arbeidsområde, sitter i feil stilling eller har
dårlige arbeidsvaner. Kontakt lege dersom du får smerter, blir nummen, hovner opp, føler svie,
får kramper eller føler deg stiv i hender, håndledd, armer, skuldre, nakke eller rygg. Du finner
mer informasjon i retningslinjene for komfortabel bruk i brukerveiledningen på programvare-cd-en
og på hjemmesiden til Logitech® på http://www.logitech.com/comfort.
Slik fester du håndleddstøtten
2
til tastaturet
Sett festene under håndleddsstøtten kant i kant med åpningene
på undersiden av tastaturet foran, og knepp dem sammen.
Slik justerer du høyden på tastaturet
Du finner reguleringsfunksjonene for høyde på undersiden av tastaturet. Tastaturets høyde kan stilles
inn etter eget behov, slik at du slapper av i håndleddene når du skriver. Trekk reguleringsfunksjonene
ut eller skyv dem inn til du finner den høyden som passer best for deg.
Norsk 37
Page 42

Slik kopler du til tastaturet
4
5
4
1. Slå av datamaskinen, og fjern tastaturet og musen.
2. Kople den grønne PS/2-pluggen til PS/2-porten for
mus på datamaskinen. Kople den lilla PS/2-pluggen til
PS/2-porten for tastatur på datamaskinen.
3. Start datamaskinen på nytt.
Slik konfigurerer og aktiverer du
5
musen
1. Åpne batteriluken på undersiden av musen.
2. Sett batteriene inn i batterikammeret. Se figuren på innsiden
av batterikammeret. Sett luken på plass igjen når du er ferdig.
3. Kontroller at tastaturets PS/2-kabel er koplet til PS/2-tastaturporten
på datamaskinen.
4. Slik oppretter du en forbindelse: a) Trykk på den røde
tilkoplingsknappen på undersiden av tastaturet, b) trykk deretter
på den røde tilkoplingsknappen på undersiden av musen.
5. Musen er nå aktiv. Du finner mer informasjon om museknapper
i det elektroniske hjelpesystemet på harddisken.
38 Norsk
Page 43

Slik installerer du programvaren
6
7
8
9
6
1. Sett cd-en med programvaren inn i cd-rom-stasjonen, og følg anvisningene på skjermen.
2. Dersom installeringen ikke starter automatisk, må du starte installasjonsprogrammet manuelt.
Velg Start-knappen og deretter Kjør. Skriv inn [stasjonsbokstav]: setup og trykk på Enter. Merk:
Erstatt [stasjonsbokstav] med bokstaven på den cd-rom-stasjonen du satt programvare-cd-en inn
i, f.eks.: D: setup.
Slik bruker du Logitechs produktivitetstaster
7
Hurtigknappene, som du finner øverst på tastaturet, kan brukes til å gå direkte til de programmene og
kommandoene du anvender oftest, f.eks.: Søk, Filer, E-post, WWW, Dempet, Volume -, og Volume +.
Du finner mer informasjon om disse knappene i det elektroniske hjelpesystemet på harddisken.
Lampene på tastaturet
8
De fire lampene øverst til høyre på tastaturet viser om følgende funksjoner er aktive: Num Lock,
Caps Lock og Scroll Lock. Hvis en lampe lyser, betyr det at den tilhørende funksjonen er aktiv,
og hvis en lampe er slukket, betyr det at den tilhørende funksjonen ikke er aktiv. Legg merke til at
den høyre lampen gjelder den trådløse forbindelsen til tastaturet.
Slik egendefinerer du hurtigknappene
9
Du kan egendefinere Logitech®-hurtigtastene ved hjelp av programvaren på cd-en som følger med
tastaturet. Sett cd-en med programvaren inn i cd-rom-stasjonen, og følg anvisningene på skjermen.
Du er nødt til å installere programvaren som følger med for å få fullt utbytte av disse
spesialfunksjonene.
Norsk 39
Page 44

10
10
11
Tastaturet virker ikke!
Hurtigtastene eller de spesielle funksjonstastene fungerer ikke!
Feilsøking
•Kontroller at alle ledningene til tastaturet er riktig tilkoplet. Påse at tastaturkabelen er plugget
inn i PS/2-tastaturporten på datamaskinen, og ikke i PS/2-museporten.
• Du finner mer informasjon om dette i det elektroniske hjelpesystemet på harddisken.
• Husk å installere programvaren fra cd-en, og sørg for at programvaren er i gang.
• Husk å avinstallere eldre versjoner av programvaren.
• Du kan lese mer om dette i det elektroniske hjelpesystemet på harddisken.
•Kontroller at Internett-forbindelsen fungerer som den skal.
11
Hvis du vil ha størst mulig utbytte av tastaturet, bør du lese i hjelpesystemet på programvare-cd-en
fra Logitech®. Hjelpesystemet gir deg viktig informasjon om produktet, så vi anbefaler deg å lese det.
Når programvaren installeres, kopieres hjelpesystemet over til harddisken din. Etter at programvaren
er installert, kan du lese hjelpesystemet på skjermen. Du kan også velge å skrive det ut. Hvis du går
til Start-menyen, finner du en snarvei til hjelpesystemet.
Dette produktet leveres med en to års begrenset garanti. Du kan lese mer om dette i produktgarantidelen av hjelpesystemet på programvare-cd-en fra Logitech.
40 Norsk
Les mer om dette i det elektroniske hjelpesystemet!
Page 45

Tärkeää tietoa ergonomiasta
1
233
1
Pitkäaikaiset toistuvat liikkeet väärin suunnitellussa työtilassa tai virheellisessä työasennossa sekä väärät
työskentelytavat saattavat johtaa hermojen, jänteiden ja lihasten fyysisiin vaivoihin ja vammoihin.
Jos tunnet näissä ruumiinosissa kipua, puutumista, heikkoutta, turvotusta, kuumotusta, kouristelua tai
jäykkyyttä, hakeudu lääkärin hoitoon. Lisätietoja saat Tietokoneen mukava käyttö -oppaasta Logitech®
-ohjelmisto-CD:llä ja Logitechin verkkosivuilta osoitteessa http://www.logitech.com/comfort.
Kiinnitä kämmentuki näppäimistöön.
2
Sovita kämmentuen ulkonemat näppäimistön etureunassa
oleviin koloihin. Napsauta laitteet yhteen.
Näppäimistön tukijalkojen säätö
Näppäimistön alapuolen takaosassa on tukijalat. Niiden avulla voit säätää näppäimistön kaltevuuden
itsellesi sopivaksi. Vedä jalkoja ulos tai työnnä niitä sisään kunnes asento on sopiva.
Suomi 41
Page 46

Näppäimistön liittäminen
4
5
4
1. Katkaise tietokoneesta virta ja irrota vanha
näppäimistö sekä hiiri.
2. Liitä vihreä PS/2-liitin tietokoneen PS/2-hiiriporttiin.
Liitä purppuranpunainen PS/2-liitin tietokoneen PS/2näppäimistöporttiin.
3. Käynnistä tietokone uudelleen.
Hiiren asennus ja aktivointi
5
1. Avaa hiiren alla oleva paristolokero
2. Asenna paristot paristolokeroon. Katso lokeron sisällä olevaa
kaaviokuvaa. Aseta paristolokeron kansi takaisin paikoilleen,
kun olet valmis.
3. Varmista, että näppäimistön PS/2-kaapeli on liitetty tietokoneen PS/2näppäimistöporttiin.
4. Muodosta yhteydet: a) Paina punaista yhteyspainiketta näppäimistön
alla; b) Sitten paina punaista yhteyspainiketta hiiren alla.
5. Hiiri on nyt toiminnassa. Lisätietoja hiiren painikkeista löydät
kiintolevyllä olevasta käyttöoppaasta.
42 Suomi
Page 47

Ohjelmiston asennus
6
7
8
9
6
1. Aseta ohjelmisto-CD-levy CD-ROM-asemaan ja noudata näyttöön tulevia ohjeita asentaaksesi
ohjelmiston.
2. Jos asennusnäyttö ei tule näkyviin, on asennusohjelma käynnistettävä manuaalisesti.
Napsauta "Käynnistä"-painiketta ja valitse "Suorita". Kirjoita [asema]: setup ja paina Enternäppäintä. Huomautus: korvaa [asema] sen CD-ROM-aseman kirjaimella, jossa ohjelmisto-CD on
(esim. d: setup).
Logitechin pikanäppäimien käyttö
7
Näppäimistön ylälaidassa olevilla pikanäppäimillä avaat välittömästi usein käytettyjä ohjelmia ja suoritat
komentoja: etsi, tiedostot, sähköposti, WWW, vaimennus, äänenvoimakkuus – ja äänenvoimakkuus +.
Lisätietoja näistä painikkeista löydät kiintolevyllä olevasta käyttöoppaasta.
Näppäimistön merkkivalot
8
Neljä merkkivaloa näppäimistön oikeassa yläkulmassa kertovat, ovatko seuraavat toiminnot päällä
vai pois päältä: Num Lock, Caps Lock ja Scroll Lock. Jos merkkivalo palaa, toiminto on käytössä.
Jos merkkivalo ei pala, toiminto ei ole käytössä. Huomaa, että oikeanpuolimmainen merkkivalo
on langattoman yhteyden ilmaisin.
Pikanäppäimien mukauttaminen
9
Näppäimistön mukana toimitetulla CD-levyllä on ohjelma, jolla voit mukauttaa Logitech®pikanäppäimet omia tarpeitasi vastaaviksi. Aseta ohjelmisto-CD-levy CD-ROM-asemaan ja noudata
näyttöön tulevia ohjeita mukauttaaksesi pikanäppäimet. Mukana tuleva ohjelmisto täytyy asentaa,
jotta kaikki ominaisuudet toimivat kunnolla.
Suomi 43
Page 48

10
10
11
Näppäimistö ei toimi!
Pikanäppäimet tai toimintonäppäimet eivät toimi!
Vianmääritys
•Tarkista näppäimistön johtoliitäntä. Varmista, että näppäimistön kaapeli on liitetty
tietokoneen PS/2-näppäimistöporttiin EIKÄ PS/2-hiiriporttiin.
• Lisätietoja löydät kiintolevyllä olevasta käyttöoppaasta.
•Varmista, että CD-levyllä oleva ohjelmisto on asennettu ja käytössä.
•Poista tietokoneelta kaikki aiemmin asennetut näppäimistön mukautusohjelmistot.
• Lisätietoja löydät kiintolevyllä olevasta käyttöoppaasta.
•Varmista, että Internet-yhteys toimii oikein.
11
Logitech® ohjelmisto-CD-levyllä on käyttöopas, jonka avulla saat näppäimistöstä täyden hyödyn irti.
Tämä käyttöopas antaa arvokasta tietoa tuotteesta, joten suosittelemme että luet sen huolella.
Käyttöopas kopioitiin kiintolevylle ohjelmiston asennuksen aikana. Asennuksen jälkeen voit katsella
käyttöopasta tietokoneesi näytöllä tai tulostaa sen. Löydät pikakuvakkeen käyttöohjeeseen
tietokoneen Käynnistä-valikosta.
Tällä tuotteella on rajoitettu kahden vuoden takuu. Takuusta saat lisätietoja kappaleesta Tuotetakuu,
joka on käyttöoppaassa Logitech-ohjelmistolevyllä.
44 Suomi
Lisätietoja saat online-ohjeesta!
Page 49

Σηµαντικές πληροφορίες για την εργονοµία
1
233
1
Κινήσεις που επαναλαµβάνονται για παρατεταµένες χρονικές περιδους σε ακατάλληλα
διαρρυθµισµένο εργασιακ χώρο, λανθασµένη στάση του σώµατος και κακές εργασιακές
συνήθειες ενδέχεται να προκαλέσουν ενοχλήσεις και τραυµατισµούς στα νεύρα, τους
τένοντες και τους µυς. Εάν αισθανθείτε πνο, µούδιασµα, αδυναµία, πρήξιµο, κάψιµο,
κράµπες ή παρατηρήσετε δυσκαµψία σε αυτά τα σηµεία, απευθυνθείτε σε έναν ειδικ
γιατρ. Για περισστερες πληροφορίες, διαβάστε τις Οδηγίες για άνετο χειρισµ που
περιλαµβάνονται στη βοήθεια του λογισµικού στο CD της Logitech® και στην τοποθεσία της
Logitech στο web http://www.logitech.com/comfort.
Σύνδεση του υποστηρίγµατος παλάµης
2
στο πληκτρολγιο
Ευθυγραµµίστε τις προεξοχές του υποστηρίγµατος παλάµης
µε τις υποδοχές που βρίσκονται στο µπροστιν κάτω µέρος
του πληκτρολογίου. Στη συνέχεια, προσαρµστε τη µια
µονάδα µέσα στην άλλη.
Προσαρµογή των υποστηριγµάτων του πληκτρολογίου
Τα υποστηρίγµατα του πληκτρολογίου βρίσκονται κάτω απ το πληκτρολγιο στο πίσω
µέρος. Είναι σχεδιασµένα για να εξυπηρετούν τις προσωπικές σας προτιµήσεις ως προς
τη θέση των καρπών κατά την πληκτρολγηση. Τραβήξτε προς τα έξω ή σπρώξτε προς
τα µέσα τα υποστηρίγµατα του πληκτρολογίου στη θέση που είναι πιο βολική για εσάς.
Ελληνικά 45
Page 50

Σύνδεση του πληκτρολογίου
4
5
4
1. Τερµατίστε τη λειτουργία του υπολογιστή και
αφαιρέστε το πληκτρολγιο και το ποντίκι.
2. Συνδέστε τον πράσινο ακροδέκτη PS/2 στη
θύρα PS/2 για το ποντίκι του υπολογιστή.
Συνδέστε τον πορφυρ ακροδέκτη PS/2 στη
θύρα PS/2 για το πληκτρολγιο του
υπολογιστή.
3. Επανεκκινήστε τον υπολογιστή σας.
Ρύθµιση κι ενεργοποίηση του
5
ποντικιού
1. Ανοίξτε τη θήκη των µπαταριών στο κάτω µέρος του
ποντικιού.
2. Τοποθετήστε τις µπαταρίες µέσα στη θήκη. ∆είτε το
διάγραµµα των µπαταριών στο εσωτερικ της θήκης.
Τοποθετήστε ξανά τη θύρα της θήκης των µπαταριών ταν
τελειώσετε.
3. Βεβαιωθείτε τι το καλώδιο PS/2 του πληκτρολογίου είναι
συνδεδεµένο στη θύρα πληκτρολογίου PS/2.
4. Ενεργοποιήστε την επικοινωνία: α) Πατήστε το κουµπί
"Connect" που βρίσκεται στο κάτω µέρος του
πληκτρολογίου. β) Πατήστε το κουµπί "Connect" που βρίσκεται στο κάτω µέρος του
ποντικιού.
5. Το ποντίκι ενεργοποιήθηκε. Για περισστερες πληροφορίες σχετικά µε τα κουµπιά
του ποντικιού, ανατρέξτε στο σύστηµα ηλεκτρονικής βοήθειας που έχει εγκατασταθεί
στον υπολογιστή σας.
46 Ελληνικά
Page 51

Εγκατάσταση του λογισµικού
6
7
8
6
1. Τοποθετήστε το CD µε το λογισµικ στη µονάδα CD-ROM και στη συνέχεια
ακολουθήστε τις οδηγίες που εµφανίζονται στην οθνη για να εγκαταστήσετε
το λογισµικ.
2. Αν ταν τοποθετήσετε το CD δεν εµφανιστεί η οθνη εγκατάστασης, θα χρειαστεί
να εκκινήσετε εσείς το πργραµµα εγκατάστασης. Κάντε κλικ στο κουµπί "Έναρξη"
και επιλέξτε "Εκτέλεση". Πληκτρολογήστε [µονάδα]: setup και πατήστε Enter.
Σηµείωση: 3που [µονάδα] βάλτε το γράµµα που αντιστοιχεί στη µονάδα CD-ROM στην
οποία τοποθετήσατε το CD του λογισµικού (π.χ. d: setup).
Χρήση των πλήκτρων παραγωγικτητας της Logitech
7
Τα πλήκτρα συντµευσης που βρίσκονται στο πάνω µέρος του πληκτρολογίου
παρέχουν µε το πάτηµα ενς πλήκτρου πρσβαση σε προγράµµατα κι εντολές που
χρησιµοποιείτε συχνά: Search (Αναζήτηση), Files (Αρχεία), E-mail, WWW, Mute (Σίγαση),
Volume – (Μείωση έντασης) και Volume + (Αύξηση έντασης).
Για περισστερες πληροφορίες σχετικά µε αυτά τα πλήκτρα, ανατρέξτε στο σύστηµα
ηλεκτρονικής βοήθειας που έχει εγκατασταθεί στον υπολογιστή σας.
Λυχνίες πληκτρολογίου
8
Οι τέσσερις λυχνίες που βρίσκονται στο πάνω δεξι τµήµα του πληκτρολογίου
υποδεικνύουν αν είναι ενεργοποιηµένες οι ακλουθες λειτουργίες: Num Lock,
Caps Lock και Scroll Lock. Εάν η λυχνία είναι αναµµένη, η αντίστοιχη λειτουργία είναι
ενεργοποιηµένη. Εάν η λυχνία είναι σβηστή, η λειτουργία δεν είναι ενεργοποιηµένη.
Σηµειώστε τι η δεξιά λυχνία υποδεικνύει αν είναι ενεργοποιηµένη η ασύρµατη λειτουργία.
Ελληνικά 47
Page 52

Προσαρµογή των πλήκτρων συντµευσης
9
10
9
Το λογισµικ στο CD (περιλαµβάνεται στη συσκευασία του πληκτρολογίου) σάς επιτρέπει
να προσαρµσετε τα πλήκτρα συντµευσης της Logitech® ανάλογα µε τις απαιτήσεις σας.
Τοποθετήστε το CD µε το λογισµικ στη µονάδα CD-ROM και στη συνέχεια
ακολουθήστε τις οδηγίες που εµφανίζονται στην οθνη για να προσαρµσετε τα πλήκτρα
συντµευσης στις προτιµήσεις σας. Για να εκµεταλλευτείτε πλήρως λες τις λειτουργίες,
πρέπει να εγκαταστήσετε το λογισµικ που περιλαµβάνεται.
10
Το πληκτρολγιο δεν λειτουργεί!
Τα πλήκτρα συντµευσης ή τα πλήκτρα λειτουργιών δεν λειτουργούν!
48 Ελληνικά
Αντιµετώπιση προβληµάτων
• Ελέγξτε τη σύνδεση του καλωδίου του πληκτρολογίου. Βεβαιωθείτε τι
το καλώδιο του πληκτρολογίου έχει συνδεθεί στη θύρα πληκτρολογίου PS/2
του υπολογιστή σας και ΟΧΙ στη θύρα ποντικιού PS/2.
• Για περισστερες πληροφορίες, ανατρέξτε στη βοήθεια που έχει εγκατασταθεί
στον υπολογιστή σας.
• Εγκαταστήστε το λογισµικ που βρίσκεται στο CD και βεβαιωθείτε τι το λογισµικ
εκτελείται.
• Βεβαιωθείτε τι έχετε απεγκαταστήσει οποιοδήποτε άλλο εγκατεστηµένο
λογισµικ προσαρµογής του πληκτρολογίου.
• Ανατρέξτε στο σύστηµα ηλεκτρονικής βοήθειας που έχει εγκατασταθεί στον
υπολογιστή σας.
• Βεβαιωθείτε τι η σύνδεσή σας στο Internet λειτουργεί κανονικά.
Page 53

11
11
Για να εκµεταλλευτείτε λες τις δυναττητες του πληκτρολογίου, ανατρέξτε στη
βοήθειας που περιλαµβάνεται στο CD µε το λογισµικ της Logitech®. Η βοήθεια παρέχει
πολύτιµες πληροφορίες για το προϊν, συνιστάται λοιπν να αφιερώσετε λίγο χρνο για
να τη διαβάσετε.
Κατά την εγκατάσταση του λογισµικού, έγινε αντιγραφή της βοήθειας στο σκληρ
σας δίσκο. Μετά την εγκατάσταση, µπορείτε είτε να δείτε τα περιεχµενα της βοήθειας
στην οθνη του υπολογιστή είτε να τα τυπώσετε. Η συντµευση για τη βοήθεια υπάρχει
στο µενού "Έναρξη" του υπολογιστή σας.
Το προϊν αυτ συνοδεύεται απ περιορισµένη διετή εγγύηση. Για περισστερες
πληροφορίες, διαβάστε την εντητα Product Warranty (Εγγύηση προϊντων) που θα βρείτε
στη βοήθεια του CD µε το λογισµικ της Logitech.
Ανατρέξτε στο σύστηµα ηλεκτρονικής βοήθειας!
Ελληνικά 49
Page 54

Page 55

Важные сведения по эргономике
1
233
1
Однообразные движения, совершаемые в течение длительного времени, в сочетании
с плохой организацией рабочего места, неудобной позой и недостатком навыков работы
могут вызвать ощущение физического дискомфорта и повреждение нервов, сухожилий
и мышц. При возникновении болезненных ощущений, слабости, опухания, покалывания,
ущемления, при потере чувствительности или подвижности в этих областях следует
немедленно обратиться к врачу. Дополнительные сведения см. в документе Comfort
Guidelines (рекомендации по созданию удобных условий работы) в справке на компактдиске с программным обеспечением Logitech® и на веб-узле Logitech по адресу
http://www.logitech.com/comfort.
Подсоединение подставки для кистей
2
рук к клавиатуре
Совместите выступы на подставке для кистей с пазами
на клавиатуре, находящимися спереди в нижней части
клавиатуры. Соедините оба устройства (со щелчком).
Регулировка положения ножек клавиатуры
Ножки клавиатуры расположены сзади на нижней панели клавиатуры. Их конструкция
позволяет обеспечивать наиболее удобное для пользователя положение запястий
при работе с клавиатурой. Выдвиньте или вдвиньте ножки клавиатуры, чтобы подобрать
для себя наиболее комфортное положение.
По-русски 51
Page 56

Подключение клавиатуры
4
5
4
1. Выключите компьютер, затем отсоедините
имеющиеся клавиатуру и мышь.
2. Зеленый соединительный разъем PS/2
подсоедините на компьютере к порту PS/2
мыши. Фиолетовый соединительный разъем
PS/2 подсоедините на компьютере к порту
PS/2 клавиатуры.
3. Включите компьютер.
Установка и активизация мыши
5
1. Откройте батарейный отсек в нижней части мыши.
2. Вставьте в батарейный отсек батарейки. Обратите внимание
на схему расположения батареек в батарейном отсеке.
По завершении установите крышку батарейного отсека
на место.
3. Убедитесь, что кабель PS/2 клавиатуры подключен
к предназначенному для клавиатуры порту PS/2
на компьютере.
4. Установите связь: а) нажмите красную кнопку установки
связи в нижней части клавиатуры; б) затем нажмите красную
кнопку установки связи в нижней части мыши.
5. Теперь мышь стала активной. Дополнительные сведения о кнопках мыши см.
в электронной справке на жестком диске компьютера.
52 По-русски
Page 57

Установка программного обеспечения
6
7
8
6
1. Вставьте компакт-диск с программным обеспечением в дисковод для компакт-дисков
и следуйте инструкциям на экране для установки программного обеспечения.
2. Если при вставке компакт-диска экран установки не отобразится, нужно будет
запустить программу установки вручную. Нажмите кнопку Start (Пуск) и выберите
команду Run (Выполнить). Введите [буква_диска]: setup и нажмите клавишу ВВОД.
Примечание: [буква_диска] следует заменить буквой, соответствующей дисководу
для компакт-дисков, в который установлен компакт-диск с программным обеспечением
(например, d: setup).
Использование клавиш Logitech,
7
повышающих производительность труда
Специальные клавиши, расположенные в верхней части клавиатуры, позволяют
мгновенно — одним нажатием — получить доступ к часто используемым программам
и командам: Search (поиск), Files (файлы), E-mail (электронная почта), WWW (Интернет),
Mute (отключение звука), Volume - (уменьшение громкости) и Volume +
(увеличение громкости).
Дополнительные сведения об этих клавишах см. в электронной справке на жестком
диске компьютера.
Индикаторы клавиатуры
8
Четыре светодиодных индикатора, расположенные в верхней правой части клавиатуры,
показывают, включены или отключены следующие функции: Num Lock, Caps Lock
и Scroll Lock. Если индикатор горит, соответствующая функция включена. Если индикатор
не горит, функция отключена. Обратите внимание: правый светодиодный индикатор —
индикатор беспроводной связи.
По-русски 53
Page 58

Настройка специальных клавиш
9
10
9
Программное обеспечение на компакт-диске (поставляемом с клавиатурой) позволяет
настраивать специальные клавиши Logitech® в соответствии с конкретными потребностями
пользователя. Вставьте компакт-диск с программным обеспечением в дисковод для
компакт-дисков и следуйте инструкциям на экране для настройки специальных клавиш.
Установка прилагаемого программного обеспечения необходима для надлежащего
выполнения всех функций.
10
Клавиатура не работает.
Специальные клавиши не функционируют.
54 По-русски
Устранение неполадок
• Проверьте правильность подключения кабеля клавиатуры. Убедитесь, что кабель
клавиатуры подключен к порту PS/2 компьютера, предназначенному
для клавиатуры, а НЕ к порту PS/2 для мыши.
• Дополнительные сведения см. в электронной справке на жестком диске
компьютера.
• Убедитесь, что установлено и работает программное обеспечение,
поставляемое на компакт-диске.
• Убедитесь, что удалено все ранее установленное программное обеспечение
для настройки клавиатуры.
• Обратитесь к электронной справке на жестком диске компьютера.
• Убедитесь в надлежащем функционировании подключения к Интернету.
Page 59

11
11
Электронная справка, находящаяся на компакт-диске с программным обеспечением
Logitech®, поможет использовать клавиатуру с максимальной эффективностью. В справке
содержится важная информация о продукте, поэтому мы рекомендуем выделить время
на то, чтобы ознакомиться с ней.
В процессе установки программного обеспечения справка была скопирована на жесткий
диск компьютера. После установки пользователь может либо просмотреть материалы
справки на экране компьютера, либо распечатать их. Быстрый доступ к справке можно
получить из меню Start (Пуск).
Данный продукт поставляется с ограниченной двухлетней гарантией. Для получения
дополнительных сведений ознакомьтесь с разделом Product Warranty (гарантия на изделие)
в справке на компакт-диске с программным обеспечением Logitech.
Обратитесь к электронной справке!
По-русски 55
Page 60

Page 61

Fontos ergonómiai tudnivalók
1
233
1
A nem megfelelő kialakítású munkakörnyezetben hosszú időn keresztül végzett ismétlődő
mozgások, a helytelen testtartás és az egészségtelen munkavégzési szokások testi
bántalmakhoz, illetve az idegek, az ínszalagok és az izmok károsodásához vezethetnek.
Ha ezekben a testrészekben fájdalmat, zsibbadást, gyengeséget érez, vagy égető érzést,
görcsöket, duzzadást, izommerevséget tapasztal, feltétlenül forduljon orvoshoz.
Amennyiben további tudnivalókra kíváncsi, olvassa el a súgó kényelmi szempontokat
tárgyaló, Comfort Guidelines című részét. Az útmutató megtalálható a Logitech®
szoftvert tartalmazó CD-n és a Logitech webhelyén, a következő címen:
http://www.logitech.com/comfort.
A kéztámasz és a billentyűzet
2
összeillesztése
A kéztámaszon lévő füleket helyezze egy vonalba
a billentyűzet elején, alul található nyílásokkal. Pattintsa össze
a két elemet.
A billentyűzet lábainak beállítása
A billentyűzet lábai az eszköz alján és hátulján találhatóak. Segítségükkel igény szerint
beállíthatja a csukló számára megfelelő szöget. Húzza ki, vagy tolja be a lábakat annyira,
amennyire a legkényelmesebb.
Magyar 57
Page 62

A billentyűzet csatlakoztatása
4
5
4
1. Kapcsolja ki a számítógépet, majd válassza le a
meglévő billentyűzetet és egeret.
2. A zöld színű PS/2 csatlakozót dugja a
számítógép PS/2 egérportjába. A bíborszínű PS/
2 csatlakozót dugja a számítógép PS/2
billentyűzetportjába.
3. Indítsa újra a számítógépet.
Az egér üzembe helyezése és
5
aktiválása
1. Nyissa ki az elemtartó rekeszt az egér alján.
2. Helyezze be az elemeket a rekeszbe. Az elemek helyes
elrendezése a rekeszben lévő ábrán látható. Helyezze vissza
az elemtartó rekesz fedelét, ha kész van.
3. Győződjön meg arról, hogy a PS/2-kábel be van dugva
a számítógép PS/2 billentyűzetportjába.
4. Hozza létre a kapcsolatokat: a) Nyomja meg a billentyűzet
alján található Connect (Csatlakozás) gombot;
b) Ezután nyomja meg az egér alján lévő Connect gombot.
5. Ekkor az egér aktív. Az egérgombokról további információk a merevlemezen lévő on-line
súgóban találhatók.
58 Magyar
Page 63

A szoftver telepítése
6
7
8
6
1. Helyezze a szoftvert tartalmazó CD-t a CD-ROM-meghajtóba,
majd a szoftvertelepítéshez kövesse a képernyőn megjelenő utasításokat.
2. Ha a CD behelyezésekor nem jelenik meg a telepítő képernyője, Önnek kell elindítania
a telepítőprogramot. Kattintson a Start gombra, válassza a Futtatás parancsot és írja
be a [meghajtóbetűjel]: setup parancsot, majd nyomja le az Enter billentyűt.
Megjegyzés: [meghajtóbetűjel] helyett azon CD-ROM meghajtó betűjelét adja meg,
amelybe a szoftvert tartalmazó CD-t behelyezte (például d: setup).
A Logitech hatékonyságnövelő billentyűk használata
7
Ezek a billentyűzet tetején található gyorsbillentyűk a gyakran használt programok
és parancsok azonnali, egy gombnyomásra történő elérését szolgálják, és a következő
feladatokat hajthatják végre: keresés, fájlok megnyitása, e-mail küldése, internethez való
csatlakozás, elnémítás, hangerő csökkentése, illetve növelése.
E billentyűkről további információk a merevlemezen lévő on-line súgóban találhatók.
A billentyűzeten lévő LED-ek
8
A billentyűzet jobb felső sarkában lévő négy LED a következő funkciók be- és kikapcsolt
állapotát jelzi: Num Lock, Caps Lock és Scroll Lock. Ha a LED világít, a megfelelő funkció
be van kapcsolva, ellenkező esetben nincs. A jobb szélső LED a vezeték nélküli kapcsolat
jelzésére szolgál.
Magyar 59
Page 64

A gyorsbillentyűk testreszabása
9
10
9
A billentyűzethez mellékelt CD-n lévő szoftver segítségével a Logitech® gyorsbillentyűk
az egyéni igényeknek megfelelően testreszabhatók. Helyezze a szoftvert tartalmazó CD-t
a CD-ROM-meghajtóba, majd a gyorsbillentyűk testreszabásához kövesse a képernyőn
megjelenő utasításokat. Az összes funkció megfelelő működése érdekében telepíteni kell
a mellékelt szoftvert.
10
Nem működik a billentyűzet
A gyorsbillentyűk nem működnek
60 Magyar
Hibaelhárítás
• Ellenőrizze, hogy a billentyűzet kábele megfelelően van-e csatlakoztatva.
Győződjön meg róla, hogy a billentyűzetkábel a számítógép PS/2
billentyűzetportjához – és NEM a PS/2 egérporthoz – van csatlakoztatva.
• További információkért olvassa el a merevlemezen található súgót.
• Ellenőrizze, hogy telepítette-e a CD-n található szoftvert, és hogy a szoftver fut-e.
• Távolítson el minden korábban telepített billentyűzet-testreszabó szoftvert.
• Olvassa el a merevlemezen található súgót.
• Ellenőrizze, hogy az internetkapcsolat megfelelően működik-e.
Page 65

11
11
A Logitech® szoftvert tartalmazó CD-n lévő súgó segítségével kiaknázhatja a billentyűzet
összes szolgáltatását. A súgó hasznos tudnivalókat nyújt a termékről, érdemes tehát időt
szakítani az elolvasására.
A szoftver telepítése során a telepítő a merevlemezre másolja a súgót. A telepítés után
a súgót megtekintheti a képernyőn, de ki is nyomtathatja. A súgó hivatkozását a számítógép
Start menüjében találja.
A termékre 2 éves korlátozott garancia érvényes. Erről további tájékoztatást a Logitech
szoftvert tartalmazó CD-n lévő súgó jótállásra vonatkozó része nyújt.
Olvassa el az on-line súgót!
Magyar 61
Page 66

Page 67

Důležité informace týkající se ergonomického uspořádání
1
233
1
Dlouhodobě opakované pohyby v nesprávně uspořádaném pracovišti, nesprávné držení
těla a špatné pracovní návyky mohou mít za následek mírné bolesti celého těla a nervové
poruchy či poškození šlach a svalů. Pokud v uvedených oblastech pociťujete bolest,
znecitlivění, slabost, otoky, pálení, křeče nebo strnulost, obraťte se na odborného lékaře.
Další informace naleznete v příručce Comfort Guidelines (Pokyny pro správné uspořádání
pracoviště) umístěné v nápovědě k softwaru Logitech® na disku CD-ROM a na webovém
serveru společnosti Logitech http://www.logitech.com/comfort.
Připojení opěrky dlaní ke klávesnici
2
Zarovnejte zoubky na opěrce dlaní se zářezy na klávesnici,
které jsou umístěny vepředu a na spodní straně.
Pak zaklapněte obě jednotky k sobě.
Nastavení nožek klávesnice
Nožky jsou umístěny vzadu na spodní straně klávesnice. Jsou navrženy pro různé osobní
požadavky týkající se umístění zápěstí při psaní. Nastavte pohodlnou pozici klávesnice
vytažením nebo zatlačením nožek klávesnice.
Česká verze 63
Page 68

Připojení klávesnice
4
5
4
1. Vypněte počítač a odpojte stávající klávesnici a
myš.
2. Připojte zelený konektor PS/2 do portu PS/2 pro
myš v počítači. Připojte fialový konektor PS/2 do
portu PS/2 pro klávesnici v počítači.
3. Restartujte počítač.
Nastavení a aktivace myši
5
1. Otevřete prostor pro baterie na spodní straně myši.
2. Vložte do tohoto prostoru baterie. Postupujte podle nákresu
uvnitř prostoru pro baterie. Uzavřete prostor pro baterie.
3. Zkontrolujte, zda je kabel PS/2 od klávesnice zapojen do
příslušného portu PS/2 v počítači.
4. Navažte komunikaci: a) Stiskněte červené tlačítko Connect na
spodní straně klávesnice; b) Potom stiskněte červené tlačítko
Connect na spodní straně myši.
5. Myš by nyní měla být aktivní. Další informace o funkci tlačítek
myši získáte v nápovědě online umístěné na pevném disku
počítače.
64 Česká verze
Page 69

Instalace softwaru
6
7
8
6
1. Vložte disk CD-ROM se softwarem do jednotky CD-ROM a proveďte instalaci podle
pokynů na obrazovce.
2. Pokud se po vložení disku CD-ROM neobjeví instalační obrazovka, bude třeba spustit
instalační program ručně. Klepněte na tlačítko Start a vyberte položku Spustit.
Do okna zadejte [jednotka]: setup a stiskněte klávesu Enter. Poznámka: zástupce
[jednotka] nahraďte písmenem jednotky CD-ROM, ve které je vložen disk se softwarem
(například d: setup).
Použití kláves pro zvýšení produktivity
7
Přístupové klávesy umístěné na horní straně klávesnice umožňují okamžitý přístup k často
používaným programům a příkazům, jako je hledání souborů, e-mail, Internet a ztlumení,
zeslabení nebo zesílení zvuku.
Další informace o těchto klávesách získáte v nápovědě online umístěné na pevném
disku počítače.
Kontrolky klávesnice
8
Čtyři kontrolky, které naleznete vpravo nahoře, indikují stav funkcí Num Lock,
Caps Lock a Scroll Lock. Pokud kontrolka svítí, je příslušná funkce zapnuta. Jestliže nesvítí,
je funkce vypnuta. Pravá kontrolka indikuje bezdrátový režim.
Česká verze 65
Page 70

Přizpůsobení přístupových kláves
9
10
9
Software na disku CD-ROM (dodaném s klávesnicí) umožňuje přizpůsobit přístupové klávesy
Logitech® specifickým požadavkům. Vložte disk CD-ROM se softwarem do jednotky CDROM a potom podle pokynů na obrazovce upravte zvláštní klávesy. Správná činnost všech
funkcí je podmíněna instalací dodaného softwaru.
10
Klávesnice nefunguje.
Funkční a přístupové klávesy nefungují
66 Česká verze
Odstraňování problémů
• Zkontrolujte připojení kabelu klávesnice. Zkontrolujte, zda je kabel od klávesnice
připojen v počítači k portu PS/2 pro klávesnici a NIKOLI k portu PS/2 pro myš.
• Další informace naleznete v systému nápovědy na pevném disku.
• Zkontrolujte, zda je nainstalován software dodávaný na disku CD-ROM a zde je tento
software spuštěn.
• Odinstalujte jakýkoli předchozí software pro přizpůsobení klávesnice.
• Prostudujte systém nápovědy na pevném disku počítače.
• Přesvědčte se, zda správně funguje připojení k Internetu.
Page 71

11
11
Systém nápovědy, který vám pomůže využít všech možností klávesnice, je umístěn na disku
CD-ROM se softwarem společnosti. Nápověda obsahuje cenné informace o produktu,
proto vám doporučujeme si ji přečíst.
Během instalace byl systém nápovědy zkopírován na pevný disk počítače. Po instalaci
si můžete obsah nápovědy zobrazit na monitoru nebo vytisknout. Systém nápovědy
naleznete v nabídce Start.
Na produkt se vztahuje omezená dvouletá záruka. Další informace najdete v části
Product Warranty (Záruka na produkt) v nápovědě umístěné na disku CD-ROM
se softwarem.
Systém nápovědy
Česká verze 67
Page 72

Page 73

Wzmianka o ergonomii pracy
1
233
1
Powtarzanie przez dłuższy czas tych samych czynności, niewłaściwa pozycja ciała,
niewygodne miejsce i nienajlepsze nawyki pracy – wszystko to stanowi o poczuciu
dyskomfortu, niekorzystnie wpływa na system nerwowy, a może też powodować urazy
mięśni i ścięgien. Jeśli poczujesz ból, zdrętwienie, ucisk, obrzęk lub osłabienie w jakiejś
części ciała, koniecznie zwróć się po poradę do lekarza specjalisty. Więcej o ergonomii pracy
dowiesz się z opracowania "Comfort Guidelines", które znajdziesz w systemie pomocy
na dostarczonej z oprogramowaniem płycie CD-ROM, jak również w witrynie firmy Logitech®,
pod adresem http://www.logitech.com/comfort.
Podpórkę nadgarstka dołącz
2
do klawiatury
Klapki podpórki nadgarstka ustaw blisko otworów
znajdujących się pod spodem przedniej części klawiatury.
Zatrzaskując klapki w otworach, złącz podpórkę z klawiaturą.
Ustaw nóżki klawiatury
Nóżki klawiatury umieszczone są na jej spodzie, bliżej przedniej krawędzi. Pozwalają one
ustawić klawiaturę w pozycji najdogodniejszej do pisania. Wyciągając lub wpychając
te nóżki, ustaw klawiaturę w optymalnym położeniu.
Po polsku 69
Page 74

Podłączanie klawiatury
4
5
4
do komputera
1. Wyłącz komputer, po czym odłącz od niego
używaną dotąd klawiaturę i mysz.
2. Włóż zielone złącze PS/2 do przeznaczonego na
mysz portu PS/2 komputera. Włóż fioletowe
złącze PS/2 do przeznaczonego na klawiaturę
portu PS/2 komputera.
3. Ponownie uruchom komputer.
Zainstaluj i uaktywnij mysz
5
1. Otwórz znajdującą się na spodzie myszy komorę na baterie.
2. Włóż baterie do wnętrza tej komory. Diagram wewnątrz
komory na baterie pomoże Ci je prawidłowo zainstalować.
Po zainstalowaniu baterii zamknij pokrywę komory.
3. Sprawdź, czy kabel klawiatury podłączony jest do
przeznaczonego na klawiaturę portu PS/2 komputera.
4. Ustanów komunikację: a) Naciśnij czerwony przycisk
„Connect” na spodzie klawiatury. b) Następnie naciśnij
czerwony przycisk „Connect” na spodzie myszy.
5. Mysz zostanie uaktywniona. Więcej o przyciskach myszy
przeczytasz w zapisanym na dysku twardym systemie pomocy online.
70 Po polsku
Page 75

Jak zainstalować oprogramowanie
6
7
8
6
1. Włóż płytę CD z oprogramowaniem do napędu CD-ROM i postępuj zgodnie
z wyświetlanymi na ekranie instrukcjami.
2. Jeśli po włożeniu płyty CD nie pojawi się okno programu instalacyjnego, trzeba
będzie uruchomić ten program ręcznie. Kliknij przycisk „Start” i wybierz „Uruchom”.
Wpisz [napęd]: „setup” i naciśnij Enter. Uwaga: zastąp [napęd] literą przypisaną
do napędu CD-ROM, w którym znajduje się płyta CD (np. d:setup).
Klawisze specjalne – zastosowanie
7
Klawisze te, umieszczone w górnym rzędzie klawiatury, dają bezpośredni dostęp
do często używanych programów i poleceń: Znajdź, Pliki, E-mail, WWW, Wycisz, Głośność –
i Głośność +.
Więcej o tych klawiszach przeczytasz w zapisanym na dysku twardy systemie pomocy online.
Światełka na klawiaturze
8
Cztery diody LED w prawym górnym rogu klawiatury informują o włączeniu lub wyłączeniu
następujących funkcji: Num Lock, Caps Lock i Scroll Lock. Świecenie diody oznacza,
że odpowiednia funkcja jest włączona. Brak światełka oznacza, że funkcja jest wyłączona.
Trzeba też wiedzieć, że prawa dioda LED jest wskaźnikiem połączenia bezprzewodowego.
Po polsku 71
Page 76

Programowanie funkcji klawiszy specjalnych
9
10
9
Dostarczone wraz z klawiaturą oprogramowanie na płycie CD pozwala przystosować
funkcje klawiszy specjalnych („Logitech® Hot-keys”) do własnych potrzeb. Włóż płytę CD
do napędu CD-ROM i postępuj zgodnie z wyświetlanymi na ekranie instrukcjami,
aby klawiszom specjalnym przypisać żądane funkcje. Oczywiście, można to zrobić dopiero
po zainstalowaniu oprogramowania.
10
Klawiatura nie działa!
Nie działają klawisze specjalne ani funkcyjne!
72 Po polsku
Rozwiązywanie problemów
• Sprawdź kablowe połączenia klawiatury. Upewnij się, że kabel klawiatury
jest podłączony do przeznaczonego na klawiaturę porty PS/2 komputera,
a NIE do portu PS/2 dla myszy.
• Zajrzyj też do systemu pomocy zapisanego na dysku twardym.
• Sprawdź, czy oprogramowanie z płyty CD jest zainstalowane i czy zostało
uruchomione.
• Nie zapomnij usunąć z komputera wcześniej zainstalowanego oprogramowania
klawiatury.
• Skorzystaj z zapisanego na dysku twardym systemu pomocy.
• Sprawdź, czy połączenie z Internetem działa prawidłowo.
Page 77

11
11
O efektywnym posługiwaniu się klawiaturą przeczytasz w systemie pomocy zamieszczonym
na płycie CD wraz z oprogramowaniem Logitech®. System te zawiera szereg ważnych
informacji, więc warto przeznaczyć trochę czasu na zapoznanie się z ich treścią.
System pomocy kopiowany jest na dysk twardy komputera w trakcie instalacji
oprogramowania. Po instalacji będzie można na ekranie przeglądać system pomocy,
ale można go również wydrukować. Skrót do systemu pomocy znajdziesz w menu „Start”
komputera.
Ten produkt objęty jest ograniczoną, ważną przez dwa lata gwarancją. O warunkach
udzielanej przez firmę Logitech gwarancji przeczytasz w części „Product Warranty” systemu
pomocy zapisanego na płycie CD.
Zajrzyj do systemu pomocy online!
Po polsku 73
Page 78

Page 79

Logitech
®
Addresses and Telephone Numbers
Country
EUROPEAN, MIDDLE EASTERN
& AFRICAN HEADQUARTERS
LOGITECH Europe S.A.
CORPORATE HEADQUARTERS
LOGITECH Inc.
ASIAN PACIFIC HEADQUARTERS
LOGITECH Far East Ltd.
AUSTRALIA
LOGITECH Australia Computer
Peripherals Pty Ltd.
CANADA
JAPAN
LOGICOOL Co. Ltd.
LATIN AMERICA AND CARIBBEAN
Address
Moulin-du-Choc
CH 1122 Romanel-sur-Morges
6505 Kaiser Drive
USA Fremont, CA 94555
#2 Creation Road IV
Science-Based – Industrial Park
ROC Hsinchu, Taiwan
Level 2, 633 Pittwater Road
AUS Dee Why NSW 2099, Australia
5025 Orbitor Dr., Bldg. 6, Suite 200
CDN Mississauga, ON L4W 4Y5
Ryoshin Ginza East Mirror Bldg.,
7F 3-15-10 Ginza
Chuo-ku, Tokyo, Japan 104-0061
+1 702 269 3457 +1 702 269 3457
Infoline
Product Information
+41 (0) 21 863 54 00 English
FAX +41 (0) 21 863 54 02
(800) 231-7717
(800) 231-7717
Hotline
Tec hni cal Help
+41 (0) 21 863 54 01 English
FAX +41 (0) 21 863 54 02
+1 702 269 3457
+886 (2) 27466601 x2206
+61 (02) 9804 6968
+61 (02) 9972 3561
+1 702 269 3457
+81 (3) 3543 2122
FAX +81 (3) 3543 2911
Page 80

www.logitech.com
© 2003 Logitech. All rights reserved. Logitech, the Logitech logo, and other Logitech marks are owned
by Logitech and may be registered. All other trademarks are the property of their respective owners.
Logitech assumes no responsibility for any errors that may appear in this manual. Information contained
herein is subject to change without notice.
623251-0914.A
 Loading...