

Page 1
Mouse for Dell QSG_1.ai 2007/2/8/¬P´Á¥| ¤U¤È 15:16:27Mouse for Dell QSG_1.ai 2007/2/8/¬P´Á¥| ¤U¤È 15:16:27
Bluetooth Mouse M-RCG-DEL6
Note: If you have
the Widcomm
Bluetooth Software
installed or run the
Microsoft Vista OS
on a Dell notebook
computer,
complete the steps
on part 2 or part 3.
Turn off any other Bluetooth-enabled mice, because during setup, the receiver may detect such
Setting Up Your Dell™ BT Travel Mouse (Part 1)
CAUTION:
Before you set up and operate your
Dell computer, read and follow the
safety instructions in your computer
Owner’s Manual.
If you have the Toshiba Bluetooth Software installed on a Dell notebook computer, complete
the following steps:
All required mouse software is pre-installed on your notebook computer. If you must restore
this software, insert the Setup CD-ROM, and then follow the on-screen instructions (about 5
minutes).Note: To uninstall your mouse software, in the Windows Control Panel, click
Add/Remove Programs, and then remove the SetPoint program.
1
2
3
devices if they are in the 33 foot (10 meter) signal range.
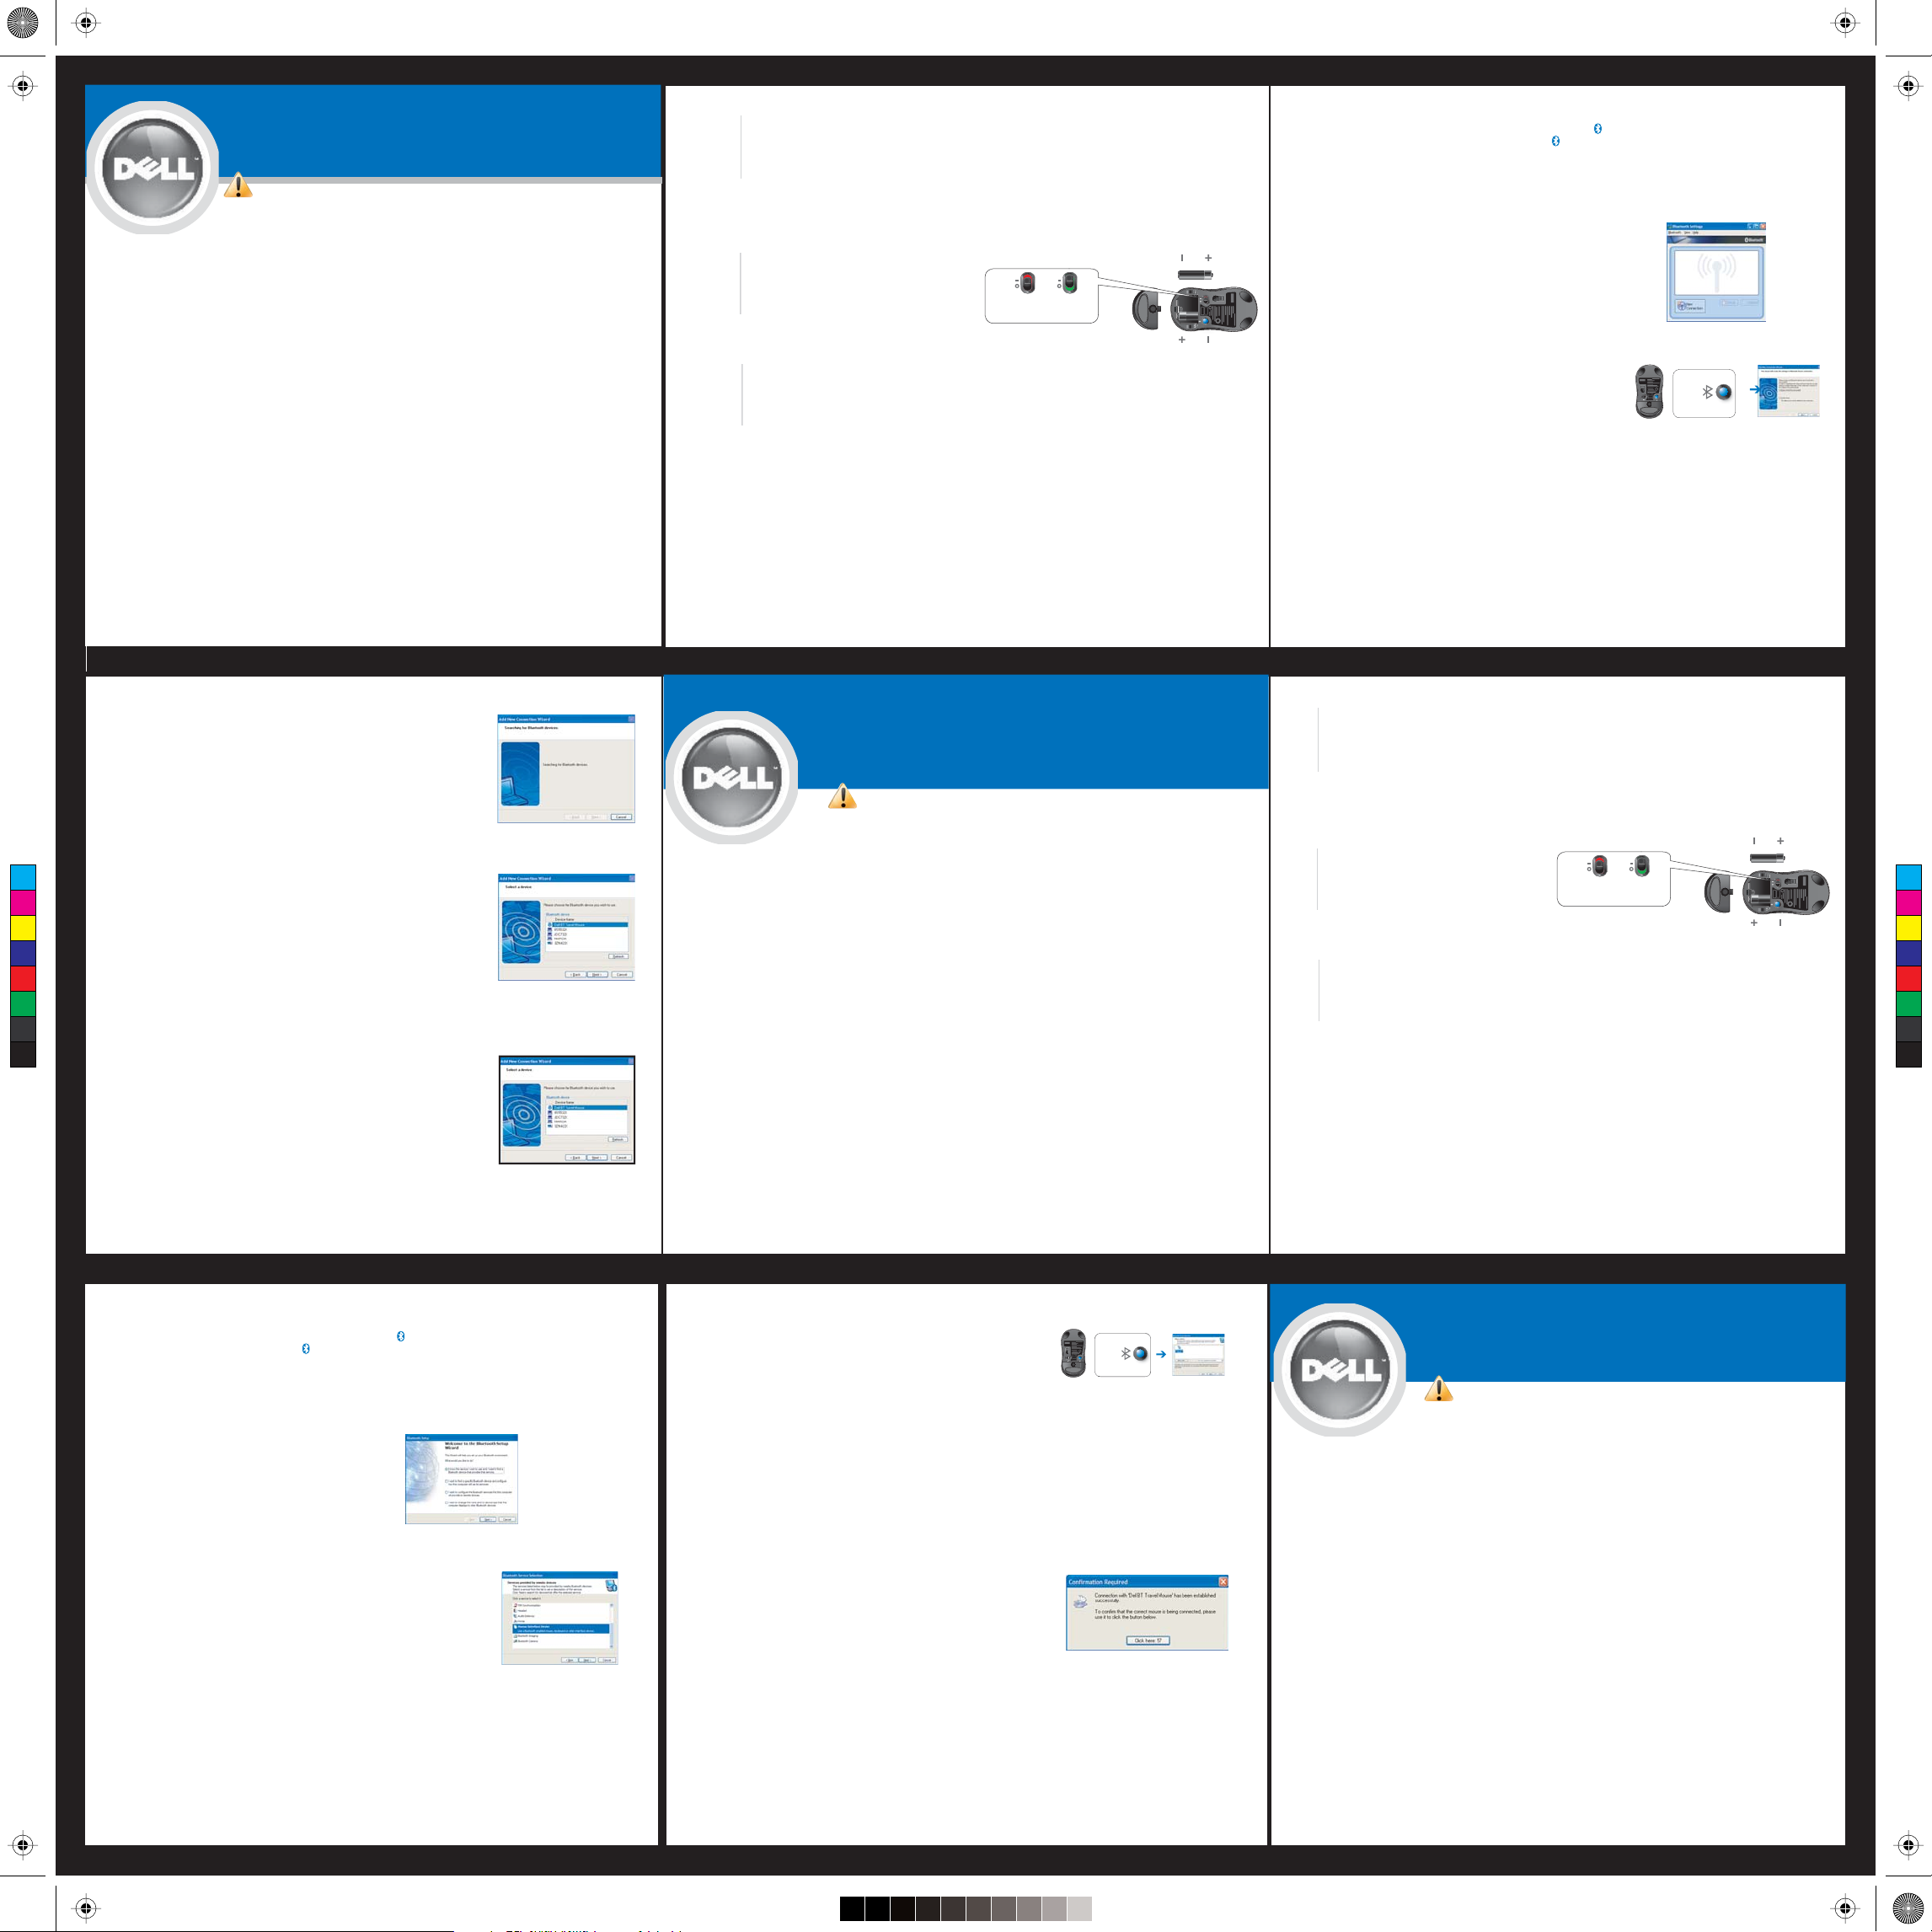
Insert two batteries into your mouse, and
then turn it on (I).
A. Do one of the following:
•If your computer’s Bluetooth LED is on (blue), proceed to step B.
•If your computer’s Bluetooth LED is off, please follow your computer’s user manual to enable the
Bluetooth radio.
On Off
On Off
On Off
On Off
On Off
B. In the Windows taskbar at the bottom of the screen, right-click , click Start Bluetooth, follow the
instructions to activate Bluetooth, and then double-click .
C. In the Bluetooth Settings window that appears, click New Connection.
D. When the Add New Connection Wizard appears, press the
Bluetooth button on your mouse for 2 seconds, and then click Next in
the Add New Connection Wizard. Note: Be sure to complete steps E
and F within 3 minutes; otherwise, return to step B.
Bluetooth
E. Wait for a minimum of 20 seconds while the Searching for Bluetooth devices
window appears to let your computer connect with your mouse.
1
Turn off any other Bluetooth-enabled mice, because during setup, the receiver may detect such
devices if they are in the 33 foot (10 meter) signal range.
Setting Up Your Dell™ BT Travel Mouse (Part 2)
CAUTION:
Before you set up and operate your
Dell computer, read and follow the
safety instructions in your computer
Owner’s Manual.
C
M
Y
CM
MY
CY
CMY
K
F. When the connection is complete and Dell BT Travel Mouse appears in the
list, select the mouse, and click next.
G. Close the Bluetooth setting window that appears (With Dell BT Travel Mouse
in the list) by clicking X in the upper-right corner.
Note: If you have
the Toshiba
Bluetooth Software
installed or run the
Microsoft Vista OS
on a Dell notebook
computer, complete
the steps on part 1
or part 3.
If you have the Widcomm Bluetooth Software installed on a Dell notebook computer,
complete the following steps:
All required mouse software is pre-installed on your notebook computer. If you must restore
this software, insert the Setup CD-ROM, and then follow the on-screen instructions (about 5
minutes).Note: To uninstall your mouse software, in the Windows Control Panel, click
Add/Remove Programs, and then remove the SetPoint program.
2
3
Insert two batteries into your mouse, and
then turn it on (I).
On Off
On Off
On Off
On Off
On Off
A. Do one of the following:
•If your computer’s Bluetooth LED is on (blue), proceed to step B.
•If your computer’s Bluetooth LED is off, please follow your computer’s user manual to enable the
Bluetooth radio.
B. In the Windows taskbar at the bottom of the screen, right-click , click Start Using Bluetooth, follow the
instructions to activate Bluetooth, right click , and then click Bluetooth Setup Wizard.
C. In the Bluetooth Settings window that appears, click Next.
D. In the Bluetooth Service Selection window that appears, select Human Interface
Device, and then click Next.
E. When the Bluetooth Device Selection window appears, press the
Bluetooth button on your mouse for 2 seconds, and then wait a minimum
of 20 seconds until Dell BT Travel Mouse appears in the list.
F. In the Bluetooth Device Selection window, double-click Dell BT Travel
Mouse to let your computer connect with your mouse.
E. When the Bluetooth Device Selection window appears, press the Bluetooth button on your mouse
G. In the Confirmation Required window that appears, click Click here
before the countdown reaches zero to confirm that the correct mouse is
connected.
Bluetooth
Note: If you have the
Widcomm Bluetooth
Software and Toshiba
Bluetooth Software
installed or run the
Microsoft Vista OS on a
Dell notebook
computer, complete
the steps on part 1 or
part 2.
If you have the Microsoft Vista Operation System installed on a Dell notebook computer,
complete the following steps:
All required mouse software is pre-installed on your notebook computer. If you must
restore this software, insert the Setup CD-ROM, and then follow the on-screen
instructions (about 5 minutes).Note: To uninstall your mouse software, in the Windows
Control Panel, click Add/Remove Programs, and then remove the SetPoint program.
Setting Up Your Dell™ BT Travel Mouse (Part 3)
CAUTION:
Before you set up and operate your
Dell computer, read and follow the
safety instructions in your computer
Owner’s Manual.
Page 2

Mouse for Dell QSG 2.ai 2007/2/8/¬P´Á¥| ¤U¤È 15:00:44Mouse for Dell QSG 2.ai 2007/2/8/¬P´Á¥| ¤U¤È 15:00:44
Federal Communication Commission Interference Statement
This equipment has been tested and found to comply with the limits for a Class B digital device, pursuant to Part 15 of
the FCC Rules. These limits are designed to provide reasonable protection against harmful interference in a
residential installation. This equipment generates, uses and can radiate radio frequency energy and, if not installed
and used in accordance with the instructions, may cause harmful interference to radio communications. However,
there is no guarantee that interference will not occur in a particular installation. If this equipment does cause harmful
interference to radio or television reception, which can be determined by turning the equipment off and on, the user is
encouraged to try to correct the interference by one of the following measures:
- Reorient or relocate the receiving antenna.
- Increase the separation between the equipment and receiver.
- Connect the equipment into an outlet on a circuit different from that
to which the receiver is connected.
- Consult the dealer or an experienced radio/TV technician for help.
FCC Caution: Any changes or modifications not expressly approved by the party responsible for compliance could
void the user's authority to operate this equipment.
This device complies with Part 15 of the FCC Rules. Operation is subject to the following two conditions: (1) This
device may not cause harmful interference, and (2) this device must accept any interference received, including
interference that may cause undesired operation.
This equipment complies with FCC RF radiation exposure limits set forth for an uncontrolled environment. To maintain
compliance with FCC RF exposure compliance requirements, please avoid direct contact to the transmitting antenna
during transmitting.
Industry Canada Statement
This device complies with RSS-210 of the Industry Canada Rules. Operation is subject to the following two conditions:
1) this device may not cause interference and
2) this device must accept any interference, including interference that may cause undesired operation of the device
1
2
3
Turn off any other Bluetooth-enabled mice, because during setup, the receiver may detect such
devices if they are in the 33 foot (10 meter) signal range.
Insert two batteries into your mouse, and then
turn it on (I).
On Off
On Off
On Off
On Off
On Off
B. In the Windows taskbar at the bottom of the screen, click Start, click Control Panel.
In the Control Panel, make sure the window is switched to Classic View, and then
double-click the Bluetooth devices.
C. In the Bluetooth Devices window that apprears, click Add.
A. Do one of the following:
•If your computer’s Bluetooth LED is on (blue), proceed to step B.
•If your computer’s Bluetooth LED is off, please follow your computer’s user manual to enable the
Bluetooth radio.
D. Press the Bluetooth button on your mouse for 2 seconds, and the Blue LED on the mouse should start blinking.
Proceed to check the My device is set up and ready to be found, click next.
Bluetooth
E. In the Add Bluetooth Device Wizard window, wait for a minimum of 20 seconds
until Dell BT Travel Mouse appears in the list, select the mouse, and click next
F. In the next page, check Don’t use a passkey, and click next
G. In the last page, click Finish, and your computer now is connected
with your mouse. Please repeat the process if you failed to set up the
mouse.
If you run the Microsoft Vista OS on your system, go to step F.
D
If you run the Microsoft XP OS on your system, verify that your Bluetooth software is installed properly on
Getting to Know Your Mouse (Part 4)
A
Verify the contents of your package.
C
M
Y
CM
MY
CY
CMY
K
Right
Left
Forward
Back
Scroll (with left/right tilt)
Blue (flashing)–Bluetooth discovery indicator appears after you press the Bluetooth
button on the bottom of the mouse and indicates the device’s readiness to be found
by the notebook PC.
Blue (solid)–Connection established indicator appears when the receiver finds your
mouse, and then turns off after several seconds.
Amber (flashing)–Low battery indicator appears when you need to replace
batteries.
Mouse
AA Batteries (2)
Setup CD-ROM
Connection Issues?
B
C
Troubleshooting Your Mouse (Part 5)
Verify that the batteries are new and properly inserted and that the mouse is turned on
(from step 2)
If you still experience connection issues, restart your computer.
If you still experience connection issues, do one of the following:
•If your computer’s Bluetooth LED is on (blue), proceed to step D.
•If your computer’s Bluetooth LED is off,
to enable the Bluetooth radio.
please follow your computer’s user manual
your notebook computer and ensure that you started Bluetooth by right-clicking in the taskbar.
In the Windows taskbar at the bottom of the screen, right-click , click the Options menu, and then do
E
the following to review your Bluetooth software version:
• If the About menu command appears, click it to display Bluetooth stack for Windows by Toshiba.
• If the Advanced Configuration menu command appears, click it to display Widcomm Bluetooth
Software.
Do one of the following:
F
• If you have Toshiba Bluetooth Software for Dell on your notebook computer, refer to page 1.
• If you have Widcomm Bluetooth Software for Dell on your notebook computer, refer to page 2.
• If you have Microsoft Vista OS on your notebook computer, refer to page 3.
Complete steps 1 to 3 in Setting Up Your Dell™ BT Travel Mouse to set up your mouse again.
G
Adjusting Your Mouse Movement Speed
To customize mouse settings, in the Windows taskbar at the
bottom of the screen, click , and then click Device Setting.
Check the Windows taskbar at the bottom of the screen, and confirm if Dell SetPoint Software is
properly installed.
(Part 6)
If the icon is in the taskbar, adjust the mouse movement speed in Dell SetPoint Software
(Recommended) by following steps below,
A. In the Windows taskbar at the bottom of the screen, double-click on the
B. Click on the "My Mouse" tab in SetPoint, and select "Dell BT Travel Mouse" from the pull-down menu
C. Click on the to the Mouse Movement page
D. Hold the left-click on the "Pointer Speed" bar, and move it to the right will increase the pointer speed
E. Hold the left-click on the "Pointer Speed" bar, and move it to the left will decrease the pointer speed
If the icon is not in the taskbar, please install the software first from your SetUp CD-ROM
(Recommended); or, adjust the mouse movement speed in Microsoft Vista OS by following steps below,
A. In the Windows taskbar at the bottom of the screen, click on the "Start" and then click on the
"Control Panel"
B. Under "Control Panel", click on "Hardware and Sound", and then click on "Mouse" to the "Mouse
Properties" Page
C. Click on the "Pointer Options" tab to the mouse movement page
D. Hold the left-click on the "Pointer Speed" bar, and move it to the right will increase the pointer speed
E. Hold the left-click on the "Pointer Speed" bar, and move it to the left will decrease the pointer speed
Waste Electrical and Electronic Equipment (WEEE) Directive
In the European Union, this label indicates that this product should
not be disposed of with household waste. It should be deposited at
an appropriate facility to enable recovery and recycling. For
information on how to recycle this product responsibly in your
country, please visit: www.euro.dell.com/recycling.
______________________
Information in this document is subject to change without notice.
© 2007 Dell Inc. All rights reserved.
Reproduction in any manner whatsoever without the written permission of Dell Inc.
is strictly forbidden.
Trademarks used in this text: Dell and the DELL logo are trademarks of Dell Inc.
Other trademarks and trade names may be used inthisdocument to refer to either
the entities claiming the marks andnames or their products. Dell Inc. disclaims any
proprietary interest intrademarks and trade names other than its own.
www.dell.com | support.dell.com
Printed in China Impreso en China
Imprimé en Chine Impresso na China
 Loading...